North Kiteboarding Rebel Kite User manual

_English

1
north kiteboarding rebel 08 manual
ENGLISH
CONTENT
WARNING: Kiteboarding is Dangerous
Always use extreme caution when using this product.
Only use this product if you are in good physical health.
For safety reasons you should only use the North Kiteboarding kites on
or above the water.
Never act in a careless manner when using this product.
You are responsible for your own safety and the safety of others when
using this product.
1. release of liability 2
2. introduction and safety 3
3. Rigging the kite 6
4. attaching the lines 8
5. kite tuning 11
6. kite care 12
7. bladder repair 13
8. WINDrage and kite sizes 19
9. TIpS aND TRICKS for rebel 08 20
10. warranty policy 25
content

2
north kiteboarding rebel 08 manual
1. release of liability
Release Of Liability, Claim Waiver, Assumption of Risk.
By assembling and/or using this North Kite product, you agree that you have read
and understood the entire North Kiteboarding product owner’s manual, including
all instructions and warnings contained in that manual, prior to using the North
Kiteboarding product in any way. You additionally agree that you will ensure any
additional or subsequent user of your North Kiteboarding product will read and
understand the entire North Kiteboarding product Owner’s Manual, including all
instructions and warnings contained in that manual, prior to allowing that person
to use your North Kiteboarding product.
ASSUMPTION OF RISK:
Use of the North Kiteboarding Product and any of its components involve certain
inherent risks, dangers, and hazards that can result in serious personal injury
and death to both the user and to nonuser third parties. In using the North
Kiteboarding Product, you freely agree to assume and accept any and all known
and unknown risks of injury to you and to third parties while using this equip-
ment. The risks inherent in this sport can be greatly reduced by abiding by the
warning guidelines listed in this owner manual and by using common sense.
RELEASE AND WAIVER OF CLAIMS:
In consideration of the sale of the North Kiteboarding product to you, you hereby
agree to the fullest extent permitted by law, as follows:
TO WAIVE ANY AND ALL CLAIMS, that you have or may in the future have
against Boards & More and all related parties resulting from use of the North
Kiteboarding Product and any of its components.
TO RELEASE Boards & More and all related parties from any and all liabili-
ty for any loss, damage, injury or expense that you or any users of your North
Kiteboarding product may suffer, or that your next of kin may suffer, as a result
of the use of the North Kiteboarding product, due to any cause whatsoever,
including negligence or breach of contract on the part of Boards & More and all
related parties in the design or manufacture of the North Kiteboarding product
and any of its components. In the event of your death or incapacity, all provisions
contained herein shall be effective and binding upon your heirs, next of kin, exe-
cutors, administrators, assigns, and representatives. Boards & More-related par-
ties have not made and expressly deny any oral or written representations other
than what is set forth herein and the North Kite product User’s Manual.
1. release of liability

3
north kiteboarding rebel 08 manual
ENGLISH
2. introduction and safety
At North we understand that you demand the most out of your equipment. We are
riders just like you and we strive to develop gear that will deliver maximum per-
formance and safety. Although technical, our products are user friendly and come
ready to use straight out of the package. Plug and play. It’s that simple!
It is, however, important that you become familiar with your new 5th Element
Bar before using it on the water. Please take the time to read, study and under-
stand all of the following safety precautions and bar features in this manual for
your own personal pleasure and safety.
Kiteboarding is a sport that takes place within the interplay of the elements.
This sport involves great risks and can possibly be very dangerous. Therefore it
is of utmost importance to assess yourself and your kiteboarding abilities.
We strongly recommend the following:
If you are not yet able to kite or if you feel insecure, do attend a licensed
Kiteboarding school to learn the basics of this fantastic sport.
Get familiar with the safety precautions, which are indispensable for safe
Kiteboarding.
Kiteboarding creates a heavy strain on your body. You should only go kiteboar-
ding if you are in good physical condition and suffer from no medical condi-
tions that may prevent you from kiting.
No risk, no fun ... but: be careful when practicing this sport. Caution always
pays, as you should be able to enjoy the wind even at a “mature” age.
Dangers when Kiteboarding
When kiteboarding, the extreme powers of the elements may come into play. In
rare cases, the kite or its lines may cause dangerous situations:
The canopy can pull you into the air giving you involuntary “air time”. Upon
landing, there is a high risk of getting injured.
When the kite gets out of control, you can collide with obstacles and objects in,
on or off the water.
In case of improper use, the canopy or its lines may get caught up with other
people. Due to the enormous powers involved, this may lead to life-threatening
situations.
People who get caught in the lines of the kite may suffer from severe gashes or
burns.
Canopies coming down may injure onlookers.
2.introduction and safety

4
north kiteboarding rebel 08 manual
Risks Caused by the Kiteboard
If you bang your head against the kiteboard, there is a risk of severe head
injuries.
Feet, ankles and legs may also be injured by the board.
Never use this kite as a flying object.
This list of dangers cannot be complete. The basic rules for kiteboarding corre-
spond to those of common sense and are to be applied to all (outdoor) sports:
(1) Never put at risk the safety of onlookers in your surroundings.
(2) Be aware of the risk you are taking and restrict this to a reasonable residual
risk (according to your skills).
Threats to Onlookers
It is within your responsibility to check whether uninvolved people or other
athletes may be endangered or injured by your actions or your gear. Spots where
onlookers may be injured are taboo for responsible-minded kiters!
Only fly your canopy over unobstructed water.
When kiting, do not fly over people or pets.
Ensure that a semi-circle extending 100 meters downwind and to each side of
your flying position is clear of people and obstructions.
Use a kite leash that allows you to keep the kite under control.
Avoid flying the kite in the vicinity of other water users such as swimmers,
kayakers, windsurfers, water-skiers and boats.
When not in use, inflated canopies must be secured with sand or heavy objects.
A canopy filled with air can fly away at any time, thus it may injure people and
in extreme cases even kill them.
Safety of the Kiteboarder
Fly this kite only over unobstructed water. Never on land!
Fly this kite only if you are a strong swimmer and are wearing a Coast Guard-
approved PFD.
Use only bars with a safety system that you can open in emergency situations.
Use a quick-release kite leash with which you can unhook your body from the
gear in case of an unforeseeable emergency.
Avoid power lines, telephone poles, airports, streets, buildings and trees.
If you use a board that is leashed to your body, wear a helmet!
Take into account the usual risks associated with water sports such as rocks,
waves, sunburn, hypothermia, jellyfish etc.
2.introduction and safety

5
north kiteboarding rebel 08 manual
ENGLISH
Threats through Kite Lines
Never touch the kite lines when the kite is under wind load as these lines can
become dangerously sharp when under tension.
Never use kite lines with notches, nicks, cuts etc. They must be changed!
Use only lines that have no knots in them, as knots can weaken lines by as much
as 50%.
Do not touch the lines of the canopy, unless the kite has been secured to the
ground. An unsecured kite can re-launch unexpectedly, putting the lines dan-
gerously under tension.
Never tie lines around your arms or other body parts!
Weather-related Dangers
Avoid offshore wind.
Be careful with onshore wind.
Get information on tidal and sea current conditions at your kiting spot!
Get information from both the weather report and the locals on prevailing wea-
ther conditions.
Never use the kite with wind forces so strong that you are unable to maintain
precise control.
Do not use the kite when wind conditions are likely to change dramatically.
Never use this kite when thunderstorms are nearby or when such storms have a
good chance of developing (check the weather report!).
Leave the water immediately when a storm is approaching. You are in acute life-
threatening danger since you may be struck by lightning!
2.introduction and safety
6
north kiteboarding rebel 08 manual
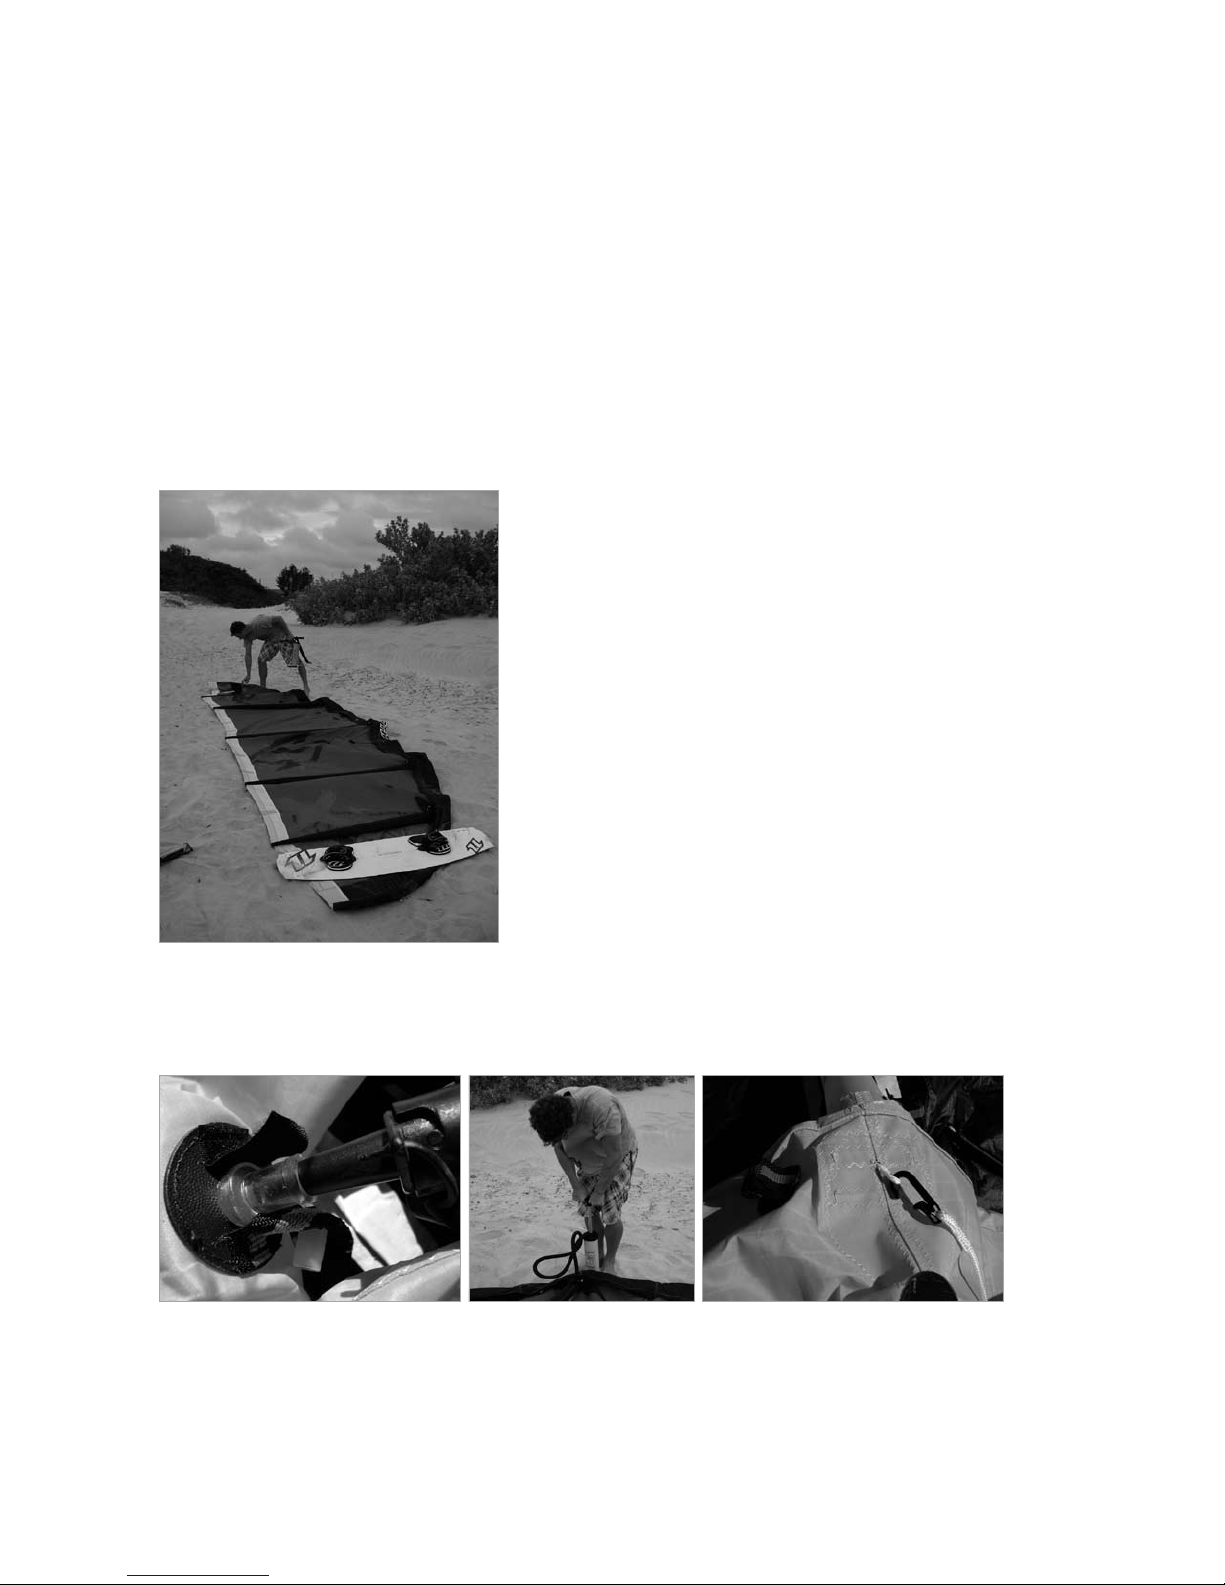
3. Rigging the kite
INFLATING THE REBEL
1. Lay the kite out on the sand, grass or a surface free of hard or sharp objects.
Although the kite is engineered to withstand the enormous stresses of flying, it
can easily be damaged by rocks, thorns, wood and other hard objects.
2. Turn the kite with its leading edge (front tube) facing into the wind, and the
underside of the canopy facing upwards.
3. Place a weight, e.g. sand, gear bag etc. on one wingtip of the canopy.
4. Inflate the ribs. To inflate follow these steps:
a. Grasp the valve with one hand and insert the pump tip into the valve with the
other hand.
b. Pump air into the bladder until it is firm.
3. rigging the kite

7
north kiteboarding rebel 08 manual
ENGLISH
c. Strut valves are all one way air valves, therefore there is no need to pinch them
off after removing the pump nozzle. If the valve has been pulled in while pum-
ping, you must completely deflate the rib again by pushing the small plastic
stick into the rib valve.
After deflating you can pull the valve to the correct position.
d. Quickly close the cap on the air valve and fasten the Velcro over the top. Do not
push the valves into the bladder after inflating!
e. Finally, inflate the leading edge bladder (front tube) until the correct pressure
is reached. All Rebels perform well with 6 PSI of air pressure in the leading
edges and 10 PSI in the ribs. Be sure to close the dump valve on the wingtip
before inflating.
Pinch the valve with your fingers to prevent air from escaping as you remove
the pump’s tip from the valve.
3. rigging the kite

8
north kiteboarding rebel 08 manual
SECURING THE KITE ON THE BEACH
When the kite is not in use, it must be secured on the beach. Turn the kite around
as shown in the illustrations. The leading edge must always point upwind and be
secured with sufficient weight. As a general rule, more sand is better because if
the canopy flies away it can become a dangerous flying object. If the leading edge
is face down, the canopy is pushed to the ground by the wind pressure in addi-
tion to its own weight. When turning the kite around, make sure that there are
no sharp objects lying on the ground. With changing wind directions, the canopy
should be turned into the prevailing wind direction.
4. attaching the lines
The Rebel is designed to be flown with the 5th Element Bar. All sizes of the Rebel
have two attachment points at each wing tip. The forward position makes for a
better de-power/power range and slightly harder bar pressure. This setting is
ideal for wave riding, gusty or over-powered conditions. The back pigtail setting
will make the kite turn faster and have slightly softer bar pressure. It will also
limit the amount of de-power.
The pigtail lengths come pre-measured so there is no need to make any adjust-
ments on the bar when changing pigtail positions. Simply attach your lines to
your desired attachment point and enjoy the ride!
These settings allow you to have a great range of use of your kite but remember
that riding overpowered involves risk and that overextend range can be mislea-
ding. Make sure you are familiar with all your safety release systems.
4. attaching the lines

9
north kiteboarding rebel 08 manual
ENGLISH
One of the most common user errors in kiteboarding is mixing up steering and
flying lines. North’s Kook Proof System makes this error impossible and will help
prevent you from becoming a kook.
Attach the knot on the end of your steering (back) line to the larks head loop on
the kite’s wingtips.
Connect the flying (front) line with larks head loop to the wingtip attachment
with the knot.
Repeat for the opposite wingtip. Your kite lines are also color coordinated to
match the kite pigtail attachments, ensuring that you connect the lines to the cor-
rect wingtip. The blue fifth line connects to the blue nose line attachment in the
center of the kite.
The Kook Proof System is only compatible with North’s 5th Element Bar and a
North Kite.
4. attaching the lines
10
north kiteboarding rebel 08 manual
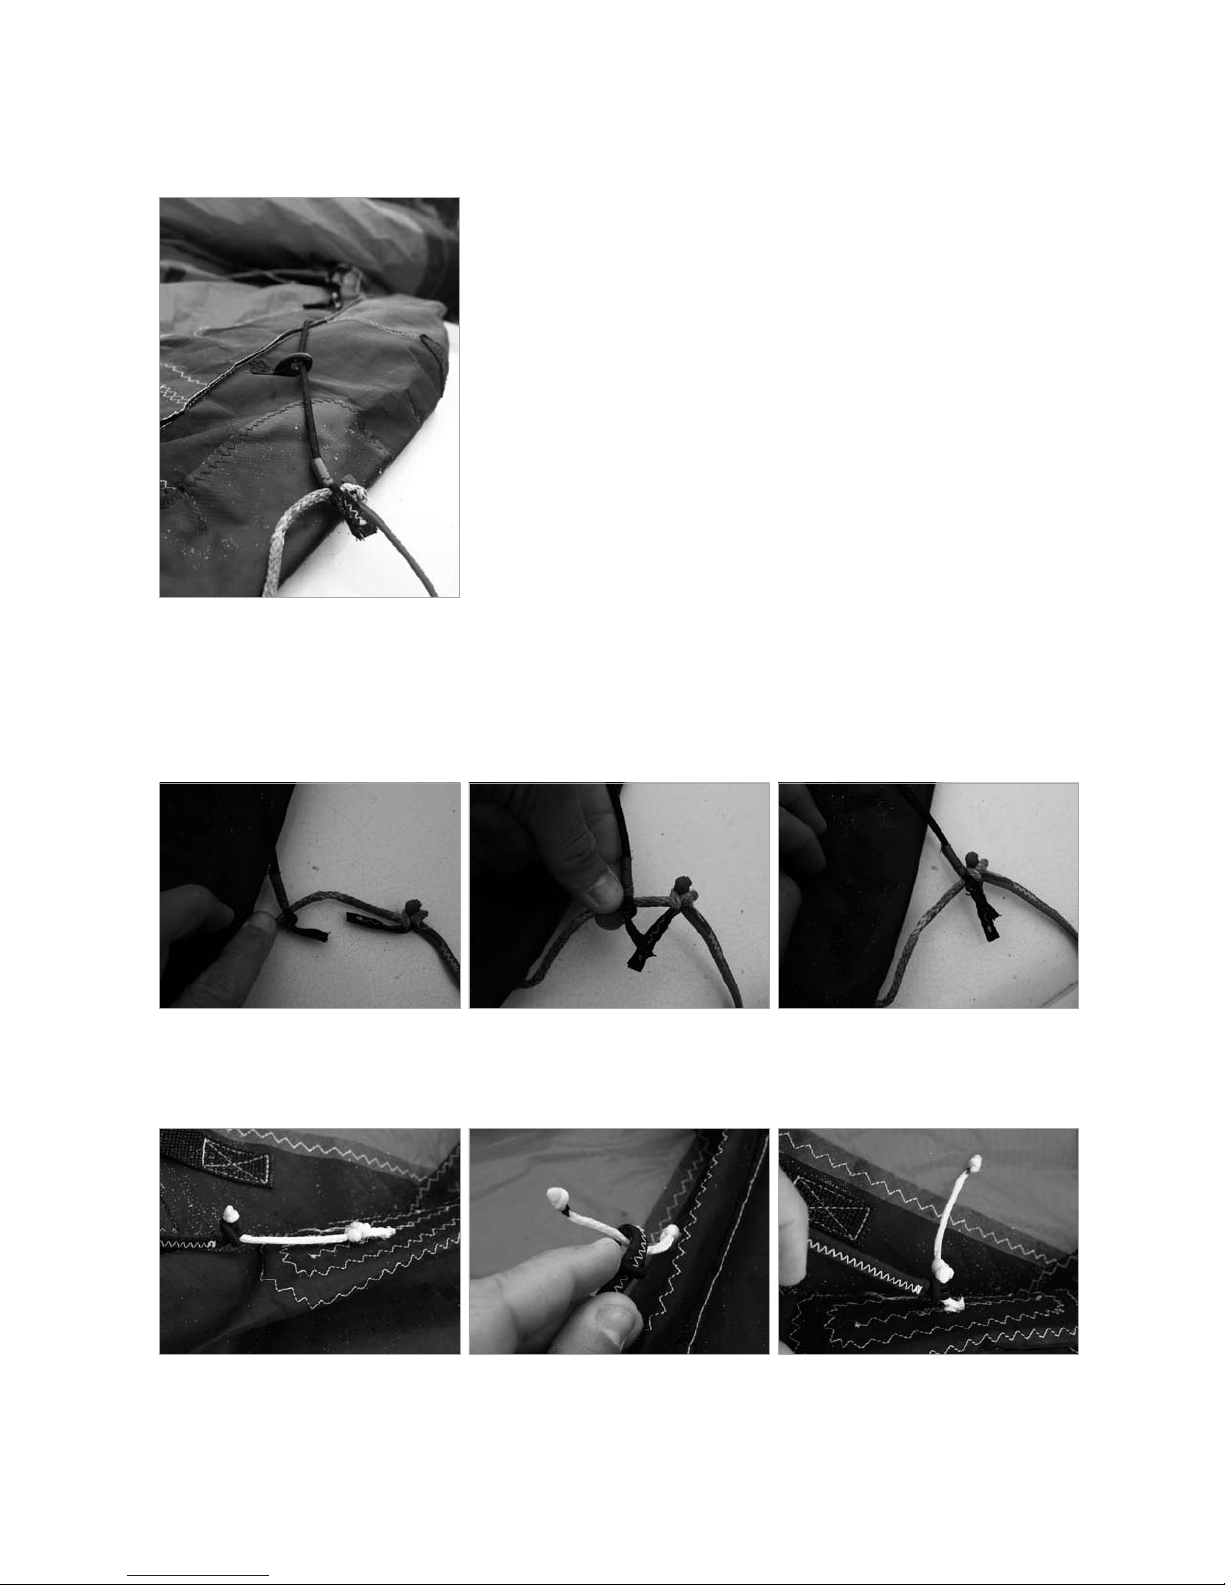
The Rebel is now equipped with Re-launch bungies.
Re-launch bungies prevent line tangles and snags during water re-launch.
When attaching the backlines, slide the bungee up the pigtail, attach your back-
line, then slide the re-launch bungee back down into place resting firmly against
the knot.
When changing back pigtail positions, the bungies must be adjusted to maintain
proper tension. When moving the back pigtails forward, simply shorten the bun-
gee by one knot on the leading edge attachment and vice-versa.
4. attaching the lines

11
north kiteboarding rebel 08 manual
ENGLISH
5. kite tuning
Adjusting the line length has an impact on the performance of the kite.
We recommend that all lines be the same distance from the control bar, this
however does not mean that, even if the lines are the same length, every kite
is perfectly tuned for all kiteboarders and wind conditions. Every kiteboarder,
every kite and all spot conditions differ from each other, thus the recommen-
dations can only be guidelines.
The kiteboarder must adjust the length of the lines before every flight, but also
during the flight, using the “North Flight Control System” (or comparable sys-
tems).
E.g, Sit-harnesses require a longer basic depower setting than waist-harnesses.
The speed at which a kite responds to control input – its response rate – varies
with the amount of tension on the kite lines. The greater the tension, the quicker
the response will be. The tension on the lines varies in turn with the size and
skill of the boarder.
For example, a kite used by a lightweight boarder in light wind will have low line
tension and will respond relatively slowly, while the same kite used by a heavy-
weight boarder in strong wind will have high line tension and will turn quickly.
This means that the construction and the design of the kite control the response
rate only to some extent and that there is no canopy that suits boarders of all
different weights and skill levels. The response rate of the canopy can also be
varied by the two different width adjustments of the bar. With a wide bar, the
canopy reacts and turns faster than with a narrow bar adjustment.
North Kiteboarding recommends flying the larger size kites using the wide
adjustment and using the smaller Rebels with the narrower adjustment. The kite
is equipped with several attachment points and can thus be tuned in terms of its
turning ability and de-powering qualities. The hare symbol stands for a fast tur-
ning canopy whereas the tortoise indicates a slower turning of the kite.
In order to trim the kite quickly, please turn to the illustrations below. These
show an optimally trimmed kite and over-taut adjustment.
5. kite tuning

12
north kiteboarding rebel 08 manual
6. kite care
Avoid bringing the kite into contact with sharp-edged rocks, thorns, wood and
other objects that may damage, puncture or tear the cloth.
The canopy is often damaged in a way that is not obvious until the kite fails
while flying. Careless handling on the ground usually causes such damages; for
example, when a rock is placed on the canopy to secure the kite.
The sun is one of the kite’s worst enemies. Keep your kite out of intensive sun-
rays as much as possible and avoid leaving your kite inside a hot car.
Deflate the bladders if the kite is to be left unattended for any length of time.
Avoid leaving your kite on the beach for extended lengths of time as small wind
movements may quickly cause wear and tear to the cloth.
Try to pack the kite into the kite bag with as few wrinkles as possible avoiding
creases that may damage the cloth material.
To carry a kite, turn it so that the leading edge is upwind and the underside
faces upward. Grab the center of the leading edge tube. If the wind is blowing,
it will hold the kite clear off the ground. Be sure not to drag the tips of the kite
across the ground.
A coating that results from using the kite in salt water will not damage the kite.
However, rinsing in fresh water and drying doesn’t hurt.
Let the kite dry away from sun and wind.
Failure to dry the kite after use or rinsing in fresh water can cause mildew,
which is unsightly but will not affect the performance of the canopy.
Be sure to prevent water, dirt and sand from entering the bladders when using
or rinsing the kite.
Failure to dry the kite after use or rinsing can cause bleeding of dye from one
panel of cloth to another. Such bleeding is not covered under the North
warranty.
Keep sand and water out of the air pump.
Make sure to remove the deflators from the rib valves after use!
6. kite care

13
north kiteboarding rebel 08 manual
ENGLISH
7. bladder repair
Removing Leading Edge Bladder:
1. Lay the kite down flat on the ground with the ribs facing upwards and deflate
all the ribs.
2. Tie a “reinstall” line to the bladder you are repairing. You will need to use this
line to pull the bladder back into the LE after the repair is complete. Tie a sepa-
rate line to the bladder at both wingtips. Each line should extend one meter more
than the distance from kite tip to center.
3. Push the air valves entirely into the LE.
Open the zipper near the middle of the leading edge and pull the bladder out.
First one side then the other. When the bladder has been removed from the kite,
the reinstall line should pass through the tube and extend from each end.
7. bladder repair

14
north kiteboarding rebel 08 manual
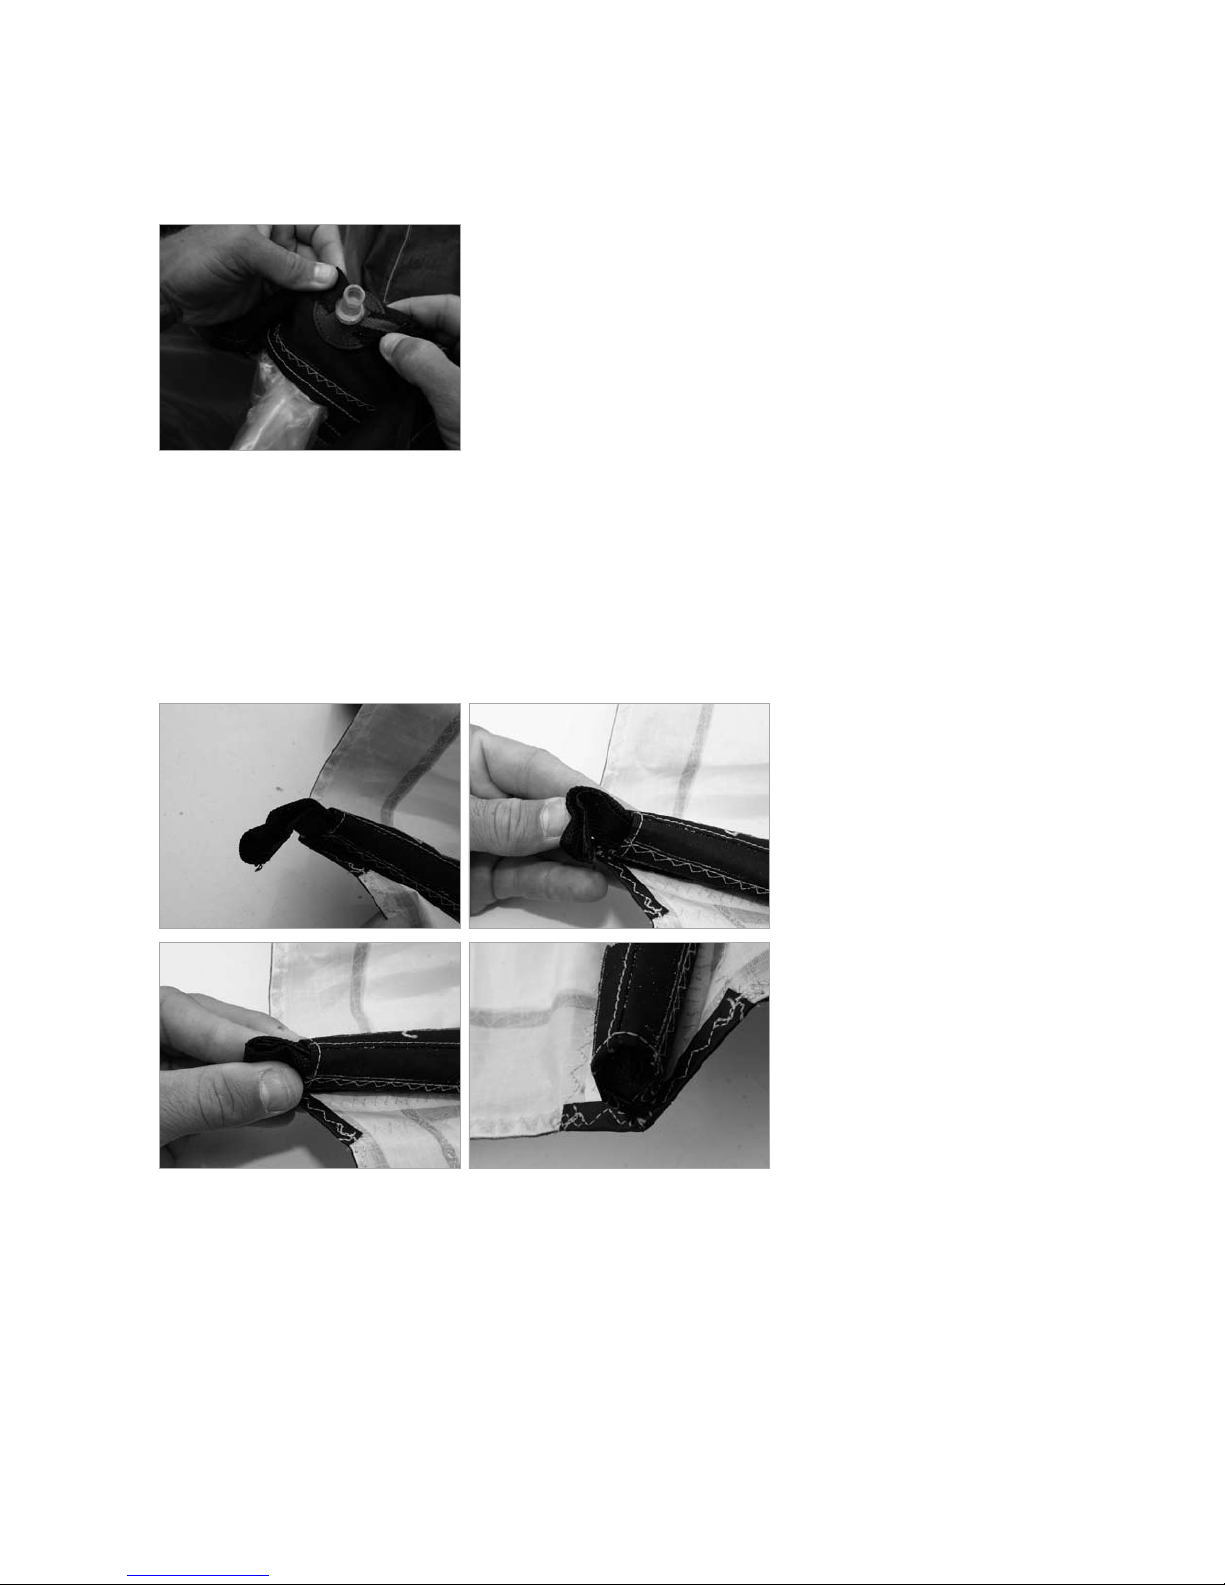
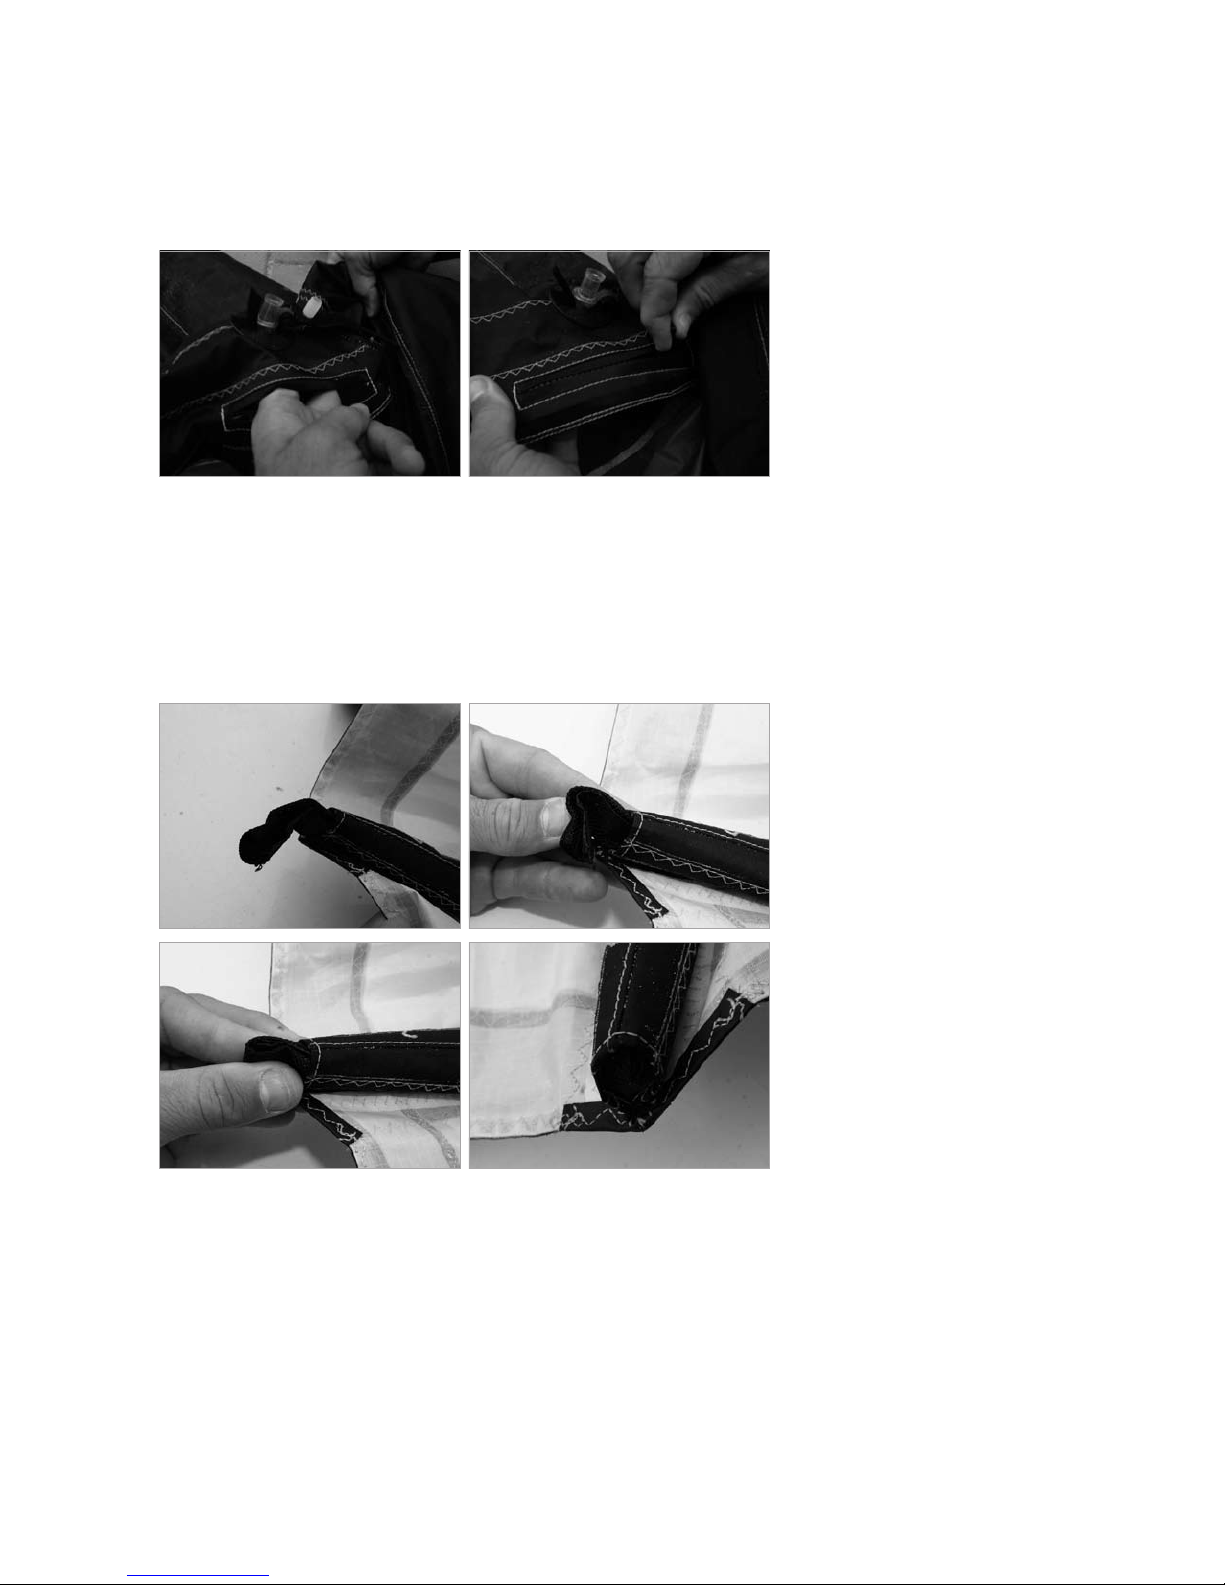
Removing Strut Bladders:
1. Open the Velcro closure at the trailing edge of the strut and attach a re-install
line. The line should be about one meter longer than the strut itself.
2. Open the zipper near the front of the strut, push in the air valve and pull the
bladder out through the zipper.
TIP: It’s best if someone helps you by holding one end of the strut, ensuring that
the bladder comes out of the tube smoothly.
When the bladder has been removed from the kite, the reinstall line should pass
through the tube and extend from each end.
7. bladder repair
15
north kiteboarding rebel 08 manual
ENGLISH
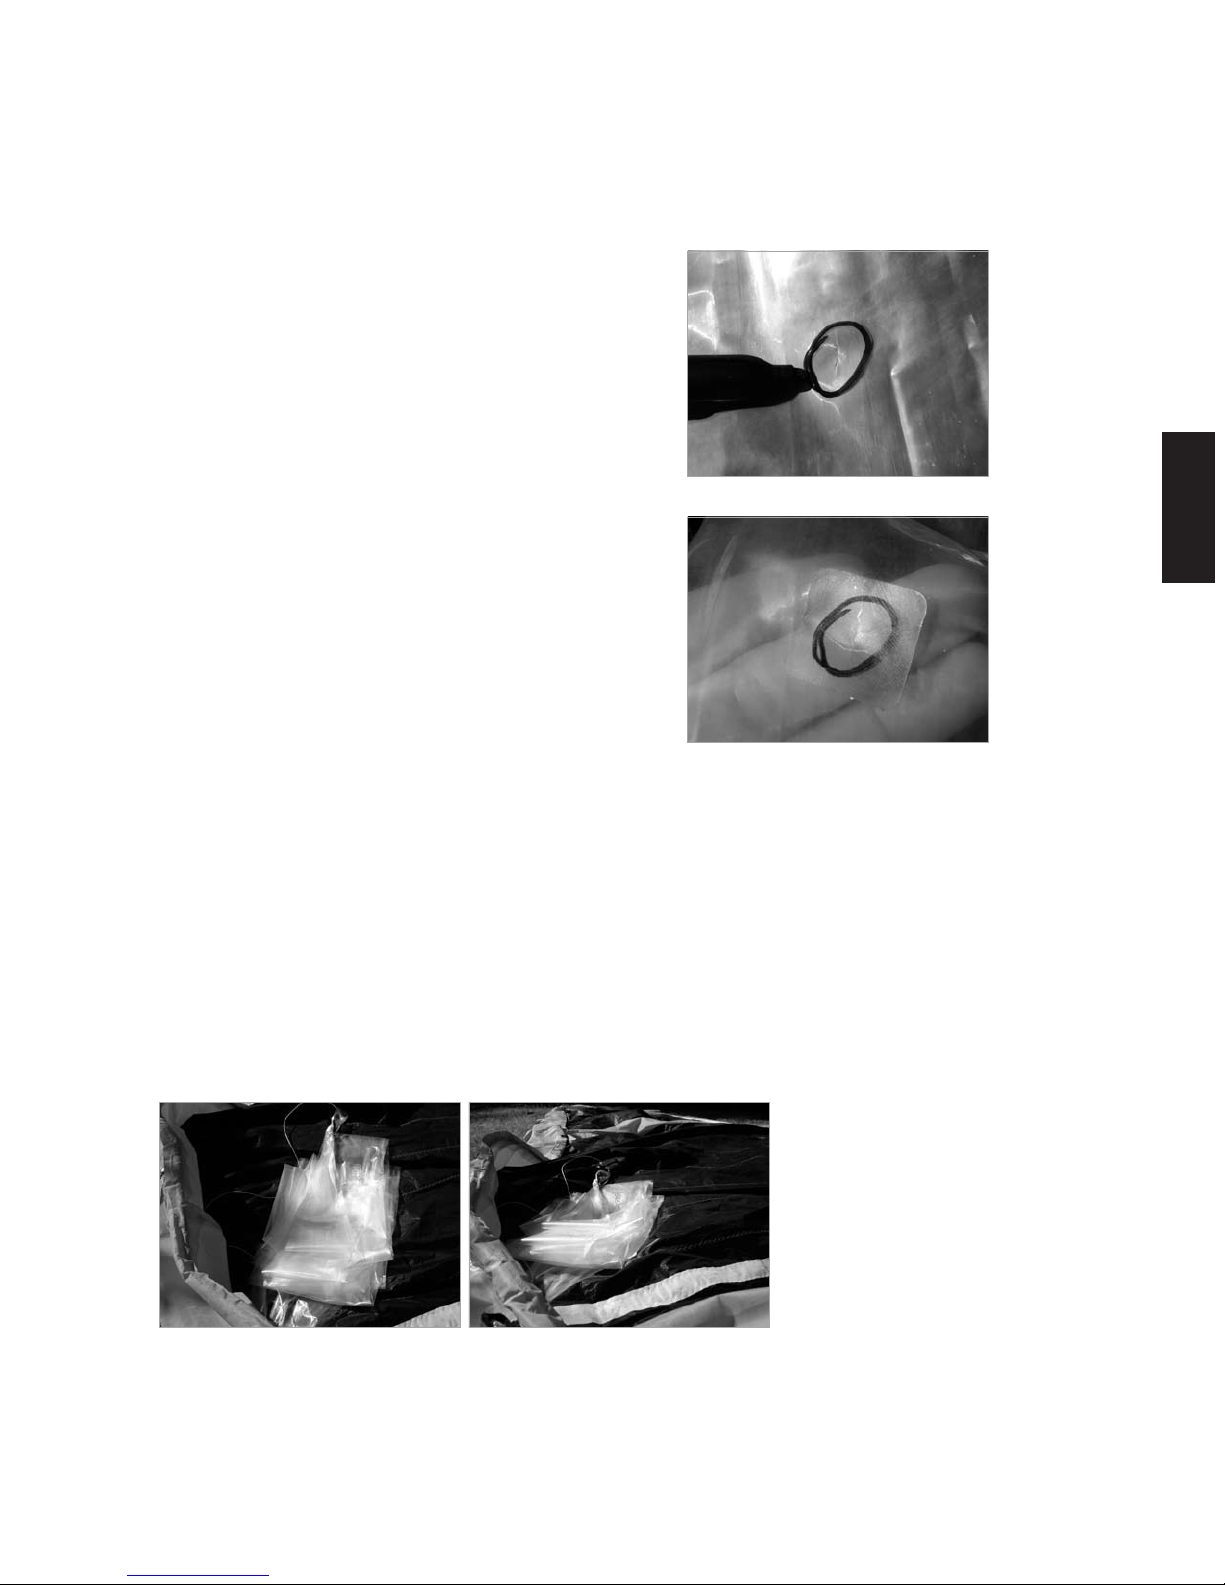
Repair:
1. lnflate the bladder and wipe it with a sponge soaked in soapy water or sub-
merge portions of the bladder in a tub of water. Air bubbles indicate holes.
2. After you locate the holes, dry and clean the
bladder with a towel, mark the hole (using a per-
manent black marker) and deflate the bladder
again.
3. Use the sandpaper enclosed in the repair kit,
lightly roughen the area to be repaired. For larger
holes proceed as follows: Cut a round patch out of
the enclosed tube material.
4. Spread the patch and the damaged spot with a
thin layer of contact glue. Follow the instructions
indicated on the contact glue tube and let both
sides begin to dry. The first pressure exerted is
the deciding factor for successful repairing. For
small damages: Peel the backing off the repair
patch and carefully press it on the bladder to
cover the hole.
5. After all repairs are complete, close the valve and place the dry bladder in a
plastic bag with a generous amount of baby powder. Close the bag and shake it
until the air tube is completely coated in powder.
Re-installing Leading Edge Bladders:
1. Before you begin to reinsert the bladder, fold it like an accordeon with the air
valves in the direction of the valve openings.
2. Re-tie your re-insertion string to the bladder and have your assistant pull the
line to insert the bladder into the leading edge. During this procedure you should
keep the bladder taut and make sure that it is inserted correctly without twisting.
7. bladder repair
16
north kiteboarding rebel 08 manual
3. When the bladder is completely inserted, make sure that the air valve is positi-
oned correctly in the valve opening.
4. Pump air into the bladder until it is half inflated. Check that the bladder has
been correctly inserted and look for wrinkles in the material. If you detect any
irregularities in the air tube or if the valve is not positioned correctly, deflate and
start over again to ensure that the bladder is inserted properly. Warning! If you
fail to correct the mistake at this stage you risk serious damage to the bladder
when it is fully inflated.
5. Roll up the excess bladder and Velcro the ends shut.
6. Once the Velcro ends are shut and you have made sure there are no twists in
your bladder, it is safe to inflate to full pressure.
7. bladder repair

17
north kiteboarding rebel 08 manual
ENGLISH
Re-installing Strut Bladders:
1.Before you begin to reinsert the bladder, fold it like an accordeon with the air
valves in the direction of the valve openings.
2. Re-tie your re-insertion string to the bladder and have your assistant pull the
line to insert the bladder into the leading edge.
During this procedure you should keep the strut taut and make sure that it is
inserted correctly without twisting.
3. When the bladder is completely inserted, make sure that the air valve is positi-
oned correctly in the valve opening.
7. bladder repair
18
north kiteboarding rebel 08 manual
4. Reach into the zipper opening and ensure that the bladder is properly in place
and filling all the space at the front of the strut. Then close the zipper before
pumping air into the bladder until it is half inflated.
Check that the bladder has been correctly inserted and look for wrinkles in the
material. If you detect any irregularities in the air tube or if the valve is not
positioned correctly, deflate and start over again to ensure that the bladder is
inserted properly. Warning! If you fail to correct the mistake at this stage you
risk serious damage to the bladder when it is fully inflated.
5. Roll up the excess bladder and Velcro the ends shut.
6. Once the Velcro ends are shut and you have made sure there are no twists in
your bladder, it is safe to inflate to full pressure.
7. bladder repair
19
north kiteboarding rebel 08 manual
ENGLISH
8. WINDrage and kite sizes
Rebel kites are superbly easy to water re-launch and offer easy, predictab-
le performance. Only a few knots of wind speed is required to fly these kites.
Kiteboarding, however, generally requires more wind, depending not only on rider
ability but also the size of kite, rider and board. The following table demonstra-
tes the APPROXIMATE average wind speeds in which kites of different sizes can
be used by kiteboarders of various skill levels and weights.
Riders who are significantly heavier or lighter should use, for a given wind speed
range, kites that are one size bigger or smaller respectively. These represent a
rough guide only.
Keep in mind that kiteboarding is a dangerous sport in any circumstance and
that using any kite in any wind strength can result in serious injury or death.
A novice has flown small trainer kites but has no experience with large kite-
boarding kites.
An intermediate rider can stay upwind while kiteboarding.
An advanced rider can jump consistently and safely, without injury.
An expert rider can perform aerial spins and flips while maintaining a safe level
of kite control.
These wind strength numbers do not represent gusts and lulls, but only average
wind speeds at a height of 2 meters from the surface of the water in typical sea
level atmospheric conditions.
Kite Size Information:
There are several ways of measuring a kite and even more ways of indicating kite
size. This can be confusing. To be clear, North kites are named according to their
actual surface area. For example, if you have a sheet of paper that measures ten
cm wide by ten cm long, the area of this sheet of paper is 100 square cm. Each
panel of fabric in the canopy of a North kite is precisely measured in this way,
and the sum of the areas of all these panels is listed as the size of the kite.
Note: Surface area (or size) doesn’t necessarily indicate power.
8. windrage and kite sizes
6 18-26 17-36 16-41 4.5 3.9
7 17-25 16-34 15-39 4.5 4.5
9 16-24 15-31 14-34 4.5 5.8
10 14-22 13-29 12-31 4.5 6.5
12 12-20 11-26 10-28 4.5 7.8
14 10-18 11-23 9-25 4.5 9.1
16 8-17 10-21 8-23 4.5 10.4
REBEL ‘08 NOVICE/ INT/ EXPERT AR PROJECTED
INT ADVA N C E D AR EA
Table of contents
Other North Kiteboarding Aircraft manuals


Popular Aircraft manuals by other brands


Aviation Artur Trendak
Aviation Artur Trendak TERCEL Flight manual

SOL paragliders
SOL paragliders Sonic 15 Pilot's manual

Sabfoil
Sabfoil Plate Shim Kit manual

ATP Electronics
ATP Electronics Cessna 172 K 1969 Supplement manual

Raytheon
Raytheon PREMIER 1 manual

SOARING MODELS
SOARING MODELS F3K Assembly instruction