NORTH SAILS GO BEYOND Melges 20 Quick start guide

Melges 20 Tuning Guide
Rev R12 Photo Steve Bernstein, Power Play Action Images
TUNE YOUR SAILS
FOR OUTRIGHT
SPEED

Melges 20 Tuning Guide
Rev R12
1
The following tuning guide is meant to
be a good starting point when setting
up your Melges 20. Depending on total
crew weight, wind and sea condition and
sailing style you may have to alter your
set up slightly from what is given here. As
you read this tuning guide, write down
any questions you might have and we
will be happy to discuss them in detail
with you. The goal of this tuning guide
is to achieve a rig set up that is fast in all
conditions upwind and down. Your new
North sails are designed with this “all
around” philosophy in mind.
Pre-Race Preparation
One of the most important items you
and your team can do in preparing for
high performance racing is to have your
Melges 20 ready to race. Listed in this
section are just a few items we feel are
critical for success on the racecourse.
TRAILER AND BOAT
Make sure when transporting your
Melges 20 that the keel bulb always sits
perfectly in the keel bed of the trailer. If
the boat is sitting where she belongs on
the trailer you will find the bulb resting
perfectly in the keel bed with space in
the keel box both in front and in back
of the keel. Also packing pre-cut foam
between the keel edges / sides and the
keel box will help prevent any movement
of the keel when trailing. It is important
to ensure that the keel fin is not touching
the hull fairing plate prior to trailing. It
is also important to ensure that the boat
stays forward against the bow guide
when trailing.
HULL, RUDDER AND KEEL
Class rules do not allow re-shaping of
these items.
Hull - For traveling to regattas and
general care of your new boat the
investment of our bottom trailing cover
and 1 piece top cover is well worth the
protection it aords.
Rudder - The rudder should always be
removed when not in use and kept in
its padded rudder bag. Remember to
always put away dry.
Keel - We just talked about taking care
of your keel when the boat is on the
trailer. When lowering the keel with the
keel crane make sure you have rinsed out
the keel box along with the keel guides.
Make sure the keel box is free of any lines
or padding. Also, make sure you keep the
boat level when raising or lowering the
keel to ensure the keel fin does not get
damaged.
Launching & Retrieving
Believe it or not this is when most
damage occurs to Melges 20s. When
trailer launching make sure the keel box
is well packed with padding, as the keel
wants to shift as soon as the transom
starts floating. To ramp launch you will
need to use the keel retractor crane and
just lift the keel about ½” to ensure you
do not damage the hull fairing plate.
Make sure you pad the keel well on the
leading and trailing edges and make sure
you take great care when using the keel
retraction crane.
When using an electric hoist be sure
to keep the boat level or maybe a few
inches down in the bow. Again we
are trying to protect the keel. Also by
holding the bow down just a few inches
we are protecting the spreaders from
possibly hanging up on the hoist arm
as the spreaders pass the arm. Keep in
mind when you lower the bow the keel
fin is vulnerable so care must be taken
not to damage the keel fin. Make sure
you use the aft leg of the lifting bridle
attaching it to the transom to help keep
the boat in a slight bow down attitude
when lifting.
When launching on a hoist it is best to
use the keel retractor crane. Hook the
keel retractor to the lifting ring on the
keel, make sure the lift ring is screwed
all the way in the top of the keel. Take
a tension on the keel lift winch and
securely tie o the winch handle to the
horn cleat. Install the lifting straps to
the lifting pins alongside of the keel
utilizing a luggage tag type install. Also,
install the longer aft lifting strap through
the top rudder gudgeon at the transom
using a rudder pin. When hooking up the
hoist, put one of the lifting straps over
the hook, then the aft leg, then the last
lifting strap. Now when you lift the boat
take care not to hit the spreaders on the
hoist arm. It is best to have the boat at
90 degrees or more to the hoist arm and
hold the bow slightly down to keep the
rig o the hoist. Keep the keel padding
in place until the keel is ready to be
lowered and be sure to always hold onto
the winch handle, keep all body parts
away from keel and take great care when
lifting the keel or lowering the keel.
It is a good idea to put some soap and
water on the keel guide blocks and in the
keel box to allow the keel to seat more
easily. If the keel guide blocks do not line
up fore and aft perfectly, put a body on
the bow or the stern to help tilt the boat
to line up the keel guides.
Deck Preparation
The factory Melges 20 comes ready to
race. There are a few small class legal
modifications that really help with sailing
the boat.

Melges 20 Tuning Guide
Rev R12
2
lWith your spinnaker up at maximum
hoist mark the halyard with a black
permanent marker.
lWith your bow sprit fully extended
also mark the tack line/bow sprit
extender line. Make sure that you have
the proper knot tied in the end of the
line to account for it being tied to the
tack of the spinnaker. It is best to tie the
loop with about a 65 mm or 2.5” loop to
prevent the tack of the kite from binding
on the bow sprit end plug.
lThe bow sprit is shock corded to
retract. Ensure that the shock cord is
adjusted so that it is just enough to
retract the bow sprit and not retract with
too much force.
lAttach shockcord from the top of the
forward stanchion to the upper shroud
above the turnbuckle to prevent the
spinnaker sheet from dropping in and
catching on the shroud car.
lApply some number scales to the jib
track adjustment locations. Place these
above where the jib sheet lead comes aft
and above the spinnaker bag sock on the
port side. Number 1 should align with
the traveler car pin when the car is all the
way forward on the track.(front of car
even with front of track)
Practice - Practice - Practice!
It has been said that each mark rounding
can be worth a minute on the course.
Now that is a reference between the
first group and the last group of boats.
That is a lot of time and a majority of it
comes at the corners and the first few
minutes of a race. Knowing how your
Melges 20 accelerates o the starting
line is something you need to practice.
Sets at the windward mark are critical,
especially if you want to gybe right away.
Having the ability to pass between two
leeward gate marks absolutely requires
that you and your crew understand all
three spinnaker takedowns, the Mexican,
the windward and the leeward. You do
not have to have rock star crews in the
Melges 20 class to be successful; you do
need to have a regular steady crew who
are willing to practice. If we had “Time
On The Boat Meters” you would find the
top finishing boats in our class had the
most accumulated time together sailing
the Melges 20.
We highly recommend the spinnaker
launch system with the retrieval line and
spinnaker storage sock in the cockpit.
The spinnaker take downs become quick,
safe and easy.
Rig Set-Up
MAST DOWN
As the Melges 20 comes almost
completely ready to race straight from
the factory there is very little to do
to prepare your boat and mast to be
competitive. With the mast down, pull
all the halyards down and tie o at the
bottom, also make sure the turnbuckles
are set evenly with similar amount of
threads showing at the top and bottom
of the open body. Another thing we
like to do is tie some light weight shock
cord between the two lower shrouds
around the front of the mast 6”- 8”
down from their attachment points,
also above the lower spreader between
the intermediates and the diamond
stays, and below the port spreader, also
between the Intermediates and around
the front side of the forestay about 12”
below their attachment points. This
keeps the head of the spinnaker from
getting jammed between the shrouds
and mast on hoists and keeps the kite
from getting caught above the lower
spreader on a take down.
Double check the spreader angle and
symmetry: The following process is
performed at the factory when doing the
final rigging on every mast. Every mast
is laser straightened so when adjusting
the diamond statys make sure to keep
them symmetrical. We are providing the
process for future field checks. Using
an angle finder, level the mast using the
mast base, check the spreader sweep
by placing a straight edge from tip to tip
on the diamond shroud or use a string
pulled tight.
For masts built prior do July 2013: The
upper spreader should measure from the
string to the aft side of the mast track
9.2 cm and the lower spreader should
measure 31 cm.
DO NOT ADJUST SPREADER ANGLE
FORWARD OF 9 cm AT TOP AND
30 cm AT THE LOWER SPREADERS
OR THIS WILL VOID THE MAST
WARRANTY.
Spreader angles too far forward makes
the mast less forgiving and more prone
to inversion with the spinnaker up in
heavy wind.
For masts built after July 1st, 2013
utilizing dyform rigging we use the
following spreader angles: The upper
spreader should be set to 115 mm, the
lower spreader set to 320 mm.
To make sure the spreaders are
symmetrical, use an angle finder and
find zero or level at the mast base, then
check the angle on the port spreader
and then the starboard spreader. Adjust
as needed to make symmetrical and at

Melges 20 Tuning Guide
Rev R12
3
the same time maintaining the correct
sweep. Make sure that the turnbuckle
adjuster has at least 4 turns onto
the threaded stud. After setting the
spreader angle adjust the diamond stays
so that you have approximately 75mm
(3”) of prebend in the mast and sight up
the tunnel and adjust the diamonds to
make sure the mast is straight side to
side.
Once the rig is ready to step you can
slide the mast aft, place the diamond
stay over the keel and lock in the mast
base to the mast step deck plate. Rest
the mast in the mast support on the
rear mast hold down bunk. Now, attach
the Intermediate shrouds to the outer
shroud cars, make sure the shroud cars
are all the way forward on the tracks.
Also, attach the lower shrouds to the
inner sidestay cars and insure that they
are all the way forward on the tracks.
You will want to ease both intermediates
and lowers out at least ¾ of the way on
the turnbuckles to ease in attaching the
forestay for the very first mast stepping.
Set the diamond stays so that there is
approximately 75mm (3”) of prebend in
the mast. By tensioning the diamond
stays you put more prebend in the
rig. The diamonds accomplish two
important tuning tasks. First, they put
prebend in the mast to better fit the
lu curve in the mainsail and set the rig
up to sail in a wide variety of conditions
without needing a backstay. The other
important aspect of the diamond stays
is that they support the top of the mast
when you are flying the Asymmetrical
spinnaker. So, it is important to have
enough tension on the diamonds to
support the mast with the gennaker is
flying. Refer to tuning matrix chart.
Before stepping the mast it is best to
pre furl the jib furler so it is ready to go
before stepping the mast. When furling
the jib it should furl counter clockwise,
so, to wind up the drum turn it clockwise
until the drum has filled up with the
furling line.
It is possible to step the mast alone but
will be easier if you have some one pull
forward on the forestay as you walk
up the mast. Ensure that the mast
base stays securely locked in the deck
plate and does not come out as you
are walking the mast up. Also, place a
sail bag, or the provided keel fin cover
over the keel to protect the mast and
keel from scratching when raising and
lowering the mast. The spinnaker sail
bag also works well for this or the factory
supplied keel fin cover.
Once the mast is up, attach the Forestay
to the furling tang.
MAST UP
With mast stepped attach a 15M or
50’ tape measure to the main halyard
and hoist to the top and lock o on the
halyard latch.
Check to see that the mast is close to
centered by measuring to the top of the
outer shroud track at the same position
on both sides of the boat. Tighten/
loosen the upper shrouds on each side so
that the mast is centered side to side.
With the main halyard locked in the up
position, measure to the intersection of
the transom and the bottom of the hull.
The measurement should be 9310mm
or 30’6-1/2”. Tighten or loosen the
turnbuckle on the forestay to achieve this
measurement.
Use the follwing setting for masts built
prior to July 2013 with 1X19 shrouds:
You will have to adjust the upper tension
when adjusting the forestay to maintain
a constant tension on the uppers of
250Kg (550lbs) when checking the mast
rake. The upper shroud cars should be
in the max forward position for tuning
at base. The diamonds should read a
tension of approximately 95Kg (210lbs)
when the uppers are set at 250Kg
tension. Now, move the lower shroud
car two holes aft and measure the lower
shroud tension at 130Kg (285lbs) and
sight up the mast on the aft tunnel side
to insure that it is straight side to side.
Dial in the settings to achieve the desired
tensions with the shroud cars in the base
positions.
Be sure to adjust the diamond stays to
this setting with the tension gauge and
to set the uppers and the diamonds to
this tension to check the final mast rake.
Finally, recheck to be sure the mast tip is
centered side to side and that the mast
rake is 9310mm or 30’6-1/2”.
For masts built after July 2013 with
dyform shrouds we use the following
base settings using the Loos PT-1 gauge
to check the tensions. Note that dyform
will produce a higher tension reading
for the same tension compared to 1X19.
Set the uppers at 275kg (#39), lowers at
135kg (#28), diamonds at 175kg (#28).
RIG TENSION
he tension on the upper shrouds is critical
to the upwind shape of primarily the jib
and to a smaller degree the mainsail. For
maximum speed it is important to adjust
the shroud car position on the upper and
lower shrouds depending on wind and sea
conditions. The Melges 20 is designed with

Melges 20 Tuning Guide
Rev R12
4
shroud tracks on ramps to facilitate ease of
rig tune with minimal turnbuckle adjusting.
As the wind increases you can move the
upper shroud cars aft to increase rig tension
and headstay tension. This in turn helps
flatten the jib and depower the rig. So as
you start to get overpowered start to move
the upper shroud cars aft on the tracks.
You will want to be all the way aft by
approximately 16knots of wind. The class
rules allow for purchase on the sidestay
cars to allow the cars to be adjusted more
easily. Visit www.melges.com for the latest
shroud adjustment system set up.
The lower shrouds control the side-to-side
sag or bend of the mast, how much the
mast can bend forward in the middle, and
the headstay sag. We set the lowers so
that when both cars are all the way forward
in approximately 7 knots of wind there is
approximately 10mm of sag in the mast at
the lower spreader.
After you have set up the uppers to the
correct wind speed, sail the boat on both
tacks checking the mast sag side to side
and adjusting the lowers according to
the wind speed. Also, check the mainsail
depth. If the main is overbending or
showing a wrinkle into the mast below the
bottom spreader you either need to ease
o the diamond tension a bit if the breeze
is lighter or pull the lowers aft on the tracks
if it is breezier. This will straighten the
lower mast section and increase headstay
tension flattening the jib. Generally we like
to set up the rig so that the main sets up
fairly flat with the lower cars at base when
we are sitting on the windward side of the
boat. With this set up we can pull the
lower cars aft to power up the main when
needed and not have to pull too much vang
on to flatten the mainsail. Generally, if the
mainsail is backwinding with the jib in max
trim position,(top leach telltale just on the
verge of stalling at times but flowing 100%
of the time) then you need to bend the
mast more to flatten the sail. You can do
this either by tightening the diamonds or
moving the lower shroud car forward. You
will want to just take out the backwinding
in the main and not go too far unless
you are overpowered and are looking to
depower the mainsail further.
Using the North tuning chart at the end of
this guide as a guideline for shroud tensions
in the given wind conditions we then play
the cars to fine tune the power in the boat.
Generally, if you are all the way aft on the
shroud cars and still need to depower
the rig further it is time to tighten to the
next step in the tuning chart. If you are
never moving the cars aft on a beat then
generally, you are too tight and should
loosen to the next step down on the chart.
Note that in heavy wind it is important
to move the lower shroud cars forward 2
holes from your upwind setting prior to
going downwind to allow the mast to bend
forward down low and reduce the tendancy
for the mast to inverse bend with the
gennaker up.
SPEED TARGETS
Speed targets are important on any
keelboat. If you dial in a good feel for a
target speed in all the dierent conditions
you will find that your performance gains
will be significant.
Upwind targets are more important
than downwind but both will be helpful.
Upwind we have developed the following
target range that we have found to be fast.
An important note is that you need to use
an accurate through the water speedo
and that a GPS based system will not be
accurate enough.
5 to 7 knots of wind = 4.7 to 4.9 knots of
boat speed
7 to 10 knots of wind = 4.9 to 5.1 knots of
boat speed
10 to 13 knots of wind = 5.1 to 5.3 knots of
boat speed
13 to 18 knots of wind = 5.3 to 5.7 knots of
boat speed
15+ = > 5.7 knots of boat speed
Downwind the condition where targets pay
o the most is in the low soak mode. This
speed changes a lot depending on wave
and wind conditions and is best called by
the tactician for each given condition based
on boat to boat performance.
Sail Trim
MAINSAIL TRIM
Because the Melges 20 does not have a
backstay or main traveler it is relatively
simple to trim the main and steer
requiring very little movement by the
helmsperson. Like other boats main trim
on the Melges 20 is keyed o the end
of the top horizontal batten. In light to
moderate air we trim the main so that
the telltale on the top batten is stalled
about 25% of the time (the second
telltale from the top -at the second
batten, is flying 100% of the time). As the
wind increases both telltales will fly all
the time. In light to moderate air the back
end of the top batten should be parallel
to the centerline on the boat, in heavy
air it will be pointed out as much as 30
degrees. With the square top mainsail on
the Melges 20 it is important to not over
trim the mainsail. Twist is your friend,
when it doubt, ease it out to get the boat
going through the water. Also, keeping

Melges 20 Tuning Guide
Rev R12
5
the mainsail trim soft and very twisted
sometimes in order to sail the boat very
flat can be very fast. It is important to
experiment with given heel angles and
main sheet tension in dierent conditions
to see what is working the best.
Following is an overview of each main
control and how it should be adjusted.
OUTHAUL
The Melges 20 likes to have some power
down low in the mainsail so we like to
keep the outhaul eased about 10-25mm
in from the band In most conditions. In
the heavy air setting we tend to pull the
outhaul out to the band to flatten the
sail, especially in flat water. In rougher
seas it may be fast to keep the outhaul a
bit looser to make the main fuller down
low.
VANG
We use the vang upwind as soon as the
boat is overpowered. At the early stages
of being overpowered we simply snug
the vang to help induce mast bend and
flatten the mainsail. As you become
more overpowered we pull the vang
harder to flatten the mainsail and vang
sheet. Downwind adjust the vang so the
top batten telltale is always flowing, twist
is generally good. Generally the vang
with the slack taken out of it upwind
will be too tight for downwind sailing.
It is a good idea to put a number scale
on the boom next to the vang track
to keep track of fast settings and for
an approximate downwind setting. A
medium vang setting for the oset reach
leg and then a loose setting for the run
provides the best performance.
CUNNINGHAM
We use the Cunningham on the Melges
20 as another one of the depowering
tools. We pull on just enough to remove
any horizontal wrinkles in the sail as soon
as we start to get overpowered. As you
become overpowered experiment with
a very hard Cunningham to flatten the
main, pull the draft forward and twist
open the head. Again, dierent wave
conditions warrant dierent settings so
you must experiment to find the fast
setting. Downwind the Cunningham
should be o.
JIB TRIM
Because the jib on the Melges 20 is a
high aspect sail (tall and skinny) it is very
sensitive to small adjustments in jib sheet
tension. Tightening or easing the jib
sheet 1/2” can have a big eect on boat
speed and pointing.
The Melges 20 jib halyard is set up on
a halyard lock system similar to the
mainsail. Some adjustment of jib height
may be required using an extra shackle
on the head of the jib. The standard
setting sets the jib so the foot is just o
the deck in light air and just touching
in more breeze as the shrouds are
tightened and is generally a good setting.
Generally in light to medium breeze set
the jib lead so that when lung slowly
into the wind the lu breaks evenly. As
the wind builds you will want to move
the lead aft to flatten the foot and twist
the head of the jib to depower.
It is a good idea to put some numbers
and dashes corresponding to the
dierent jib car positions on the track.
We like to have a dash and number at
each hole that the pull pin plunger will
seat into. The first dash and #1 will start
at the 4th hole back from the front end
of the track, at this position the front of
the car will be flush with the front of the
track.
The Base setting for the jib car is #3.
This puts the car in a position where the
aft end of the car splits the second bolt
from the front of the track.
In winds below about 15 knots it is legal
to inhaul the windward jib sheet to
narrow the sheeting angle on the jib.
This is legal to do and is sometimes fast.
It only requires a slight tension on the
windward sheet to make a noticeable
dierence. Take care not to over inhaul
as this will be slow. In light to medium
conditions we inhaul as much as 25mm
on the clew of the jib. It is best to mark
the jib sheets in a way that you can
easily replicate settings from tack to
tack. When in doubt, ease it out! Note:
On the newer jibs we’re finding that
inhauling is rarely required so take care
when inhauling.
We have placed a telltale on the upper
leech (near the spreaders) of the jib to
help you judge how tight or loose the
sheet should be. The general rule of
thumb is to trim the sheet hard enough
so that the upper leech telltale is just on
the edge of stalling, but never stalled.
Just as with the mainsail it will be easy
to stall the telltale in light air and very
hard to stall in heavy air even with the
sheet trimmed very hard.
JIB CLOTH TENSION
Adjust the small line at the tack of the
jib so the lu of the sail has some slight
wrinkles coming o it. It will be necessary
to change the tension depending on
the wind speed to keep the wrinkles the
same in most conditions. In very heavy
air, tension the lu so that the sail is
smooth. In flat water it will sometimes
be fast to carry some horizontal wrinkles
o the lu.

Melges 20 Tuning Guide
Rev R12
6
LEECHCORD
Be sure that your leech cord is not too
tight. It is very easy to put a lot of tension
on the cord in heavy air and have it too
tight in light air. The key is to just stop
the flutter in the leach if there is any.
SPINNAKER TRIM
Spinnaker trim on the Melges 20 is much
easier than that of a conventional poled
boat. There are a few tricks that can
make you faster downwind and make
your sail handling easier.
You will want to set up the spinnaker
sheets to always gybe inside the lu
of the kite. So the tack line would be
over the top of the spinnaker sheet as
it comes aft to the kite. When rigging –
“tack over sheet” is your reminder.
Always trim the kite so it is on the edge
of collapsing on the lu, it is not fast to
over trim the kite.
GYBING THE ASYMMETRIC
On the gybe, the fastest method is to
have the trimmer ease the kite as the
boat heads down, then the forward crew
starts to trim the new sheet as quickly as
possible to fill the kite on the new gybe.
This is called the pre gybe and requires
the driver to bear away to almost dead
down wind and wait for the clew of
the kite to be about half way from the
headstay to the side shrouds before
turning onto the new gybe.
MEXICAN GYBE
In heavier wind the Mexican style gybe
works the best. It is also best to sail
with the jib out downwind in planing
conditions. So, the trimmer will want
to trim the jib in so that it is snug, the
driver goes into the gybe straight away,
the trimmer trims the kite in as the boat
heads down, the kite fills and backs into
the tight jib once the wind hits the kite
and jib on the other tack, trimmer blows
o the sheet and trims the new sheet
as quickly as possible and releasing the
jib sheet as soon as possible. When
performed properly the kite will blow
across the headstay and fill with a pop on
the leeward side.
SPINNAKER SETS
Forward crew pulls the spinnaker halyard
up and the second crew pulls the tack/
pole out. Or, vice/verse, either way
works well.
SPINNAKER DOUSE
There are three types of takedowns:
the windward, the leeward, and the
“Mexican”.
The windward douse is used when doing
a port rounding and you are approaching
the mark on port tack. The “Mexican”
is for rounding a mark to port but your
approach is relatively shallow on a
starboard tack. The leeward douse is for
rounding a mark to starboard while on
starboard tack or when you approach
the mark at a very sharp angle while on
starboard tack and you will have to gybe
quickly around a mark leaving it to port.
For the leeward douse, you can either
grab the lazy sheet o of the clew, or
grab the sheet just above the anti hiking
pad to strap the foot. The helmsperson
then must bear o slightly, the clew
should be pulled in under the mainsail to
prevent the kite from blowing over the
leech of the mainsail, and then the tack
line must be blown o completely. The
halyard should then be fed down as the
crew gather the spinnaker. The key here
is to maintain the tack and foot of the
kite and keep it out of the water, also
watch for the kite blowing behind the
leach of the mainsail.
For the windward douse, the skipper can
sail low, while the crew start to trim the
windward sheet to pull the kite around
to the windward side the forward crew
should blow o the tack to unload the
pressure o the kite. The clew should be
grabbed inside the shrouds and start to
stu the kite in the bag gathering leach
first for about 1/3 and then grab both.
Steer under the foot to keep the kite on
the deck.
For the “Mexican”, as you approach
the leeward mark on starboard, the
helmsperson should bear o into a slow
gybe, the trimmer will over-trim the
sheet as the boat gybes to port. Just as
the boat is headed directly down wind
and the mainsail begins to gybe, blow
o the halyard. The spinnaker will blow
against the rig and fall on the deck.
When the sail is 2/3rds the way down
release the tack and stu the spinnaker
in its bag. Practice of these three douses
is vital to success on the racecourse.
SPINNAKER DOUSE WITH TAKE
DOWN LINE
We highly recommend using the take
down system on the Melges 20. This
system adds greatly to the ease and
simplicity of taking the gennaker down.
With this system the entire process
Melges 20 Tuning Guide
Rev R12
7
is simplified. The middle crew typically starts to inhaul the
takedown line while counting down 3-2-1 and at zero the
forward crew release the gennaker halyard and the tack line
guiding the lines out so they do not snag. We always ease the
halyard first, even on leeward drops. On a leeward drop after
the halyard is eased and the tack released the forward crew
should tend to the foot and tack of the kite to keep it out of the
water. The driver needs to bear away to flatten the boat. The
forward crew can help to stu the last part of the kite into the
sock.
On the set, it is helpful to pull the kite forward to the front
of the sock to help it come out easier. Also, tending the kite
halyard so it runs out freely helps insure a clean set.
CREW POSITIONING
Generally in light wind, you want to sit as far forward as
possible between the stanchions. Keep in mind that you are
not allowed to be in front of the mast. Downwind, you will
want to also sit forward and heel the boat to windward as soon
as you have enough pressure to sail deep. As the wind builds
you want to move the weight aft upwind so the middle crew is
centered on the mainsheet swivel. Downwind when planing
everyone slide aft as far as possible unless you are in marginal
planing conditions. Then it is best to keep the weight more
centered and move the weight fore and aft to get the best feel
in the boat and keep her planing as long as possible.
IMPORTANT TIPS FOR SAILING DOWNWIND
IN HEAVY AIR CONDITIONS
lMake sure the rig is set up for the wind and see conditions
lKeep the outer shroud cars max aft
lBig ease on the kite or blow o the sheet in extreme pus
and waves with bow bury
lMainsail sheeted in with vang o or if main is eased have
some vang on
Conclusion
The Melges 20 is one of the most exciting new boats available
today with rapidly growing fleets and excellent one design
racing. We hope all of the tips we mentioned are helpful to
your Melges 20 sailing program. Let us remind you that these
are the most important and obvious helpful hints that we have
provided. Our experts will be happy to go further in detail with
you anytime.
© Photo by Steve Bernstein, Power Play Action
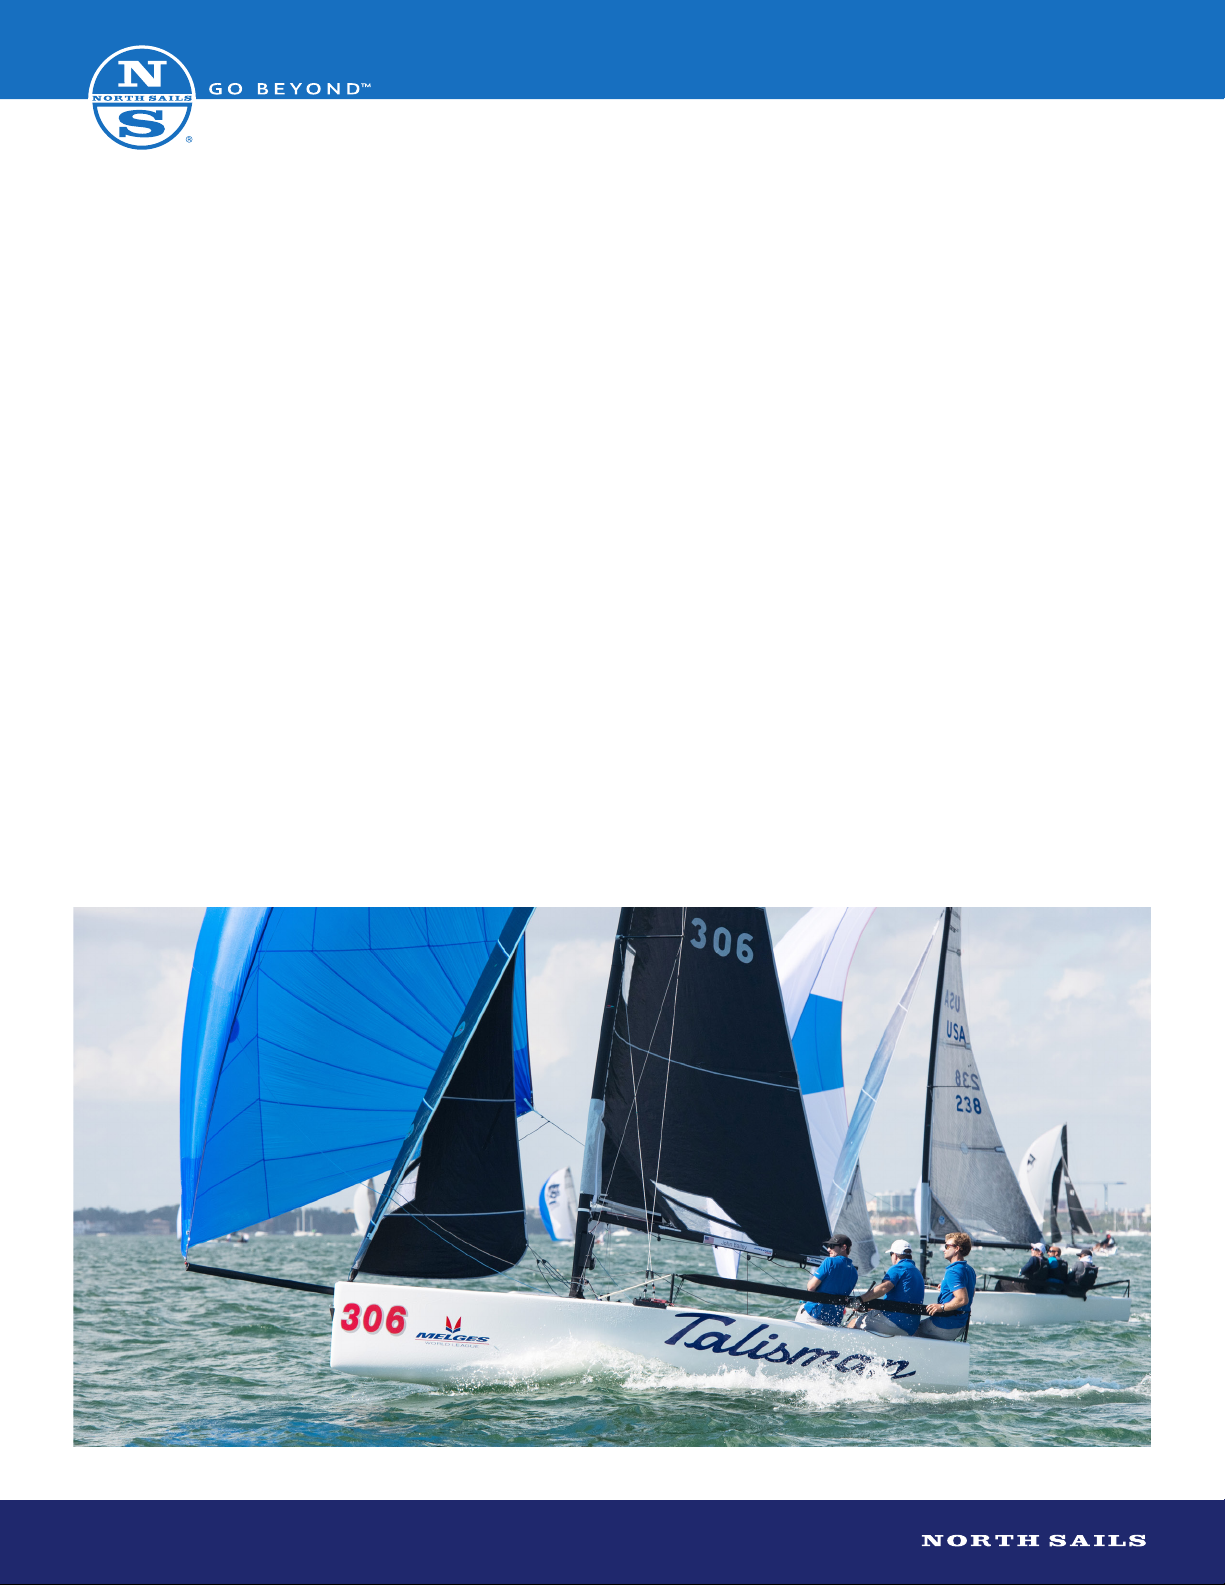
Wind
Speed
(Knots)
Uppers
Track
Uppers
Turnbuckle
Uppers
Tension
Lowers
Track
Lowers
Turnbuckle
Lowers
Tension
(Kg)
Diamonds
Turnbuckle
Diamonds
Tension
(Kg)
Headstay
Turnbuckle Jib Car X sheet
(mm)
2-6 0-7 0 to 1 -1.5 0 +10 1 to 2 0 -25
7-10 0-2 -5 1 to 3 -1.5 0 +10 2 to 3 0-25
8-12 1-3 0 275 2 0 135 0 175 Base 3 0-25
11-14 2-4 +4 3 to 5 0 +8 0 3 to 4 0-25
13-18 3-5 +8 4 to 5 0 +12 0 4 to 5 0
16-20 5 +12 4 to 5 0 +16 0 5 to 6 0
18-25 5 +14 4 to 5 +22 0 6 to 8 0
** Forward Aft mast rake setting +10 full turns on headstay, -2 full turns on uppers, +1.5 turns on lowers
All turns are from base
Shroud track settings are holes showing in front of car
MAST SETTINGS AT BASE
Top Spreader 115 mm - Back of track to straight line from diamonds
Bottom Spreader 320 mm - Back of track to straight line from diamonds
Mast Rake 9310 mm (30’6-1/2”)
Use calipers to record turnbuckle settings at base
Change Lowers/Diamonds per table to minimize mainsail backwind
Flat Water - More Vang
Waves - Less Vang and Less Lowers
TURNBUCKLE SETTINGS AT BASE
Stbd Port
Uppers
Lowers
Diamonds
Headstay
MELGES 20 QUICK TUNING CHART
Tuning table for masts built after July 1st 2013 with Dyform shrouds
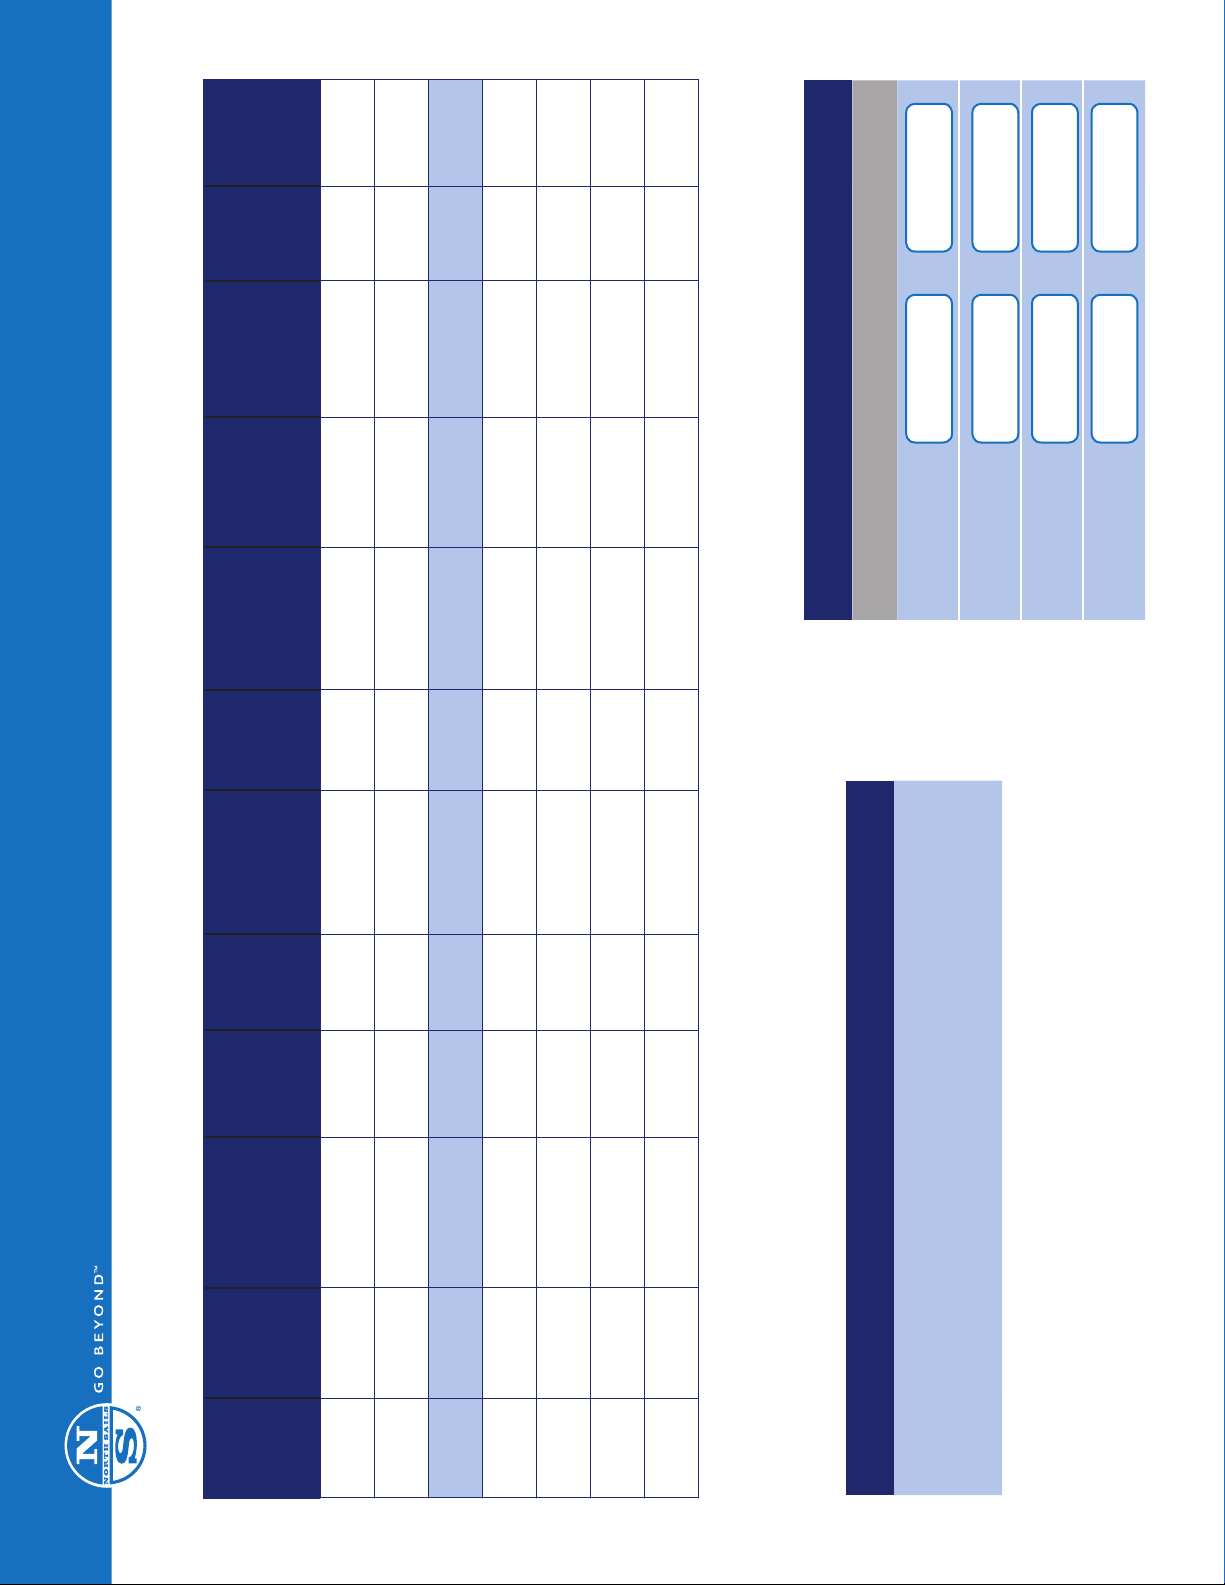
Wind
Speed
(Knots)
Uppers
Track
Uppers
Turnbuckle
Uppers
Tension
Lowers
Track
Lowers
Turnbuckle
Lowers
Tension
(Kg)
Diamonds
Turnbuckle
Diamonds
Tension
(Kg)
Headstay
Turnbuckle Jib Car X sheet
(mm)
2-6 0-7 0 to 1 0 -4 0 1 to 2 0 -25
7-10 0-2 -5 1 to 3 0 -3 0 2 to 3 0-25
8-12 1-3 0 250 2 0 130 0 95 0 3 0-25
11-14 2-4 3 3 to 5 0 3 AFT 3 to 4 0-25
13-18 3-5 5 4 to 5 0 5 AFT 4 to 5 0
18+ 4-6 7 4 to 5 0 7 to 10 AFT 5 to 6 0
** Forward Aft mast rake setting +10 full turns on headstay, -2 full turns on uppers, +1.5 turns on lowers
All turns are from base
Shroud track settings are holes showing in front of car
MAST SETTINGS AT BASE
Top Spreader 115 mm - Back of track to straight line from diamonds
Bottom Spreader 320 mm - Back of track to straight line from diamonds
Mast Rake 9310 mm (30’6-1/2”)
Use calipers to record turnbuckle settings at base
Change Lowers/Diamonds per table to minimize mainsail backwind
Flat Water - More Vang
Waves - Less Vang and Less Lowers
TURNBUCKLE SETTINGS AT BASE
Stbd Port
Uppers
Lowers
Diamonds
Headstay
MELGES 20 QUICK TUNING CHART
Tuning Tuning table for masts built prior to June 2013 with 1X19 shrouds

Melges 20 Tuning Guide
Rev R12
10
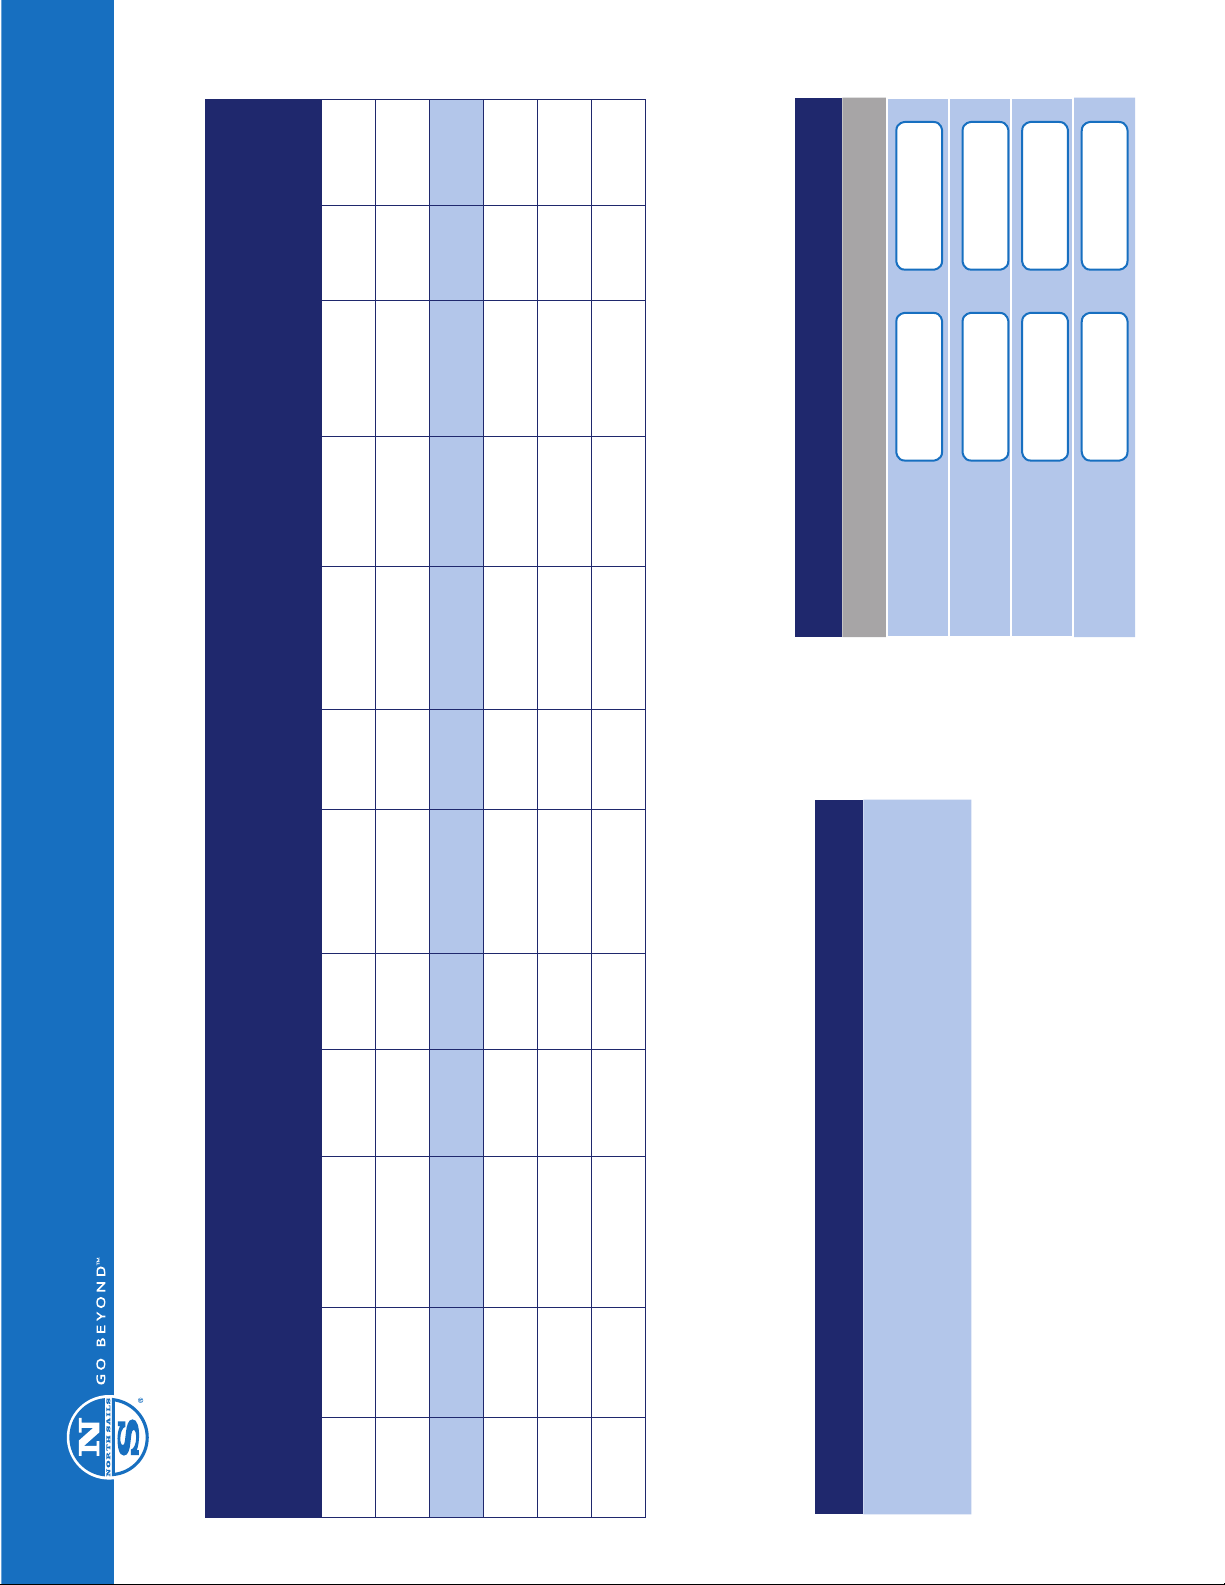
NORTH SAILS ONE DESIGN QUALITY CONTROL CHECK
MELGES 20
MAINSAIL JIB SPINNAKER
Corners Corners Corners
Cunningham Battens Leech cord
Tack slug Telltales Measurements stamp at head
Leech cord Leech telltales Class royalty
Foot chord Foot cord World Sailing royalty
Numbers Trim line North Sails Logo
Country Code Leech Cord Bag
Battens Clew Blocks
Batten End Cap Measurements stamp at head
Leech Telltales Class royalty
Insignia World Sailing royalty
Spreader dots North Sails Logo
Measurements stamp at head Bag
Class royalty
World Sailing royalty
North Sails Logo
Bag
Checked by: _____________________
Date: ____ / ____ / ____
Table of contents
Other NORTH SAILS Boat manuals


