Northern Industrial Tools 486781 User manual

ALUMINUM MANUAL NOZZLE
WITH DIGITAL METER
OWNER’S MANUAL
WARNING:
Read carefully and understand all INSTRUCTIONS before
operating. Failure to follow the safety rules and other basic
safety precautions may result in serious personal injury.
Item #486781

2 of 9
Thank you very much for choosing a NORTHERN TOOL + EQUIPMENT CO., INC. Product! For future
reference, please complete the owner’s record below:
Model: _______________ Purchase Date: _______________
Save the receipt, warranty and these instructions. It is important that you read the entire manual to
become familiar with this product before you begin using it.
This machine is designed for certain applications only. Northern Tool + Equipment cannot be
responsible for issues arising from modification. We strongly recommend this machine is not modified
and/or used for any application other than that for which it was designed. If you have any questions
relative to a particular application, DO NOT use the machine until you have first contacted Northern
Tool + Equipment to determine if it can or should be performed on the product.
For technical questions please call 1-800-222-5381.
TECHNICAL SPECIFICATIONS
NOTE!
1. Transferring oil, diesel & kerosene
2. Temperature: -10°~60°
3. Working Pressure: 0.5-50 BAR/ 7-750PSI
GENERAL SAFETY RULES
WARNING: Read and understand all instructions. Failure to follow all instructions listed
below may result in electric shock, fire and/or serious injury.
WARNING: The warnings, cautions, and instructions discussed in this instruction
manual cannot cover all possible conditions or situations that could occur. It must be
understood by the operator that common sense and caution are factors that can not be built into this
product, but must be supplied by the operator.
ITEM
DESCRIPTION
Inlet Connection
1in. NPT
Fluid Range
3-20GPM
Operating PSI
87
Diameter of spout
15/16in.
Spout
Rigid
Power source
1*3V CR2 battery

3 of 9
Fig. 1
Fig. 3
Before Installation:
1. Check if there is numerical value indicated on the meter,
2. Check that the trigger is in proper working order.
3. Check if the inlet could be swiveled.
INSTALLATION
Generally, the nozzle is installed before shipment. If it is not installed when received,
take the following steps:
1. Wrap the Teflon Tape on the outlet of the nozzle, then screw on the digital meter until the front cover is
at the same lever of the nozzle. (See Fig. 1)
2. Wrap the Teflon tape on the spout of the nozzle, then screw it on the outlet of the meter. (See Fig. 2)
3. Connect the nozzle to 1" delivery hose. (See Fig. 3)
Change to DIGITAL METER INSTRUCTIONS
1) Function Button Introduction
①With the LCD Display being
②”MOVE” button
③”RESET” button
④“1” button (back of the meter)
⑤“2” button (back of the meter)
⑥Battery Holder
Fig. 4 Fig. 5
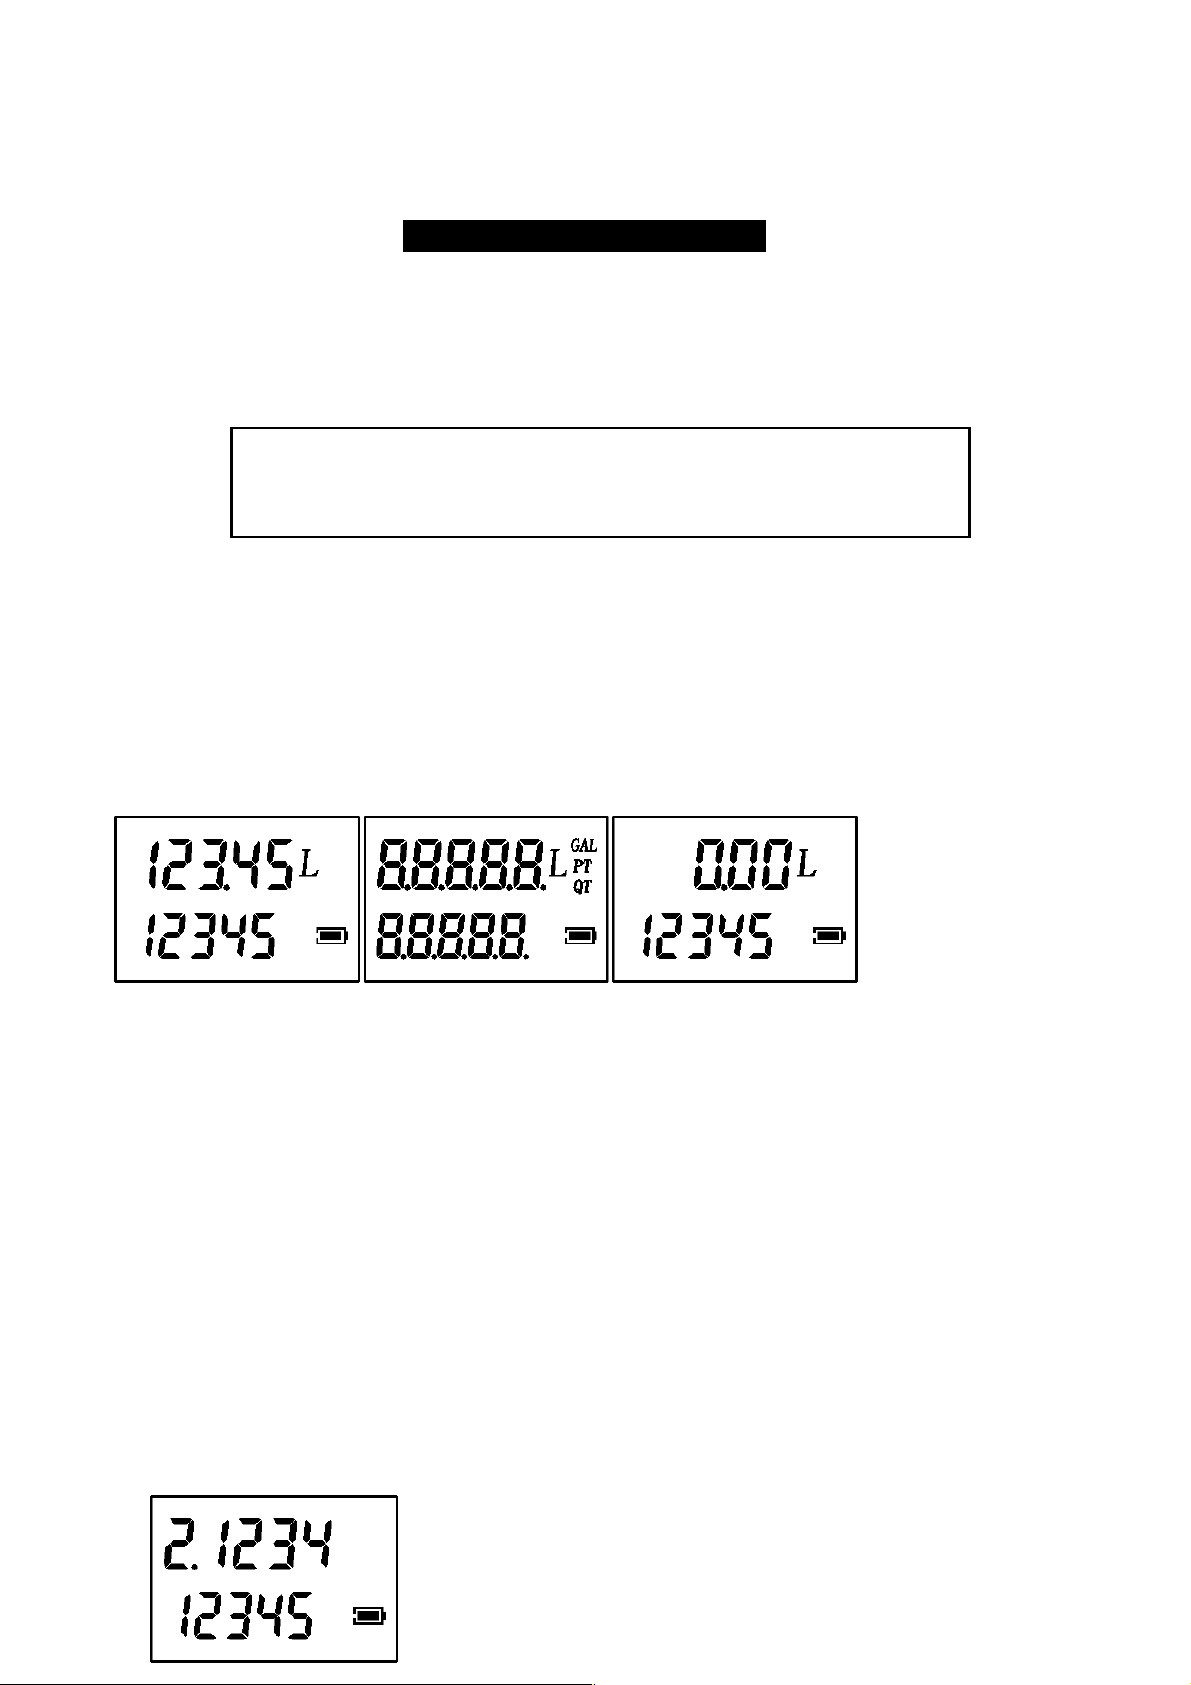
2) LCD Display
①Present total
②Non-resettable total
③Low battery indicator
④Unit
Fig. 2
①
②
③
4 of 9
Fig. 6
OPERATION INSTRUCTION
a. Before operating
Check the technical data and make sure it matches the readout on the meter, i.e.; connection,
pressure, flowrate range, medium, etc.
Use the following Formula :
Proper correction factor
=(actual value/ display value) ×current correction factor
Set the proper correction factor by the above formula.(refer to bfor correct factor)
Check all connections to avoid leakage.
b. Button usage, calibration and measurement unit change
Reset the present total (See Fig. 7)
1) When the meter is on standby, press the RESET key.
2) The display shows all the segments.
3) The meter resets the present total already.
Fig. 7
Show current correction factor (See Fig. 8)
1) Wait for the meter to go to standby,
2) Press the MOVE and RESET keys together.
3) Keep these pressed, LCD shows the current correction factor.
Calibrate and Change Unit (See Fig. 9)
1) Wait for the meter to go to standby, press the “2 button”, keep it pressed until the digit flash in
①zone, it means the meter is in calibration and changing unit mode.
2) Press the RESET key to choose the right digit from 0 to 9. Press the MOVE key to start the
next digit or unit so that each correction factor can be changed. When change the unit, it can
switch among four types of units, L, GAL. PT and QT.
3) Once the correction factor is correct, press and hold the 2 key to finish calibrating.

5 of 9
Fig.8
Fig.9
2. Manual Nozzle
1) Start
Switch the trigger on to start pumping. (See Fig. 10)
2) Keep
Push the lock key, then squeeze the trigger to keep the nozzle flowing.
(See Fig. 11)
3) Finish
a. Squeeze the trigger if did not use the locking device to finish the dispensing. (See Fig. 12)
b. If using the lock device, pull back the lock device, then depress the trigger to finish the dispensing.
(See Fig. 13)
MAINTENANCE
BATTERY REPLACEMENT
When the battery signal is flashing on the LCD (see Fig. 14), it means the meter is in low battery.
Fig.10
1010
Fig. 11
Fig. 12
Fig. 13
Table of contents
Popular Measuring Instrument manuals by other brands

Powerfix Profi
Powerfix Profi 278296 Operation and safety notes

Test Equipment Depot
Test Equipment Depot GVT-427B user manual

Fieldpiece
Fieldpiece ACH Operator's manual

FLYSURFER
FLYSURFER VIRON3 user manual

GMW
GMW TG uni 1 operating manual

Downeaster
Downeaster Wind & Weather Medallion Series instruction manual

Hanna Instruments
Hanna Instruments HI96725C instruction manual

Nokeval
Nokeval KMR260 quick guide

HOKUYO AUTOMATIC
HOKUYO AUTOMATIC UBG-05LN instruction manual

Fluke
Fluke 96000 Series Operator's manual

Test Products International
Test Products International SP565 user manual

General Sleep
General Sleep Zmachine Insight+ DT-200 Service manual


