Northwestern Bell Excursion 36570 User manual

Excursion® 36570
Congratulations on your selection of the Excursion® 36570
from Northwestern Bell Phone. his quality 2.4GHz DSS
multi-handset cordless telephone with Caller ID and Call
Waiting, like all Genuine BELL® products, has been designed
to give you many years of continuous service and represents
the best value for your money. It requires little maintenance
and is easy to setup and operate.
36570/02252A-1.PUT 5/26/01, 11:34 AM1

1
IMPOR AN SERVICE INFORMA ION
Read this manual before attempting to setup or use this instrument. It contains
important information regarding safe installation and use. Keep this manual for
future reference. Also save the carton, packing and proof of purchase to simplify
and accelerate any needed action. If you need assistance or service, call (8 )
888-899 between 8: a.m. and 4:3 p.m. Pacific Standard Time, Monday
through Friday. You can also visit our web site at: http://www.nwbphones.com for
technical support and information on our other products.
WARNING
To prevent fire or shock hazard, do not expose this product to rain or any type of
excess moisture. If accidentally dropped into water, the adapter should immedi-
ately be unplugged from the wall along with the telephone line cord.
HIS SYMBOL IS IN ENDED O ALER HE USER OF HE PRESENCE OF
IMPOR AN OPERA ING AND MAIN ENANCE (SERVICING) INS RUC-
IONS IN HE OWNER'S MANUAL.
2252A-1
36570/02252A-1.PUT 5/26/01, 11:34 AM2

CAR ON CON EN S
ACCESSORY ORDER FORMWARRANTY CARD
RECHARGEABLE
Ni-MH BATTERY PACK
ADAPTER
(DC12V, 2 mA)
TELEPHONE
LINE CORD
(Short & Long)
BELT CLIP
BASE UNITHANDSET
USER’S MANUAL
Excursion®36570
Model No: Serial No:
NAME:
ADDRESS:
Model No: Serial No:
22252A-1
36570/02252A-1.PUT 5/26/01, 11:34 AM3

32252A-1
SAVE THESE INSTRUCTIONS
IMPOR AN SAFE Y INS RUC IONS
When using your telephone equipment, basic safety precautions should always
be followed to reduce the risk of fire, electric shock, and injury to persons, includ-
ing the following:
1. Read and understand all instructions.
2. Follow all warnings and instructions marked on the product.
3. Unplug this product from the wall outlet before cleaning. Do not use liquid
cleaners or aerosol cleaners. Use a damp cloth for cleaning.
4. Do not use this product near water, for example, near a bathtub, washbowl,
kitchen sink, laundry tub, in a wet basement or near a swimming pool.
5. Do not place this product on an unstable cart, stand, or table. The product
may fall, causing serious damage to the product.
6. Slots and openings in the cabinet at the back or bottom are provided for
ventilation, to protect it from overheating. These openings should never be
blocked or covered. The openings should never be blocked by placing the
product on the bed, sofa, rug, or other similar surface. This product should
never be placed near or over a radiator or heat register. This product should
not be placed in a built-in installation unless proper ventilation is provided.
7. This product should be operated only from the type of power source
indicated on the marking label. If you are not sure of the type of power
supply to your home, consult your dealer or local power company.
8. Do not allow anything to rest on the power cord. Do not locate this product
where the cord will be abused by persons walking on it.
9. Do not overload wall outlets and extension cords as this can result in the risk
of fire or electric shock.
1 . Never push objects of any kind into this product through cabinet slots as
they may touch dangerous voltage points or short out parts that could result
in a risk of fire or electric shock. Never spill liquid of any kind on the product.
11. To reduce the risk of electric shock, do not disassemble this product, but
take it to a qualified service contractor when some service or repair work is
required. Opening or removing covers may expose you to dangerous
voltages or other risks. Incorrect reassembly can cause electric shock when
the appliance is subsequently used.
12. Unplug this product from the wall outlet and refer servicing to qualified
service personnel under the following conditions:
A. When the power supply cord or plug is damaged or frayed.
36570/02252A-1.PUT 5/26/01, 11:34 AM4

42252A-1
B. If liquid has been spilled into the product.
C. If the product has been exposed to rain or water.
D. If the product does not operate normally by following the operating
instructions. Adjust only those controls that are covered by the
operating instructions. Improper adjustments of other controls may
result in damage and will often require extensive work by a qualified
technician to restore the product to normal operation.
E. If the product has been dropped or the cabinet has been damaged.
F. If the product exhibits a distinctive change in performance.
13. Avoid using a telephone (other than a cordless type) during an electrical
storm. There may be a remote risk of electric shock from lightning.
14. Do not use the telephone to report a gas leak in the vicinity of the leak.
SAVE THESE INSTRUCTIONS
BA ERY SAFE Y INS RUC IONS
CAU ION :
To reduce the risk of fire or injury to persons, read and follow these instructions:
1. Use only the following type and size of handset battery pack:
Cordless Telephone Battery Pack
DC3.6V, 6 mAh, Ni-MH Battery Pack
2. Do not dispose of the battery in a fire. The cell may explode. Check with local
codes for possible special disposal instructions.
3. Do not open or mutilate the battery. Released electrolyte is corrosive and
may cause damage to the eyes or skin. It may be toxic if swallowed.
4. Exercise care in handling the battery in order not to short the battery with
conducting
material such as rings, bracelets and keys. The battery or conductor may
overheat and cause burns.
5. Recharge only the battery provided with or identified for use with this product.
The battery may leak corrosive electrolyte or explode if it is not the correct type.
6. Do not attempt to rejuvenate the battery provided with or identified for use
with this product by heating them. Sudden release of the battery electrolyte
may occur causing burns or irritation to eyes or skin.
7. When inserting the batteries into this product, the proper polarity or direction
must be observed. Reverse insertion of batteries can cause charging that
may result in leakage or explosion.
36570/02252A-1.PUT 5/26/01, 11:34 AM5

52252A-1
8. Remove the batteries from this product if the product will not be used for a
long period of time (several months or more) since during this time the
battery could leak in the product.
9. Discard "dead" batteries as soon as possible since "dead" batteries are more
likely to leak in a product.
1 . Do not store this product, or the battery provided with or identified for use
with this product, in high-temperature areas. Batteries that are stored in a
freezer or refrigerator for the purpose of extending shelf life should be
stabilized at room temperature prior to use after cold storage.
11. Disconnect telephone lines before installing batteries.
SAVE THESE INSTRUCTIONS
INS ALLA ION PRECAU IONS
1. Never install telephone wiring during a lightning storm.
2. Never install telephone jacks in wet locations unless the jack is specifically
designed for wet locations.
3. Never touch un-insulated telephone wires or terminals unless the telephone
line has been disconnected at the network interface.
4. Use caution when installing or modifying telephone lines.
FCC NO ICE
The FCC requires that you be advised of certain requirements involving the use
of this telephone.
1. This telephone is Hearing Aid Compatible.
2. This equipment complies with 47C FR Part 68 of the FCC rules. On the
bottom of this equipment is a label that contains, among other information,
the registration number and Ringer Equivalence Number (REN) for this
equipment. If requested, provide this information to your telephone company.
3. The REN is useful to determine the quantity of devices you may connect to
your telephone line and still have all of those entire devices ring when your
number is called. In most, but not all areas, the sum of the RENs of all
devices should not exceed five (5. ). To be certain of the number of devices
that you may connect to your line, as determined by the REN, you should
call your local telephone company to determine the maximum REN for your
calling area.
36570/02252A-1.PUT 5/26/01, 11:34 AM6

62252A-1
4. If your telephone causes harm to the telephone network, the telephone
company may discontinue your service temporarily. If possible, they will
notify you in advance. But if advance notice is not practical, you will be
notified as soon as possible. You will be advised of your right to file a
complaint with the FCC.
5. Your telephone company may make changes to its facilities, equipment,
operations or procedures that could affect the proper operation of your
equipment. If they do, you will be given advance notice so as to give you an
opportunity to maintain uninterrupted service.
6. If you experience trouble with the telephone, please contact VTC Service &
Manufacturing Co., Inc. at (8 ) 888-899 or write to: VTC Customer Service,
16988 Gale Ave., City of Industry, CA 91745 for repair/warranty information.
The telephone company may ask you to disconnect this equipment from the
network until the problem has been corrected or you are sure that the
equipment is not malfunctioning.
7. This equipment may not be used on coin service provided by the telephone
company. Connection to party line service is subject to state tariffs.(Contact
your state public utility commission or corporation commission for information).
8. WARNING: Changes or modifications to this unit not expressly approved by
the party responsible for compliance could void the user's authority to
operate the equipment.
NO E: This equipment has been tested and found pursuant to Part 15 of the
FCC Rules. These limits are designed to provide reasonable protection
against harmful interference in residential installation. This equipment
generates, uses and can radiate radio frequency energy. If not installed and
used in accordance with the instruction, may cause harmful interference to
radio communications. However, there is no guarantee that interference
will not occur in a particular installation. If this equipment does cause
harmful interference to radio or television reception, which can be
determined by turning the equipment off and on, the user is encouraged to
try to correct the interference by one or more of the following measure:
Increase the separation between the equipment and receiver.
Connect the equipment into an outlet on a circuit different from that to
which the receiver needed.
Consult the dealer of an experienced radio / TV technician for help.
9. USOC Jack type is RJ11C and the compatible jack is Part 68 compliance.
36570/02252A-1.PUT 5/26/01, 11:34 AM7

ABLE OF CON EN S
IMPOR AN SERVICE INFORMA ION............................................................1
CAR ON CON EN S.........................................................................................2
IMPOR AN SAFE Y INS RUC IONS............................................................3
BA ERY SAFE Y INS RUC IONS................................................................4
INS ALLA ION PRECAU IONS........................................................................5
FCC NO ICE......................................................................................................5
DESCRIP ION....................................................................................................8
DESK OP USE.................................................................................................10
BEL CLIP INS RUC ION................................................................................10
CONNEC ING HE HEADSE .........................................................................11
POWER INS ALLA ION...................................................................................11
INI IAL SE UP..................................................................................................12
REGISTERING THE HANDSET(S).............................................................12
TONE / PULSE SETTING...........................................................................13
SETTING THE HANDSET RINGER ON/OFF MODE.................................13
SETTING HOME AREA CODE AND LOCAL AREA CODE........................13
ENABLING THE AREA CODE FUNCTION.................................................13
ELEPHONE OPERA ION................................................................................14
TO PLACE A CALL IN TALK MODE...........................................................14
TO PLACE A CALL IN STANDBY MODE (PREDIAL MODE).....................14
TO RECEIVE A CALL .................................................................................14
LAST NUMBER REDIAL............................................................................14
STORING TELEPHONE NUMBERS INTO PHONEBOOK........................15
EDITING STORED TELEPHONE NUMBERS............................................16
DELETING STORED TELEPHONE NUMBERS.........................................17
SPEED DIALING FROM THE PHONEBOOK.............................................17
PLACE A CALL ON HOLD..........................................................................17
TO RESUME A CALL PLACED ON HOLD.................................................17
CALL TRANSFER........................................................................................17
INTERCOM FUNCTION..............................................................................18
MIXED MODE DIALING (Temporary Pulse to Tone Dialing)....................18
PAUSE FUNCTION.....................................................................................18
FLASH FUNCTION......................................................................................18
OUT OF RANGE WARNING.......................................................................18
LOW BATTERY WARNING..........................................................................19
PAGING FUNCTION..................................................................................19
CALLER ID OPERA ION..................................................................................19
GETTING TO KNOW YOUR NEW PHONE...............................................19
INTRODUCTION TO CALLER ID AND CALL WAITING ID........................19
RECEIVING NEW CALL.............................................................................2
VIEWING CALL RECORDS AND NEW CALL RECORDS.........................21
72252A-1
36570/02252A-1.PUT 5/26/01, 11:34 AM8

(Figure 1)
HANDSET CONTROLS
1. LCD Display: Shows the phone status, Caller ID Call Record information
and function menus.
2. OK Button: Press to answer an incoming call and place a call. It is used to
confirm during program mode.
3. CANCEL Button: Press to end a call and to go back to standby mode.
4. ONE ( * ) Button: Used to temporarily change the dialing mode from pulse
to tone for rotary service user. Provides tone function to access special
services such as phone banking services.
82252A-1
SAVING CALL RECORDS...........................................................................21
STORING CALL RECORD INTO PHONEBOOK........................................21
DELETING CALL RECORDS......................................................................21
DIALING FROM CALL RECORDS..............................................................22
CALL WAITING ID OPERATION.................................................................22
PROGRAMMING MENU.....................................................................................23
IMPROVING CORDLESS RECEP ION.............................................................31
MAXIMIZING BA ERY LIFE...........................................................................31
MAIN ENANCE..................................................................................................32
ROUBLESHOO ING.........................................................................................32
ECHNICAL INFORMA ION..............................................................................34
DESCRIP ION
CON ROLS' LOCA ION AND FUNC ION
15
14
13
12
11
10
1
2
3
4
5
6
7
89
36570/02252A-1.PUT 5/26/01, 11:34 AM9

92252A-1
(Figure 2)
5. FLASH Button: In talk mode, it allows you to momentarily hangs up the
phone to regain dial tone or access custom calling features such as Call
Waiting or Three- Way Calling provided by your local phone company.
6. IN (Intercom)/EDI Button: (INT) Press to enter into intercom mode with
other handset. (EDIT) Press to edit listed items. During dialing mode, it is
used to insert delay (pause time) between dialed numbers.
7. REDIAL Button: Automatically dials the last phone number dialed up to 32 digits.
8. DELE E Button: In standby mode, it allows you to remove one or all records
from the Call Record list or Phonebook. During programming mode, it allows
you to delete unnecessary entry.
9. Charge Contacts: Used for charging the handset battery.
10. Microphone: Used for speaking with callers.
11. DOWN Button: In talk mode, it allows you to decrease the handset's speaker
volume. Allows you to enter to your Call Record list. It is also used to scroll
down in Call Record list, Phonebook and program mode. In program and
phonebook mode, it is used for changing mode and moving the cursor
during edit mode.
12. UP Button: In talk mode, it allows you to increase the handset's speaker
volume. Allows you to enter to your Caller Record list. It is also used to scroll
up in Call Record list, Phonebook and program mode. In program and
phonebook mode, it is used for changing mode and moving the cursor
during edit mode.
13. Headset Jack: For headset connection at hands free conversation.
14. MENU Button: In standby mode, it allows you to enter the program menu.
15. Receiver: Allows you to hear calls.
Bottom View
Rear View
2
3
1
7
5
4
6
36570/02252A-1.PUT 5/26/01, 11:35 AM10

12252A-1
(Figure 4)
BASE UNIT CONTROLS
1. 12VDC Adapter Jack: A jack located on the rear side of the base unit used
for connecting the adapter to the base unit.
2. EL LINE Jack: Accepts line cord to make connection with modular type
telephone outlet.
3. / P ( ONE / PULSE) Switch: Allows you to select the appropriate dialing
service. TONE for tone dialing or PULSE for rotary service.
4. Charge erminals: Used for charging the handset battery. We recommend
that you clean these contacts periodically with an alcohol-moistened cloth or
cotton swab.
5. PAGE Button: Allows you to locate the handset when it is not on the base.
6. CHARGE LED Indicator: Lights up steadily when the handset is being
charged on the base. Turns off when the handset is removed from its cradle.
7. IN USE LED Indicator: Lights up steadily when the phone is in talk mode, or
during paging. Turns off when the handset is not in use.
DESK OP USE:
Connect the telephone line cord to the TEL LINE
jack on the rear of the base unit and connect the
opposite end to the telephone modular jack. (Figure 3)
BEL CLIP INS RUC ION
Clamp the belt clip at the back of the handset as shown in Figure 4.
Belt Clip
36570/02252A-1.PUT 5/26/01, 11:35 AM11
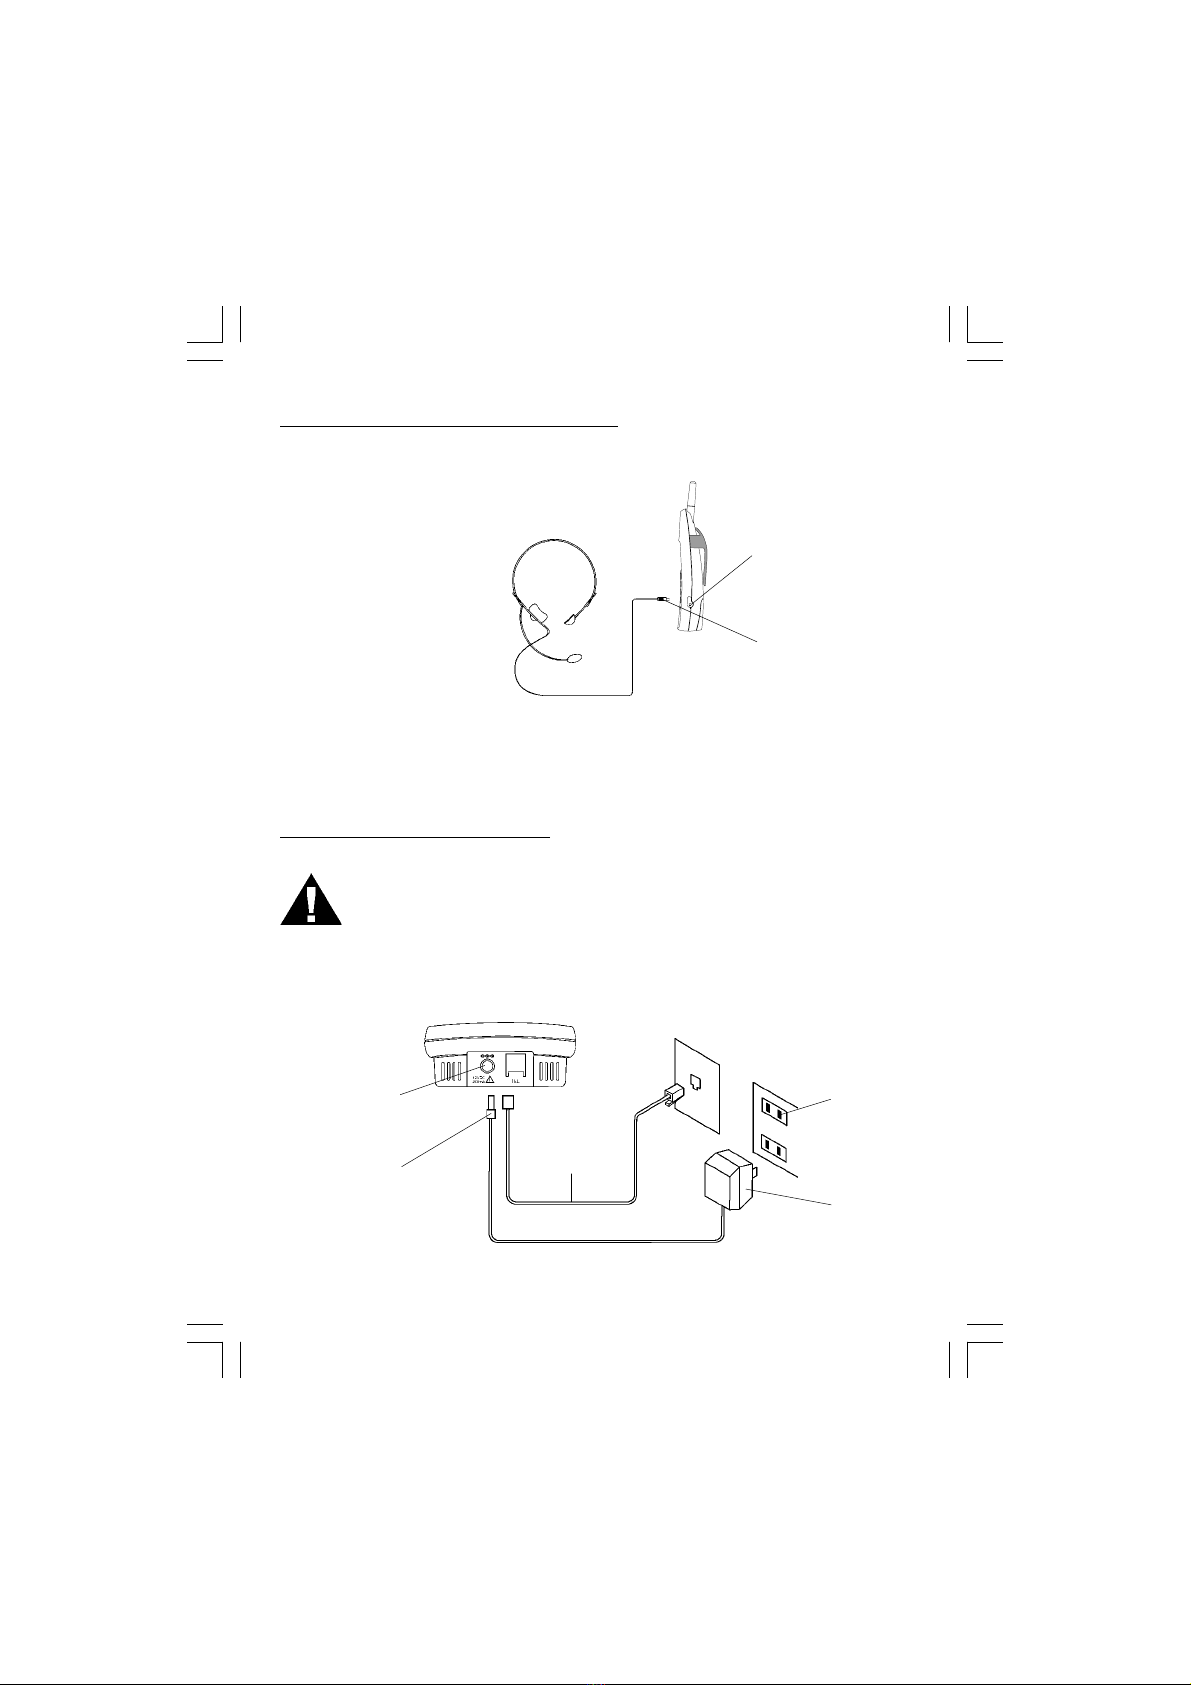
CONNEC ING HE HEADSE
For hands free conversation, a headset (not included) is connected to the head-
set jack as shown in Figure 5. The handset receiver and microphone are dis-
abled when the headset is connected.
(Figure 5)
Press the TALK button to answer or place a call using the headset. Refer to the
manufacturer's headset manual for more details.
POWER INS ALLA ION
BASE UNI POWER CONNEC ION
CAU ION:
You must use a Class 2 Power Source 12VDC 2 mA. The plug must correctly
fit the base unit's adapter jack.
1. Plug the adapter into a standard AC outlet.
2. Insert the small plug into the adapter jack on the rear of the base as shown
in Figure 6.
11 2252A-1
(Figure 6)
Headset Plug
(2.5mm)
12VDC
Adapter
Jack
Headset Jack
DC Plug
12VDC
Adapter
AC Wall
Outlet
TEL Line
Cord
36570/02252A-1.PUT 5/26/01, 11:35 AM12

HANDSE BA ERY INS ALLA ION
CAU ION:
Use only the Nickel Metal Hydride (Ni-MH) battery type included with this unit.
Use of other battery types may cause injuries or damage.
1. Remove the battery compartment cover of the handset.
2. Connect the rechargeable Ni-MH battery as shown on Figure 7.
(Figure 7)
3. Insert the Ni-MH battery into the battery compartment of the handset.
4. Slide the battery compartment cover firmly in its closed position
INI IAL SE UP
Before you can use your cordless telephone, the handset must be charged for at
least 14 hours. See charging instruction in the MAXIMIZING BATTERY LIFE
section.
REGIS ERING HE HANDSE (S)
You can purchase additional handsets (99 handsets can be registered) for use
with many of this telephone's features. Make sure the battery is connected and
the base is powered on before starting the operation.
A. REGISTERING HANDSET TO BASE UNIT
1. In standby mode, press the handset MENU button.
2. Press UP or DOWN button to search for
"REGISTER REQ." (Register Request). (Figure 8)
3. Press OK button to select. The LCD Display shows HS NO:.
4. Enter the desired handset number (1-99) and press OK
button to confirm.
5. When the LCD Display shows WAIT REG CONF (Waiting
Registration Confirmation), press and hold the PAGE
button on the base unit. The base unit IN USE LED will light. (Figure 9)
122252A-1
Insert the End
of the Battery
Pack Wire
Handset
Battery
Compartment
BLACK WIRE
RED WIRE
36570/02252A-1.PUT 5/26/01, 11:35 AM13

6. If the registration is successful, the base unit IN USE LED will blink and the
handset will emit three beep tones and the LCD Display shows SYSTEM
UPDATE.
B. REGISTERING NEW HANDSET TO EXISTING REGISTERED HANDSET
Additional handset can be registered on the base unit (same as the above
procedure) or it can be registered on the existing first registered handset.
1. In standby mode, press the new handset's MENU button.
2. Press new handset's UP or DOWN button to search for "REGISTER REQ."
(Register Request).
3. Press new handset's OK button to select. The LCD Display shows HS NO:.
4. Enter the desired handset number and press OK button to confirm.
5. When the LCD Display shows WAIT REG CONF, press the existing
registered handset's MENU button. The waiting time for registration
confirmation is 1 seconds.
6. Press the existing registered handset's UP or DOWN button to search for
"ALLOW REGISTER".
7. Press the existing registered handset's OK button to select the handset to
handset registration.
8. If the registration is successful, the handset will emit three beep tones.
ONE / PULSE SE ING
Select the appropriate dialing service by moving the
T / P (Tone / Pulse) switch on the bottom of the base unit: . T / P
T (TONE) for Tone service, or (Figure 1 )
P (PULSE) for Rotary service
SE ING HE HANDSE RINGER ON / OFF MODE
The handset ringer must be set to ring ON (DND OFF) mode in order to ring when
receiving an incoming call. See PROGRAMMING MENU section on page 24.
NO E: The default mode is ring ON (DND OFF) mode.
SE ING HOME AREA CODE AND LOCAL AREA CODE
In order to use callback function, the home (user's) area code and local
(neighboring) area code must be programmed. See PROGRAMMING MENU
section on page 27.
ENABLING HE AREA CODE FUNC ION
To enable the auto area code matching, the Area Code Function must be enabled.
See PROGRAMMING MENU section on page 28.
13 2252A-1
36570/02252A-1.PUT 5/26/01, 11:35 AM14

ELEPHONE OPERA ION
O PLACE A CALL IN ALK MODE
1. Press the OK button on the handset. The LCD Display
will show CONNECTING... and then call timer starts
to count. The base IN USE LED indicator will light up. (Figure 11)
2. Listen for a dial tone.
3. Dial the telephone number. The phone numbers appear on the LCD Display
as you enter the number.
4. When finished with your call, press the CANCEL button or place the handset
on the base unit.
O PLACE A CALL IN S ANDBY MODE (PREDIAL MODE)
1. Ensure that the unit is in standby mode. The handset and base unit IN USE
LED indicator is off.
2. Dial the telephone number.
3. Press OK button to dial out.
4. When finished with your call, press the CANCEL button or place the handset
on the base unit.
O RECEIVE A CALL
NO E: If you are expecting incoming calls, the handset must be programmed to
DND OFF mode. See PROGRAMMING MODE section on page 24.
A. IF THE HANDSET IS ON THE BASE UNIT
1. Since the Excursion® 3657 features "Auto-Answer", simply pick up the
handset from the base cradle when the phone rings. The call timer starts to
count. The base unit IN USE LED indicator will light up.
2. Start your conversation.
3. To end your conversation, either press the CANCEL button or place the hand
set on the base unit.
B. IF THE HANDSET IS OUT OF THE BASE UNIT
1. When the phone rings, press the OK button on the handset. The call timer
starts to count. The base unit IN USE LED indicator will light up.
2. Start your conversation.
3. To end your conversation, either press the CANCEL button or place the hand
set on the base unit.
LAS NUMBER REDIAL
A. REDIALLING FROM THE STORED LAST TELEPHONE NUMBERS
The unit can automatically store the last 1 telephone numbers dialed out.
142252A-1
36570/02252A-1.PUT 5/26/01, 11:35 AM15

15 2252A-1
1. In standby mode, press the handset REDIAL button.
2. Press UP or DOWN button to select the desired last
telephone number you called. (Figure 12)
3. Press the handset OK button and the unit will automatically redial the last
telephone number.
B. AFTER HEARING A BUSY TONE WHEN PLACING A CALL
1. If you get a busy tone, press handset CANCEL button to hang up.
2. Press the handset OK button and listen for a dial tone.
3. Press the handset OK button again. This will automatically redial the last
telephone number you called.
C. WHEN THE HANDSET IS OFF THE BASE UNIT AND IN STANDBY MODE
1. Press the handset OK button and listen for a dial tone.
2. Press the OK button again. This will automatically redial the last telephone
number you called.
S ORING ELEPHONE NUMBERS IN O PHONEBOOK
A total of 2 speed dial names and telephone numbers can be saved into
phonebook on each handset and each handset can have
individual phonebook.
1. In standby mode, press the handset's MENU button. (Figure 13)
2. Press UP or DOWN button to search for "PHONE BOOK".
3. Press OK button to select. The LCD Display shows the first stored telephone
number, name and the record number, otherwise it shows EMPTY REC if
no record is stored.
4. Press UP or DOWN button to locate an available location to store the new
phone book record.
5. Press the EDIT button to enter new phonebook record. The flashing line or
cursor indicates that the phone is ready for data entry.
6. Enter the telephone number you want to store. You can enter up to 14 digits.
Use UP or DOWN button to move the cursor back and forth through the
number entry line. If you make a mistake, press DELETE button to delete
the character on the left of the cursor.
7. Press the OK button to confirm the entered telephone number.
8. Enter the name, character by character. You can enter up to 14 characters.
Locate the character on the keypads through 9. See NAME ENTRY TABLE
below. Press once to enter the first character, twice for the second character,
etc. Use UP or DOWN button to move the cursor back and forth through the
name entry line. To create a space between characters and words, press #
or * once after the last entered character. If you make a mistake, press
DELETE button to delete the character on the left of the cursor.
36570/02252A-1.PUT 5/26/01, 11:35 AM16

Example: JOHN 1
Key
1
2
3
4
5
6
7
8
9
*
#
1st
1
A
D
G
J
M
P
T
W
Space
Space
2nd
,
B
E
H
K
N
Q
U
X
(
3rd
.
C
F
I
L
O
R
V
Y
)
4th
!
2
3
4
5
6
S
8
Z
_
5th
?
,
#
$
%
Space
7
&
9
*
J
O
H
N
(Space)
1
Press 5 once
Press 6 three times
Press 4 two times
Press 6 two times
Press once
Press 1 once
NAME ENTRY TABLE
9. Press OK button to save the entered phonebook records. The LCD Display
will show the saved telephone number and PRIORITY OFF to ask you to set
VIP Call mode. If the mode is set to PRIORITY ON, the LCD will show a VIP
icon on the top right corner of the LCD Display when the telephone number
is received. In PRIORITY OFF mode, no VIP icon will be shown.
1 . Press MENU button to select PRIORITY ON (VIP Call on) or PRIORITY
OFF (VIP Call off).
11. Press OK button to save the selected VIP Call mode.
12. Press UP or DOWN button to scroll the phonebook records or press
CANCEL button twice to return to standby mode.
EDI ING S ORED ELEPHONE NUMBERS
1. In standby mode, press the handset's MENU button.
2. Press UP or DOWN button to search for "PHONE BOOK".
3. Press OK button to select. The LCD Display shows the first stored telephone
number, name and the record number.
162252A-1
36570/02252A-1.PUT 5/26/01, 11:35 AM17

17 2252A-1
817-456-7890
ARE YOU SURE?
L1 CALL#
NEW 10 12:00PM 12/25
817-456-7890
00:00:10 HOLD
L1 CALL#
NEW 10 12:00PM 12/25
RANS: RE RV
L1 CALL#
NEW 10 12:00PM 12/25
817-456-7890
00:00:10 HOLD
L1 CALL#
NEW 10 12:00PM 12/25
RANS: RE RV
4. Press UP or DOWN button to select a phone book record to edit.
5. Follow steps 5 to 12 as described in the section "Storing Telephone
Numbers Into Phonebook" to overwrite the old entry.
DELE ING S ORED ELEPHONE NUMBERS
1. In standby mode, press the handset's MENU button.
2. Press UP or DOWN button to search for "PHONE BOOK".
3. Press OK button to select. The LCD Display shows the first stored telephone
number, name and the record number.
4. Press UP or DOWN button to select a phone book
record to delete.
5. Press DELETE button and the unit asks you to confirm.
6. Press OK button to confirm or press CANCEL button to undo.
7. Press CANCEL button again to exit and return to standby mode.
SPEED DIALING FROM HE PHONEBOOK
1. In standby mode, enter the 1-digit or 2-digits phonebook location of the stored
telephone number you want to dial out. Phonebook location below 1 needs
1-digit entry.
2. Press the handset REDIAL button and the unit will automatically redial the
selected telephone number.
PLACE A CALL ON HOLD
1. During talk mode or while talking over the line,
press MENU button to place a call on hold.
O RESUME A CALL PLACED ON HOLD
1. While the line is put on hold, press MENU button
to resume a call placed on hold.
CALL RANSFER
1. During talk mode or while talking over the line,
press MENU button and the unit asks to enter the
handset number you want to transfer the call.
2. Enter the handset number (1-99).
3. Press OK button and the line is put on hold. The
called handset will ring. If you want to cancel the
call transfer and return to line on hold, press MENU button.
4. Press any key on the called handset. The calling and the called handset can
have intercom conversation while the line is on hold.
5. Press the calling handset CANCEL button to transfer the call.
36570/02252A-1.PUT 5/26/01, 11:35 AM18

182252A-1
CALL#
NEW 10 12:00PM 12/25
IN ER:
NO E: If the other handset did not receive the transferred call within 35 seconds,
the handset that transfers the call will ring alarming the user to receive the
returned call.
IN ERCOM FUNC ION
1. In standby mode, press INT button on the handset and
the unit asks to enter the handset number you want to call. (Figure 14)
2. Enter the desired handset you want to call.
3. Press OK button to select. The calling and called
handset will ring.
4. Press any key on the called handset to answer.
5. Begin conversation.
6. To end your conversation, either press the CANCEL button or place the
handset on the base unit.
MIXED MODE DIALING ( emporary Pulse to one Dialing)
1. If you only have pulse (rotary dialing) service in your area and want to
access Tone services (Bank by Phone, etc.), ensure that the T / P (Tone /
Pulse) switch on the bottom of the base unit is set to the Pulse position.
2. Press the TONE ( * ) button once to switch from Pulse to Tone dialing
temporarily. Pulse dialing mode resumes when the call is ended.
PAUSE FUNC ION
In some cases, such as PABX or long distance service, a pause may be needed
in the dialing sequence. Pressing the handset INT/EDIT
button inserts delay between dialed numbers. See
PROGRAMMING MENU section on page 29. (Figure 15)
FLASH FUNC ION
Used to access custom calling features such as Call Waiting or Three-Way Call-
ing provided by your local phone company. Flash can also be used to restore a
dial tone to make a new call. See PROGRAMMING MENU section on page 29.
OU OF RANGE WARNING
The handset and base unit communicate up to a certain maximum range.
The distance can be affected by weather, power lines, or even other cordless
telephones.
If you operated the handset far away from the base unit, the handset beeps
and the LCD Display shows OUT OF RANGE to warn you that the background
noise level is too high for proper communication between the handset and
the base unit.
36570/02252A-1.PUT 5/26/01, 11:35 AM19

19 2252A-1
LOW BA ERY
BASE PAGING...
When you hear this sound, you should move closer to the base unit.
Otherwise, the call will immediately cut off.
LOW BA ERY WARNING
When the handset battery voltage level is low, the
handset will beep and the LCD Display shows
LOW BATTERY.
Return the handset on the base cradle to charge.
PAGING FUNC ION
If you have misplaced the handset or need to alert
the person nearby the handset, press the PAGE
button on the base unit. Each press of this button
will activate the handset to beep for 34 seconds and LCD Display shows
“BASE PAGING...” while it is being paged by the base unit.
CALLER ID OPERA ION
GE ING O KNOW YOUR NEW PHONE
IMPOR AN : Subscription to Caller ID (CID) / Call Waiting ID services from your
local phone company is required for using the Caller ID / Call Waiting ID features
of the Excursion® 3657 . Your new Excursion® 3657 telephone gives you the
ultimate in cordless telephone sound quality with the luxury of Caller ID and Call
Waiting ID. If this is your first cordless telephone, you will soon discover that your
cordless is similar to regular telephones, except without the cord. If you have
owned a cordless in the past, you will discover that the Excursion® 3657 tele-
phone is the most powerful and full-functioned Call Waiting ID cordless tele-
phone on the market. Some key features are:
99 name and number Caller ID / Call Waiting ID memory (Call Record)
2 name and number programmable memory (Phonebook)
Hearing -aid compatibility
Automatic selection of the clearest of 5 channels
Unlike regular telephones, your cordless does not work during power failures.
We do not recommend you to use a cordless telephone as the only phone in your
residence.
IN RODUC ION O CALLER ID AND CALL WAI ING ID
The Excursion® 3657 Caller ID / Call Waiting ID devices allow you to take ad-
vantage of the Caller Identification delivery service offered by your local tele-
phone company. For more information, you can refer to the Question and An-
swer table on the next page:
36570/02252A-1.PUT 5/26/01, 11:35 AM20
Table of contents
Other Northwestern Bell Telephone manuals

Northwestern Bell
Northwestern Bell 20200 User manual

Northwestern Bell
Northwestern Bell 77519 User manual

Northwestern Bell
Northwestern Bell 76510-1 User manual

Northwestern Bell
Northwestern Bell Excursion 39202 User manual

Northwestern Bell
Northwestern Bell Big Button Plus 20270 User manual

Northwestern Bell
Northwestern Bell Easy Touch 28507 User manual

Northwestern Bell
Northwestern Bell EasyTouch 52905 User manual


