NoSquito NT200 User manual
WARNING
FOR OUTDOOR USE ONLY
Improper installation, Alteration, Service or Maintenance can cause injuryor
property damage. Read the installation, operating and maintenance
instructions thoroughly before installing or servicing the equipment.
Outdoor Mosquito Trap
Operation Manual
Model NT200
FOR YOUR SAFETY
•If you smell gas:
1. Shut off gas to the trap.
2. Extinguish any open flame.
3. Remove the Burner Cover.
4. If odor continues, immediately
call your gas supplier or your
fire department.
• Do not store or use gasoline or
other flammable vapors and
liquids in the vicinity of this trap
or any other appliances.
• An LP cylinder not connected
for use shall not be stored in
the vicinity of this or any other
appliance.

2

Getting Started ......................................................................................... 3
General Safety Instructions ...................................................................... 4
Propane Use Safety Warnings .................................................................. 5
Parts List .................................................................................................. 5
Assembly Instructions .............................................................................. 6
Trap Placement ........................................................................................ 8
Operational Instructions ........................................................................... 9
Shut-Down Instructions .......................................................................... 12
Maintenance .......................................................................................... 13
About Mosquitoes .................................................................................. 14
For Best Results ..................................................................................... 14
Accessories / Replacement Parts ........................................................... 14
Troubleshooting ...................................................................................... 15
Limited Warranty .................................................................................... 16
TABLE OF CONTENTS
Congratulations on your NOsquito Outdoor Mosquito Trap purchase. Designed by a leading entomologist,
this Trapcombines the most effective mosquito attractants known today - carbon dioxide (CO2), moisture,
body heat, contrasting color & shape, ultraviolet lights and luring scents. The Trap mimics human
breathing by making CO2 from burning propane which is commonly available for use with all outdoor
barbecue grills. Female mosquitoes, attracted to the CO2 and other lures, mistake the machine for a meal
and get trapped in the Catch Cup where they dehydrate and die. Within 4-6 weeks, the reproductive
cycles of these biting pests are interrupted and mosquito populations can be reduced in your yard. This
results in a more pleasant outdoor environment for you and your family.
This manual contains important information about the safety, assembly, operation, use and maintenance of
the NOsquito Outdoor Mosquito Trap. Keep this manual for future reference and for educating anynew
users. Safety precautions are essential when using, storing and servicing this Trap. This product is fueled
by propane gas, which is invisible, odorless and highly flammable. Always heed these precautions, as they
are essential when using propane.
Model No NT200
Power Requires 120 Volt AC input to transformer. Only use the supplied
transformer power pack. Use of any other power pack may result in
damage and/or injury.
Type of gas used Propane
Cylinder Pressure 100-110 psi
Minimum Gas Supply Pressure 11.0 in WC
Input rating 650BTU/Hr
Minimum Clearance When in use, 5feet to walls, foliage or overhead material
Use For outdoor use only - in only well ventilated areas
Only those persons who can understand and follow these instructions should operate or service this
equipment. If you need assistance contact our Consumer Service Department at 1-800-447-0457
GETTING STARTED
TABLE OF CONTENTS
3

(Read before unpacking and operating the NOsquito Outdoor Mosquito Trap.)
1. Only use an outdoor extension cord having a 3-prong plug and receptacle that accepts the NOsquito Outdoor
Mosquito Trap's plug. The Trap has a 3-conductor cord and a 3-prong grounding type plug to fit a properly
GFCI protected grounded outlet.
2. The electrical rating of the extension cord must be greater than or equal to the electrical rating of the Trap
(120 Volt / 0.6 Amp). Use an extension cord with 16 gauge or thicker wire and that has a label stating it is
suitable for outdoor use.
3. Do not abuse any electrical cord. Never yank it to disconnect from the receptacle. Keep all cords away from
heat, flammable substances and sharp objects. Replace damaged cords.
4. The connections between the Trap and the extension cord must always remain dry and kept off of the ground.
5. Disconnect the Trap from the power supply when not in use, changing propane tanks, before servicing and/or
cleaning.
6. Do not insert foreign objects into this product.
7. To avoid electric shock, DO NOT clean the Trap by spraying water or by immersing any Trap part in water.
8. All repairs to the Trap must be performed only by qualified service personnel.
9. Read and follow all instructions listed on the burner assembly.
10. Young children should be carefully supervised when they are in the area of the Trap.
11. Clothing or other flammable materials should not be hung from or placed on or near the Trap.
12. Any guard or other protective device removed for servicing the Trap must be replaced prior to operating.
13. It is imperative that the compartment, burner and circulating air passageways of the Trap be kept clean at
all times.
14. Amaximum of a 20 lb. LP-Gas cylinder shall be used with the Trap. (Can not be used with natural gas.)
15. Use standard 20 pound LP-Gas cylinder with a shutoff valve terminating in an LP-gas supply cylinder valve
outlet specified for Connection No. 791 in the Standard for Compressed Gas Cylinder Valve Outlet and Inlet
Connections, ANSI/CGA-V-1 latest edition (any standard propane tank manufactured in the USA after 1999).
16. The installation must conform with local codes or, in the absence of local codes, with the National Fuel Gas
Code, ANSI Z223.1 for US and with the CAN1-B149 for Canada. The LP-Gas cylinder used shall be
constructed and marked in accordance with the specifications for LP-Gas cylinders of the U.S. Department
of Transportation (DOT).
17. This Trap is not intended to be installed in or on recreational vehicles and/or boats.
18. Do not place the Trapunder overhead unprotected combustible construction. Maintain a minimum of 5 feet
clearance around the perimeter of the Trap when in use.
19. Inspect the hose before each use of the Trap. If it is evident there is excessive abrasion or wear, or the
hose is cut, it must be replaced prior to operating the Trap. The replacement hose shall be that specified
by the manufacturer.
20. Retain this instruction manual for future reference.
21. This Trap shall be used outdoors and only in a well-ventilated space and shall not be used in a building,
garage or any other enclosed area.
22. The Trap should be stored indoors when not in use and kept away from children.
23. If the Trap is not in use, the gas must be turned off at the supply cylinder. Storage of the Trap indoors is
permissible only if the cylinder is disconnected and removed. Cylinders must be stored outdoors out of reach
of children and must not be stored in a building, garage or any other enclosed area.
24. The pressure regulator and hose assembly supplied with the Trap must be used for connection to the LP-Gas
cylinder. Replacement pressure regulators and hose assemblies must be provided by Kaz, Inc.
GENERAL SAFETY INSTRUCTIONS
4
5
DANGER! Failure to adequately comply with all the safety precautions and detailed instructions provided with
the NOsquito Outdoor Mosquito Trap can result in death, serious bodily injury and property loss or damage
resulting from the hazards of fire, explosion, burn, asphyxiation and/or carbon monoxide poisoning.
WARNING! Due to the use of propane, combustion by-products produced when using this Trap contain
certain chemicals known to the State of California to cause cancer, birth defects or reproductive harm.
WARNING! This Trap is fueled by propane gas, which is invisible, odorless and highly flammable. An odorant
is normally added by the manufacturer, which has a “rotten egg” smell to it. This additive can fade over
time, so leaking gas is not always detectable by smell alone.
Propane gas is heavier than air and leaking propane will sink to the lowest possible level. It can be ignited by
aspark or flame of anykind and from several feet away from a leak. Keep the Trap clear and free from
combustible materials, gasoline, and other flammable vapors and liquids. The Trap is not to be used in
locations where flammable vapor or explosive dust is likely to exist.
CAUTION! The gas pressure regulator provided with this Trap must be used. This regulator is set for an
outlet pressure of 11.0 in. Water Column.
The minimum inlet gas supply pressure is 11” WC from regulator.
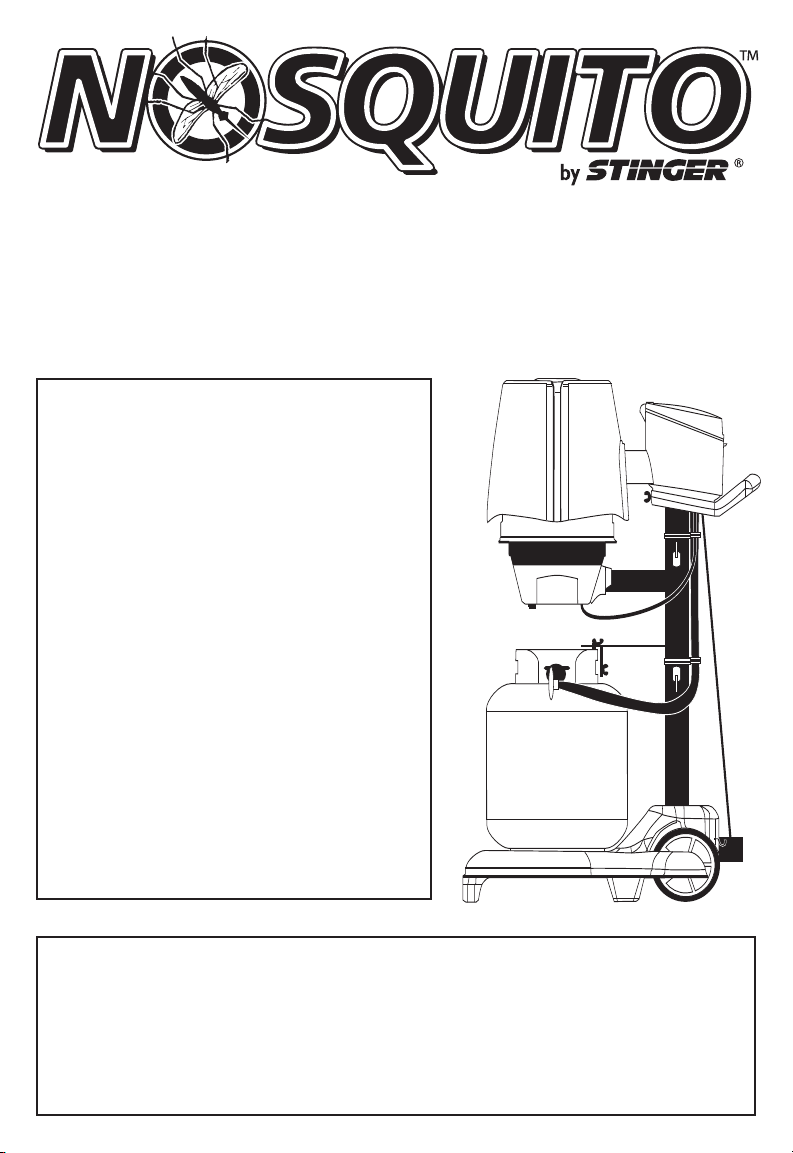
A. Upper Support Column
B. Base
C. Lower Support Column
D. Retainer Pin
E. Cotter Pin
F. Capture Head
G. Tank Cap
H. Tank Retainer Clip
I. Burner/Control Panel/Handle/Regulator Assembly
J. Burner Cover
K. Ground Stakes - Qty. (2)
L. Catch Cup (installed in Capture Head)
M. Thumb Screws (2 long)
N. Thumb Screw (1 short)
O. Cord Clips (2)
P. Low Voltage Power Supply
Q. 25’ Low Voltage Extension Cord
R. Octenol Lure with Cassette
PROPANE USE SAFETY WARNINGS
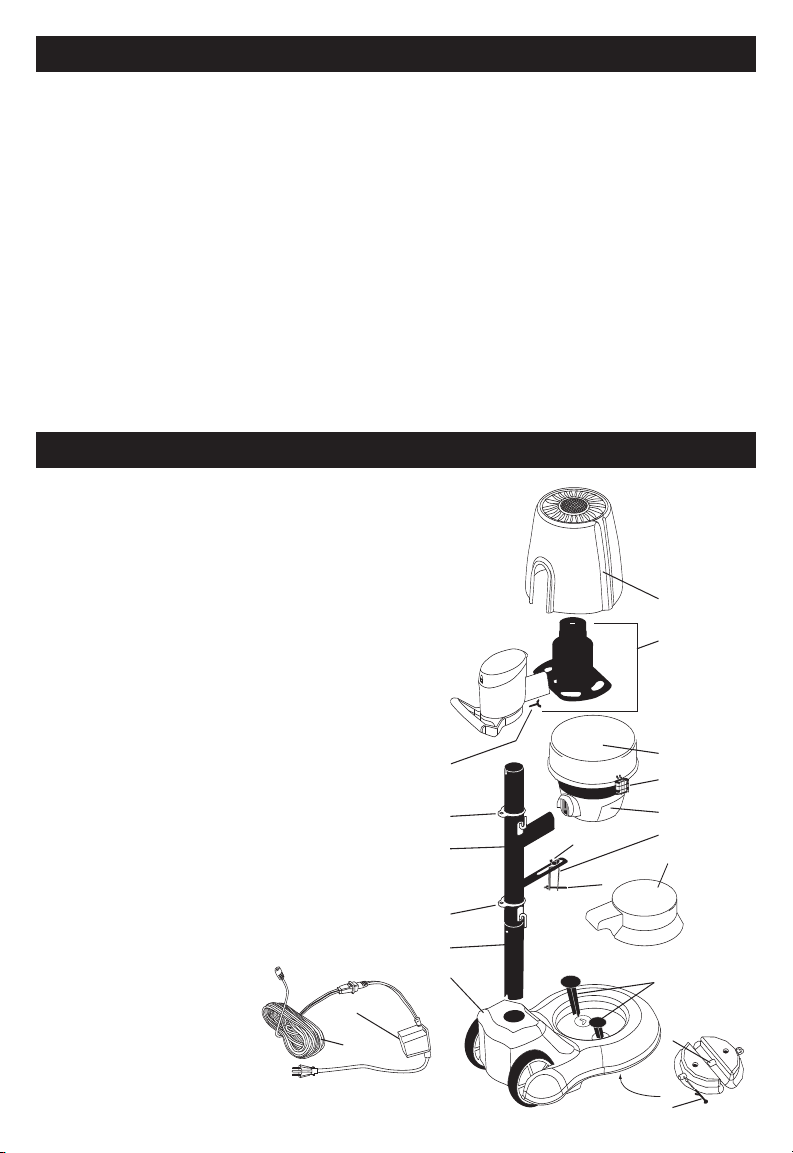
PARTS LIST
Under
Base
O
C
O
A
B
D
E
I
F
L
G
R
M
M
NH
K
J
P
Q
6
The NOsquito Outdoor Mosquito Trap is
designed to be assembled with NO tools.
For additional questions on assembly,
please contact our Consumer Service
Department at 800-447-0457.
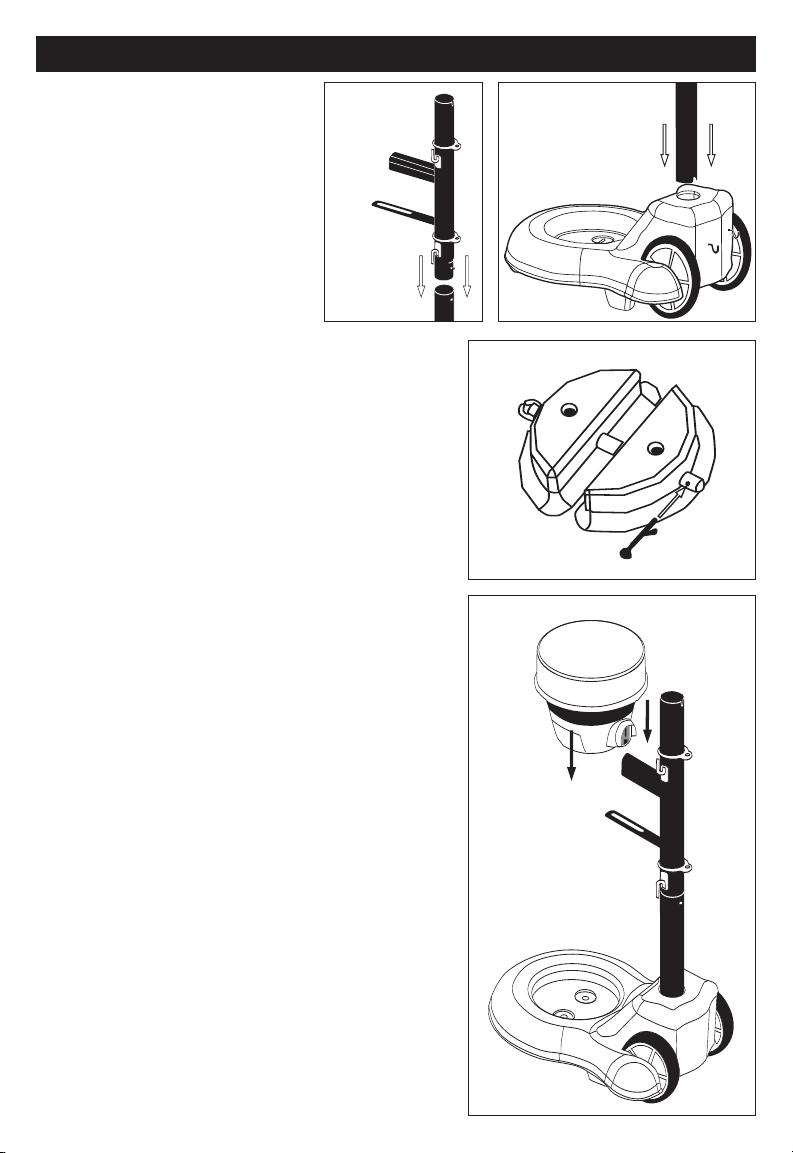
1. Attach Upper Support Column to
Lower Support Column.
Depress the 2 locking pins on the
bottom end of the Upper Support
Column and slide this end into the top
of Lower Support Column (no slots).
Align the locking pins with the holes until
it snaps into place. (Figure 1)
2. Attach the Assembled Support Columns
to the Base.
Place the Base on a flat surface and insert the
Assembled Support Columns into the Base with the
slotted end down as shown. Be sure to line up slots
with ridge inside Base and position support arm over
the Base. Press down firmly. (Figure 2) Align Retainer
Pin with holes on the underside of the Base and insert
through the matching holes in the Lower Support
Column. Insert Cotter Pin at end of Retainer Pin to
secure. (Figure 3)
3. Attach the Capture Head to the top arm of the
Assembled Support Columns.
Align the slotted clip of the Capture Head onto the end
of the arm of the Top Support Column until it snaps
into place. (Figure 4)
ASSEMBLY INSTRUCTIONS
Figure 1
Figure 3
Figure 2
Figure 4
7
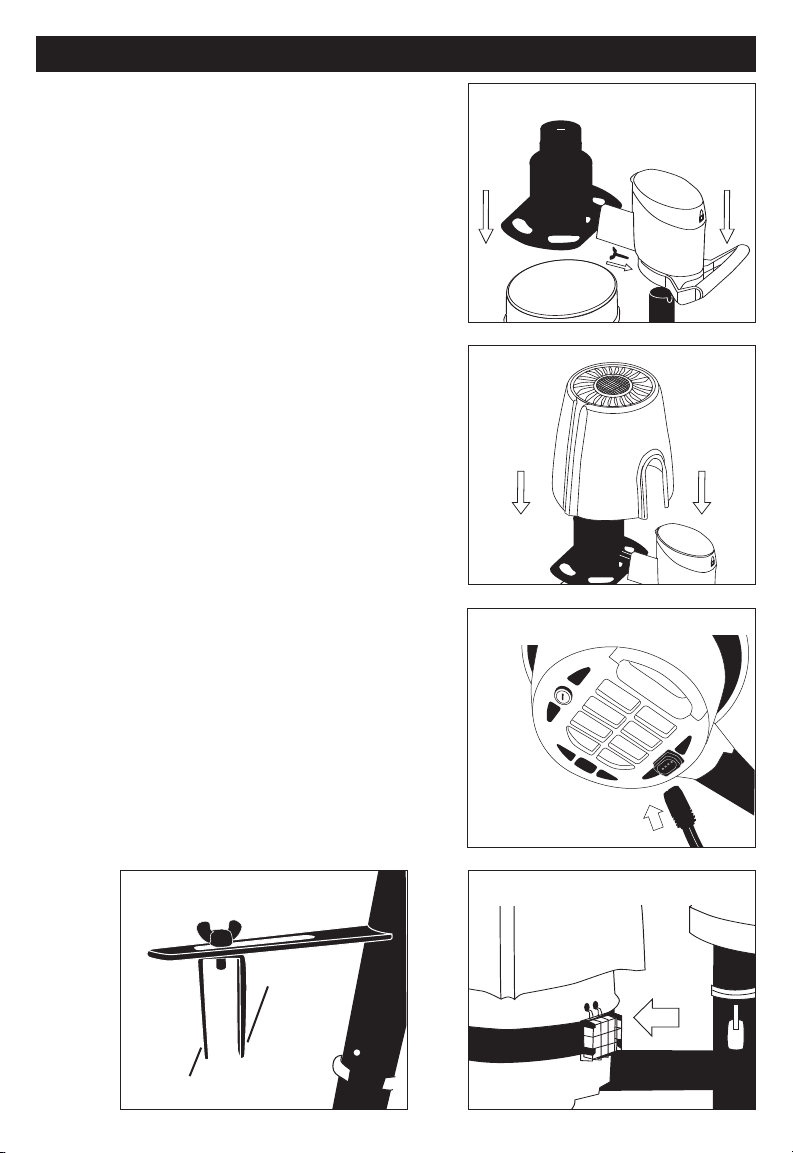
4. Attach the Burner/Control Panel/Handle/
Regulator Assembly to the Upper Support Column.
Slide the Burner/Control Panel/Handle/Regulator
Assembly onto the Upper Support Column, push
down and rotate until the alignment key drops into
the slot at the top of the Upper Support Column.
Secure with Long Thumbscrew by inserting into the
handle. (Figure 5)
5. Place Burner Cover over Burner.
Align center of cover with rain capat top of Burner
Assembly. Push down until it snaps into place.
Cover should snap into place with minimal force.
(Figure 6)
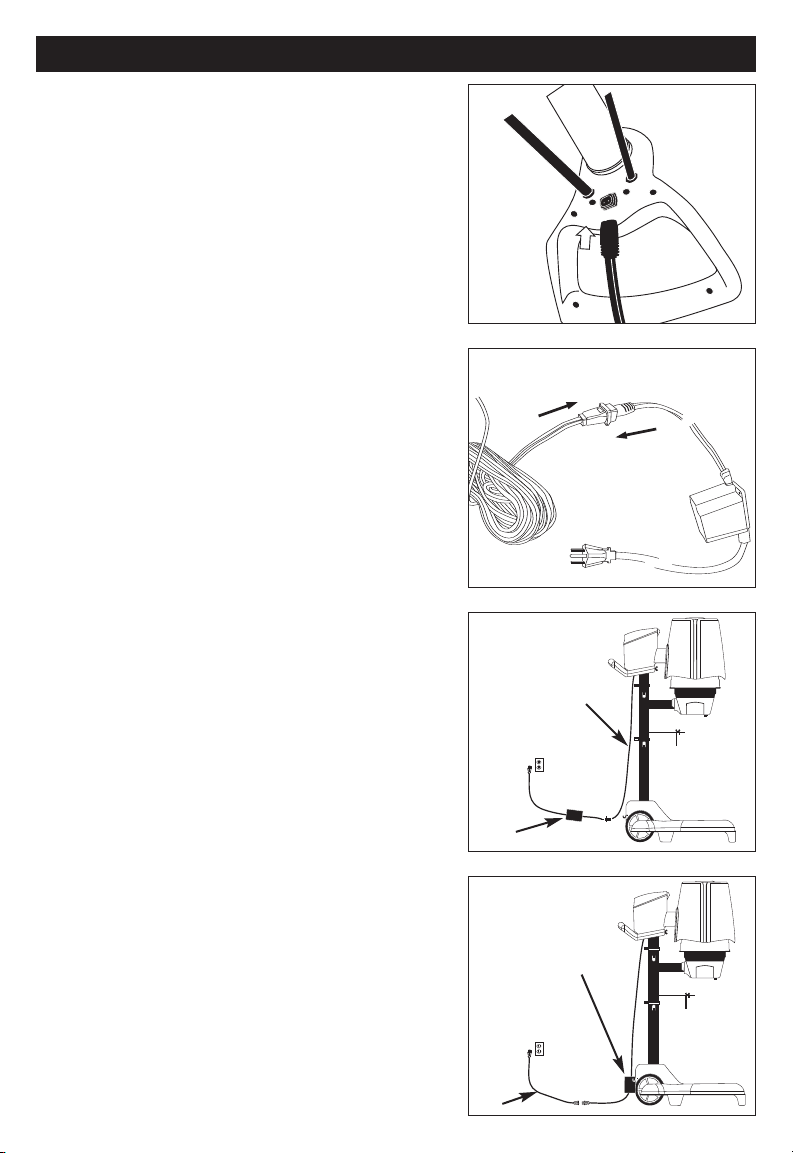
6. Plug the Capture Head Control Cord Connector to
the underside of the Capture Head. (Figure 7)
Note: The capture Head Control Cord is intended to
be inserted in one direction. Be sure to line up the
slot properly.
7. Attach Tank Retainer Clip to bottom arm of
Assembled Support Columns with short
Thumbscrew. (Figure 8)
8. Select and place the Mosquito Trap in the
optimum location.
Refer to the following TRAP PLACEMENT section for
placement recommendations.
9. Once in place, install NOsquito Octenol Lure.
Remove lure from pouch and place in the small
cassette provided. Make certain the cassette and
lure do not touch the black DermaLure Band. Attach
to the Capture Head by hooking into the holes
located on the side. (Figure 9)
Figure 5
Figure 9Figure 8
Figure 6
ASSEMBLY (Continued)
ASSEMBLY (Continued)
Figure 7
Threaded
Hole
Unthreaded
Hole

8
The placement of the NOsquito Outdoor Mosquito
Trap is critical to catching mosquitoes. The largest
amount of mosquitoes will be captured by
positioning the Trap 30 to 40 feet away from the
location you want to protect. The Trap should be
placed in the normal, down-wind direction towards
were mosquitoes live. The mosquitoes will be lured
to the Trap and be captured, before coming into
contact with you and your family.
1. Determine a suitable place with level firm ground,
approximately 30-40 feet away from the area
you want to protect.
2. Position at least 5 feet from foliage (bushes,
flowerbeds, tree line, marshbeds, etc).
3. It is recommended the Trap be placed in the
shade.
4. Do not place the Trap directly above a water
source (sprinklers, hoses, etc).
5. Make sure Trap is not directly up against a wall
such as a building or fence and has atleast
5feet of clearance.
6. Use the Ground Stakes provided to properly secure
the unit. (Figure 10)
7. If using an approved outdoor extension cord
(not provided) or Low Voltage Extension Cord
(provided), make sure they are placed in such a
manner that they are away from any human or
animal activity and cannot be run over with a lawn
mower or other such outdoor equipment. The
connections between the Trapand the extension cord
must always remain dry and kept off of the ground.
NOTE: The Ground Stakes secure the base to
the ground through the holes located under the
propane tank. The tank must first be removed
to access these holes. Depending on the ground
condition, you may need to hammer in Ground
Stakes to ensure stability. Be sure to remove
the Ground Stakes first before attempting to
move the unit.
TRAP PLACEMENT
Figure 10
9
To plug in unit
1. Connect Low Voltage Extension Cord (provided) to
the socket located under the Handle (Figure 11)
2. Connect the other end of Low Voltage Extension
Cord to the socket on the Low Voltage Power
Supply (provided). (Figure 12)
3. Plug the Power Supply into approved 120v
GFCI receptacle. (Figure 13)
4. Position Low Voltage Extension Cord such that it
will not interfere with outdoor activities.
Optional plug in instructions if using an approved
outdoor extension cord (not provided)
1. Hook Low Voltage Power Supply (provided) at the
rear of the Base of the unit as shown. (Figure 14)
2. Connect the Low Voltage Power Supply to the
socket located under the Handle. (Figure 11)
3. Plug the Power Supply into approved outdoor
extension cord. (Figure 14)
4. Plug extension cord into approved 120v
GFCI receptacle.
5. Position extension cord such that it will not
interfere with outdoor activities.
6. Pack and save Low Voltage Extension Cord
for future use.
OPERATIONAL INSTRUCTIONS
Figure 13
Figure 11
Low Voltage
Extension Cord
Low
Voltage
Power
Supply
Figure 14
LowVoltage
Power Supply
Outdoor
Extension
Cord
Figure 12
10
OPERATIONAL INSTRUCTIONS cont’d.
Figure 15
Figure 16
Figure 17
Figure 19Figure 18
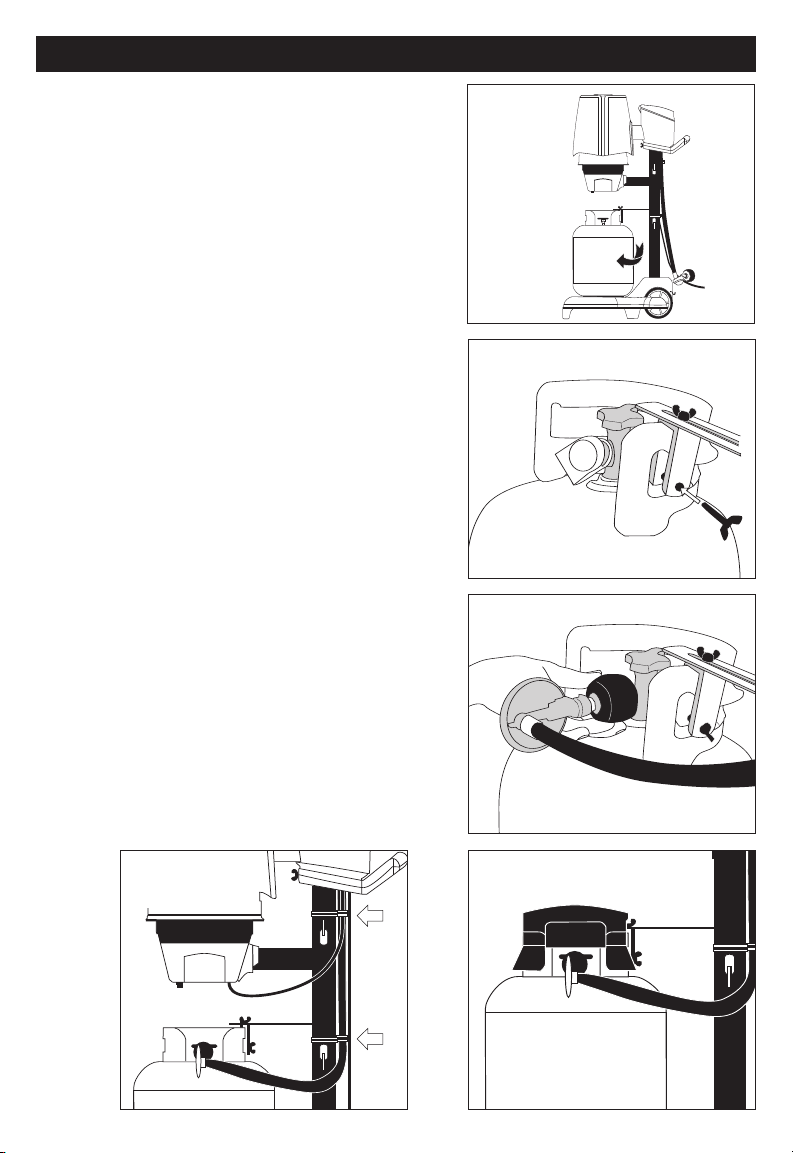
To attach propane tank and related hoses
1. Place a full 20 lb Propane Tank on the Base with
the open side facing the Tank Retainer Clip as
shown. (Figure 15) Turn the tank until the tank
handle fits through the Tank Retainer Clip. To
secure the tank to the arm, thread the Long
Thumbscrew through the bottom hole of the
Tank Retainer Clip and opening of tank handle.
(Figure 16)
2. Attach the Gas Regulator Valve to the Propane
Tank by removing the protective plastic cap from
the threaded hose connection and attach
Regulator, turning clockwise to tighten.
(Figure 17) NOTE: The hose fitting must be
securely hand tightened to prevent gas leakage.
Check for gas leaks by wiping non-ammonia
soapy water on the connector and looking for
anysigns of small bubbles forming. Inspect hose
before each use. The hose assembly must be
replaced if worn or damaged. The replacement
hose assembly is specified by and must be
purchased through Kaz Inc.
3. Secure the Hose to Assembled Support Columns
with Cord Clips. Clip power cord in outside
openings of Cord Clip. (Figure 18)
4. Place Tank Cap over Propane Tank and Regulator.
(Figure 19)
11
OPERATIONAL INSTRUCTIONS cont’d.
To Light the Burner
1. Remove the Burner Cover and following lighting
instructions located on the side of the burner.
(Figure 20)
2. Slowly turn Propane Tank on to the full open
position (turn valve counterclockwise).
3. To attach a new Propane Tank, open the side
door on the burner housing and press and hold
the GAS button for approximately two minutes
to allow air in the hose to first escape.
(Figure 21) Wait another 30 seconds for
any potential gas buildup to dissipate.
4. Depress GAS button and then press the
IGNITER button. Look through the side door
on burner housing and watch for a blue flame
while you press the IGNITER button. If the
flame does not light, you may need to press
the IGNITER button again.
5. Continue to hold the GAS button for an
additional 30 seconds after the initial ignition,
then release the GAS button. The unit should
remain lit. If it does not, wait at least 5
minutes for anybuilt up gas to dissipate before
attempting to relight.
6. If the burner goes out - repeat steps 4 and 5.
There is a safety device thatmust warm up
enough to allow gas to the burner after the
GAS button is released. Check to be sure the
propane tank valve is open and thatthe tank
is not empty.
7. Shut the side door on the burner housing and
replace the Burner Cover as described in the
ASSEMBLYINSTRUCTIONS.
GAS
OFF
IGNITION
COOL
WEATHER
HOT
WEATHER
NOsquito Outdoor Mosquito Trap
NT200
1-800-477-0457
For lighting instructions,remove burner cover.
Toshut off, close gas valve on propane tank
and switch DERMALURE to off.
DERMALURE
H
O
L
D
P
U
S
H
Figure 21
Figure 20
Control
Panel
Cover

12
OPERATIONAL INSTRUCTIONS (Continued).
GAS
OFF
IGNITION
COOL
WEATH E R
HOT
WEATH E R
NOsquito Outdoor Mosquito Trap
NT200
1-800-477-0457
For lighting instructions,remove burner cover.
Toshut off, close gas valve on propane tank
and switch DERMALURE to off.
DERMALURE
H
O
L
D
P
U
S
H
Figure 22
To set the DermaLure Switch
The DermaLure Band is a unique feature only to the
NOsquito Outdoor Mosquito Trap. It emits infra-red
heat or “body heat” which fools the mosquito into
thinking that this warm surface is the skin of their
blood meal host. Mosquitoes will attempt to land on
the DermaLure Band and will be captured into the
Catch Cup from the fan’s powerful airflow.
There are 2 temperature settings which allow you to
customize the heat of the DermaLure Band of your
yard environment to optimize mosquito catch.
1. Locate the DermaLure Switch on the Control Panel.
(Figure 22).
2. If the air temperature is cool, 60º to 85º
Fahrenheit, set the DermaLure Switch to COOL
WEATHER. At this setting, the Band will provide
the proper heat contrast to attract the most
mosquitoes in a cooler environment.
3. If the air temperature is warm, over 85º
Fahrenheit, set the DermaLure Switch to HOT
WEATHER to maximize the heat contrast in this
warmer environment.
NOTE: This switch also controls fan operation.
When in the center OFF position, neither the
DermaLure Heating Band nor the fan will operate.
When set to either COOL or HOT WEATHER, the fan
will automatically turn on.
SHUT DOWN INSTRUCTIONS
1. Close the Gas Regulator Valve on the propane tank by turning it clockwise.
2. Look through the window on the side of the Burner and verify that the flame has gone out. It may take
up to 30 seconds to burn the gas in the line and for the flame to go out.
3. Set DermaLure Switch to OFF.

13
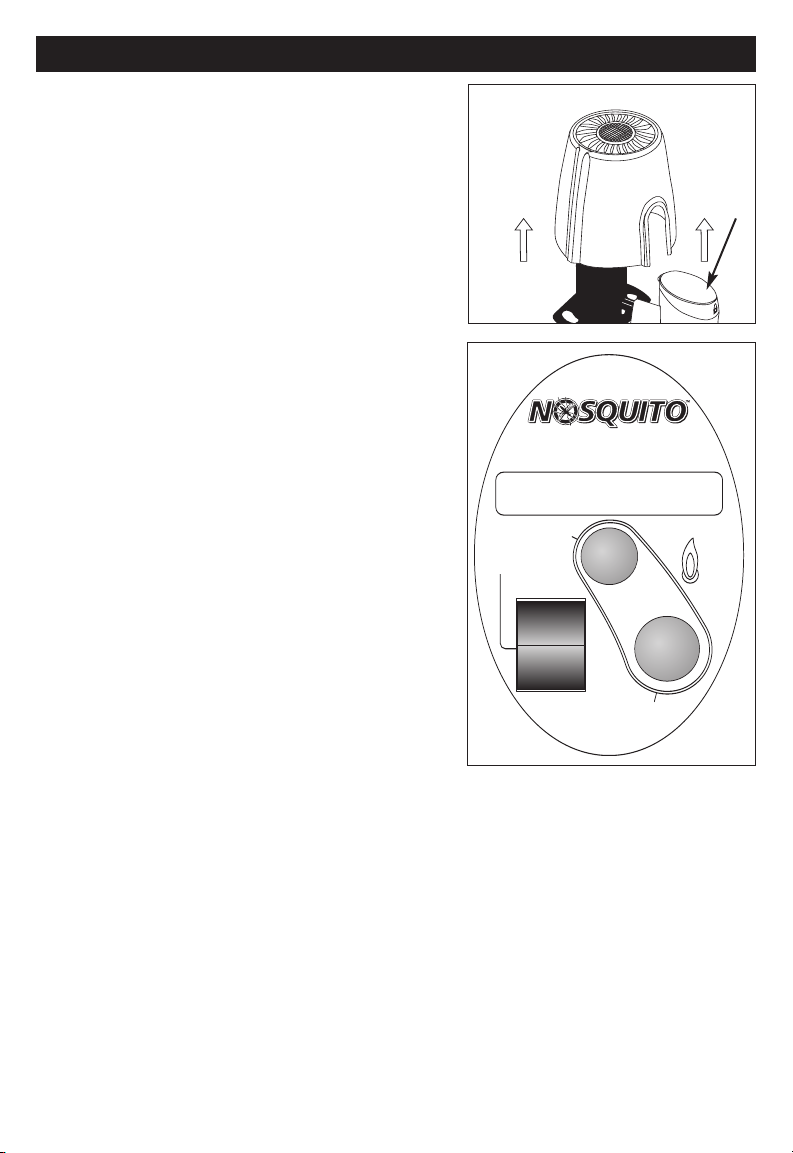
1. Check and clean the Catch Cup on a regular basis. Use only clean water to rinse the cup. Do not use
any chemical or soap as the fragrance may repel mosquitoes from the Trap.
2. Refill propane tank every 21 days or as needed.
3. Replace the Octenol lure every 30 days.
4. Clean the Trap’s outside surfaces with a mild detergent and a damp cloth. DO NOT spray with or
immerse any part in water.
5. Route the power cords in the safest possible manner to avoid personal injury.
6. Occasionally the Burner orifice may become clogged with dirt and debris causing the flame to be small
or the Trap not to light. Follow the instructions below to clean the Burner if the Trap will not light and
at the beginning of each mosquito season. !WARNING: Make
sure the propane tank is disconnected and removed from
the area and there is no flame in or around the Trap before
attempting the following cleaning procedure. Allow 30
minutes for the unit to cool if you intend to clean the
Burner orifice after immediate use.
a. Use can of Gumout®brand carburetor cleaner or an equivalent
available at most automotive supply shops. (Gumout is a
registered trademark of SOPUS Products.)
b. Attach the straw provided to the can nozzle.
c. Remove the Burner Cover and open the door to the Burner.
(Figure 22) Insert the tip of the straw into one of the air holes
under the Burner as shown. (Figure 23) NOTE: Figure 23
shows the assembly inside the Burner; the housing is
transparent grey for illustration purposes.
d. Spray two 1 second bursts from the can and let the interior
dryfor atleast 24 hours.
!WARNING! Carburetor cleaner is highly flammable.
Do not attempt to light the Trap before the cleaner has
dried thoroughly.
!WARNING! Be aware of the direction of the spray to avoid
contact with eyes.
! WARNING: Under no circumstances attempt to disassemble
the burner or anyof the internal gas components. There are no
user serviceable parts inside. Failure to heed this warning may
result in serious injury and will void any warranty.
MAINTENANCE
Figure 22
Figure 23

14
Approximately 3,000 species of mosquitoes have been identified worldwide, with approximately 170
species found in the United States. They live and breed near water and thrive in areas with low lying
foliage. They are most active in the early morning, at dusk and in into the evening. Some mosquitoes are
daytime feeders and are especially active in shady areas and on cloudy days. Geography and weather
conditions affect mosquito populations and activity. Only female mosquitoes bite. She hunts for blood as
protein to grow her eggs. She is lured to a blood meal by sensing body warmth, CO2 from breathing,
bodily chemicals, movement and visual cues such as size, color and contrast. A single female mosquito
may lay thousands of eggs so attracting, capturing and killing female mosquitoes with your NOsquito
Mosquito Trap can interrupt breeding cycles and greatly reduce mosquito populations in your yard.
ABOUT MOSQUITOES
• The NOsquito Mosquito Trap will begin catching mosquitoes immediately but it is recommended to run
the Trap continuously in season to interrupt breeding cycles and reduce mosquito populations
• Expect reductions of populations within 4-6 weeks
• The Trap will run in the rain
• If there is an interruption of power, restart the Trap
• Do not move the Trap with propane tank attached
• Empty Catch Cup as needed
FOR BEST RESULTS
We offer a full line of accessories to make the NOsquito Mosquito Trap more convenient. Please visit our
website at www.stingerproducts.com for more information.
NS16 - NOsquito Mosquito Lure
NTC2 - NOsquito Tank Cover
NTR2- Regulator with hose
NTCC2 - Catch Cup
NTGS - Ground Stakes
ACCESSORIES/REPLACEMENT PARTSACCESSORIES/REPLACEMENT PARTS

15
Unit will not light:
1. Be sure propane tank has gas.
2. Be sure propane tank is properly connected.
3. Be sure propane tank valve is open.
4. Be sure to follow Operational Instructions on page 9.
Unit will not stay lit:
1. Follow “Unit will not light” troubleshooting instructions above.
2. If unit still fails to stay lit, it may need cleaning. Follow cleaning instructions on page 13.
3. If unit still will not stay lit, please call our toll free consumer help line.
No power, fan does not come on:
1. Be sure all power connections are secure.
2. Be sure AC adapter and extension cords are properly plugged in.
3. Be sure extension cord is plugged into a known working GFCI protected outlet.
4. Be sure Dermalure switch is not set of OFF.
5. Check fuse located on the underside of the capture head. Replace if necessary.
Fuse Replacement Instructions: Locate the black circular fuse holder on the bottom of the capture
head and open with a dime or small screwdriver by pushing down and rotating 1/4 turn
counterclockwise. The fuse will pop out. If the fuse is blown, the small wire inside the fuse will not be
present. If there is doubt as to whether or not the fuse is good, it should be replaced. Replace with
the same size and type (F5AL250V). To secure, push and rotate 1/4 turn clockwise until it stops.
Unit does not seem to be catching mosquitoes:
1. Be sure flame is lit.
2. Be sure fan is operating.
3. Check to see if DermaLure Heating Band is switched to COOL or HOT WEATHER setting, and is warm to
the touch.
4. Mosquitoes become less active in lower temperatures. Is it too cool outside?
5. Mosquito population may be low.
6. Octenol cartridge might need to be replaced.
ATTENTION!
PLEASE DO NOTRETURN THIS PRODUCT TOTHE STORE.
CONTACT KAZ CONSUMER RELATIONS - WE CAN ASSIST YOU!
CALL: 1-800-477-0457
write: Kaz, Inc., Consumer Relations Dept.
250 Turnpike Rd., Southborough, MA 01772
ACCESSORIES/REPLACEMENT PARTSTROUBLESHOOTING

16
Kaz Inc warranties to the original purchaser that this product is free from defective materials and
workmanship. This warranty is limited to remedy any defective part for a period of 2 years from date of
original purchase. Retain your original receipt as proof of purchase. This warranty does not apply to
problems arising from abnormal wear, or failure to adhere to the enclosed instructions. In addition, the
foregoing warranty shall not applied to product that have been defaced, subjected to negligence, accident,
improper operation, maintenance or storage; product damaged by circumstances beyond Kaz, Inc's
control; or products modified (including but not limited to modifications through the use of unauthorized
parts or attachments) or repaired by anyone other than Kaz, Inc or its designee. This warranty gives does
not apply to this unit if purchased outside the United States, excluding Canada. In no case shall Kaz Inc.
be liable for any incidental, punitive, consequential, or any other damages of any kind for breach of this or
anyother warranty, expressed or implied, whatsoever. Some states do not allow limitation on how long an
implied warranty lasts, so the above limitation or exclusion may not apply to you. This warranty gives you
specific legal rights, and you may also have other rights that vary from state to state.
Warranty Info
Kaz, Incorporated
250 Turnpike Rd.
Southborough MA 01772
Consumer Service 800-477-0457 • Fax 508-481-0509
or visit us online at www.StingerProducts.com
31IMN200190
LIMITED WARRANTY
Table of contents
Popular Lawn And Garden Equipment manuals by other brands

Sunforce
Sunforce SOLAR user manual

GARDEN OF EDEN
GARDEN OF EDEN 55627 user manual

Goizper Group
Goizper Group MATABI POLMINOR instruction manual

Rain Bird
Rain Bird 11000 Series Operation & maintenance manual

Cub Cadet
Cub Cadet BB 230 brochure

EXTOL PREMIUM
EXTOL PREMIUM 8891590 Translation of the original user manual


Vertex
Vertex 1/3 HP Maintenance instructions

GHE
GHE AeroFlo 80 manual

Land Pride
Land Pride Post Hole Diggers HD25 Operator's manual

Yazoo/Kees
Yazoo/Kees Z9 Commercial Collection System Z9A Operator's & parts manual

Premier designs
Premier designs WindGarden 26829 Assembly instructions

Snapper
Snapper 1691351 installation instructions