Nouveau SKU 329426 User manual

INSTRUCTION MANUAL FOR LAC
FRAMLESS SH WER.
O
ATTENTION: PLEASE INSTALL THE SHOWER STEP BY STEP
Further instructions please visit https://www.mitre10.co.nz/
guides-and-advice/ guide/how-to-install-a-shower-enclosure
B K
SKU 329426
1

6mm 3.2mm
Preparation
1. After opening all boxes and packages, read this introduction carefully. Check that all of the needed
parts are included in the package by marking all the components on the "SKU Packing List".
Examine boxes and packages for shipping damage. If the unit has been damaged, has a finishing
defect or has missing parts, please contact the Store where you purchased the Shower within 5
business days of the delivery date. Please note that Mitre10 will not replace any damaged
products or missing parts free of charge after 5
b
usiness days or if the product has been
installed. Feel free to contact Mitre 10 if you have any questions.
A. The installation of this shower must be in accordance with industry standard practice, codes
and guidelines. A licensed/registered industry professional must perform all pluming/electrical
works.
B. Building and plumbing codes may vary by location, and Mitre 10 is not responsible for code
compliance standards for your project and will not accept any returns.
C. You must consult your local Council building codes with questions on installation
compliance standards.
5.
3.. This unit has to be installed on pre finished floor and walls.
instructions
Shower Installer should undertake installation.
s
Attention: Heavy, requires two people when lifting.
Tools Required (Not Supplied)
Tape Pencil
Measure
Phillips
Screwdriver
Drill bit Drill bit
Level
Measure
Caulking
Gun
Electric
Drill Hammer
Mitre saw or
Hacksaw
Glasses
Safety
Gloves
Safety Utility
Knife
Please, NOTE! Two people are required for assembly.
4.
Wall Board Adhesive
Suitable for
Acrylic Shower Liners
total weight of the unit. Its important that walls are level, and are at right angles. An uneven
surface or out of square walls will result in serious problems for the installation. Please note that
2. a will be able to support thePlease ensure prior to installation that ll surfaces are level, solid and
some minor adjustments may be needed and it may be required to cut/saw the aluminum channels
during the installation process.
Although these are comprehensive qualified, it is always recommended that a
Ensure that the enclosure is fitted to a level tray and vertical wall .
6..
2

90mm
55mm
450mm
90mm
600mm
Diagram
Diagram 1
2
25mm
upstand
Step 1. Remove shower liner from packaging, allow it to open up.
Push shower tray into position so it sits hard against timber framing and over
waste pipe.
Step 2. If a retro fit, cut solid fixings to install onto the horizontal bottom plate
and add vertical studs to fit Wall Board, Shower Liner and Aluminium Channels.
Alternatively, its important to locate nogs/dwangs or studs if not adding solid
fixings.
Step 3. Remove plastic film from the back edge of Shower Tray that will fit hard
up against the back of the wall.
Step 4. Along the face of the bottom plate apply a generous 6mm bead of
silicon the length of the shower tray. This is to act as a buffer to help prevent
any friction noises from the plastic against timber.
3
Shower frameless 1200 x 900mm Black - Tray
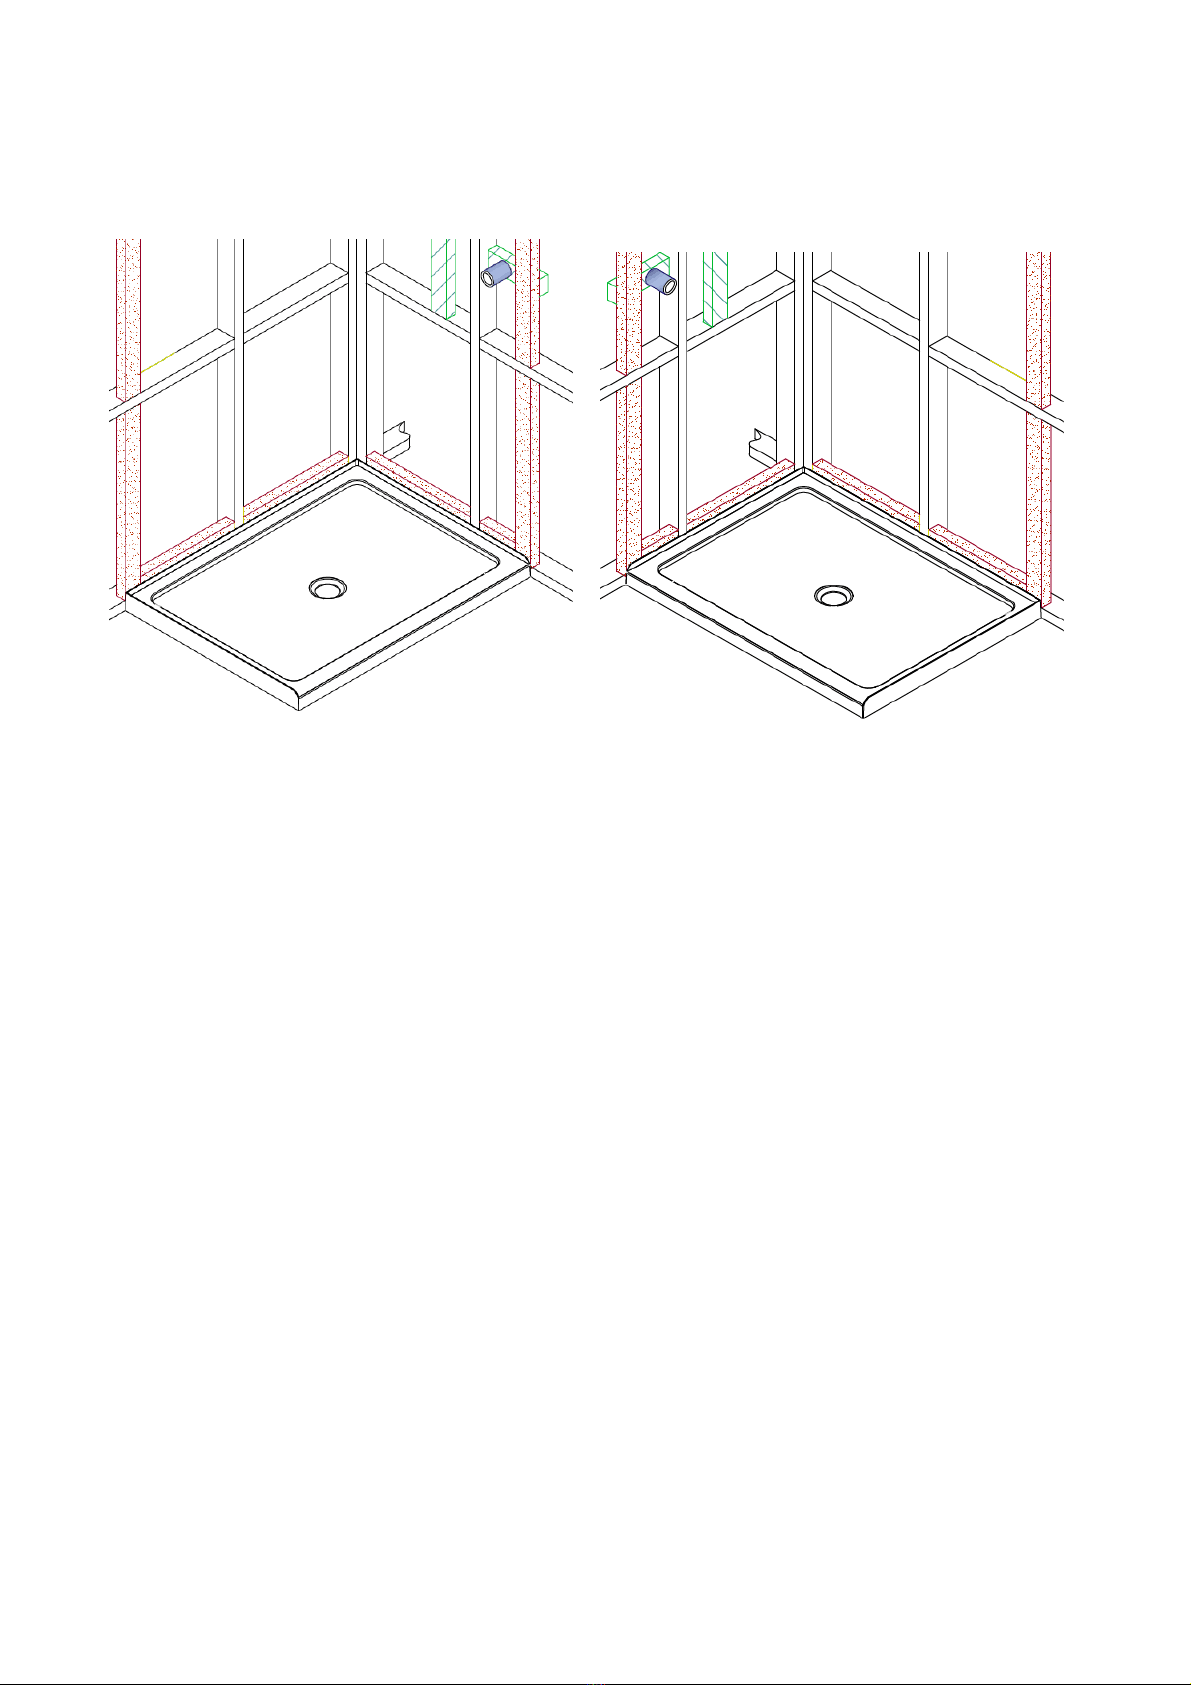
Shower frameless 1200 x 900mm Black - Tray
option a option b
Step 5. If the floor is slightly uneven after repair or levelling you can use a belt
sander to sand down the plastic shower tray feet to obtain level footing.
Underneath the shower tray apply adhesive onto feet then install the tray
against the floor plate and solid fixing as per
Step 6. Install the shower tray into place then leave for 24hours to allow the
adhesive to cure.
Step 7. It's recommended to cut and install suitable new wall boards such as GIB
Aqualine®. Ensure the GIB Aqualine® has a 10mm gap from the top of the
shower tray and floor.
For further instructions please visit https://www.mitre10.co.nz/guides-and-
advice/guide/how-to-install-a-shower-enclosure
4
option a or option b
Shower frameless 1200 x 900mm Wall Liner
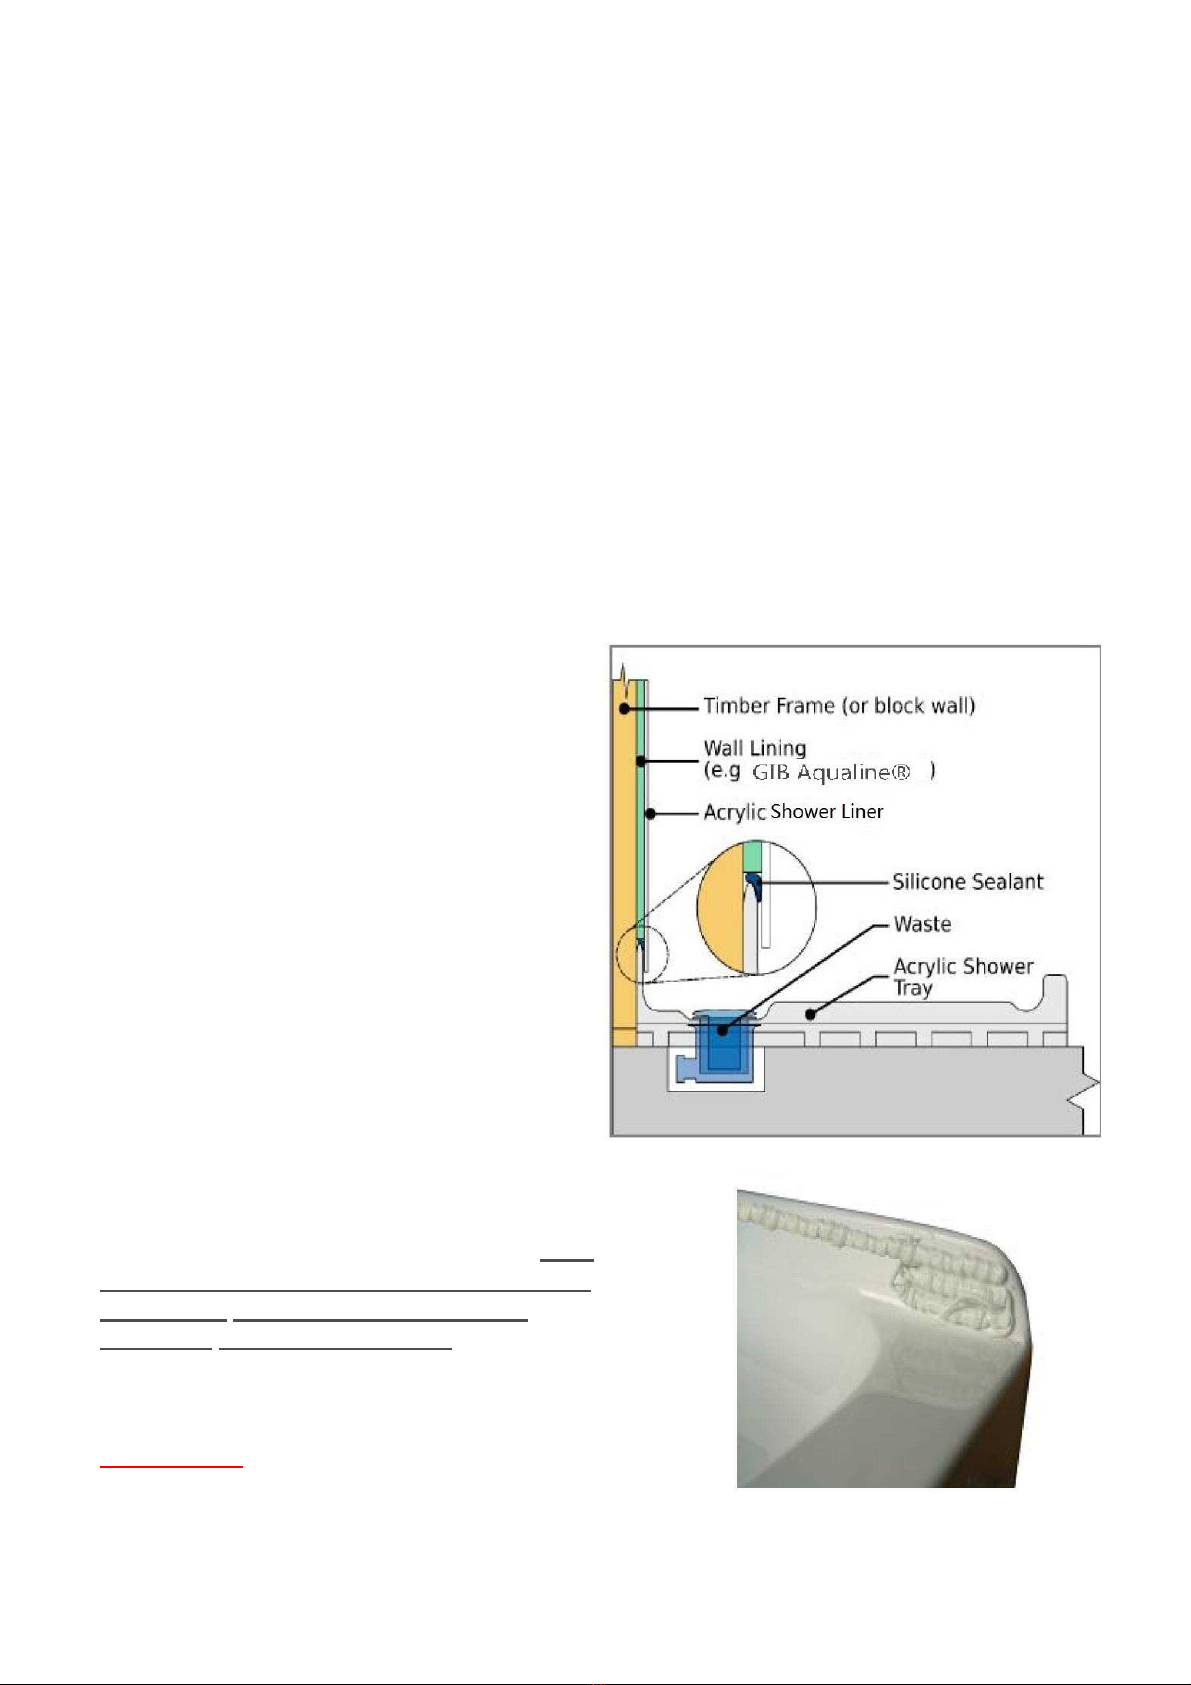
that the wall lining is not to be sealed, GIB® stopped or painted, as this will
prevent the curing of the wallboard adhesive between the, Shower Liner and the
wall lining.
1. Please ensure the shower tray is installed level in accordance with the instructions.
2. Check the wall liner for freight and handling damage and report any damage
immediately to the source of supply. Ensure Wall Liner is the right size to the Shower
Tray.
3. Lift the liner into position onto the tray. Using a builders pencil, trace the
outline of the liner. Remove liner once tracing is complete.
4. Measure, mark and measure again the
location of the shower rose and mixer.
Transfer these measurements carefully onto
the acrylic lining, and double check your
measurements before you cut the holes in
the wall liner. Cut holes on a solid surface.
5. Ensure that the surfaces to be glued are
free from dirt, dust and grease. Remove the
clear protective covering from the shower tray
up stand only, apply bead of silicone 10mm
from the top of the tray from the inside out. At
the end continue the bead down and back
100mm.
6. Using Wall Board Adhesive suitable for
Acrylic Shower Liners apply vertical strips
starting 80mm in from the pencil line then
every 80mm working towards the corner. Only
apply one horizontal line of adhesive at the
base of the Wall Board, approx 80mm
above the Shower tray upright. Refer next
page as a guide only. It is not important to
apply adhesive in one vertical direction.
Applying it up and down is fine.
IMPORTANT Only use wall board adhesive
recommended for Acrylic Shower Liners.
For further instructions please visit https://www.mitre10.co.nz/guides-and-advice/guide/
how-to-install-a-shower-enclosure
5
Additional framework (option a or option b previous page) has been installed to give
support to the lining and aluminium fixings for the shower door installation. Please note
Table of contents
Popular Bathroom Fixture manuals by other brands

Kohler
Kohler Mira Sport Max J03G Installation and user guide

Moen
Moen 186117 Series installation guide

Hans Grohe
Hans Grohe Raindance Showerpipe 27235000 Instructions for use/assembly instructions

Signature Hardware
Signature Hardware ROUND SWIVEL BODY SPRAY 948942 Install

fine fixtures
fine fixtures AC3TH installation manual

LIXIL
LIXIL HP50 Series quick start guide


