Novitec i-Nova3 Series User manual

Copyright ©2022_Ver.1 NOVITEC Co., Ltd.
[i-Nova3 + GigE]
[Installation guide]

[i-Nova3 + Installation guide]
2
Copyright ©2022_Ver.1 NOVITEC Co., Ltd.
CONTENTS
1. RECOMMENDED SYSTEM CONFIGURATION................................................................................ 4
2. PREPARATION FOR CAMERA CONFIGURATION.......................................................................... 4
3. HANDLING PRECAUTIONS............................................................................................................... 4
3.1. INSTRUMENT SAFETY INSTRUCTIONS ............................................................................................................................................4
3.2. IMPORTANT SAFETY PRECAUTIONS ................................................................................................................................................4
3.3. HANDLING AND CLEANING ............................................................................................................................................................5
3.4. INSTALLATION ...................................................................................................................................................................................5
3.5. PERFORMANCE AND LONGEVITY.................................................................................................................................................... 6
3.6. CONNECTOR......................................................................................................................................................................................6
4. HOW TO INSTALL THE SOFTWARE ................................................................................................ 6
4.1. DOWNLOAD THE INSTALLATION FILE............................................................................................................................................6
4.2. INSTALL THE NOVITEC SOFTWARE.................................................................................................................................................8
4.2.1. Windows...........................................................................................................................................................................8
4.2.2. Linux.................................................................................................................................................................................11
5. INSTALLING THE CAMERA............................................................................................................. 12
5.1. ATTACH A LENS ..............................................................................................................................................................................12
5.2. CONNECT THE INTERFACE CARD AND CABLE TO THE CAMERA .............................................................................................12
5.3. CONFIGURE IP SETTINGS..............................................................................................................................................................15
5.4. LAUNCH VIEWER............................................................................................................................................................................15
5.4.1. Windows.........................................................................................................................................................................15
5.4.2. Linux.................................................................................................................................................................................16
5.5. CONNECT THE CAMERA................................................................................................................................................................17
5.5.1. Windows.........................................................................................................................................................................17
5.5.2. Linux.................................................................................................................................................................................18
5.5.3. Set up IP temporarily...............................................................................................................................................19
5.6. GET THE IMAGE ..............................................................................................................................................................................20
5.6.1. Windows.........................................................................................................................................................................20
5.6.2. Linux.................................................................................................................................................................................22
5.6.3. Initial Account Settings ...........................................................................................................................................23

[i-Nova3 + Installation guide]
3
Copyright ©2022_Ver.1 NOVITEC Co., Ltd.
6. PHYSICAL INTERFACE ..................................................................................................................... 25
6.1. POWER/VOLTAGE ...........................................................................................................................................................................25
6.2. ETHERNET CONNECTOR ................................................................................................................................................................26
6.3. GPIO CONNECTOR .......................................................................................................................................................................26
6.4. RS232 CONNECTOR .....................................................................................................................................................................27
7. TROUBLESHOOTING........................................................................................................................ 27
7.1. UPGRADING CAMERA FIRMWARE ...............................................................................................................................................27
7.2. CAMERA &INTERFACE CARD (NIC) STATIC IP SETTING........................................................................................................32
7.2.1. Camera Static IP (Persistent IP) Settings.........................................................................................................32
7.2.2. Interface Card (NIC) static IP settings ..............................................................................................................34
7.3. FAILED TO GET IMAGE....................................................................................................................................................................38
7.4. SETTINGS INITIALIZED ON REBOOT..............................................................................................................................................39
7.5. BROKEN RTSP IMAGE...................................................................................................................................................................40
8. IMAGE TABLE OF CONTENTS ........................................................................................................ 44
9. TABLE OF CONTENTS...................................................................................................................... 45
10. REVISION HISTORY ....................................................................................................................... 46
11. CONTACTING US............................................................................................................................ 46

[i-Nova3 + Installation guide]
4
Copyright ©2022_Ver.1 NOVITEC Co., Ltd.
1. Recommended System Configuration
The following system configuration is recommended when using the camera. The specifications below are
written as internally verified specifications.
•OS –Microsoft Windows 10 (64-bit), Linux (32bit/64bit/ARM64)
•CPU –i7-5th generation More than
•RAM –8GB
•NIC –Intel Gigabit Network
•Video –graphics card that supports H265 4K hardware encoding
•Software –Microsoft Visual Studio 2013 (to compile and run example code)
2. Preparation for Camera Configuration
The following components are required to install the camera.
•Ethernet cable (Refer to 6.2. Ethernet Connector)
•GPIO cable (Refer to 6.3. GPIO Connector)
•Lens (Refer to 5.1. Attach a Lens)
•Interface card
3. Handling Precautions
3.1. Instrument safety instructions
•We are not responsible for any damage caused by user negligence or other equipment connection.
•Handle i-Nova3 with care. For example, be careful of strong impact or storage in an unsuitable
environment.
•Do not use accessories that are not recommended as they may be dangerous.
3.2. Important safety precautions
•Please check the specifications for each product and use a power supply with the appropriate
specifications.
•Keep the product away from radiators, heaters, stoves, or other products (amplifiers, etc.) and heat

[i-Nova3 + Installation guide]
5
Copyright ©2022_Ver.1 NOVITEC Co., Ltd.
sources.
•Be careful not to let flammable substances, water, or metal get inside the camera.
•Do not modify the camera or use the camera with the outer cover removed.
•Avoid using the camera in thunder or lightning storms.
•When using the camera outdoors, protect it from moisture. (rain/snow, etc.)
•Board level notes
- Be careful to avoid electric shocks such as static electricity (ESD).
- Use a ground (GND), etc. to cope with ESD, etc.
- Be careful not to get plastic, vinyl, or Styrofoam into the circuit board.
- Do not touch the parts of the circuit board with your hands or conductive devices.
3.3. Handling and cleaning
•Do not attempt to disassemble the camera.
•When replacing or removing the lens or filter, be careful not to allow water or dust to enter.
•Use a blower or lens brush to remove dust from the lens or optical filter.
•Do not disassemble the front flange.
•Clean the case with a soft, dry cloth.
•Do not use benzene, thinner, alcohol, liquid or spray-type cleaners.
3.4. Installation
Avoid installing or storing the camera in the following locations.
•Environments exposed to direct sunlight, rain or snow
•Environments with flammable or corrosive gases
•Excessive temperature or low temperature environment (recommended ambient temperature: 0 ~ 45°
C)
•Wet or dusty places
•Places subject to excessive vibration or shock

[i-Nova3 + Installation guide]
6
Copyright ©2022_Ver.1 NOVITEC Co., Ltd.
•Environments exposed to strong electric or magnetic fields
•Do not point the camera at the sun or other strong light sources.
•In case of unfavorable conditions, be sure to inquire about the installation environment.
3.5. Performance and longevity
•Please configure the environment that meets the camera operation specifications. If the ambient
temperature is high, the service life may be shortened due to deterioration of the parts. In that case,
you also need to consider the cooling system.
3.6. Connector
•When manufacturing the I/O connector, be careful with the connection so that the wires fit well.
•Make sure the power is off before connecting or disconnecting I/O connectors.
•To avoid damaging the connector, do not pull by the electric wire, etc.
4. How to install the software
4.1. Download the Installation File
We recommend that you download and install the latest version of the SDK from the Novitec website.
a. Go to the Novitec website (https://www.novitec.co.kr/en/).
<Image> 1. Enter the website address image
b. Click [ITS & Security] of [Products] in the top tab.
<Image> 2. Click ITS & Security image

[i-Nova3 + Installation guide]
7
Copyright ©2022_Ver.1 NOVITEC Co., Ltd.
c. Click [i-Nova3] or [i-Nova3-Zoom] in ITS & Security.
<Image> 3. Click i-Nova3 image
d. Click one of the iN3-89EC, iN3Z-89EC-10Z300, iN3Z-50EC-6Z210 in the camera list
to Access the page.
<Image> 4. Click i-Nova3-Zoom image
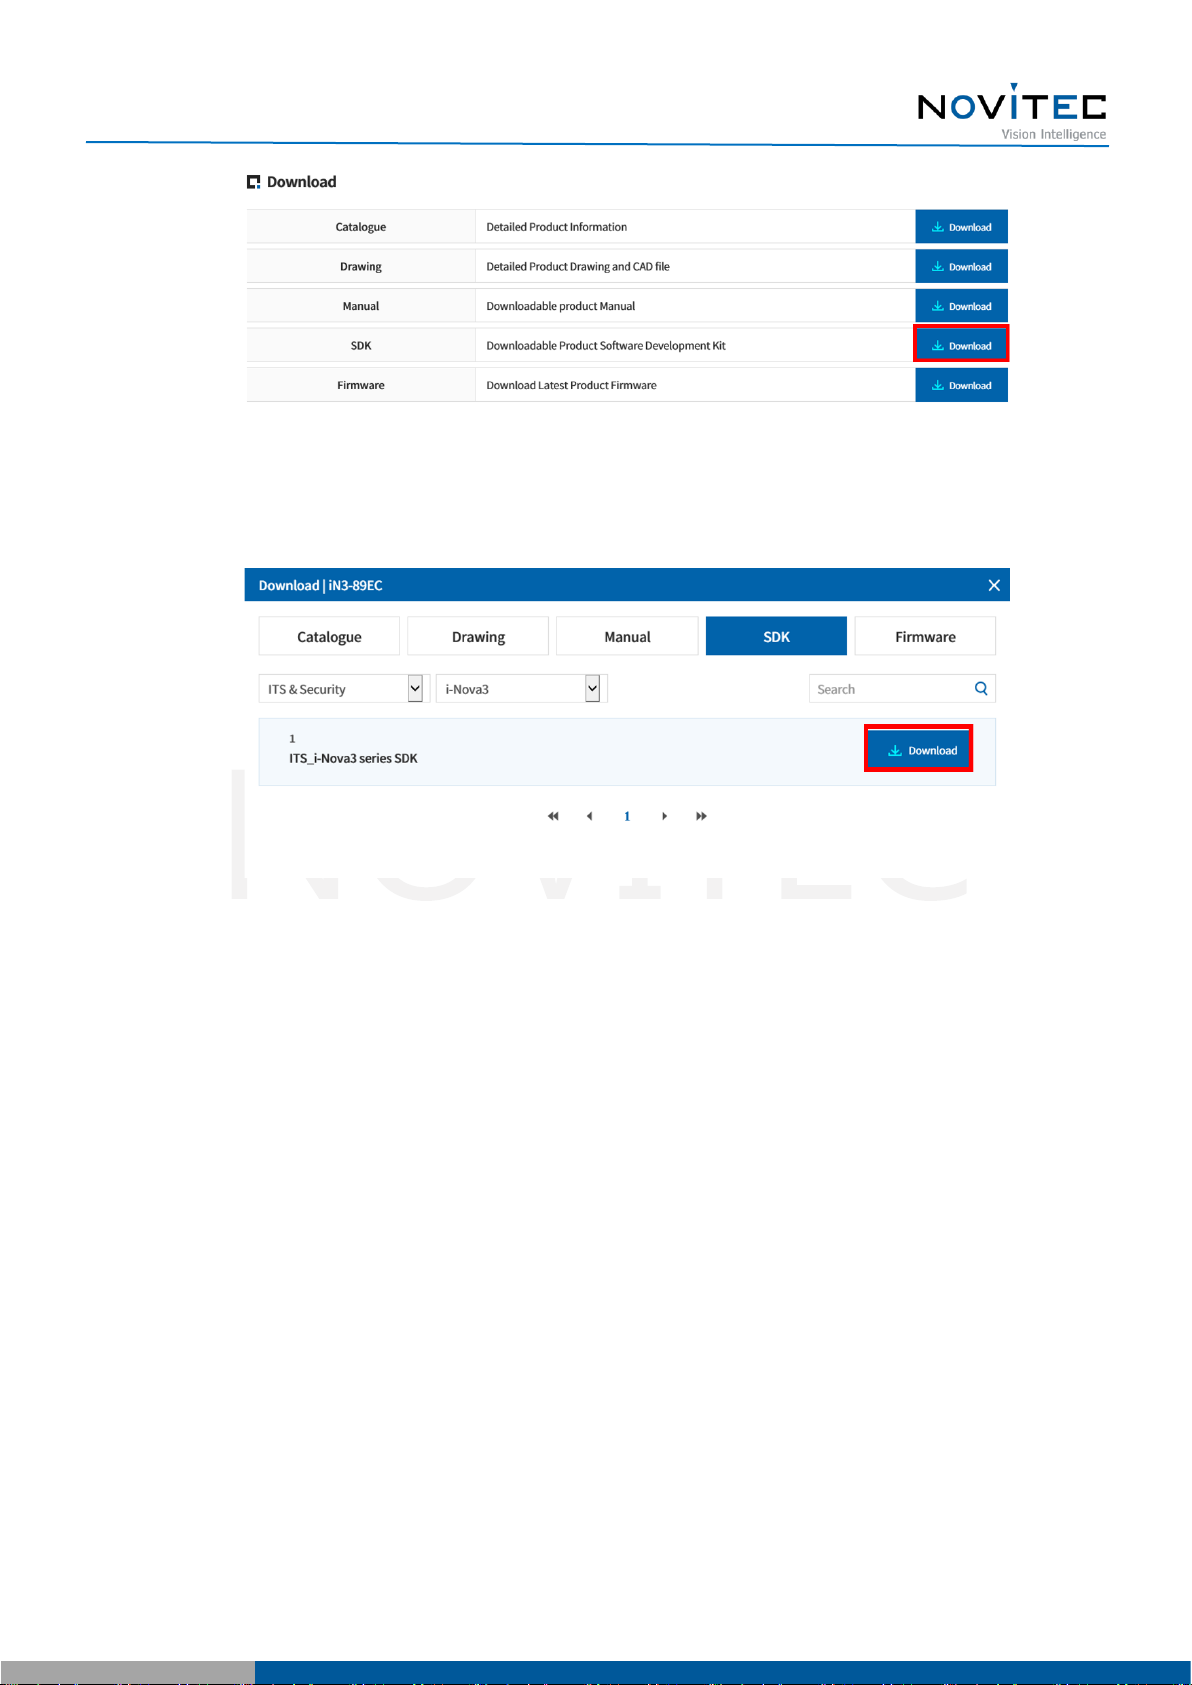
e. Click [Download] of SDK, in the download field at the bottom of the product page.
[i-Nova3 + Installation guide]
8
Copyright ©2022_Ver.1 NOVITEC Co., Ltd.
<Image> 5. Download section on product page image
f. Click [Download] of ITS_i-Nova3 series SDK to download the installation file.
<Image> 6. SDK download window image
4.2. Install the Novitec Software
4.2.1. Windows
Refer to 4.1. Download Installation File to prepare the installation file for Windows.
a. Execute the u-Nova SDK installation file (NovitecCameraSDK-vX.X.Xexe) and Click [Next >].

[i-Nova3 + Installation guide]
9
Copyright ©2022_Ver.1 NOVITEC Co., Ltd.
<Image> 7. Installation Startup image
b. Check “Examples” and click [Next >].
<Image> 8. Install item selection image
[i-Nova3 + Installation guide]
10
Copyright ©2022_Ver.1 NOVITEC Co., Ltd.
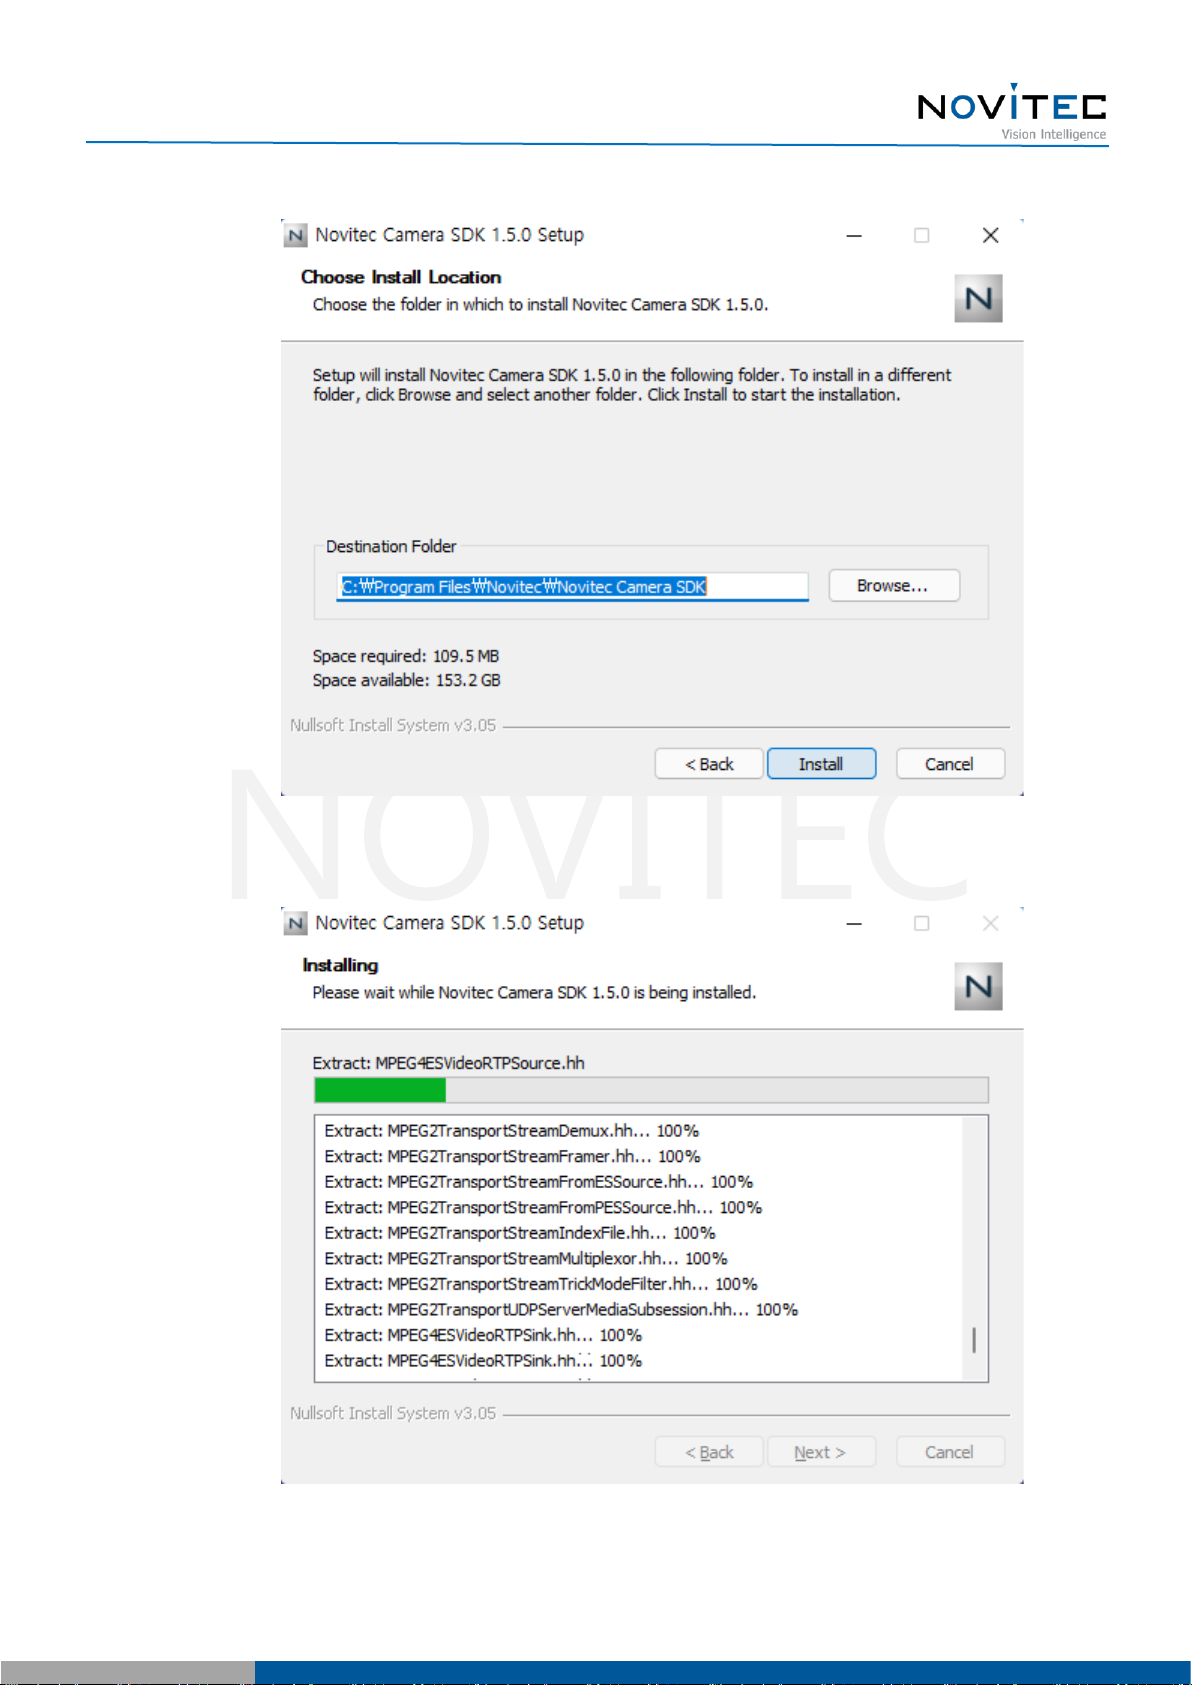
c. After selecting the folder to install, click [Install].
<Image> 9. Choose Install location image
<Image> 10. Installing image

[i-Nova3 + Installation guide]
11
Copyright ©2022_Ver.1 NOVITEC Co., Ltd.
d. Click [Finish] to finish the installation.
<Image> 11. Installation finish image
4.2.2. Linux
Refer to 4.1. Downloading the installation file to prepare the installation file for Linux.
a. Install required libraries.
# sudo apt-get install libjpeg-turbo8-dev libgtk-3-de0v libturbojpeg
b. Go to the location where you downloaded the installation file and proceed with the installation.
# cd Installation file location
# chmod a+x NovitecCameraSDK-vX.X.X-Linux-XXXXX.sh
# ./NovitecCameraSDK-vX.X.X-Linux-XXXXX.sh
# cd NovitecCameraSDK-vX.X.X-Linux-XXXXX/lib
# sudo su
# ln -s libnvtcam.so.1.X.X /usr/local/lib/libnvtcam.so.1
# exit
[i-Nova3 + Installation guide]
12
Copyright ©2022_Ver.1 NOVITEC Co., Ltd.
5. Installing the Camera
5.1. Attach a Lens
Attach the lens after removing the cap from the lens holder.
i-Nova3 has a removable 5mm C mount adapter is installed as standard, and it can be used as a CS
mount by removing the adapter.
5.2. Connect the interface Card and Cable to the Camera
Ethernet cable to the camera and PC.
Recommended NIC(Network Interface Card) is refer to 1. Recommended System Configuration.
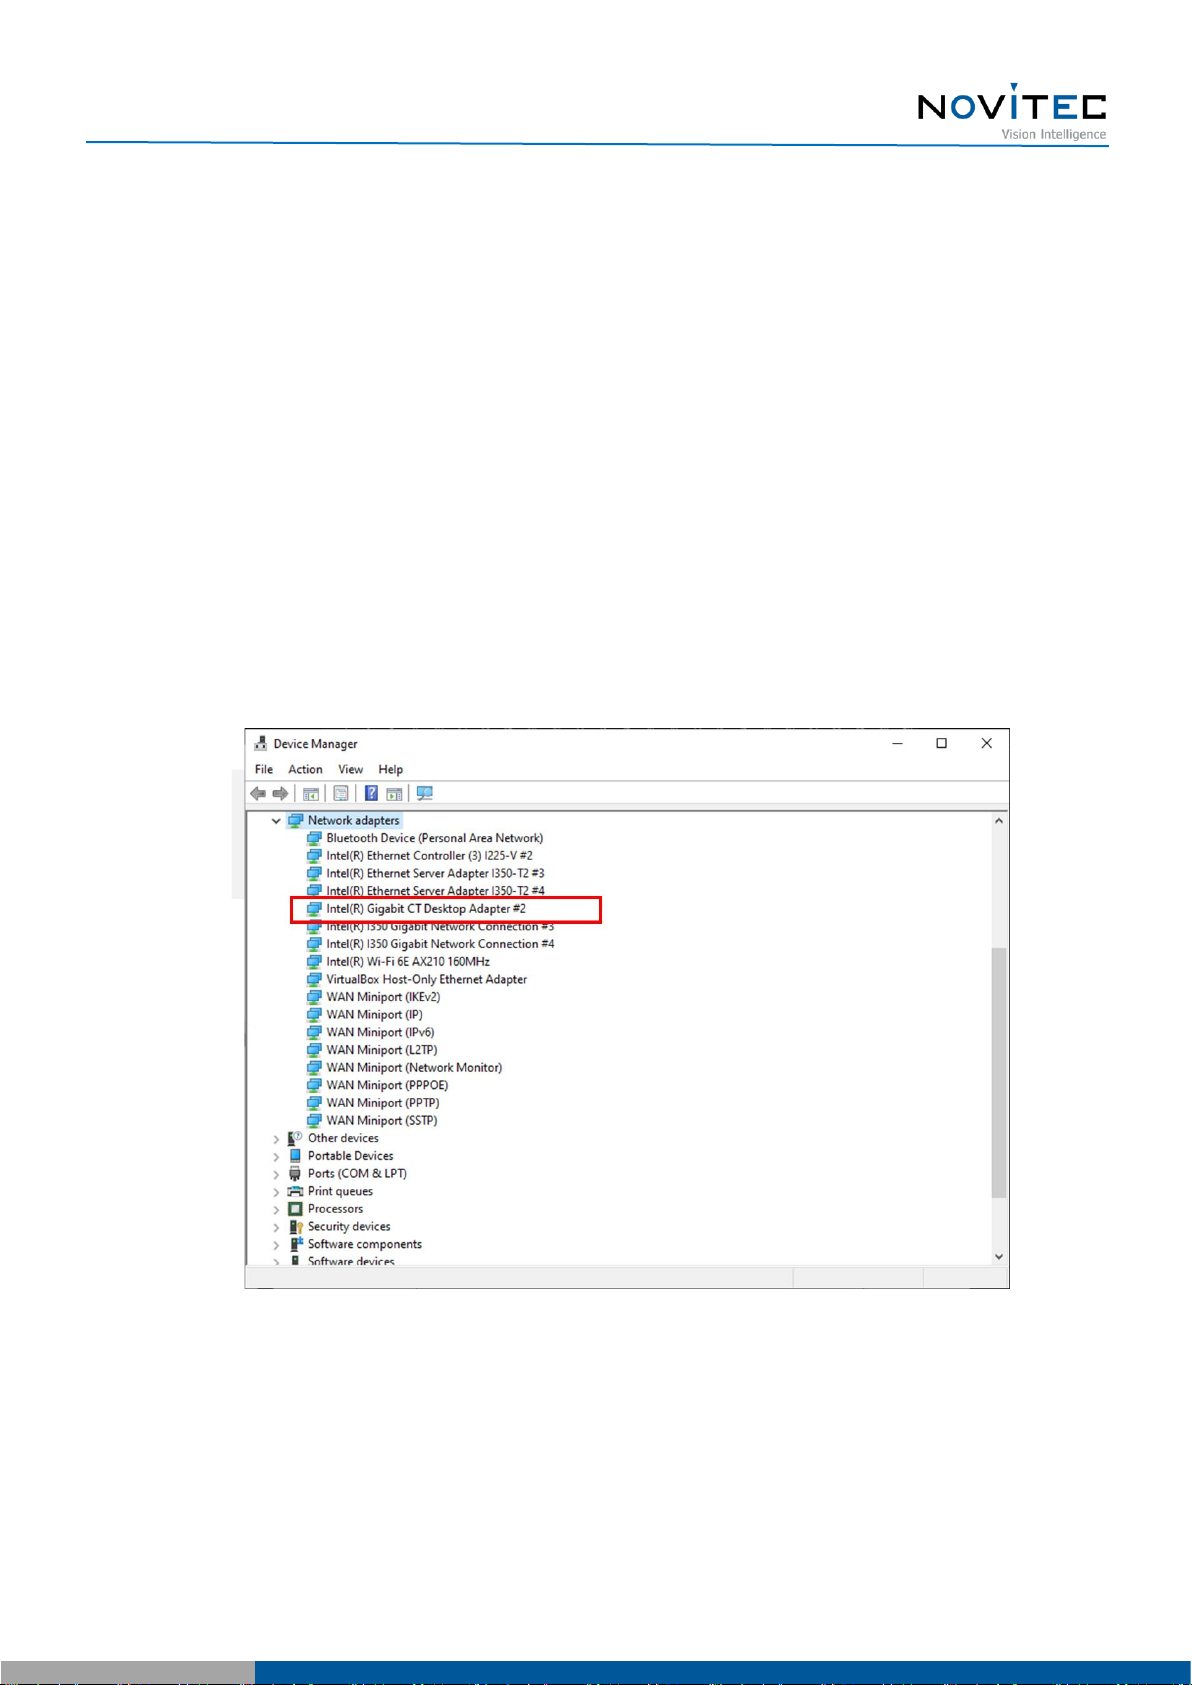
In order to acquire camera data normally, the following initial settings are required.
a. Go to Control Panel-Device Manager-Network Adapters to check information about the NICs installed
on PC.
<Image> 12. Check network adapter information image
b. Right-click the network adapter to which the camera is connected and click [Properties].

[i-Nova3 + Installation guide]
13
Copyright ©2022_Ver.1 NOVITEC Co., Ltd.
<Image> 13. Network adapter properties image
c. In the properties window, click the [Advanced] tab and set Receive buffers to the maximum value.

[i-Nova3 + Installation guide]
14
Copyright ©2022_Ver.1 NOVITEC Co., Ltd.
<Image> 14. Change receive buffers size image
d. Set Jumbo Packet to the maximum value.

[i-Nova3 + Installation guide]
15
Copyright ©2022_Ver.1 NOVITEC Co., Ltd.
<Image> 15. Jumbo Packet resizing image
5.3. Configure IP Settings
When the camera is shipped, the IP of the camera is set to be automatically assigned from DHCP.
DHCP connection fails, the IP will be set as the LLA.
When the camera is first powered on, the camera is assigned an IP in the following order:
DHCP/Persistent/ LLA.
5.4. Launch Viewer
5.4.1. Windows
3 ways to launch the camera viewer.
•Click the shortcut icon of "Novitec Camera Viewer" on the desktop.
•Click Novitec - "Novitec Camera Viewer" in the Windows Start menu.

[i-Nova3 + Installation guide]
16
Copyright ©2022_Ver.1 NOVITEC Co., Ltd.
•Go to the path below in the File Explorer and run the NovitecCameraViewer.exe.
- Default path: C:\Program Files\Novitec\Novitec Camera SDK\utils
<Image> 16. Launch viewer of Windows image
5.4.2. Linux
Refer to the installation method of 4.2.2. Linux and launch the viewer in the path where the viewer is installed.
# cd (Go to viewer installation folder)/bin
# ./ncv
<Image> 17. Launch viewer of Linux image

[i-Nova3 + Installation guide]
17
Copyright ©2022_Ver.1 NOVITEC Co., Ltd.
5.5. Connect the Camera
To use the camera, the user must connect the camera to the viewer.
5.5.1. Windows
a. Click [Connect] at the top of the viewer.
<Image> 18. Connect the Camera image
b. Check the model name and serial number of the camera connected to the PC, select the camera in the list,
and click [Connect].
- If the camera is displayed in red and not connected Refer to 5.5.3. Set up IP temporarily.
<Image> 19. Select camera image

[i-Nova3 + Installation guide]
18
Copyright ©2022_Ver.1 NOVITEC Co., Ltd.
<Image> 20. Red mark when connection is not possible image
c. Check that [Connect] at the top is activated in blue.
<Image> 21. Status of Connect after camera selection image
5.5.2. Linux
a. Click [Connect] at the top of the viewer.
<Image> 22. Linux Connect the Camera image
b. Check the model name and serial number of the camera connected to the PC, select the camera in the list,
and click [Connect].
- If the IP of the camera does not appear, the IP of the PC must be set to be the same as the IP band of the

[i-Nova3 + Installation guide]
19
Copyright ©2022_Ver.1 NOVITEC Co., Ltd.
camera.
<Image> 23. Linux Select camera image
5.5.3. Set up IP temporarily
If the camera's IP and the IP band of the NIC to be connected do not match, the camera and NIC cannot be
connected.
At this time, to connect the camera, you need to temporarily match the camera's IP with the NIC's IP using
the viewer function.
Since the temporarily changed, IP is changed to the existing IP when the camera is rebooted, it is
recommended to set and use a static IP in the camera to prevent this.
a. Select the camera to be connected in red and click [Send Force IP Command].

[i-Nova3 + Installation guide]
20
Copyright ©2022_Ver.1 NOVITEC Co., Ltd.
<Image> 24. If the camera IP band is different image
b. After confirming that the red mark disappears due to the IP change of the camera, refer to 5.5. Connect the
Camera to proceed to the next step.
5.6. Get the Image
5.6.1. Windows
To check the image stably in the viewer, users need to change the viewer settings.
a. After connecting the camera by running the Novitec Camera Viewer, click [Tools] on the top menu.
<Image> 25. Tools image
b. Click [Options].
Other manuals for i-Nova3 Series
1
This manual suits for next models
1
Table of contents
Other Novitec Digital Camera manuals


Popular Digital Camera manuals by other brands


Canon
Canon EOS 5D Mark II Firmware update procedures

Wildlife Monitoring Solutions
Wildlife Monitoring Solutions Wilsus Tradenda 4G Wireless user manual

Olympus
Olympus E-1 - Digital Camera SLR Reference manual

Olympus
Olympus FE-46 Manual de instrucciones

WCCTV
WCCTV WIRELESS CCTV Support guide

Atlantis
Atlantis A14-SC920-OUT manual