Novolink NVL-0853G-BK User manual

THANK YOU FOR CHOOSING NOVOLINK!
Visit us online to see our full line of products available for your home lighting and security needs.
USE AND CARE GUIDE
MOTION SECURITY LIGHT
Questions, problems, missing parts? Before returning to the store,
call Novolink Customer Service
Monday - Friday, 8:30 a.m. - 5:30 p.m. PST
1-800-933-7188
WWW.SHOPNOVOLINK.COM
Model #NVL-0853G-BK

2
Table of Contents
Safety Information....................................2
Precautions............................................2
Warranty ...................................................2
1-Year Limited Warranty ........................2
What Is Covered.....................................2
What Is Not Covered ..............................2
Pre-Installation.........................................3
Planning Installation ..............................3
Battery Operation...................................3
Initial Battery Charge .............................3
Mounting Location .................................3
Solar Panel.............................................3
Specications ........................................4
Tools Required .......................................4
Hardware Included.................................4
Package Contents..................................5
Installation................................................6
Operation...................................................8
Care And Cleaning....................................8
Troubleshooting........................................9
Safety Information
PRECAUTIONS
□Please read and understand this entire manual before
attempting to assemble, install, or operate this light
xture.
□Do not immerse components in liquid.
□Do not use any other charging device other than the
single solar charging panel provided with this light.
Doing so may result in injury or damage to the light
and voids any warranty.
Warranty
WARNING: To prevent possible SERIOUS INJURY or
DEATH, never allow small children near batteries. If a
battery is swallowed, immediately notify a doctor.
WARNING: DO NOT DISPOSE OF BATTERIES IN FIRE.
BATTERIES MAY EXPLODE OR LEAK.
1-YEAR LIMITED WARRANTY
WHAT IS COVERED
This product is guaranteed to be free of factory defective parts and workmanship for a period of one (1) year from date
of purchase. Purchase receipt is required for all warranty claims.
WHAT IS NOT COVERED
This guarantee does not include repair service, adjustment and calibration due to misuse, abuse or negligence.
Unauthorized service or modication of the product or of any furnished component will void this warranty in its entirety.
This warranty does not include reimbursement for inconvenience, installation, setup time, loss of use, unauthorized
service, or return shipping charges. This warranty is not extended to other equipment and components that a customer
uses in conjunction with this product, including the battery.
No service parts available for this product.
For additional questions on the warranty, or for warranty servicing, contact the Novolink Customer Service Team
at 1-800-933-7188 or visit www.shopNovolink.com.

3 SHOPNOVOLINK.com
Please contact 1-800-933-7188 for further assistance.
Pre-Installation
PLANNING INSTALLATION
Before installing the light xture, ensure that all parts
are present. Compare parts with the Hardware Included
and Package Contents sections. If any part is missing or
damaged, do not attempt to assemble, install, or operate
this light xture.
Estimated installation time: 30 minutes
BATTERY OPERATION
This light operates with Lithium (Li-ion) batteries charged
from the attached solar panel. If the voltage of the Lithium
(Li-ion) batteries run down, the light will not activate when
the motion sensor is triggered. When the solar panel has
recharged the Li-ion batteries, and voltage is sufcient to
power the light, it will return to normal operation.
INITIAL BATTERY CHARGE
IMPORTANT: Clouds, rain, snow, and other weather
conditions may not allow the solar panel to completely
recharge the batteries. Other obstructions such as
buildings or trees may block the sun as well.
□PRIOR TO USE, the batteries will require 1 to 2 days
of full, direct sunlight to completely charge with the
switch in the OFF position. If possible, aim the solar
panel toward the South and tilt it approximately 50°
from horizontal.
□Actual operating time will vary depending upon how
frequently the light is turned on by the motion sensor.
□Solar lighting is not designed to equal standard
120V lighting. The amount of light output is reduced
to allow the sun time to fully recharge the battery
between lighting cycles.
□Solar collection is only effective in direct sunlight.
Every hour the light is on requires a minimum of
5hours of sunlight charging.
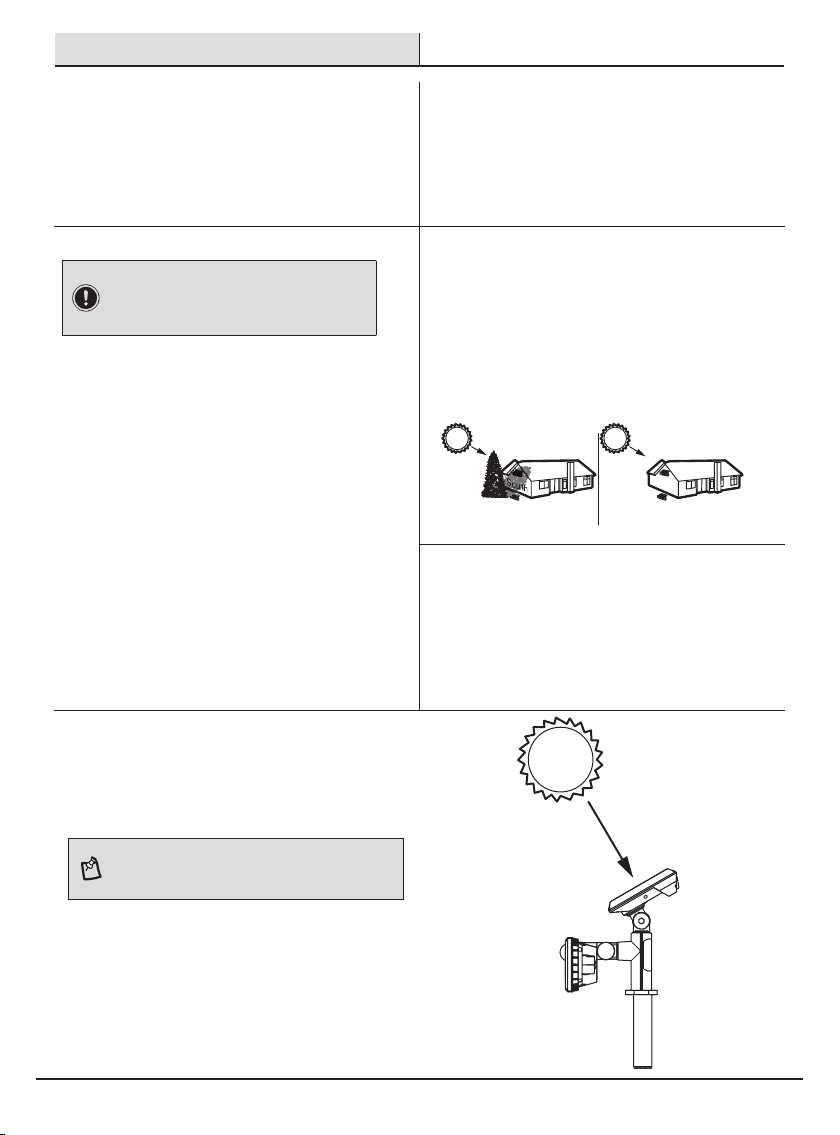
MOUNTING LOCATION
The most important thing to remember for the operation
of your solar powered motion sensing light is that it works
from the power received from direct sunlight. The solar
panel works best when placed on the southern-facing
portion of a structure, or in an area that receives ample
sunlight. The more direct sunlight the solar panel receives
in a day, the longer the light will operate. Make sure there is
a minimum amount of obstructions between the solar panel
and the sun.
Poor Position: Tree Blocks
Sunlight from Solar Panel
Good Position: Faces south
with no obstructions
South
LIGHT FIXTURE
The main unit contains the LEDs, a motion sensor, and
rechargeable Lithium batteries. When deciding where to
mount or stake this unit, keep in mind that the motion sensor
that activates the light has a “field of vision” of 26.25 ft. (8 m)
in front of the light and about 180° detection angle at a
surrounding air temperature of 77°F (25°C).
SOLAR PANEL
The solar panel converts the sun’s energy into electricity,
thus charging the batteries in the solar light xture. The
solar panel requires direct sunlight falling onto its surface
for as long as possible over the course of the day.
NOTE: Optimize charging by installing the light at high noon,
adjusting so that the panel faces the sun.

4
Pre-Installation (continued)
SPECIFICATIONS
Range Up to 26.25 ft. (8 m) (Varies with surrounding temperature)
Sensing angle Up to 180°
Lumens 520 LM
Power requirements Solar panel and rechargeable Lithium batteries
Operating mode Motion
Time delay 30 seconds
Water-resistance IP44
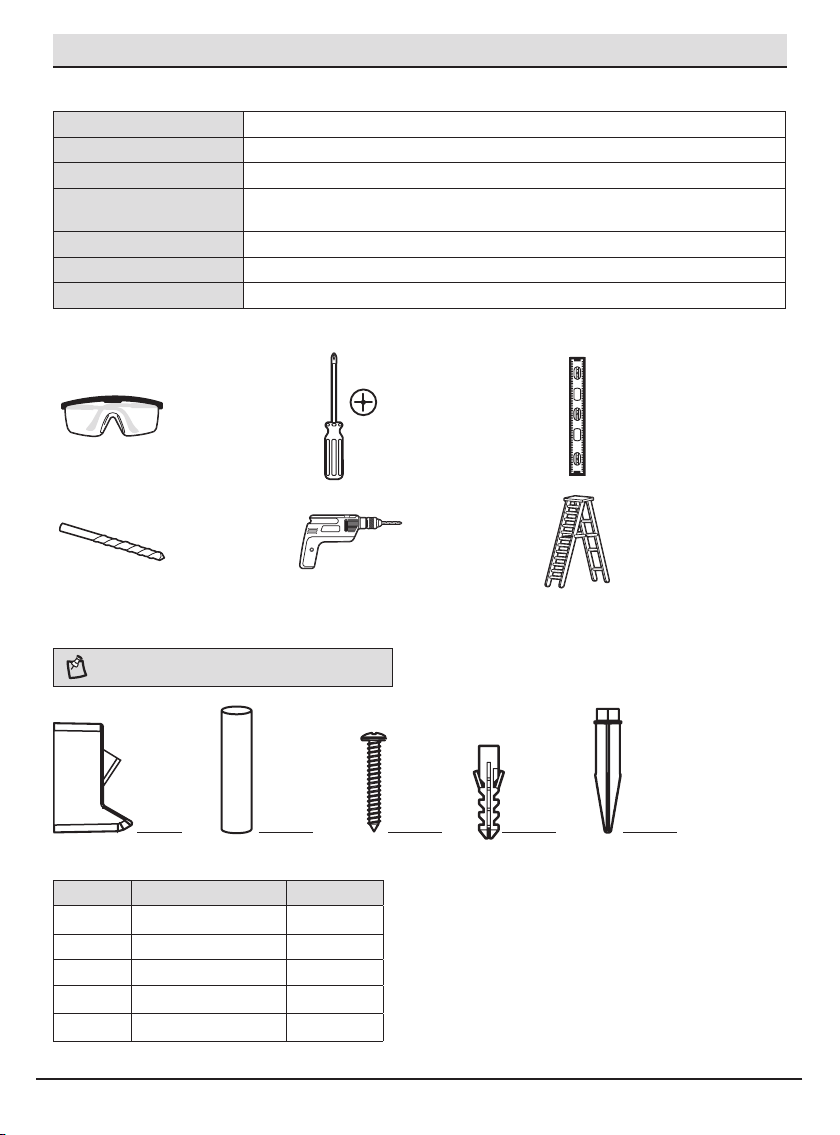
TOOLS REQUIRED
Safety goggles Phillips
screwdriver Level
Drill Bits
(3/32 in. and
7/32 in.)
Drill Ladder
HARDWARE INCLUDED
NOTE: Hardware not shown to actual size. May vary in size
and design from description.
AA DDCC EEBB
Part Description Quantity
AA Mounting bracket 1
BB Connector pipe 1
CC Mounting screws 3
DD Anchors 3
EE Ground spike 1

5 SHOPNOVOLINK.com
Please contact 1-800-933-7188 for further assistance.
Pre-Installation (continued)
PACKAGE CONTENTS
A
B
B
E
F
CD
Part Description
A Solar Panel
B 180º Motion Sensor
C Lamp Head
D Power Switch
E Light Head Rotational Axis
F Solar Panel Rotational Axis

6
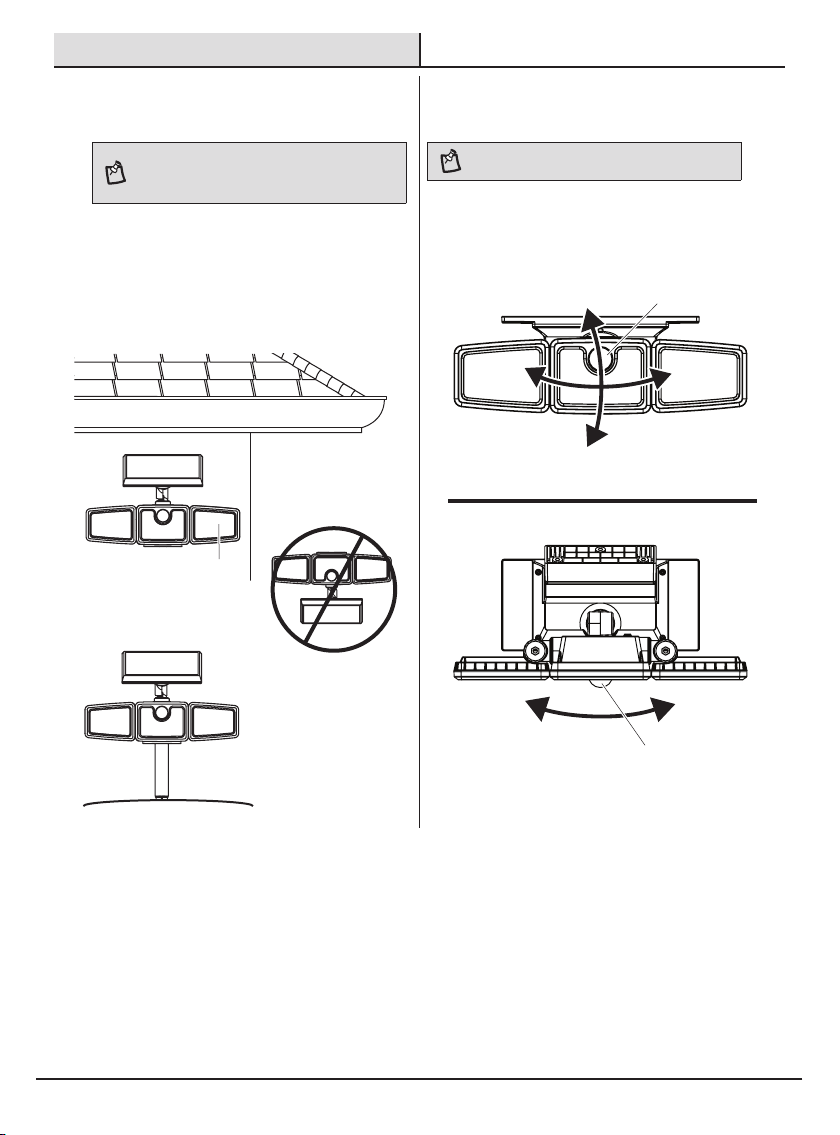
Installation
1 Determining the mounting location
NOTE: Once wall mounted, the solar panel cannot be
adjusted.
□Determine the mounting location - wall mount
(requiring the mounting bracket) or ground (requiring
the ground spike.)
□Position the lamp head (A) in the general direction of
the desired light coverage.
Wall Mount
Ground Stake Mount
Incorrect
C
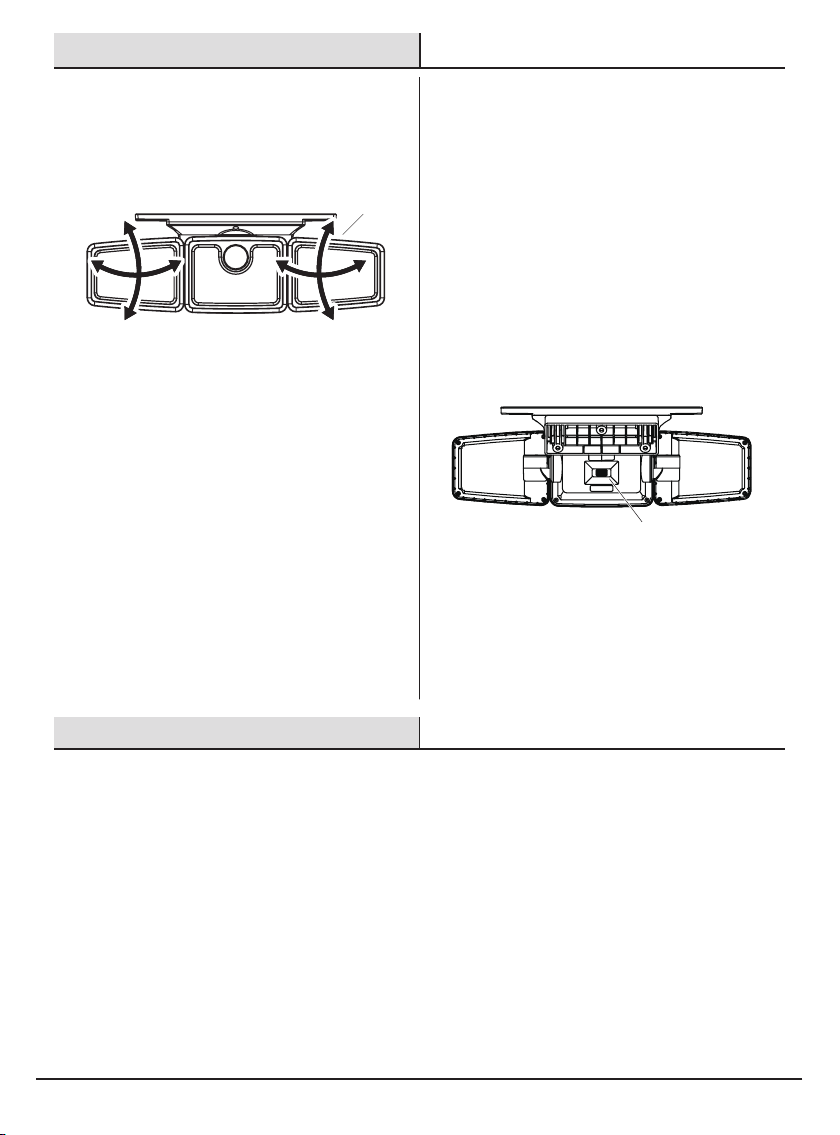
2 Setting the sensor for wall
mounting
NOTE: Adjust the sensor to the coverage desired.
□The light panel including the motion sensor (B) can be
tilted downward to an almost 90º angle, and turned
side-to-side to cover a general area.
B
B

7 SHOPNOVOLINK.com
Please contact 1-800-933-7188 for further assistance.
Installation (continued)
3 Installing the mounting plate
NOTE: Make sure there is enough vertical space above
the mounting plate to allow the light xture to be mounted.
NOTE: Make sure there is enough space on the left and
right sides of the mounting plate to allow the LED light
heads full motion.
Place the mounting plate (AA) against the mounting surface
and ensure the mounting plate (AA) is level. Mark the hole
locations on the mounting surface, through which the
mounting screws (CC) will be threaded.
□If mounting to a wooden surface, drill two 3/32 in.
holes into the mounting surface. Install the two
mounting screws (CC) through the mounting plate (AA)
and into the mounting surface.
□If mounting to wall board or brick, drill two 7/32
in. holes into the mounting surface. Insert the wall
anchors (DD) and attach the mounting plate (AA) using
the two mounting screws (CC).
View from above
AA
4 Mounting the light fixture
□Secure the screws through the mounting bracket.
Then, place the light atop the Mounting Bracket.
8
Operation
1 Adjusting the lamp heads
□If needed, gently grasp the lamp heads (A) and tilt
them up or down or side-to-side to adjust the light
coverage area
C
2 Using the ON/OFF Button
□Slide the Power switch (D) RIGHT to turn the light
ON. The lamp heads will ash once and turn OFF in
daylight. (If turned ON at night, the light will not ash.)
□The light should remain ON for continuous operation,
and there is no need to actively turn the unit ON and
OFF regularly.
□When the light detects motion, it will activate. The
light will turn OFF 30 seconds after motion is no
longer detected.
□Slide the Power switch (D) LEFT to turn the light OFF
if the light will not be used for an extended period of
time.
OFF/ON
D
Care and Cleaning
□To prolong the original appearance, clean the light xture with clear water and a soft, damp cloth only.
□Periodically clean the solar panel with a soft cloth and warm water. Do not hose spray. Keep the panel clear of snow and
leaves. Make sure trees and other objects do not block sunlight from the panel.
□Do not use paints, solvents, or other chemicals on this light xture. They could cause a premature deterioration of the
nish. This is not a defect in the nish and will not be covered by the warranty.
□Do not spray the light xture with a hose or power washer.
□If not to be used for several weeks, turn the unit OFF. Store it with the panel connected and where the panel can gather
sunlight.

9 SHOPNOVOLINK.com
Please contact 1-800-933-7188 for further assistance.
Troubleshooting
Problem Possible Cause Solution
The light will not turn ON
at night, or the motion
sensor appears not to
detect motion.
The Power button is in the
OFF position.
Make sure the Power button is in the ON position.
The batteries may be
depleted. This can occur
if there are poor charging
conditions, or if the
product has been in use
for more than a year.
Contact Novolink Customer Service at 1-800-933-7188. While the
battery is not covered under the limited warranty, we may be able
to assist you, especially if the unit has been in operation for less
than a year.
The solar panel is not
positioned correctly or
optimally.
Adjust the panel angle to face southward for sufcient and direct
sunlight.
The solar panel must face the southern sky, with clear exposure to
the sun.
The motion sensor is not
detecting motion.
Make sure the sensor is not covered, and is free of dirt or debris.
Also look for lights in the area that may register to the sensor as
sunlight.
Light from the immediate
environment (light
poles, headlights, other
oodlights) acts similar
to daylight to the light
sensor.
Move to another area, or adjust the position of the light.
The surrounding air
temperature is too hot
(greater than 122°F
(50°C)) or too cold less
(than -4°F (-20°C)).
The light will operate normally when temperatures return within
operational range.
Placing the light in areas that are not directly exposed to extreme
temperatures may extend operation time.
The light turns ON during
the day.
The light is mounted in a
dark or shaded location.
Note: The light is NOT designed to turn ON in daylight.
Move the light to a location that receives daylight.
The light appears dimmer
than normal.
The rechargeable Lithium
batteries are low.
Allow the light to charge for 5 hours of continuous sunlight.
The light is not detecting my pet (i.e., dog, cat, small
animal.)
The motion sensor is not designed to register the IR motion of pets
and small animals.

Questions, problems, missing parts? Before returning to the store,
call Novolink Customer Service
Monday-Friday, 8:30 a.m. - 5:30 p.m., PST
1-800-933-7188
WWW.SHOPNOVOLINK.COM
NOVOLINK, INC.
Chino, CA. 91710
Retain this manual for future use.

¡Gracias por elegir a Novolink!
Visítenos en línea para ver nuestra línea completa de productos disponibles para las necesidades
de iluminación y seguridad de su hogar.
GUÍA DE USO Y CUIDADO
LÁMPARA DE SEGURIDAD DETECTORA
DEMOVIMIENTO
¿Tiene preguntas o problemas, o le faltan piezas? Antes de devolver a la tienda,
llame a Atención al Cliente de Novolink
Lunes a viernes de 8:30 a.m. - 5:30 p.m. PST
1-800-933-7188
WWW.SHOPNOVOLINK.COM
Model #NVL-0853G-BK

2
Índice
Información de seguridad .......................2
Precauciones .........................................2
Garantía.....................................................2
Garantía limitada por 1 año ...................2
Qué es lo que cubre...............................2
Qué es lo que no cubre..........................2
Antes de la instalación.............................3
Planicación de la instalación ...............3
Funcionamiento de la batería ................3
Carga inicial de la batería......................3
Ubicación de montaje ............................3
Panel solar.............................................3
Especicaciones....................................4
Herramientas requeridas .......................4
Herraje incluido......................................4
Contenido del paquete...........................5
Instalación ................................................6
Funcionamiento........................................8
Cuidado y limpieza ...................................8
Resolución de fallas .................................9
Información de seguridad
PRECAUCIONES
□Lea y entienda este manual por completo antes de
intentar ensamblar, operar o instalar esta lámpara.
□No sumerja los componentes en líquido.
□No utilice ningún otro dispositivo de carga que no
sea el panel de carga solar único provisto para esta
lámpara. De lo contrario, puede causar lesiones o
daños a la lámpara y anulará cualquier garantía.
Garantía
ADVERTENCIA: Para evitar posibles LESIONES GRAVES
o la MUERTE, nunca permita que los niños pequeños se
acerquen a las baterías. Si se ingiere una batería, notique
inmediatamente a un médico.
ADVERTENCIA: NO DESECHE LAS BATERÍAS EN EL
FUEGO. LAS BATERÍAS PUEDEN EXPLOTAR O TENER FUGAS.
GARANTÍA LIMITADA POR 1 AÑO
QUÉ SE CUBRE
Este producto está garantizado contra piezas defectuosas de fábrica y mano de obra por un período de 1 año apartir
de la fecha de compra. El recibo de compra es necesario para todos los reclamos de garantía.
QUÉ NO SE CUBRE
Esta garantía no incluye servicio de reparación, ajuste y calibración debido al mal uso, abuso o negligencia. El servicio
no autorizado o la modicación del producto o de cualquier componente proporcionado anularán esta garantía en su
totalidad. Esta garantía no incluye reembolso por inconveniencias, instalación, tiempo de preparación, pérdida de uso,
servicio no autorizado o gastos de envío de devolución. Esta garantía no se extiende a otros equipos y componentes
que el cliente utilice junto con este producto, incluida la batería.
No hay piezas de repuesto disponibles para este producto.
Comuníquese con el equipo de Atención al Cliente al 1-800-933-7188 o visite www.shopNovolink.com.
3 SHOPNOVOLINK.com
Comuníquese con el 1-800-933-7188 para obtener más ayuda.
Antes de la instalación
PLANIFICACIÓN DE LA INSTALACIÓN
Antes de instalar la lámpara, asegúrese de que todas
las piezas estén presentes. Verique las piezas con las
secciones de Herraje incluido y Contenido del paquete. Si
alguna pieza falta o está dañada, no intente montar, instalar
o utilizar esta lámpara.
Tiempo estimado de instalación: 30 minutos
FUNCIONAMIENTO DE LA BATERÍA
Esta lámpara funciona con baterías cargadas por el panel
solar acoplado. Si el voltaje de las baterías de níquel-metal
hidruro (Ni-MH) se reduce a 3 V, la lámpara no se encenderá
cuando se active el sensor de movimiento. Cuando el panel
solar haya recargado las baterías de Ni-MH, y el voltaje esté
por encima de 3 V, la lámpara volverá a la operación normal.
CARGA INICIAL DE LA BATERÍA
IMPORTANTE: Las nubes, lluvia, nieve y otras
condiciones meteorológicas pueden impedir que el panel
solar recargue completamente a las baterías. Otras
obstrucciones tales como edicios o árboles pueden
bloquear al sol también.
□ANTES DE SU USO, las baterías requerirá de 1 a
2 días de luz solar directa y plena para cargarse
completamente con el interruptor en la posición de
apagado. Conecte el enchufe del cable del panel solar
con el conector que se extiende desde la parte inferior
de la carcasa de la lámpara. Si es posible, apunte el
panel solar hacia el sur e inclínelo aproximadamente
50° de la horizontal.
□El tiempo de funcionamiento real variará dependiendo
de la frecuencia con la que el sensor de movimiento
encienda la lámpara.
□La iluminación solar no está diseñada para igualar la
iluminación estándar de 120 V. La emisión de luz es
reducida para permitir que durante el horario diurno
las baterías se recargue completamente entre los
ciclos de iluminación.
□La carga solar sólo es ecaz bajo la luz solar directa.
Por cada hora que la lámpara esté encendida se
requiere un mínimo de 5 horas de carga a la luz del
sol.
UBICACIÓN DE MONTAJE
El factor más importante a recordar para el funcionamiento
de su lámpara solar detectora de movimiento es que esta
funciona con la energía recibida de la luz directa del sol. El
panel solar funciona mejor cuando se coloca en la parte
orientada al sur de una estructura, o en un área que recibe
mucha luz solar..Cuanta más luz solar directa reciba el panel
solar en un día, mayor será la duración de la luz. Asegúrese
de que haya una cantidad mínima de obstrucciones entre el
panel solar y el sol.
Mala posición: los árboles bloquean
la entrada de luz solar al panel solar
Buena posición: orientada hacia
el sur sin obstrucciones
South
LÁMPARA
La unidad principal contiene los LED, un sensor de
movimiento y baterías de litio recargables. Cuando decida
dónde montar o estacar esta unidad, tenga en cuenta que
el sensor de movimiento que activa la luz tiene un “campo
de visión” de 8 m (26,25 pies) frente a la luz y un ángulo
de detección de aproximadamente 180° a su alrededor.
temperatura del aire de 77°F (25°C).
PANEL SOLAR
El panel solar convierte la energía del sol en electricidad,
recargando así las baterías que se encuentra en la lámpara
solar. El panel solar requiere que la luz solar directa caiga
sobre la supercie del panel durante el mayor tiempo
posible a lo largo deldía.
NOTA: Al mediodía, ajuste el panel solar para que esté de
frente al sol. Durante cualquier época del año, este ajuste
proporcionará un posicionamiento óptimo para la recolección
de energía solar.
4
Antes de la instalación (continuación)
ESPECIFICACIONES
Alcance Hasta 26.25 pies (8 m) (varía con la temperatura ambiente)
Ángulo de detección Hasta 180°
Lúmenes 520 LM
Requerimientos de
alimentación
Solar panel and rechargeable Lithium batteries
Modos de funcionamiento Movimiento
Tiempo de demora 30 segundos
Water-resistance IP44
HERRAMIENTAS REQUERIDAS
Gafas de
seguridad
Destornillador
Phillips Nivel
Brocas de
taladro (3/32” y
7/32”)
Taladro Escalera
HERRAJE INCLUIDO
NOTA: El producto real puede variar en tamaño y diseño de la
descripción.
AA DDCC EEBB
Pieza Descripción Cantidad
AA Soporte de montaje 1
BB Tubo conector 1
CC Tornillos de montaje 3
DD Anclajes 3
EE Espiga de tierra 1

5 SHOPNOVOLINK.com
Comuníquese con el 1-800-933-7188 para obtener más ayuda.
Antes de la instalación (continuación)
CONTENIDO DEL PAQUETE
A
B
B
E
F
CD
Pieza Descripción
A Panel solar
B 180º Sensor de movimiento
C Cabeza de la lámpara
D Botón de encendido
E Eje de rotación del cabezal de luz
F Eje de rotación del panel solar
6
Instalación
1 Determinación de la ubicación de
montaje
NOTA: Nota: Una vez montado en la pared, el panel solar
no se puede ajustar. Por esta razón, seleccione un área
de montaje en pared que reciba luz solar abundante y sin
obstrucciones todos los días.
□Determine la ubicación de montaje: montaje en pared
(requiere el soporte de montaje) o tierra (requiere la
pica de tierra).
□Coloque el cabezal de la lámpara (C) en la dirección
general de la cobertura deseada de la luz.
Montaje
en la pared
Montaje de punta de tierra
Incorrecta
C
2 Ajuste del sensor para montaje en
la pared
NOTA: Ajuste el ángulo del sensor a la cobertura deseada.
□El panel de luz que incluye el sensor de movimiento
(B) se puede inclinar hacia abajo hasta un ángulo de
casi 90º y girar de lado a lado para cubrir un área
general.
B
B

7 SHOPNOVOLINK.com
Comuníquese con el 1-800-933-7188 para obtener más ayuda.
Installation (continued)
3 IInstalación de la placa de montaje
NOTA: Asegúrese de que haya suciente espacio vertical
por encima de la placa de montaje para que la lámpara se
pueda montar.
NOTA: Asegúrese de que haya suciente espacio en los
lados izquierdo y derecho de la placa de montaje para
permitir que los cabezales de luz LED se muevan por
completo.
Coloque la placa de montaje (AA) contra la supercie de
montaje y asegúrese de que la placa de montaje (AA) esté
nivelada. Marque los oricios en la supercie de montaje, a
través de los cuales se enroscarán los tornillos de montaje
(CC).
□Si se monta en una supercie de madera, taladre
dos oricios de 3/32 de pulgada en la supercie de
montaje. Instale los dos tornillos de montaje (CC) a
través de la placa de montaje (AA) y en la supercie
de montaje.
□Si se monta en una pared de panel o de ladrillos,
taladre dos oricios de 7/32 de pulgada en la
supercie de montaje. Inserte los anclajes de pared
(DD) y je la placa de montaje (AA) con los dos
tornillos de montaje (CC).
Vista desde arriba
AA
4 Montaje de la lámpara
□Asegure los tornillos a través del soporte de montaje.
Luego, coloque la luz encima del soporte de montaje.

8
Funcionamiento
5 Ajuste de las cabezas de las
lámparas
□Si es necesario, agarre suavemente las cabezas de la
lámpara (C) e inclínelas hacia arriba o hacia abajo o de
lado a lado para ajustar el área de cobertura de la luz.
C
6 Cómo utilizar el botón de
encendido/apagado
□Deslice el interruptor de encendido (D) hacia la
DERECHA para encender la luz. Los cabezales de
las lámparas parpadearán una vez y se apagarán a
la luz del día. (Si se enciende por la noche, la luz no
parpadeará).
□La lámpara debe permanecer encendida para el
funcionamiento continuo, y no hay necesidad de
encender y apagar la unidad de manera regular.
□Cuando la luz detecta movimiento, se activará. La luz
se apagará 30 segundos después de que ya no se
detecte movimiento.
□Deslice el interruptor de encendido (D) hacia la
IZQUIERDA para APAGAR la luz si no se utilizará
durante un período de tiempo prolongado.
OFF/ON
D
Cuidado y limpieza
□Para prolongar el aspecto original, limpie la lámpara con agua limpia y un paño suave y húmedo solamente.
□Limpie periódicamente el panel solar con un paño suave y agua tibia. No lo rocíe con una manguera. Mantenga el panel
libre de nieve y hojas. Asegúrese de que los árboles y otros objetos no bloqueen la luz solar del panel.
□No utilice pinturas, disolventes u otros químicos en esta lámpara. Pueden causar un deterioro prematuro del acabado.
Esto no es un defecto en el acabado y no será cubierto por la garantía.
□No rocíe la lámpara con una manguera o una rociadora eléctrica a presión.
□Apague la unidad si no se va a utilizar durante varias semanas. Guárdela con el panel conectado y donde el panel pueda
recibir la luz del sol.
9 SHOPNOVOLINK.com
Comuníquese con el 1-800-933-7188 para obtener más ayuda.
Resolución de fallas
Problem Possible Cause Solution
La lámpara no enciende
en la noche o el sensor
de movimiento parece no
detectar el movimiento.
El botón de encendido
está en la posición de
apagado (OFF).
Asegúrese de que el botón de encendido esté en la posición ON.
Las baterías pueden estar
agotadas. Esto puede
ocurrir si hay malas
condiciones para la carga
o si el producto ha estado
en uso durante más de
un año.
Comuníquese con el Servicio de atención al cliente de Novolink al
1-800-933-7188. Si bien la batería no está cubierta por la garantía
limitada, es posible que podamos ayudarlo, especialmente si la
unidad ha estado en funcionamiento por menos de un año.
El panel solar no está
colocado de manera
correcta u óptima.
Ajuste el ángulo del panel hacia el sur para obtener suciente luz
solar directa.
El panel solar debe estar orientado hacia el sur, con clara
exposición al sol.
El sensor de movimiento
no detecta movimiento.
Asegúrese de que el sensor no esté cubierto y que no tenga
suciedad ni residuos. También busque luces en el área que puedan
registrarse en el sensor como luz solar.
La luz del entorno
inmediato (postes de
alumbrado, faros, otros
reectores) actúa de
manera similar a la luz
diurna para el sensor
de luz.
Muévase a otra área o ajuste la posición de la luz.
La temperatura del aire
circundante es muy alta
(superior a 122 °F (50°C)
o muy baja (inferior a
-4°F (-20 °C)).
La lámpara funcionará normalmente dentro del rango de
temperatura especicado.
Colocar la lámpara en áreas que no estén directamente expuestas
a temperaturas extremas puede extender el tiempo de operación.
La lámpara se enciende
durante el día.
La lámpara se ha montado
en un lugar oscuro o
sombreado.
Nota: La lámpara NO está diseñada para encenderse durante el día.
Mueva la luz a un lugar que reciba la luz del día.
La luz aparece más
atenuada de lo normal
Las baterías recargables
de lithium tienen poca
carga.
Permita que la lámpara se cargue durante 5 horas de luz solar
continua.
La luz no está detectando mi mascota (p. ej., perro,
gato, animal pequeño).
El sensor de movimiento no está diseñado para registrar el
movimiento IR de mascotas y animales pequeños.

¿Tiene preguntas o problemas, o le faltan piezas? Antes de devolver a la tienda,
llame a Atención al Cliente de Novolink
Lunes a viernes de 8:30 a.m. - 5:30 p.m., PST
1-800-933-7188
WWW.SHOPNOVOLINK.COM
NOVOLINK, INC.
Chino, CA. 91710
Guarde este manual para su uso futuro.
Table of contents
Languages:
Other Novolink Lighting Equipment manuals


Popular Lighting Equipment manuals by other brands

Larson Electronics
Larson Electronics EPL-AMB-150LED-50 instruction manual

thomann
thomann Stairville Big Par 24x12 HEX RGBAW/UV BL user manual

Titanium
Titanium TT-TRK-5W-1R quick start guide

YORKVILLE
YORKVILLE LP-LED4 Service manual

EuroLite
EuroLite Pro Flood 1000S user manual

Uplus Lighting
Uplus Lighting IP1000 Strobe user manual


