Novy 6830053 User manual
NL Gebruiksaanwijzing p. 2
FR Mode d’emploi p. 2
DE Bedienungsanleitung S. 3
EN User manual p. 3
ES Manual de empleo p. 4
IT Istruzione d’uso p. 4
PL Instrukcja obsługi str. 5
CZ Návod k obsluze str. 5
6830053 110130 MAB1
Novy
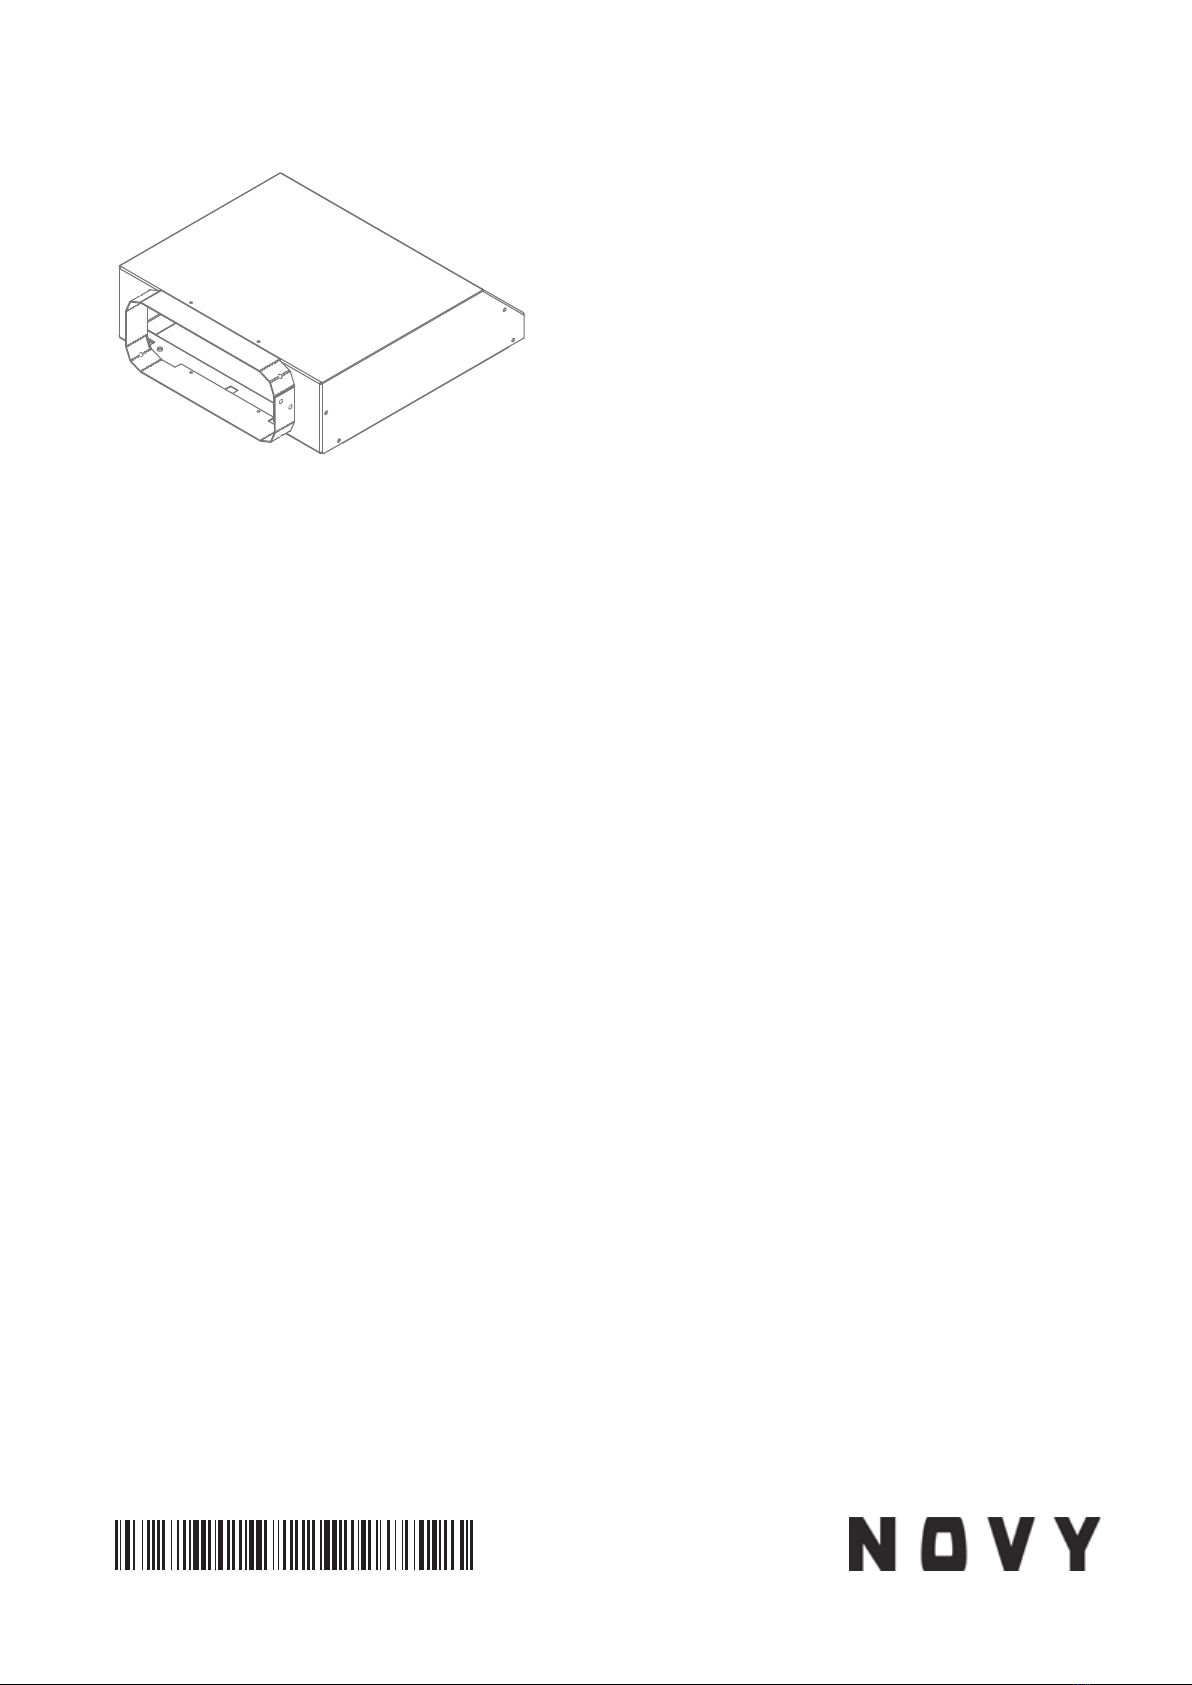
6830053 Pureline Cubic
6830/6831/6833/6834
6835/6836/6838/6839
6840/6841/6843/6844
6845/6846/6848/6849
NL
1 VOORSCHRIFTEN VOOR VEILIGHEID EN
MONTAGE
Meer informatie over de Novy producten, accessoires en
diensten kunt u vinden op internet:
− België: www.novy.be
− Nederland: www.novynederland.nl
Dit is de montage instructie voor het toestel zoals op de
voorzijde is aangegeven.
In deze montage instructie wordt gewerkt met een aantal
symbolen. Hieronder vind u de betekenis van deze symbolen.
Symbool Betekenis Actie
Indicatie Toelichting van een
indicatie op het toestel.
Info/
Waarschuwing
Dit symbool duidt op
een belangrijke tip of een
gevaarlijke situatie
Waarschuwing voorafgaand montage
− Lees aandachtig de gebruiksaanwijzing en de montage
instructie vóór de installatie en ingebruikname van dit
toestel. Hierin vind u belangrijke informatie voor de mon-
tage en gebruik van het toestel.
− Controleer aan de hand van tekening A of alle monta-
gematerialen meegeleverd zijn.
−
Het toestel is uitsluitend bedoeld voor huishoudelijk ge-
bruik (bereiding van voedingsmiddelen) met uitsluiting
van alle ander huishoudelijk, commercieel of industrieel
gebruik. Gebruik het toestel niet buitenshuis.
− Bewaar deze handleiding zorgvuldig en geef deze door
aan de persoon die het toestel eventueel na u gebruikt.
−
Dit toestel voldoet aan de geldende veiligheidsvoorschrif-
ten. Ondeskundige montage kan echter persoonlijk letsel
en schade aan het toestel veroorzaken.
−
Controleer de staat van het toestel en het montage-
materiaal zodra u ze uit de verpakking haalt. Neem het
toestel met zorg uit de verpakking. Gebruik geen scherpe
messen om de verpakking te openen.
−
Installeer het toestel niet indien het beschadigd is en
richt u in dat geval tot Novy.
−
Novy is niet aansprakelijk voor schade als gevolg van
onjuiste montage, onjuiste aansluiting, onjuist gebruik
of onjuiste bediening.
− Het toestel niet ombouwen of wijzigen.
−
Metalen onderdelen kunnen scherpe kantjes hebben
en u kunt zich eraan verwonden. Draag daarom bij het
monteren handschoenen die u daartegen beschermen.
FR
1 PRESCRIPTIONS DE SÉCURITÉ ET
D’INSTALLATION
Vous trouverez plus d’informations sur les produits, acces-
soires et services Novy sur Internet : www.novy.fr
Ceci est la notice de montage de l’appareil identifié en
première page.
Cette notice de montage utilise un certain nombre de
symboles. Vous trouverez ci-dessous la signification de
ces symboles.
Symbole Signification Action
Indication Explication d’une indication
apparaissant sur l’appareil
Avertissement Ce symbole signale un
conseil important ou une
situation dangereuse
Avertissements préalables au montage
− Veuillez lire attentivement le mode d’emploi et la notice
de montage avant d’installer et de mettre en service cet
appareil. Vous y trouverez des informations importantes
pour le montage et l’utilisation de l’appareil.
− Vérifiez sur base du schéma A que tout le matériel de
montage est inclus.
−
L’appareil est exclusivement destiné à un usage domes-
tique (préparation d’aliments), à l’exclusion de tout autre
usage domestique, commercial ou industriel. N’utilisez
pas l’appareil en extérieur.
−
Conservez soigneusement cette notice et remettez-le
à la personne qui pourrait utiliser l’appareil après vous.
−
Cet appareil est conforme aux règles de sécurité en vigueur.
Toutefois, une utilisation non conforme peut entraîner
des blessures corporelles et endommager l’appareil.
−
Vérifiez l’état de l’appareil et du matériel de montage dès
que vous les sortez de l’emballage. Retirez l’appareil de
l’emballage avec précaution. N’utilisez pas de couteaux
pointus pour ouvrir l’emballage.
−
Si l’appareil est endommagé, ne l’installez pas et contac-
tez Novy.
−
Novy n’est pas responsable des dommages résultant
d’un montage, d’un raccordement, d’une utilisation ou
d’un maniement incorrects.
− Ne pas transformer ni modifier l’appareil.
−
Les pièces métalliques peuvent présenter des arêtes
vives et peuvent occasionner des blessures. Dès
lors, portez des gants qui vous en préservent lors
de l’assemblage.
– 2 –

EN
1 INSTRUCTIONS FOR SAFETY AND USE
Further information on Novy products, accessories and
services may be found on the internet: www.novy.co.uk
These are the installation instructions for the appliance
shown on the front.
These directions for use make use of a number of symbols.
The meanings of the symbols are shown below.
Symbol Meaning Action
Indication Explanation of an indication on
the device.
Warning This symbol indicates an
important tip or a dangerous
situation
Warnings before installation
− Read the directions for use and the installation instruc-
tions before installing and using this appliance. You will
find important information here for the assembly and
use of the appliance.
−
Check on the basis of the drawing A that all the materials
for installation have been supplied.
−
The appliance is intended exclusively for household use
(preparation of food) and excludes all other domestic,
commercial or industrial use. Do not use the appliance
outside.
−
Keep good care of this manual and pass it on to any
person who may use the appliance after you.
− This appliance complies with the applicable safety in-
structions. However, inexpert installation may cause
personal injury or damage to the appliance.
−
Check the condition of the appliance and the installation
fittings as soon as you remove them from the packaging.
Remove the appliance from the packaging with care. Do
not use sharp knives to open the packaging.
− Do not install the appliance if it is damaged, and in that
case inform Novy.
−
Novy is not liable for damage resulting from incorrect
assembly, incorrect connection, incorrect use or incorrect
operation.
− Do not convert or alter the appliance.
− Metal parts may have sharp edges, and you may injure
yourself on them. For that reason, wear protective gloves
during installation.
DE
1 SICHERHEITS- UND
MONTAGEVORSCHRIFTEN
Weitere Informationen zu den Produkten, dem Zubehör
und den Dienstleistungen von Novy finden Sie im Internet
unter: www.novy-dunsthauben.de
Diese Broschüre enthält die Montageanleitung für das
Gerät, wie auf der Vorderseite angegeben.
In dieser Montageanleitung werden einige Symbole ver-
wendet. Nachfolgend finden Sie eine Erklärung dieser
Symbole.
Symbol Bedeutung Aktion
Anzeige Erläuterung einer Anzeige auf
dem Gerät
Warnhin-
weis
Dieses Symbol weist auf
einen wichtigen Tipp oder
eine gefährliche Situation hin.
Warnhinweise vor der montage
−
Lesen Sie die Gebrauchsanweisung und Montageanleitung
sorgfältig durch, bevor Sie dieses Gerät installieren und
in Betrieb nehmen. Darin sind wichtige Informationen in
Bezug auf die Installation und Verwendung des Geräts
enthalten.
− Überprüfen Sie anhand der Zeichnung A, ob alle Mon-
tagematerialien vorhanden sind.
−
Das Gerät ist nur für den Hausgebrauch (Zubereitung von
Lebensmitteln) bestimmt, unter Ausschluss aller anderen
haushaltlichen, gewerblichen und industriellen Zwecke.
Das Gerät darf nicht im Freien verwendet werden.
− Bewahren Sie diese Anleitung sorgfältig auf und geben
Sie sie an die Person weiter, die das Gerät möglicher-
weise nach Ihnen benutzt.
−
Dieses Gerät erfüllt die geltenden Sicherheitsvorschriften.
Eine unsachgemäße Montage kann jedoch zu Verletzun-
gen und Schäden am Gerät führen.
−
Überprüfen Sie den Zustand des Geräts und des Monta-
gematerials, sobald Sie es aus der Verpackung nehmen.
Nehmen Sie das Gerät sorgfältig aus der Verpackung.
Verwenden Sie zum Öffnen der Verpackung keine schar-
fen Messer.
−
Installieren Sie das Gerät nicht, wenn es beschädigt ist,
und wenden Sie sich in diesem Fall an Novy.
− Novy haftet nicht für Schäden, die durch falsche Mon-
tage, falschen Anschluss, unsachgemäße Verwendung
oder falsche Bedienung entstehen.
− Das Gerät darf nicht umgebaut oder verändert werden.
−
Metallteile können scharfe Kanten haben, an denen
Sie sich verletzen können. Tragen Sie bei der Montage
Handschuhe, die Sie vor Verletzungen schützen.
– 3 –
ES
1 INSTRUCCIONES SOBRE SEGURIDAD Y
MONTAJE
Si desea más información sobre productos, acceso-
rios y servicios Novy, consulte nuestra página web en:
www.novy.es
Estas son las instrucciones de montaje para el equipo que
se indica en la portada.
En este manual de montaje se usan una serie de símbolos.
Este es el significado de estos símbolos:
Símbolo Significado Acción
Indicación Explicación de una indica-
ción en el dispositivo.
Advertencia Este símbolo indica un
aviso importante o una
situación peligrosa.
Advertencias antes del montaje
−
Lea atentamente el manual de instrucciones y de montaje
antes de instalar y poner en marcha este equipo. Aquí
encontrará información importante sobre el montaje y
puesta en marcha del equipo.
− Compruebe que se le hayan entregado todos los ma-
teriales de montaje en base a la figura A.
−
El equipo solo sirve para uso doméstico (preparación de
alimentos), excluyendo cualquier otro uso doméstico,
comercial o industrial. No use el equipo en exteriores.
−
Guarde bien este manual y páselo a la persona que vaya
a usar el equipo después de usted.
−
Este equipo cumple las directivas vigentes sobre seguri
-
dad. El montaje no profesional puede provocar lesiones
personales y daños materiales al equipo.
−
Compruebe el estado del equipo y el material de montaje
en cuanto lo saque del paquete. Saque cuidadosamente
el equipo del embalaje. No utilice cuchillas afiladas para
abrir el embalaje.
− No instale el equipo si está dañado. En ese caso, pón-
gase en contacto con Novy.
−
Novy no se responsabiliza de cualquier daño como con-
secuencia de un montaje, conexión, uso o accionamiento
incorrectos.
− No transforme o modifique el equipo.
− Las piezas de metal pueden estar afiladas y se puede
lesionar. Por eso, cuando haga el montaje, lleve guantes
de protección.
IT
1 NORME DI SICUREZZA E DI
MONTAGGIO
Ulteriori informazioni sui prodotti, gli accessori e i servizi
di Novy sono disponibili su internet: www.novy.it
Le presenti istruzioni per l’uso sono riferite all’apparecchio
Novy indicato sul frontespizio.
In questo manuale sono stati utilizzati alcuni simboli. Di
seguito è indicato il significato di questi simboli.
Simbolo Significato Azione
Indicatore Spiegazione di
un’indicazione sull’apparec-
chio.
Avvertenza Questo simbolo indica un
suggerimento importante o
una situazione pericolosa
Avvertenze da osservare prima del
montaggio
−
Leggere con attenzione le presenti istruzioni per l’uso
e il montaggio prima dell’installazione e della messa in
funzione dell’apparecchio. Esse contengono informazioni
importanti per l’installazione e l’utilizzo dell’apparecchio.
− Controllare sulla base del disegno A che tutti i materiali
di montaggio siano stati consegnati.
−
L’apparecchio è destinato esclusivamente all’utilizzo
domestico (preparazione dei cibi), con esclusione di ogni
altro uso domestico, commerciale o industriale. Non
utilizzare l’apparecchio all’aperto.
−
Conservare con cura le istruzioni e se necessario conse-
gnarle alla persona che utilizzerà l’unità successivamente.
−
Questo apparecchio è conforme alle norme di sicurezza
applicabili. Tuttavia un’installazione impropria può causare
lesioni personali e danni all’apparecchio.
− Controllare lo stato dell’apparecchio e del materiale di
montaggio al momento dell’estrazione dall’imballaggio.
Usare cautela nell’estrarre l’apparecchio dall’imballag-
gio. Non utilizzare lame appuntite o taglienti per aprire
l’imballaggio.
−
Non installare l’apparecchio se risulta danneggiato; in
tal caso rivolgersi a Novy.
−
Novy non si assume alcuna responsabilità per danni
derivanti da installazione impropria, collegamento im-
proprio, uso improprio o azionamento improprio.
−
Non apportare modifiche o trasformazioni sull’apparecchio.
− I componenti in metallo possono avere bordi e spigoli
taglienti che potrebbero causare ferite. Pertanto indossare
guanti di protezione durante il montaggio.
– 4 –
PO
1 ZASADY BEZPIECZEŃSTWA I
MONTAŻU
Więcej informacji o produktach, akcesoriach i usługach
Novy znajdziesz na stronie internetowej: www.novy.com
Jest to instrukcja montażu urządzenia, zgodnie z informacją
podaną na pierwszej stronie.
W niniejszej instrukcji montażu zastosowanych zostało
kilka symboli. Poniżej podajemy ich znaczenie.
Symbol Znaczenie Akcja
Wskaźnik Objaśnienie wskazania na
urządzeniu
Ostrzeżenie Istotna wskazówka lub nie-
bezpieczna sytuacja
Uwagi przed montażem
−Przed instalacją i użyciem urządzenia należy dokładnie
zapoznać się z instrukcją obsługi i montażu. Znajdziesz
w nich istotne informacje odnośnie instalacji i wykorzy-
stywania urządzenia.
−
Na podstawie ilustracji A sprawdź, czy dostarczone zo-
stały wszystkie materiały montażowe.
−Urządzenie przeznaczone jest wyłącznie do użytku do-
mowego (przygotowanie żywności), za wyjątkiem innego
użytku domowego, komercyjnego czy przemysłowego.
Z urządzenia nie należy korzystać poza domem.
−
Instrukcję należy przechowywać i przekazać osobie, która
będzie po Tobie korzystać z tego urządzenia.
−
Niniejsze urządzenie spełnia obowiązujące przepisy bez-
pieczeństwa. Niekompetentny montaż może prowadzić
do uszkodzeń ciała lub urządzenia.
−
Skontroluj stan urządzenia i materiału montażowego tuż
po wyciągnięciu go z opakowania. Urządzenie należy
ostrożnie rozpakować. Do otwarcia opakowania nie należy
wykorzystywać ostrych noży.
−
Nie należy instalować urządzenia jeśli jest ono uszko-
dzone. Taką sytuację należy zgłosić firmie Novy.
−
Firma Novy nie ponosi odpowiedzialności za szkody
powstałe w wyniku niewłaściwego montażu, podłączenia,
użytkowania lub obsługi.
−Nie należy przebudowywać ani zmieniać urządzenia.
−
Części metalowe mogą mieć ostre brzegi, którymi można
się skaleczyć. Dlatego podczas montażu należy nosić
rękawice ochronne.
CZ
1 BEZPEČNOSTNÍ A MONTÁŽNÍ
PŘEDPISY
Více informací o výrobcích, příslušenství a službách spo-
lečnosti Novy najdete na internetu: www.novy-odsavace.cz
Toto je návod k montáži pro zařízení, které je uvedené na
přední straně.
V těchto pokynech k montáži se používá několik symbolů.
Níže naleznete jejich význam.
Symbol Význam Akce
Indikace Vysvětlení symbolů na
zařízení
Varování Důležitý tip nebo nebezpečná
situace
Varování před zahájením montáže
−Před instalací a zahájením používání tohoto zařízení si
pozorně přečtěte návod k použití a pokyny pro montáž.
Obsahují důležité informace pro montáž a používání zařízení.
−
Podle kresby A zkontrolujte, zda balení obsahuje veškeré
montážní materiály.
−
Zařízení je určeno výhradně k použití v domácnosti (k
přípravě potravin) s výjimkou jakéhokoli jiného použití v
domácnosti, použití ke komerčním účelům či průmys-
lového využití. Zařízení nepoužívejte venku.
−
Tuto příručku pečlivě uschovejte a předejte ji osobě,
která bude zařízení případně používat po vás.
−
Toto zařízení splňuje platné bezpečnostní předpisy.
Neodborná montáž však může vést ke zranění osob a
poškození zařízení.
−
Po vyjmutí z obalu zkontrolujte stav zařízení a montážních
materiálů. Vyjměte zařízení opatrně z obalu. K otevření
obalu nepoužívejte ostré nože.
−
Zařízení neinstalujte, pokud je poškozené. V takovém
případě se obraťte na společnost Novy.
−Společnost Novy neodpovídá za škody způsobené ne-
správnou montáží, nesprávným připojením, nesprávným
použitím nebo obsluhou.
−Nie należy przebudowywać ani zmieniać urządzenia.
−Kovové části mohou mít ostré hrany a můžete se o ně
poranit. Proto při montáži používejte rukavice, které vás
před zraněním ochrání.
– 5 –

6
1x 906292
1x 801006
1x 6830501
32
1A
4
NL
Algemeen
Dit is de montage-instructie voor
de adapter voor verlaagde in-
bouwhoogte. Deze dient recht-
streeks geïnstalleerd te worden
op de plafondunit met een plat
kanaal. Lees aandachtig de in-
stallatieinstructies van de adapter
en van de plafondunit alvorens
deze te installeren en in gebruik
te nemen.
Deze adapter altijd
monteren in combinatie met
de kit voor motor op afstand
(6830/6831/6833/6834/6840/
6841/6843/6844).
FR
Généralités
Ce manuel fournit les consignes
d’installation de l’adaptateur pour
hauteur d’installation limitée. Il
doit être installé directement sur
l’unité de plafond à l’aide d’un
conduit plat. Lisez attentivement
les consignes d’installation de
l’adaptateur et de l’unité de pla-
fond avant de les mettre en place
et de les utiliser.
Cet adaptateur doit
toujours être monté en com-
binaison avec le kit de moteur
distant (6830/6831/6833/6834/
6840/6841/6843/6844).
DU
Allgemein
Dies sind die Installationsan-
weisungen für den Adapter bei
begrenzter Installationshöhe. Er
sollte mit einem flachen Abluft-
kanal direkt an der Deckeneinheit
installiert werden. Lesen Sie die
Installationsanweisungen des
Adapters und der Deckeneinheit
vor Installation und Inbetrieb-
nahme sorgfältig.
Montieren Sie diesen
Adapter stets in Kombination
mit dem Kit für den entfernt
installierten Motor (6830/
6831/6833/6834/6840/6841/
6843/6844).
EN
General
This is the installation instruc-
tion for the adapter for limited
installation height. It should be
installed directly on the ceiling
unit with a flat duct. Carefully
read the installation instructions
of the adapter and of the ceiling
unit before installing and putting
it into operation.
Always mount this
adapter in combination with
the remote motor kit (6830/
6831/6833/6834/6840/6841/
6843/6844).
ES
General
Estas son las instrucciones de
instalación del adaptador para
una altura de instalación limitada.
Debe instalarse directamente en
la unidad de techo con un con-
ducto plano. Lea atentamente
las instrucciones de instalación
del adaptador y de la unidad de
techo antes de instalarla y ponerla
en funcionamiento.
Instale siempre este
adaptador junto con el kit de
motor remoto (6830/6831/683
3/6834/6840/6841/6843/6844).
IT
Generale
Il presente manuale contiene
le istruzioni di installazione per
l’installazione ad altezze limi-
tate. L’installazione deve essere
eseguita direttamente a soffitto
tramite tubo piatto. Leggere at-
tentamente le istruzioni di instal-
lazione dell’adattatore e dell’unità
a soffitto prima di installare e
avviare il dispositivo.
Montare sempre
l’adattatore in combinazione
con il kit motore remoto
(6830/6831/6833/6834/6840/
6841/66843/6844).
PL
Informacje ogólne
Niniejsza instrukcja montażu
dotyczy adaptera ograniczają-
cego wysokośćdla ograniczonej
wysokości montażu. Należy go
zamontować do urządzenia sufi-
towego z kanałem płaskim. Przed
zamontowaniem i uruchomie-
niem należy dokładnie przeczytać
instrukcje montażu adaptera i
urządzenia sufitowego.
Adapter ten zawsze
należy montować w połą-
czeniu z zestawem zdalnego
silnika (6830/6831/6833/6834/
6840/6841/6843/6844).
CZ
Obecné
Toto jsou montážní pokyny pro
adaptér pro omezenou výšku
montáže. Montáž se provádí pří-
mo na stropní jednotku pomocí
plochého potrubí. Před instalací
zařízení a uvedením do provozu si
pečlivě přečtěte pokyny k mon-
táži adaptéru a stropní jednotky.
Tento adaptér vždy
připojujte v kombinaci se
sadou vzdáleného motoru
(6830/6831/6833/6834/6840/
6841/6843/6844).

7
NL
1
Neem de adapter uit de verpakking. Kleef de isolatiestrip
(801.006) rondom de aansluittuit.
2
Zorg dat het platte afvoerkanaal uitmondt boven
de uitsparing in het plafond of constructie voor de
afzuigkap. Sluit op dit platte kanaal een verbindingsstuk
(906.402). Deze is niet meegeleverd.
3
Schuif de adapter in het verbindingsstuk van het platte
kanaal. Gebruik de meegeleverde aluminiumtape
(906.292) voor een luchtdichte verbinding.
4
Positionering van de adapter: ongeveeer in het
midden van de uitsparing.
ES
1
Extraiga el adaptador del embalaje. Conéctelo
a la boquilla de conexión alrededor de la tira de
aislamiento (801006).
2
Asegúrese de que el conducto plano de escape
termina por encima del hueco realizado en el techo
para la campana. Enganche una pieza de conexión
(906.402) al conducto plano (no se incluye).
3
Deslice el adaptador en la pieza de conexión del
conducto plano. Utilice la cinta de aluminio incluida
(906262) para lograr una conexión estanca.
4
Posicionamiento del adaptador: aproximadamente
en el centro del hueco del techo.
FR
1
Retirez l’adaptateur de son emballage. Appliquez
le ruban isolant (801006) tout autour du raccord.
2
Veillez à ce que le conduit d’évacuation plat débouche
au-dessus de l’ouverture dans le plafond devant la
hotte. Posez sur ce conduit plat un raccord 906.402
(non fourni).
3
Insérez l’adaptateur dans le raccord du conduit plat.
Utilisez le ruban aluminium adhésif fourni (906262)
pour obtenir un raccordement étanche.
4
Positionnement de l’adaptateur : environ au milieu
de l’ouverture dans le plafond.
IT
1
Rimuovere il dispositivo dall’imballo. Applicarlo
sull’ugello di collegamento intorno alla striscia
isolante (801006).
2
Assicurarsi che il condotto di scarico piatto termini
al di sopra dell’apertura sagomata nel soffitto per
la cappa. Applicare un connettore 906.402 al tubo
piatto (non fornito).
3
Fare scorrere l’adattatore nel connettore del tubo
piatto. Utilizzare il nastro in alluminio fornito (906262)
per un collegamento a tenuta stagna.
4
Posizionamento dell’adattatore: all’incirca a metà
dell’apertura sagomata sul soffitto.
DU
1
Nehmen Sie den Adapter aus der Verpackung.
Kleben Sie den Isolationsstreifen (801006) um
die Anschlusstülle herum.
2
Achten Sie darauf, dass der flache Abluftkanal über
der Deckenaussparung für die Dunstabzugshaube
mündet. Schließen Sie an diesen flachen Kanal ein
Verbindungsstück 906.402 (nicht mitgeliefert) an.
3
Schieben Sie den Adapter in das Verbindungsstück
des flachen Kanals. Sorgen Sie mithilfe des
mitgelieferten Aluminiumklebebands (906.262)
für einen luftdichten Abschluss.
4
Positionierung des Adapters: ungefähr in der Mitte
der Deckenaussparung.
PL
1
Wyjmij adapter z opakowania. Nałóż go na dyszę
łączącą wokół listwy izolacyjnej (801006).
2Upewnij się, że płaski kanał wylotowy kończy się
nad wycięciem w suficie pod okapem. Przymocuj
łącznik 906.402 do kanału płaskiego (nie wchodzi
w zakres dostawy).
3
Wsuń adapter do łącznika w kanale płaskim.
Użyj dostarczonej taśmy aluminiowej (906262)
do uzyskania szczelnego połączenia.
4
Pozycjonowanie adaptera: w przybliżeniu na
środku wycięcia w suficie.
EN
1Remove the adapter from the packaging. Stick it
onto the connection nozzle around the insulation
strip (801006).
2Make sure that the flat exhaust duct ends above
the cut-out opening in the ceiling for the hood.
Attach a connecting piece 906.402 to the flat duct
(not delivered).
3
Slide the adapter into the connecting piece of
the flat duct. Use the delivered aluminium tape
(906262) for an airtight connection.
4
Positioning of the adapter: approximately in the
middle of the cut-out opening in the ceiling.
CZ
1
Vyjměte adaptér zbalení. Připojte ho kpřipojovacímu
hrdlu kolem izolační pásky (801006).
2
Dávejte pozor, aby ploché výfukové vedení končilo
nad otvorem vyříznutým pro digestoř ve stropě.
Připojte připojovací díl 906.402 kplochému vedení
(není součástí dodávky).
3Zasuňte adaptér do připojovacího dílu plochého
vedení. Kzajištění vzduchotěsného spojení použijte
dodanou hliníkovou pásku (906262).
4
Umístění adaptéru: přibližně doprostřed vyříznutého
otvoru ve stropu.

8
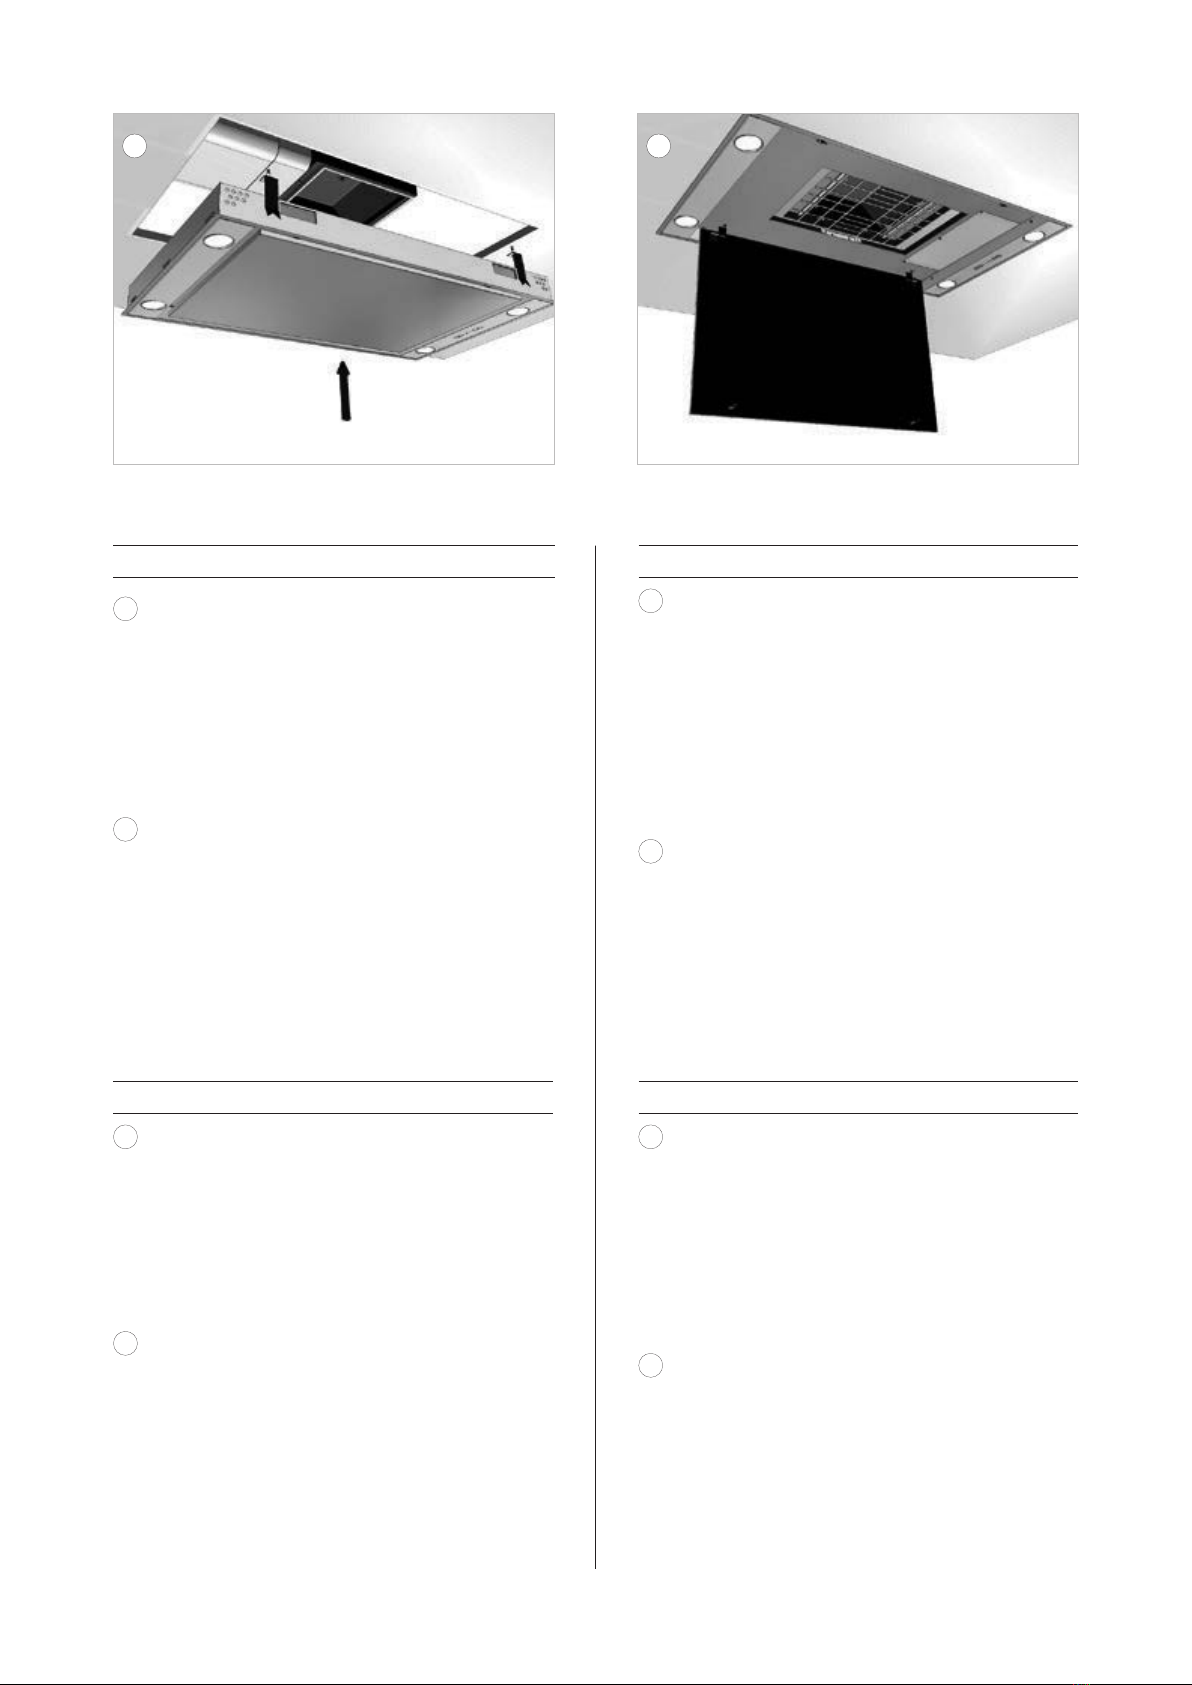
NL
5
Demonteer eerst de motorunit of flensplaat van de
afzuigkap voordat u de afzuigkap monteert. Volg
hiervoor de instructies op zoals deze vermeld
staan in de montage handleiding van afzuigkap.
Hou de 4 verwijderde schroeven apart. Je hebt
ze later nodig.
Monteer vervolgens de afzuigkap in de uitsparing
en draai de klemschroeven van de afzuigkap aan
volgens de instructies zoals deze vermeld staan
in de montage handleiding van desbetreffende
afzuigkap.
6Open de onderplaat door deze met twee handen
voorzichtig naar beneden te trekken en neem de
aluminium vetfilters uit de plafondunit.
DU
5
Lösen Sie zunächst die Motoreinheit oder die
Flanschplatte von der Dunstabzugshaube, bevor Sie
die Dunstabzugshaube selbst installieren. Befolgen
Sie die Anweisungen im Installationshandbuch
der Dunstabzugshaube. Bewahren Sie die vier
entfernten Schrauben separat auf. Sie werden
sie später brauchen.
Setzen Sie dann die Dunstabzugshaube in die
Aussparung ein und ziehen Sie die Klemmschrauben
der Dunstabzugshaube gemäß den Anweisungen
in der Installationsanleitung der jeweiligen
Dunstabzugshaube fest.
6
Öffnen Sie die Grundplatte, indem Sie diese
vorsichtig mit zwei Händen nach unten ziehen,
und entfernen Sie die Aluminiumfettfilter von der
Deckeneinheit.
FR
5Commencez par démonter le bloc moteur ou la
plaque bridee de la hotte de cuisine avant d’installer
la hotte de cuisine. Suivez les instructions qui
figurent dans le manuel d’installation de la hotte de
cuisine. Mettez les 4 vis que vous venez d’enlever
de côté. Vous en aurez besoin plus tard.
Ensuite, installez la hotte dans la niche et serrez
les vis de serrage de la hotte conformément aux
instructions données dans le manuel d’installation
de la hotte concernée.
6
Ouvrez le panneau inférieur en le poussant
délicatement vers le bas à l’aide des deux mains
et retirez les filtres à graisse en aluminium de
l’unité de toit.
EN
5
First dismount the motor unit or flange plate from
the cooker hood before installing the cooker hood.
Follow the instructions in the installation manual
for the cooker hood. Keep the 4 removed screws
separate. You will need them later.
Then install the cooker hood in the cut-out opening
and tighten the clamping screws of the cooker
hood in accordance with the instructions given
in the assembly instructions for the respective
cooker hood.
6Open the bottom panel by gently pulling it down
with two hands and remove the aluminium grease
filters from the ceiling unit.
5 6
9
ES
5
Retire la unidad del motor o la brida de la campana
de cocina antes de instalarla. Siga las instrucciones
del manual de instalación de la campana de
cocina. Guarde los 4 tornillos que ha retirado por
separado. Los necesitará más adelante.
Instale la campana en el hueco y apriete los
tornillos de sujeción de la campana según las
instrucciones ofrecidas en las instrucciones de
montaje de la campana correspondiente.
6
Abra el panel inferior tirando suavemente hacia
abajo con las dos manos y extraiga los filtros de
grasa de aluminio de la unidad de techo.
PL
5
Przed montażem okapu kuchennego należy najpierw
wymontować z niego jednostkę silnika lub płytę
kołnierzową. Postępować zgodnie z instrukcjami
podanymi w instrukcji montażu okapu kuchennego.
Odłożyć na bok 4 wyjęte śruby. Będą potrzebne
później.
Następnie zamontuj okap kuchenny w wyciętym
otworze i dokręć śruby mocujące okap kuchenny
zgodnie z instrukcjami podanymi w instrukcji
montażu odpowiedniego okapu kuchennego.
6
Otworzyć płytę dolną, delikatnie pociągając ją
dwoma rękami w dół, i wyjąć aluminiowe filtry
tłuszczowe z urządzenia sufitowego.
IT
5
Smontare l’unita motore o la flangia dalla
cappa prima di installare la cappa. Seguire
le istruzioni contenute nel manuale della
cappa. Tenere separate le 4 viti rimosse.
Saranno necessarie più tardi.
Quindi, installare la cappa nell’apertura sagomata
e stringere le viti della cappa in conformità alle
istruzioni fornite nel manuale della cappa.
6
Aprire la piastra sul fondo tirandola verso il basso
con due mani e rimuovere il filtro del grasso in
alluminio dall’unità a soffitto.
CZ
5
Před montáží digestoře nejprve odpojte motorovou
jednotku nebo přírubovou desku od digestoře.
Postupujte podle pokynů v návodu k montáži
digestoře. Čtyři vyjmuté šrouby si odložte zvlášť.
Budete je později potřebovat.
Poté nainstalujte digestoř do vyříznutého otvoru
autáhněte upínací šrouby digestoře vsouladu
spokyny uvedenými v návodu kmontáži příslušné
digestoře.
6
Jemným zatažením dolů oběma rukama otevřete
spodní panel a vyjměte hliníkový tukový filtr ze
stropní jednotky.
5 6
10
NL
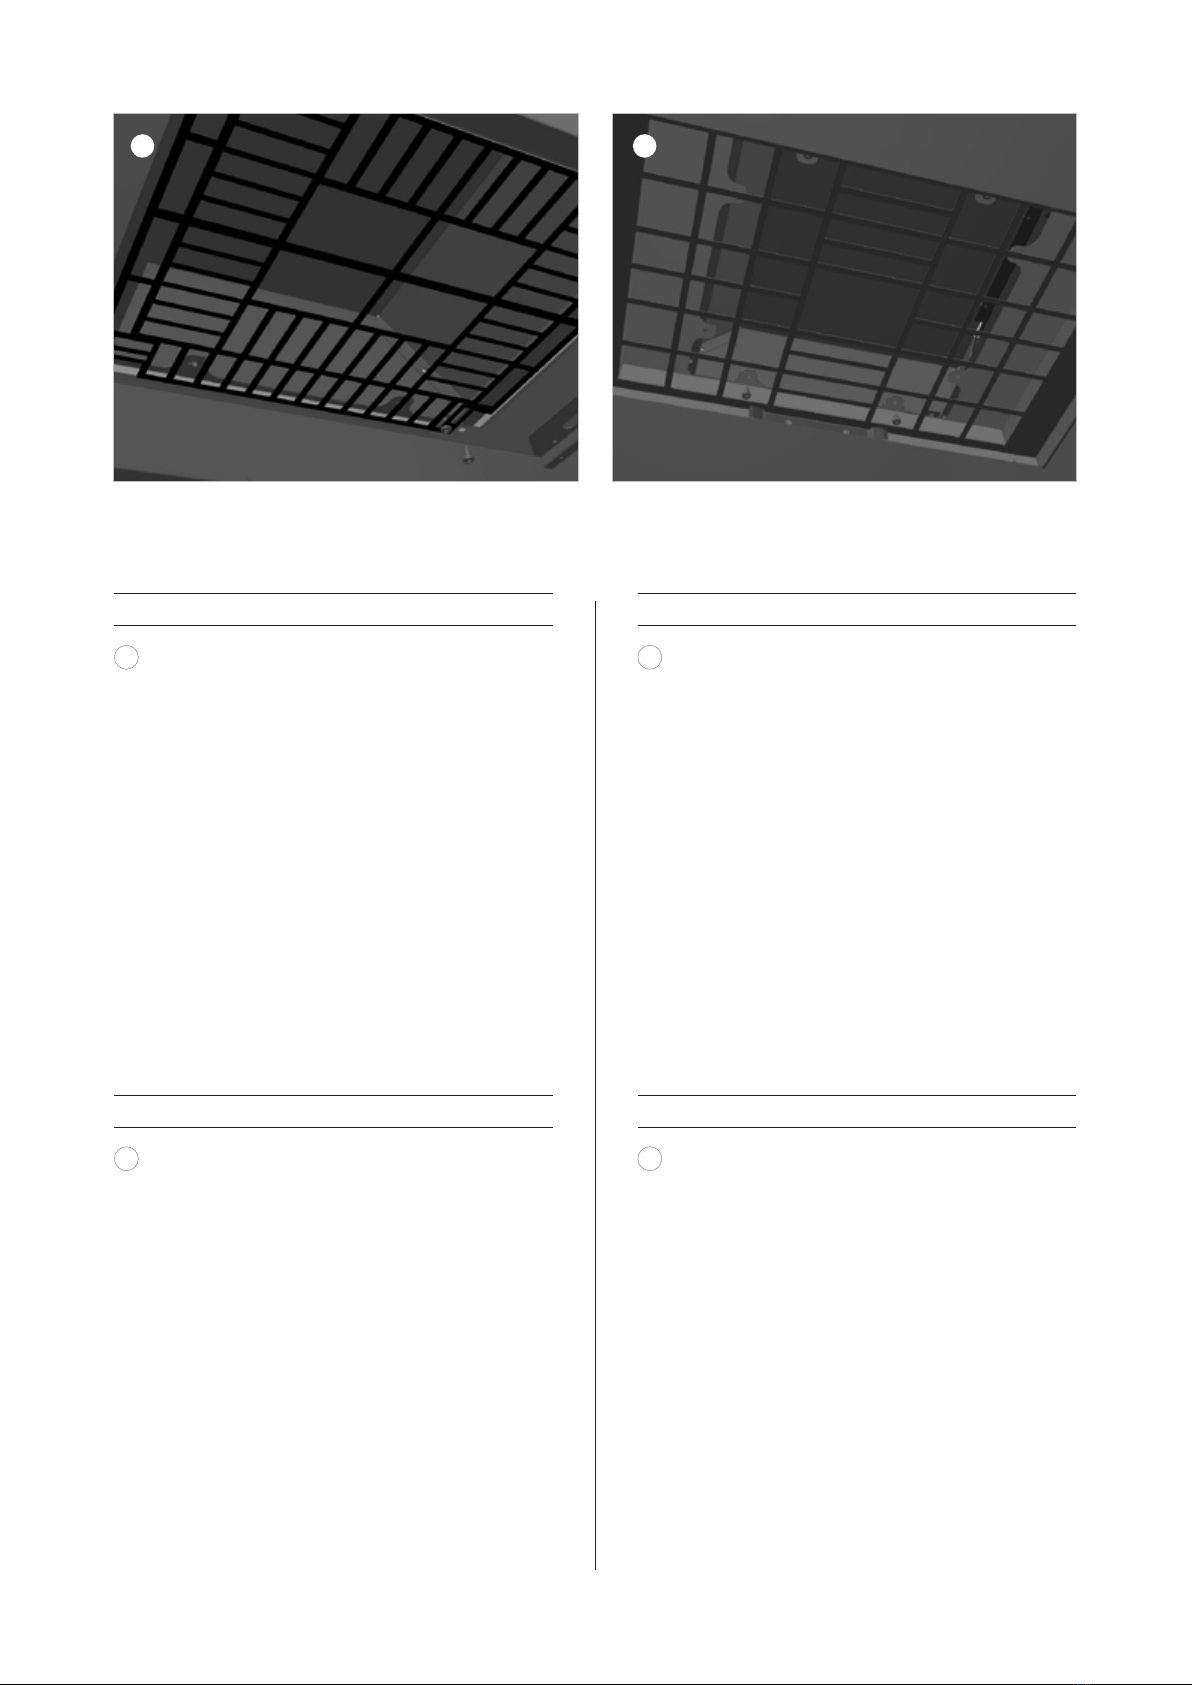
7
Afhankelijk van model en versie afzuigkap, gebruik
ter oriëntatie tekening 7a of 7b.
7a Pureline ≥V18.
7b Pureline ≥V15≤V18.
Achter het afschermraster ziet u de adapter.
Positioneer de adapter zodat de bevestigingsgaatjes
van de adapter overeenkomen met de 4 gaatjes
in de mantel van de afzuigkap.
Maak met de 4 apart gehouden schroeven (906116)
de adapter vast aan de afzuigkap.
De adapter is nu gemonteerd op de afzuigkap.
Plaats het vetfilter en eventueel het recirculatiefilter
in de afzuigkap en sluit de onderplaat.
DU
7
Verwenden Sie je nach Modell und Ausführung
der Dunstabzugshaube Zeichnung 7a oder 7b
zur Orientierung.
7a Pureline ≥V18.
7b Pureline ≥V15≤V18.
Hinter dem Schutzgitter sehen Sie den Adapter.
Positionieren Sie den Adapter so, dass die
Befestigungslöcher des Adapters entsprechen
den 4 Bohrungen im Mantel der Dunstabzugshaube.
Sichern Sie den Adapter mit den vier Schrauben
(906.116), die Sie separat aufbewahrt haben.
Der Adapter ist jetzt an der Dunstabzugshaube
montiert.
Montieren Sie den Fettfilter und, falls erforderlich,
den Umluftfilter in die Dunstabzugshaube ein und
schließen Sie die Bodenplatte.
FR
7Selon le modèle et la version de la hotte, utilisez
le dessin 7a ou 7b pour vous guider.
7a Pureline ≥V18.
7b Pureline ≥V15≤V18.
Derrière la grille de sécurité, vous pouvez voir
l’adaptateur.
Positionnez l’adaptateur de manière à ce que les
trous de fixation de l’adaptateur correspondent
aux 4 trous du manteau de la hotte.
Fixez l’adaptateur à l’aide des 4 vis de serrage
(906116) que vous avez mises de côté.
L’adaptateur est maintenant monté sur la hotte.
Installez le filtre à graisse et, si nécessaire, le filtre
de recirculation dans la hotte et fermez la plaque
inferior.
EN
7
Depending on model and version of cooker hood,
use drawing 7a or 7b for guidance.
7a Pureline ≥V18.
7b Pureline ≥V15≤V18.
Behind the safety grill you can see the adapter.
Position the adapter so that the mounting holes
of the adapter correspond to the 4 holes in the
mantle of the cooker hood.
Secure the adapter using the 4 screws (906116),
which are held separately.
The adapter is now mounted on the cooker hood.
Fit the grease filter and, if necessary, the recirculation
filter in the cooker hood and close the bottom
plate.
7a 7b

11
ES
7
En función del modelo y la versión de la campana,
siga la imagen 7a o 7b como ayuda.
7a Pureline ≥V18.
7b Pureline ≥V15≤V18.
El adaptador puede verse detrás de la rejilla de
seguridad.
Coloque el adaptador de manera que los orificios
de montaje del adaptador se correspondan con los
cuatro orificios del recubrimiento de la campana.
Fije el adaptador con los cuatro tornillos (906116),
los cuales se sujetan de forma independiente.
Ahora, el adaptador se puede montar en la
campana.
Coloque el filtro de grasa y, si fuera necesario,
el filtro de recirculación en la campana y cierre
la placa inferior.
PL
7
W zależności od modelu i wersji okapu kuchennego
zastosuj rysunek 7a lub 7b jako wskazówkę.
7a Pureline ≥V18.
7b Pureline ≥V15≤V18..
Za kratką zabezpieczającą znajduje się adapter.
Ustaw adapter w taki sposób, aby otwory
montażowe adaptera odpowiadały 4 otworom
w płaszczu okapu kuchennego.
Zabezpieczyć adapter za pomocą 4 wcześniej
odłożonych śrub (906116).
Adapter jest teraz zamontowany do okapu
kuchennego.
Zamontuj filtr tłuszczowy oraz, jeśli to konieczne,
filtr recyrkulacyjny w okapie kuchennym i zamknij
płytę podstawy.
IT
7
A seconda del modello e della versione della cappa,
utilizzare il disegno 7a o 7b come riferimento.
7a Pureline ≥V18.
7b Pureline ≥V15≤V18.
Dietro la griglia di sicurezza è visibile l’adattatore.
Posizionare l’adattatore affinché i fori di montaggio
dell’adattatore corrispondano ai 4 fori sulla
copertura della cappa.
Fissare l’adattatore con le 4 viti (906116) rimosse
in precedenza.
L’adattatore è ora montato sulla cappa.
Inserire il filtro del grasso e, se necessario, il filtro
di ricircolo nella cappa, quindi chiudere la piastra
sul fondo.
CZ
7V závislosti na modelu averzi digestoře se řiďte
nákresem 7a nebo 7b.
7a Pureline ≥V18.
7b Pureline ≥ V15 ≤ V18.
Za bezpečnostní mřížkou je vidět adaptér.
Adaptér umístěte tak, aby byly montážní otvory
adaptéru zarovnané se čtyřmi otvory vplášti
digestoře.
Pomocí čtyř zvlášť odložených šroubů (906116)
adaptér zajistěte.
Adaptér je nyní nainstalován na digestoři.
Upevněte do digestoře tukový filtr avpřípadě
potřeby recirkulační filtr azavřete spodní desku.
Afmetingen - Dimensions - Abmessungen - Dimensions -
Dimensiones - Dimensioni - Wymiary - Rozměry
6930053
303
94
303
331

NOVY nv behoudt zich het recht voor te allen tijde en zonder voorbehoud de constructie en de prijzen van haar producten te wijzigen.
NOVYSA se réserve le droit de modifier à tout moment et sans réserve la fabrication et les prix de ses produits.
Die NOVY AG behält sich das Recht vor, zu jeder Zeit und ohne Vorbehalt die Konstruktion und die Preise ihrer Produkte zu ändern.
NOVY nv reserves the right at any time and without reservation to change the structure and the prices of its products.
NOVY nv se reserva el derecho a modificar en cualquier momento y sin condiciones la construcción y los precios de sus productos.
NOVY nv si riserva il diritto di modificare in qualsiasi momento senza preavviso la struttura e i prezzi dei suoi prodotti.
NOVY nv zastrzega sobie prawo do zmiany struktury i cen swoich produktów w dowolnym czasie i bez ostrzeżeń.
Společnost NOVY nv si vyhrazuje právo kdykoli a bez výhrad změnit konstrukci a cenu svých výrobků.
NOVY nv
Noordlaan 6
B - 8520 KUURNE
Tel. 056/36.51.00
Fax 056/35.32.51
E-mail: novy@novy.be
http://www.novy.be
http://www.novy.com
France: Tél: 0320.940662
Deutschland und Österreich: Tel: +49 (0)511.54.20.771
Nederland: Tel.: +31 (0)88-0119110
United Kingdom: +44 (0)207 866 2493
España: Tel.: +34 938 700 895
Italia: Tel.: +39 039.20.57.501
Table of contents
Other Novy Adapter manuals

Popular Adapter manuals by other brands


TRENDnet
TRENDnet TU2-ET100 user guide

Adaptec
Adaptec AUA-1411 installation guide

Manhattan
Manhattan 506847 instructions

Nortel
Nortel BayStack 22 206380-A Installation and reference guide

Intermec
Intermec L5020 instructions

Sipura Technology
Sipura Technology SPA2002-ER - Earthlink Truevoice Phone Adpt user guide


