ns design NS-CR4 Radius Bas User manual

radius
NS-CR4/5 RadiuS BaSS
Owner’s Manual
All manuals and user guides at all-guides.com
all-guides.com

© 2013 NS Design
The contents of this document, including all graphics, are the property of NS Design. NS Design has
made every reasonable eort to ensure that all the information contained in this manual is correct at
the time of publishing. However, NS Design reserves the right to make any changes necessary without
notice as part of ongoing product development.
Radius™ and Polar™ are trademarks of NS Design
Visit NS Design at http://thinkns.com
NS-CR4/5 Radius Bass Owner’s Manual
All manuals and user guides at all-guides.com

3
NS-CR4/5 Radius Bass Owner’s Manual
Overview (Front) 5
Overview (Back) 7
Re-Stringing and Tuning 8
Setting Up the Bass 15
Setting the intonation ..................................................................................................................17
Setting the action ........................................................................................................................19
Adjusting the truss rod ................................................................................................................21
Replacing the Batteries 23
Specifications 24
Accessories 25
All manuals and user guides at all-guides.com

4 NS-CR4/5 Radius Bass Owner’s Manual
Piezo EQ
high – mid – low EMG pickups
bridge – both – neck
Volume
Blend
Piezo – EMG
Treble
cut – boost
Bass
cut – boost
1
2
3
4
10
9
5
6
7
8
11
All manuals and user guides at all-guides.com

5
Overview (Front)
NS-CR4/5 Radius Bass Owner’s Manual
Overview (Front)
Overview Features
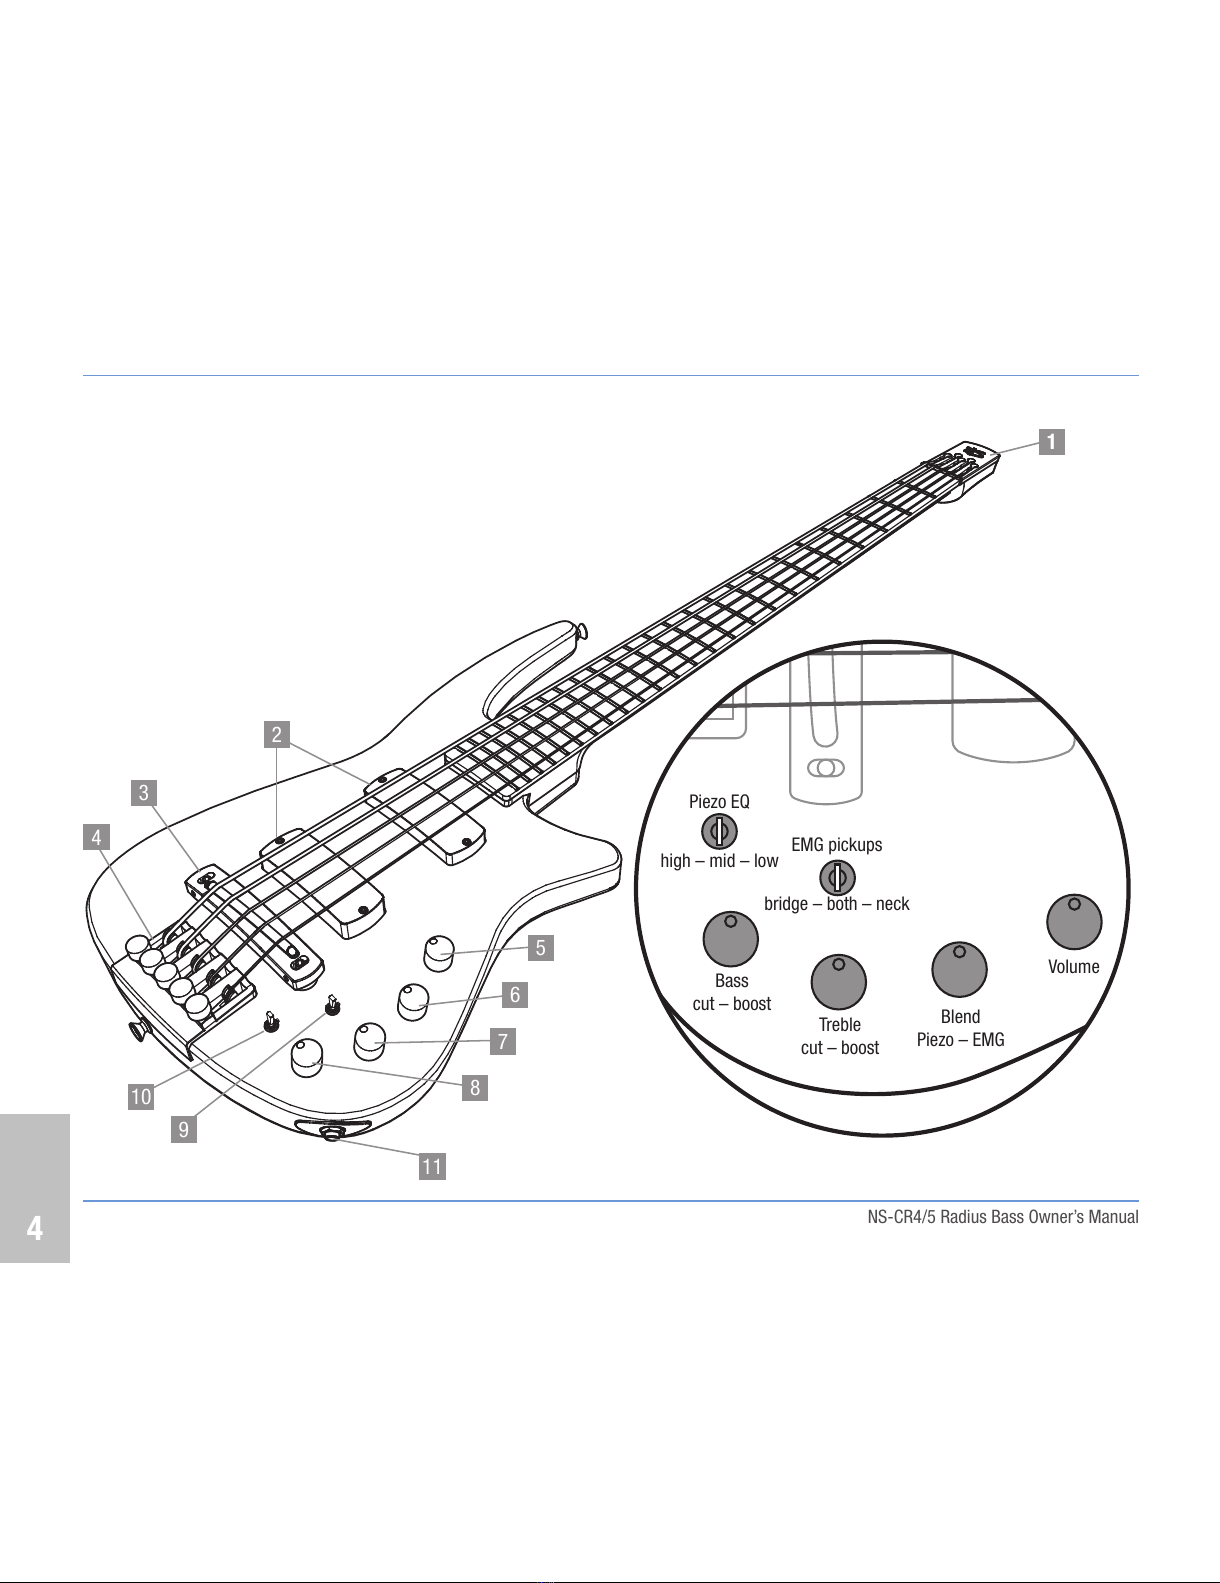
1 Aluminum headplate with ball-end string.mounting slots
2 Magnetic pickups (EMG) unique design matched to the fretboard radius
3 Bridge with one piece aluminum saddle and integrated
Polar Piezo pickup system
4 Tuner housing with self-clamping precision tuning system
5 Volume pot for both piezo and magnetic pickups
6 Blend pot with center detent, blending between piezo and
magnetic pickups
7 Active treble boost/cut pot with center detent
8 Active bass boost/cut pot with center detent
9 Pickup selector switch for magnetic pickups 3-position switch
10 Piezo EQ switch 3-position switch
11 Output jack
All manuals and user guides at all-guides.com

6 NS-CR4/5 Radius Bass Owner’s Manual
12
13
14
15
All manuals and user guides at all-guides.com
all-guides.com

7
Overview (Back)
NS-CR4/5 Radius Bass Owner’s Manual
Overview (Back)
Overview Features
12 Electronics compartment cover
13 Battery compartment cover can be opened separately for battery
replacement
14 Thumb screw for battery compartment cover
15 String aperture
All manuals and user guides at all-guides.com

8 NS-CR4/5 Radius Bass Owner’s Manual
Re-Stringing and Tuning
This bass accepts any standard single-ball end,
full-scale bass guitar strings. The way the strings
are clamped leaves them undamaged and without
the usual windings on the end. This lets you easily
take them out (e.g. for cleaning) and put them
back on the bass as often as desired.
1 Turn the tuning knob fully counter-clockwise
to loosen the string, until the slotted tuning
arm is in the frontmost position (towards the
bridge).
The clamping mechanism opens up and you can
pull the string(s) out.
All manuals and user guides at all-guides.com

9
Re-Stringing and Tuning
NS-CR4/5 Radius Bass Owner’s Manual
To install strings:
2 Put the ball end of the new string into the slot
on the headplate.
3 Pull the string towards the neck and guide it
over the nut.
All manuals and user guides at all-guides.com

10 NS-CR4/5 Radius Bass Owner’s Manual
All manuals and user guides at all-guides.com

11
Re-Stringing and Tuning
NS-CR4/5 Radius Bass Owner’s Manual
4 Guide the other end of the string through the
opening behind the slotted tuning arm.
If you have diculties to guide the string into
the tuning mechanism, check if the tuning arm
is in the frontmost position (which at the same
time fully opens up the clamping mechanism).
5 Push the string through the tuner housing
(and the bass body) as far as it will go, and
hold it with one finger in this position.
6 Turn the tuning knob clockwise to close the
clamping mechanism, which now tightly
holds the string. This happens shortly after
the string holder has started moving back.
7 Continue rotating the tuning knob until the
string is tuned to pitch.
All manuals and user guides at all-guides.com
all-guides.com

12 NS-CR4/5 Radius Bass Owner’s Manual
All manuals and user guides at all-guides.com

13
Re-Stringing and Tuning
NS-CR4/5 Radius Bass Owner’s Manual
After all strings are installed and tuned up to
pitch:
8 Turn the bass over.
9 Cut the strings within the recessed aperture
of the body, so that their ends don’t stick out.
Bass strings are hard and may have sharp or
pointy ends. Only use appropriate cutters to cut
the ends of the strings. Otherwise you might
injure yourself or damage the bass.
All manuals and user guides at all-guides.com

14 NS-CR4/5 Radius Bass Owner’s Manual
Intonation
Intonation
String action
String action
All manuals and user guides at all-guides.com

15
Setting Up the Bass
NS-CR4/5 Radius Bass Owner’s Manual
Setting Up the Bass
If you are not familiar with setting up a bass, you
should ask a qualified bass and guitar technician
for help. Most set-up steps are easy, but if done
wrong there is potential damage to the instru-
ment.
Your bass has left the factory with the set-up
already done. Additionally, the neck is very
sti due to the carbon fiber core and the
truss rod, which makes it highly insensitive to
environmental influences. Changing the set-up
is generally only necessary if a higher or lower
action is desired, or when using a dierent string
gauge which exerts dierent tension on the neck.
All manuals and user guides at all-guides.com

16 NS-CR4/5 Radius Bass Owner’s Manual
All manuals and user guides at all-guides.com
all-guides.com

17
Setting Up the Bass
NS-CR4/5 Radius Bass Owner’s Manual
Setting the intonation
The horizontal bridge position is locked by two
screws on each side (3/32" hex wrench, provided
with the bass). By loosening these screws you are
able to move the bridge on the respective side
back and forth to adjust intonation.
If the intonation becomes flat when the strings
are played at the higher frets, the bridge should
be moved slightly closer to the neck.
To move the bridge towards the neck:
1 Loosen the screw on the tuner side of the
bridge and push the bridge into the desired
position.
2 Turn in the previously loosened screw until it
slightly touches the bridge post.
3 Tighten the screw on the neck side of the bridge.
If the intonation becomes sharp when the
strings are played at the higher frets, the bridge
should be moved slightly closer to the tuners.
To move the bridge towards the tuners:
1 Loosen the screw on the neck side of the
bridge and push the bridge into the desired
position.
2 Turn in the previously loosened screw until it
slightly touches the bridge post.
3 Tighten the screw on the tuner side of the bridge.
All manuals and user guides at all-guides.com

18 NS-CR4/5 Radius Bass Owner’s Manual
All manuals and user guides at all-guides.com

19
Setting Up the Bass
NS-CR4/5 Radius Bass Owner’s Manual
Setting the action
The bridge has two posts which can individually
be adjusted for each side. To set up the string
action:
1 Using a 3/32" hex wrench, slightly loosen
one of the screws locking the bridge on the
bridge post (see page 17).
2 Put a 5/32" hex wrench (provided with the
bass) into the bridge post.
3 Turn the hex wrench
• counter-clockwise to raise this side of the
bridge, or
• clockwise to lower this side of the bridge.
4 When the bridge height is correctly adjusted,
tighten the previously loosened screw again.
All manuals and user guides at all-guides.com

20 NS-CR4/5 Radius Bass Owner’s Manual
All manuals and user guides at all-guides.com
Other manuals for NS-CR4 Radius Bas
1
This manual suits for next models
1
Table of contents
Other ns design Music Equipment manuals