NST MR1 User manual

8. Overwrite setting
Set【Yes】, overwrite data by loop recording
1. Turn on / off when memory is full.
9. Stop recording
2. Language setting
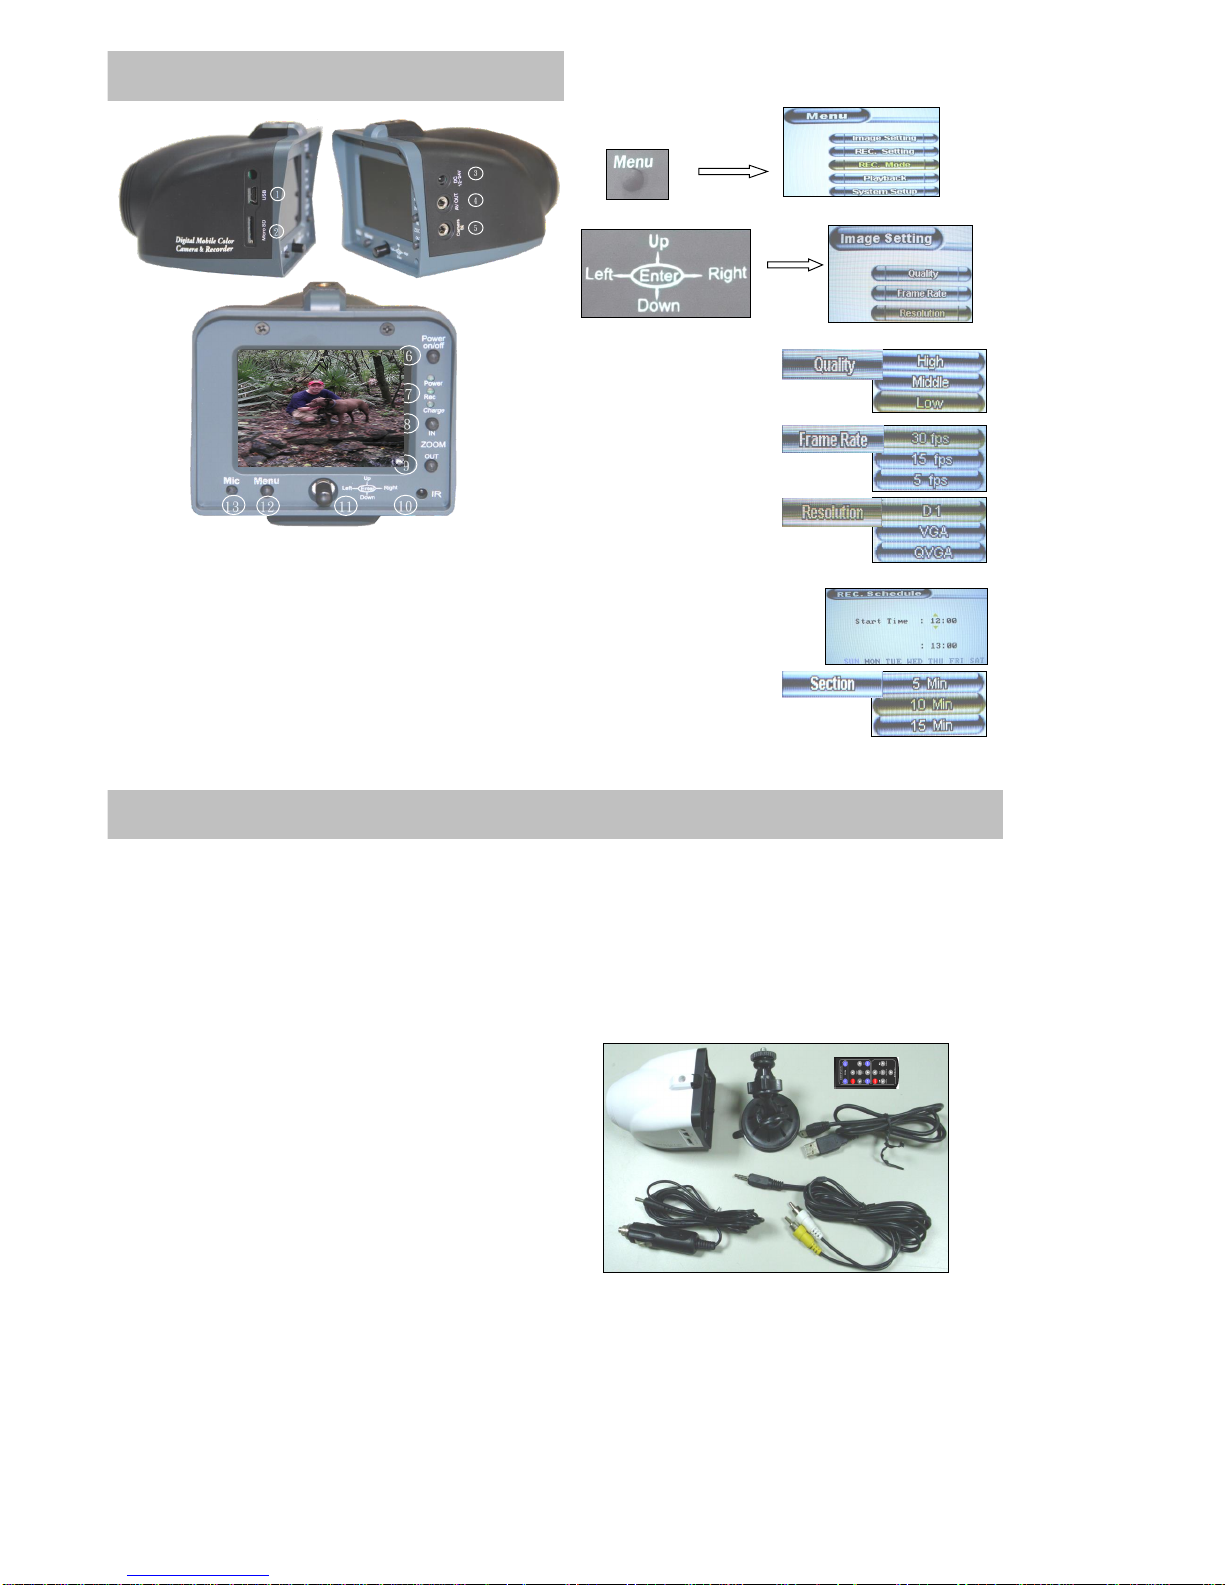
Press Menu joystick, enter menu screen, to【System setting】by
Enter 【Language setting】, enter again, select English. 10. Forced turn on/off
Then press Menu again to exit, return to main menu. Press“Power On/Off”for 3 seconds for forced turn on/off.
3. Date Time setting 11. Parking recording
Enter 【Date Time setting】, use joystick to adjust time clock.
4. LCD back light setting (Energy saving)
Select power on recording as LCD shown to have time set, for example,
【3 min.】, screen will be shut down in 3 minutes but 12. Playback:Self replay
recording is still going.
5. Power on recording
13. Playback:Replay on PC
6. Manual recording
Set 【Manual Rec.】auto recording won't go even engine
is activated. 14. SD card used storage
Press Enter, start recording (Rec indicator flicking)
Access to system setting →【system info.】, then press Enter
Press Enter again, stop recording (Rec indicator off)
『Total size』for Total SD storage (MB)
7. Motion detection
『Usage size』for percentage of recorded file ( %)
Enter 【Rec. setting】→ Motion detection, set mask area,
『Remain size』for percentage of recordable spare ( %)
start recording when object's move is detected. 15. RESET
There are 5-10 seconds of pre-record once motion detection activated
Highly Sensitive 1/3" CCD Vehicle Recorder
Rec. setting>Power-off Delay, set【3 mins】, turn off engine,
recording continues & will be stopped in 3 minutes; set 【0 mins】
recording will be stopped as long as engine's off.
Parking recording by “Forced turn on” until UPS 's out of battery.
It can be carried as personal camera. Built-in UPS system continue
power supplying for 2 hours after LCD's shut down .
Press“Menu”, then use joystick to enter 【Playback】, Enter again to
select time segment file, press Enter for replay or stop playing. Turn
left / right joystick for playing forward or reversed replay.
Turn up / down it for choosing time of recording file.
Shut down camera, draw SD card & insert it into PC (Card Reader
needed) to access file, then replay through Media play.
Press Zoom + and Zoom - at the same time.
P. 7
5.Instruction
Insert the cable to cigarette lighter jack, device will automatically turn
on when vehicle ignited and shut down automatically as car engine's off.
Set 【Power on Rec.】, auto recording is on when car engine is
activated. Meanwhile, Rec. Indicator glitters as Rec. icon displaying on
left bottom screen, indicates that recording is on.
P. 6
Instruction Manual
Model :MR1
1-512-756-1678

1. Safety precautions P. 1
2. Installation P. 1 1.
Notwater-proof, not for outdoor applications like high-
3. Direction joystick P. 2
humidity or rain.
4. Menu P. 2 2.
Do not disassemble , repair or modify the product. These will void the
4-1. Image setting 4-2. Recording setting P. 3 warranty
4-3. Recording mode 4-4. Playback P. 4 3. Do not operate the product when driving
4-5. System set-up P. 5 4.
Be aware of camera's position, and have it mounted away from drivers
5. Instruction P. 5 sight for safety. (Middle top of windshield is the best spot.)
5-1. Power (On/Off) 5-2. Language Setting P. 5 5. Secure the suction cap and mounting cradle tightly
5-3. Time setting P. 5 6.Do not remove micro SD card when recording the data into SD card.
5-4. LCD Back light setting:(Energy saving) P. 5 This may cause the loss of data and damage to the SD card.
5-5. Power-On Rec 5-6. Manual Rec P. 5
5-7. Motion Detection Recording P. 6
5-8. Over-writing setting 5-9. Stop Rec P. 6
5-10. Forced power on/off P. 6
5-11. Stop recording P. 6
5-12. Playback:self-play P. 6
5-13. Playback:computer play P. 6 1. Clean your windshield and press the suction cap to the windshield
5-14. SD card info. P. 7 2. While pressing, flip the lever back toward the windshield.
6. Specification P. 8 3. Connect your device power to cigarette lighter of the vehicle.
7. Recording time reference P. 9 4. Align the direction of camera lens to the front and fix the cradle tightly.
8. Feature P. 10
5. Insert Micro-SD card (32GB Max. supported),start to record image.
9. Product Accessories
6. Adjust setting according to Menu's function.
7. Set Rec.【Power on Rec.】, record will start when vehicle ignited
2GB
30FPS 15FPS 5FPS
HQ 1H 28M 4H 20M 12H 37M
MQ 2H 5H 37M 17H
LQ 3H 18M 8H 26M 24H 57M
HQ 1H 27M 4H 20M 12H 37M
MQ 2H 5H 37M 17H
LQ 3H 18M 8H 26M 24H 57M
HQ 4H 25M 13H 37H 52M
MQ 6H 16H 51M 51H 05M
LQ 9H 55M 25H 20M 74H 51M
32GB
30FPS 15FPS 5FPS
D1 HQ 23H 42M 70H 03M 203H 36M
D1 MQ 32H 90H 36M 274H 42M
※Detail specification depends on the standard of attached
instruction manual inside the package as purchased item.
P. 8
P. 9
BLC
BLC, HLC;ATR
White Balance
Auto or Manual
AES
Auto:1/60 ~ 1/100,000 second
S/N ratio
60dB (AGC: Off)
OSD menu
Lens、AES、BLC、D-WDR、AGC、
ATW、NR、motion detection、privacy
mask、sharpness
Recording quality
Image Switch
Left-right,Up-down,turn over (For upside down)
Resolution
650 TV Lines
Lens
Motorized 4 ~ 9mm Auto focus
Minim Illumination
0.01 Lux
Camera specification:
QVGA
Image Sensor
1/3" SONY Exview 960H CCD
Image Pixel
1020 (H) X 508 (V) ( 0.48 Mega Pixels)
PC connection
USB slot to PC
Lens adjustment
Manual Zoom In/Out ,or by Remote
VGA
Function adjustment
Manual ,or by Remote
Audio recording
Built-in microphone,real time video recording
Monitor
2.4 ”LCD Monitor
Recording quality
Storage Device
Micro-SD card (Max. support 32 GB)
D1
Image Output
A / V output to external monitor
6.Specification
7.Recording time reference
Recording specification:
※Recording time depends on various model's SD card storage. ※
Storage Format
Mpeg 4,D1 (720*480) 30 frame, Real time
Contents
1.Safety Precaution
2.Installation
P. 1

>Menu joystick
>Enter Setting (Up, down, right, left. Main menu)
1. Image Setting:
Quality: 【High】
【Middle】
【Low】
Frame Rate: 【30 fps】
【15 fps】
【5 fps】
Resolution: 【D1】
【VGA】
1. USB port 8. Lens Zoom IN
【QVGA】
2. Micro SD slot 9. Lens Zoom OUT
2. REC. Setting:
3. Power in (DC12V~24V) 10. IR Remote receiver
REC Schedule: 【Start Time】
4. AV OUT 11. Direction Joystick
【End Time】
5. Camera IN 12. Recording Menu
6. Power (On/Off) 13. Microphone (Audio in)
Section: 【5 Min】
7. Indicator (Power, Rec, Charge)
【10 Min】
【15 Min】
Camera Feature
1. Low light 1/3" CCD color camera, true color image reproduced. 1. Low Light 1/3" CCD Vehicle Camera * 1
2. Latest highly sensitive CCD presenting vivid image 2. Cradle with suction cap *1
on low light at night. 3. A/V Cable * 1
3. License plate camera, high light suppression. 4. USB cable (for PC) * 1
4. Motorized lens, flexible angel adjust with accurate auto-focus. 5. 12V DC power cord (Cigarette Plug) * 1
5. True D1 video quality, vivid image. 6. IR Remote Controller * 1
6. Recording saving for storage saving (24 hrs for 32GB 7. Manual * 1
recording in HQ).
7. Built in UPS will continue to work 2 hrs after power switch to off.
8. Without PC, self replay or image output to large monitor
9. Working at DC 12V ~ 24V, to prevent camera from damage
out of car activation's instantaneous power.
10. Automatically switch to external image ( Reverse Gear)
11. Working temperature 60°C Endurable
12. 3 axis G sensor
13. Extendable GPS (option) for GPS tracking
14. Selectavle frame rate: 5 fps ; 15 fps ; 30 fps
15. Recording file size: 5 min. ; 10 min. ; 15 min.
16. Camera functions are programable through
the separate OSD settings
17. 256x digital zoom
18. Anti-Vibration (Image Stabilization)
19. Built in voice record.
20. Connect to PC and download data from USB port
P. 10
3.Product Function Structure
4.Menu Setting
P. 2
P. 3
8.Feature
9.Components

5. System Setup
Motion Detection: 【Mask Area】Language: 【English】
16*12
【Japanese】
【Traditional Chinese】
【Sensitivity】Date Time Setup: 【Date Time】
【High】 【Time Zone】
【Middle】
【Low】
Overwrite: 【Yes】
【No】
LCD Backlight: 【1 Min】
REC. Display: 【Display Off】 【3 Min】
【Date Time Disp】 【5 Min】
【All Display】 【Continue】
G-sensor:SD Format: 【Yes】
3. REC. Mode:【Manual REC.】 【No】
【Schedule REC.】
【Motion REC.】System Info: 『Total Size』
【Power On REC.】『Usage Size』
【G-sensor Det. REC】 『Remain Size』
4. Playback:Power-off Delay: 【0 Min】
『File Name』【1 Min】
『Date』 【3 Min】
『Start Time』 【5 Min】
P. 4
P. 5
100.1
73.41
63.63
75.8
100.0
Dimensions
Table of contents