6
OPERATING INSTRUCTIONS
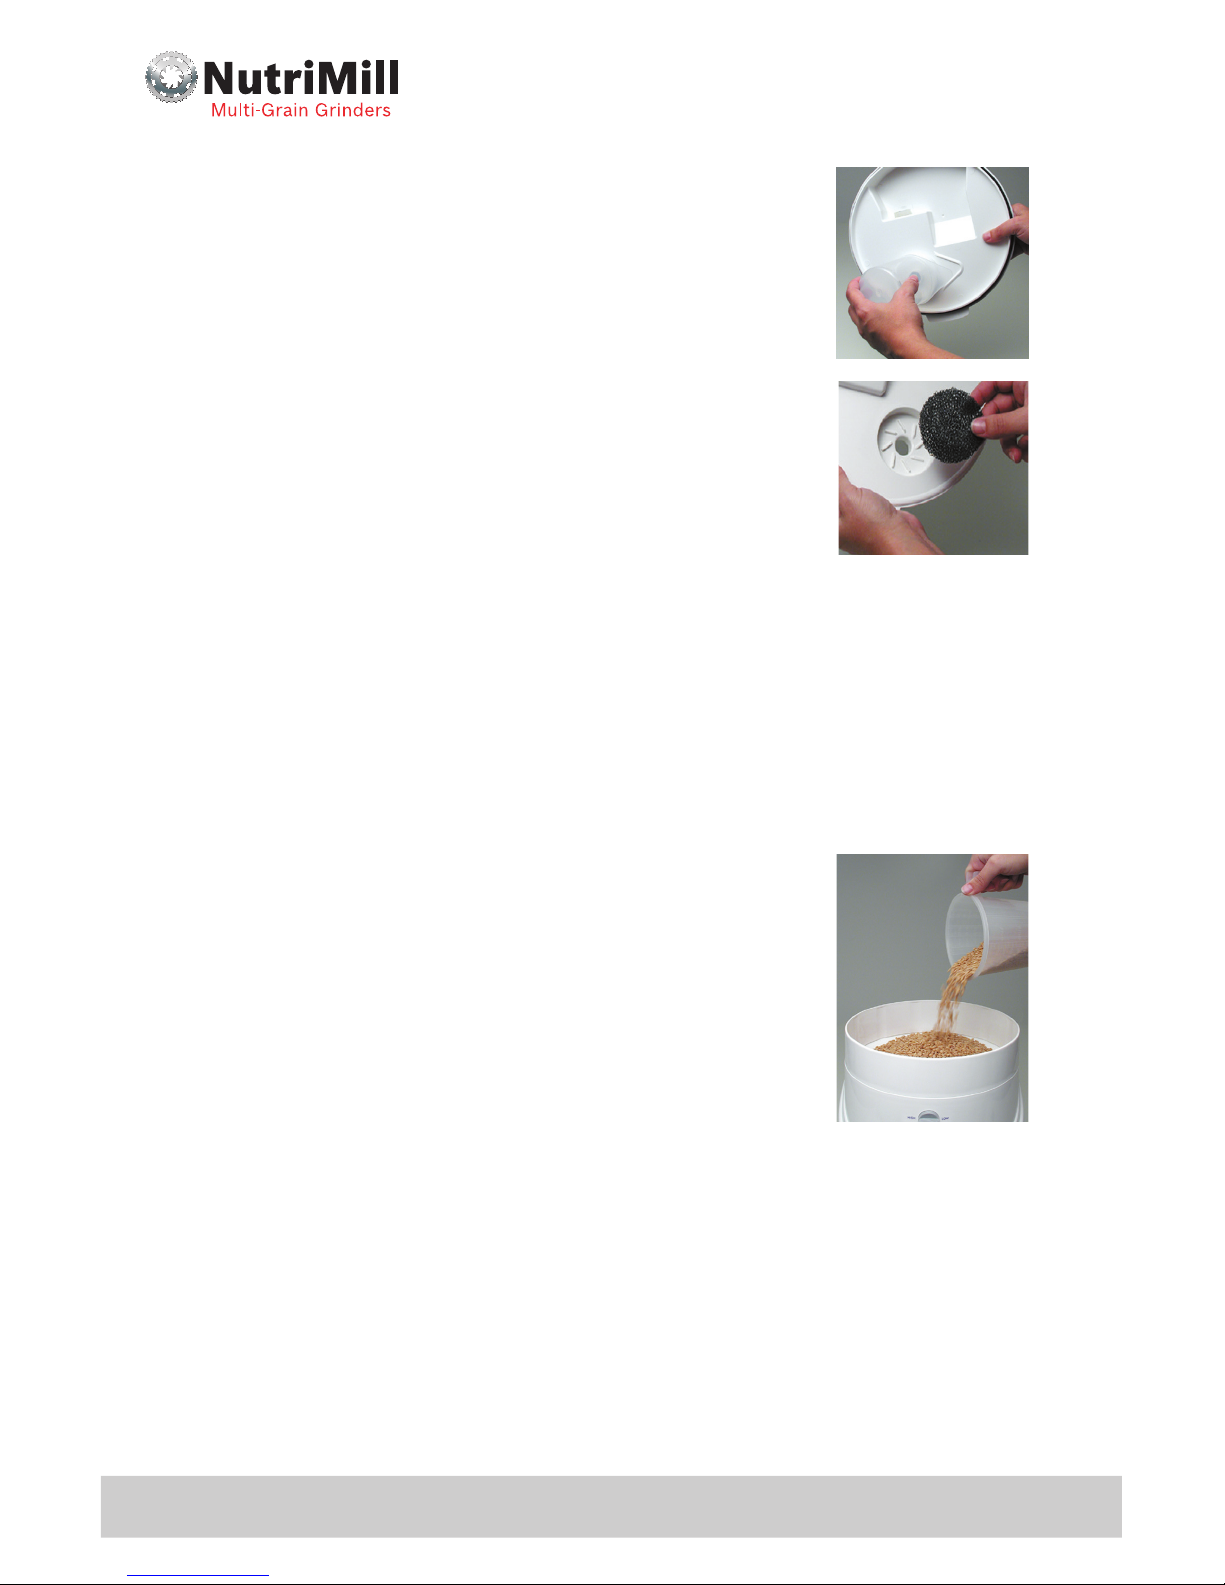
1. Attach the Separator Cup - Must be attached when milling.
Align handle on cup with the handle guide on the bowl lid and snap
securely into place. This cup collects the finest flour. Flour in the cup
is useable. After milling either empty the separator cup and add to the
flour in the bowl or save and use as pastry flour.
2. Insert air filter into place on top of bowl lid - Must be in place
when milling. Clean filter and cavity it fits into after each milling
session. Filter can be cleaned by tapping out flour that has
collected. Be sure there is no flour in filter if you wish to wash it.
NOTE: Make sure the filter is thoroughly dry before using.
3. Attach bowl lid to top of flour bowl. Lids twists to lock into
place. Bowl lid has a durable rubber gasket that creates a seal
and prevents flour leakage. Gasket will have a tight grip, this also
happens sometimes during regular use. For tight gaskets, we suggest lubricating the
gasket by rubbing on either flour, cornstarch or non-stick cooking spray. NOTE: Never
spray directly on the gasket. Spray only a little on a rag or paper towel and wipe on
gasket. You will periodically need to reapply one of the above lubricants, especially after
washing.
4. Lock on hopper extension ring - (not necessary to use when milling small amounts)
The hopper extension ring comes packed in the flour bowl and should be removed when
milling. Extension ring has 3 locking tabs to secure it to the mill. It is best to insert/
remove the tabs one at a time. To attach: With mill facing you, insert tab at the front
right then move clockwise and insert the next two tabs. To remove: With mill facing you
begin with front right tab and move counterclockwise to remove
next two tabs.
5. Fill with grain.
See the ‘grain to flour’ ratio guide on the next page to help you
understand how much grain you should start with.
6. Plug in machine and turn on by turning lower knob.
NOTE: It is not necessary to start the motor before adding grain.
Always start the mill on high speed. Never turn the knobs directly
to the far right. Always allow your mill to run for 15 seconds before
adjusting knob to coarsest setting. You may also stop the milling
mid cycle if necessary.
7. Put on lid and let run.
The NutriMill is designed to operate with the lid on for quieter milling.
8. When milling is complete, let mill run for 5 seconds. This eliminates any flour left
in the self-cleaning milling chamber. Tapping the bowl lid a few times after milling will
help settle the flour in the bowl and release flour from the bottom of the lid. Unplug the
machine and wipe or brush away any flour residue from the mill.
We recommend hand-washing the plastic bowl and lid. High-heat dishwashers can warp
the plastics. The gasket on the bowl lid will need to be relubricated after washing.
7
GRAIN TO FLOUR RATIO
You will want to adjust the amount of grain you add to the hopper so the flour bowl does
not overfill.
Overfilling the flour bowl may cause the mill to clog. The bowl will hold 21 to 22 cups of
flour. You will get about 21 cups of flour from 13 cups of hard wheat when milled at a
medium texture. This texture is ideal for most breads.
The amount of flour you get from a cup of grain varies with the type of grain and how
finely it is milled. Fine milling produces a greater volume of flour than coarse milling.
NOTE - Soft grains like oats and beans will produce a greater volume of flour. With
the hopper extension ring in place only fill hopper 2⁄3to 3⁄4full of soft grains to avoid
overfilling the flour bowl!
TEXTURE CONTROL KNOB GUIDE
The Motor Speed Control Knob (Upper Knob):
The motor speed helps determine the texture of your flour or meal.
• For most flour, upper knob should remain to the left.
• For very coarse flour and medium fine corn meal, knob should be set to the right.
• For heavy flour & dense textured breads, select a middle setting. Adjust for desired
results in the future based on your experience.
• NOTE: Always allow the mill to run for 15 to 20
seconds with the knob turned all the way to the
left before adjusting the knob to your desired
setting in the middle or the right.
The Grain Feed Rate Knob (Lower Knob):
This is the ON-OFF switch and a valve that controls how
quickly grains can flow into the mill. (You can look under
the inlet cover and see how this valve opens and closes.
Instructions for better understanding how your mill
works are on page 4).
• For finer flour set the knob towards 11:00 – 12:00.
(Most grains will not flow at less than a 10:00 position on the knob.)
• For coarse flour turn the knob toward the right.
• Large items (like beans) won’t begin to flow until the knob is turned far to the right.
• Texture results also vary with the kind of grain being milled. Soft grains, such as
oats, mill much finer than hard grains. Hard wheat mills more coarsely than soft
wheat.
• Larger grains such as legumes or rice will mill slowly while small grains like wheat or
millet will mill quickly.
• NOTE: For optimum milling turn the knob all the way to the right for 15 seconds,
so grain will start to flow freely. Then turn the knob back left to your desired
setting.
NOTE: PERIODICALLY MILL 3 CUPS OF WHITE RICE ON A COARSE SETTING
TO CLEAN THE MILLING HEADS AND REMOVE ANY POSSIBLE LEFT OVER
PARTICLES.
Classic