Nuvo jSax User manual

DOWNLOAD
FREE
METHOD BOOK
BACKING TRACKS
&
VIDEOS
Play It Today!
www.nuvo-instrumental.com
jSax

jSAX
Introducing Nuvo WindStars!
WindStars is a band program for Elementary Schools using DOOD, TOOT, jSAX, Clarinéo and jFlute.
The “First Steps” series provides the foundation for playing all Nuvo instruments. When you
feel confident with the basics you can download the WindStars Music Books and explore the
WindStars website for more tunes. You will find music in many styles such as jazz, pop, rock, reggae
and of course traditional tunes. We will continue to add new tunes and please feel free to contact us
with suggestions.
One of the great things about Nuvo instruments is that they are all in the key of C (concert pitch)
which means you can share music across instruments and if you want to add piano, guitar and even
Or music, it’s easy to do.
Why not perform at your school or in the local community? If you’d like to share your WindStars or
individual performance videos, please contact us through the Nuvo website and we will happily post
them on our YouTube channel.
To access the free WindStars music, go to www.nuvo-windstars.com and search the relevant
instrument. You can listen to demonstration tracks as well as download backing tracks and sheet music.
There is also a free iPad app that has playback options as well as interactive fingering charts for Nuvo
instruments.
For more information, please visit www.nuvo-instrumental.com and www.nuvo-windstars.com

jSAX
Contents
Introducing the jSAX
Holding the jSAX
Playing your jSAX
Introducing the Sta or Stave
Let’s Play Some Notes: B, A and G
Introducing Note Lengths
Introducing the Half Note Rest
Introducing the Quarter Note Rest
Introducing the Repeat Sign
Introducing Duets
Introducing Eighth Notes
Introducing Articulation
Let’s Learn 2 More Notes: C and F
Introducing Slurs
Let’s Play a New Note: B
Introducing the Dotted Half Note
Let’s Learn D: Introducing the 2nd Octave
Introducing Key Signatures
Three Three More Notes: E, Low D and Low C
Introducing the C Major Scale
Introducing Time Signatures
Introducing the Dotted Quarter Note
Introducing Ties
Playing Staccato
First and Second Endings
Let’s Play a New Note: F#
Let’s Play a New Note: High E
Introducing the Coda Sign
Introducing Accidental
Let’s Play a New Note: High F
Introducing the F Major Scale
Let’s Learn 2 More Notes: A and E
Congratulations! - First Steps Certificate
jSAX Fingering Chart
4
7
8
9
10
11
12
12
13
16
17
17
19
20
21
22
23
24
25
26
28
29
31
36
42
44
46
46
48
49
49
53
56
57
Copyright © 2016 Nuvo Instrumental Ltd. All rights Reserved
PageVideo
01
05
02 03
04

3
jSAX
jSAX – First Steps Book
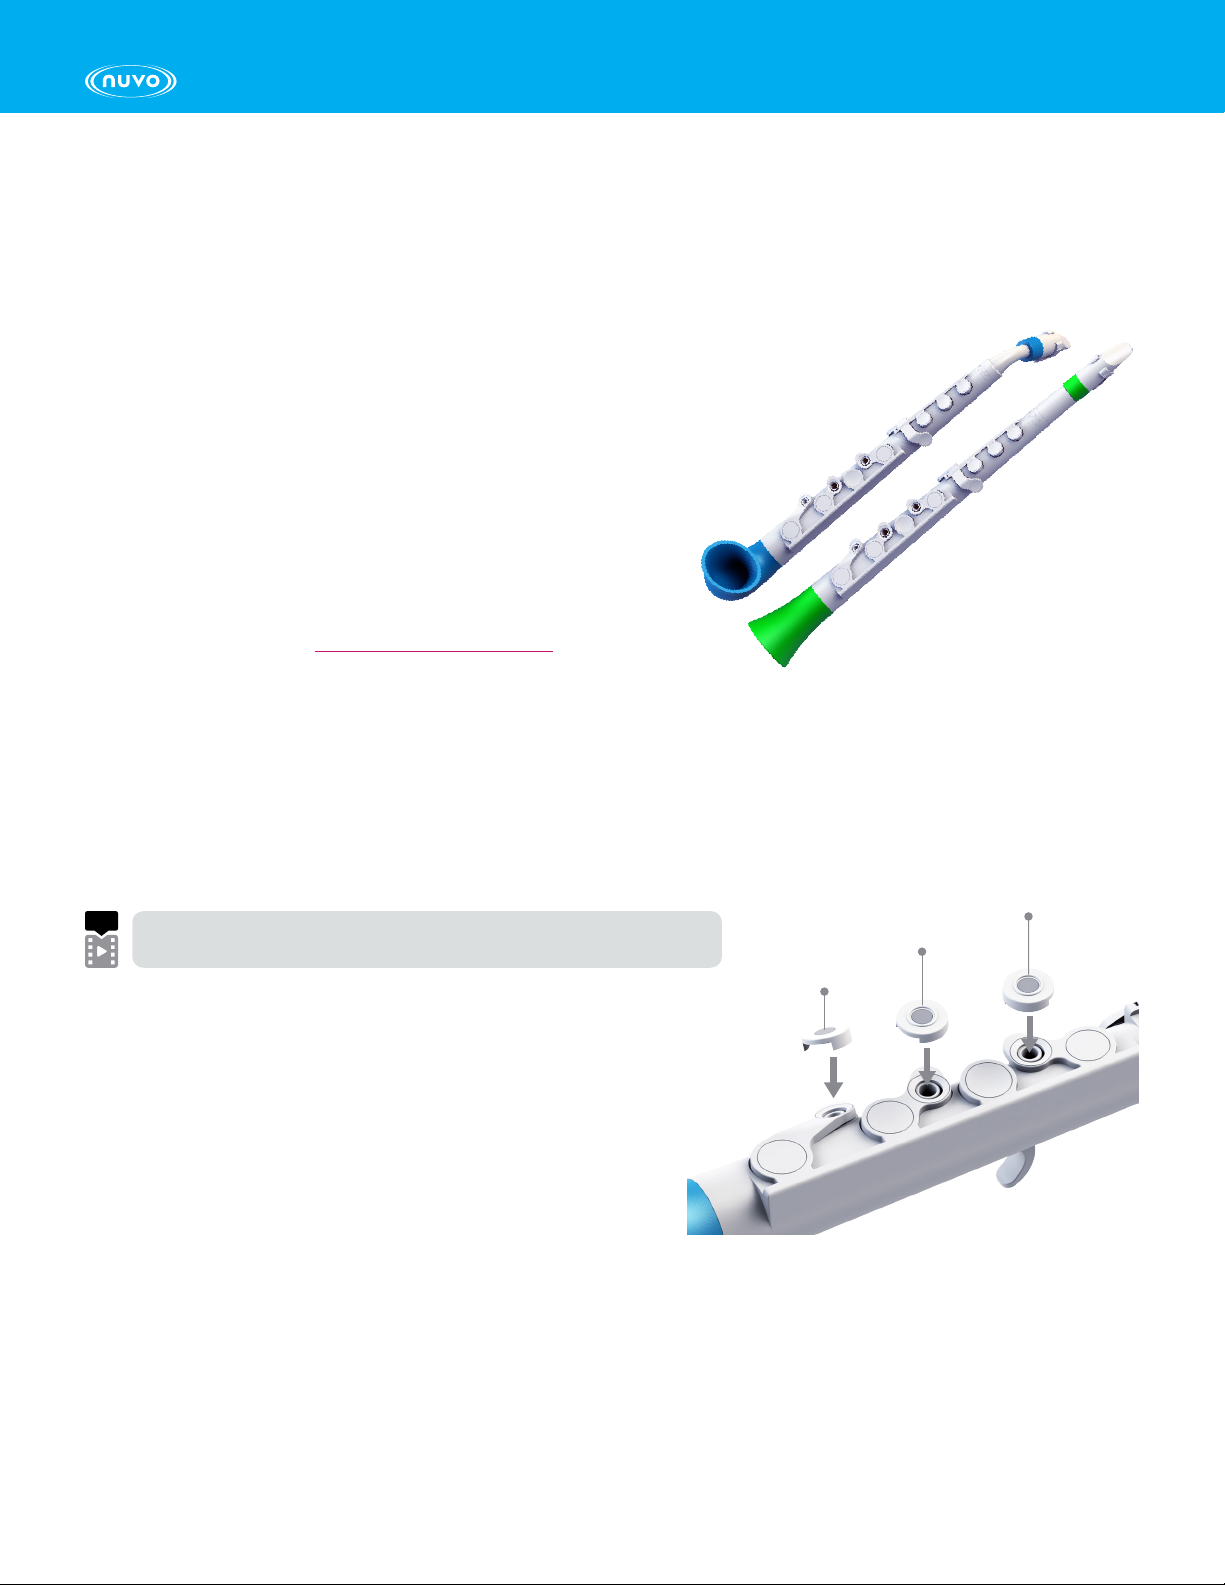
The jSAX is fantastic fun to play and a great way to introduce younger players to the joy of playing the
saxophone and other single reed instruments. It’s lightweight, durable and easy to hold, making it the perfect
stepping stone from Nuvo DOOD and TOOT, or recorders. Much of the music in this book can also be
played on the DOOD and TOOT, so if you are in a mixed group with other Nuvo instruments it is easy to
practice and perform the music together. This “First Steps” book will guide you through the basics of playing
the instrument and reading music notation. It doesn’t matter if you have never read music, or even picked
up an instrument before. Many of the tunes in this book can be played in conjunction with the First Steps
for DOOD and TOOT book, so if you are in a group with other Nuvo instruments, it’s easy to make music
together. This book is written to be used either on your own, or as part of a larger group or class.
Teacher Tips
You don’t have to be a woodwind specialist to have fun teaching Nuvo instruments. Check out our new
WindStars curriculum which is coming soon, where you can find games and activities to engage classes of all
sizes regardless of your own musical ability.
Nuvo Super-Stars & First Steps Certificate
Look out for the 9stars as you progress through the book. You can color them in when you reach them to show
that you have learnt everything up to that point. You can also color the stars below to track your progress.
When you have finished the book, and can play all the tunes perfectly, you can print out the “First Steps
Complete” certificate, fill in your name and put it on your wall!
Backing Tracks and Videos
Throughout the book you will find backing tracks and video icons as shown.
If you are viewing the PDF while online, you can click the icons to access the track or video. You can also
download all the tracks and videos and manage them from your computer when not online.
01 TRACK 01 - B Tune by Graham Lyons
1532 4 687 9
01 VIDEO 01 - Introducing the jSAX

4
jSAX
Right Hand Keys
Left Hand Keys
Silicone Bell
O-Rings
Mouthpiece
Mouthpiece Cap
Ligature
Reed
Right Hand Adjustable
Thumb Rest
Left Hand
Thumb Hole
Introducing the jSAX!
Your jSAX is easy to assemble; it has 4main parts which simply push together.
01 VIDEO 01 - Introducing the jSAX

5
jSAX
Straighten Your jSAX
Training Wheels
Key Plug 3
Key Plug 2
Key Plug 1
02 VIDEO 02 - jSAX training wheels how to fit them
It is possible to straighten your jSAX using the additional
“Straighten your jSAX” kit. The kit has a dierent bell and
neck that when fitted to your jSAX make it straight. It’s
a fun alternative to the curved jSAX, and some players,
particularly taller children and adults find the straight sax
allows them a more relaxed and comfortable playing
position for their shoulders and wrists. The “Straighten Your
jSAX Kit” is available from your local Nuvo retail store.
There is a video on our Nuvo YouTube Channel showing
dierent ways you can play your jSAX including introducing
the “Straighten Your jSAX Kit”.
Your jSAX comes fitted with “Training wheels”. These are
small plugs that cover over the 3holes in the right hand
keys, making it easier to play the notes of the C major
scale. As you progress and want to play notes outside of
this scale, you can remove the plugs and use your fingers
to cover the holes. There is a short video showing you how
to remove and fit your training wheels.

6
jSAX
The Reeds and Mouthpiece
The reed on your jSAX is very important, this is the part that vibrates and makes the sound. Your
jSAX comes with 2synthetic reeds numbered 1½and 2. The reed marked 1½is the softest and
should be the easiest to create an initial sound. The 2reed is a little harder and oers more resistance
when played. We recommend starting with the number 1½, and trying the 2as you progress through
the book. If you look after them, your reeds should last a long time. Biting or chewing your reeds will
damage them, and they won’t work properly. Check the tip of your reed from time to time to make
sure it is flat, and always replace the mouthpiece cap carefully when you have finished playing.
Removing the Reed
You should not have to remove the reed very often, as it is
ok to leave it on the mouthpiece all the time. When you do
need to change the reed, simply lift the ligature as shown
then carefully slide the reed away from the mouthpiece. Try
not to touch the tip of the reed.
Assembling Your Reed and Mouthpiece
There is a location rib on the reed which fits into the slot on the mouthpiece; slide the reed into the
slot and then snap the ligature shut as shown. This enables you to position the reed perfectly every
time. The tip of the reed should now be lined up with the tip of the mouthpiece.
When placing the mouthpiece on your jSAX, notice the rubber O-rings on the neck which seal the
mouthpiece with the body. Make sure they are in their slots before attaching the mouthpiece to the
body. The end of the mouthpiece should line up with the line on the neck.
03 VIDEO 03 - Changing the reed on your jSAX
Lift Ligature Pull Out
Reed Location Slot
Snap Shut Ligature
Reed Level With
Mouthpiece Tip

7
jSAX
Holding the jSAX
Hold your jSAX in front of you with your left thumb covering the hole on the back, and your right thumb
under the thumb hook. Place the first three fingers of your hand on the top three keys, and the four finger of
your right hand over the lower four keys as shown below.
Good Posture
It is important to stand upright and bring your instrument up to your mouth. This will help you to
produce good notes. Remember not to bend forward or dip your head towards your instrument.
Bad Good

8
jSAX
Playing Your jSAX
Make sure your mouthpiece is positioned so the reed is at the bottom. Start by resting your top teeth
on the top or “beak” of the mouthpiece about 1cm from the tip (Image 1), and close your mouth
around the mouthpiece (Image 2). Your bottom lip will cover your lower teeth and make a cushion
for the reed to rest on. Now take a breath and without pung your cheeks out, try to blow a note on
the jSAX. No need to think about your fingers yet, just think about blowing! You can experiment with
a little less and a little more mouthpiece in your mouth and listen to how it changes the sound. So
that you can see what your mouth and fingers are actually doing, it’s always a good idea to stand in
front of a mirror when you first try to get a sound.
Not Making a Sound?
If you find you can’t make a sound, you might be biting down on the reed too hard, try to loosen
your mouth a little around the mouthpiece. If you are making a lot of squeaking noises, you might
have too much of the mouthpiece in your mouth, try sliding the mouthpiece out a little and have
another go. Don’t worry if you can’t always do it first time!
04 VIDEO 04 - Playing your jSAX
Image 1 Image 2

9
jSAX
Introducing the Sta or Stave
Musical notation is written out using 5lines called the sta, or stave. The notes are placed either in
the spaces between the lines, or on the lines depending on which notes they are.
Time signatures tell us how many
beats per measure.
Treble Clef
Bar lines divide the music sta
into measures
Final bar line, found at
the end of the piece.
The first 3 notes we will learn on the jSAX are called B, A and G, this is what they look like on the
sta. Notice how the B and G are on the line, while the A is in the space between the lines.
We will learn to read more notes at the same time as we learn to play them on our instruments.

10
jSAX
Let’s Play Some Notes: B, A and G
The first notes we are going to learn on the jSAX are B, A and G. Remember how to hold your
instrument – left hand 3fingers at the top, right hand 4fingers below and don’t forget those thumbs
at the back.
Now have a go at playing the 3notes, and try moving between them. Always check to make sure
you have the hole on the back covered up. Make sure you have your hands the right way around, left
at the top, right at the bottom, and be sure to cover over the holes when you play the notes.
* Teachers, check out our “Nuvo Top Tips for Teachers” for some activity ideas *
This is how to play the notes on your instruments;

11
jSAX
Note Lengths
Music notes don’t just tell us what notes to play, but also how long to hold the note on for.
Half note,
count 2 beats
Whole note,
count 4 beats Quarter note,
count 1 beat
Let’s Play Some Tunes
The first tune we are going to play only uses one note – B. First try to clap out the rhythm of the tune,
then have a listen to the demonstration track, try clapping along to the tune whilst looking at the music.
NOTE B
B Tune Graham Lyons
01
This means rest for the count of 2 beats
Now try and play the tune on your instrument, follow the music as you play.

12
jSAX
Now try the same with this tune which
uses just the note A, remember to try
clapping the rhythm of the tune first.
Finally try this on the note G
NOTE A
A Tune Graham Lyons
02
G Tune Graham Lyons
03
This means rest for the count of 1 beat
NOTE G

13
jSAX
If we want the music to sound more interesting we need to use more than one note in a tune. Try
playing these 4 tunes that use B, A and G. Notice the repeat sign at the end of each piece - this
means you repeat the tune again from the start.
Button Graham Lyons
04
Au Clair de la Lune Trad.
05
Suo-Gan Trad. Welsh
06
Up and Down Bruce Hunnisett
07
1
This means repeat

14
jSAX
More B, A, G Tunes
Baggy Pants 1 Graham Lyons
08
Baggy Pants 2 Graham Lyons
09
Baggy Pants 3 Graham Lyons
10

15
jSAX
When you play Time Traveller first listen to the backing track, then try to play with the music. In the
classroom you could split into Group A and Group B, taking a line each.
Time Traveller Graham Lyons
11
Group A
Group A
Group B
Group B

16
jSAX
Playing Duets
Music is usually played by more than one instrument at a time. A duet is a piece written for two
players. Sometimes the two players have similar sounding lines, other times they have very dierent
lines, but they always sound great when played together.
Rock Duo Paul Barker
12
Part 1
1
2
Part 2

17
jSAX
A Single eighth
note 2Eighth notes beamed together
equal 1 quarter note
Introducing Eighth Notes
When we need notes that are shorter than quarter notes, we can use eighth notes. Each eight note
is worth half a quarter note.
See if you can spot the eighth notes in Donkeys, clap the rhythm, listen to the track, then try to play it.
Starting Notes with Your Tongue
On the jSAX we should start some of the notes using our tongue. This is called articulation.
Play a B, and without stopping the air from your lungs, touch the tip of the reed with your tongue
to stop the sound. When you take it away the sound will carry on. Now play the note again and try
to touch the reed, as if you are saying “Tu, tu, tu,”. Try to make all the notes the same length. This is
called tonguing!
Try playing Hot Cross Buns, and think about tonguing all the notes.
Donkeys Graham Lyons
13
Hot Cross Buns Trad.
14
2
=

18
jSAX
Eighth Note Workout! Bruce Hunnisett
15
Moderato
Disco Duet Paul Barker
16
Part 1
1
2
Part 2

19
jSAX
NOTE F
Let’s Learn 2More Notes: C and F
Merrily
18
NOTE C
C Freeze! Bruce Hunnisett
17
Trad.
D DT T
Table of contents
Other Nuvo Music Equipment manuals
Popular Music Equipment manuals by other brands

aion
aion XIPHOS manual

Avid Technology
Avid Technology Pro Tools S6 Master Post Module user manual

Solid State Logic
Solid State Logic XLogic SDI-MADI Installation and user guide

Clank
Clank Chaos Quick start manual

EARTHBOARD
EARTHBOARD EBII quick start guide

Fishman
Fishman ELLIPSE BLEND - installation guide