NXR 780-0838 User manual

8 Burner Stainless Steel Event Grill
ITM. / ART. 1031506
Model: 780-0838
Care & Assembly Instructions
IMPORTANT, RETAIN FOR FUTURE REFERENCE: READ CAREFULLY
Warning:
•For outdoor use only.
•This instruction manual contains important information necessary for the proper assembly and
safe use of the appliance.
•Do not leave the appliance unattended. Keep young children and pets away.
•Do not move the device during use.
•Not intended to be installed in or on boats and should never be used as a heater.
•Close the valve of the gas cylinder after use.
FOR YOUR SAFETY
Do not store or use gasoline or other
flammable vapors and liquids in the vicinity
of this or any other appliance.
!Warning: Improper installation, adjustment,
alteration, service or maintenance can cause
property damage, injury or death. Read the
installation, operating and maintenance
instructions thoroughly before installing or
servicing this equipment.
Questions, problems, and/or missing parts? Before returning to your retailer, please send an email to
our customer service department: nxrcs@duro-global.com
If you prefer to speak to a live agent; call 1-888-909-8818 (USA/CANADA) Monday-
Friday 9 AM-5 PM PST;
Languages Spoken: English, Spanish, French.
1

CONTENTS
EXPLODED VIEW..................................................................................................................................................... 3
PART LIST ..................................................................................................................................................................3
PACKAGE CONTENT LIST..................................................................................................................................... 4
HARDWARE CONTENT .......................................................................................................................................... 5
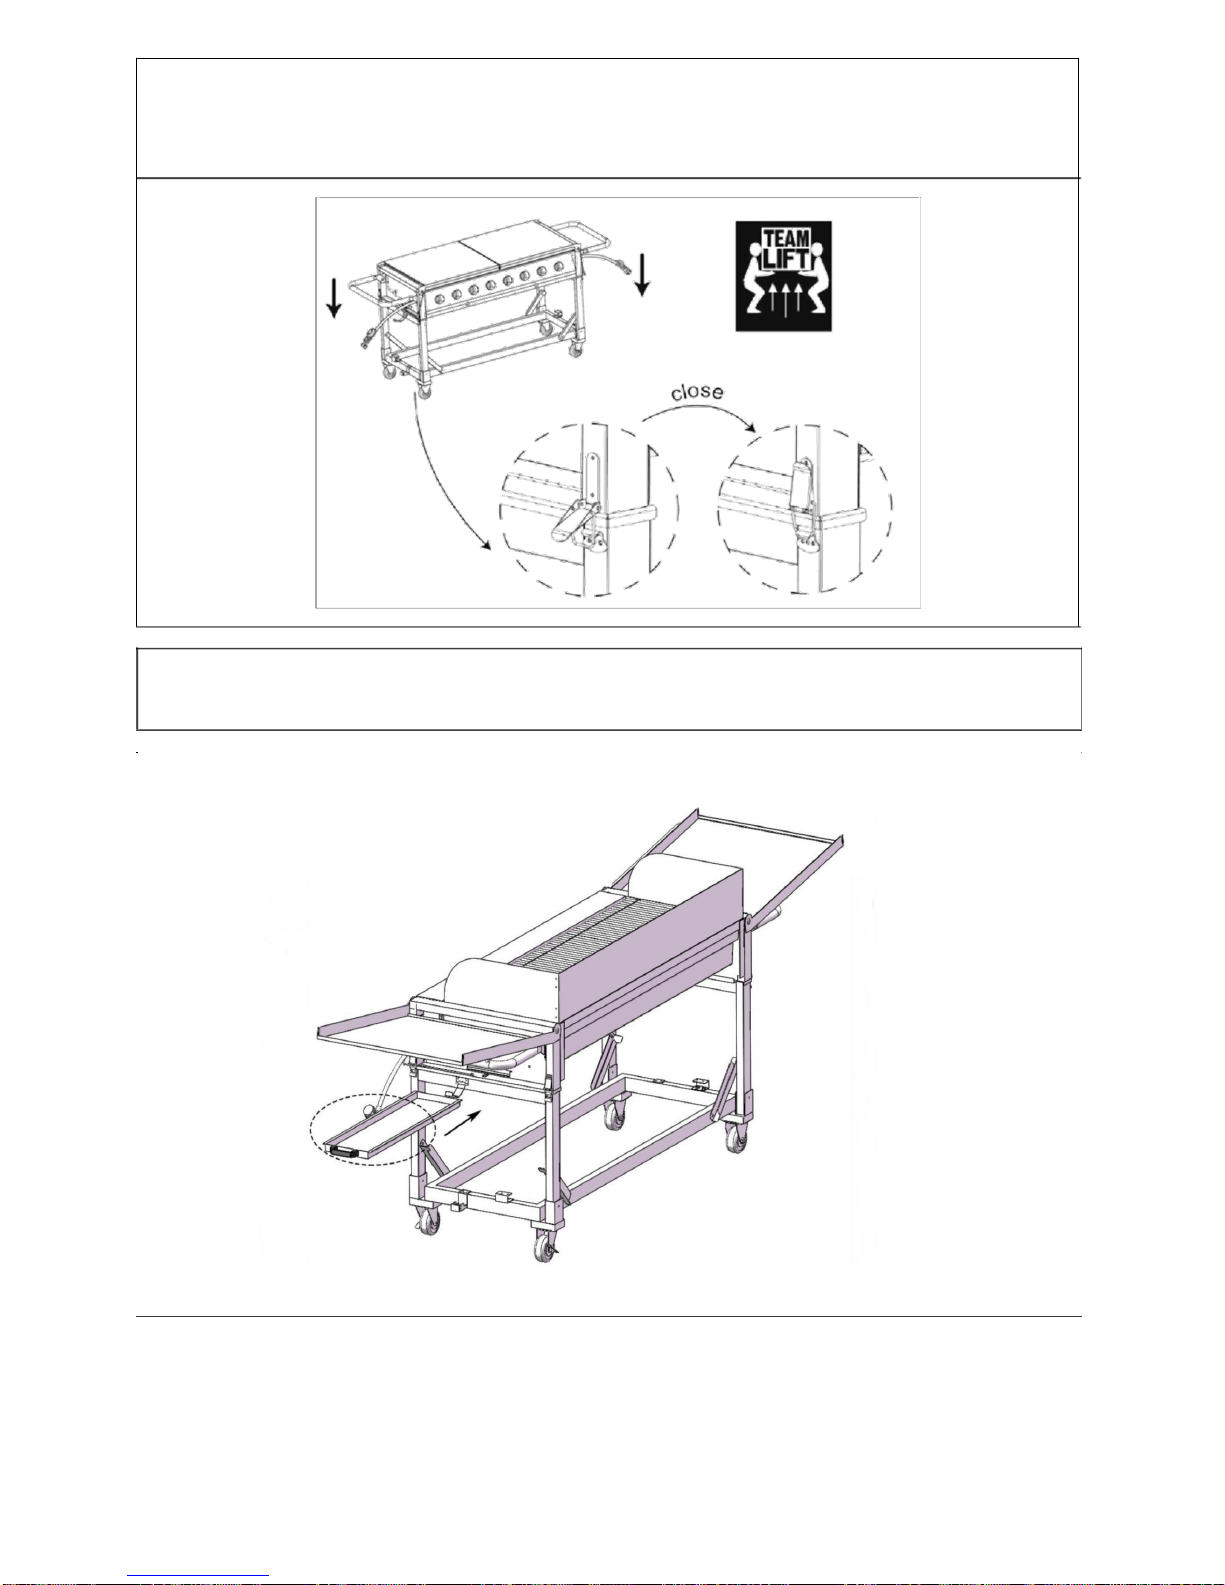
ASSEMBLY INSTRUCTION.................................................................................................................................... 6
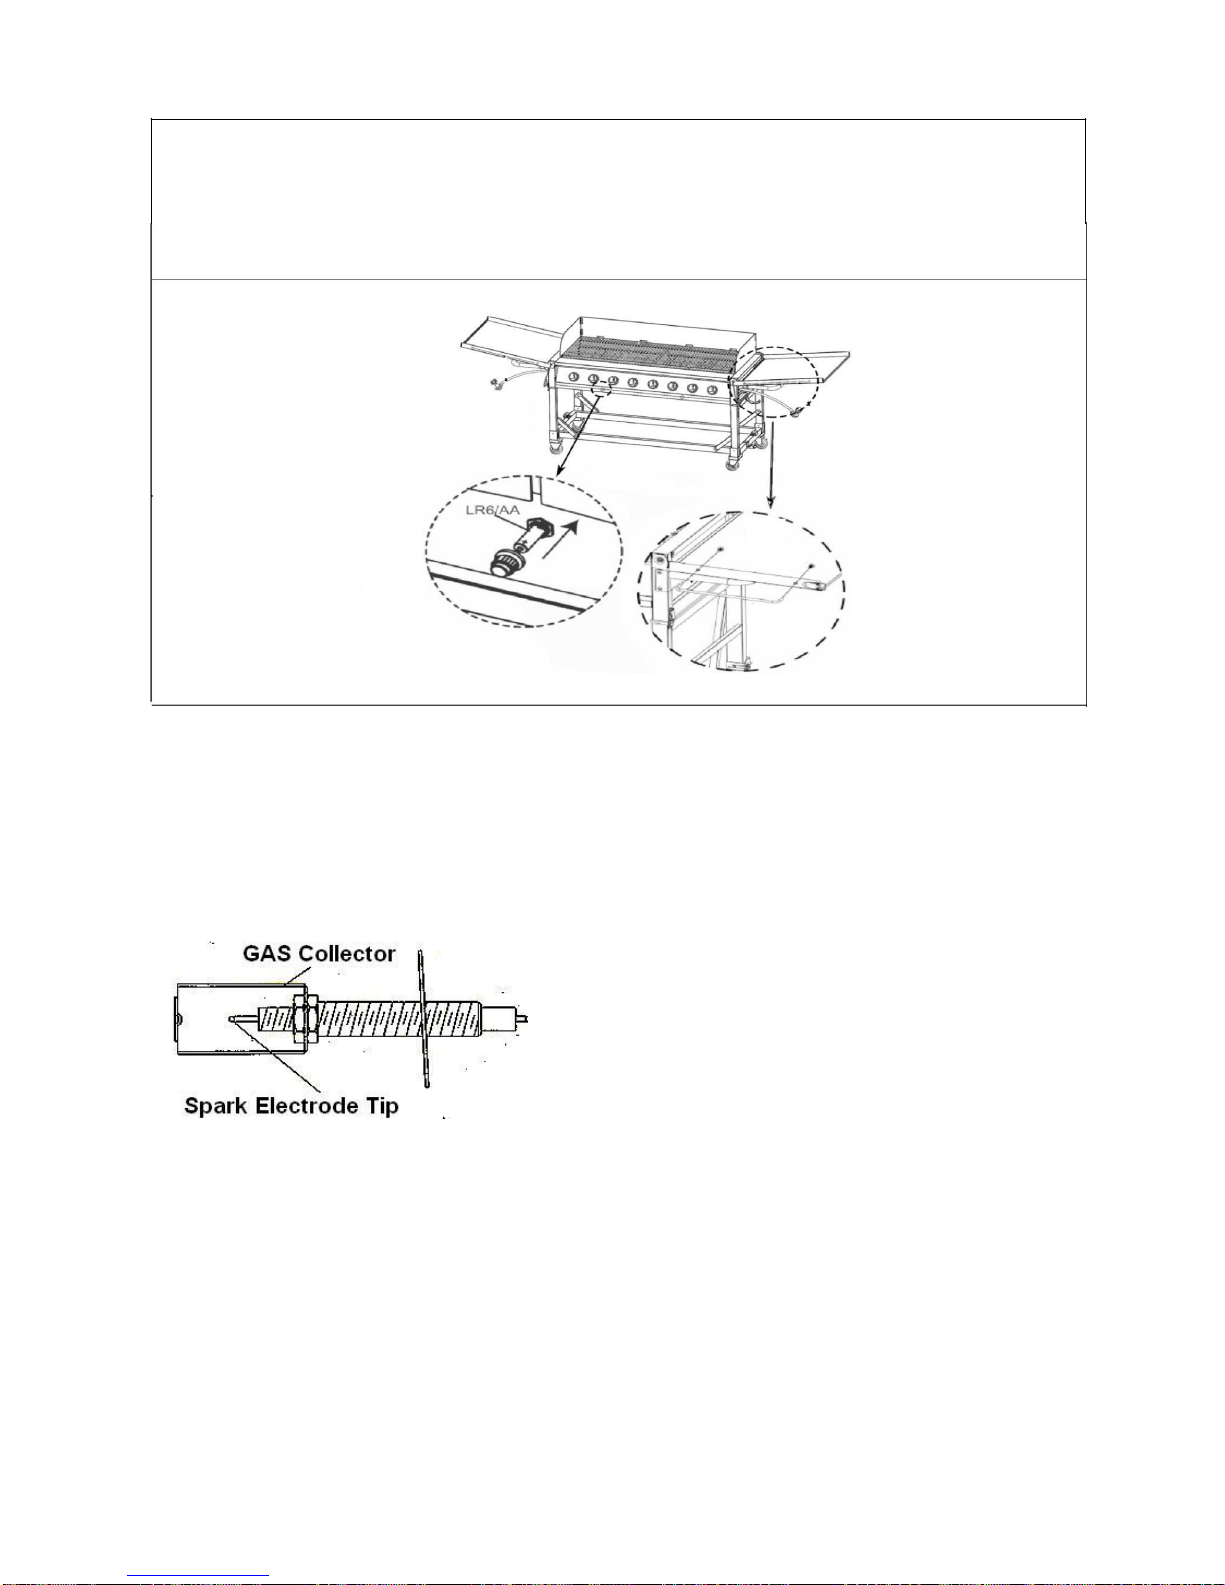
ELECTRODE CHECK ..............................................................................................................................................10
INTENDED USE........................................................................................................................................................12
SAFETY WARNINGS...............................................................................................................................................12
SCOPE OF DELIVERY.............................................................................................................................................13
ACCESSORIES..........................................................................................................................................................13
BEFORE FIRST USE.................................................................................................................................................14
OPERATION ..............................................................................................................................................................15
AFTER USE................................................................................................................................................................17
TROUBLESHOOTING .............................................................................................................................................17
CLEANING, MAINTENANCE AND REPAIR......................................................................................................18
STORAGE AND TRANSPORTATION ..................................................................................................................19
DISPOSAL..................................................................................................................................................................19
TECHNICAL DATA..................................................................................................................................................20
WARRANTY..............................................................................................................................................................21

1
2
3
4
5
6
7
8
9
10
11
12
13
14
15
16
EXPLODED VIEW
17
18
19
20
21
22
23
24
25
26
27
28
29
30
31
32
33
34
35
36
PARTS LIST
Part Number
Part Description
Qty
1
cooking grid
4pcs
2
flame tamer
8pcs
3
fire box division plate
1pc
4
fire box left side panel
1pc
5
gas valve
8pcs
6
grease tray handle
2pc
7
control knob
8pcs
8
flame tamer support
1pc
9
control panel
1pc
10
pulse ignitor
2pcs
11
left leg assembly
1pc
12
fire box bottom panel
1pc
13
main tube burner
8pcs
14
grease tray
2pcs
15
cart bottom frame
1pc
16
fixed caster
2pcs
17
wind shield assembly
1pc
18
main lid left
1pc
19
main lid,right
1pc
20
main lid, handle
2pcs
3

Part Number
Part Description
Qty
21
fire box rear panel
1pc
22
fire box front panel
1pc
23
fire box right side panel
1pc
24
mainfold
1pc
25
side handle
2pcs
26
regulator
2pcs
27
gas tank hook
2pcs
28
latch lock
4pcs
29
upside beam
2pcs
30
lightning rod
2pcs
31
fire box heat insulation plate
1pc
32
control knob bezel
8pcs
33
cart bottom frame hanger
2pcs
34
gas tank holder
2pcs
35
cart leg slide support
4pcs
36
swivel caster
2pcs
PACKAGE CONTENT LIST
Main Lid,left:1pc
Main Lid,right:1pc
Fire Box Assembly:1pc
Cart Assembly: 1pc
Grease Tray:2pcs
Main Lid Handle:2pcs
Cooking Grid:4pcs
Cart Handle:2pcs,right:2pcs
Hose and Regulator:2pcs
4

Flame Tamer:8pcs Gas Tank Hook:2pcs Gas Tank Holder:2pcs
Cart Bottom Frame Hanger:2pcs Swivel Caster:2pcs Fixed Caster:2pcs
HARDWARE CONTENTS
Pack
Description
for Required
Extra
Total
assembly
hardware
AA
Screw Head Truss mm-12 x 1/4
pcs. 20
pcs. 2
pcs. 22
BB
Washer Locking 1/4
pcs. 16
pcs. 2
pcs. 18
CC
Washer Flat 1/4
pcs. 16
pcs. 2
pcs. 18
DD
Screw Head Truss1/4x17.5mm
pcs. 8
pcs. 2
pcs. 10
EE
Screw Head Truss 5/32x10mm
pcs. 4
1pcs
pcs. 5
AA
BB
CC
DD
EE
5

ASSEMBLY INSTRUCTIONS
1. Install Casters.NOTE: We recommend at least 2 people to assemble grill.
•Lift the Cart out of shipping carton and place it on the cardboard work surface.
•Install the Casters to the cart leg with Screw #AA, make sure the 2 swivel casters on the right side.
Warning: Make sure that all casters have been tightened before unfold the legs of cart.
Fixed Caster
Swivel Caster
AA: 16pcs
BB: 16pcs
CC: 16pcs
2. Assemble Cart NOTE: We recommend at least 2 people to assemble grill.
•Turn the cart right side up. Then unfold the cart legs.
CAUTION: Do not stand, lean or apply pressure to the Cart Frame Bracket once assembly.
6

3. Install bottom gas tank holder
• Install gas tank Holder to both left and right lower bar of the cart frame and tightly secure with screw$#AA.
AA:4pcs
4. Install Handles
•Align both left and right handles onto the body of the grill. Then tighten the handles with bolt #DD as shown on diagram
below.
Screw DD: 8pcs
7

5. Install Grill Body
•Lift and position Fire Box Assembly to the Cart.
•All bottom four corners of grill body must be sitting on the SEAT on the cart beam.
•Then lock each leg by closing the latch of each buckle on legs and grill body.
•Warning: Always keep the latches locked.
6. Install Grease Tray
• Position Grease Tray to the Holders on both left and right side of the cart.ˇˇ
8

7. Install Windshield
•Open both left and right side shelf and insert the side handles (Shown on diagram 1).
•Open the wind shield (Shown on diagram 2).
•Unfold the left and right side panel of wind shield and insert the small flag on bottom edge of panel onto the slot on
the grill body frame (Shown on diagram 3).
8. Install Flame tamer and Cooking grid.
•Place all the 8 Flame Tamers over the burners.
•Place all the 4 cooking grids over the Flame Tamer.
9

9. Install Main Lid Handle and Ignitor Battery
•Twist and remove Ignitor Cap from Control Panel
•Place 1 AA battery into the igniter body with + outward and –inward. (Battery not included)
•Install the igniter cap and spring over the + end of the battery and tightly screw it onto the control panel.
•Repeat the same steps for the igniter on the other side.
•Install the both left and right side handle to the cart with screw EE.
EE: 4pcs
Electrode Check
NOTE: We recommend at least 2 people to perform the Electrode Check before proceeding
This test will ensure that the Spark Electrode Tips are properly positioned so your grill can easily ignite.
10

Tips prior to using grill
•Be sure all Control Knobs are set to “OFF” and open the Grill Lids.
•Have your assistant stand behind the right side of the grill and look toward the front of the grill. Never place your face inside the Grill.
•Press the Igniter Cap, You should hear a “clicking” sound. Your assistant should see a blue spark within each Gas Collector Box.
If a spark is present Electrode Tips are properly positioned.
•If no spark is seen, the Spark Gap needs to be adjusted as follows:
a) If you’re not able to see a spark, the Spark Gap Electrode Tip and Receiver is more
than 0.47 cm/ 3/16 in. off use long nose pliers to gently squeeze the Gas Collector Box to the
narrow gap.
b) Recheck the Electrode again, if no “clicking” sound is heard; AA Battery is installed
backwards.
c) Electric wires may be loose. Remove the AA Battery and inspect the Ignitor Junction
Box found behind the Control Panel and reconnect any loose wires.
Latch
!
WARNING
!
Failure to read and follow the Use and Care Instructions could result in a fire or explosion that could
cause serious bodily injury, death or property damage.
Transporting or storing your grill:
1. Lock grill casters.
2. Remove LP Gas tank and Grease Tray from your grill.
3. Loosen 4 Latches on Grill Bowl and Cart. With an assistant. Lift and position Grill Bowl on a
cardboard surface.
4. Lift up the 4 connect bracket shown on Fig.2 with your finger, then have the cart folded.
5. With an assistant, lift and position Grill Bowl onto the folded Cart. See Fig.3.
6. Then lock the Grill Bowl and Cart as Fig.4 shown.
Fig.1 Fig.2 Fig.3
Fig.4
10

SAFETY INSTRUCTION
Dear customer,
Congratulations on your purchase of this product.
Please take a few minutes before starting operation of the appliance and read the following operating instructions.
0051
Many thanks.
16
QA16-0000003148
USE OUTDOORS ONLY!
READ THE INSTRUCTIONS BEFORE USING THE APPLIANCE!
WARNING! ACCESSIBLE PARTS MAY BE VERY HOT. KEEP YOUNG CHILDREN AWAY!
RISK OF EXPLOSION!
THIS APPLIANCE MUST BE KEPT AWAY FROM FLAMMABLE MATERIALS DURING USE!
DO NOT MOVE THE APPLIANCE DURING USE!
TURN OFF THE GAS SUPPLY AT THE GAS CYLINDER AFTER USE!
DO NOT MODIFY THE APPLIANCE!
INTENDED USE
This barbecue is intended to grill different kinds of foodstuff in well-ventilated outdoor areas. The appliance must be operated with low pressure propane or butane
liquefied petroleum gas (LPG). It may not be supplied with natural gas.
This appliance is intended for commercial or industrial use. It must not be used for any purposes other than those described to avoid personal injury or damage to property.
SAFETY WARNINGS
Read this instruction manual carefully before using the appliance. Familiarise yourself with the operation, adjustments and functions of switches. Internalise and
follow the safety and operation instructions in order to avoid possible risks and hazards.
Keep the instruction manual for future reference and provide to other when passing the appliance.
GENERAL BARBECUE WARNINGS
1. WARNING! Danger of carbon monoxide poisoning! Never operate the appliance in enclosed areas such as garages or sheds, as this leads to a carbon monoxide build-up
resulting in personal injury or death.
2. WARNING! Danger of explosion! Never operate the appliance in enclosed areas such as garages or sheds, as this leads to gas accumulation in case of a leakage which
may result in an explosion.
3. Place the appliance on a secure level, stable and non-flammable surface, away from any heat source, prior to use.
4. Always lock the wheels with their brakes (if available) prior to use.
5. Do not move the appliance while it is in use.
6. Do not attempt to modify the appliance in any way. Only use attachments and accessories recommended by the manufacturer. Any alterations made to the appliance,
improper use or non-compliance with the instructions lead to danger.
7. Do not use the appliance near flammable objects. Do not use under a pavilion, sun umbrella or the like. Keep distance of at least 3 m around the appliance to such objects.
8. Do not use the appliance in the immediate presence of aerosol cans, flammable liquids, volatile gases or other flammable substances. Keep open flames such as candles
or torches away from the appliance.
9. Do not store any flammable liquids or volatile gases near the appliance.
10. Do not leave the appliance unattended during use.
11. Do not use liquid fuels with this appliance.
12. Never lean over cooking surface while lightening the appliance or during cooking.
13. This appliance is not intended to be used by persons (including children) with reduced physical, sensory or mental capabilities, or lack of experience
and / or knowledge of the appliance and its properties, unless they have been given supervision or instruction concerning use of the appliance by a person responsible for
their safety.
14. Supervise children at all times to ensure that they do not play with the appliance.
11

GAS BABRBECUE WARNINGS
1. This appliance is configured to work with low pressure propane & butane liquefied petroleum gas (LPG). Do not use natural gas supply.
2. Open the cover(s) and fold up the wind screen before igniting the appliance.
3. Only cover the appliance when it has completely cooled off.
4. Never use charcoal or other solid fuels in this appliance.
GAS CONNECTIONS / GAS CYLINDER / PRESSURE REGULATOR WARNINGS
1. Check the appliance and all connections regularly and each time the gas cylinder(s) is / are replaced for possible gas leaks (→Testing for gas leaks).
2. Never check for gas leaks using a match or any other open flame.
3. Never alter or modify the pressure regulator(s) or gas supply assembly.
4. Always turn the gas supply off on the gas cylinder(s) and / or the pressure regulator(s) and disconnect the gas hose(s) after use.
5. Never store gas cylinders indoors or close to heat sources.
6. Always store gas cylinders in upright position, never in horizontal position. This could cause the gas cylinder to leak or gas could leak into the gas hose.
7. Never use the appliance without the pressure regulator(s).
8. Only use pressure regulators approved for liquid petroleum gas (LPG) and complying with national regulations. Observe the technical data (→
TECHNICAL DATA).
GAS HOSE WARNINGS
1. Inspect the gas hose(s) prior and after each use - look for any cuts, cracks excessive wear or other damage. Let the gas hose(s) be replaced every one to two years by a qualified
technician or the retailer only. Have brittle gas hoses and their connections exchanged. In case of doubts, ask a local specialist.
2. Protect the gas hose(s) against damages. Do not let it / them hang over sharp edges, do not twist, squeeze or bend it / them. Keep the gas hose(s) away from hot
surfaces and ensure that nobody can trip over it / them.
3. Only use a gas hoses approved for liquid petroleum gas (LPG) and complying with national regulations. Observe the technical data (→ TECHNICAL DATA).
4. Every kind of work or replacement of the hoses is to be conducted according to manufacturer’s instruction, by qualified personal or specialists.
IF YOU SMELL GAS
1. Never light the appliance if you smell gas.
2. Immediately turn the gas supply off on the appliance as well as on the gas cylinder(s) and / or the pressure regulator(s).
3. Extinguish all open flames near the appliance, such as candles or torches. Switch all electric appliances in the surrounding off.
4. Make sure the area is well-ventilated with fresh air.
5. Do not use the appliance any longer and have it repaired by an authorized professional only, should it still smell of gas.
BATTERY WARNINGS
1. Keep batteries out of reach of children at all times.
2. Seek immediate medical advice if batteries have been swallowed.
3. Handle leaking batteries with proper protection and dispose them of accordingly. Prevent battery acid from coming into contact with skin and eyes. If you do get battery
acid in your eyes or mouth, flush them thoroughly with lots of water and seek medical advice immediately. If battery acid comes into contact with your skin, wash the
affected area with lots of water and soap.
4. Clean the contacts on batteries and the appliance prior to inserting.
5. Do not use old and new batteries, batteries of different types or different manufacturers together. Always replace all batteries of a set at the same time.
6. Only use batteries recommended for this appliance. Observe the technical data (→ TECHNICAL DATA) stated within this instruction manual.
7. Observe the polarity (+ and -) when inserting batteries. Pay attention to the markings on the appliance and the battery.
8. Remove batteries from the appliance if it is not to be used for an extended period of time.
9. Remove exhausted batteries promptly from the appliance.
10. Do not attempt charging non-rechargeable batteries.
11. Never expose batteries to extreme environmental conditions like heat, cold or moisture.
12. Do not dismantle, open or shred batteries.
13. Do not short-circuit batteries. Do not store them haphazardly in a place where they may short-circuit each other or be short-circuited by other metal objects.
SCOPE OF DELIVERY
Refer to the illustration pages in the front section of this instruction manual for details.
Make sure the scope of delivery is complete and free of any damage. Contact the dealer from whom you purchased the appliance if you find that parts are missing or
show damage (→ WARRANTY).
Do not use the appliance unless missing parts have been delivered in addition or defective parts have been replaced. Using an
incomplete or damaged appliance leads to personal injury und property damage.
ACCESSORIES
To operate this appliance safely and correctly, some accessories, i. e. tools and attachments, are necessary. Refer to the illustration pages in the front section of this instruction
manual for details.
Ensure that you have the accessories and tools needed for commissioning and operation available. This also includes suitable personal protective equipment. Accessories and
tools are available through your authorised dealer. When buying always consider the technical requirements of this appliance
(→ TECHNICAL DATA).
If you are not certain, ask a qualified specialist and get advice from your trusted dealer.
NOTE: This instruction manual contains information and suggestions for several attachments and their uses. The attachments depicted are not necessarily
included in the shipment, but are meant to indicate additional possibilities for using this appliance.
13

BEFORE FIRST USE
UNPACKING
1. Unpack all parts and lay them on a flat, stable surface.
2. Remove all packing materials and shipping devices (if applicable).
WARNING!
The appliance and the packaging are not children’s toys! Children must not play with plastic bags, sheets and small parts! There is a danger of choking and
suffocation!
ASSEMBLING
1. Assemble the appliance completely and make all required adjustments prior to operation.
2. Follow the assembly and operation instructions closely. Use the figures as visual guide.
3. Pay attention to small parts such as screws and nuts that are loosened or removed for assembly or during adjustments. Keep them safe in order to avoid losing them.
4. The appliance is large. Assemble with two people.
WARNING!
Use the appliance only after it has been completely assembled and adjusted!
Choosing gas
1. Propane gas cylinders can be used throughout the entire year. Butane gas cylinders work best during the summer. They are distinctly less efficient at temperatures
under +10 °C.
2. We recommend using either 5 kg or 11 kg gas cylinders, for best performance.
3. Do not allow cylinders to be filled beyond 80% capacity. Over-filled cylinders can create a dangerous condition due to build-up pressure and cause the valve to expel
propane gas vapours. The vapour is combustible and if it comes in contact with a spark source or flame an explosion causing severe burns, bodily harm, or death could
occur.
4. Always use a protective cylinder cap when appliance is not connected to the cylinder(s).
Gas connections
WARNING! Be aware of flashback!
Make sure there is no debris, spiders, small insects or webs inside the head of the gas cylinder(s), pressure regulator(s), burner(s), burner tube(s) or hose(s),
before any connection is made. They can obstruct the gas flow, which could result in a fire in and around the burner tube. This kind of fire is known as “flash-
back” and can cause serious damages. Check and clean (→ CLEANING, MAINTENANCE AND REPAIR) all the parts of the appliance before assembling it,
to reduce the chance of its occurrence.
Connecting / exchanging gas cylinders
WARNING!
Only use the provided or equivalent pressure regulator(s) (→ TECHNICAL DATA) in order to guarantee that it functions safely and efficiently. Using an
improper or a defective pressure regulator is dangerous. Consult your specialised dealer concerning suitable pressure regulators. The type of the pressure
regulator to be used must indicate that it complies with the relevant standard and requirement (EN 16129).
Consult your local gas retailer regarding suitable gas cylinders and pressure regulators (→ TECHNICAL DATA).
NOTE: Gas connections are equipped with left handed threads; the screw-nut needs to be turned counter clockwise!
1. Ensure that there are no ignition sources like cigarettes, open flames, sparks and other heat sources nearby when connecting or replacing gas cylinders.
2. Place the gas cylinder(s) on level ground next to the appliance.
3. Make sure that all control knobs on the appliance are in the off positions ARRÊT/OFF.
4. Make sure that the gas valve of the gas cylinder(s) and / or the pressure regulator(s) is / are closed.
5. Connect the gas hose(s) to the gas line(s) of the appliance (Fig. 1). Do not overtighten the connections. Use only the delivered hardware to secure the connections.
Do not use sealing tape or a liquid sealant.
6. Connect the / each pressure regulator to the gas cylinder inlet(s) by turning the pressure regulator counter clockwise (Fig. 2). Secure the connection(s) with the retention
nut(s).
7. Connect the other end of the gas hose(s) to the pressure regulator(s) (Fig. 3).
8. Check all connection for gas leaks (→ Testing for gas leaks).
1
2
3
2. 2.
2x 2.
1.
1.
1.
14

Testing for gas leaks
WARNING! Risk of explosion!
Never check for gas leaks using a match or any other open flame.
Test all connections, fittings and all gas hoses for gas leaks every time prior use of the appliance, or each time the gas cylinder(s) is / are changed. Make sure this procedure is carried out
in a well ventilated area away from flames, sparks or any heat sources. Do not attempt to light the appliance, if you smell gas.
1. Make sure that all control knobs on the appliance are in the off positions ARRÊT/OFF.
2. Open the gas valve of the gas cylinder(s) and / or the pressure regulator(s).
3. Apply leak detector spray or half water / half soap solution with a brush to all the connection points.
4. Turn the gas supply on the valve of the gas cylinder(s) and or the pressure regulator(s) off immediately, if you spot gas bubbles forming on the interested areas.
Tighten all connections again and repeat the test.
5. Do not use the appliance but contact your retailer, if gas bubbles keep forming.
Inserting / exchanging batteries
This appliance is equipped with two battery operated electronic ignitors, sparking the electrodes of a group of four burners (left and right) at once.
1. Remove the cap of each electronic ignitor by turning it counter-clockwise (Fig. 1).
2. Insert one LR6/AA battery into the tube (Fig. 2). Observe correct polarity (+ and -)!
3. Screw the cap back on clockwise (Fig. 3).
1
2
3
Burning-off
WARNING!
Use the appliance only after it has been completely errected! Do not use it in collapsed position!
WARNING!
Use the appliance only with the firebox fixed and secured to the substructure! Do not use it without substructure!
WARNING!
Use the appliance only after the wind screen has been properly unfolded and secured! Do not use it with folded wind screen!
Before first use, remove any production residue and clean the appliance:
1. Operate the appliance at high temperature with the wind shield folded up for about 10 - 15 minutes to burn-off production residues (→
IGNITING THE BURNER(S)).
2. Turn the appliance off; allow it to cool and clean all parts (→ CLEANING AND CARE) afterwards.
OPERATION
WARNING! Danger of burns!
This appliance generates heat and escaping steam during use! Take proper precautions to prevent risk of burns, fires, or other damages to people and property!
Wear protective oven mittens or gloves. Use proper tools like barbecue tong and prongs to turn over grillables!
COOKING TIPS
1. Brush the grill grates with cooking or vegetable oil, before using the appliance. Use a brush with a long handle. The juices from the food drip onto the heater during
cooking and vaporise. The steam arising from this process contributes to the taste of the food.
2. Set the control knob(s) to the desired temperature in order to reach your desired cooking results.
IGNITING THE BURNER(S)
The burner(s) can be ignited with the built-in electronic ignitor(s) or alternatively manually with a match. Follow the procedure for each method as described below.
WARNING! Risk of explosion!
Always ignite the burner(s) within 5 seconds after turning the control knob to a position in between HI and LO. Gas can collect inside the appliance causing an
explosion on ignition.
15

WARNING!
If any burner still does not ignite after a few tries, it could indicate a problem with the gas supply. Turn the gas supply off on the appliance as well as on the gas
cylinder(s) and / or the pressure regulator(s). Do not use the appliance until the cause of the problem has been found
(→ TROUBLESHOOTING).
Igniting the main burner(s) with the electronic ignitor(s)
1. Wait 5 minutes after all connections are made and make sure no gas is leaking (→ Testing for gas leaks).
2. Open the cover(s) of the appliance and fold up the wind screen. Refer to the illustration pages in the front section of this instruction manual for details. Turn all
control knobs to the off positions ARRÊT/OFF (Fig. 1).
3. Open the valve of the gas cylinder(s) and / or the pressure regulator(s) (Fig. 2).
4. Keep your face and body as far away from the appliance as possible while igniting.
5. Push and turn the control knob of the selected burner to the HI position (Fig. 3). Push and hold the button of the electronic ignitor until the selected burner lights up. The
electronic ignitor sparks all electrodes of the selected burner group at once.
6. Set the control knob between HI and LO position (Fig. 4), to adjust the heat.
7. Ignite the other burner(s) using their respective control knob(s), after the first burner has fired up.
WARNING!
Turn all the control knobs to the off positions ARRÊT/OFF, if any burner does not ignite within 5 seconds. Wait for 5 minutes to let the gas dissipate
and try again.
1
1.
3.
4.
2.
8x
4
2
3
2.
1.
3.
Igniting the main burner(s) with a match
1. Wait 5 minutes after all connections are made and make sure no gas is leaking (→ Testing for gas leaks).
2. Open the cover(s) of the appliance and fold up the wind screen. Refer to the illustration pages in the front section of this instruction manual for details. Turn all
control knobs to the off positions ARRÊT/OFF (Fig. 1).
3. Open the valve of the gas cylinder(s) and / or the pressure regulator(s) (Fig. 2).
4. Keep your face and body as far away from the appliance as possible while igniting.
5. Insert a long stick match into the match holder (Fig. 3).
6. Light the match and insert it into the match lighting hole on the left / right side of the firebox (Fig. X). Push and turn the control knob of the selected burner to the HI
position (Fig. 5).
7. Set the control knob between HI and LO position (Fig. 6), to adjust the heat.
8. Ignite the other burner(s) using their respective control knob(s), after the first burner has fired up. Push and turn the control knob(s) and set it to the HI position to
ignite it. The first burner will ignite the nearby burner through cross-lighting.
WARNING!
Turn all the control knobs to the off positions ARRÊT/OFF, if any burner does not ignite within 5 seconds. Wait for 5 minutes to let the gas dissipate
and try again.
16

1
1.
3.
2
3
4.
2.
8x
4
5
1.
3.
2.
APPEARANCE OF THE FLAME
• The flame should appear blue and stable (Fig. 1). There should be no yellow sparks, loud noises nor
1
should there be distance between the base of the flame and the nozzle.
•A yellow flame indicates insufficient oxygen supply. Loud noises and the flame being distant from the
nozzle indicate excessive oxygen supply.
•Check the appearance of the flame at every use. Contact a specialist to reset the appliance, should the appearance
differ from normal.
TIPS REGARDING BURNING GREASE
WARNING!
Protect yourself and your hands from spurts of flames. Never try to put out a grease fire with water! Turn all the control knobs to the off positions ARRÊT/OFF,
if a grease fire occurs. Turn the gas supply on the gas cylinder(s) and / or the pressure regulator(s) off and wait until the fire goes out by itself.
•Grease and juice that drips from meat onto the heater produces short spurts of flames which also contribute to the grilling taste.
•If too many spurts of flames are produced, the meat could burn.
•Only use meat that is suitable for grilling. Try to avoid grilling meat with excessive fat.
•Cut away as much fat as possible and do not overuse marinade to prevent meat from burning, before grilling meat.
AFTER USE
1. Close the valve on the gas cylinder(s) and / or the pressure regulator(s), wait until the flame extinguishes completely in the appliance.
2. Turn all the control knobs to off positions ARRÊT/OFF and let the appliance cool for about 5 minutes. The cover(s) must be open at this time.
3. Disconnect the gas cylinder(s) from the appliance, clean and store the appliance (→ CLEANING, MAINTENANCE AND CARE), if you do not plan to use the appliance
again soon.
TROUBLESHOOTING
Suspected malfunctions, errors or damage are often due to causes that the users can fix themselves. Therefore check the appliance using below table before contacting a
qualified specialist. In most cases the problem can be solved quickly.
WARNING!
Only perform the steps described within this instruction manual! All further inspection, maintenance and repair work must be performed by an authorised
service centre or a similarly qualified specialist!
17

Problem
Possible cause and solution
The appliance does not ignite immediately.
• Ensure that the gas valves are open.
• Check if sparks are produced when igniting the appliance.
• Push the control knob(s) for 5 seconds before you attempt to ignite the appliance.
• Ensure that the burner(s) is / are clean.
• Check if the gas cylinder(s) is / are not empty.
The appliance does not ignite at all.
• The electrode maybe covered with cooking residues. Use a clean swab and alcohol to clean.
• The electrode or wire may be damaged. Replace with a new electrode assembly with wire.
• The wires of the electrode are loose or fell off. Replace with a new electrode assembly with wire.
• Clear the orifice if blocked.
• The electrode does not aim at burner hole. Align the electrode and the burner hole. Adjust the
distance between metal pin of the electrode and burner hole to 3 - 5 mm.
No spark noise.
• Ignitor battery is empty. Replace the battery.
• The electrode does not aim at the burner hole. Align the electrode and the burner hole. Adjust
the distance between metal pin of the electrode and burner hole to 3 - 5 mm.
Pressure regulator makes noise.
• Check if the ventilation opening on the pressure regulator is plugged. Unplug the opening and
wait 5 minutes before starting again.
• Check if the ventilation openings are covered up. Check the appearance of the flames and
remove possible plugging.
The appliance only heats up from 100 °C to 150 °C;
• Check all gas connections for gas leaks. If there is a gas leak, tighten the connection.
low heat with knob(s) in HI position.
• Straighten up the gas hose(s) if bent or kinked
• Clear the burner(s) or the orifice if blocked.
• Have your gas dealer check the gas cylinder(s), in case of low gas pressure.
• Gas supply is not sufficient as there is not enough gas in the gas cylinder(s). Refill or replace
the gas cylinder(s).
The appliance takes a long time to heat up.
• The appliance takes longer to heat up when it is cold outside. The time required to heat from
250 °C to 320 °C is usually about 10 - 15 minutes.
• Gas supply is not sufficient as there is not enough gas in the gas cylinder(s). Refill or replace
the gas cylinder(s).
• Check if the gas hose(s) is / are blocked or clogged.
The burner flame is not blue.
• Check if there is too much or too little air being supplied.
• Check if the burner is misaligned.
• In case of incomplete combustion contact specialist.
Burner(s) cannot be ignited by match.
• Open the valve of the gas cylinder(s) and / or the pressure regulator(s), if no gas is being fed to
the burner(s).
• Clear the tubes of the burner(s) if the gas flow is not smooth.
• Re-assemble burner(s) and valve(s) if you deem the assembly to be incorrect.
• WARNING! Turn all the control knobs to the off positions ARRÊT/OFF, if any burner does not
ignite within 5 seconds. Wait for 5 minutes to let the gas dissipate and try again.
Flare-up.
• Excessive fat content in the meat, remove part of the fat before grilling.
• Reduce the temperature.
• Clean if you spot deposits of grease.
Flame rising from the burner.
• Excessive gas pressure, contact your gas dealer.
CLEANING, MAINTENANCE AND REPAIR
WARNING!
Always switch the appliance off and let it cool down before performing inspection, maintenance and cleaning work!
Do not immerse burner(s) into water or other liquids. If they become wet, let them dry thoroughly and check the function afterwards.
Cleaning
1. Clean the appliance after each use with a slightly damp cloth and a little soap. Use a brush for hard to reach places.
2. Remove stubborn dirt with high pressure air (max. 3 bar).
NOTE: Do not use chemical, alkaline, abrasive or other aggressive detergents or disinfectants to clean this appliance as they might be harmful to its surfaces.
18

Stainless steel surfaces
1. Wipe all stainless steel surfaces with a wet soft cloth. Use a mild detergent to remove grease.
2. Remove grease and food remains from the fire box with a plastic or wooden spatula.
3. Remove the burner(s), before cleaning the fire box.
Grease tray(s)
1. Avoid that the grease tray(s) overflow(s). Empty regularly during use.
2. Clean the grease tray(s) after each use using warm water and a mild detergent.
NOTE: Add sand or cat litter to the grease tray(s) before use to avoid that the grease sticks on the surface.
MAINTENANCE
Before and after each use, check the appliance or accessories or attachments for wear and damage. If required, exchange them for new ones as described in this instruction
manual. Observe the technical requirements (→ TECHNICAL DATA).
Burner
1. A conversion to a different gas type must be done by qualified personnel or your retailer only.
2. Clean the burner(s) at least once per year or whenever they get dusty.
3. Make sure that no dust or insects get inside the burner(s) openings or the air intake.
4. Clean the burner(s) with a pipe cleaner. Use a wire brush to clean any rust from the surface of the burner(s).
5. Make sure that the valve outlets of the valve unit are placed exactly in the air funnels of the / each burner, when
assembling the appliance.
1
6. Perform a visual check of the burner(s) flames regularly, do as follows:
a. Remove cooking grids and flame tamers.
b. Light the burner(s).
c. Turn control knob(s) from LO to HI. Check the flame status, the flame in LO position should be smaller than in
HI position, as figure shown below.
HI
LO
Always check flame before each use, if anything seems out of the ordinary (→ TROUBLESHOOTING).
REPAIR
This appliance does not contain any parts that can be repaired by the consumer. Contact a qualified specialist to have it checked and repaired.
WARNING!
Always make sure all safeguards, if available, have been reinstalled safely and correctly after each cleaning or maintenance! Never use the appliance
without its safeguards!
STORAGE AND TRANSPORTATION
STORAGE
1. Switch the appliance off and remove the batteries.
2. Clean the appliance as described above.
3. Cover the burner(s) with aluminum foil so that no dust or insects collect inside.
4. Collapse the substructure and secure the fire box. Refer to the illustration pages in the front section of this instruction manual for details.
5. Cover the appliance with the hood cover to protect it against dust.
6. Disconnect the gas cylinder(s) and store it in an outdoor location. Make sure that the gas cylinder(s) is / are not stored near heat sources or in direct sunlight.
7. Do not store a spare gas cylinder under or near this appliance.
8. Store the appliance and its accessories in a dry, frost-free place. The ideal storage temperature is between 10 °C and 30 °C.
9. Always store the appliance in a place that is inaccessible to children.
10. Clean the appliance itself and the burner(s) thoroughly before use, if the appliance has been stored for a long period of time.
TRANSPORTATION
1. Switch the appliance off and remove the batteries.
2. Make sure the fire box is secured with its latches and the retaining wing nuts of the leg support of the substructure are properly tightened, when moving the appliance on
casters. Refer to the illustration pages in the front section of this instruction manual for details.
3. Ensure the fire box is secured with the transportation clamps, when transporting the appliance collapsed.
4. Attach transportation guards, if applicable.
5. Always push or pull the appliance by its handle / gripping surfaces.
6. Protect the appliance from any heavy impact or strong vibrations which may occur during transportation in vehicles.
7. Secure the appliance to prevent it from slipping or falling over.
DISPOSAL
Environmental Protection
Discarded electric appliances are recyclable and should not be discarded in the domestic waste! Please actively support us in conserving resources and protecting
the environment by returning this appliance to the collection centres.
Do not put your used batteries, nickel cadmium, rechargeable, round cell or starter batteries in with your household rubbish. Take them to an appropriate
disposal/collection site.
19

TECHNICAL DATA
Power supply (control knob
1.5 V
(LR6/AA battery x2) (not included)
illumination)
Nominal heat input
Main burner(s) (x8): 4.2 kW
Gas consumption
Butane: 2443 g/h
Total: 33.6 kW
Propane: 2400 g/h
Cooking area (W x D)
123.0 x 49.0 cm
Cooking height (H)
89.5 cm
Dimensions folded
92.0 x 65.0 x 140.0 cm
(H x D x W)
Dimensions unfolded
108.5 x 65.0 x 260.0 cm
(H x D x W)
Max. length gas hose
1.5 m (for Finland only 1,2 m)
Appliance category
I3+ (28-30/37)
I3B/P (30)
I3B/P (50)
I3B/P (37)
Gas type and pressure
Butane at 28-30 mbar /
G30 (Butane),
G30 (Butane),
G30 (Butane),
propane at 37 mbar
G31(Propane) and their mixtures at
G31 (Propane) and their
28-30 mbar
mixtures at 50 mbar
mixtures at 37 mbar
Main burner(s) orifice size
Ø 1.02 mm
Ø 1.02 mm
Ø 0.89 mm
Ø 0.95 mm
Destination country
BE, CH, CY, CZ, ES, FR, GB,
BE, BG, CY, CZ, DK, EE, FI, FR, GB,
AT, CH, CZ, DE, LU, SK
PL
GR, IE, IT, LT, LU, LV, PT, SI,
GR, HR, HU, IT, LT, LU, LV, MT, NL,
SK, TR
NO, RO, SE, SI, SK, TR
Pressure regulator type
included for different destination countries (→ PRESSURE REGULATOR
TYPES)
PRESSURE REGULATOR TYPES
Destination country
Pressure regulator type
Gas pressure [mbar]
Gas consumption [kg/h]
BG
29
PT
A235is
30
ES
RU
RO
30
NL
1.5
HU
28
IT
A300i-A310i
PL
37
BE
DE
30/50
AT
20
This manual suits for next models
1
Table of contents
Other NXR Grill manuals