NXR 880-0011 Maintenance manual

1
ITM./ART. 853265
2 BURNER STAINLESS STEEL TABLE TOP GAS GRILL
IMPORTANT, RETAIN FOR FUTURE REFERENCE: READ CAREFULLY
Model: 880-0011
Warning:
For outdoor use only.
This instruction manual contains important information necessary for the proper assembly
and safe use of the appliance.
Do not leave the appliance unattended. Keep young children and pets away.
Do not move the device during use.
Not intended to be installed in or on boats and should never be used as a heater.
Close the valve of the gas cylinder after use.
Gas Grill Manual for Installation, Care and Maintenance
Questions, problems, missing parts? Before returning to your retailer, call our customer
service department at 1-888-909-8818, 9 a.m.-5 p.m., PST, Monday-Friday. English, French, and

2
WARNING
1. Do not store or use gasoline or other
flammable liquids or vapors in the vicinity
of this or any other appliance.
2. Any propane cylinder not connected for use
should not be stored in the vicinity of this
or any other appliance.
3. Never operate this appliance unattended.
This appliance is not intended for commercial
use.
T ABLE OF CONTENTS
Care and Maintenance. ..............…..……………………………………....…………......3
Parts List……….........……………………....…. .............................................................7
Assembly Instructions..………………………………………………………...……… .…....8
Lighting Instruction......................................................................................................13
Warranty.........…………………….....…….…...............................................................15
DANGER
If you smell gas:
1. Shut off gas to the appliance.
2. Extinguish an open flame.
3. Open lid.
4. If odor continues, keep away from the
appliance and immediately call your gas
supplier or your fire department.
Failure to follow these instructions could
result in fire or explosion which could
cause property damage, personal injury or
death.
CALIFORNIA PROPOSITION 65 WARNING
WARNING: This product contains a chemical known to the State of
California to cause cancer, birth defects, or other reproductive harm.
The burning of gas fuel generates some by-products and chemicals that are known
to the State of California to cause cancer, birth defects, or other reproductive harm.
To minimize exposure to these chemicals, always ensuring you provide the required
ventilation when operating this unit, and only operate according to the care and use manual

3
CARE AND MAINTENANCE
Precautions
WHEN USING THE GRILL, DO NOT TOUCH THE GRILL RACK, BURNER GRATE OR IMMEDIATE SURROUNDINGS
WHICH BECOME EXTREMLY HOT DURING USE AND CAN CAUSE BURNS.
AVOID ALLOWING EXCESS GREASE TO COLLECT IN THE GREASE TRAY AT THE BOTTOM OF THE GRILL FIREBOX.
CLEAN THE GREASE TRAY OFTEN.
FOR PROPER BURNER LIGHTING AND PERFORMANCE, KEEP THE BURNER PORTS CLEAN. IT IS NECESSARY TO
CLEAN THEM PERIODICALLY FOR OPTIMUM PERFORMANCE.
CLEAN THE GRILLWITH CAUTION. TURN OFF ALL CONTROL KNOBS AND MAKE SURE THE GRILL IS COOL BEFORE
CLEANING. WHEN USING AEROSOL SPRAY TO CLEAN BURNERS, BE VERY CAREFUL. ENSURE THAT THE
EQUIPMENT IS COOL BEFORE USING AN AEROSOL SPRAY AS THE PRESENCE OF HEAT COULD CAUSE IT TO
CORRODE OR LIGHT THE EQUIPMENT ON FIRE.
DO NOT USE THE GRILL FOR COOKING EXCESSIVELY FATTY MEATS OR PRODUCTS WHICH CAN CAUSE
FLARE-UPS. DO NOT OPERATE THE GRILL UNDER UNPROTECTED COMBUSTIBLE CONSTRUCTION. USE ONLY IN
WELL VENTILATED AREAS. DO NOT USE IN BUILDINGS, GARAGES, SHEDS, BREEZEWAYS OR OTHER SUCH
ENCLOSED AREAS. THIS UNIT IS FOR OUTDOOR USE ONLY.
CAUTION: BEWARE OF FLASHBACK
CAUTION: SPIDERS AND SMALL INSECTS OCCASIONALLY SPIN WEBS OR MAKE NESTS IN THE GRILL BURNER
TUBES DURING TRANSIT AND WAREHOUSING. THESE WEBS CAN LEAD TO GAS FLOW OBSTRUCTION, WHICH
COULD RESULT IN A FIRE IN AND AROUND BURNER TUBES. THIS TYPE OF FIRE IS KNOWN AS “FLASH-BACK”
AND CAN CAUSE SERIOUS DAMAGE TO YOUR GRILL AND CREATE AN UNSAFE OPERATING CONDITION FOR THE
USER.
ALTHOUGH AN OBSTRUCTED BURNER TUBE IS NOT THE ONLY CAUSE OF “FLASH-BACK,” IT IS THE MOST
COMMON CAUSE.
TO REDUCE THE LIKELIHOOD OF“FLASH-BACK” YOU MUST CLEAN THE BURNER TUBES.

4
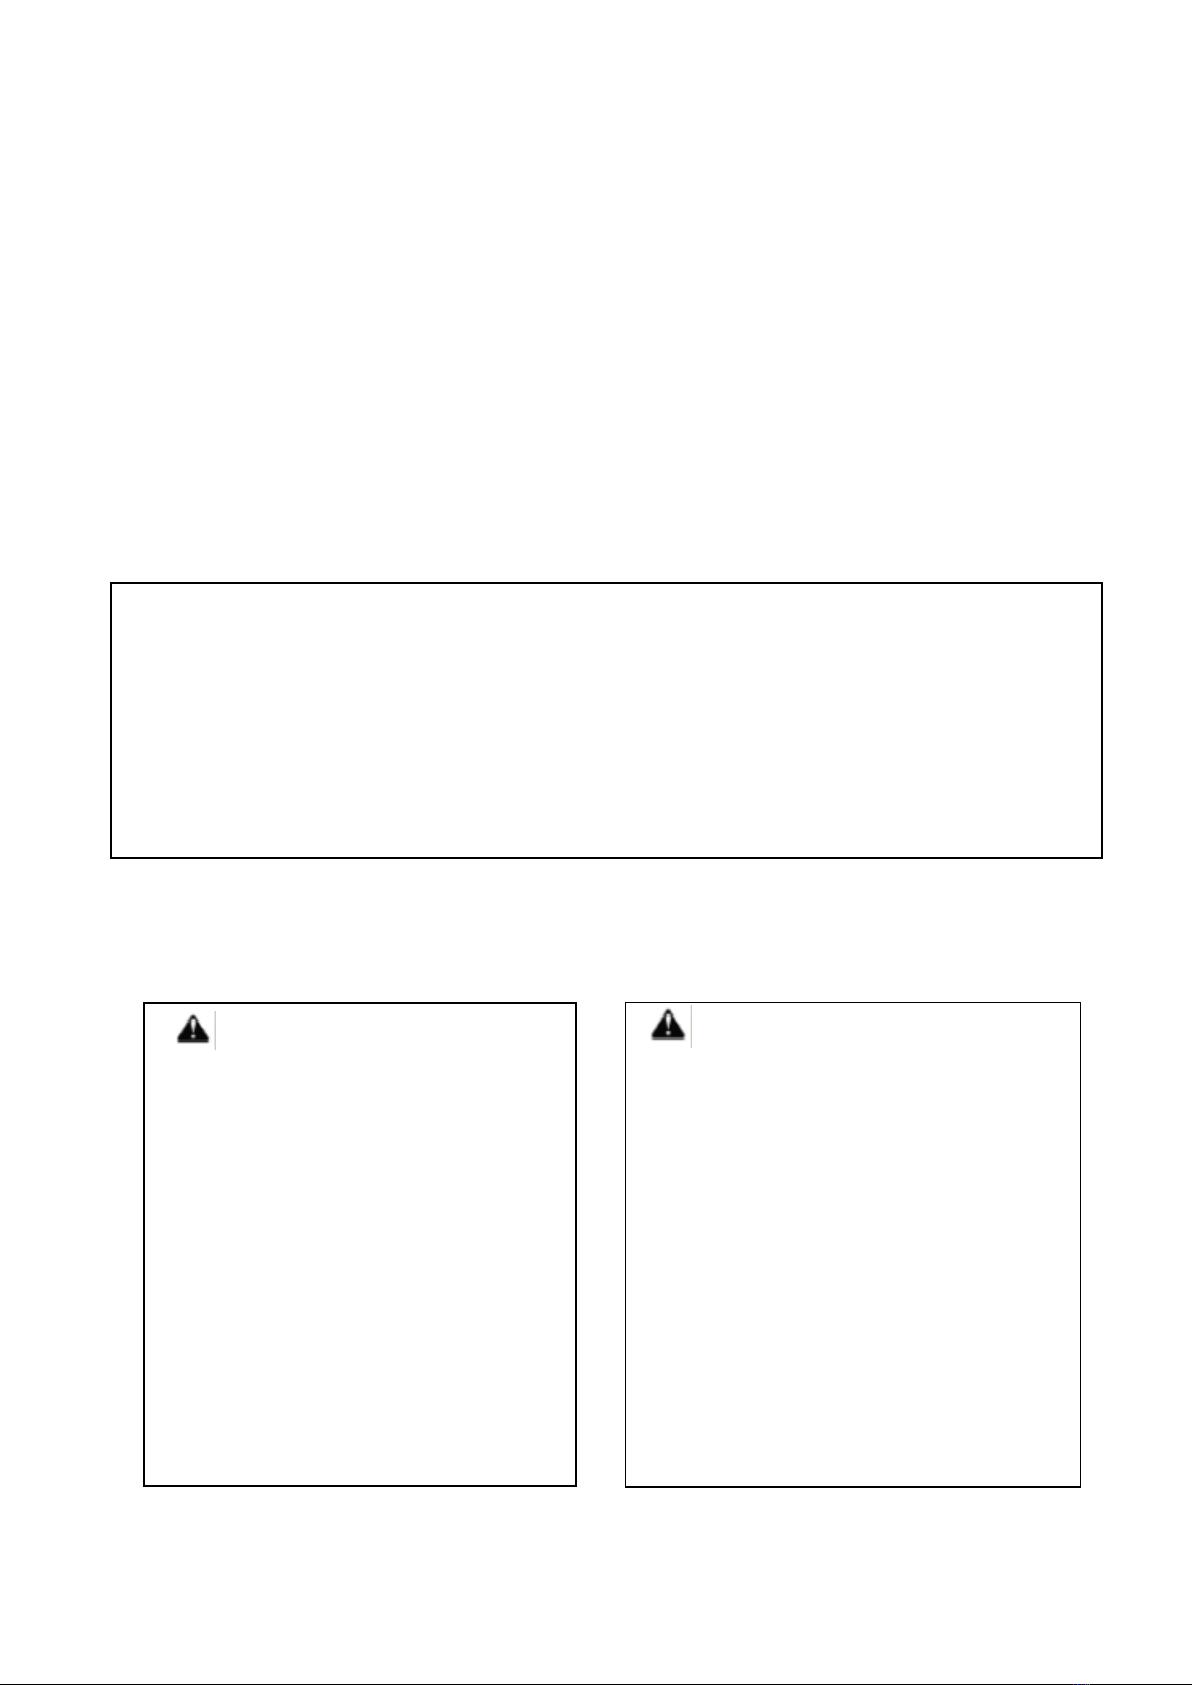
PROPER PLACEMENT AND CLEARANCE OF GRILL
•Never use your gas grill in a garage, porch, shed, breezeway or any other enclosed area. Your gas grill is to be used outdoors
only.
•DO NOT install this unit into combustible enclosures.
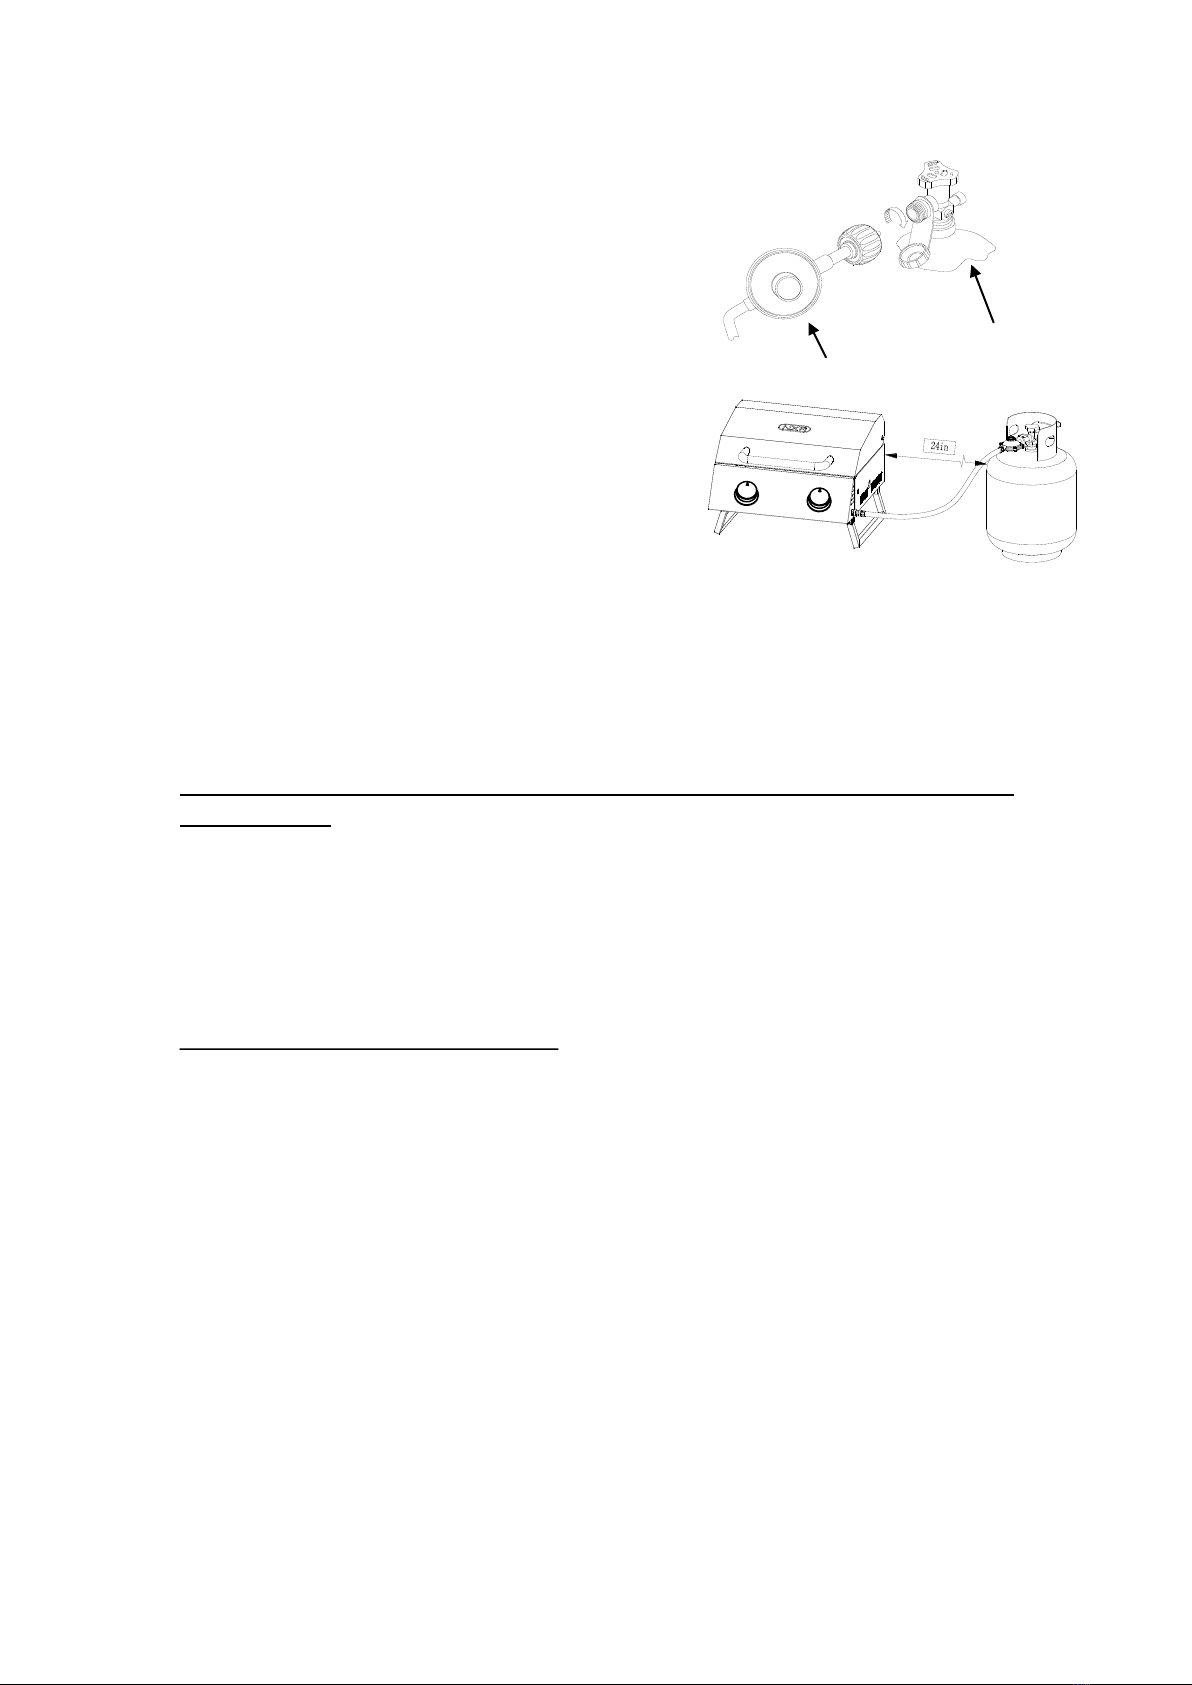
•Minimum clearance from sides and back of unit to combustible construction, 61 cm (24 inches) from both sides and
61 cm (24 inches) from the back.
•DO NOT use this appliance under overhead combustible surfaces. This outdoor cooking gas appliance is not intended to be
installed in or on recreational vehicles and/or boats.
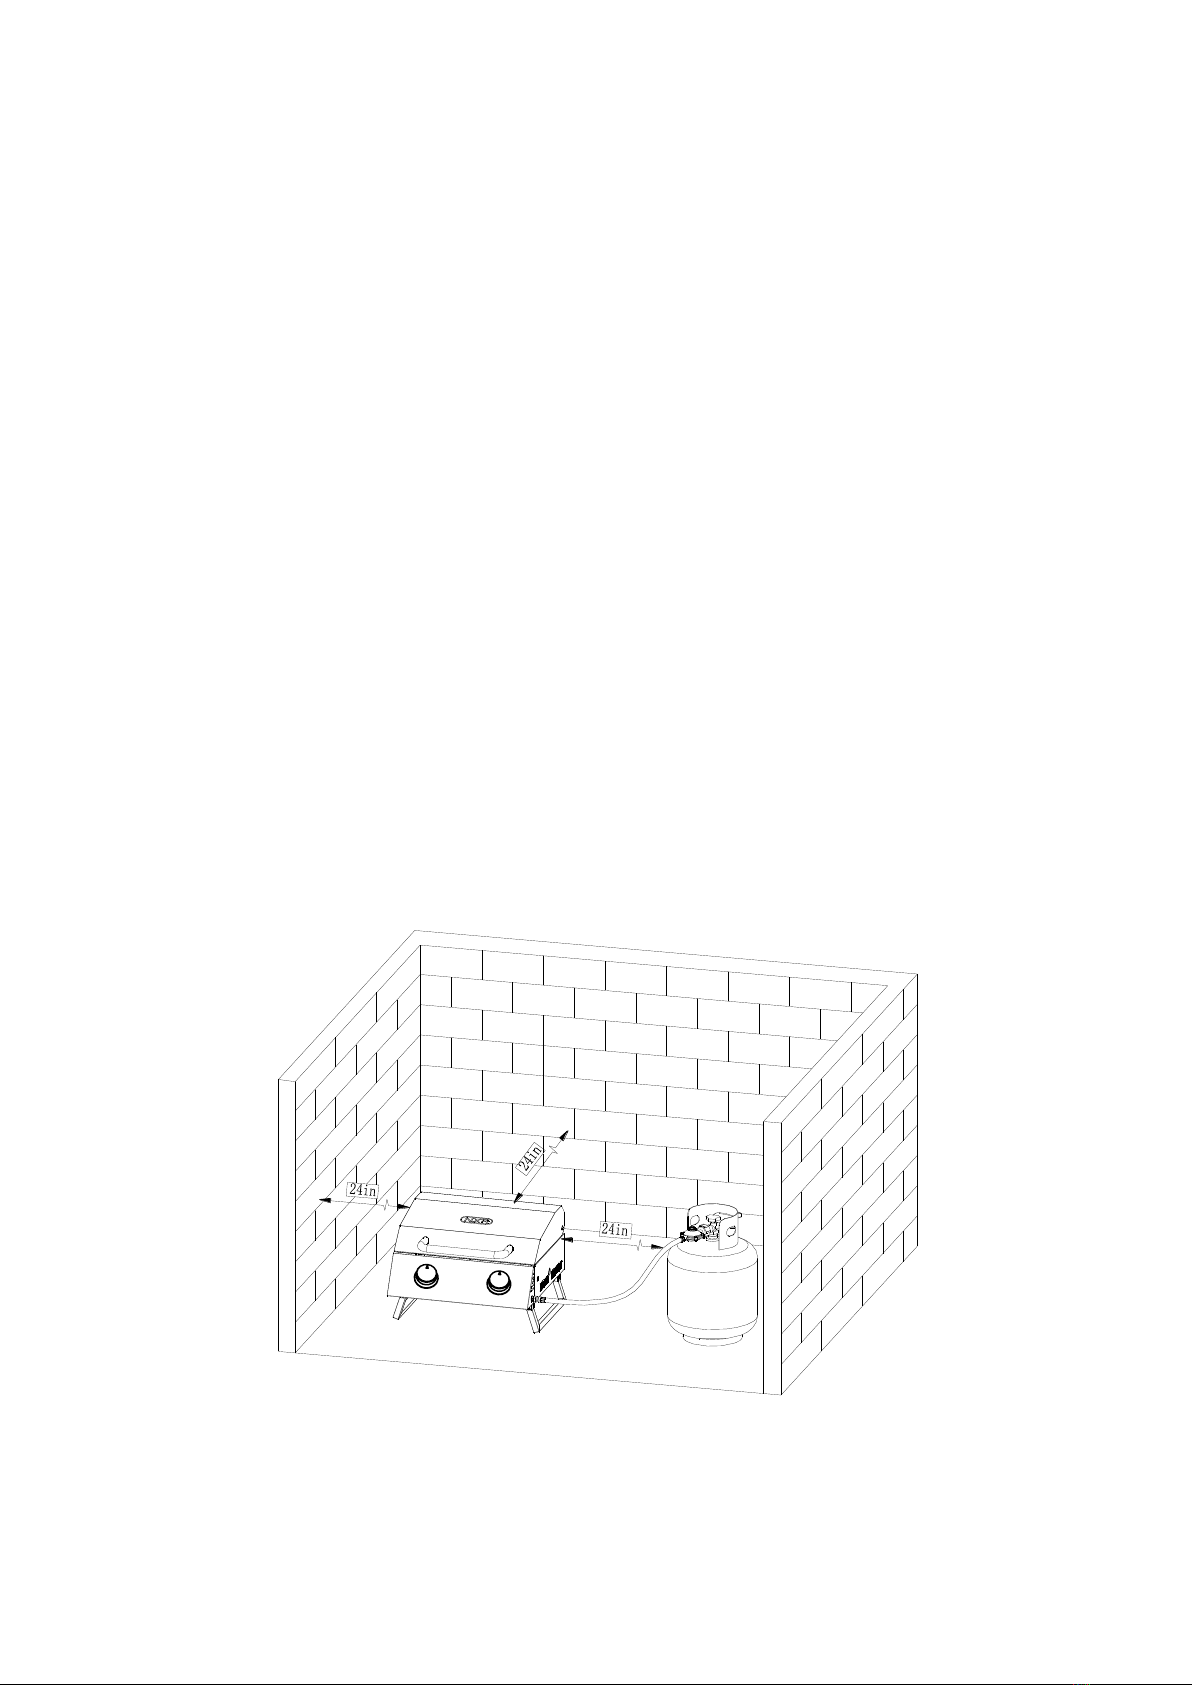
•DO NOT obstruct the flow of ventilation air around the gas grill housing. Only use the regulator and the hose assembly
supplied with your gas grill. Replacement regulators and hose assemblies must be those specified in this manual.
•The regulator and hose assembly must be inspected before each use of the grill. If there is excessive abrasion or wear or if
the hose is cut, it must be replaced prior to the grill being put into operation. The replacement hose assembly shall be that
specified by the manufacturer.
•This outdoor cooking gas appliance is equipped with a pressure regulator which complies with the standard for pressure
regulating valves for LP Gas ANSI/ UL 144.
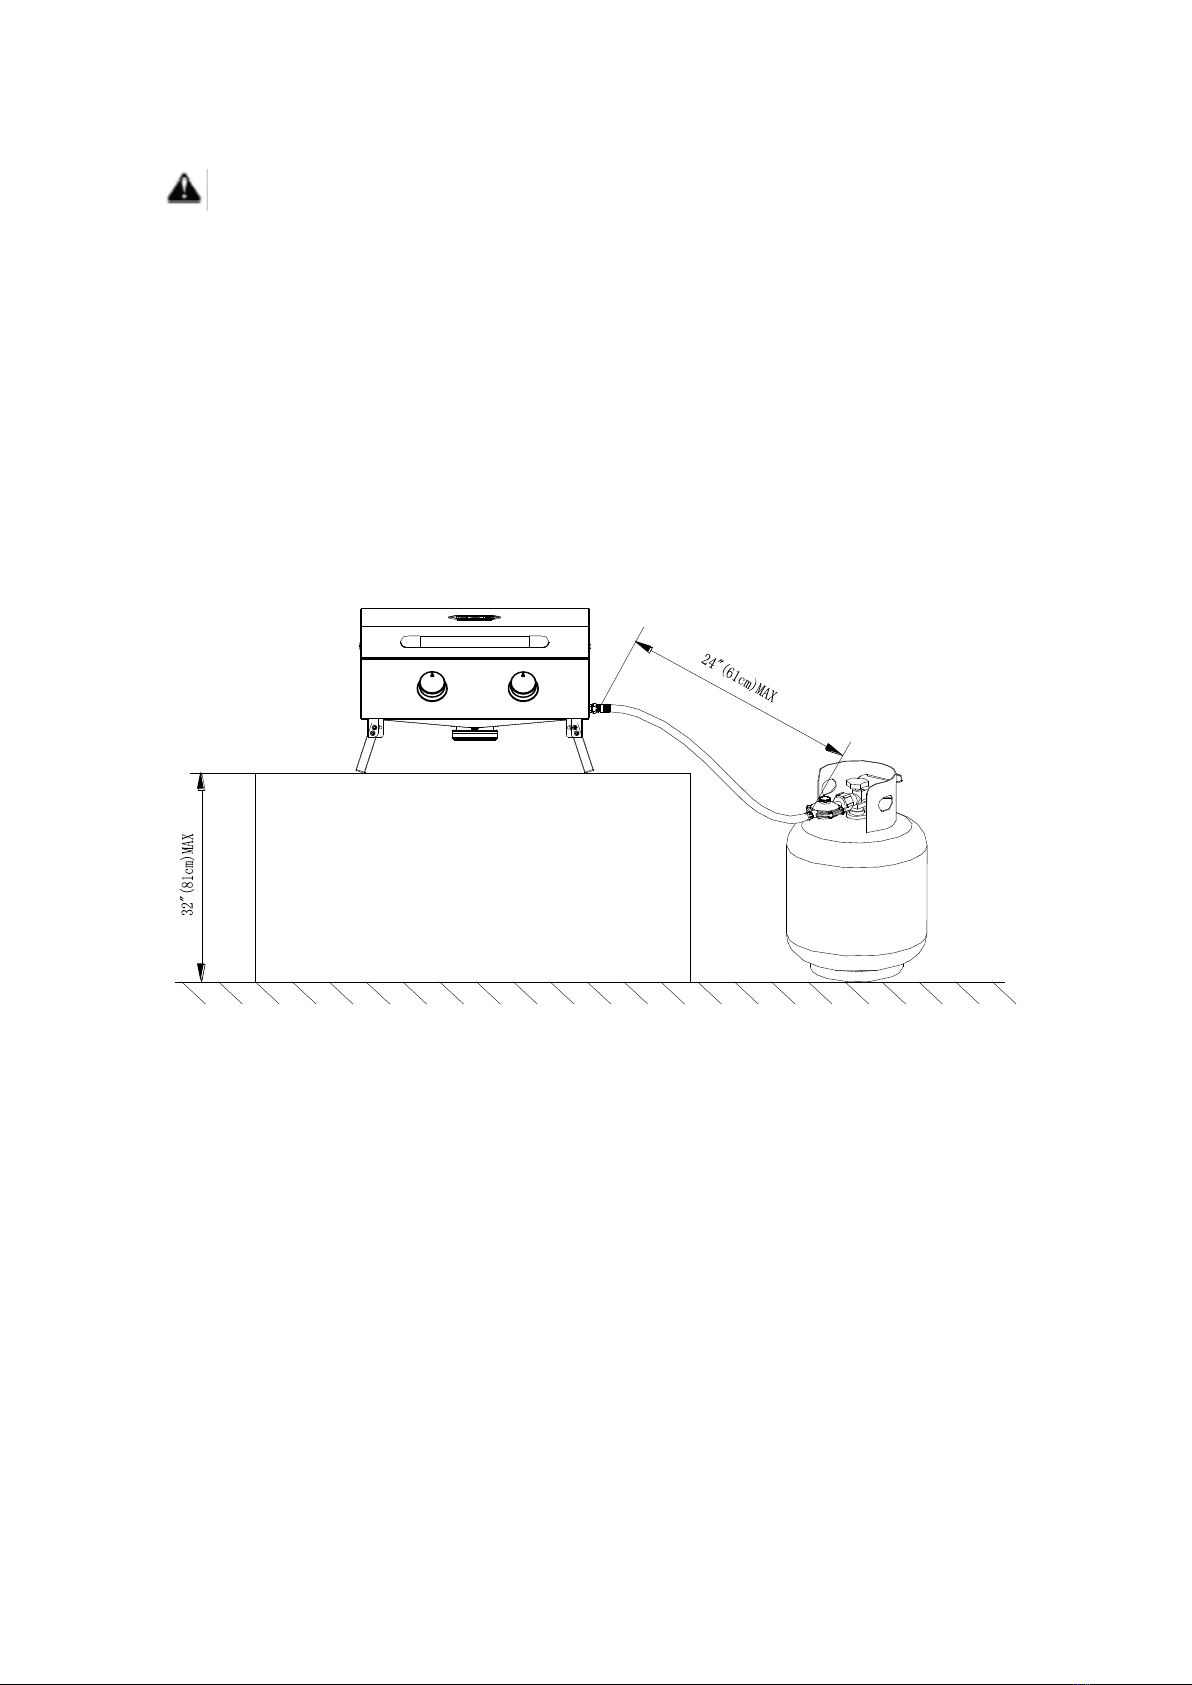
•DO NOT use briquettes of any kind in the grill.
•Never use the grill in extremely windy conditions. If located in a consistently windy area (oceanfront, mountaintop, etc.) a
windbreak will be required.Always adhere to the specified clearance.
•Never use a dented or rusty propane tank.
•Keep any electrical cords and the fuel supply hose away from any heated surface.
•While lighting, keep your face and hands as far away from the grill as possible.
•Burner adjustment should only be performed after the burner has cooled.

5
WARNING
1. Always operate the grill on a tabletop, no higher than 81 cm (32 inches).
2. Place the propane tank on the ground immediately adjacent to the tabletop, no further than
61 cm (24 inches) from the grill.
3. Failure to follow these instructions could cause the propane tank to overheat and vent propane
which could ignite causing serious personal juries or property damage and/or a tripping hazard
over the gas hose or propane tank, pulling the grill off the tabletop causing serious personal
injuries or property damage.

6
TECHNICAL DESCRIPTION
PREPARATION
Before beginning assembly, make sure all parts are present. Compare parts with packagecontents list and diagram on page 7.
If any part is missing or damaged, do not attempt to assemble the product. Contact customer service for replacement parts.
Estimated Assembly Time: 10 minutes
Tools Required for Assembly:
Phillips Screwdriver (not included) and wrench (not included)
Note: The right and left sides of the grill are designated as if you are facing the front of the grill.
Phillips Screwdriver
Wrench
3

7
PARTS LIST
No.
Part Description
QTY.
No.
Part Description
QTY.
01
Logo
1
14
Foot Stand Leg, Left
1
02
Main Lid Hinge Bolt
2
15
Cooking Grid
1
03
Lid Nut Cap
2
16
Flame Tamer
2
04
Lid “R”Pin
2
17
Snap Joint
2
05
Main Lid
1
18
Main Burner
2
06
Lid handle Insulating Spacer
2
19
Grease Tray
1
07
Lid Handle
1
20
Regulator and Hose
1
08
Main Firebox
1
21
Foot Stand Leg, Right
1
09
Gas Valve
2
22
Lightning Rod
1
10
Manifold
1
23
Regulator “S” hook
1
11
Control Panel
1
24
Leg Plug
4
12
Knob Bezel
2
25
Hardware Pack
1
13
Control Knob
2
Manual
25
24
23
17
9
20
22
21
19
18
16
14
15
13
12
11
10
8
7
6
4
3
2
5
1

8
Fig2: Install the foot stand legs as shown below:
Fig1:
ASSEMBLY INSTRUCTIONS
Remove all the packing materials and move grill colse to a desired location.

9
Fig3: Install the grease tray under the firebox as shown below:
Note: When not in use, please
place the regulator on grill handle.
This will protect the regulator.
Fig4: Install the flame tamers on the burners then install the grid on the firebox as shown
below:

10
Note: Always keep the cylinder at
90° (upright) orientation to provide
vapor withdraw.
Keep the fuel supply hose away
from any heated surface(s).
24in
Tank Installation
If the outdoor cooking gas appliance is not in use,
the gas must be turned off at the supply cylinders.
Storage of an outdoor cooking gas appliance
indoors is permissible only if the cylinder(s) is/are
disconnected and removed from the outdoor
cooking gas appliance.
Cylinder(s) must be stored outdoors and out of the
reach of children. It must NOT be stored in a building,
garage or any other enclosed area.
Cylinder(s) used must include a collar to protect the
cylinder valve. The specific size and capacity of 20lb
(9kg). L.P. cylinder (18.25in (46.35cm) high, 12.25in
(31cm) diameter) cylinder(s) to be used only.
INSTALLATION INSTRUCTIONS
GAS HOOK-UP
Only the pressure regulator and hose assembly suitable for the grill should be used. Any
replacement pressure regulator and hose assembly must be specified by the grill
manufacturer.
This grill is configured for propane. Do not use a natural gas supply.
Main burner 10,000BTU (2.9kw).
Total: 2 main burners 20,000BTU (5.8kw).
Cylinder
Regulator

11
TESTING FOR LEAKS
GENERAL
Although all gas connections on the grill are leak
tested at the factory prior to shipment, a complete
gas tightness check must be performed at the
installation site due to possible mishandling in
shipment, or excessive pressure unknowingly
being applied to the unit. Periodically check the
whole system for leaks following the procedures
listed below. If the smell of gas is detected at any
time you should immediately check the entire
system for leaks.
BEFORE TESTING
Make sure that all packing material is removed
from the grill including the burner tie-down straps.
DO NOT SMOKE WHILE TESTING FOR LEAKS.
NEVER PERFORM LEAK TEST WITH AN OPEN
FLAME.
Make a soap solution of one part liquid detergent
and one part water. You will need a spray bottle,
brush, or rag to apply the solution to the fittings.
For the initial leak test, make sure the L.P. cylinder
is full.
TO TEST
1. Make sure the control valves are in the “OFF”
position, and turn on the gas supply.
2. Check all connections from the LP gas
regulator and supply valve up to and including the
connection to the manifold pipe assembly (the
pipe that goes to the burners). Soap bubbles will
appear where a leak is present.
3. If a leak is present, immediately turn off the gas
supply and tighten the leaky fittings.
4. Turn the gas back on and recheck.
5. Should the gas continue to leak from any of the
fittings, turn off the gas supply and contact
customer service at 1-888-909-8818, 9 a.m.-5
p.m., PST, Monday-Friday. English, French, and
Spanish representatives are available.
Only those parts included by the manufacturer
should be used on the grill.
Substitution will void the warranty. Do not use the
grill until all connections have been checked and do
not leak.
GAS FLOW CHECK
Each grill burner is tested and adjusted at the factory
prior to shipment; however, variations in the local
gas supply may make it necessary to adjust the
burners. The flames of the burners should be
visually checked.
Flames should be blue and stable with no yellow
tips, excessive noise or lifting. If any of these
conditions exist, check to see if the air shutter or
burner ports are blocked by dirt, debris, spider webs,
etc.
If you have any questions regarding flame stability,
please call customer service at 1-888-909-8818, 9
a.m.-5p.m., PST, Monday-Friday. English, French,
and Spanish representatives are available.
ALWAYS CHECK FOR LEAKS AFTER
EVERY L.P. TANK CHANGE
Check all gas supply fittings for leaks
before each use. It is handy to keep a
spray bottle of soapy water near the
shut-off valve of the gas supply line.
Spray all the fittings. Bubbles indicate
leaks.
CSA requires the conversion must be performed by a qualified installer or gas supplier in
accordance with the manufacturer
jurisdiction. Failure to follow ALL instructions could result in serious injury or property damage. The
qualified agency performing this work assumes ALL responsibility and liability for this conversion.
Warning: s
'instructions and all codes and requirements of the authority having

12
STATEMENT
1. The LP gas supply cylinder(s) to be used must be:
a) Constructed and marked in accordance with the Specifications for LP-Gas Cylinders of the U.S.
Department of Transportation (D.O.T) or the National Standard of Canada, CAN/CSA-B339, Cylinders,
Spheres and Tubes for Transportation of Dangerous Goods; and Commission, as applicable;
b) Provided with a listed overfilling prevention device.
c) Provided with a cylinder connection device compatible with the connection for outdoor cooking
appliances.
2. The installation must confirm with local codes or, in the absence of local codes, with either the National
Fuel Gas Code, ANSI Z223.1/NFPA 54, Storage and Handling of Liquefied Petroleum Gases ANSI/NFPA
58; Natural Gas and Propane Installation Code, CSA B149.1, or Propane Storage and Handing Code,
B149.2, or the standard for Recreational Vehicles.
3. This outdoor cooking gas appliance is not intended to be installed in or on boats.
4. Checking orifices alignment with burners
a) Orifices on the valve may shift during assembly and movement. Check the orifices alignment with the
burners according to the following illustrations before lighting.
5. Maintenance instructions:
a) Keep outdoor cooking gas appliance area clear and free from combustible materials, gasoline and
other flammable vapors and liquids.
b) DO NOT obstruct the flow of combustion and ventilation air.
c) Keep the ventilation opening(s) of the cylinder enclosure free and clear from debris.
d) Visually check the burner flames prior to each use, the flames should look like this picture. If they do
not, refer to the burner maintenance part of this manual..

13
WARNING
When lighting, keep your face and hands as far
away from the grill as possible.
CAUTION
When using a match to light the grill make
sure to use the attached lighting rod.
CAUTION
Remove the warming rack when using a
match to light the grill.
WARNING
Before lighting, please check the hose
connection with proper procedure. If leaking,
turn the gas off.
e) Check and clean the burner tubes for insects and insect nests. A clogged tube can lead to a fire
beneath the grill.
LIGHTING INSTRUCTIONS
Before Lighting
Inspect the gas supply hose prior to turning on the gas. If there is evidence of cuts, wear, or abrasion, it
must be replaced prior to use.
Connect the regulator onto the cylinder, and leak check the hose and regulator connections before
operating the grill.
Only the pressure regulator and hose assembly supplied with the unit should be used. Never substitute
regulators. If a replacement is necessary, contact customer service for proper replacement.
WARNING
Do not use the grill if the odor of gas is present.
TO LIGHT THE MAIN BURNERS
1. OPEN LID AND MAKE SURE ALL KNOBS ARE IN THE OFF POSITION.
2. TURN ON THE CYLINDER VALVE. PUSH AND TURN BURNER KNOB SLOWLY TO“MAX” THEN
RELEASE THE KNOB.
3. IF IGNITION DOES NOT OCCUR IN 5 SECONDS, TURN THE BURNER CONTROL(S) OFF, WAIT 5
MINUTES, AND REPEAT THE LIGHT PROCEDURE.
TO LIGHT THE GRILL WITH MATCH
If a burner will not light after several attempts using the control knobs, the burners may be
lit with a Match.

14
WARNING
Do not store a spare LP-Gas cylinder
under or near the appliance.
WARNING
Never fill the cylinder beyond 80 percent
full.
WARNING
If the information in above warning is not followed exactly, a fire causing death or
serious injury may occur.
1. If you have already attempted to light the main burner with the igniter, allow 5 minutes for any
accumulated gas to dissipate.
2. Insert a match into the lighting rod.
Ignite the match and insert through the cooking grids to the burner.
3. If the burner does not light within seconds turn the knob to the “OFF” position, wait 5 minutes and try
again.
match

15
LIMITED WARRANTY
DURO warrants to the original consumer-purchaser only that this product (Model #880-0011)
shall be free from defects in workmanship and materials after correct assembly and under
normal and reasonable home use for the periods indicated below beginning on the date of
purchase. The manufacturer reserves the right to require photographic evidence of damage, or
that defective parts to be returned, postage and or freight Pre-paid by the consumer, for review
and examination.
Stainless steel tube burners: 3 year warranty.
Other burners (Searing & rotisserie): 3 year warranty.
Flame tamers: 3 year LIMITED warranty; does not cover dropping, chipping, scratching, or
surface damage.
Cooking grids: 3 Year LIMITED warranty; does not cover dropping, chipping, scratching, or
surface damage.
Stainless steel parts: 2 Year LIMITED warranty against perforation; does not cover cosmetic
issues like surface corrosion, scratches and rust.
All other parts: 2 Year LIMITED warranty (Includes, b ut not limited to, valves, frame, housing,
control panel, igniter, regulator, hoses); does not cover chipping, scratching, cracking surface
corrosion, scratches or rust.
Upon consumer supplying proof of purchase as provided herein, Manufacturer will repair or
replace the parts which are proven defective during the applicable warranty period. Parts
required to complete such repair or replacement shall be free of charge to you except for
shipping costs, as long as the purchaser is within the warranty period from the original date of
purchase. The original consumer-purchaser will be responsible for all shipping charges of
parts replaced under the terms of this limited warranty.
Manufacturer requires reasonable proof of your date of purchase. Therefore, you should retain
your sales receipt and/or invoice. If the unit was received as a gift, please ask the gift-giver to
send in the receipt on your behalf, to the below address. Defective or missing parts subject to
this limited warranty will not be replaced without registration or proof of purchase. This limited
warranty applies to the functionality of the product ONLY and does not cover cosmetic issues
such as scratches, dents, corrosion or discoloring by heat, abrasive and chemical cleaners or
any tools used in the assembly or installation of the appliance, surface rust, or the
discoloration of stainless steel surfaces. Surface rust, corrosion, or powder paint chipping on
metal parts that does not affect the structural integrity of the product is not considered a defect
in workmanship or material and is not covered by this warranty. This limited warranty will not
reimburse you for the cost of any inconvenience, food, personal injury or property damage. If
an original replacement part is not available, a comparable replacement part will be sent. You
will be responsible for all shipping charges of parts replaced under the terms of this limited
warranty.

16
ITEMS MANUFACTURER WILL NOT PAY FOR:
■ Service calls to your home.
■ Repairs when your product is used for other than normal, single-family household or
residential use.
■ Damage resulting from accident, alteration, misuse, lack of maintenance/cleaning, abuse,
fire, flood, acts of God, improper installation, and installation not in accordance with electrical
or plumbing codes or use of products not approved by the manufacturer.
■ Any food loss due to product failures.
■ Pickup and delivery of your product.
■ Postage fees or photo processing fees for photos sent in as documentation.
■ Repairs to parts or systems resulting from unauthorized modifications made to the product.
■ The removal and/or re-installation of your product.
■ Shipping cost, standard or expedited, for warranty/non warranty and replacement parts.
DISCLAIMER OF IMPLIED WARRANTIES; LIMITATION OF REMEDIES
limited warranty.
Manufacturer will not be responsible for any consequential or incidental damages arising from
the breach of either this limited warranty or any applicable implied warranty, or for failure or
damage resulting from acts of God, improper care and maintenance, grease fire, accident,
alteration ,replacement of parts by anyone other than Manufacturer, misuse, transportation,
commercial use, abuse, hostile environments (inclement weather, acts of nature, animal
tampering), improper installation or installation not in accordance with local codes or printed
manufacturer instructions.
THIS LIMITED WARRANTY IS THE SOLE EXPRESS WARRANTY GIVEN BY THE
MANUFACTURER. NO PRODUCT PERFORMANCE SPECIFICATION OR DESCRIPTION
WHEREVER APPEARING IS WARRANTED BY MANUFACTURER EXCEPT TO THE
EXTENT SET FORTH IN THIS LIMITED WARRANTY. ANY IMPLIED WARRANTY
PROTECTION ARISING UNDER THE LAWS OF ANY STATE, INCLUDING IMPLIED
WARRANTY OF MERCHANTABILITY OR FITNESS FOR A PARTICULAR PURPOSE OR
USE, IS HEREBY LIMITED IN DURATION TO THE DURATION OF THIS LIMITED
WARRANTY.
Neither dealers nor the retail establishment selling this product has any authority to make any
additional warranties or to promise remedies in addition to or inconsistent with those stated
above. Manufacturer’s maximum liability, in any event, shall not exceed the documented
purchase price of the product paid by the original consumer. This warranty only applies to units
purchased from unauthorized retailer and or re-seller.
NOTE: Some states do not allow an exclusion or limitation of incidental or consequential
damages, so some of the above limitations or exclusions may not apply to you; this limited
warranty gives you specific legal rights as set for herein. You may also have other rights which
Repair or replacement of defective parts is your exclusive remedy under the terms of this

17
vary from state to state.
If you wish to obtain performance of any obligation under this limited warranty, you should write
to:
DURO CORPORATION
17018 Evergreen Place
City of Industry, CA 91745
All consumer returns, parts orders, general questions, and troubleshooting assistance can be
acquired by calling call our customer service department at 1-888-909-8818, 9 a.m.-5 p.m.,
PST, Monday-Friday (English/French/Spanish). Send email to: nxrcs@duro-global.com
AUSTRALIA: Our goods come with guarantees that cannot be excluded under the Australian
Consumer Law. You are entitled to a replacement or refund for a major failure and for
compensation for any other reasonably foreseeable loss or damage. You are also entitled to
have the goods repaired or replaced if the goods fail to be of acceptable quality and the failure
does not amount to a major failure.
This manual suits for next models
1
Table of contents
Other NXR Grill manuals
Popular Grill manuals by other brands

Weber
Weber 42371 owner's guide

Eurotops
Eurotops EASY COOK instruction manual

Jenn-Air
Jenn-Air 740-0712 Installation Instructions and Use & Care Guide

Campingaz
Campingaz PARTY GRILL 600 Instructions for use

Grandhall
Grandhall B17001050A Operating and assembly instructions

Trueheat
Trueheat B60 Installation, operation and service manual