25. Fast Forward
2. Next
27. Stop
Instructions Guide
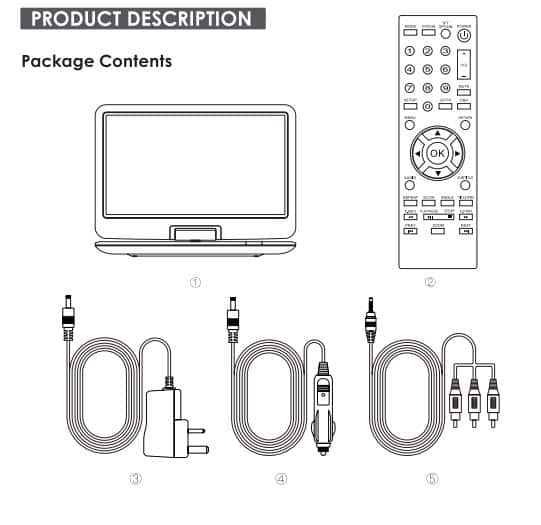
Connection
Power Supply & Charge
● Connect to mains power supply with AC Adaptor, to play device using mains power supply and to charge
internal battery. Battery charge will show as red light on front panel. When fully charged, the red light will dim.
Note – you can charge device at same time as playing DVD.
● Connect to car power supply with Car Adaptor, to power device using car power supply or to charge internal
battery. Battery charge will show as red light on front panel. When fully charged, the red light will dim. Note –
you can charge device at same time as playing DVD.
● Internal Battery Power – do not connect AC Adaptor or Car Adaptor, and device can play from internal
battery when fully charged. When battery level is running low, a battery level icon on DVD screen will ash.
Please connect AC Adaptor or Car Adaptor to maintain power supply, and to charge battery.
Setup Page
Menu Operation
1. Press [Setup] on the remote control or on the unit to show the setup menu
2. Press [Left] or [Right] to select an item. The submenu of the selected item will be instantly shown.
3. Press [up] / [down] to select an item in the submenu then press [OK] / [Enter] to enter, use [up] / [down] to
select an option then press [OK] / [Enter] to conrm it or press [Left] to cancel.
4. Press [up] / [down] to continue to set other items in the submenu.
5. Press [left] to go back to the superior menu of the current one.
. Press [setup] again and press [enter] / [ok] to exit the setup menu.
General Setup
TV DISPLAY
1. 4:3 Normal/ PS Panscan
If the unit is connected to an conventional Tv set, the wide screen image will be displayed on the screen in
its native aspect ratio with some part on the left and right cut off.
2. 4:3 Normal / LB Letterbox
If the unit is connected to a conventional TV set, the wide screen image will be displayed in it’s native
aspect ratio with black borders on the top and the bottom side.
3. 16:9 wide
Select this option if the unit is connected to a wide-screen Tv set, The wide-screen image will be displayed
in full screen in it’s native aspect ratio while the 4:3 image will be stretched out horizontally to t in the
screen.
ANGLE MARK
1. Set this item to ON. When a disc encoded with multiple camera angles is playing the angle mark will
display on the screen. Then you can view the video of different camera angles by pressing [Angle] on the
remote control.
This function only works with those discs encoded with multiple camera angles
2. Set this item to OFF to disable this function.
OSD LANGUAGE (ON SCREEN DISPLAY)


