Oaktree Products Mark V+ User manual

1-800-347-1960
Mark V+™
Hearing Aid Suction Pump
User Manual
Oaktree Products, Inc.
www.oaktreeproducts.com
HE
AR
IN
G
A
ID
S
U
CT
I
O
N
PU
M
P
MA
RK
V
+
™
W
a
n
d
S
uctio
n
D
r
y
i
n
g
Pre
ss
ure
C
h
a
mb
e
r

Thank you for purchasing the Mark V+.
Please read the instruction manual carefully before use.
The Mark V+ continues the legacy of the original Mark V. The Mark V+ offers the most powerful
suction and quietest operation on the market.
With the Mark V+ you can suction wax from hearing aids and earmolds and blow air to remove
dust and debris from devices and surfaces.
The large powerful drying chamber provides a powerful vacuum for completely drying out
instruments quickly.
Product Overview
1
Environment:
a)Environment Temperature: 40˚F - 104˚F
b)Air Humidity: ≤80%RH (when temperature is 77˚F)
c)Atmospheric Pressure: 86kpa~106kpa
d)Do not use in the presence of flammable or corrosive gases or conductive dust
Technical Specifications
Maximum Negative Pressure: ≤ -28 inHg
Vacuum Drying Chamber: 3.75”L x 3.75”H
Continuous Run Time: 15 minutes
Noise: ≤ 55 dB
Weight: 9.64 lbs
External Dimension: 13.38”L x 7.5”W x 11.5”H
Warranty
The Mark V+ comes with a one year warranty on all parts and labor. The warranty does not
cover malicious damage.
The Mark V+ is equipped with a 100-240V, 50/60Hz power supply so it can be used anywhere in
the world with the appropriate plug adapter. The circuit breaker is 4 Amp.

2
Front and Top View
Handle
Vacuum Chamber Cover
Optional Suction and Pressure
Wand Holder
Power Switch
Gauge
Suction Wand
Pressure Wand
Selector Button
OUT for Wand
IN for Drying Chamber
Tubing
Suction Needles
What’s Included
• (1) Mark V+ Suction Pump
• (2) Clear 36” Tubes (one for suction port and one for pressure port)
• (2) Filter/Wand Assembly (one for suction port and one for pressure port)
• (1) Set of Suction Needles
• (1) Reamer for cleaning suction needles
• (1) Lid for Drying Chamber
• (1) Silicone Pad for Drying Chamber
• (1) 100-240V, 50/60Hz Universal AC Power Supply Plug
• (1) Optional Suction & Pressure Wand Holder with screws that can be mounted to side of pump
(Silicone Pad for Drying Chamber Inside)
Suction and Pressure
Filter/Wand Assembly
HE
AR
IN
G
A
ID
S
U
CT
I
O
N
PU
M
P
W
a
n
d
S
uctio
n
Pre
ss
ure
D
r
y
i
n
g
C
h
a
mb
e
r
MA
RK
V
+
™

Rear View
3
Chamber Release Valve
Power Supply
Circuit Breaker
Assembly Instructions
Chamber Release Valve
Circuit Breaker 4A
Insert one tube into the ports marked suction and pressure on the front panel of the Mark V+.
Push tube in firmly. Pull on tube gently to see it holds. If not, push in again.
The suction and pressure filter/wand assembly is attached to the opposite end of the tube by
pushing the tip firmly into the tube. For best results, push tip all the way into tube. Needles
attach to the luer lock tip of the filter/wand assembly.
To connect the suction and pressure wand holder, look for the two holes on the side of the unit.
Affix the holder by inserting the two screws (included) into those holes. Please look at diagram
of “Font & Top View” for orientation.
Before using, be sure the Chamber Release Valve on the back of the unit is all the way
closed (clockwise). Suction will not engage if valve is not closed.
DC 12/V/3.5A

Pressure Wand
Circuit Breaker
Filter/Wand Assembly
Operating Instructions
4
To use the pressure wand, push the POWER button in. Then push the Wand button until it is “out”
to activate wand. Pressure and suction are operational at the same time, but when the wands are
working, the Drying Chamber is off. Use the pressure wand to clean out vents and volume
controls.
The Mark V+ is equipped with a circuit breaker to protect the motor from circuit overload and
power surges. If the circuit breaker trips, wait 60 seconds then press the circuit breaker in to
return to normal operation.
The filter for the Mark V+ is assembled in the hand wand. When the wand appears dirty, simply
replace it by pulling it off the tube and replacing it with a new one.
Drying Chamber
To use the drying chamber, push the POWER button in. Then push the Drying Chamber button
“in” to activate chamber. Gently push the drying chamber lid down until the vacuum holds it firm.
The motor will turn off automatically after 15 minutes of continuous use. To release the lid at
anytime, turn off the POWER button and twist the Chamber Release Valve, located on the back
of the pump, counter clockwise until you hear a release of air. Once lid is released, return
Chamber Release Valve to closed position by fully turning valve clockwise.
Suction Wand
To use the suction wand, push the POWER button in. Then push the Wand button until it is “out”
to activate wand. Suction and pressure are operational at the same time, but when the wands are
working, the Drying Chamber is off. Carefully move the suction needle into the area to be cleaned,
such as the microphone, receiver and sound ports. Do NOT use the Mark V+ to clean ears.
NOTE: In stubborn cases, it may help to place a few drops of hydrogen peroxide in the
microphone and receiver with a syringe. Allow the hydrogen peroxide to penetrate, then suction
again. Do NOT use alcohol in the microphone or receiver.

Needles
Attach appropriately sized needle (included) to the luer lock tip of the filter/wand assembly.
Needles can be used for both suction and pressure wands. It is recommended that the larger
diameter needles are used for the pressure wand and the smaller diameter needles are used for
the suction wand.
Operating Instructions Continued
Tubing
To remove tubing from suction and pressure ports, push blue ring “in” while pulling tubing out. To
insert tubing, push tubing firmly into the port with blue ring. Once inserted, pull on tube gently to
ensure it is secure.
5

1.
2.
3.
4.
5.
Notes
Keep the needle from bending. Use the reamer (included) to clean out clogged suction
needles.
When suctioning, great care should be exercised to not insert the needle too deeply into the
microphone or receiver.
The motor will shut off automatically after 15 minutes of continuous use.
This equipment is not suitable for the removal of corrosive and particulate dust-containing
gases and explosive gases.
This equipment is only used for the maintenance of hearing aids and earmolds. It
should NOT be used to clean ears.
Suction Value
is Less Than
-20 inHg
Unit does NOT
Power-On
Properly
1. There is a leak in the tube
connection to the wand
1. Reconnect the wand to the tube.
1. Check that the power cord is
firmly plugged into the machine
and the wall.
1. The power cord is loose
Item Event Possible Cause Potential Fixes
1
2
6
Troubleshooting
Note
Do not open cabinet for service. Contact Oaktree Products, Inc. at 800-347-1960 for all repairs.
2. The chamber release valve
is not closed
3. The drying chamber lid is
not fixed in place
4. The suction needle is
clogged or too small
2. Close the chamber release valve
(turn clockwise).
3. Push the drying chamber lid
down until vacuum holds it firm
4. Use reamer to clean out clogged
wax or debris; If that does not
work, try a larger suction needle.
3. Fuse failure
2. The circuit breaker tripped
3. Call Oaktree for a new circuit
breaker.
2. Wait 60 seconds, then press the
circuit breaker button in on the
back of the unit.

610 Spirit Valley East Drive
Chesterfield, MO 63005
Oaktree Products, Inc.
636-530-1664
800-347-1960
www.oaktreeproducts.com
Replacement Parts
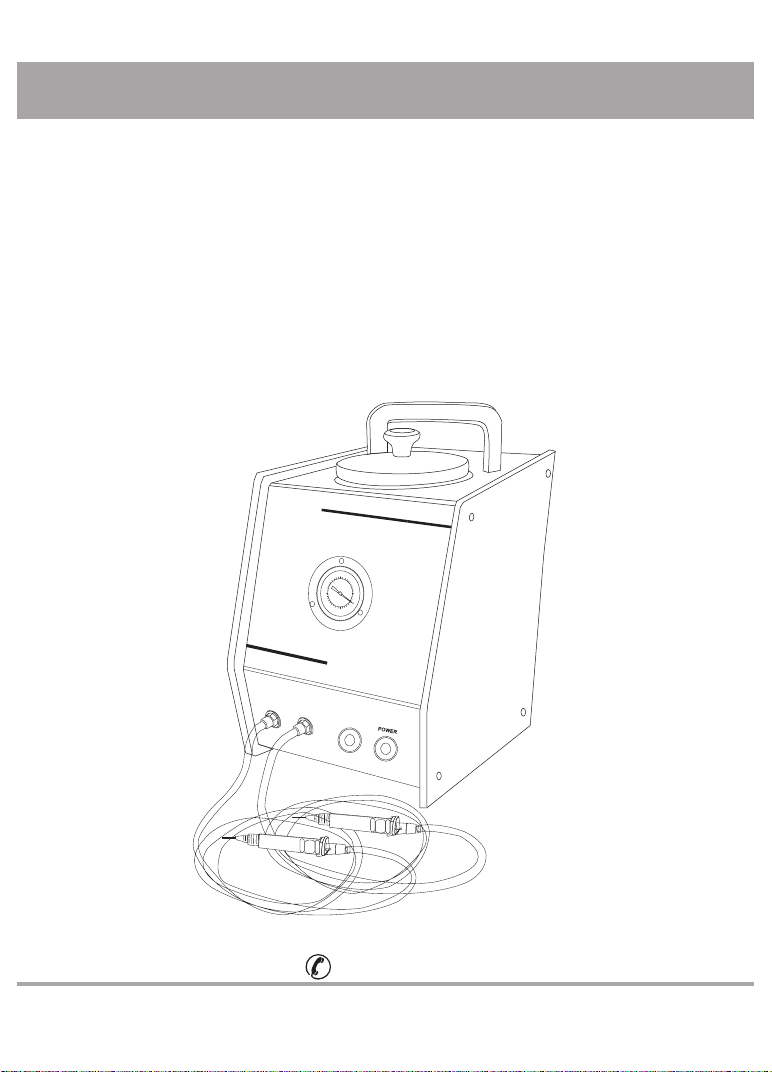
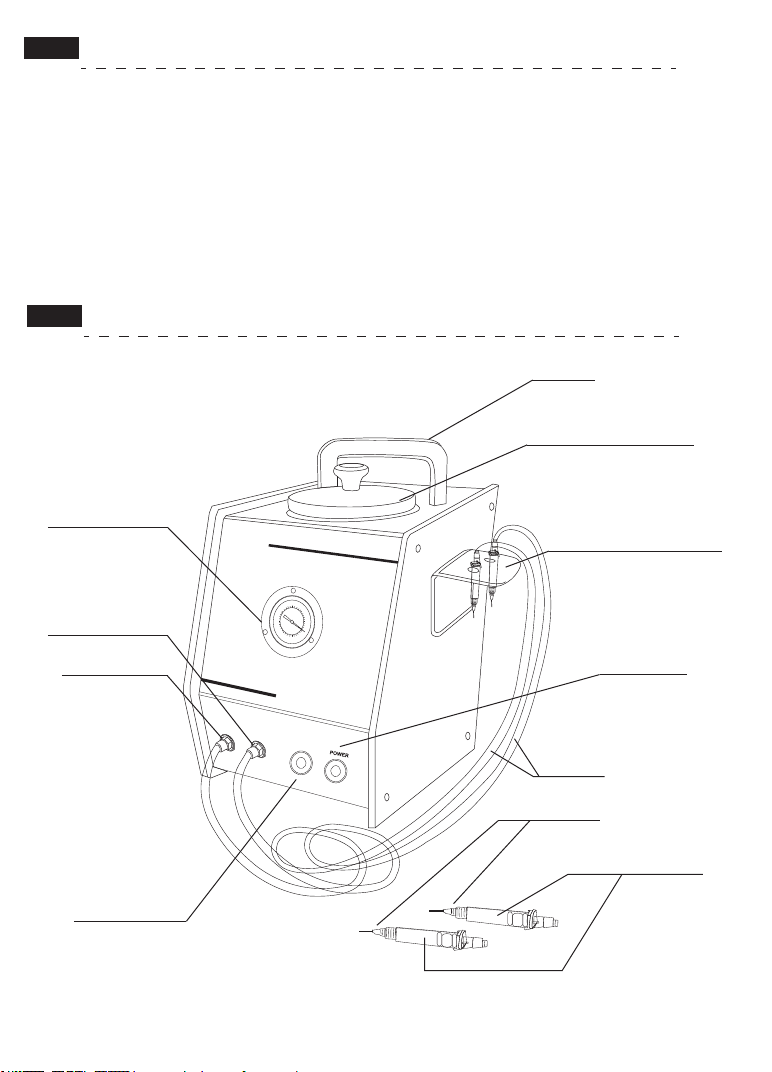
• Filter/Wand Assembly (item# M-FILTER)
• Clear Tubing, 36” Length (item# M-TUBE36)
• Drying Chamber Lid (item# M-LID)
• Drying Chamber Silicone Pad (item# M-PAD)
• Reamer (item# M-REAMER)
• Suction Needle Pack, 7/pack (item# M-NEEDLES)
• Individual Suction Needles:
• Olive, 1” 14 Gauge (item# 5114-1-B)
• Olive, 0.5” 14 Gauge (item# 5114-B)
• Orange, 1” 15 Gauge (item# 5115-1-B)
• Orange, 0.5” 15 Gauge (item# 5115-B)
• Pink, 1” 18 Gauge (item# 5118-1-B)
• Pink, 0.5” 18 Gauge (item# 5118-B)
• Brown, 1” 19 Gauge (item# 5119-1-B)
• Brown, 0.5” 19 Gauge (item# 5119-B)
• Yellow, 1” 20 Gauge (item# 5120-1-B)
• Yellow, 0.5” 20 Gauge (item# 5120-B)
• Green, 1” 21 Gauge (item# 5121-1-B)
• Green, 0.5” 21 Gauge (item# 5121-B)
• Black, 1” 22 Gauge (item# 5122-1-B)
• Black, 0.5” 22 Gauge (item# 5122-B)
• Light Blue, 1” 23 Gauge (item# 5123-1-B)
• Light Blue, 0.5” 23 Gauge (item# 5123-B)
• Blue, 1” 25 Gauge (item# 5125-1-B)
• Blue, 0.5” 25 Gauge (item# 5125-B)
• 1.5” Polypropylene Flexible (item# 5123-B)
Table of contents
Popular Water Pump manuals by other brands

Central Machinery
Central Machinery 40634 Assembly & operating instructions

PFT
PFT RITMO L FC-230V plus operating manual

Additel
Additel ADT927 user manual

UNIBLOC
UNIBLOC FLOTRONIC ONE-NUT Installation, operation and maintenance manual

Performance Tool
Performance Tool W87032 owner's manual

KSB
KSB Evamatic-Box N Series Installation & operating manual

Zoeller
Zoeller SHARK Series Installation & service instructions

Medela
Medela Vario Instructions for use

Wayne
Wayne CDUCAP Series Operating instructions and parts manual

Grundfos
Grundfos UPM3 instruction manual

Clements
Clements HiVac SUC 84109 user manual

InoTec
InoTec Inomat M8 Operation and maintenance instructions