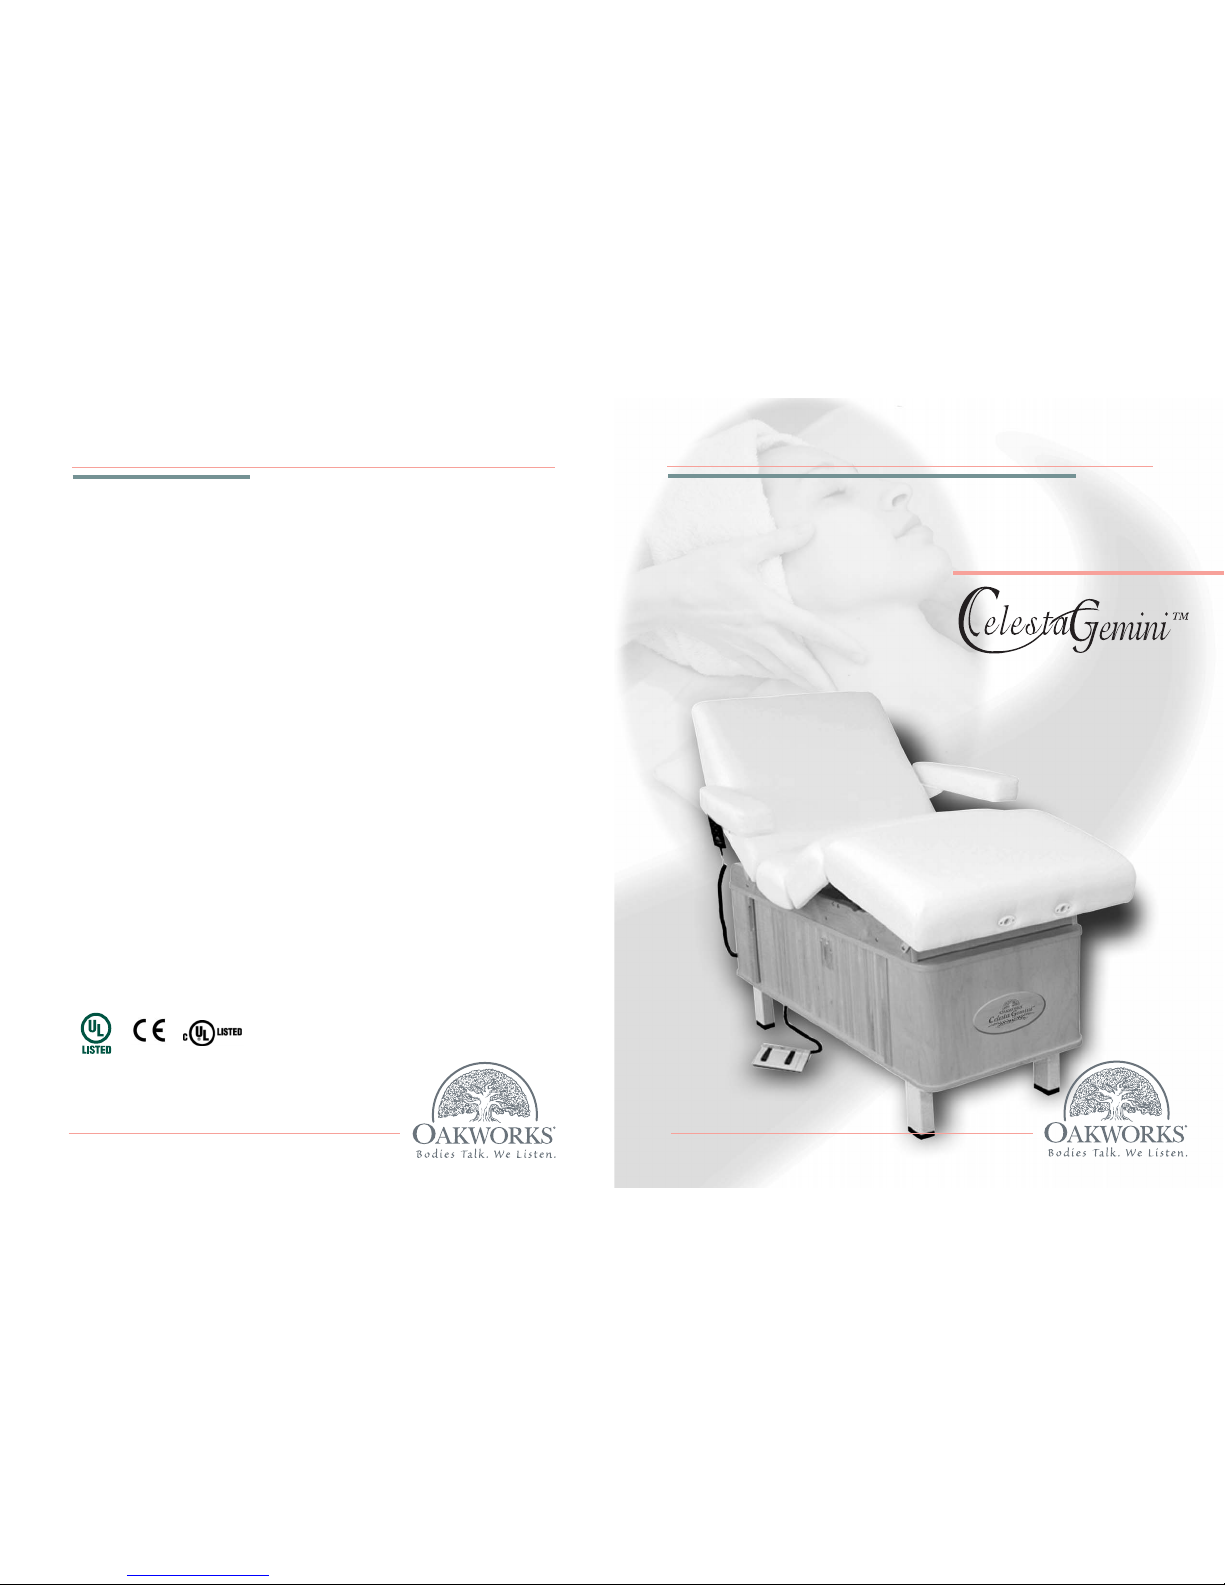
OAKWORKS GMCTMP User manual

INSTRUCTION MANUAL
OAKWORKS®
INSTRUCTION MANUAL
Manual Part # MMMNCG0109
Edition 3, English May 2007
Printed in U.S.A.
®
MASSAGE TABLES
64CA

© 2005 OAKWORKS®, Inc.
Manual Part # MMMNCG0109
Edition 3, English May 2007
All rights are reserved. No part
of this document may be
photocopied, reproduced or
translated to another language
without prior written consent
of OAKWORKS®, Inc.
OAKWORKS®is a registered
trademark of OAKWORKS®, Inc.
Notice
The information contained in this
document is subject to change
without notice and should not
be construed as a commitment by
OAKWORKS®, Inc.
OAKWORKS®, Inc. assumes no
responsibility for any errors that
may appear in this document nor
does it make expressed or implied
warranty of any kind with regard
to this material, including, but not
limited to, the implied warranties
of merchantability and fitness for
a particular purpose.
OAKWORKS®, Inc. shall not be liable
for incidental or consequential
damages in connection with or
arising out of the furnishing,
performance, or use of this
document and the program
material which it describes.
CONTACT INFORMATION:
OAKWORKS®Inc.
923 East Wellspring Road
New Freedom, PA 17349
Toll Free (USA only): 800-916-4613
Phone: 717-235-6807
Toll Free FAX (USA only): 877-562-4787
FAX: 717-235-6798
www.oakworks.com

WARRANTY
STATEMENT
All warranties are limited to factory-provided replacement parts, factory
repair or replacement, at the discretion of OAKWORKS®.
All warranties exclude damage caused by improper set-up, accident,
abuse, misuse, neglect, use for other than intended purpose or reasonable
wear such as tears in the upholstery.
All warranties are invalidated by non-factory modifications and
unauthorized repairs, which will immediately terminate all liability by
OAKWORKS®for the product or damages caused by its use.
The buyer and its customers shall be responsible for proper set-up and
use of the products as well as any supervision required for safety. In no
event shall OAKWORKS®be liable for any special, indirect, consequential,
incidental, exemplary or punitive damages or costs. Use of non-approved
cleaning solutions voids the guarantee on all fabrics.
The warranties set forth herein are the sole and exclusive warranties
provided by OAKWORKS®. There are no other warranties, representations
or guarantees provided by OAKWORKS®either expressed or implied,
including warranties of merchantability and fitness for a particular purpose.
Warranty valid with proof of purchase.
26
Model No. GMCTMP
Celesta Gemini™
TABLE OF CONTENTS
i
TABLE OF CONTENTS
Symbol Identification .......................................................................... pg iii
Warnings .............................................................................................. pg iv
Grounding Instructions ......................................................................... pg vi
Introduction .......................................................................................... pg 1
Section I: Product Description & Photo
Celesta Gemini™....................................................................... pg 2
Section II: Installation
Leveling Instructions ....................................................... pg 4
Section III: Directions for Use
Celesta Gemini™......................................................................... pg 5
Under-Table Cabinet .......................................................... pg 9
Side Arm Rests ................................................................. pg 11
QuickLock™Face Rest ........................................................ pg 13
Accessory Option: Table Extender ................................ pg 15
Moving the Celesta Gemini™.............................................. pg 15
Section IV: Troubleshooting
If Table Will Not Change Height or Angle ................... pg 16
Hand Control Replacement Instructions ..................... pg 16
Foot Control Replacement Instructions ....................... pg 19
Section V: Care & Cleaning ................................................................. pg 22
Section VI: Product Identification ...................................................... pg 23
Section VII: Table Specifications......................................................... pg 24
Section VIII: List of Parts ................................................................... pg 25
Section IX: Warranty .................................................................... pg 26
Contact Information ........................................................................... IBC
TABLE OF CONTENTS
WARRANTY STATEMENT
• How to Care for Your Upholstery
WARRANTY STATEMENT
FRAME/UPHOLSTERY ELECTRICAL RETURN REPLACEMENT
UNDERSTRUCTURE /PADDING COMPONENTS SHIPPING SHIPPING
Limited Lifetime
Warranty —
original owner;
International :
10 years
5 years 2 years not
Included
Included in
Continental US;
not included on
International

ii
SYMBOL IDENTIFICATION
• How to Care for Your Upholstery
SYMBOL
IDENTIFICATION
FLUOROSCOPY TABLE
Part No. Description
2378 Column DL1(4)
2379 Cable, Motor (1)
7324-1 Control Box, Master (1)
7324-2 Control Box, Master / EU (1)
7324-3 Control Box, Master / Japan (1)
7328-1 Control Box, Slave (1)
7328-2 Control Box, Slave / EU (1)
7328-3 Control Box, Slave / Japan (1)
2401 Power Cord, Control Box
2403 Hand Control/10 Button (1)
2404 Foot Control (1)
7736 Receptacle/15A Beige (1)
7791 Power Cord,Main /North America (1)
7791-02 Power Cord / United Kingdom (1)
7791-03 Power Cord / Europe/Italy (1)
7791-04 Power Cord / Swiss (1)
5589 Power Cord / Japan (1)
7791-06 Power Cord / Australia (1)
Celesta Gemini™
LIST OF PARTS
MODEL GMCTMP
25
LIST OF PARTS
LIST OF PARTS
Part No. Description
0301 Table Extender
QuickLock™Face Rest (2 parts)
0218 - Platform (1)
2410-03 - Crescent Face Rest Pad(1)
7811-03 Side Arm Rest Cushion/ Right (1)
7812-03 Side Arm Rest Cushion / Left (1)
7813-03 Side Arm Rest /Right; assembly includes frame
& cushion (1)
7814-03 Side Arm Rest / Left; assembly includes frame
& cushion (1)
46467 Manicure Armrests (2)
3680-1,2,3,4 Hot Towel Caddy
Accessory
Options

SPECIFICATIONS
Model No. GMCTMP
Designed For: North America Europe/Switzerland United Kingdom Australia Japan/Korea
Voltage/Current
Service Available
Input Frequency
Voltage Output
Current
Consumption w/o
internal Outlets
Electric Shock
Protection
Mode of
Operation
Storage &
Transport
* measurements are determined from floor to top of seat pad using standard padding;
these measurements can be affected by natural material variations in padding.
120 VAC/ 20 amps
60 Hz
Temperature: 14Þ F - 140Þ F Humidity: 60% relative humidity Pressure: no limitations known
-10Þ C - 60Þ C During transport, DO NOT stack containers.
24 VDC
4.7 amps
Class I Equipment
Continuous Operation is
limited to a 10% Duty
Cycle (2 min. - 18 min.
rest)
220 VAC/ 10 amps
50 Hz
24 VDC
2.6 amps
Class I Equipment
Continuous Operation is
limited to a 10% Duty
Cycle (2 min. - 18 min.
rest)
220 VAC/ 10 amps
50 Hz
24 VDC
2.6 amps
Class I Equipment
Continuous Operation is
limited to a 10% Duty
Cycle (2 min. - 18 min.
rest)
220 VAC/ 10 amps
50 Hz
24 VDC
2.6 amps
Class I Equipment
Continuous Operation is
limited to a 10% Duty Cycle
(2 min. - 18 min. rest)
100 VAC/ 20 amps
50/60 Hz
24 VDC
5.6 amps
Class I Equipment
Continuous Operation is
limited to a 10% Duty
Cycle (2 min. - 18 min. rest)
CUS
L
I
S
T
E
D
CUS
L
I
S
T
E
D
Length:
Width:
Height Range*
Weight*
Shipping Weight
Shipping Crate
Dimensions
Maximum Working
Load Rating
Total Outside
Dimensions:
Storage Area 1/
Head End:
Storage Area 2/
Foot End:
Opening
Dimensions:
Storage Area 1/
Head End:
Opening
Dimensions:
Storage Area 2/
Foot End:
14.875" Hx 24.25" W
x 56.5" L
13.5" Hx 24.25" Wx
21.75" L
13.5" Hx 24.25" Wx
17" L
13.5" HX20.125" L
13.5"Hx15.375"L
Cabinet Dimensions:
182 cm
74 cm
61 cm - 81 cm
~ 137 kg
~ 159 kg
205.7cm x 91.4cm x
89cm
283 kg
72"
31"
25" - 37"
~ 301 lbs.
~ 350 lbs.
81" Lx 36" Hx 35" W
625 lbs.
182 cm
74 cm
61 cm - 81 cm
~ 137 kg
~ 159 kg
205.7cm x 91.4cm x
89cm
283 kg
182 cm
74 cm
61 cm - 81 cm
~ 137 kg
~ 159 kg
205.7cm x 91.4cm x
89cm
283 kg
182 cm
74 cm
61 cm - 81 cm
~ 137 kg
~ 159 kg
205.7cm x 91.4cm x
89cm
283 kg
24
SPECIFICATIONS
SPECIFICATIONS
Celesta Gemini™
E
L
E
C
T
R
I
C
A
L
S
P
E
C
S
T
A
B
L
E
S
P
E
C
S
37.8cm Lx 61.6cm Hx
143.5cm W
34.3cm Lx 61.6cm Hx
55.2cm W
34.3cm Lx 61.6cm Hx
43.2cm W
34.3cm Hx 51.1cm L
34.3cm Hx 39.1cm L
37.8cm Lx 61.6cm Hx
143.5cm W
34.3cm Lx 61.6cm Hx
55.2cm W
34.3cm Lx 61.6cm Hx
43.2cm W
34.3cm Hx 51.1cm L
34.3cm Hx 39.1cm L
37.8cm Lx 61.6cm Hx
143.5cm W
34.3cm Lx 61.6cm Hx
55.2cm W
34.3cm Lx 61.6cm Hx
43.2cm W
34.3cm Hx 51.1cm L
34.3cm Hx 39.1cm L
37.8cm Lx 61.6cm Hx
143.5cm W
34.3cm Lx 61.6cm Hx
55.2cm W
34.3cm Lx 61.6cm Hx
43.2cm W
34.3cm Hx 51.1cm L
34.3cm Hx 39.1cm L
SYMBOL IDENTIFICATION
iii
SYMBOL IDENTIFICATION
SYMBOL
IDENTIFICATION
SYMBOL IDENTIFICATION
This symbol, when used in documentation on this product, represents a caution.
Be sure to read and comply with all precautions and warnings.
This symbol, when used in documentation on this product, indicates danger
and warns against an electrical shock hazard. Be sure to observe and
comply with all warnings and instructions.
This symbol, when used in documentation on this product, indicates a
Protective Earth (Ground) Terminal.
This symbol when used in documentation on this product, warns that dur-
ing transport there should be no stacking of containers.
This symbol, when used in documentation on this product, indicates that
the product should be protected from moisture. The humidity specifications
for Transport & Storage are listed on page 24.
This symbol, when used in documentation on this product indicates that
information is given regarding the recommended temperature limits
during transport and storing. The specifications for these limits are listed
on page 24.
This symbol, when used in documentation on this product, indicates the date
of manufacture of the device.
This symbol, when used in documentation on this product indicates
alternating current (AC).
This symbol, when used in documentation on this product, indicates direct
current (DC).
This symbol, when used in documentation on this product, indicates
that instructional information is included. All instructions should be
read carefully and completely before using the equipment.
CUS
L
I
S
T
E
D
CUS
L
I
S
T
E
D
CUS
L
I
S
T
E
D
CUS
L
I
S
T
E
D
CUS
L
I
S
T
E
D
~
----

Improper use of this device can cause injury. Be sure to read all
operating instructions prior to use to prevent injury to operator or client.
Electrical Shock Hazard. To reduce the risk of electric shock, always
disconnect the table from the electrical outlet before moving the table
or doing any maintenance or troubleshooting procedures. Never use
this equipment if it has a damaged cord or plug. Use this equipment
only for its intended use as described in these instructions. Do not use
any attachment or accessories not recommended by the manufacturer.
To reduce the risk of burns, fire, electrical shock or injury:
• The power supply/control module is located at the head end of the
table beneath the base. Refer servicing to qualified personnel and
follow manual instructions when doing any authorized troubleshooting.
Before doing any work on the unit, disconnect the power cord from the
power outlet.
• Before cleaning with any liquid cleaner be sure to un-plug the power cord
from the power outlet. Do not operate the table in standing water.
• Be careful of slack in the power cords as you put the control box back in
the cabinet when troubleshooting to avoid pinching cords between the
cabinet base and the control box bracket.
• Before moving the table, disconnect the power cord from the power
outlet and secure the electrical cord, hand control and foot controls
out of the way for moving.
•Risk of Electrical Shock. — Connect this table to a properly grounded
outlet only. See Grounding Instructions.
• Use this furnishing only for its intended use as described in these
instructions. Do not use attachments not recommended by the manufacturer.
• Never operate this table if it has a damaged cord or plug., if it is not
working properly, if it has been dropped or damaged, or dropped into
water. Return the furnishing to a service center for examination and repair.
• Keep the cord away from heated surfaces.
• Do not use outdoors.
• Do not operate where aerosol (spray) products are being used or where
oxygen is being administered.
Risk of Injury — Keep children from moving headrest and foot support.
Never drop or insert any object into any opening.
POWER LEAD PLUGS
OAKWORKS®Part #: Voltage (ACE) Power Cord Plug
7791 120v 60 Hz 3 prong grounded
hospital grade;
North America
7791-03 220v 50 Hz Continental Plug;
Europe/Italy
7791-04 220v 50 Hz Swiss plug; Switzerland
7791-02 220v 50 Hz British plug;
United Kingdom
7791-05 100v 50/60 Hz 3 prong polarized plug;
Japan & Korea
7791-06 220v 50 Hz Australian Plug; Australia
23
PRODUCT IDENTIFICATION
• Power Lead Plugs
PRODUCT IDENTIFICATION
PRODUCT
IDENTIFICATION
• Plugs
These part numbers
are for identification
only; they are not field
serviceable items.
iv
WARNINGS & IMPORTANT SAFETY INSTRUCTIONS
• How to Care for Your Upholstery
WARNINGS
WARNINGS & IMPORTANT SAFETY INSTRUCTIONS
IMPORTANT SAFETY INSTRUCTIONS
DANGER
READ AND
SAVE THESE
INSTRUCTIONS
WARNING
WARNING
WARNING

v
WARNINGS
WARNINGS
WARNINGS & IMPORTANT SAFETY INSTRUCTIONS
22
CARE & CLEANING
• How to Care for Your Upholstery
CARE & CLEANING
HOW TO CARE FOR YOUR UPHOLSTERY:
In order to maintain the quality and ensure the life of the Celesta Gemini™,
here are some preventative steps that can be taken to protect the upholstery
on the chair and accessories.
IF T• Protect your Celesta Gemini™ and accessories with sheets and
fleeces. We offer both fitted sheets and thick fleeces that
protect your upholstery fabric against oil stains while offering
comfortable 100% cotton flannel softness to your clients.
You can also preserve your face rest and bolsters with 100%
cotton flannel covers and fleeces.
• Clean your upholstered items only when needed with a mild
detergent or Green Windex. A diluted 1/100 bleach solution for
disinfecting can be used. Dry the table immediately after cleaning
to remove excess cleaning solution. Using strong cleaners, such as
alcohol, acetone, higher concentrations of bleach or other products
that contain high concentrations of these substances, can shorten
the life of your fabric, or discolor it. Note: Damage caused by these
cleansers will not be covered under the warranty.
• Avoid extremes in heat. Very cold temperatures can make your
fabric prone to cracking. Very high temperatures can cause the
fabric to stretch permanently.
• Avoid exposing your products to direct sunlight for extended
periods of time. This can lead to fading and cracking of the fabric.
• Use an anti-slip pad to prevent oil from reaching the upholstery
and to keep your sheets from slipping.
Caring for your Celesta Gemini™upholstery fabric involves more than just
protecting it from general abrasions, cuts and punctures. We offer most
of the products mentioned above in our therapeutic equipment catalog.
Therapeutic equipment may be reupholstered for a charge, but you can
lengthen the life of the upholstery fabric on your table by following these
quick and easy suggestions.
GENERAL CARE OF EQUIPMENT COMPONENTS:
• Use only a mild solution of 4:1 diluted non-alcohol cleaner such
as 409®, Fantastik®or some other non-abrasive cleaner to wipe
down the metal and wooden surfaces of the chair. Apply with a
damp (not wet) lint-free cloth. Be sure excess liquid does not
drip onto, or into, any of the electrical controls or mechanisms.
Be sure that the unit is unplugged before cleaning these areas.
Wipe these areas carefully with a lint free cloth.
• The electronic powering mechanism of your Celesta Gemini™
requires no general maintenance or lubrication.
• The wooden cabinetry of the equipment can be polished with any
polish approved for wooden surfaces. Spray, or pour, the polish
onto a soft cloth and be careful not to get it onto other surfaces.
IMPORTANT
CAUTION
Before cleaning with any
liquid cleaner be sure to un-
plug the power cord from the
power outlet. Do not operate
the table in standing water.
CARE & CLEANING
• Upholstery
• Base
& Controls
Be sure to read all
cautions, warnings
and instructions given
in the manual to prevent
injury to both operator
and client.
IMPORTANT SAFETY INSTRUCTIONS(CONT.)
This product is equipped with an interior accessory outlet. The total
electrical load of equipment plugged into this set of outlets is not to
exceed 840 watts.
Close supervision is necessary when this furnishing is used by, or near,
children, invalids or disabled persons. DO NOT leave children alone or allow
them to operate the controls. Keep controls out of reach of children. DO NOT
allow children to crawl into the cabinet or under the table.
Be certain that the table is completely lowered without any tilt being
present prior to discharging an ambulatory patient. The patient may
lose balance and fall. Do not leave clients unattended when table is set at
its highest level.
The table weighs as much as 300 lbs. DO NOT lift or move the unit
without using proper safely procedures or equipment. DO NOT turn
the Celesta Gemini™on its side for any reason. To do so could cause
damage to the base and will void the warranty. There are no serviceable
items that require this action. Never lift the table by grasping the table top
as the table top is not designed to hold the weight of the base and you
could damage the table.
When operating the Celesta Gemini™controls and making any and all
adjustments to the table, move hands and feet away from the working
mechanism of the table. Use care when opening the doors all the way
so that you do not pinch or injure your fingers. Either arm rest can be
repositioned to allow a client to get on and off the Celesta Gemini™easily.
When making adjustments to the arm rests make certain that the client’s
arms are away from the working mechanism.
DO NOT sit on the Arm Rests, the elevated Back Rest or Leg Rest. DO NOT
place excess weight on the Side Arm Rests. DO NOT use them in assisting
the client on and off the Celesta Gemini™.
DO NOT put excessive weight or pressure on the QuickLock™Face Rest.
Excessive pressure can cause premature failure of the QuickLock™Face Rest.
Do Not extend the dowels of the Face Rest further than 3" from the table
edge to ensure a stable connection.
DO NOT use the hand control and the foot control simultaneously as this
can cause damage to one or both units.
DO NOT store or place anything on the cabinet hood under the backrest as
this can cause damage to top and/or hood and will void the warranty.
Maximum Working Load Rating (client and accessories): 625 lbs.
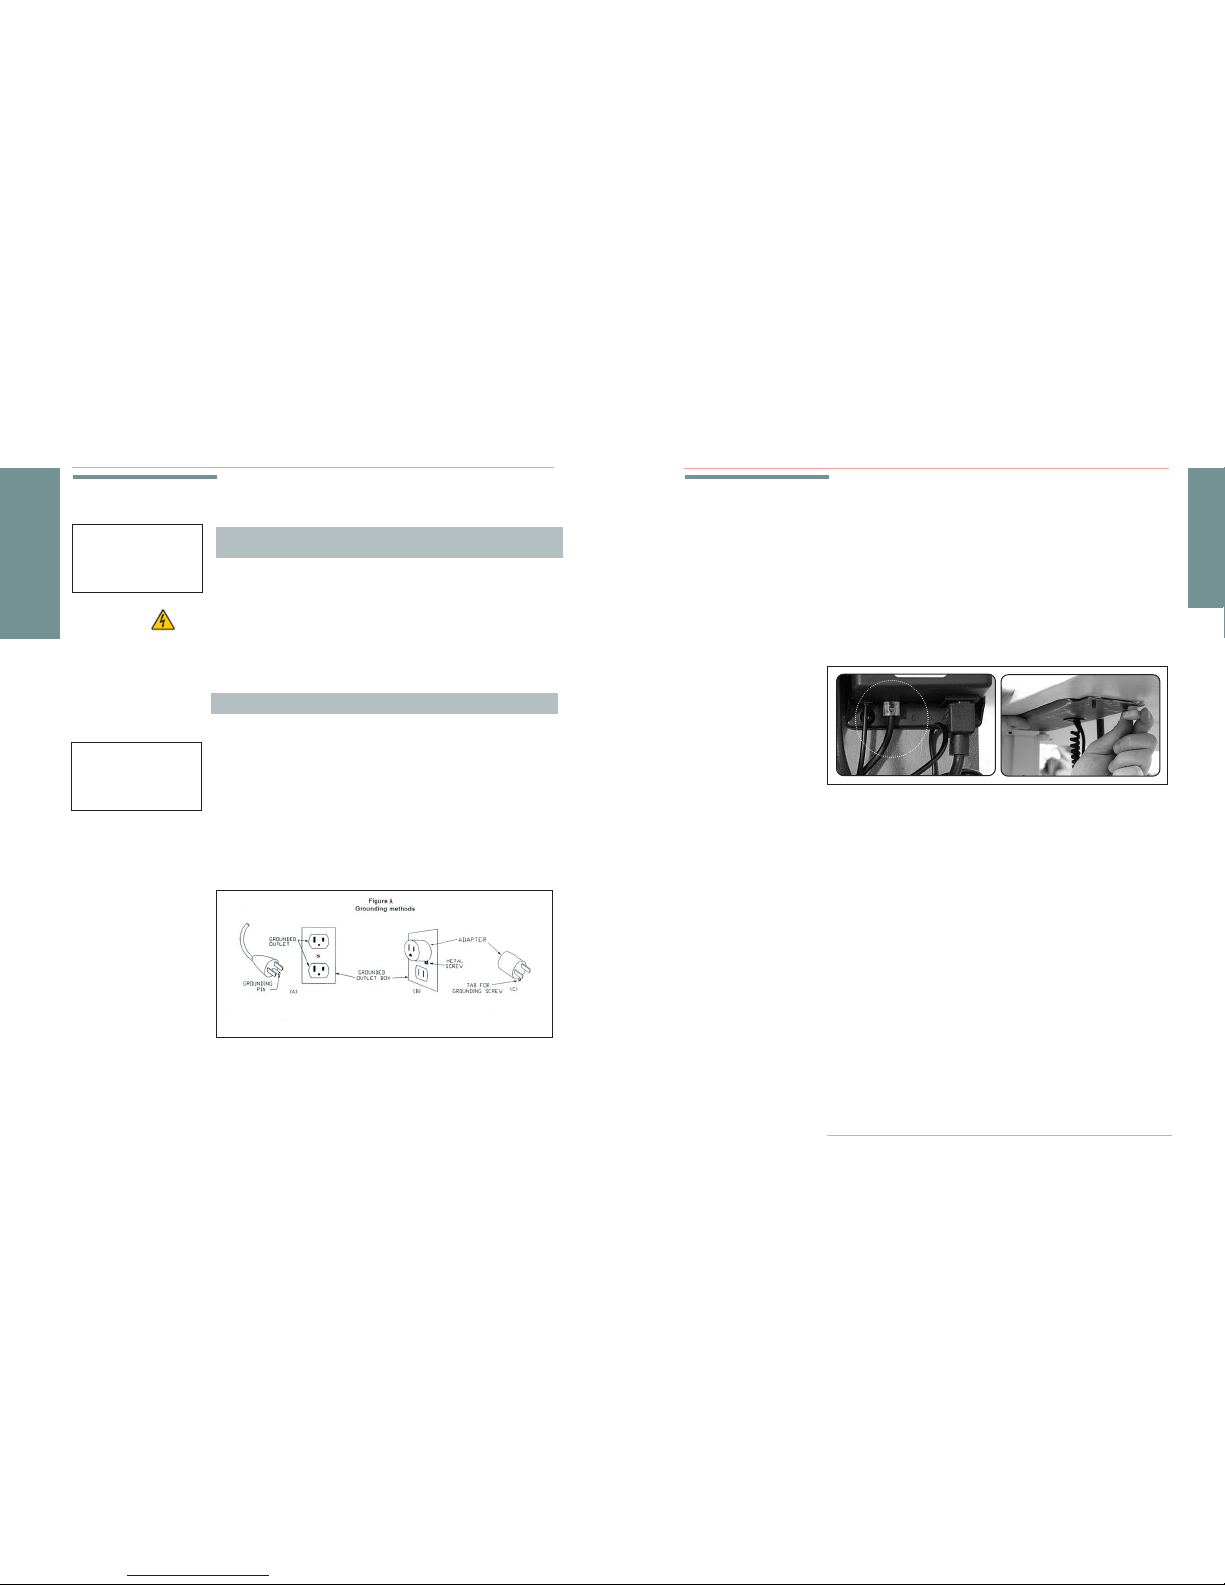
WARNING
CAUTION
CAUTION
CAUTION
CAUTION
CAUTION
CAUTION
CAUTION
CAUTION
WARNING
READ AND
SAVE THESE
INSTRUCTIONS

vi
WARNINGS & IMPORTANT SAFETY INSTRUCTIONS
GROUNDING INSTRUCTIONS
WARNINGS & SAFETY
INSTRUCTIONS
GROUNDING INSTRUCTIONS
8. Plug the new foot control into the control box bracket at the
same connection where the inoperable unit had been.
9. Carefully lift the control box, mounting bracket and excess cords
back up into the cabinet floor, being careful to keep all the excess
out of the way of the control box opening. Be sure all cords are
away from the screw area of the knob connections. Line up the
screw holes, hold the control box bracket base plate in position
and begin to fasten the knobs onto the 4 screws. Hand tighten
them until the bracket is secure.
10. Connect the power cord and test the new foot control.
Should you need assistance at any time, please call a Customer Service
Representative at 800-558-8850.
21
TROUBLESHOOTING
• Foot Control Replacement Instructions
TROUBLESHOOTING
TROUBLESHOOTING
• Foot Control
(cont)
GROUNDING
INSTRUCTIONS
WARNINGS & IMPORTANT SAFETY INSTRUCTIONS
GROUNDING INSTRUCTIONS:
This product must be grounded. If it should malfunction or breakdown,
grounding provides a path of least resistance for electrical current to
reduce the risk of electric shock. This product is equipped with a cord
having an equipment-grounding conductor and a grounding plug. The
plug must be plugged into an appropriate outlet that is properly installed
and grounded in accordance with all local codes and ordinances.
This product is for use on a nominal 120-volt circuit (see below, USA
plug example)and has a grounding plug that looks like the plug
illustrated in Figure A . Make sure that the product is connected to
an outlet having the same configuration as the plug.
No adapter should be used with this product.
G•To remove the accessory from the cabinet: Turn the accessory controls
to the ‘off’ position and then disconnect the unit from the interior
power source by removing the plug from the outlet.
When moving the table: Turn the accessory controls to the ‘off’
position, disconnect the table from the exterior power source by
removing the table plug from the outlet.
Correct Implementation Incorrect Implementation
READ AND
SAVE THESE
INSTRUCTIONS
READ AND
SAVE THESE
INSTRUCTIONS
IMPORTANT SAFETY INSTRUCTIONS(CONT.)
WARNING
DANGER-Improper connection of the equipment-grounding
conductor can result in a risk of electric shock. Check with a qual-
ified electrician or service man if you are in doubt as to whether the
product is properly grounded. Do not modify the plug provided with
the product - if it will not fit the outlet, have a proper outlet installed
by a qualified electrician.

1
INTRODUCTION
• Celesta Gemini™
INTRODUCTION
INTRODUCTION
Celesta Gemini™
OAKWORKS®Celesta Gemini™offers a variety of positioning capabilities for
massage therapists and skincare professionals of all specialties. On this multi-
functional professional model table the practitioner can perform numer-
ous protocols with ease and comfort. The fully electric Celesta Gemini™
is especially effective when professional protocols require specific position-
ing for the client, guest or patient. While the client receives comfortable,
relaxing support, the comfort level of the therapeutic professional is
enhanced by superior ergonomics.
The Celesta Gemini™should not be used in any other manner than that
described within this manual. Use of any unnecessary force or unauthorized
procedures could result in injury to practitioner, client or equipment.
Celesta Gemini™/ Model GMCTMP
The Celesta Gemini™raises, lowers and tilts your clients to the optimal
working height easily with added features provided by an electronically
adjustable flextop and a set of 4 pre-set automatic positions. The variety
of height and reclining positions align the Celesta Gemini™top so your
client’s body is at the optimum level for any number of treatments. It features
a single hand control and a foot control to make the precise adjustments
to height, back and knee rest positions to really make it a custom fit to
each client and practitioner.
The cabinet offers an in-cabinet plug-in option to accommodate hot towel
cabinets, placing them right at your fingertips. The large cabinet holds stacks
of towels and other equipment without interfering with the lifts - a problem
many other tables have. The doors slide handily to a fully-open position
for ease of access.
The Celesta Gemini™’s bed is built on a solid steel frame for optimum
strength, but you will never know it. The beautiful wood surround makes
the Celesta Gemini™look like custom-designed, high-end furniture. You
will rely on the strength, but all you will see is the beauty. We’ve gone to
great lengths to hide the wiring on the Celesta Gemini™, for a streamlined
glamour that will accentuate your decor as well as provide ergonomic
benefits and comfort to serve you and your client.
IMPORTANT
5. Follow the cord for the foot control back to the place where it
connects to the control box. Press down on the cord connector tab and
unplug the foot control.
6. Pull on the foot control’s cord enough to enable you to reach the
plastic cord restraint that holds the cords in place (the hand
control coil cord enters the control box here as well). Remove the
plastic cord restraint by just applying a little pressure to one side.
Slide the foot control cord out of the slit in the restraint. Discard
the inoperable control.
7. Take the new foot control and thread the straight section of cord
closest to the plug into the slit of the plastic cord restraint. The
cords for both the hand control and the foot control will fit in to
this slit. Place the plastic cord restraint into the hole in the
bottom plate of the control box bracket and push it into place
using slight pressure until the cord restain flange is flush against
the control box bracket.
TROUBLESHOOTING
CAUTION
Before doing any work on the
unit,disconnect the power
cord from the power outlet.
Be careful of slack in the
power cords as you put the
control box back in the
cabinet to avoid pinching
cords between the cabinet
base and the control box
bracket.
20
TROUBLESHOOTING
• Foot Control Replacement Instructions
TROUBLESHOOTING
CAUTION
• Foot Control
(cont)
CAUTION
The table weighs as much
as 300 lbs. DO NOT lift or
move the unit without using
proper safety procedures
or equipment. DO NOT turn
the Celesta Gemini™on its side
for any reason. To do so
could cause damage to the
base and will void the warran-
ty. There are no serviceable
items that require this action.
Never lift the table by grasp-
ing the table top as the
table top is not designed to
hold the weight of the base
and you could damage the
table.
IMPORTANT

FOOT CONTROL REPLACEMENT INSTRUCTIONS
Replacement of the Foot Control may be necessary if the control does
not actuate the functions of raising or lowering the Celesta Gemini™.
Once the replacement unit has been received you are ready to replace
the inoperable foot control.
To Replace the Foot Control, follow these steps:
1. Obtain the new Foot Control. (see Parts List, pg. 25)
2. It is recommended that the table be raised to the highest height
level (use hand control) if possible, as you will need to drop the
control box out from beneath the cabinet. You will need about
14" of space to work easily.
3. After raising the table, disconnect the table’s power cord from
your power outlet before proceeding.
4. To access the control box to disconnect the foot control you must first
remove the control box mounting bracket from the underside of
the cabinet (head end) by unscrewing the four knobs that hold the
bracket in place. Brace the bottom of the control box with one hand
while loosening the knobs. Once the knobs are removed, rest the
control box carefully down on the floor. There is plenty of excess cord
stored inside the cabinet to allow the control box to sit on the floor.
19
TROUBLESHOOTING
• Foot Control Replacement Instructions
TROUBLESHOOTING
TROUBLESHOOTING
CAUTION
The table weighs as much
as 300 lbs. DO NOT lift or
move the unit without using
proper safety procedures
or equipment. DO NOT turn
the Celesta Gemini™on its side
for any reason. To do so
could cause damage to the
base and will void the warran-
ty. There are no serviceable
items that need this action.
Never lift the table by grasp-
ing the table top as the
table top is not designed to
hold the weight of the base
and you could damage the
table.
IMPORTANT
CAUTION
Before doing any work on the
unit, disconnect the power
cord from the power outlet.
• Foot Control
NOTE:
The new electronic
component will be
reinstalled in the same
manner as the old one.
When dissembling please
take note of the order,
installation method and
placement of plugs as
the new unit will be
reassembled in the
same way.
Be sure to read all
cautions, warnings
and instructions given
in the manual to prevent
injury to both operator
and client.
(back of
control box)
2
PRODUCT DESCRIPTION
• Celesta Gemini™
PRODUCT DESCRIPTION
PRODUCT
DESCRIPTION
Celesta Gemini™-
Model GMCTMP
Total Lifting Capacity:
625 lbs. Maximum Working Load
• Quiet height adjustments with the touch of a button
accommodates practitioners and estheticians of all sizes
• Electronically adjustable top, controlled by a
multifunctional hand control, allows you to
effortlessly change your clients position while
they relax on the table
• Ergonomically designed access top allows the seated
practitioner total ergonomic access to the client’s
head region, reducing strain and fatigue
• Four maintenance-free whisper quiet motors
power the electric lift feature
• Powered back rest and leg rest make adjustments
easy when a client is on the table
• Solid steel frame provides optimum strength.
• Fully enclosed cabinet base with doors that slide
all the way open for convenience and ease of access.

3
PRODUCT DESCRIPTION
• Celesta Gemini™
PRODUCT DESCRIPTION
Table Specs* :
• Height *: 25" - 37"
• Width: 31"
• Length: 72"
• Lift Capacity: 625 lbs Maximum Working Load
• Weight: 300 lbs.
• Top: Electronically Controlled
Easy Access Design Top
• Electronics: 1 Hand Control & 1 Foot Control
• Padding: Aero·Cel™System
• Upholstery: Ultratouch II or TerraTouch™
• Cabinetry: Wood/Maple
For electrical specs, see Specifications Chart, pg 24.
* measurements are determined from floor to top of seat pad using
standard padding; these measurements can be affected by natural
material variations in padding
** published weight may differ due to options chosen, natural
material variations and padding density
Celesta Gemini™-
Model GMCTMP Self Adjusting
Removable
Arm Rests (2)
Hand
Control (1)
Sliding Cabinet
doors (2 - access
both sides)
Upholstered
Top
Access
Design Top
Back Rest
Fully Enclosed
Cabinet Base
- Maple
Accessory
Outlets (2)
Foot Control (1)
Vertical
Electronic
Lift Columns (4)
Leg Rest
Seat
Adjustable
Interior
Cabinet
shelf; foot
end only (1)
PRODUCT
DESCRIPTION
IMPORTANT
7. Take the new hand control and thread the straight section of cord
closest to the plug into the slit of the plastic cord restraint. The
cords for both the hand control and the foot control will fit in to
this slit. Place the plastic cord restraint into the hole in the bottom
plate of the control box bracket and push it into place using
slight pressure until the cord restraint flange is flush against the
control box bracket.
8. Plug the new hand control into the control box bracket at the
same connection where the inoperable unit had been.
9. Carefully lift the control box, mounting bracket and excess cords
back up into the cabinet floor, being careful to keep all of the
excess cordage out of the way of the control box opening. Be sure
all cords are away from the screw area of the knob connections.
Line up the screw holes, hold the control box bracket base plate
in position and begin to fasten the knobs onto the 4 screws.
Hand tighten them until the bracket is secure.
10. Connect the power cord and test the new hand control.
Should you need assistance at any time, please call a Customer Service
Representative at 800-558-8850.
TROUBLESHOOTING
Be careful of slack in the
power cords as you put the
junction box back into the
cabinet.
18
TROUBLESHOOTING
• Hand Control Replacement Instructions
TROUBLESHOOTING
CAUTION
• Hand Control
(cont)

4
INSTALLATION
INSTALLATION
INSTALLATION
• Leveling Instructions
The Celesta Gemini™comes completely assembled and ready to use. Plug the
cord into a functioning outlet that is rated for the table.
Arrange the power cord and control cords so that they will not create a tripping
hazard. Place the controls in a safe location where they are convenient and
accessible. Keep the controls out of the way of all table mechanisms.
LEVELING INSTRUCTIONS:
If Table Will Not Sit Flat on the Floor:
The Celesta Gemini™is equipped with Leveler Feet that adjust to level
the table on uneven floors. To adjust the Leveler Feet to suit common
floor differences you will need to use a 1
/2" open-end wrench or an
adjustable wrench. Adjust each leg individually in turn by adjusting the
height of each leveler foot until the unit rests level and steady. This
adjustment will not effect the function of the table.
1/2" Open-end Wrench
Leveler Foot
CAUTION
The table weighs as much
as 300 lbs. DO NOT lift or
move the unit without using
proper safely procedures
or equipment. DO NOT turn
the Celesta Gemini™ on its side
for any reason. To do so
could cause damage to the
base and will void the warran-
ty. There are no serviceable
items that require this action.
Never lift the table by grasp-
ing the table top as the
table top is not designed to
hold the weight of the base
and you could damage the
table.
IMPORTANT
• Leveling Feet
When operating the
Celesta Gemini™ controls be
sure to observe all cautions
and warnings given in the
manual to prevent injury to
both operator and client.
4. To access the control box to disconnect the hand control you must first
remove the control box mounting bracket from the underside of
the cabinet (head end) by unscrewing the four knobs that hold the
bracket in place. Brace the bottom of the control box with one hand
while loosening the knobs. Once the knobs are removed, rest the
control box carefully down on the floor. There is plenty of excess cord
stored inside the cabinet to allow the control box to sit on the floor
and to rotate the mounting plate to face you.
5. Follow the coil cord for the hand control back to the place
where it connects to the control box. Press down on the cord
connector tab and unplug the hand control.
6. Pull on the hand control’s coil cord enough to enable you to
reach the plastic cord restraint that holds the cords in place (the
black foot control cord enters the control box here as well).
Remove the plastic cord restraint by just applying a little pressure
to one side. Slide the hand control cord out of the slit in the restraint.
Discard the inoperable control.
17
TROUBLESHOOTING
• Hand Control Replacement Instructions
TROUBLESHOOTING
TROUBLESHOOTING
• Hand Control
(cont)
(back of
control box)

16
TROUBLESHOOTING
• If Celesta Gemini™ will not Change Height or Position
• Hand Control Replacement
TROUBLESHOOTING
IF THE CELESTA GEMINI™WILL NOT CHANGE HEIGHT OR POSITION:
• Check the outlet to be sure that it has power and that the power
cable is plugged in. Try each Foot Control and Hand Control to
see if any work. If any work, then possibly there is a loose connection
or a faulty controller.
• Unplug the power cable from the wall outlet.
• Make sure that all male and female connectors are firmly
pushed into each other. Even a slight misconnection can
cause a possible malfunction.
• Plug the unit back into the wall and check the controls
again. If one or more of the controls still do not work,
contact Customer Service at 800-558-8850 to arrange
replacement. After receiving replacement for the needed
control then proceed to the section describing the replacement
of the inoperative control.
HAND CONTROL REPLACEMENT INSTRUCTIONS
Replacement of the Hand Control may be necessary if the Hand
Control does not actuate the functions of height adjustment or
table top positioning.
To Replace the Hand Control, follow these steps:
1. Obtain the new Hand Control. (see Parts List, pg. 27)
2. It is recommended that the table be raised to a high height level
(use foot control) if possible, as you will need to drop the
control box out from beneath the cabinet. You will need about
14" of space to work easily.
3. After raising the table, disconnect the table’s power cord from
your power outlet before proceeding.
TROUBLESHOOTING
CAUTION
The table weighs as much
as 300 lbs. DO NOT lift or
move the unit without using
proper safety procedures
or equipment. DO NOT turn
the Celesta Gemini™on its side
for any reason. To do so
could cause damage to the
base and will void the warran-
ty. There are no serviceable
items that require this action.
Never lift the table by grasp-
ing the table top as the
table top is not designed to
hold the weight of the base
and you could damage the
table.
IMPORTANT
NOTE:
The new electronic
component will be
reinstalled in the same
manner as the old one.
When dissembling please
take note of the order,
installation method and
placement of plugs as
the new unit will be
reassembled in the
same way.
CAUTION
Before doing any work on the
unit,disconnect the power
cord from the power outlet.
Be sure to read all
cautions, warnings
and instructions given
in the manual to prevent
injury to both operator
and client.
• Controls
ADJUSTING HEIGHT OF THE TABLE:
The OAKWORKS®Celesta Gemini™comes complete with a multifunctional
hand control that operates the height, backrest and leg rest positioning
functions as well as a foot control that operates the height with
electronic ease. These controls should not be used simultaneously
but individually to ensure safety and complete ease of use.
Foot Controls:
Operate the foot control as shown below to raise or lower the height
of the Celesta Gemini™. The foot control allows the therapist to adjust
the height function separately from the other functions found on the hand-
control whenever needed. When operating the table’s controls, be sure to
observe all cautions and warnings as given in the manual.
Hand Control: 10 positioning Buttons
The Hand Control on the Celesta Gemini™operates all the positioning and tilt
functions available at the touch of a button. The top 4 buttons operate
the customizable positioning of the backrest, seat and leg rest of the
top while the next 2 buttons operate the height of the table. The lower
4 buttons activate the pre-set positions of the Access Design flex top.
Follow the directions on the next two pages to access these functions.
5
DIRECTIONS FOR USE
• Adjusting Height and Tilt Angle
of the Celesta Gemini™using the Foot Control
DIRECTIONS FOR USE
Foot Control (1):
(used only to change height of table)
UP DOWN
Celesta Gemini™
When operating the
Celesta Gemini™ controls be
sure to observe all cautions
and warnings given in the
manual to prevent injury to
both operator and client.
CAUTIONS
When operating the
Celesta Gemini™controls and
making any and all adjustments
to the table, move hands, feet
and controls away from any
working mechanisms of the
table.
Children must be supervised
when around this equipment by
a responsible adult. Do not
leave children alone or allow
them to operate the controls.
Do not allow children to crawl
into the cabinet or under the
table.
DIRECTIONS FOR USE
• Foot Control
CAUTION
DO NOT use the hand
control and the foot control
simultaneously as this can
cause damage to one or
both units.
IMPORTANT

6
DIRECTIONS FOR USE
• Adjusting Height and Top Positions
of the Celesta Gemini™using the Hand Control
DIRECTIONS FOR USE
Celesta Gemini™HAND CONTROL OPERATIONS • Celesta Gemini™
Back Rest
Control:
- activates
backrest
up to 64Þ
Back Rest
Control:
- activates
backrest down
to level position
12
Leg Rest UP Control:
- elevates leg rest
up to 24Þ
Leg Rest DOWN
Control:
- lowers leg rest
to level position
CAUTIONS
Do not sit on the elevated
Back Rest or Leg Rest.
Press and hold the appropriate button until the position desired is
achieved and then release. When accessing controls 3 & 4, the leg
position will move in tandem with the thigh section and maintain the
angle of original setting. The arm rests will adjust automatically to
provide the most in comfort and ergonomics while staying parallel
to the floor, no matter what the position.
34
• Hand Control
DIRECTIONS FOR USE
Children must be supervised
when around this equipment
by a responsible adult. Do not
leave children alone or allow
them to operate the controls.
Do not allow children to crawl
into the cabinet or under the
table.
CAUTION
DO NOT use the hand
control and the foot control
simultaneously as this can
cause damage to one or
both units.
When operating the
Celesta Gemini™ controls be
sure to observe all cautions
and warnings given in the
manual to prevent injury to
both operator and client.
IMPORTANT
• Moving the
Celesta Gemini™
15
DIRECTIONS FOR USE
• Accessory Option: Table Extender
• Moving the Celesta Gemini™
ACCESSORY OPTIONS
The optional stationary Table Extender provides ultimate comfort for
your tallest clients, quickly and easily. The Table Extender comes with
two connecting arms that slide into the outlets at the foot end of the
tabletop. Slide these fully into the outlets so the Table Extender is flush
to the end of the table top. This Stationary Extender provides 11" of
additional comfort and support when needed.
The Celesta Gemini™weighs approximately 300 lbs. You will need 4 people
working together if it is necessary to move the table. Never lift the table by
grasping the table top as the table top is not designed to hold the weight
of the base and you could damage the table and the electronics that run
the tabletop.
If you need to move the table, place one person at each corner of the
table. We recommend that you have the table top in Position 8 (with
Arm Rests removed) to have the table top ends out of the way as much
a possible. Have each person firmly grasp the cabinet base at the bottom
by the table legs and lift the table from the base. As when moving any
piece of heavy equipment, bend at the knee and lift with your legs
beneath you and not with your back. Be aware and use proper, safe
procedures for moving a table of this size to prevent injury to yourself
or the table. We strongly recommend that a flatbed dolly be used that
can hold the entire table if moving the table involves any distance.
• Accessory Option:
Table Extender
CAUTION
Before moving the Celesta
Gemini™, disconnect the power
cord from the power outlet
and secure the electrical
cord, hand control and foot
controls for moving.
DIRECTIONS FOR USE
Be sure to read all
cautions, warnings
and instructions given
in the manual to prevent
injury to both operator
and client.
CAUTION
The table weighs as much
as 300 lbs. DO NOT lift or
move the unit without using
proper safety procedures
or equipment. DO NOT turn
the Celesta Gemini™on its side
for any reason. To do so
could cause damage to the
base and will void the warran-
ty. There are no serviceable
items that require this action.
Never lift the table by grasp-
ing the table top as the
table top is not designed to
hold the weight of the base
and you could damage the
table.
Outlets
Moving the Celesta Gemini™:
Position 8 at low height range
Grasp
at base
corner
CAUTION
Do not put excessive weight
or pressure on the extender.
Excessive pressure can cause
premature failure of the Table
Extender.

When operating the
Celesta Gemini™controls and
making any and all adjust-
ments to the table, move
hands and feet away from
the working mechanism of
the table.
Height Control:
- raises table height
Height Control:
- lowers table height
Press and hold the appropriate button until the position desired is
achieved and then release. When accessing controls 3 & 4, the leg
position will move in tandem with the thigh section and maintain the
angle of original setting. The arm rests will adjust automatically to
provide the most in comfort and ergonomics while staying parallel
to the floor, no matter what the position.
56
7
DIRECTIONS FOR USE
• Adjusting Height and Top Positions
of the Celesta Gemini™ using the Hand Control
DIRECTIONS FOR USE
HAND CONTROL OPERATIONS • Celesta Gemini™
Celesta Gemini™
Do not leave clients
unattended when table
is set to its highest level.
• Hand Control
DIRECTIONS FOR USE
CAUTION
Attaching the QuickLock™Face Rest / Foot End Outlets:
When attaching the QuickLock™Face Rest to the foot end by using the
provided outlets, just slide the frame dowels into the outlets being sure to
keep the 1st cam lock within 3" of the table to ensure a stable connection.
To remove the QuickLock™Face Rest, just pull the frame from the outlet
until it comes free. Set it safely aside or store it inside the under-table
cabinet until needed.
Tips for Great Positioning using the QuickLock™Face Rest:
• To use the face rest with your clients supine, rotate the face rest
pad so that the thick part of the pad supports your client’s cervical
region. Adjusting the height and angle of the face rest gives your
clients perfectly comfortable support.
• The face pad is flexible so that you can bring the open ends together
or spread them apart to achieve the most comfortable support for
any size face. To avoid your client's chin from hitting the spacebar,
make sure the pad is narrow enough to support their whole face.
• For appropriate cervical flexion, use the cam locks to adjust the
downward angle of the face rest, making sure that the surface of
the face rest pad at the chin is not lower than the surface of the table.
14
DIRECTIONS FOR USE
• QuickLock™ Face Rest
DIRECTIONS FOR USE
• Accessory Option:
QuickLock™
Face Rest (cont.)
* U.S. Patent #5,177,823
CAUTION
Do not put excessive weight
or pressure on the face rest.
Excessive pressure can cause
premature failure of the
QuickLock™Face Rest
DIRECTIONS FOR USE

Pre-set
Positions
HAND CONTROL OPERATIONS • Celesta Gemini™
Position 5:
- full horizontal position
Position 6:
- Reclined with leg rest
at low incline
Position 8:
- upright position with leg
rest at mid-incline
Position 7:
- slight recline
with leg rest
at low incline
56
78
Celesta Gemini™
Do not leave clients
unattended when table
is set at its highest level.
Close supervision is necessary
when this unit is used by or
near, children, invalids or
disabled persons.
Press and hold the appropriate button until the position desired is
achieved and then release. The arm rests will adjust automatically to
provide the most in comfort and ergonomics while staying parallel
to the floor, no matter what the position.
• Hand Control
CAUTION
When operating the
Celesta Gemini™controls and
making any and all adjust-
ments to the table, move
hands and feet away from
the working mechanism of
the table.
Children must always be
supervised when around this
equipment by a responsible
adult. Do not leave children
alone or allow them to operate
the controls. Do not allow
children to crawl into the
cabinet or under the table.
CAUTION
DO NOT use the hand
control and the foot control
simultaneously as this can
cause damage to one or
both units.
8
DIRECTIONS FOR USE
• Adjusting Height and Top Positions
of the Celesta Gemini™ using the Hand Control
DIRECTIONS FOR USE
IMPORTANT
13
DIRECTIONS FOR USE
• QuickLock™Face Rest
DIRECTIONS FOR USE
Double articulating action provides nearly limitless positioning options
with the QuickLock™Face Rest.The adjustable pad takes pressure off
sensitive facial areas while providing superb support. The QuickLock™
Face Rest can be used in both prone and supine positioning and folds
out of the way when not in use. Adjustments are made easily by loosening
the cam locks, adjusting for height and angle and then locking the cam
locks into that position. The Celesta Gemini™has webbing loops at the
head of the table for a variety of uses and outlets at the other end that
work as well for additional procedures.
Attaching the QuickLock™Face Rest / Head End Webbing:
When attaching the QuickLock™Face Rest, just slide the frame dowels
into the webbing loops, being sure to keep the 1st cam lock within 3" of the
table to ensure a stable connection. The recommended length of dowel
bracing against the backrest should be at least 2 inches.
To remove the QuickLock™Face Rest, just pull the frame from the webbing
loops until it comes free. Set it safely aside or store it inside the under-
table cabinet until needed.
Do Not extend the dowels of
the Face Rest further than 3"
from the table edge to ensure
a stable connection.
* U.S. Patent #5,177,823
CAUTION
CAUTION
Do not put excessive weight
or pressure on the face rest.
Excessive pressure can cause
premature failure of the
QuickLock™Face Rest.
QuickLock™Face Rest Important Safety Note: Maximum
Distance from edge of table = 3"
3"
2"
Be sure to read all
cautions, warnings
and instructions given
in the manual to prevent
injury to both operator
and client.
QuickLock™FACE REST:
• Accessory Option:
QuickLock™
Face Rest
DIRECTIONS FOR USE
IMPORTANT
IMPORTANT

12
DIRECTIONS FOR USE
• Use & Adjustment of the Celesta Gemini™Arm Rests
DIRECTIONS FOR USE
DIRECTIONS FOR USE
To remove one or both arm rests just take hold of the base of the arm
rest at the metal frame and somewhere on the cushion. Holding secure-
ly, rotate the arm rest while at the same time pulling slightly away
from the table. You will feel the notched connection slide out as you
rotate the arm rest. When you feel this you can then slide the entire arm
rest out of the connection hole very easily. Store it safely inside the
under-table cabinet until ready for installation.
Re-attach the armrest by sliding the arm rest frame into the hole on the
tabletop and rotating the it until you feel the notch slip into place. Push
it in securely and allow the arm rest to rest in the parallel position. This
resets the arm rest in the proper position for the automatic adjustment
feature to be activated.
Removing the Side Arm Rests
Do not place excess weight
on the Side Arm Rests. DO
NOT use them in assisting
the client on and off the
Celesta Gemini™.
Either arm rest can be
repositioned to allow a
client to get on and off the
Celesta Gemini™.™easily.
When making adjustments
to the arm rests make
certain that the client’s
arms are away from the
working mechanism.
CAUTION
Do not sit on the Arm Rests.
SIDE ARM RESTS: (CONT.)
• Side Arm Rests
(cont.)
IMPORTANT
9
DIRECTIONS FOR USE
• Important Safety Note/ Celesta Gemini™
• Celesta Gemini™Under-Table Cabinet
DIRECTIONS FOR USE
The cabinet hood area under the backrest top is not designed for storage
or as an area to hold accessories while with a client. DO NOT use this
area for holding anything. Damage can occur to the table, especially
when the pre-set position commands that are accessed by the hand control
are activated. Placing anything on this area is prohibiting movement of the
backrest and can cause damage to the table or the object. Using this area as
storage will void the warranty.
DIRECTIONS FOR USE
CAUTION
DO NOT store or place
anything on the cabinet hood
under the backrest as this can
cause damage to the top
and/or hood.
IMPORTANT
IMPORTANT SAFETY NOTE • Celesta Gemini™
UNDER-TABLE CABINET
• Under-Table
Cabinet
To Access the Storage in the Under Table Cabinet:
The Celesta Gemini™has a fully integrated beautiful wood cabinet and
base. The large under-table cabinet provides storage for stacks of
towels and other equipment without interfering with the lift capacity
of the table. The doors slide all the way open with ease - no need to
fight with double sided doors!
The doors on the under-table cabinet are made of Maple wood and are
placed in a slide track for ease of movement. The doors, 2 on either side
CAUTION
Use care when opening
the doors all the way so
that you do not pinch or
injure your fingers.
Children must always be
supervised when around this
equipment by a responsible
adult. Do not leave children
alone or allow them to operate
the controls. Do not allow
children to crawl into the
cabinet or under the table.
NOT FOR STORAGE!
If you have purchased the optional manicure arm rest please follow the
standard installation and removal instructions above.
OPTIONAL MANICURE ARM RESTS:
A. hand soak bowl installation
B. hand soak bowl removal
C. Manicure surface installation
AB C

To Access the Storage in the Under Table Cabinet: (cont)
of the table, slide independently along this track with slight pressure on
the handles found in the center of each door. They will open until they
are completely inside the cabinet; stopping when the handle meets the
handle recess in side of the cabinet.
Inside the the foot end of the cabinet, is an adjustable/removable shelf
to provide room for organized storage. By moving the shelf pegs in the
side of the cabinet wall you can adjust the height and placement of the
shelf. It has three placement levels to accommodate your storage needs.
The Celesta Gemini™offers an in-cabinet plug to accommodate hot towel
cabinets. This allows you to store the unit inside with no excess cords to
get in the way. With it plugged in, your towels stay warm and within easy
reach, yet are still out of the way. You will find the plug inside the cabinet
at the head end of the Celesta Gemini™. Simply plug the warming cabinet
in and move any excess cord inside the wooden cabinet.
10
DIRECTIONS FOR USE
• Celesta Gemini™ Under-Table Cabinet
DIRECTIONS FOR USE
UNDER-TABLE CABINET
DIRECTIONS FOR USE
• Under-Table
Cabinet (cont)
DANGER
This product is equipped
with an interior 120-volt 60Hz
accessory outlet. Disconnect
all power cords from the
interior power outlet (found
within the cabinet) after use.
The total electrical load of
equipment plugged into this
set of outlets is not to exceed
7 amps (840 watts).
Note: Appearance of outlets
will vary depending on
country of use.
CAUTION
Use care when opening the
doors all the way so that you
do not pinch or injure your
fingers.
Children must always be
supervised when around this
equipment by a responsible
adult. Do not leave children
alone or allow them to operate
the controls. Do not allow
children to crawl into the
cabinet or under the table.
Keep controls out of reach of
children.
Track
Though the arm rests adjust automatically to remain parallel to the
floor in any position, there will still be times when you will need to
move an arm rest out of the way or remove them altogether. We
recommend that you raise the arm rest out of the way to allow a client to
get on or off the table. They are designed to be strong and will take a
reasonable amount of weight but they are not designed to be used to
sustain a person’s weight when getting on or off the table.
To Adjust the Arm Rest:
Before asking a client to mount or dismount from the table we recommend
that you move the arm rest out of the way. The arm rests are easy to move
and manually adjust. First position the tabletop with the backrest in the
upright position and all other section flat. Take hold of the arm rest
firmly and raise the arm rest up and out of the way with a steady swing
until the arm rest is in the highest upright position (see images below).
Hold it in place until your client has mounted (or dismounted)and then
actively move it back into the resting position where it will proceed to
move automatically with the table top.
The arm rest is now set and will adjust automatically as you position the
client for whatever procedure is needed.
There will be times when removal of the arm rests will be needed. This
feature is helpful when doing massage or helping someone get on or off
the Celesta Gemini™. This can be done easily and storage is conveniently
located in the under-table cabinet. They are then right at hand when you
are ready to re-install.
To Remove the Arm Rest:
The arm rest frame has a notched connection to the interior of the the
table top which allows it to move automatically when the table top
changes position. (cont. on next page)
11
DIRECTIONS FOR USE
• Use & Adjustment of the Celesta Gemini™ Arm Rests
DIRECTIONS FOR USE
DIRECTIONS FOR USE
Do not place excess
weight on the Side Arm
Rests. Do not use them in
assisting the client on and
off the Celesta Gemini™.
Either Arm Rest can be
repositioned to allow a
client to get on and off
the Celesta Gemini™easily.
When making adjustments
the arm rests make certain
that the client’s arms are
away from the working
mechanism.
CAUTION
Do not sit on the Arm Rests.
SIDE ARMRESTS:
Be sure to read all
cautions, warnings
and instructions given
in the manual to prevent
injury to both operator
and client.
• Side Arm Rests
Adjusting the Side Arm Rest
IMPORTANT
Table of contents
Popular Hot Tub manuals by other brands

Penner Manufacturing
Penner Manufacturing PACIFIC Safe Operation & Daily Maintenance Instructions

Jacuzzi
Jacuzzi The Essentials manual

Dimension One Spas
Dimension One Spas Venture Specifications

Schmidlin
Schmidlin AQUA SILENT Instructions for use

Dimension One Spas
Dimension One Spas 1998 owner's manual

Bestway
Bestway Lay-Z-Spa Series manual