Oasis Aquatics Oasis SE Series User manual


SE SERIES SINGLE-ELEMENT CARTRIDGE FILTER INSTALLATION AND OPERATION MANUAL Page 1of 19
FOR QUICK REFERENCE, RECORDS YOUR DETAILS HERE.
Model No:
Serial No:
Purchase Date:
Installer:
Warranty Registered Online:
Yes / No
See page 15 for details
PRESSURE GAUGE READING RECORD
Initial Reading
Date
PSI
kPa
Date
PSI
kPa
Date
PSI
kPa
Date
PSI
kPa
Date
PSI
kPa
Date
PSI
kPa
Date
PSI
kPa
Date
PSI
kPa
Date
PSI
kPa
Date
PSI
kPa
Date
PSI
kPa
Date
PSI
kPa
Date
PSI
kPa
Date
PSI
kPa
Date
PSI
kPa
Date
PSI
kPa
Date
PSI
kPa
Date
PSI
kPa

SE SERIES SINGLE-ELEMENT CARTRIDGE FILTER INSTALLATION AND OPERATION MANUAL Page 2of 19
TABLE OF CONTENTS
1. IMPORTANT WARNINGS & SAFETY INSTRUCTIONS.............................................................. 3
2. GENERAL OVERVIEW................................................................................................................ 5
3. HOW IT WORKS.......................................................................................................................... 6
4. INSTALLATION............................................................................................................................ 6
5. STARTING THE PUMP AND FILTER SYSTEM........................................................................... 7
BEFORE STARTING THE PUMP............................................................................................ 7
STARTING PUMP................................................................................................................... 8
OPERATION ........................................................................................................................... 8
6. MAINTAINING YOUR FILTER..................................................................................................... 9
FILTER DISASSEMBLY INSTRUCTIONS............................................................................... 9
REMOVING CARTRIDGE....................................................................................................... 9
CLEANING CARTRIDGE ........................................................................................................ 9
FILTER REASSEMBLY INSTRUCTIONS................................................................................ 9
RESTARTING FILTER PUMP............................................................................................... 10
7. WINTERISING........................................................................................................................... 10
8. TROUBLESHOOTING............................................................................................................... 11
9. PRO-ACTIVE MAINTENANCE .................................................................................................. 12
10. SPECIFICATIONS & DIMENSIONS...................................................................................... 12
11. REPLACEMENT PARTS OF FILTER..................................................................................... 13
12. WARRANTY........................................................................................................................... 14
13. TECHNICAL SUPPORT......................................................................................................... 15
14. WARRANTY REGISTRATION ............................................................................................... 15
15. NOTES................................................................................................................................... 16

SE SERIES SINGLE-ELEMENT CARTRIDGE FILTER INSTALLATION AND OPERATION MANUAL Page 3of 19
1. IMPORTANT WARNINGS & SAFETY INSTRUCTIONS
THESE OPERATING INSTRUCTIONS CONTAIN IMPORTANT INFORMATION ON THE
SAFE, PROPER, AND ECONOMICAL OPERATION OF THIS SWIMMING POOL
APPLIANCE. STRICT OBSERVATION OF THE OPERATING INSTRUCTIONS WILL
HELP TO AVOID DANGERS, REDUCE REPAIR COSTS, AND INCREASE THE
RELIABILITY AND WORKING LIFE OF THE PRODUCT.
Failure to follow the instructions in this manual may result in serious adverse health effects or even serious
or fatal injury. Failure to follow the instructions in this manual will in all cases invalidate all guarantees and
liability on the part of the manufacturer.
Consumer Information and Safety
These Cartridge Filters are designed and manufactured to provide years of safe and reliable operation.
They must be installed, operated and maintained in accordance with the information in this manual along
with any relevant local installation codes.
THIS FILTER OPERATES UNDER HIGH PRESSURE
When any part of the pool filtration system, is serviced, air
can enter the system and become pressurised. Pressurised
air can cause the Cartridge Filter top assembly to separate,
Resulting in severe injury, death, or property damage.
To avoid this potential hazard, follow these instructions:
1. If you are not familiar with your pool filtration system:
a. Do NOT attempt to adjust or service without consulting your dealer, or a qualified pool
technician.
b. Read the entire Installation & Operation Manual before attempting to use, service, or adjust
the pool filtration system.
2. Before repositioning valve(s) and before beginning theassembly, disassembly, or any other service
of the filtration system:
a. Switch off all pumps and electrical power in pool equipment to ensure the system is NOT
inadvertently started during the servicing.
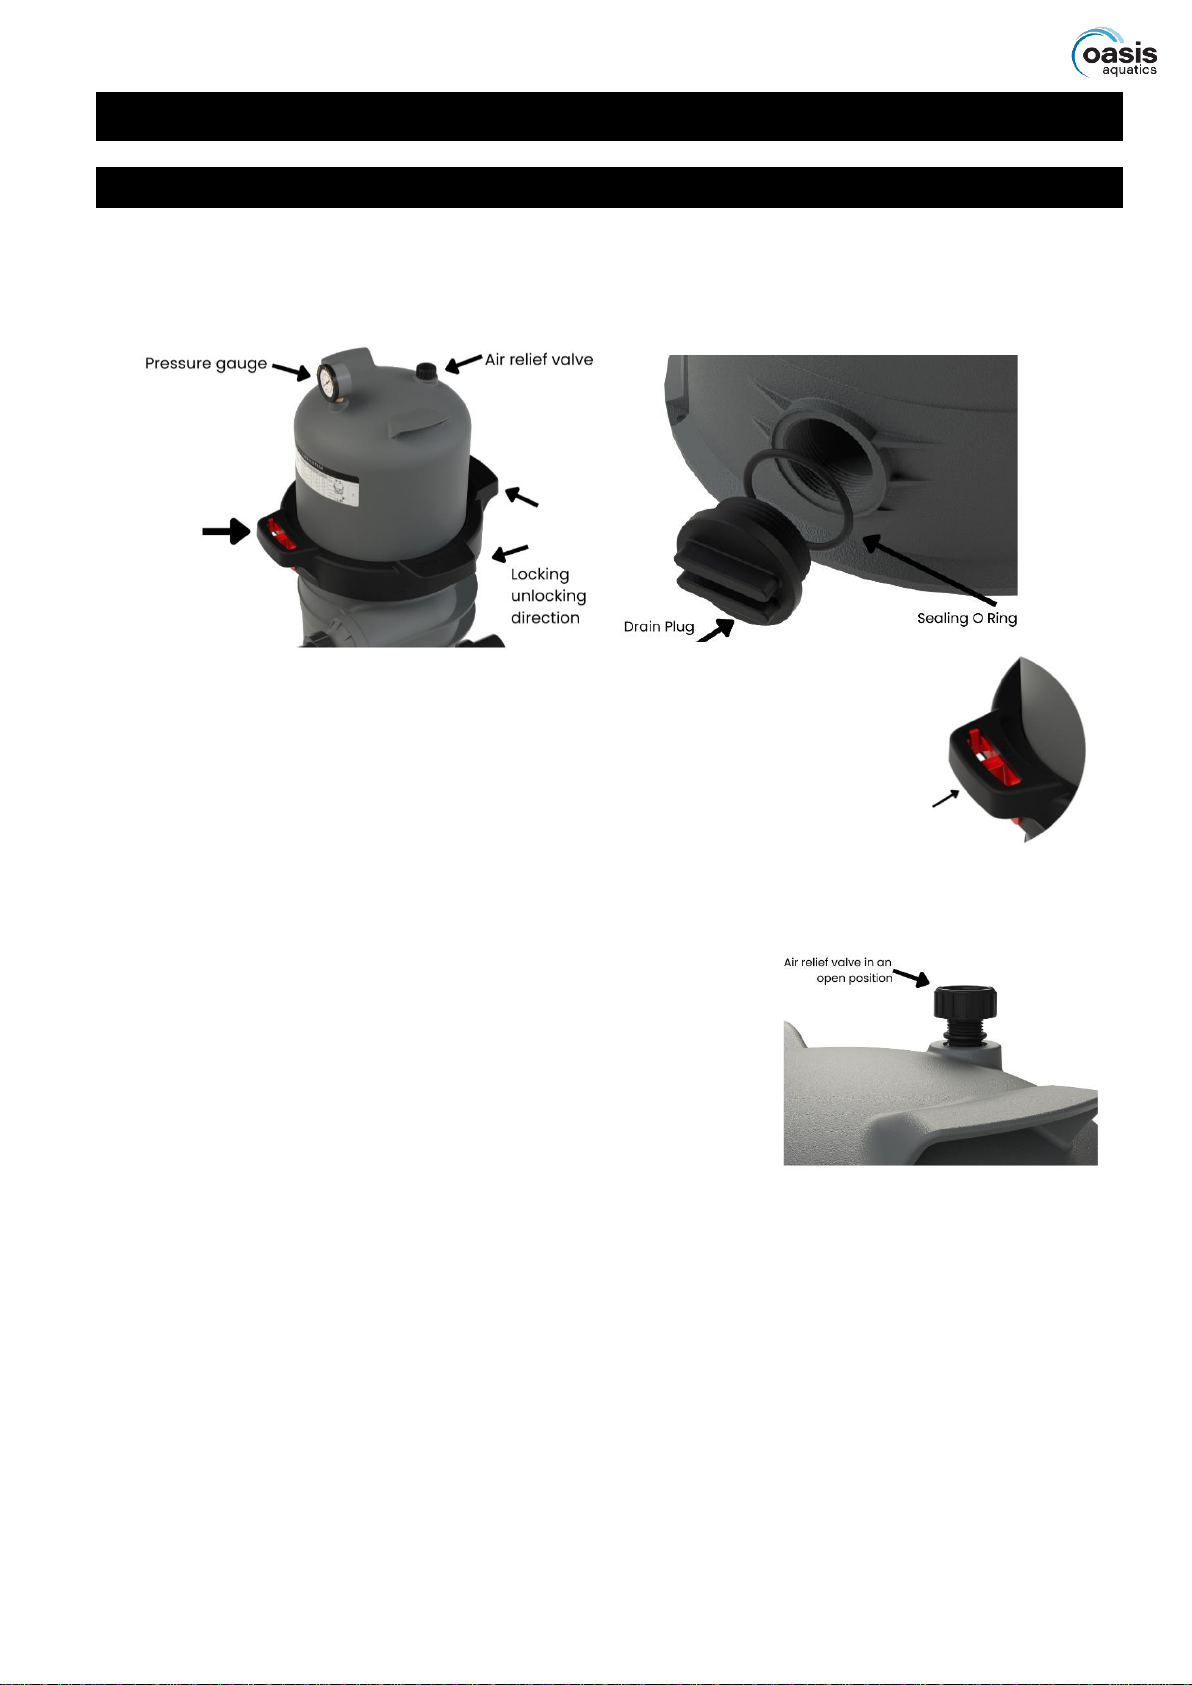
b. Loosen air relief valve on top of the filter by approximately one and a half turns.
c. Wait until all pressure is relieved.
3. Whenever installing or reassembling the filter assembly, always follow the instructions and
warnings outlined in this manual exactly.
4. Once service of the filtration system is complete follow initial start-up instructions exactly.
5. Ensure that your filtration system is maintained properly. Replace any worn or damaged parts
immediately.
6. Be sure that the filter is properly mounted and positioned according with the instructions provided.
This filter must be installed by a licensed or certified service person
in accordance with any relevant local installation codes.
Improper installation could result in death or serious injury to pool
users, installers, or others and may also cause damage to property.
Always switch off all pumps and electrical power in pool equipment area before servicing the filter. Ensure
that the disconnected circuit is locked out or properly tagged so that it cannot be switched on while you
are working on the filter. Failure to do so could result in serious injury or death to a serviceman, pool user,
or others due to electric shock.

SE SERIES SINGLE-ELEMENT CARTRIDGE FILTER INSTALLATION AND OPERATION MANUAL Page 4of 19
READ UNDERSTAND AND FOLLOW ALL SAFETY AND
OPERATION:
Do not operate the filter until you have read and clearly
understand all the operating instructions and warnings for you
pool filtration system equipment.
The following instructions are intended as a guide for the initial
operation and ongoing maintenance of the filter in a general
pool installation.
Failure to follow all operating instructions and warnings can
result in property damage or severe personal injury or death.
To reduce the risk of injury, do not permit children to use this
product
ELECTROCUTION HAZARD
Direct water discharge from air relief valve away from electrical
equipment. Do not locate electrical equipment over or near
filter.
Due to the potential risk that can be involved, it is
recommended that any pressure tests are kept to the minimum
time required by the relevant local codes. Do not allow people
to work around the filtration system while pressure testing is
occurring. Post appropriate warning signs and establish a
barrier around the pressurised equipment. If the equipment is
located in an equipment room, lock the door and post a
warning sign.
Never attempt to adjust any closures or lids or attempt to
remove or tighten bolts when the system is pressurised .
These actions can cause the closure to separate and could
cause severe personal injury or death if they were to strike a
person.
Never exceed the maximum operating pressure of system
components. Exceeding these limits could result in a
component failing under pressure. This instantaneous release
of energy can cause the closure to separate and could cause
severe personal injury or death if they were to strike a person.

SE SERIES SINGLE-ELEMENT CARTRIDGE FILTER INSTALLATION AND OPERATION MANUAL Page 5of 19
2. GENERAL OVERVIEW
Congratulations on your recent purchase of your Oasis Aquatics SE Single Element Cartridge Filter.
Please take a moment to read through the entire manual before installing your new unit.
While every effort has been made to ensure that the information contained in this manual is accurate and
complete, no liability can be accepted for any errors or omissions.
Oasis Aquatics reserves the right to change the specification of the hardware and software described
herein at any time without prior notice.
There are 3 different size models in our range:
SE100
SE150
SE200
It is important that you read through the manual to identify the key areas you need to understand,
particularly the following:
•Health and Safety Concerns
•Installation requirements
•How to operate the major features of the unit
•The importance of maintenance
•If you have a problem, what you can do to trouble shoot before you contact your pool professional
•Your entitlements under the product warranty.
Oasis Aquatics have developed their product line to provide you with the ultimate experience and are
sure you will be delighted with your purchase.
Please note: This manual has been designed to cater for installation rules and codes in Australia.
Specific rules and regulations for other countries may differ. Please speak with your installer should you
have any questions.
Your filter is a high-performance unit designed with superior flow characteristics and ease of operation in
mind.
Oasis Aquatics highly recommends the use of qualified service technicians to ensure that your pool
remains healthy and balance all year round.
Thank you again for choosing an
Oasis Aquatics SE Series Single-Element Cartridge Filter .

SE SERIES SINGLE-ELEMENT CARTRIDGE FILTER INSTALLATION AND OPERATION MANUAL Page 6of 19
3. HOW IT WORKS
Oasis Aquatics SE Series Filters utilise multiple reusable, reinforced polyester filter cartridge elements
to provide a high degree of water clarity and long filter cycles with minimum care.
With maximum flow ratings between 380 and 455 litres per minute (LPM), they are designed for continuous
or intermittent operation, when installed both above or below the pool waterline.
Oasis Aquatics SE Series Filters are compatible with freshwater, saltwater and mineral pools and spas.
4. INSTALLATION
The filter should be installed as close to the pool as possible while keeping a minimum distance of 1.5m
away from the waters edge. Locate the filter on clean, rigid and level surface, preferably in a dry, shaded,
and well-ventilated area.
Prior to installation take into consideration the following conditions:
•Position of suction and return PVC connections
•Access for cleaning operation and servicing, particularly important if installing under a deck or roof
structure that enough space is provided to remove the element for cleaning
•The operation of the air relief which discharges water from the filter, you must position the filter in
a way which witch prevents this water from reaching any electrical equipment which would present
a risk of electric shock or electrocution.
•Protection from sun, rain, splashing etc
•Drainage of mounting area, ensuring that it does not flood when it rains, or when the filter is
serviced.
•Ventilation and protection of the full filtration system from any chemical fumes or spills.
1. Place the complete filter assembly in position.
a. Position filter body such that all operation and safety labels are visible.
b. Ensure that the mounting position is level and stable.
2. Do not locate electrical equipment over or near filter.
3. Ensure that water discharge from the air relief valve will not reach any electrical equipment when
the filter is bled.
4. Make sure that there is ample room above and around the filter to allow clear access for regular
maintenance activities.
5. Connect the pool suction PVC pipe plumbing between the skimmer, the pool outlet (from the pool),
and the pump.
6. Install the plumbing from the filter to the pool (return to the pool)
REQUIRED CLEARANCE
Model
A
B
C
cm
cm
cm
SE100
82.7
47
30
SE150
91.2
47
30
SE200
103.4
47
30

SE SERIES SINGLE-ELEMENT CARTRIDGE FILTER INSTALLATION AND OPERATION MANUAL Page 7of 19
5. STARTING THE PUMP AND FILTER SYSTEM
BEFORE STARTING THE PUMP
1. Ensure that all unions, clamps, fasteners, lids and other accessories are properly fitted, and that
any glued fittings have had ample time to cure.
2. Ensure that the pressure gauge, air relief valve and drain plug are installed. Note that each of
these contains a sealing o-ring.
3. Loosen and retighten the filter lock ring, ensuring that the latch clicks into
the locked position.
Depress the latch by hand for unlocking then turn the ring
4. Open all system valves to allow water from the pool to the filtration system and from the filter to
return to the pool.
5. Loosen air relief valve approximately one and a half turns.
(Do not remove the valve completely

SE SERIES SINGLE-ELEMENT CARTRIDGE FILTER INSTALLATION AND OPERATION MANUAL Page 8of 19
STARTING PUMP
Stand clear of pump during start-up
Pool and spa circulation systems operate under high
pressure. When any part of the pool filtration system is
serviced, air can enter the system and become pressurised.
Pressurised air can cause the cartridge filter top assembly to
separate, resulting in severe injury, death, or property
damage.
Upper body and lock ring must be secured to prevent violent separation.
1. Switch on filter pump. When pump starts, do not stand over or near filter.
NOTE: If water leakage appears at the main lock ring, immediately turn off all pumps,
electrical equipment and stand away from the filter until the water leak has stopped, before
inspecting further.
2. If closed, loosen air relief valve approximately oneand a half turns andwait for a constant stream
of water to exit. Gently close valve only enough to seat the seal (do not overtighten).
OPERATION
Filtration starts as soon as the flow is steady through the filter. As the filter removes particles from the
pool water, this accumulates in the filter element. The pressure inside the filter will gradually rise over
time, resulting in reduced water flow.
1. Record the initial starting pressure which is the initial pressure reading when a new filter element
is working under filtration conditions. This measurement
should be taken once all air is bled from the filtration system.
2. Each time the filter element is cleaned or replaced, the gauge
ring should be adjusted to align the needle with the “Start”
marking, once all air is bled from the system
3. Monitor the pressure over time and when the needle reaches
the “Clean Filter” mark, clean or replace the filter element as
per the instructions.
Installing a new filter element.
You should replace the filter cartridge element:
1. If after cleaning and installing the filter element, if the pressure is:
a. Reading 10 psi higher than the initial ‘start’ reading when the element was new, or
b. Is reading over 30 psi.
2. When the filter element is broken, or the layers are peeling.
3. When the pressure or flow rate is below the desired rate of the system.

SE SERIES SINGLE-ELEMENT CARTRIDGE FILTER INSTALLATION AND OPERATION MANUAL Page 9of 19
6. MAINTAINING YOUR FILTER
FILTER DISASSEMBLY INSTRUCTIONS
1. Switch off all pumps and electrical power in pool equipment area.
2. Set any pool system valves in a position that prevents water from flowing to the filter.
3. Loosen the air relief valve approximately one and a half turns.
4. Remove the filter drain plug to release all water from the filter.
5. Depress the latch and unscrew the lock ring counter clockwise.
6. Lift and remove upper filter body.
REMOVING CARTRIDGE
1. Remove the filter cartridge element by using a slight rocking motion and lifting.
2. Clean filter cartridge element.
CLEANING CARTRIDGE
The cartridge filter element can be washed inside and outside by a garden hose. After hosing the cartridge,
for best results, carefully brush the pleated surface to remove fine particles. Do not use high-pressure
water to wash as it can damage the filter element.
You may find some debris on the cartridge pleats, which cannot be removed with hosing. From time to
time, the filter element will require a deep clean using a purpose-specific cleaning solution that can be
purchased from most pool shops. Follow the instructions provided by the pool shop or solution
manufacturer to achieve the best result.
FILTER REASSEMBLY INSTRUCTIONS
RE-INSTALLING CARTRIDGE
1. Clean any debris from the lower filter body.
2. Reinstall the filter drain plug.
3. Install the cartridge element.
4. Clean and lubricate the upper body o-ring with
silicone-based grease.
5. Install the upper body and push down until o-ring
seats.
6. Install the lock ring by tightening clockwise until
the latch clicks into the locked position.
7. Reset any previously adjusted pool system
valves.
8. Switch on filter pump. When pump starts, do not
stand over or near filter.

SE SERIES SINGLE-ELEMENT CARTRIDGE FILTER INSTALLATION AND OPERATION MANUAL Page 10 of 19
RESTARTING FILTER PUMP
STARTING PUMP AFTER INSTALLATION OR CLEANING OF FILTER
1. Switch on filter pump. When pump starts, do not stand over or near filter.
NOTE: If water leakage appears at the main lock ring, immediately turn off all pumps, electrical
equipment and stand away from the filter until the water leak has stopped, before inspecting
further.
2. If closed, loosen air relief valve approximately one and a half turns and wait for a constant stream
of water to exit. Gently close valve only enough to seat the seal (do not overtighten).
7. WINTERISING
Is it important to protect your Oasis Aquatics Cartridge Filter from freezing water conditions in areas
where sub-freezing temperatures can be expected. As water freezes it expands and that can cause the
internals of the Cartridge Filter to break under the intense pressure of expanding water.
It is your responsibility to monitor temperatures and take the following actions:
In mild climate areas, when temporary freezing conditions may occur, run your pump and filtration
equipment all night to maintain water circulation and prevent freezing.
If freezing conditions are expected, take the following steps to shut down your filter system and reduce the
risk of freeze damage. Freeze damage is not covered under warranty.
1. Follow the steps in “FILTER DISASSEMBLE INSTRUCTIONS”to remove and clean the
cartridge.
2. Reinstall the cartridge in the filter.
3. Fully tighten the lock ring while storing.
4. Reassemble as per “FILTER REASSEMBLY INSTRUCTIONS”.
5. Be sure to leave the drain plug unattached during the winter season to avoid cracking the filter
body.
Winter is an ideal time for any repairs that may be required during the off-season. Most pool professionals
will recommend what is needed before the next pool season, so contact them for a thorough maintenance
plan.

SE SERIES SINGLE-ELEMENT CARTRIDGE FILTER INSTALLATION AND OPERATION MANUAL Page 11 of 19
8. TROUBLESHOOTING
If you suspect for any reason your Oasis Aquatics SE Series Single-Element Cartridge Filter
is not performing or running as it should be, here are some handy troubleshooting tips that may
assist you. This table should assist with the majority of problems
WHAT IS THE PROBLEM?
POTENTIAL CAUSE?
Low Water Flow
•Check skimmer and pump strainer baskets for debris.
•Check for restrictions in intake and discharge lines
•Check for air leak in intake line indicated by bubbles returning to
pool.
•Clean Filter Cartridges
Short Filter Cycles
•Check for algae in the pool and super-chlorinate as required.
•Be sure chlorine and pH levels are in a proper range (adjust as
required).
•Filter could be dirty, clean the elements as per instructions and
restart. Carry out a deep clean using a purpose-specific cleaning
solution (available from most pool shops)
Water Is Not Clear
•Check chlorine, pH, and total alkalinity levels and adjust as
required.
•Filter could be dirty, clean the elements as per instructions and
restart.
•Be sure the flow rate through the filter is sufficient.
•Operate filter for longer periods.
•Filter elements could be damaged, replace elements from your
local pool professionals.
Low Water Flow
•Check and clean pump strainer baskets.
•Filter could be dirty, clean the elements as per instructions and
restart. Carry out a deep clean using a purpose-specific cleaning
solution (available from most pool shops)
•Check for air leak in intake line indicated by bubbles returning to
pool.
•Check for leaks on all equipment, refit gaskets and seal.
•Check for restrictions in intake and discharge lines.
•Check Pool water level is high enough to cover the Skimmer and
allow water to be circulated.
Dirt Returns to Pool
•Check for damage to Element and replaces as necessary.
NOTE: If the recommendations in this manual do not solve your particular problem(s), please contact your
local pool shop or Oasis Aquatics dealer for service.

SE SERIES SINGLE-ELEMENT CARTRIDGE FILTER INSTALLATION AND OPERATION MANUAL Page 12 of 19
9. PRO-ACTIVE MAINTENANCE
Your new Oasis Aquatics Cartridge Filter has been designed to withstand harsh outdoor conditions and
withstand high velocity water with chemicals. Some of these parts will wear in the normal course of use
and require regular checks and maintenance. A well thought out pro-active maintenance schedule will
identify faults early and extend the lifespan of your Cartridge Filter.
A good tip for all outdoor Filtration Equipment includingyour Cartridge Filter is to ensurethat the equipment
area is protected from any insects and vermin with a regular treatment of Surface Spray or suitable
Insecticide. Most of the electronics in Pumps, Chlorinators or Heaters are well vented to protect against
extremes of temperature, however this creates a popular environment for ants and other insects who are
attracted to the warmer, dry environments inside the enclosures. We recommend that, with power turned
off to all equipment, you spray a surface insecticide on the surfaces surrounding the equipment to prevent
ant and insect ingress. Repeat every three months or as necessary to ensure no nasty surprises.
Like your motor vehicle it is important to maintain a regular service program for your pool equipment to
ensure the best operation and long lasting results.
Regular maintenancecan identify any potential issues early and save on expensive maintenance at a later
date
10. SPECIFICATIONS & DIMENSIONS
Model
Filtration
Area
Design
Flow
Height
Height
Diameter
Height
m2
LPM
A (cm)
B (cm)
C (cm)
D (cm)
SE100
9.29
380
53.0
23.0
46.40
8.20
SE150
13.94
455
53.0
31.5
46.40
8.20
SE200
18.58
455
53.0
43.8
46.40
8.20

SE SERIES SINGLE-ELEMENT CARTRIDGE FILTER INSTALLATION AND OPERATION MANUAL Page 13 of 19
11. REPLACEMENT PARTS OF FILTER
REPLACEMENT PARTS OF MULTIPORT VALVE
Item
Part No
Description
Qty
1
117068519
Pressure gauge 60psi, plastic casing
1
2
550188198
Upper Body ICF100
1
2
550188199
Upper Body ICF150
1
2
550188200
Upper Body ICF200
1
3
570818164
Nut D22X15
1
4
550058153
Lock Ring
1
5
550058196
Latch
1
6
11000036
O-ring D306Xd7.5
1
7
430178159
Union nut 2"
2
8
430308158
Union 2inch/2.5inch ANSI
2
8
430309780
Union 1.5inch/2inch
2
8
430309779
Union GB50
2
8
430309059
Union GB63
2
9
111040071
O-ring D77Xd62X8
2
10
E140401
ICF100-200 Bottom Body
1
11
E160553
End cap with O-ring
1
12
E010201
Air Relief Valve with O-ring
1
13
570818165
Nut D31X20 14G
1
14
914100004
ICF100 Element
1
14
914100005
ICF150 Element
1
14
914100006
ICF200 Element
1
15
107048520
PVC Pipe 2.5inch for ICF100, 387 mm
1
15
107048520
PVC Pipe 2.5inch for ICF150, 440mm
1
15
107048520
PVC Pipe 2.5inch for ICF200, 517mm
1
16
550128166
ICF100-200 Center Drain connection
1

SE SERIES SINGLE-ELEMENT CARTRIDGE FILTER INSTALLATION AND OPERATION MANUAL Page 14 of 19
12. WARRANTY
Australian Consumer Law
Our goods come with guarantees that cannot be excluded under the Australian Consumer Law. You are
entitled to a replacement or refund for a major failure and for compensation for any other reasonably
foreseeable loss or damage. You are also entitled to have the goods repaired or replaced if the goods fail to
be of acceptable quality and the failure does not amount to a major failure.
Your Oasis Aquatics SE Series Single-Element Cartridge Filter is covered by alimited five (5) year warranty
and commences from the date of purchase.
Please refer below for details as follows:
•5 year limited warranty on Oasis Aquatics SE Series Single-Element Cartridge Filter unit against
component failure or defects workmanship and materials excluding obvious neglect, misuse, improper
installation or improper maintenance from date of purchase.
•12 months limited warranty on the cartridge element, internal components, including o-rings, gaskets
and gauges unit against defects in workmanship and materials excluding obvious neglect, misuse,
improper installation or improper maintenance from date of purchase.
•12 months warranty is provided on installation labour completed by Oasis Aquatics or Sunlover Heating
staff from date of install.
•Items that are replaced as part of routine maintenance are not covered by this warranty.
This warrantyis subject to the conditions and limitations herein after stated and is applicable to workmanship
and materials only.
You must notify Oasis Aquatics of the failure of any component of your product within seven (7) days of the
recognised fault.
Oasis Aquatics will at its option, repair or replace any defective parts. Component failure must be due solely
to a defect in materials or workmanship. The manufacturer will not be held liable for damage caused by, but
not limited to, corrosion, scaling or stress.
This warranty does not apply if failure is due to any abuse, misuse, improper installation or accident
or to any of the following:
•The customer has not complied with Oasis Aquatics terms and conditions of sale
•The product was used in an application for which it wasn’t intended
•The product was altered, modified or repaired by any other person than Oasis Aquatics or its
Authorised Service Agents
•The product has not been installed, maintained or operated in accordance with installation and
operating instructions
•Environmental influences such as flooding, storm, lighting, fire
•Running filtration system without water
•Damage beyond our control
This Warranty is solely for the benefit of the original consumer and with respect to the original installation
only. and is therefore non transferable under any circumstance.
Oasis Aquatics shall have no liability for incidental or consequential damages. No person is authorised to
make any representation or warranty on behalf of Oasis Aquatics other than what is stated here.
Ifa defectin materialsor workmanshipoccurs within thewarrantyperiod Oasis Aquatics will,atitsdiscretion
repair or replace product or the defective part of the product free of charge or cause the product or the
defective part to be repaired or replaced by an Authorised Oasis Aquatics Service Agent free of charge.
Oasis Aquatics reserves the right to substitute defective parts or the product with parts or product of similar
quality, grade and performance where an identical part or product is not available. Parts or products may be
replaced by refurbished goods of the same type rather than be repaired.
If the product is bought as a demonstration, refurbished, ex-rental, discontinued or otherwise previously
unboxed unit, the warranty applicable shall be limited to twelve (12) months only.
On Commercial Installations, such as health clubs, swim schools, motels/hotels and hydrotherapy, parts and
in field labour warranty, the warranty period is limited to twelve (12) months only.

SE SERIES SINGLE-ELEMENT CARTRIDGE FILTER INSTALLATION AND OPERATION MANUAL Page 15 of 19
13. TECHNICAL SUPPORT
For all warranty enquiries please contact your local distributor or contact Oasis Aquatics directly and we
will either direct you to your nearest authorised repairer for assistance.
OASIS AQUATICS
Ph: 1800 815 913
Website: oasisaquatics.com.au
Email: sales@sunloverheating.com.au
DISCLAIMER
Information in this guide is intended to provide general information on a particular subject(s) in good
faith and is not an exhaustive treatment of such subject(s). Its use is beyond the control of the author,
contributor, publishers and distributors and should not be relied upon without consulting your local
Professional for comprehensive advice.
This guide includes subject(s) that should only be performed by or under the direction and advice of
your local Professional and under no circumstances should the guide be used as a substitute for such
professionals.
No representations or warranties are made that the content, advice and recommendations in this guide
are current, free from errors or omissions, or appropriate for the user’s circumstances or abilities. No
liability or responsibility is accepted for any loss suffered as a result of any user’s reliance on such
content.
14. WARRANTY REGISTRATION
Registering your Oasis Aquatics products is fast and easy, providing peace of mind that you’ve got
great backup support for the life of your pool heating!
•Scan QR Code
https://sunloverheating.com.au/service-request/warranty-registration/
•No Need to create an account
•Fill in your details
•Upload a photo of your serial number
•Submit
For Quick reference, records your details here, which can be updated as an image at a later time.
Model No:
Serial No:

SE SERIES SINGLE-ELEMENT CARTRIDGE FILTER INSTALLATION AND OPERATION MANUAL Page 16 of 19
15. NOTES

SE SERIES SINGLE-ELEMENT CARTRIDGE FILTER INSTALLATION AND OPERATION MANUAL Page 17 of 19

SE SERIES SINGLE-ELEMENT CARTRIDGE FILTER INSTALLATION AND OPERATION MANUAL Page 18 of 19

SE SERIES SINGLE-ELEMENT CARTRIDGE FILTER INSTALLATION AND OPERATION MANUAL Page 19 of 19
A part of the
Victoria
6-8 Austral Place
Hallam VIC 3803
Australia
T: 03 9887 2131
New South Wales
Unit 2, 10 Boden Road
Seven Hills NSW 2147
Australia
T: 02 9838 0000
Queensland
11 Andys Court
Upper Coomera QLD 4209
Australia
T: 07 5679 6821
oasisaquatics.com.au
sales@sunloverheating.com.au
This manual suits for next models
3
Table of contents
Other Oasis Aquatics Swimming Pool Filter manuals
Popular Swimming Pool Filter manuals by other brands

Swim & Fun
Swim & Fun EASY SALT Instructions for use

Waterway
Waterway Clear Water II owner's manual

Oase
Oase Skimmer 250 operating instructions

Miganeo
Miganeo Dynamic 6500 instruction manual

Idegis
Idegis DOMOTIC SERIES Hardware installation and maintenance manual

fluidra
fluidra Astralpool Viron QL 420 Installation and operating instructions