Ocean Sonics icListen User manual

icListen User Guide
Ocean Sonics Ltd.
110 Parkway Dr.
Truro, NS, B6L 1N8 Canada
Phone: +1 902 655 3000
www.OceanSonics.com
V2021.1

Congratulations on your purchase of an icListen Smart Hydrophone.
Ocean Sonics is dedicated to your success. We want to ensure you
collect the best data possible and that you get everything out of
your data that you need. This user guide will help you navigate how
to most eectively use your hydrophone, from basic set up and
conguration through complex deployments.
Ocean Sonics recommends that you review the entire user guide
before you begin using your hydrophone. If you have any questions
that are not answered in this document, please do not hesitate to
contact us for clarication.
With the purchase of every hydrophone, Ocean Sonics oers an
Introduction to icListen training course. This is an hour long session
with an Ocean Sonics team member that will get you comfortable
using your icListen Hydrophone and help fast track your ocean
sound data collection projects.
Many of the deployments featured in this guide use additional
Ocean Sonics tools and accessories. If you are interested in
purchasing these tools, or if you would like to know if they are useful
for your data collection needs, contact our technical sales team.
To request your Introduction to icListen training course, or if you need
assistance of any kind, please contact:
Suppor[email protected]
For any other inquiries please contact:
You can also contact us via phone:
Head oce in Truro, Nova Scotia: 1(902)655-3000
West Coast oce in Vancouver, BC: 1(236) 666-8715

Contents
Introduction .................................................................1
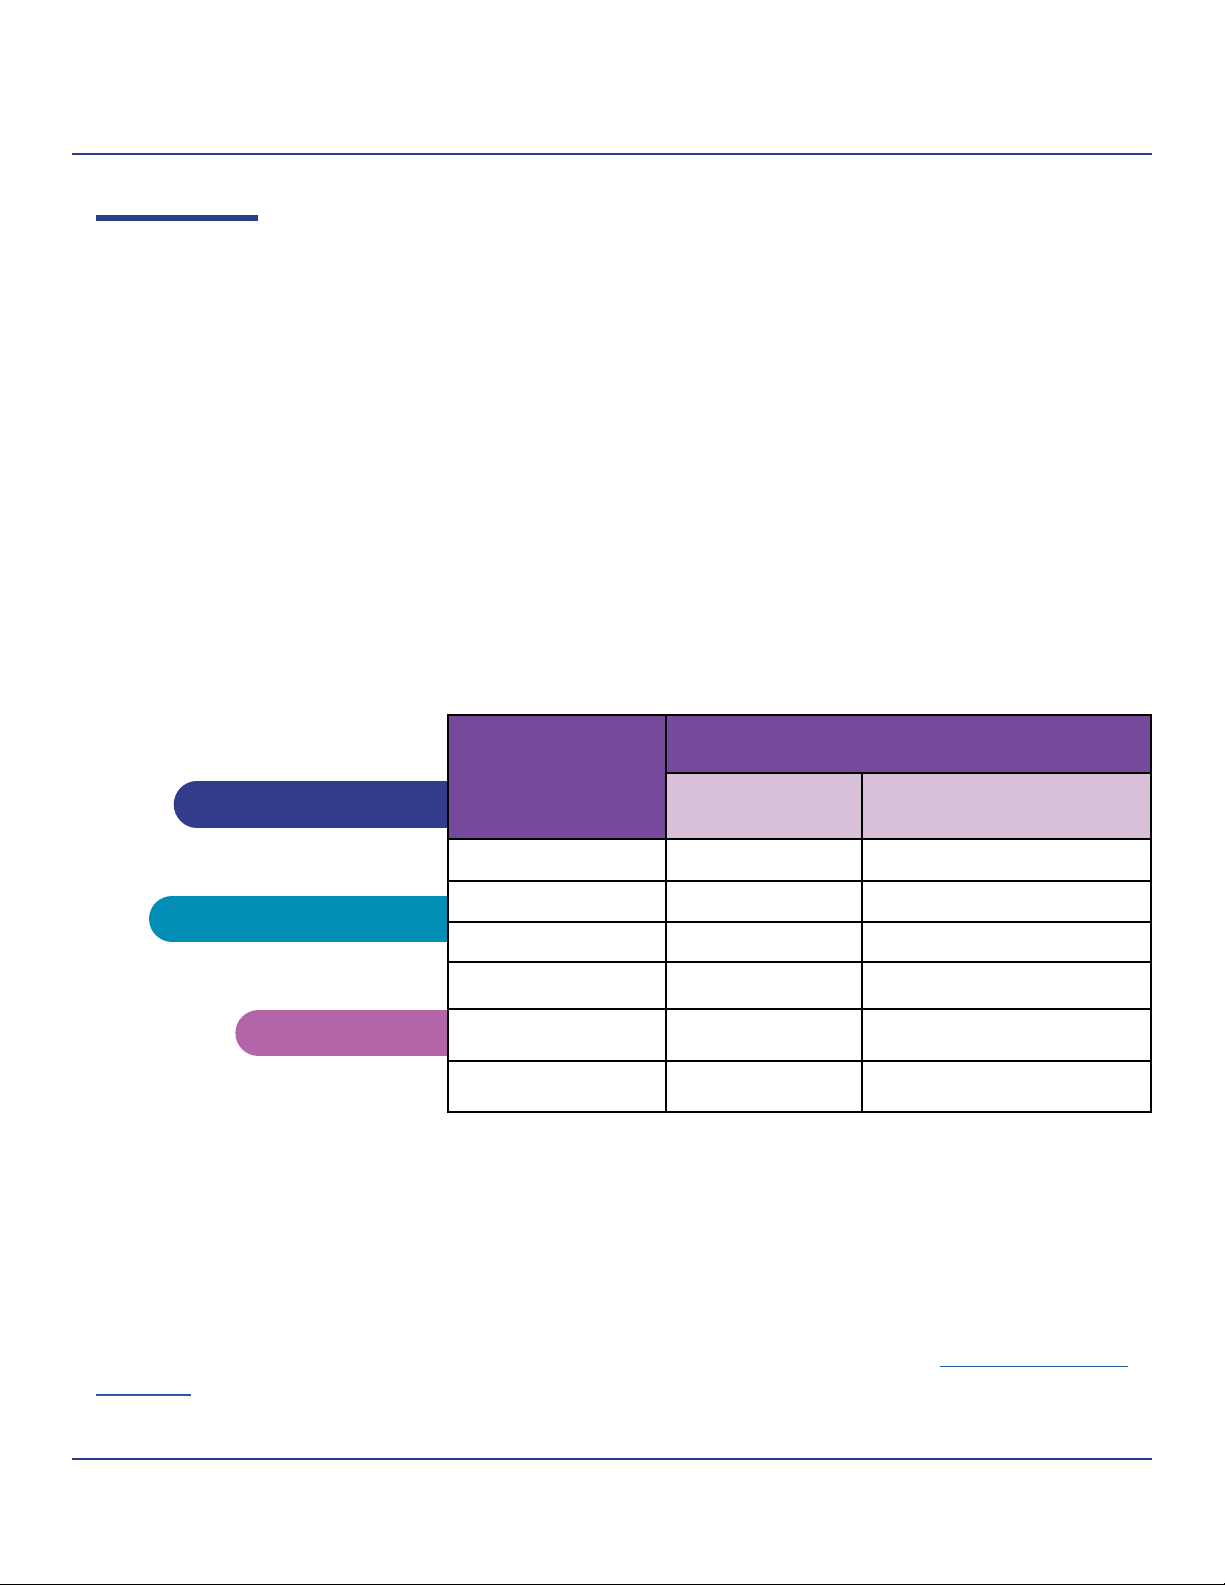
Compatibility ................................................................3
Getting Started with your icListen ..............................................4
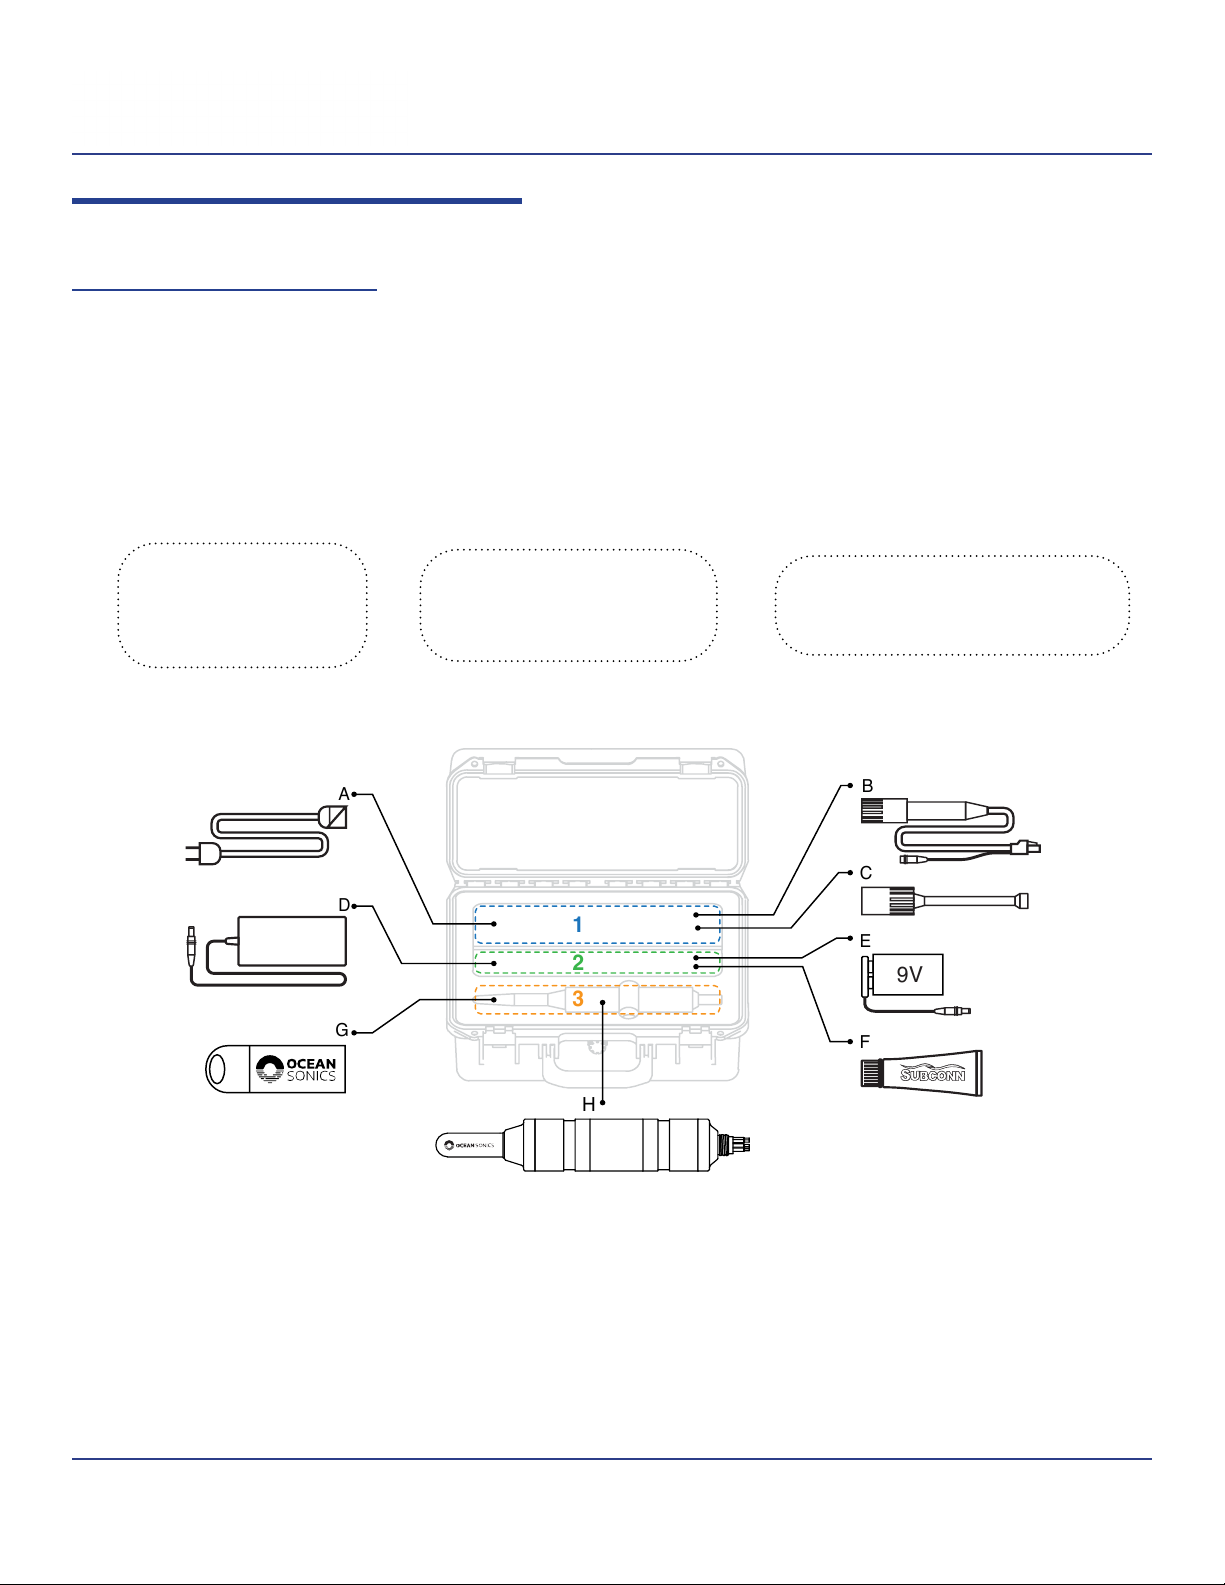
Included with your icListen............................................. 4
Step 1: Connect Cables ............................................... 5
Step 2: Setup the icListen.............................................. 6
Step 3: View and record real-time data .................................. 7
Powering your icListen ........................................................8
Operating Power ..................................................... 8
Power O ........................................................... 9
Standby Mode ...................................................... 10
Charging the icListen ................................................ 10
Buzzer Patterns ..................................................... 11
icListen Web Interface .......................................................12
Home Page ........................................................ 12
About Page ........................................................ 13
Settings Page....................................................... 14
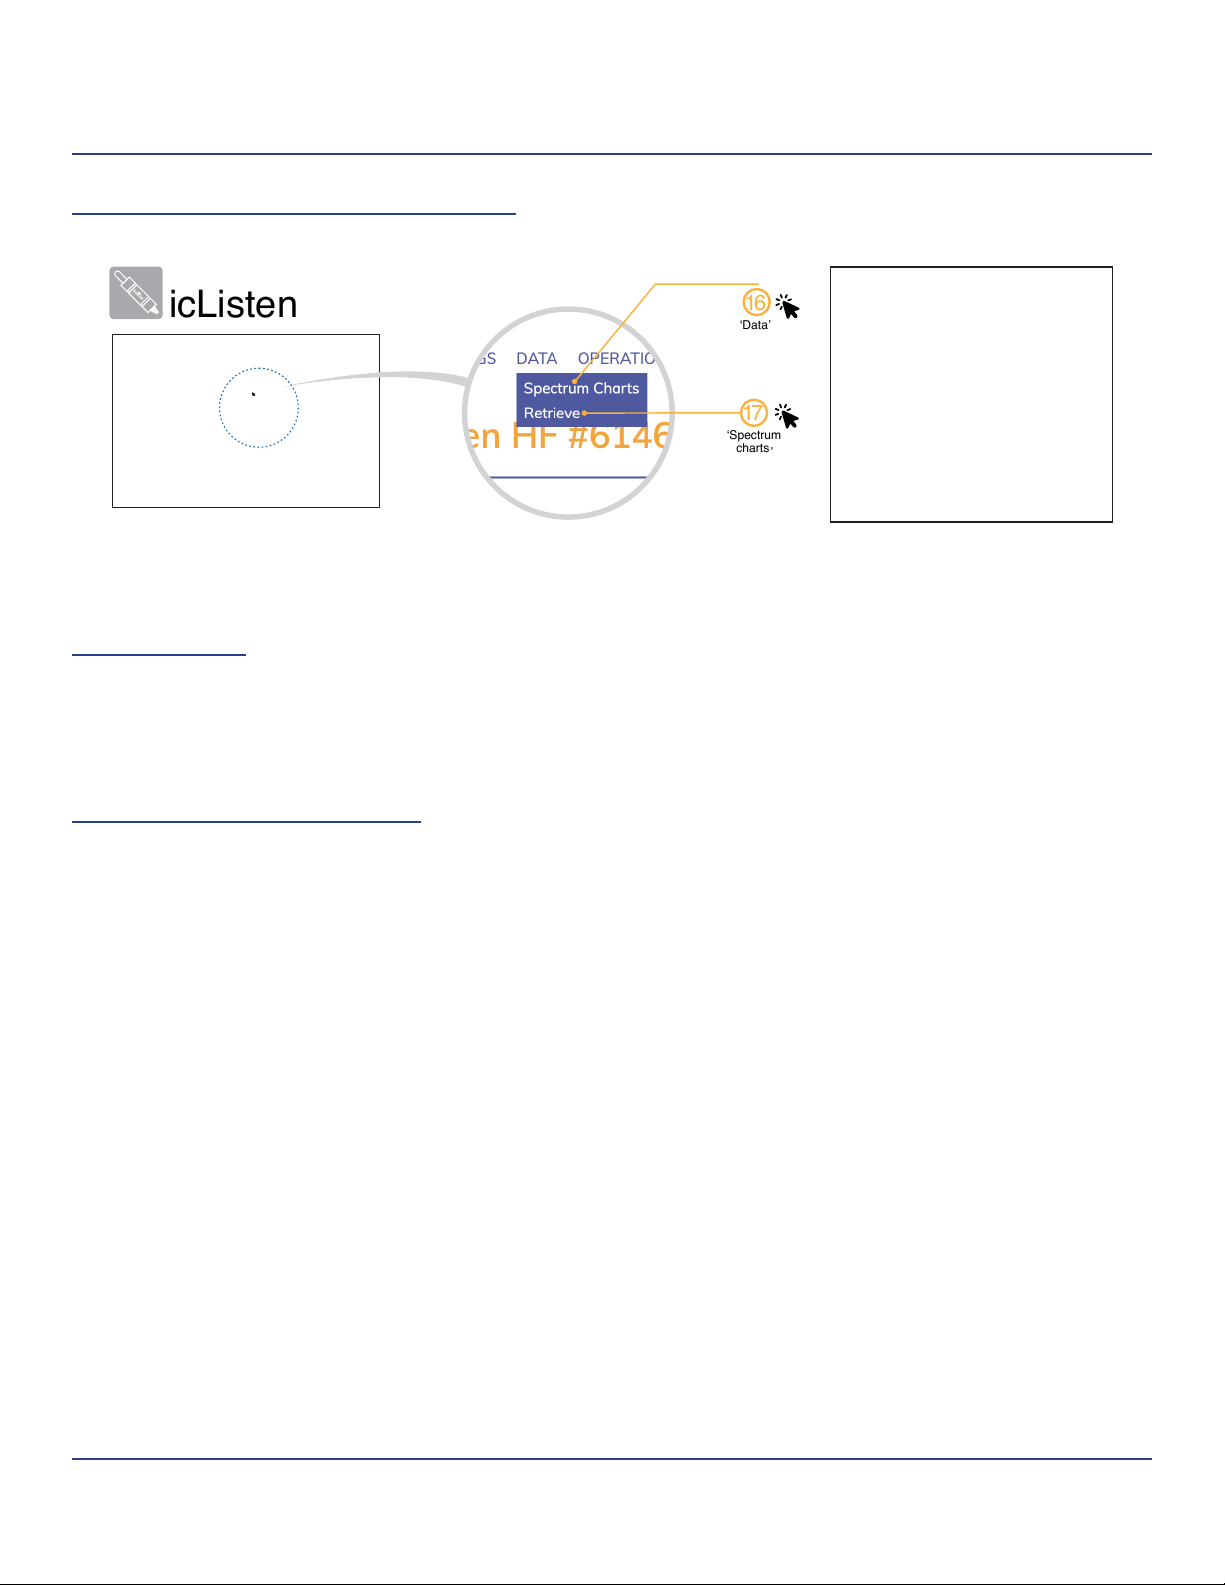
Data Page ......................................................... 21
Operations Page .................................................... 22
Deployment considerations ...................................................24
Real-Time Deployment Scenarios .............................................26
Directly Cabled to a PC .............................................. 26
Using a Launch Box ................................................. 28
Float Collar ........................................................ 29
Tripod ............................................................. 30
Autonomous Deployment Scenarios ...........................................31
Stand Alone ........................................................ 31
With a Battery Pack ................................................. 33
On a Buoy ......................................................... 34
Data Retrieval ..............................................................35
Maintenance and Storage ....................................................37
Firmware .......................................................... 37
Cleaning .......................................................... 38
Connector Care ..................................................... 38
Storage............................................................ 39
File System Care .................................................... 39
Battery Care ....................................................... 40
icListen Servicing ................................................... 41
icListen Connector Information ........................................ 41

icListen User Guide
1v2021.1
Introduction
The icListen Smart Hydrophone combines high signal integrity, data storage capacity, low
power, and small size with the ability to process sound data in real time. This guide provides
comprehensive information on how to congure and use your hydrophone in the eld as well as
its maintenance and care. It also links directly to many other relevant documents on our website
(these will either open or download based on your browser settings). All referenced documents
are also provided on the thumb drive provided with your hydrophone.
The icListen is an ethernet based device. This allows the hydrophone to connect to networks,
stream data, and be easily integrated into multi-device platforms. The icListen can be used
as a fully autonomous device providing 256GB of storage and real-time streaming of both
waveform and spectral data. The hydrophone will operate for up to 8 hours using the internal
rechargeable battery. Optional battery packs can also be used to extend deployment time.
The amount of recording time available is dependent upon the sample rate as shown below.
SampleRate
(kS/sec)
24 Bit Data
GB per day Days with 256 GB
16 4.5 56
32 8.6 29
64 16.9 15
128 33.5 7.5
256 66.7 3.8
512 133.1 1.9
Note that the storage time can be increased signicantly by enabling Duty Cycle Logging to
record data periodically, or by storing only processed FFT data. Waveform data is logged in the
standard “.wav” format, making it accessible from a wide range of software programs.
Spectral analysis of data can be performed by the icListen and can be averaged for up
to one minute to reduce data volume. The data is provided in .txt format, suitable for
spreadsheet viewing and further analysis. Full details are available in the icListen Log File
Formats document.

icListen User Guide
2v2021.1
Ocean Sonics provides a Microsoft Windows application, Lucy, which can be used to congure
the icListen (it performs all the functions of the web interface described in this User Guide) and
provides additional sound recording and data analysis capabilities. Lucy can stream real-time
audio and spectral data, provide real-time sound analysis and record icListen data to a computer.
Replay functions are available to review recorded spectral FFT les and waveform data.
Each icListen comes with a 30-day trial of the Lucy application. For full details on how to
install and use Lucy please see the Lucy Software User Guide.

icListen User Guide
3v2021.1
Compatibility
This User Guide (V2021.1) applies to all models of the icListen hydrophone running version 39.0
rmware. To determine your current rmware version go to the ABOUT page in the hydrophone
web interface ( See “About Page” on page 13).
If you are running an older version of the rmware it is highly recommended that you update it.
Instructions for doing so are in “Firmware” on page 37.
This release of icListen rmware is compatible with Lucy v4.3.8 and up, and Marco 2.0 and up. It
is also compatible with most third party FTP/SFTP/SCP clients, SSH clients, and web browsers.
The web interface requires javascript to be enabled in your browser for full functionality. Logged
waveform (WAV) data can also be viewed/edited by audio editing software capable of dealing
with uncompressed PCM WAV les.
Here are some free third party programs recommended by Ocean Sonics for use with your
icListen:
Audacity
Free open source audio recording and editing software.
FileZilla
Free open source FTP client.
PuTTY
Free SSH client.

icListen User Guide
4v2021.1
Getting Started with your icListen
Included with your icListen
Your icListen ships in a rugged custom-designed carrying case to protect it when not in use and
during transportation. A number of accessories are included as shown below. It is important
to test the icListen when it is rst unpacked and before each deployment for best results. A
functional test can be performed in-air prior to deployment.
1A) Power Cord
B) Test Cable
C) Shorting Plug
G) USB Drive
H) icListen Smart Hydrophone
3
D) Power Adapter
E) Hardware Reset Tool
F) Lubricant
2
C
F
E
D
A
G
B
H
9V
1
2
3

icListen User Guide
5v2021.1
NoteNote
When picking up the instrument ensure it is handled byWhen picking up the instrument ensure it is handled by
the body. Do not handle the hydrophone by the element orthe body. Do not handle the hydrophone by the element or
connectors.connectors.
Step 1: Connect Cables
Please connect the equipment in the following order.
Connect
1
2
34
6
5
Push
Vibrating icListen
1. Plug the power cord into a wall outlet.
2. Connect the power cord to the power adapter.
3. Connect the power adapter barrel connector to the matching test cable connector.
4. Connect the test cable ethernet connector to a computer ethernet port.
5. Connect the test cable hydrophone connector to the icListen.
a. Line up the holes in the connector and the pins on the icListen.
b. Mate the connector and pins. See “Connector Care” on page 38 for more
information on mating connectors.
c. The hydrophone will buzz once, then double buzz.
6. Insert the Ocean Sonics USB drive into a USB port on your computer.

icListen User Guide
6v2021.1
Step 2: Setup the icListen
Ocean Sonics provides a Windows application, Marco, to nd your icListen on your network
and connect to it via your default web browser.
1
1
Open Marco 2.0
7
8
Install
Marco
2.0
9
10
setup.exe
13
12
14
15
‘Open in
W
eb Browse
r
’
‘Clea
r
’
‘Refresh
’
Select
icListen
‘Install
’
Installing Marco 2.0
Install Marco
7. Open the USB drive folder on your computer.
8. Navigate to and open the Marco Folder.
9. Double click on the setup le to run the setup executable.
10. Follow the Setup instructions to Install Marco.
Open the icListen web interface
11. Open the Marco Application.
12. Click on the Clear button to erase any previous information stored in Marco.
13. Click Refresh to nd all hydrophones on your network.
14. Click on the icListen you would like to control.
15. Click Open in Web Browser. You should now see the icListen home page.

icListen User Guide
7v2021.1
Step 3: View and record real-time data
icListen
‘Data
’
16
‘Spectrum
charts
’
17
View Live Data
16. On the web interface click the Data Tab.
17. Click Spectrum Charts.
Setup icListen Data Collection
18. On the web interface, click the Settings Tab > Data Collection
Set the options as desired and click “Apply”. All settings and options are explained in
“Settings - Data Collection” on page 14.
To ensure recorded les have proper time stamps, set the date and time on the Operations
Tab.
Hydrophone Time > SYNC TIME.

icListen User Guide
8v2021.1
Powering your icListen
Operating Power
The icListen can be operated continuously when connected to an external power source as
described in “Getting Started with your icListen” on page 4. The acceptable voltage range is
18-30V DC.
The icListen will operate for up to 8 hours from its fully charged internal battery. When external
power is disconnected the unit will draw power from the battery until it is depleted. External
power can be re-applied at any time to operate the unit and recharge the battery.
Recent models of the icListen (Hardware release 5
or later) can also be powered by -12 V DC. If your
icListen has the distinctive silver cone between the
sensor and the body, as shown here, then -12V
operation is supported. The hardware release
version is also reported on the “About” page on the
icListen web interface.
Note that when operating at -12V, if the power is
removed the unit will turn o - it will NOT continue
to operate under battery power.

icListen User Guide
9v2021.1
Power Off
It is important to turn the unit o between deployments and for long term storage. If powering at
-12V this is accomplished by simply removing power. In all other cases you must use the Power
Down Tool supplied in the case and follow this procedure:
1. Turn o any recording on the hydrophone.
2. Unplug the barrel connector of the power adaptor to remove the power supply.
3. Put the hydrophone into Standby mode.
Using the web interface or Lucy software, select the Standby option under Operations. The
hydrophone will buzz three times.
Web Interface Lucy

icListen User Guide
10 v2021.1
4. Plug the Power Down Tool (-9v battery) barrel connector into the power barrel connector on
the test cable for 1-2 seconds then remove. (Do not leave the Power Down Tool plugged into
the test cable attached to the hydrophone as it can drain the battery on the Power Down
Tool.)
The hydrophone is now turned off.
Notes
• If the icListen is powered down for 3 or more weeks, the hydrophone’s internal clock time
will reset to January 1, 2010.
• In older units the time will automatically reset to January 1, 2010 after each power down.
• The battery charge will be reset and a lower battery charge (up to 20%) is expected
when the unit is repowered, the charge percentage will be accurate at full charge.
Standby Mode
Standby Mode is a low power mode which can extend battery life to 5 days. Settings will be
remembered, and recording (if enabled) will continue when woken from Standby Mode.
Charging the icListen
To charge the icListen, connect the hydrophone to a power outlet using the test cable. If fully
depleted, the hydrophone will require approximately 8 hours to regain a full charge.
• The icListen can remain plugged into a power source during use.
• Only use the charger supplied by Ocean Sonics to charge the instrument. If you require
another charger please contact Ocean Sonics.
• Store the icListen with batteries at 40% - 60% charge. See “Battery Care” on page 40
for more information.

icListen User Guide
11 v2021.1
Buzzer Patterns
The icListen uses buzzer patterns as a tactile aid in understanding its status.
icListen Buzzer Patterns
Pattern Meaning
1 short pulse (0.5s) Unit Booting Up
2 short pulses (0.5s each) Firmware is Ready/Running
3 short pulses (0.5s each) Unit Shutting Down
1 short & 1 long pulse (0.5s and 1s), [three
times]
Error Booting Unit
Notes
• The error pattern may repeat multiple times if the unit is unable to boot.
• Any patterns not listed could be the result of patterns being prematurely cut o by low
battery charge.

icListen User Guide
12 v2021.1
icListen Web Interface
Whether connected directly to a laptop or via wi- with a Launch Box, the icListen Web interface
is where you can review the status of the hydrophone, congure all of its settings, view data in
real time, and manage your recordings.
Home Page
When you rst connect to the hydrophone you arrive at the Home page which provides summary
status information including serial number, current operating conditions, and recording status.
Epoch refers to 5 user customisable triggers for recording. These are described in detail in
“Settings - Epoch” on page 18. Their status is reported on this page and colour coded as
follows.
No Signal, Event Inactive
Signal Present, Event Inactive
Signal Present, Event Active
No Signal, Event Active

icListen User Guide
13 v2021.1
About Page
This page provides information on the hardware and rmware versions being used on the
hydrophone, current IP address, MAC Address, and hydrophone sensitivity.

icListen User Guide
14 v2021.1
Settings Page
This page has four subsections which control data collection, event triggered recording, special
feature settings, and detailed network settings.
Settings - Data Collection
The icListen hydrophone can record acoustic data in two formats, Waveform (.wav) and Spectrum
FFT (.txt) and has an internal memory for data storage. Lucy can also be used to record data on
a computer.
Waveform Data Acoustic time series data. Uncompressed audio, in a standard
waveform (.wav) le. The les can be reviewed in any software
compatible with .wav les.
Spectrum (FFT) Data Processed Fast Fourier Transform (FFT) data stored in text
(.txt) les. To view spectrum (FFT) les, replay the data in Lucy
or open the data in a spreadsheet. Detailed information
on Spectrum (FFT) les can be found in the icListen Log File
Formats document.

icListen User Guide
15 v2021.1
Max Waveform Frequency & Spectrum Frequency
The Max Frequency drop down menus provide the options for data collection sampling rates.
Max Frequency refers to the bandwidth of the recording, giving the highest frequency that is
recorded by the hydrophone at each sampling rate. The sampling rate is given in kilosamples
per second (kS/s).
Waveform & Spectrum Files
Mode: Available settings are: Logging O (no recording), Logging On (continuous
recording), or Epoch (event triggered recording). When recording in Epoch
Mode, go to Settings > Epoch, to complete set up. This is described in
“Settings - Epoch” on page 18.
File Length/ As data is recorded to memory it will be divided into sequential les of
Max Log Length: the the specied length. The maximum supported lesize is 1GB which
limits the amount of time an individual le can store. For example, at
the maximum sample rate of 512 kS/s, 11 minutes is the max time that
can be stored in a single le. If you try to set a number higher than the
maximum for a given sample rate the interface will alert you and provide
the maximum available time.
Duty Cycle Recording
This option is available for waveform data collection only and provides the ability to record for a
specic length of time at regular intervals,
Cycle Time: The time between each recording start.
Log Data Time: The duration of each recording
For example, you can record for 2 minutes (Log Data Time) in every 10 minute period (Cycle Time.
If no Duty Cycle is required, leave the Cycle Time and Log Data Time as 1.
Epoch Mode and Duty Cycle Recording provide for exible data collection, optimizing the storage
capacity of the hydrophone.

icListen User Guide
16 v2021.1
Spectrum Processing
The icListen processes incoming real-time sound data using FFT to create a visual representation
in the frequency domain (Spectrum Charts). Our FFT processing has the following attributes:
• Window Type: Hann
• Fixed Window Size: 1024
• FFT Overlap: 50%
• FFT Data Processing Modes: Mean, Peak or Filtered (IIR). These are explained in detail
below.
• Spectrum (FFT) les: tab-separated values in text (.txt) le format
• Sound pressure values displayed on Web Browser as dB re 1 µPa. Calculated values are
reported as SPL rms (root mean square).
The Spectrum (FFT) data is recorded in a tab-delimited text le format (.txt). The FFT les can be
opened by any application that supports this format (See: FFT Data Processing below). The data
can also be replayed using Lucy, providing detailed waterfall spectral displays and analysis.
Storing spectrum data can provide a compact form of data storage, allowing for faster data
retrieval and analysis. The FFT les also store sensor data (temperature and humidity), hardware
information, and setup information useful in processing data.
The available Spectrum processing settings are:
Modes
Mean: This is the default. The mean average power found at each frequency,
over a congurable averaging period (Update rate). Optimal for most
deployments, ex. recording soundscapes, marine mammal observation,
etc
Peak: The maximum power level found at each frequency, over a congurable
time period (Update rate). Optimal for recording impulsive events, events
with short duration or peak sound pressure levels. Examples include pile
driving, leak detection, odontocete echolocation clicks.
Filtered: Innite impulse response (IIR) ltering on the power levels detected at
each frequency. This has an exponential moving average which has the
eect of smoothing new data with the previous FFT results.

icListen User Guide
17 v2021.1
Update Rate
How often power levels are calculated. Power levels are recorded for each update in
the FFT le. Default: ¼ second update rate.
Accumulations per Result
The number of FFT data sets used to calculate recorded power level at each
frequency bin. Based on sampling rate and update rate. With a xed window size, a
lower sampling rate oers better frequency resolution per bin.
Enable Delay
The start time of the recording can be set to a date and time in the future. Ensure the time is set
correctly on the icListen prior to enabling a delay (See “Set Date and Time” on page 22).
Enable Advanced Settings
Provides additional settings for Data Collection. Ocean Sonics recommends that users do not
change these settings unless very specic requirements need to be met.
Waveform Data Format allows the the number of bits used to capture each sample to be
changed to 16 or 32 from the default 24. In addition the Endianness can be changed to Big from
the default Little.
If 16 bit resolution is selected the gain can also be modied.
In Spectrum Processing the Reference Level can be set to a custom value between -120 and
-180 dBV.
Click APPLY to send the settings to the device and start recording.
Other manuals for icListen
2
Table of contents
Other Ocean Sonics Recording Equipment manuals
Popular Recording Equipment manuals by other brands

Sune Technology
Sune Technology QPI-LVTX-NCC5 installation manual

swissonic
swissonic ASM5 user manual

netvox
netvox R718IB2 user manual

Festo
Festo CPX-AP-I-EP-M12 Instructions & Operating

Disaster Area Design
Disaster Area Design DMC-3XL Gen3 user manual

Black Lion Audio
Black Lion Audio 500 Series owner's manual

Honeywell
Honeywell CIU 888 Migration Manual

Aube Technologies
Aube Technologies Non-programmable Heat Pump Controller... installation guide

Aiwa
Aiwa CSD-A110 Service manual

Denon
Denon DN-HC1000S - Serato Scratch Live Sub... Service manual

Xaoc Devices
Xaoc Devices DREZNO Operator's manual

AMX
AMX MAX-AOM installation guide