Octave TouchTunes FRU User manual

Purpose
This document explains how to replace a Fusion Music System monitor using the Fusion Monitor Field
Replacement Unit (FRU) kit (P/N 600312-001).
Topics
•Required Tools and Equipment
•Important Safety Information
•Included in this Kit
•Installing the Replacement Monitor
•Contacting Technical Support
Required Tools and Equipment
• Cross-head screwdrivers, #2 and #1
• Anti-static wrist band
• 2 Hex keys 5/32
• Clean flat table on which to place the monitors (side by side)
• Cable ties, if needed
Audience
• Fusion Music System operators and technicians
• TouchTunes Field Service and Customer Support
• TouchTunes Sales personnel
Estimated Time
25 minutes
Required Personnel
1 technician, 1 assistant
This document includes tasks of the following type:
Software
Hardware
Electrical
FRU Installation Guide
Replacing a Fusion Monitor
January 2020
901130-001
Rev 00

2 Replacing a Fusion Monitor
Important Safety Information
Included in this Kit
Ensure that you have received all required parts before proceeding with this installation.
Installing the Replacement Monitor
1. Unlock and open the Fusion Music System.
2. Press the MNGR button on the I/O Board to open the Operator interface main menu.
3. On the Fusion screen, press the REBOOT button.
4. When you hear the BIOS beep, power down Fusion by setting the rocker switch on the power strip to the off
(O) position.
5. Unplug the AC power cable from the wall socket.
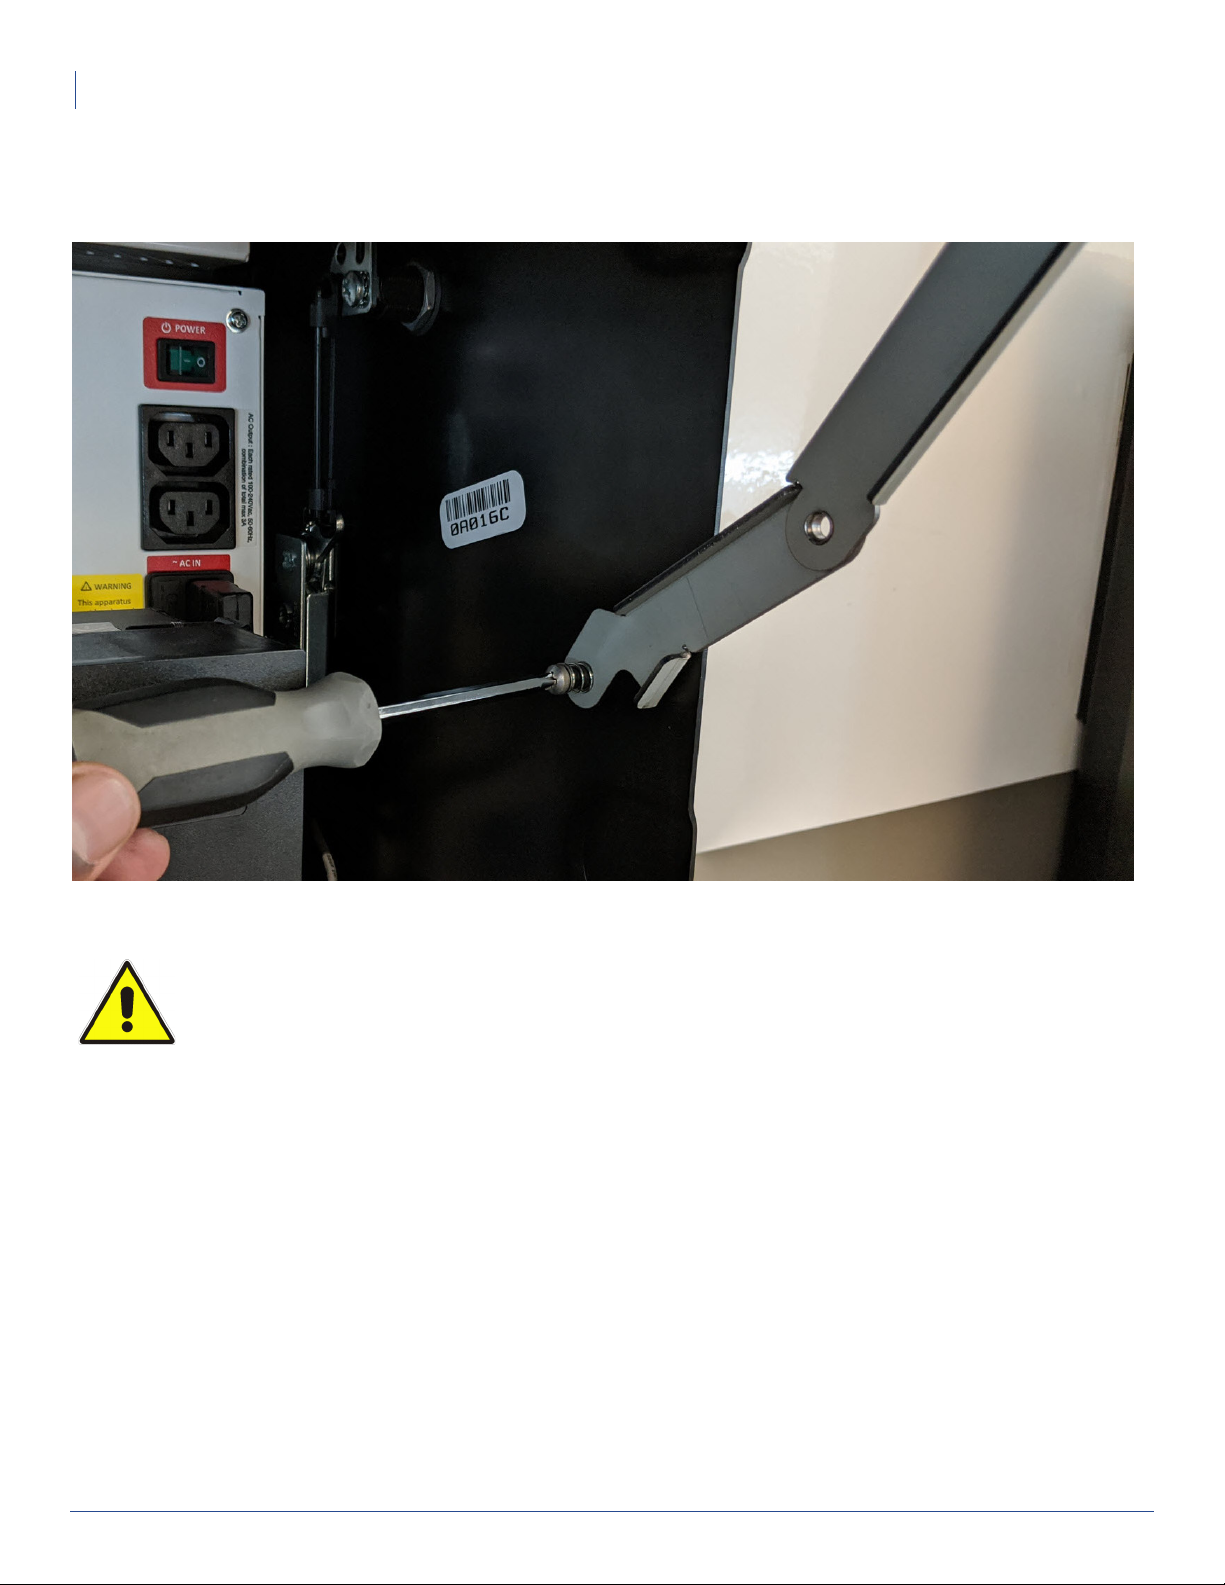
6. Remove the custom enclosure (or barrel enclosure) installed upon the Fusion Music System:
• Remove the three wing bolts located at the top interior of the Fusion Music System door. Set these aside
for re-installation. Your kit does not contain replacements for this item.
Part Quantity Part Number (P/N)
ASY, FRU, MONITOR, FUSION 1 401731-001
FAS, SCR, X-CSNK, M3x8,NI 6 200001-308
FAS, SCR & BIND BARL, 10-24 THRD SIZE, 1/2"-5/8" MAT THCK
(screw and barrel)
2 200285-004
FAS, WSHR, FLAT, M7X7MM 3 200296-001
HWR, SPCR, UNTHRD,1 /2OD, 3/16LG, OFF-WHITE, NYL 2 401656-001
FAS, SCR, X-PAN, M5X0.8MM THRD, 8MM L 2 200288-008
HWR, COMP SPR, 0.36" OD, 0.308" ID, ZN 2 401659-001
MAN, FRU, MONITOR, FUSION (this document) 1 901130-001
NOTE For warranty returns, place the defective unit into the packaging/container from which you
remove the replacement unit. You must obtain a valid Return Authorization (RA) number
from TouchTunes before shipping a defective unit back.
CAUTION: When performing this procedure or any other maintenance on the Fusion Music
System, the unit must be powered off and its electrical power disconnected.
IMPORTANT: A properly-grounded anti-static wrist band should be worn at all times during the
procedure presented in this document.
IMPORTANT: Never shut down or unplug Fusion without first performing a reboot and waiting
for the BIOS beep. Doing so can cause damage to the hard drive and make it unusable.

3Replacing a Fusion Monitor
Installing the Replacement Monitor
• Push down on the latch release (located between the two bill acceptors).
Pushing down on the latch release mechanism
• Remove the custom enclosure (or barrel enclosure) from the chassis and set it aside for re-installation
later.
7. Make sure the Fusion door is locked.
8. Unlock the Fusion screen and remove the key from its lock.
9. Slide the screen up slightly from its bottom panel and then lift it out.
10. Make sure that the two hinges in the interior of Fusion pop into the locked position to ensure the screen is
secured in the upright position.

4 Replacing a Fusion Monitor
Installing the Replacement Monitor
11. Slide the monitor cables out of the black metal cable clamp (circled in green below). There is no need to
remove the cable ties.
Location of black metal cable clamp
Bottom of monitor

5Replacing a Fusion Monitor
Installing the Replacement Monitor
12. Remove the cable connections (HDMI, remote, serial, and power) from the bottom panel of the monitor and
lay them to the side. Do not clip the cable tie otherwise the remote control could fall off when you perform the
next step.
Monitor cable connections
As shown in the previous figure, a straight HDMI connector with a right angle adapter was previously used (shown
below).
Right angle adapter
However, later models of Fusion have an HDMI cable with an integrated right angle connector (as shown below).
HDMI cable with an integrated right angle connector

6 Replacing a Fusion Monitor
Installing the Replacement Monitor
13. Detach the magnetic remote from the monitor and lay it along side the cables.
14. Remove the two bottom screws (including the springs) that secure each hinge to the chassis and set them
aside.
Removing the right side screw
IMPORTANT: TouchTunes recommends that you enlist the help of an assistant to perform the
next two steps to ensure that the monitor is properly supported and does not fall once the final
bolt securing the monitor is removed.

7Replacing a Fusion Monitor
Installing the Replacement Monitor
15. While an assistant supports the monitor, use 2 Hex keys to remove the first screw and barrel (including the
spacer and washers) on one side of the enclosure.
Removing the left side screw and barrel (including spacer and washers)

8 Replacing a Fusion Monitor
Installing the Replacement Monitor
16. While an assistant continues to support the monitor, use the 2 Hex keys to remove the second screw and
barrel (including spacer and washers).
Removing second screw and barrel (including spacer and washers)

9Replacing a Fusion Monitor
Installing the Replacement Monitor
17. Slide the monitor out of the Fusion Music System and set it on a clean, flat table.
Removing the old monitor
18. Unpack the replacement monitor and place it on the table beside the old one and in the same orientation (this
ensures that the components to be installed will be done in the same orientation).

10 Replacing a Fusion Monitor
Installing the Replacement Monitor
19. Remove the 2 screws that hold the lock bracket in place on the bottom of the monitor.
Removing bottom bracket
20. Transfer the lock bracket to the new monitor and fasten it using the screws removed in the previous step. If
screws are lost or damaged, you can find replacements in your kit.

11Replacing a Fusion Monitor
Installing the Replacement Monitor
21. Remove the screws the hold the hinge brackets in place on the monitor (2 screws for each hinge bracket).
Removing bottom screw
Removing top screw

12 Replacing a Fusion Monitor
Installing the Replacement Monitor
22. Transfer both hinges to the replacement monitor and fasten them to the monitor using the screws removed
in the previous step. Torque 10 Lbf*in. Do not over torque. If the screws removed from the previous monitor
are lost or damaged, you can find replacements in your kit.
23. Remove the metal cable clamp from the side of the defective monitor and fasten it to the replacement monitor.
Installing metal cable clamp
24. Transfer the assembled replacement monitor to Fusion Music System.
IMPORTANT: TouchTunes recommends that you enlist the help of an assistant to perform the
next few steps to ensure that the monitor is properly supported and does not fall before the
screws and bolts that support the monitor have been re-installed.

13Replacing a Fusion Monitor
Installing the Replacement Monitor
25. While an assistant supports the monitor, re-install the screw, barrel, spacer, and washers that connect the
monitor to the chassis on either side. The following figure shows the correct positioning of the components.
Note that the spacer must be placed between the chassis and the monitor bracket.
Re-installing the right-side screw, barrel, spacer, and washers
26. Use the Hex keys to Torque 10 Lbf*in.
Torque using Hex keys

14 Replacing a Fusion Monitor
Installing the Replacement Monitor
27. While an assistant continues to support the monitor, re-install the screws (including springs and washers) that
connect the hinges to the chassis (the left side install location is shown in the following figures).
• Place a washer on the on the fixed bolt on the chassis.
Placing washer on the side bolt
• Align the bottom hole on the hinge and place it on top of the washer.

15Replacing a Fusion Monitor
Installing the Replacement Monitor
• Place the spring.
Placing left-side spring

16 Replacing a Fusion Monitor
Installing the Replacement Monitor
• Hand-tighten the screw then Torque 10 Lbf*in.
Re-installing right-side hinge screw

17Replacing a Fusion Monitor
Installing the Replacement Monitor
28. Route the cables disconnected in step 12 through the black metal cable clamp.
Routing cables through the metal clamp

18 Replacing a Fusion Monitor
Installing the Replacement Monitor
29. Reconnect the serial, remote, HDMI, and power cables to the bottom of the monitor (as shown in the following
figure). Make sure that the cables remain flush with the bottom of the monitor to ensure they do not get
pinched by the locking mechanism. Use a cable tie if needed.
Reconnected cables
30. Attach the magnetic remote to the back of the monitor.
31. Re-install the custom enclosure:
• Place the enclosure over Fusion so that the screen passes through the opening at the center of the
enclosure.
• Align the struts on the enclosure with the metal plates located on top of the Fusion chassis as you slide
the enclosure into place.
• Make sure that the striker bracket located at the bottom interior of the enclosure connects with the rotary
latch on the front of the Fusion Music System. The bill acceptor slots must align with the slots (openings)
on the enclosure.
• Locate the three wing bolts removed in step 6.
• Secure the enclosure to the Fusion chassis by hand-tightening the three wing bolts to the top interior of
the Fusion Music System. The location of the for the wing bolts corresponds to the location of the metal
brackets on top of the Fusion Music System chassis.
32. Close the Fusion screen and lock it.
33. Plug the AC power cord back in.
34. Power on Fusion and ensure it boots to the customer interface.
You have completed replacement of the Fusion monitor.

Copyright © 2020 The Octave Music Group, Inc. (formerly known as TouchTunes Interactive Networks, Inc.)
The Octave Music Group, Inc.
7250 Mile End, Suite 202
Montreal, Quebec,
Canada, H2R 3A4
The Octave Music Group, Inc.
850 Third Ave, 15th Floor
New York, NY 10022
USA
Technical Support
888-338-5853
www.touchtunes.com
19Replacing a Fusion Monitor
Contacting Technical Support
If you need assistance or have questions, call the TouchTunes Tech Line at 888-338-5853.
To help us assist you more effectively with problem reports, the following information may be required when
contacting TouchTunes support:
• Fusion Music System model and ID
• Operator ID
• Serial number of the component you believe to be defective
• Date/time of the problem
• Actions performed immediately before the problem occurred
• Any additional comments relevant to the problem
Table of contents