Odys MultiFlat 19 inch User manual

ODYS MultiFlat 19”-CINEMA-DVB-T/DVD
1
EN
Table of Contents
1Safety instructions .................................................................................................................2
2Characteristic Features and Contents of package................................................................5
3Controls and connections......................................................................................................7
3.1 Front view/ Side View........................................................................................................................ 7
Front view/ Side View................................................................................................................................... 8
3.2 Rear View ......................................................................................................................................... 9
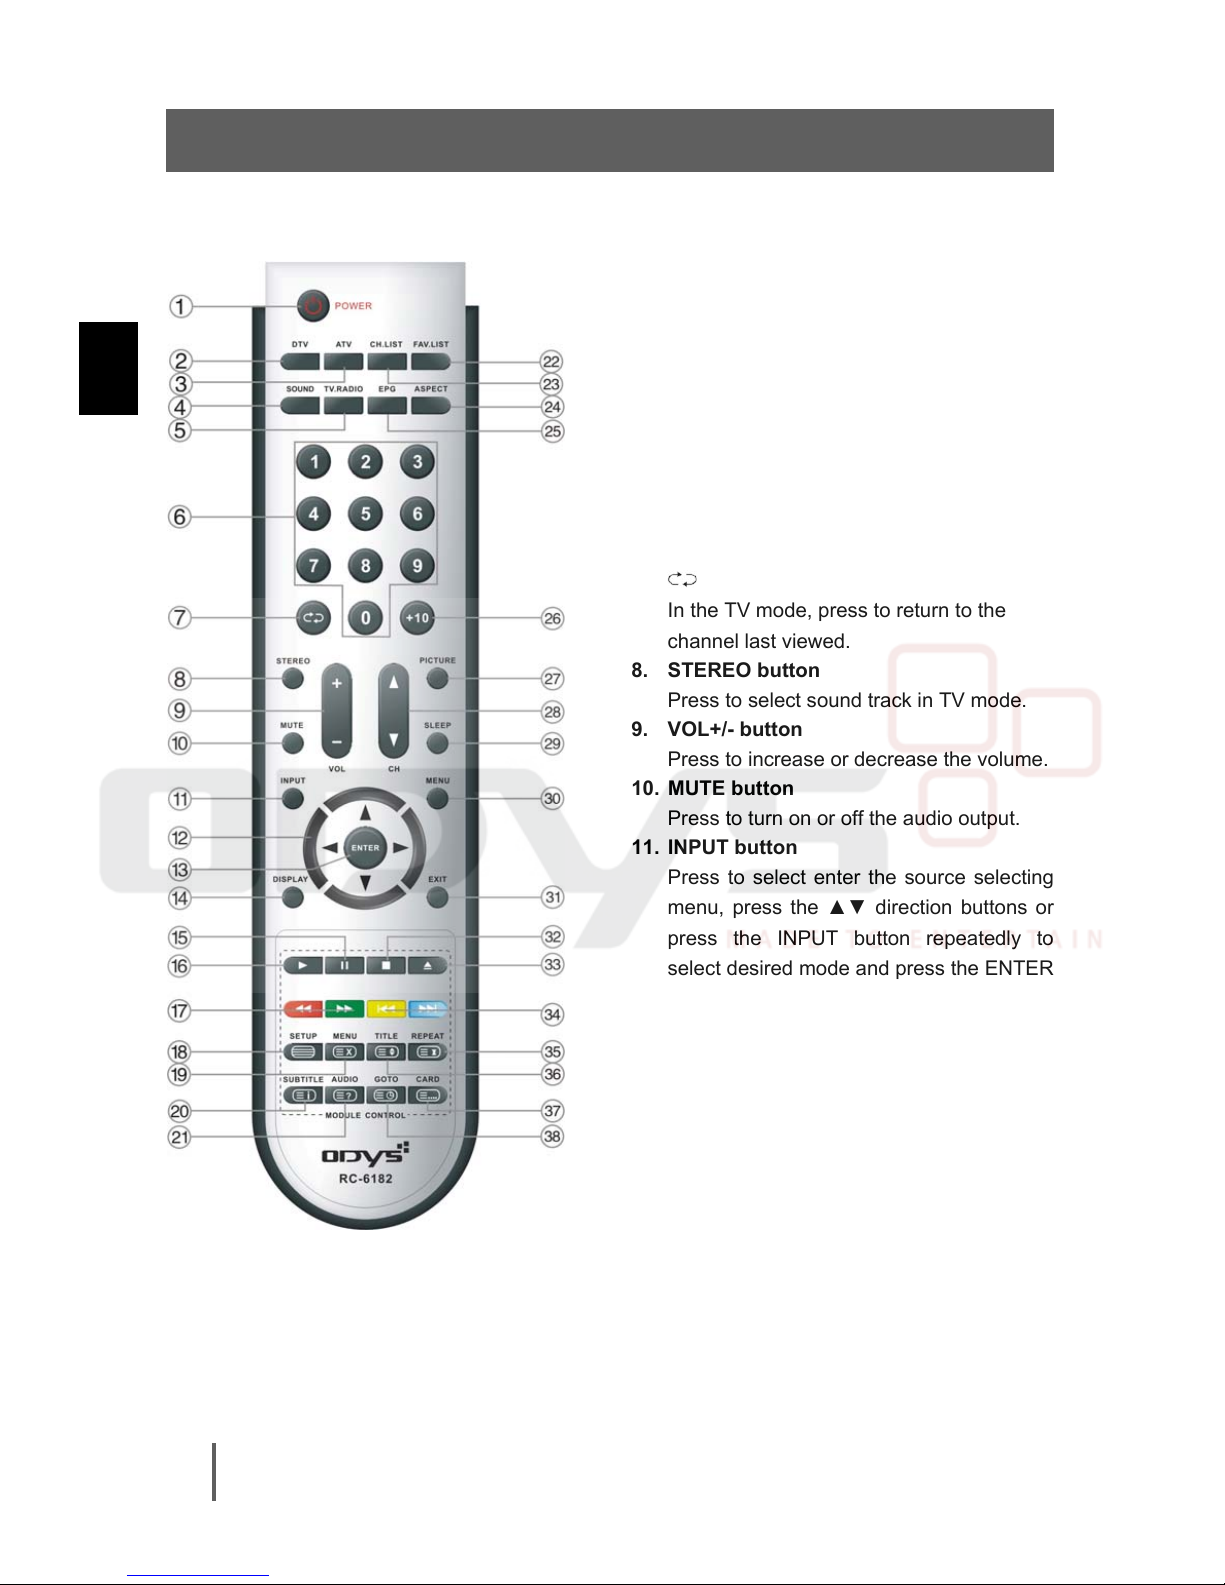
3.3 Remote Control............................................................................................................................... 10
4System Connections ...........................................................................................................14
4.1 Connecting to Power Supply........................................................................................................... 14
4.2 Connecting to Power Adapter ......................................................................................................... 14
4.3 Connecting to External AV Signal Source....................................................................................... 15
4.4 Connecting to External AV Signal Source (Y/PB/PR) ..................................................................... 15
4.5 Connecting to External AV Signal Source (SCART) ....................................................................... 16
4.6 Connecting to a Coaxial Digital Output Device ............................................................................... 16
4.7 Connecting to External AV Signal Source (HDMI) .......................................................................... 17
4.8 Connecting to PCMCIA Card .......................................................................................................... 17
4.9 Connecting a USB Device for Upgrading........................................................................................ 18
4.10 Connecting to Headphones............................................................................................................. 18
4.11 Connecting to PC............................................................................................................................ 19
4.12 Connecting to TV-Signal Input ........................................................................................................ 19
5Input Source Selection ........................................................................................................20
6TV operation and System Setup .........................................................................................21
6.1 Installation Guide ............................................................................................................................ 21
6.2 Channel Setting .............................................................................................................................. 22
6.3 Picture Setting................................................................................................................................. 25
6.4 Sound Setting ................................................................................................................................. 27
6.5 Time Setting .................................................................................................................................... 28
6.6 Option Setting ................................................................................................................................. 30
6.7 Lock Setting .................................................................................................................................... 31
7EPG Function ......................................................................................................................33
8NICAM Function ..................................................................................................................34
9DVD, CD, File Playback Operation .....................................................................................35
9.1 DVD Playback................................................................................................................................. 35
9.2 CD Playback ................................................................................................................................... 37
9.3 MP3 Playback ................................................................................................................................. 37
9.4 JPEG Playback ............................................................................................................................... 38
9.5 DivX Playback................................................................................................................................. 40
9.6 Using USB memory and Memory cards .......................................................................................... 41
10 DVD Setup Menu ................................................................................................................42
10.1 General Setup Page........................................................................................................................ 42
10.2 Audio Setup Page ........................................................................................................................... 44
10.3 Video Setup Page ........................................................................................................................... 45
10.4 Preference Page ............................................................................................................................. 46
10.5 Password Setup Page..................................................................................................................... 47
11 Troubleshooting...................................................................................................................48
12 Specifications.......................................................................................................................49
Warranty conditions ............................................................................................. 51

ODYS MultiFlat 19”-CINEMA-DVB-T/DVD
2
EN
1 Safety instructions
Thank you for choosing our product. Please read this manual carefully and observe all
safety and operating instructions. Store the manual in a safe place for later reference.
The information symbol in the documentation indicates useful information and tips for
using and maintaining the device.
CAUTION: USE OF ANY CONTROLS, ADJUSTMENTS, OR PROCEDURES OTHER THAN
THOSE SPECIFIED HEREIN MAY RESULT IN HAZARDOUS RADIATION EXPOSURE.
CAUTION
1. The product contains a low-power laser device. In order to ensure the safety of the laser device,
do not remove any cover and attempt to repair the unit. If any service is needed, please contact
the distributor or its authorized service center.
2. To reduce the risk of electric shock, do not remove the cover (or back). No user-serviceable
parts inside. Refer servicing to qualified service personnel. Unplug the product from the wall
outlet before servicing or when it is unused for a long period of time.
3. The manufacturer should not hold responsibility for the damage caused by any substitutions
and modifications of the product without authorization from the manufacturer or authorized unit.
The flash symbol displayed in a triangle warns the user of dangerous electrical voltages
inside the device that could lead to electrical shocks with harmful effects to health if the
device is used incorrectly.
The exclamation point displayed in a triangle in the documentation indicates
dangers when using and maintaining the device.
CAUTION
Laser radiation when open. Do not stare into beam.

ODYS MultiFlat 19”-CINEMA-DVB-T/DVD
3
EN
WARNING
The apparatus shall not be exposed to dripping or splashing and that no objects filled with liquids,
such as vases, shall be placed on the apparatus.
NOTES
1. Read these instructions.
2. Keep these instructions.
3. Heed all warnings.
4. Follow all instructions.
5. Do not use this apparatus near
water.
6. Clean only with dry cloth.
7. Do not block any ventilation
openings. Maintain well ventilated conditions around the product. Do not put product on bed,
sofa or anything that blocks ventilation. Install according to the manufacturer’s instructions.
8. Do not install near any heat sources such as radiators, heat registers, stoves, or other apparatus
(including amplifiers) that produce heat.
9. Read, heed and follow all instructions to ensure correct and safe installation and interconnection
of the apparatus.
10. The apparatus shall not be exposed to dripping or splashing and that no objects filled with liquids,
such as vases, shall be placed on the apparatus.
11. The mains socket-outlet shall be installed near the apparatus and the mains plug shall remain
readily operable.
12. Protect the power cord from being walked on or pinched particularly at plugs, convenience
receptacles, and the point where they exit from the apparatus.
13. Only use attachments/accessories specified by the manufacturer.
14. Use only with the cart, stand, tripod, bracket, or table specified by the manufacturer, or sold with
the apparatus. When a cart is used, use caution when moving the cart/apparatus combination to
avoid injury from tip-over.
15. Unplug the apparatus during lightning storms or when unused for long periods of time.
16. Refer all servicing to qualified service personnel. Servicing is required when the apparatus has
been damaged in any way, such as power-supply cord or plug is damaged, liquid has been
spilled or objects have fallen into the apparatus, the apparatus has been exposed to rain or
moisture, does not operate normally, or has been dropped.
17. The apparatus shall be connected to a mains socket outlet with a protective earthing connection.
Do not touch the color TFT LCD screen by hand directly.
IMPORTANT FOR LASER PRODUCTS
1. CLASS 1 LASER PRODUCT
2. DANGER: Visible laser radiation when open and
interlock failed or defeated. Avoid direct exposure to
beam.
3. CAUTION: Do not open the top cover. There are no
user serviceable parts inside the unit. Leave all
servicing to qualified service personnel.

ODYS MultiFlat 19”-CINEMA-DVB-T/DVD
4
EN
The illustrations in this manual serve mainly as a reference and may differ slightly from
your device.
Copyright Protection
This product incorporates copyright protection technology that is protected by U.S. patents and other
intellectual property rights. Use of this copyright protection technology must be authorized by
Macrovision, and is intended for home and other limited viewing uses only unless otherwise authorized
by Macrovision. Reverse engineering or disassembly is prohibited.

ODYS MultiFlat 19”-CINEMA-DVB-T/DVD
5
EN
2 Characteristic Features and Contents of
package
This product incorporates DVD player, LCD display and DVB-T receiver in one system. You also
may use this device via the VGA interface as a PC monitor. Thanks to of its USB and SD card
interface, it is possible to exchange data with the latest memory media quickly and easily.
Multiple Mode
DVD mode VGA mode HDMI mode
SCART mode Component mode Composite mode
S-Video mode TV mode DTV mode
Product properties
High Resolution (DVD mode)
Adopt an MPEG2 decoding format to achieve horizontal resolution more than 500 lines.
Superior sound (DVD mode)
Dolby Digital decoder to output high quality sound effects.
Special playback
Support multi-angle, multi-language and multi-subtitle playback.
LCD (Liquid Crystal Display)
Designed with 19" color TFT liquid crystal display clearly shows the data.
Stereo amplifier
Built-in 2 x 3 W speakers provide high quality sound.
Teletext:
Supports teletext and several teletext functions are available.
Support
URL: http://www.odys.de
See our website for the latest information on this DVD player, on other products by our company and
on our company itself. If you have questions or problems, please read the FAQs on our website or
Contents of package
1 x MultiFlat 19“-CINEMA-DVB-T/ DVD 1 x DVB-T antenna 1 x remote control with batteries
1 x a/v cable 1 x audio cable 1 x operating manual
1 x mains cable with power supply unit

ODYS MultiFlat 19”-CINEMA-DVB-T/DVD
6
EN
Disc Information
Discs formats supported by this player
DISC LOGO CONTENTS SIZE
MAXIMUM TIME
(Side - Layer)
133 min (SS-SL)
242 min (SS-DL)
266 min (DS-SL)
DVD
Audio + Video
(active picture) 12 cm
484 min (DS-DL)
CD
Audio 12 cm 74 min
MP3 12 cm 600 min
JPEG Still high resolution 12 cm
MPEG2
DIVX
Audio + Video
(active picture) 12 cm
The operating method of some DVD discs is specified by the software maker. Please refer to the
instruction manual of the disc.
About Disc Terms
Title
Generally, pictures or music compressed on a DVD are divided into several sections, “title”.
Chapter
The smaller section unit of picture or music in a DVD under the title, usually one title is comprised of
one or more chapters and each of them is numbered for easy searching. But some discs may not
have a recording chapter.
Track
A segment of picture or music on a CD. Each track is numbered for searching.

ODYS MultiFlat 19”-CINEMA-DVB-T/DVD
7
EN
3 Controls and connections
3.1 Front view/ Side View
1. Color TFT screen
Presents high resolution picture.
2. EJECT button
Press to eject the disc out.
3. ■STOP button
Press to stop disc playback in DVD mode.
4. PLAY/PAUSE button
Press to start disc playback and press it again to pause playback in DVD mode.
5. Disc Tray Slot
Used to load disc.
6. SD/MS/MMC Card Port
Used to insert the SD/MMC or MS card.
7. USB terminal
USB connection to USB mass storage/Sticks.
8. INPUT button
Press to select enter the source selecting menu, press the ▲▼ direction buttons to select
desired mode and press the ENTER button to enter the selected mode.
When in the setup menu, this button also serves as the ENTER button.

ODYS MultiFlat 19”-CINEMA-DVB-T/DVD
8
EN
Front view/ Side View
9. MENU button
Press to enter or exit system setup menu.
10. CH▲/▼buttons
Press in TV mode to page up or down through channels. When in the setup menu, this button
also serves as the ▲/▼directional arrow button.
11. VOL▲/▼buttons
Press to decrease or increase the volume. When in the setup menu, this button also serves as
the ◄/►directional arrow button.
12. POWER button
Press to switch on or off the device (enter or exit the standby mode).
13. Speaker
14. Remote Sensor
Remote sensor window for the remote control.
15. Power Indicator
In active mode, it is blue; in standby mode, it turns red.
The “ PLAY/PAUSE”, “■STOP”, “ EJECT” buttons are available when the DVD
module is connected.

ODYS MultiFlat 19”-CINEMA-DVB-T/DVD
9
EN
3.2 Rear View
1. USB Upgrade Port
Connect the USB device only for upgrading
the TV software.
2. HDMI Input Jack
Connecting for HDMI signal.
3. COAXIAL Output Jack
Output the coaxial digital audio signal.
4. Y/PB/PR and L/R audio Input Jacks
Connecting for the Y/PB/PRinput in
Component mode.
5. AV/S-VIDEO Input Jacks
Connecting for AV/S-VIDEO signal input in
Composite or S-Video mode.
AV and S-Video share L/R audio jacks.
6. VGA Input Jack
Connected to the VGA output jack on a
personal computer.
7. PCMCIA Card Slot
Used to insert the PCMCIA card.
8. SCART Jack
Connecting for SCART signal.
9. Antenna Input Jack
Connected to external antenna to receive
the TV/DTV program in TV/DTV mode.
10. PC Audio Input Jack
Connected to the audio output jack on a
personal computer.
11. Headphone Jack
When headphone is inserted, the
loudspeakers are switched off.
12. DC 12V IN Jack
Connected to power adapter.
13. Power Supply Cord

ODYS MultiFlat 19”-CINEMA-DVB-T/DVD
10
EN
3.3 Remote Control
1. POWER button
Press to enter or exit the standby mode.
2. DTV button
Press to enter DTV mode.
3. ATV button
Press to enter ATV mode.
4. SOUND button
Press this button to change the audio mode:
User, Standard, Music, Movie or Sport.
5. TV.RADIO button
Press to select TV program playback or
Radio program playback in DTV mode.
6. Number buttons (0–9)
Press to select numbers.
7. button
In the TV mode, press to return to the
channel last viewed.
8. STEREO button
Press to select sound track in TV mode.
9. VOL+/- button
Press to increase or decrease the volume.
10. MUTE button
Press to turn on or off the audio output.
11. INPUT button
Press to select enter the source selecting
menu, press the ▲▼ direction buttons or
press the INPUT button repeatedly to
select desired mode and press the ENTER
button to enter the selected mode.
12. Direction buttons▲▼◄►
Press the direction buttons to select menu
options or settings.
13. ENTER button
Press to confirm selection in the setup
menu.
14. DISPLAY button
Press this button to display information
about the current mode on the screen.
15. PAUSE button
Press to pause the playback.
Press the ►PLAY button to resume normal
playback.

ODYS MultiFlat 19”-CINEMA-DVB-T/DVD
11
EN
16. ►PLAY button
Press to play the disc under DVD mode.
17. /buttons
Press to search backward or forward in
DVD mode.
In Channel Edit menu, use the red button to
delete a channel and use the green button
to rename a channel (see P21 for details).
In teletext mode, they are the teletext color
buttons.
18. SETUP button
In DVD mode press to open the setup
menu.
In TV mode, press to display or close the
teletext.
19. MENU button (under DVD mode)
Press to enter disc menu in DVD mode.
In teletext mode, press to disable teletext
display for page updates and press again
to resume.
20. SUBTITLE button
In DTV or DVD mode, press to select
alternate subtitle languages during
view/playback of a DTV program or
multiple language DVD disc.
In teletext mode, press to display P.100.
Note: Subtitle and teletext is only available
if the service is provided by broadcaster.
21. AUDIO button
Press to activate slow playback function in
DVD mode.
In teletext mode, press once to display the
concealed information, such as solution of
riddles or puzzles; press again to remove
the riddles answers from the display.
22. FAV.LIST button
Press to display the favorite channel list.
In Channel Edit menu, press this button to
set a favorite channel (see P21 for details).
23. CH.LIST button
Press to display the channel list.
24. ASPECT button
Press to shift the aspect radio of the screen
among Auto, 16:9, 4:3, Zoom1 and Zoom2.
25. EPG button
Press to display the Channel Guide menu
in DTV mode.
26. +10 button
In DVD mode, press to select numbers
greater than 10.
27. PICTURE button
Press to select the picture mode: choose
from User, Dynamic, Standard or Mild.
28. CH▲/▼button
In TV or DTV mode, press to select analog
channel or digital channel.
29. SLEEP button
This feature allows you to set up sleep time
in TV mode. Press the button repeatedly to
select the desired time to sleep or select
Off to close the function.
30. MENU button
Press to enter or exit the setup menu.
31. EXIT button
Press to exit all the OSD on the screen.
32. ■STOP button
Press to stop disc playback in DVD mode.
33. EJECT button
Press to eject the disc out.
34. /Next Skip buttons
Press to skip to the previous or next
chapter/track in DVD mode.
In Channel Edit menu, press the yellow
button to move a channel and use the blue
button to skip a channel (see P22 for
details).
In teletext mode, they are the teletext color
buttons.

ODYS MultiFlat 19”-CINEMA-DVB-T/DVD
12
EN
35. REPEAT button
Press to repeat a chapter, track, title or all
program content in DVD mode.
In teletext mode, press to hold the current
page and press again to resume.
36. TITLE button
During disc normal playback, press to go to
display the title menu.
In teletext mode, press the button first time
to double the size of teletext letters in the
upper half of the screen, second to double
the size of teletext letters in the lower half
of the screen and third to resume normal
status.
37. CARD button
Press to shift among disc playback, USB
playback and SD/MS/MMC playback.
In teletext mode, press to select four
groups of 3-digit numbers that are
displayed in different colors at the bottom of
the screen. Press the color buttons on the
remote control to select, then use the
number buttons to input the corresponding
number to display the page.
Repeat the above procedures for each
page to be stored, using a different color
button each time.
38. GOTO button
Press to select the desired disc starting
time, title or chapter in DVD mode.
In TV mode, press to display the real clock
and press the EXIT button to exit.

ODYS MultiFlat 19”-CINEMA-DVB-T/DVD
13
EN
Preparation of Remote Control
Place the remote control on an even surface
and insert the supplied batteries into the remote
control as follows.
1. Softly push the back cover to open the
battery compartment.
2. Insert two batteries (1.5V, size AAA),
please make sure the polarity matches the
marks inside the compartment.
3. Softly press the back cover to close it.
Under normal use the battery will last
for six months.
Take out battery when the remote is
not in use for a long time.
Using of Remote control
Point the remote control unit from no more than
about 7m from the remote control sensor and
within about 60 degrees of the front of the unit.
The operating distance may vary depending to
the brightness around.
Do not point bright lights directly at the
remote control sensor.
Do not place objects between the
remote control unit and the remote
control sensor.
Do not use this remote control unit
while simultaneously operating the
remote control unit of any other
equipment.

ODYS MultiFlat 19”-CINEMA-DVB-T/DVD
14
EN
4 System Connections
•Do not connect the power cord until all other connections have been made.
•Ensure that you observe the color cord when connecting audio and video cables.
4.1 Connecting to Power Supply
Connect the power supply cord to the wall AC outlet, see the figure below.
4.2 Connecting to Power Adapter
Power is also supplied through the appropriate power adapter(optional), one end is connected to the
DC 12V IN jack on the rear panel of the unit, the other end to the AC100~240V wall outlet.
It could damage the TV set that if the power supply cord and the power adapter are used
simultaneously.

ODYS MultiFlat 19”-CINEMA-DVB-T/DVD
15
EN
4.3 Connecting to External AV Signal Source
Use the audio and video cable to connect the input jacks on the rear panel of the unit to the external
AV signal source.
Connect the unit and the external AV signal source to the respective jacks with the S-Video cable.
Ensure that you observe the color cord when connecting audio and video cables.
After connection, turn on the power of the unit and the external AV signal source. Press INPUT then
direction buttons to select Composite or S-Video mode, and then press the ENTER button to
confirm.
The L/R audio input jacks can be used in the both Composite and S-Video modes.
4.4 Connecting to External AV Signal Source (Y/PB/PR)
Use the audio and video cables to connect the Y/PB/PRinput jacks on the rear panel of the unit to the
external AV signal source.
After connection, turn on the power of the unit and the external AV signal source. Press INPUT then
direction buttons to select Component mode, and then press the ENTER button to confirm.

ODYS MultiFlat 19”-CINEMA-DVB-T/DVD
16
EN
4.5 Connecting to External AV Signal Source (SCART)
Use the SCART cables to connect the SCART input Jacks on the rear panel of the unit to the
external AV signal source.
After connection, turn on the power of the unit and the external AV signal source. Press INPUT then
direction buttons to select SCART mode, and then press the ENTER button to confirm.
4.6 Connecting to a Coaxial Digital Output Device
This unit is designed with a coaxial digital audio jack, can be connected to the digital amplifier, see
the figure below:
This feature is available only for amplifiers equipped with coaxial digital audio input
connectors.
For TVs with a built-in DVD player (optional) and an amplifier with Dolby Digital decoding
function, set the digital audio signal output format in TV setup menu to “RAW”.

ODYS MultiFlat 19”-CINEMA-DVB-T/DVD
17
EN
4.7 Connecting to External AV Signal Source (HDMI)
Follow the figure below to connect an HDMI signal source to the HDMI jack on the rear panel of the
unit.
After connection, turn on the power of the unit and the external AV signal source and use the INPUT
and the direction buttons to select HDMI mode, and then press the ENTER button to confirm.
HDMI provides both audio and video signals and typically provides superior image quality
to component, S-Video or composite.
4.8 Connecting to PCMCIA Card
Insert the PCMCIA card into the PCMCIA slot on the rear panel of the unit. Please see the below
figure:
Please refer to the manual of the PCMCIA card for details.

ODYS MultiFlat 19”-CINEMA-DVB-T/DVD
18
EN
4.9 Connecting a USB Device for Upgrading
This unit is designed with a USB upgrade port, can be connected to the USB device for upgrading
the software, see the figure below:
Make sure that upgrading files are stored in the USB device before connection.
Upgrade just can be operated in ATV or DTV mode.
After upgrading, please unplug and re-plug the power supply cord to reboot the TV set.
4.10 Connecting to Headphones
This unit can be connected to an earphone for listening music privately. Insert the headphone plug in
the headphone jack on the back of the unit. After connecting to the earphone, the internal speakers
output will turn off automatically.
Prevent hearing damage and keep the volume in an acceptable range. Turn the volume
down before connecting the headphones; after they are connected, slowly turn the
volume up to the desired level.

ODYS MultiFlat 19”-CINEMA-DVB-T/DVD
19
EN
4.11 Connecting to PC
The unit can be connected to PC (personal computer) via the VGA cable. Follow the figure below to
connect:
1. Connect one end of the VGA cable to the VGA input jack on the rear panel of the unit and connect
the other end to the PC.
2. Connect one end of the audio cable to the PC audio input jack on the rear panel of the unit and
connect the other end to the PC audio output jack.
3. Set the PC video resolution to match that of the television (typically 1024 x 768@60Hz).
After connection, turn on the power of the unit and the external AV signal source and use the INPUT
and the direction buttons to select VGA mode, and then press the ENTER button to confirm.
4.12 Connecting to TV-Signal Input
Connect the TV signal cable (the antenna cable, for example) to the Antenna Input Jack on the back
of the unit so that you can receive television programmes.
After connection, turn on the power of the unit. Then press the INPUT button to select ATV or DTV
mode and conduct program selection.

ODYS MultiFlat 19”-CINEMA-DVB-T/DVD
20
EN
5 Input Source Selection
The unit incorporates multiple video modes which can be selected via the Input button on the
television or remote.
Press the INPUT button to enter Input menu. The screen will display as shown below:
Use the ▲▼ direction buttons and ENTER button
On the input menu, press the ▲▼ direction button to select the desired video mode. After
several seconds, you can enter the selected mode.
Or after you selected the desired mode press the ENTER button to enter the selected mode
immediately.
Use the INPUT button and ENTER button
On the input menu, press the INPUT button repeatedly to select the desired video mode. After
several seconds, you can enter the selected mode.
Or after you selected the desired mode press the ENTER button to enter the selected mode
immediately.
Table of contents
Other Odys LCD TV manuals