Odys Multi TV 700 Move User manual

ODYS Multi TV 700 Move
1
EN
Table of contents
1Safety instructions..................................................................................... 2
2Product properties..................................................................................... 5
3Quick Start Guide...................................................................................... 6
3.1 DVB-T installation – channel search.........................................................6
3.2 Language Setting .....................................................................................6
4Controls ..................................................................................................... 8
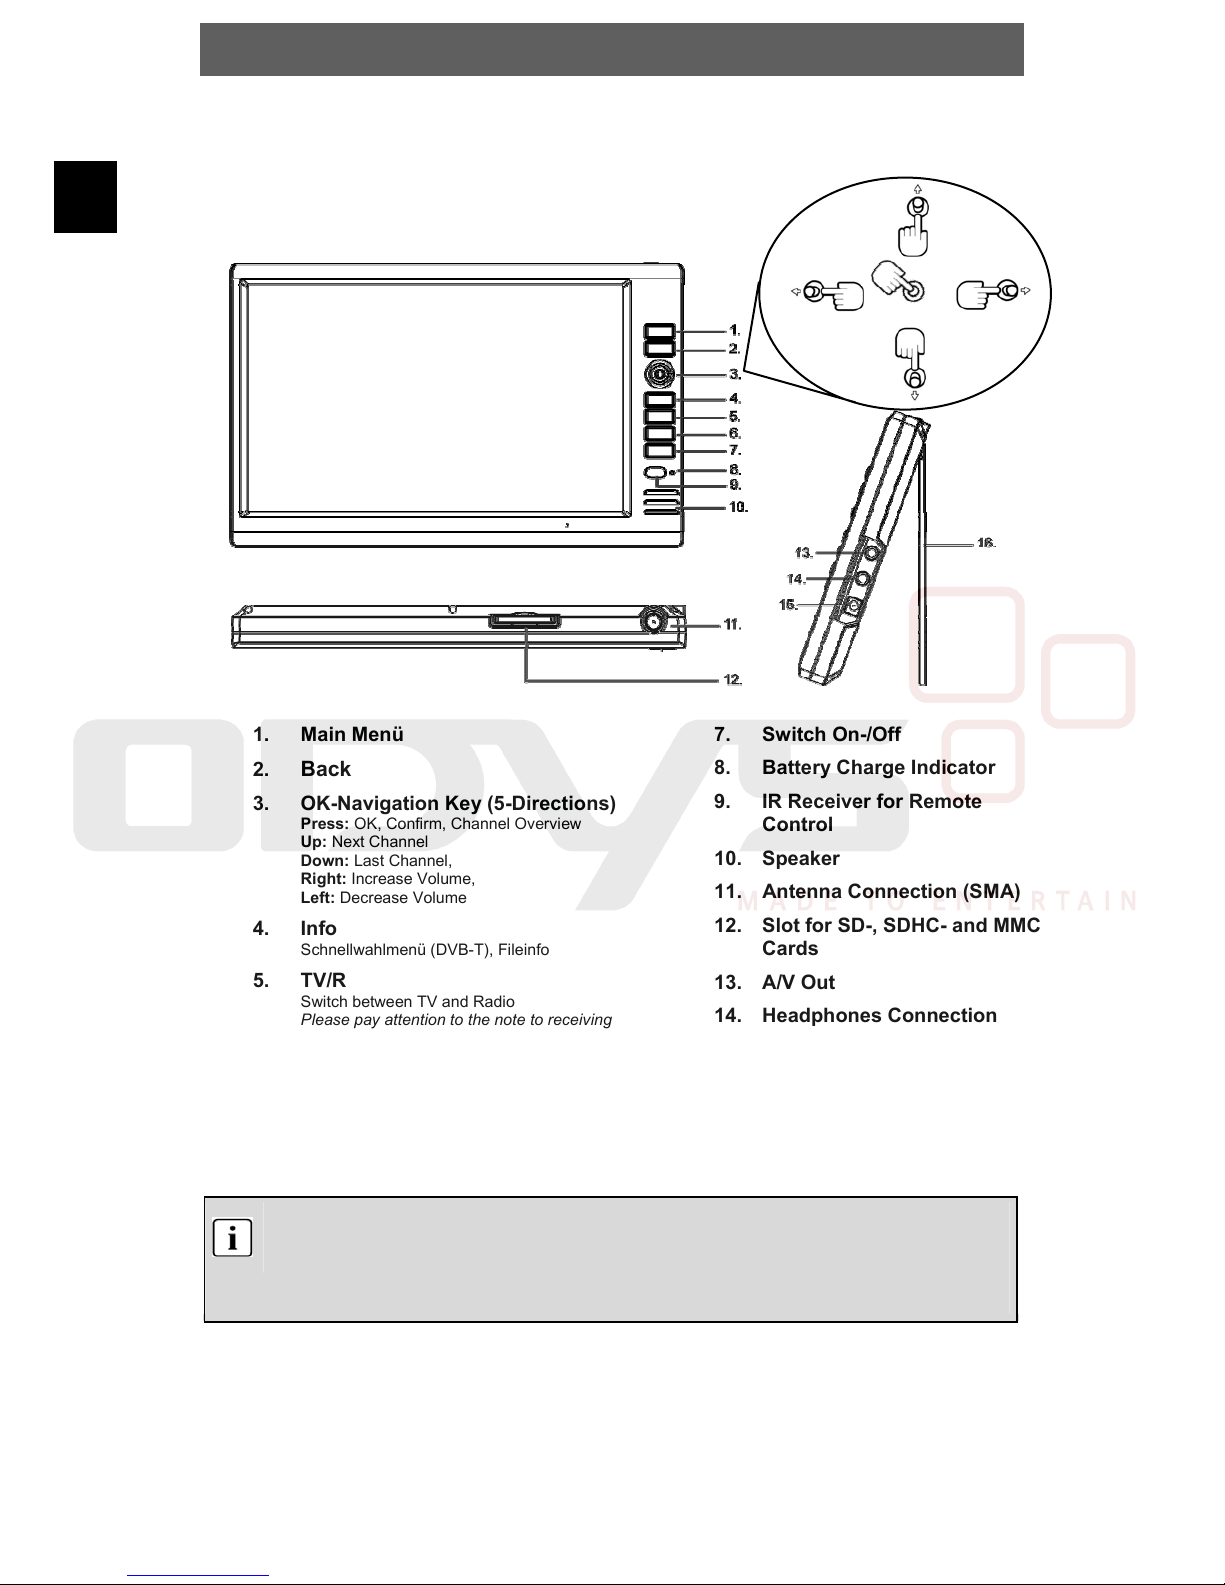
4.1 Buttons and controls on the main unit.......................................................8
4.2 Buttons on the Remote Control ................................................................9
5Connecting the Multi TV 700 Move ........................................................ 11
5.1 Connecting to a television set.................................................................11
5.2 Connecting Headphones ........................................................................11
5.3 Connecting Additional DVB-T-Antenna...................................................12
5.4 Power supply Unit...................................................................................12
6Rechargeable battery.............................................................................. 13
6.1 Notes on using rechargeable batteries ...................................................13
7Mode selection ........................................................................................ 14
8Digital TV................................................................................................. 15
8.1 DVB-T Installation – channel search.......................................................16
8.2 TV- Channel Selection............................................................................16
8.3 Short-Key Menu .....................................................................................17
8.4 Recording of DVB-T Programs ...............................................................19
9Multimedia (Video, Photo, Music)........................................................... 20
9.1 Photo playback.......................................................................................21
9.2 Video and MP3 playback........................................................................21
10 FUN (Games) .......................................................................................... 22
11 SYSTEM (Configuration) ........................................................................ 23
11.1 Channel Manager...................................................................................23
11.1.1 Delete All .....................................................................................23
11.2 Channel Search......................................................................................23
11.2.1 Installation(channel search) .......................................................23
11.3 Configuration .......................................................................................... 24
11.3.1 OSD Settings ..............................................................................24
11.3.2 TV Display...................................................................................24
11.3.3 Menu Settings (OSD) .................................................................25
11.3.4 Time Settings ..............................................................................25
11.4 Software Upgrade...................................................................................26
11.5 Factory Default .......................................................................................26
11.6 Version ................................................................................................... 26
12 Troubleshooting ...................................................................................... 27
13 Specifications .......................................................................................... 28
14 Warranty conditions ................................................................................ 29

ODYS Multi TV 700 Move
2
EN
1 Safety instructions
Thank you for choosing our product. Please read this manual carefully and observe all
safety and operating instructions. Store the manual in a safe place for later reference.
The flash symbol displayed in a triangle warns the user of dangerous electrical
voltages inside the device that could lead to electrical shocks with harmful effects
to health if the device is used incorrectly.
or
The exclamation point displayed in a triangle in the documentation
indicates dangers when using and maintaining the device.
The information symbol in the documentation indicates useful information and tips
for using and maintaining the device.
Power supply
Connect the power supply cable to the DC 5V IN jack of the device. Connect the
power plug to an earthed socket AC 100-240 V. If you have problems when
plugging the mains plug into the socket, rotate the plug by 180° and plug it in
again.
Tips regarding environmental protection
At the end of its operating life, this product may not be disposed of by
way of your normal household waste. Instead it must be delivered to a
collection point for recycling electrical and electronic equipment. The
icon on the product, in the operating instructions or on the packaging,
indicates this.
The materials used in manufacturing this product are recyclable,
depending on their identifying markings. By recycling this equipment,
by recycling its components, or through other procedures of re-using
outdated equipment, you are making an important contribution to
protection our environment. Please ask you local municipal
administration for the location of the corresponding recycling point.

ODYS Multi TV 700 Move
3
EN
Caution
Read, keep and follow these instructions and heed all warnings.
•Do not open the casing of the device under any circumstances, and do not attempt to
repair or modify the device. Malfunctions, damage, electric shocks and fires can occur as
a result.
•Never expose the device to rain, moisture or humidity. Malfunctions, damage and electric
shocks can occur as a result.
•When cleaning the device, do not use any volatile substances, such as solvents, to avoid
damaging the surface. Clean the device only using a soft, dry cloth.
•Ensure adequate air circulation around the device. Do not place the device on soft
furniture, carpets or other materials while in operation, as this may restrict the air from
properly circulating around the device.
•The device may not be excessively heated or operated near heat sources (e.g. heaters).
Malfunctions, damage, smoke and fires can occur as a result.
•Connect the device only to mains sockets that are properly earthed (protective earth).
The mains voltage must correspond to the operating voltage of the device indicated on
the device housing. When connecting the device to other electric devices, always follow
the manufacturer's instructions.
•Make sure that the cables are not damaged, stretched or twisted and that no short
circuits occur.
•Use only accessories specified or supplied by the device manufacturer. This also applies
to any attachments and fasteners.
•Place the device in a secure spot where it cannot shift or fall. If used in a
vehicle, the device must be securely fastened to avoid injuries or accidents
resulting from the device shifting or falling down.
•During a thunderstorm, disconnect the device from the mains. Do not use the
device during a thunderstorm. Malfunctions, damage and electric shocks can occur as a
result. Disconnect the power plug from the socket when you do not use the device for an
extended period of time. Keep the device in a clean, dry location where it is not exposed
to direct sunlight.
Caution
•In case of malfunctions or damage, maintenance or repair work may be required. Do not
use the device if there is visible damage to it. All maintenance and repair should be
conducted by qualified service technicians only.
•Do not place any heavy objects and objects that contain liquids, such as vases, on top of
the device..
•Make sure that no objects or fluids can penetrate into the device though openings or
venting slots. This could lead to short circuits, damage, electric shocks and fires.
•Do not touch the TFT LCD screen with your bare hand.
•Observe the safety instructions on rechargeable batteries in chap. 5.1.

ODYS Multi TV 700 Move
4
EN
Operating the device in a vehicle
•Please note that the device may not be used while the vehicle is in motion. It may only be
used when the vehicle is parked!
•When operating the device in a vehicle, make sure that it does not inhibit the driver's
forward or rear view and that it does not interfere with the safe operation of the vehicle.
Otherwise injuries or accidents may result. The driver must not operate the device or look
at the screen while driving. Do not allow your children to loosen or disengage their safety
belts to operate the device.
•Do not place the device near the airbag in the vehicle, thus avoiding functional disorders.
When the airbag deploys, the device or accessories may be flung through the vehicle and
thus can cause injuries and accidents.
•Install the cables so that they do not present an obstacle to operating the vehicle or to
getting into or out of the vehicle. Make sure that no cables can accidentally wrap around
the steering wheel, the pedals or any passenger's feet. Tie the cables together.
•If operating the device inside a vehicle, do not set the volume level too high so that you
are still able to hear sounds occurring on the inside and outside of your vehicle.
Otherwise accidents may occur.
Battery Recycling
In order to ensure the environmently friendly disposal of batteries, please do
NOT dispose of used batteries through normal household waste. Please take the
batteries to your local retail or community collection point for recycling.
The following may be an indication of a discharged battery: The device cannot
be switched on. The device switches off automatically and "Battery Empty" is
shown in the display. The device and or battery do not function properly.

ODYS Multi TV 700 Move
5
EN
2 Product properties
•AV Out: Analogue audio/video output
•DVB-T Receiver
•Supports Multimedia File Formats: MP3, WMA, JPEG, AVI, MPG
•Digital 7" TFT - Color Display
•Switchable power supply unit:
Automatic adjustment to different voltages in different countries.
•Multi-Language On-screen menu
•Recording of DVB-T
Special features:
•Recording of DVB-T Programmes
•Removable Antenna
•SD/MMC card slot
•Remote control
•Integrated Games
Support
URL: http://www.odys.de
See our website for the latest information on this DVD player, on other products by our
company and on our company itself. If you have questions or problems, please read
the FAQs on our website or contact our customer support service support@odys.de.

ODYS Multi TV 700 Move
6
EN
3 Quick Start Guide
3.1 DVB-T installation – channel search
First Installation
1. Switch on your Multi TV 700 Move.
2. Confirm the following query with “Yes” or “Ja” in order to start the channel
search..
3. Press the „OK“ Key.
New Channel Search using the menu
1. Switch on your Multi TV 700 Move.
2. Press then menu key on the remote control.
3. Select the Menu option „System“ using the keys.
4. Press the „OK“ Key in order to display the Menu.
5. Select the Menu option „Channel Search“ (Sender suchen) using the
keys.
6. Choose your desired search method for the channel search using the
keys.
7. It is strongly recommended to choose the Option „Area scan“ (Country
Search).
8. Press the „OK“ key to start the channel search.
9. Using the „EXIT“ key you can return to the menu level.
Note
Whether and how many DVB-T channels can be received by Multi Pocket TV 350,
is strongly depending on the operational place, and the DVB-T signal strength in
this Area.
DVB-T radio in particular is very limited and not available in most locations
Please note that for using of DVB-T after each larger local changes, a new
channel search should be accomplished. Since the frequency of the Channels
may Vary from region to region.
3.2 Language Setting
1. Switch on your Multi TV 700 Move.
2. Press the menu key on the remote control.
3. Select the Menu Entry “System” using the keys.
4. Press the Key “OK” to display the menu.
5. Select the Menu „Configuration“ using the keys.
6. Press the „OK“ key to enter the menu.
7. Select the Menu Entry „Display Setting“ option using the keys.
8. Move to „OSD Language“ using the key.
9. Highlight your desired language using key in the language list.
10. Confirm the language selection “Deutsch” to select Deutsch as language for
the menu.
11. Confirm your choice with the key “OK”.
12. Use the „EXIT“ key to get back in the main menu.

ODYS Multi TV 700 Move
7
EN
Contents of package
1 x Multi TV 700 Move 1 x Remote control 1 x Battery for remote
control
1 x users manual 1 x Power Supply 1x additional Antenna
1 x Audio/Video-cable
Similar illustration
Note
Accessories and their corresponding part numbers are subject to change without
notice due to technological progress.

ODYS Multi TV 700 Move
8
EN
4 Controls
4.1 Buttons and controls on the main unit
1. Main Menü
2. Back
3. OK-Navigation Key (5-Directions)
Press: OK, Confirm, Channel Overview
Up: Next Channel
Down: Last Channel,
Right: Increase Volume,
Left: Decrease Volume
4. Info
Schnellwahlmenü (DVB-T), Fileinfo
5. TV/R
Switch between TV and Radio
Please pay attention to the note to receiving
radio.
6. Rec
Start Recording
Attention! The Recording can only be started, if
there is a Memory Card in the Slot.
7. Switch On-/Off
8. Battery Charge Indicator
9. IR Receiver for Remote
Control
10. Speaker
11. Antenna Connection (SMA)
12. Slot for SD-, SDHC- and MMC
Cards
13. A/V Out
14. Headphones Connection
15. Power Supply
16. Stand
Note
Charge the battery with the device switched off. This will shorten the charging time
and extend the life of the battery.
Charge the battery fully before using for the first time.
Up
Down
Right
Left
Press
for OK

ODYS Multi TV 700 Move
9
EN
4.2 Buttons on the Remote Control
1. Mute (switch the sound off)
2. Switch on/off
3. Enter menu
4. Info Sort-key menu, Fileinfo
5. TV/Radio
Switch betweeen DVB-T Radio and TV
6. Down, last Channel
7. EPG
Electronic Program Guide
8. Channel Language
9. Record
Start Recording
Attention! The Recording can only be started,
if there is a Memory Card in the Slot.
10. Up, next channel
11. Direction left, Volume decrease
12. Select, short-key menu
13. Direction right, Volume increase
14. Down, Last Channel
15. Numerical buttons to directly select
the corresponding station numbers
or for entering the page numbers of
Videotext.
16. Play
17. Stop
18. Fast Rewind
19. Fast Forward
20. Previous Title
21. Next Title
22. Zoom In
23. Zoom Out
1 2
3
4
5
7
6 8
9
10
11
12
14
15 16
17
18
13
20
19
21
22 23

ODYS Multi TV 700 Move
10
EN
Preparation of the Remote Control
Place the remote control on an even surface and insert the supplied button cell into
the remote control as follows.
1Refer to the drawing and remove the empty
battery receptacle.
2Insert the battery into the receptacle. Make
sure the polarity matches the marks inside the
component.
3Insert the receptacle into the remote control.
Button cell data
Battery type: CR2025 , 3 V
Service life: approximately 1 year (for normal use and room temperature)
Using Of Remote Control
Point the remote control towards the main unit when operating. The remote control works
best at a distance less than 5 m and at an angle of up to 30° to the front of the unit. No
obstacles may stand in the way between remote control and infrared sensor and do not
place the remote control in direct sunlight. If the remote control unit fails to work even when
it is operated near the player, replace the battery.
Notes on batteries
If the remote control is not used for a long period of time, please remove the
battery from the compartment.
Do not heat batteries or dispose of them in fires.
Do not dismantle, deform or modify batteries.

ODYS Multi TV 700 Move
11
EN
black
yellow
red
Signal path
A
udio/Video cable
TV
white
5 Connecting the Multi TV 700 Move
•The DVB-T player, the television set and any other electric devices to be connected to
the DVB-T player must be switched off and disconnected from the mains.
•Observe the colour coding when connecting audio and video cables.
5.1 Connecting to a television set
Audio/Video-Connection
Using the A/V cable, connect the Multi TV 700 Move to the AV input of the television
set as shown in the illustration.
5.2 Connecting Headphones
Connect the headphones to the headphone/AV jack on the right side of the device. the
Loudspeaker is automatically deactivated.
Caution
Excessively high volume can damage your hearing. Turn the volume down before
connecting the headphones and then turn the volume up to a moderate level.

ODYS Multi TV 700 Move
12
EN
5.3 Connecting Additional DVB-T-Antenna
Connect the DVB-T-Antenna with DVB-T-Antenna connection jack.
Note
Depending on your region and building structure, a stronger antenna may be
requires in order to receive DVB-T stations. For the use of an antenna with
coaxial(IEC) connection you need an appropriate adapter(not included in the
package). The Multi Pocket TV has an MMCX Antenna connection.
5.4 Power supply Unit
The DVB-T player is delivered with a power supply unit.
Connect the power supply cable to the Jack on the right side of the device as shown
below. Connect the power plug to an earthed socket. The power supply indicator lamp
lights up red.
The illustration may vary
DVB-T
A
ntennenkabel

ODYS Multi TV 700 Move
13
EN
6 Rechargeable battery
Fully charge the battery before you use the device for the first time. Normally it takes
about five hours for the battery to be charged. When the rechargeable battery is fully
charged, you can operate the device with it for about 4 hours. Fully charge the battery
when it will not be used for an extended period of time.
6.1 Notes on using rechargeable batteries
¾When using a new rechargeable battery, fully charge it prior to use.
¾Use rechargeable batteries only in temperatures between 0°C and 40°C. Do not expose
rechargeable batteries to high temperatures or direct sunlight.
¾Do not throw the battery into water or fire.
¾Ensure adequate air circulation around the device. Do not place the device on soft furniture,
carpets or other materials while in operation, as this may restrict the air from properly circulating
around the device.
¾Do not disassemble the rechargeable battery.
¾While the battery is being charged, the battery status indicator lamp lights up red; when the
battery is fully charged, the lamp lights up green.
¾When the state of charge reaches a low level, a empty battery symbol is flashed on the LCD
Screen, Some minutes later the Multi Pocket TV 350 turns off automatically..
.
Note
Charge the battery with the device switched off. This will shorten the charging
time and extend the life of the battery.
Charge the battery fully before using for the first time.

ODYS Multi TV 700 Move
14
EN
7 Mode selection
Use the main menu to access the various operation modes and Settings:
1Press the MENU Key to switch to above illustrated main menu.
2Use the keys to move between the options.
3 Confirm your selections with OK key.
Available Functions:
TV (Digital TV) - Change various Settings for DVB-T Mode.
VIDEO - Playback for Movie files from SD card.
PHOTO - Playback for Pictures from SD card.
MUSIK - Playback for Music files from SD card.
FUN - 3 integrated games
SYSTEM - Change various System settings
The functions are explained in the following chapters.

ODYS Multi TV 700 Move
15
EN
8 Digital TV
Note
To avoid distortion, it may me necessary to switch the display to 4:3 or 16:9 which
ever best suites the current station. Refer to Chapter 9
Please note that movies using the 21:9 format may cause black margins on the
upper and lower margins of the display.
Note
Insure that DVB-T reception is available for your area. DVB-T radio in
particular is very limited and not available in most locations.
Depending on your region and building structure, a stronger antenna may be
requires in order to receive DVB-T stations. The antenna provided is only
designed for reception when close to the DVB-T transponder.
Metal buildings and the geographic location of the transponder may have a
strong effect on the reception. Please note that this is not a device defect;
merely specific specifications for the reception of DVB-T.
The Multi Pocket TV has an SMA Antenna connection.
Appropriate antennas may be obtained from your local specialty stores.
For the use of an antenna with coaxial(IEC) connection you need an
appropriate adapter, which may also be obtained from your local specialty
stores.
Please switch on the Device and switch to TV Mode.

ODYS Multi TV 700 Move
16
EN
8.1 DVB-T Installation – channel search
1. Switch on your Multi TV 700 Move. The device displays the main menu.
2. Select the Menu option “Setup” with the keys.
3. Press the “OK” key to display the menu.
4. Select the Menu Option ”Installation” (Menu Settings) using the keys.
5. Choose your desired search method for the channel search using the
keys.
6. It is strongly recommended to choose the Option „Country scan “ (Regional
Scan).
7. Press the “OK” key to display the menu.
8. Using the Keys move between the Area selections.
9. Select “Germany” with the keys to search available channels in
Germany.
10. Press two times the „OK“ key to start the channel search.
11. Using the „Return“ key to move up one menu level.
12. Use the „EXIT“ key to get back to the main menu.
Note
Whether and how many DVB-T channels can be received by Multi Pocket TV 350,
is strongly depending on the operational place, and the DVB-T signal strength in
this Area.
DVB-T radio in particular is very limited and not available in most locations.
8.2 TV- Channel Selection
1The DVB-T mode is the standard mode of the device. It starts automatically. Select
TV from the main menu and confirm with OK.
2Use the number buttons 0-9 on the remote control to select the desired TV program.
3 You can also switch to the stored TV programs going both forwards and backwards
in succession using the or CH+ and CH- buttons.
4 Set a suitable volume using the Vol+ und Vol- buttons.
5
6
Press the OK key to display the channel overview.
Press the Info key to call the short-key menu.
Program List
Press the key OK in order to display the channel overview.
Select the desired channel using the keys
/. Confirm your choice by pressing the key OK.
Press the EXIT key in order to return to the standard TV mode.

ODYS Multi TV 700 Move
17
EN
8.3 Short-Key Menu
1Press the INFO key on the remote control.
2 The short-key menu appears on the Display with several Options.
3Press the OK key again in order to select the desired option..
Subtitle
Press the OK Key to call the short-key menu. And confirm OK key again to enable the
subtitle function.
Note
This function is only available if appropriate information are transmitted form the
TV channels.
EPG(electronic program guide)
Press the INFO key to call the short-key menu. use /keys to highlight the Option
„EPG“ and confirm with OK key. follow picture will appear.
Use the ///Keys to see the EPG information from different channels.
Press the EXIT key in order to return to the standard TV mode.

ODYS Multi TV 700 Move
18
EN
Videotext (TTX)
1Press the INFO Key to call the short-key menu and select the option TTX.
Confirm with the OK Key to switch to Videotext.
2 Press the OK Key again to open the Videotext window, which shown the first page
of the Text content from current TV channel.
3Use the number keys 0-9 to input the number of your desired Videotext page.
4 You can also use the direction buttons to browse the Videotext content as following:
(Vol-) call index page
(VOL+) 100 pages up
(CH+) one page up
(CH-) one page down
5 For returning to the TV-Mode just Press the EXIT button.
Multiaudio
Press the INFO key to call the short-key menu and select the option Multi-audio. Using
the CH+/CH- Key to select the desired Audio language.
Note
The Multi-audio Function will only have an effect when receiving stations that
have been transmitted in more than one language.
Program info.
Press the INFO Key to call the short-key menu and select the option program info, the
information of current program is shown on the display.
For returning to the TV-Mode just Press the EXIT button.
Note
You can adjust how long the Program information remaining showed on the
display in the System setting (Configuration – OSD - OSD Timeout).
TV/Radio
Press the TV/RADIO Key to switch between DVB-T TV and DVB-T Radio mode.
Note
DVB-T radio in particular is very limited and not available in most locations.

ODYS Multi TV 700 Move
19
EN
8.4 Recording of DVB-T Programs
Note
This device does not have internal memory. In order to use the recording
function an SD or SDHC Card is required. Please insure that the memory
card being used has enough free space.
SD or SDHC Memory Cards may be used up to 8GB.
Please chose the desired channel and press the REC or record key to start the
recording.
Press this key again to stop the recording and then chose “Ja” or “Yes” zu finish
recording.
The device creates a folder named „REC“ on the memory card where the
recordings will be stored.
The recordings will be stored using the MPEG file format.
The filename of the recording will correspond with the channel and the time of the
recording.

ODYS Multi TV 700 Move
20
EN
9 Multimedia (Video, Photo, Music)
Insert the SD-Card into the SD-Slot (see the images below).
Prior to connecting the device, make sure that the SD card contains playable files.
1. Switch the device on and open the main menu by pressing the MENU button.
2. Choose in the same way if you want to play Photo, Music or Videos (Movie).
3. Now you can choose the data source Card (sde0).
4. Select the desired file and start playback using OK.
5. Press EXIT to return to the folder menu.
6. Press the „MENU“ button to step back to the main menu.
Playable Formats:
Audio: mp3
Video: avi, mpg, vob
Foto: jpg
Note
The USB jack cannot be used for connecting digital cameras or other USB
devices.
Please note that Videos with large data files may have an effect on the playback.
This device accepts memory cards with a maximum capacity of 2 GB.
Because of the variety of known file formats it is possible that some few files can not be
played.
Caution
In Video-Mode you can only see video files, in Music-Mode only music files and in Photo-
Mode only pictures!
Table of contents