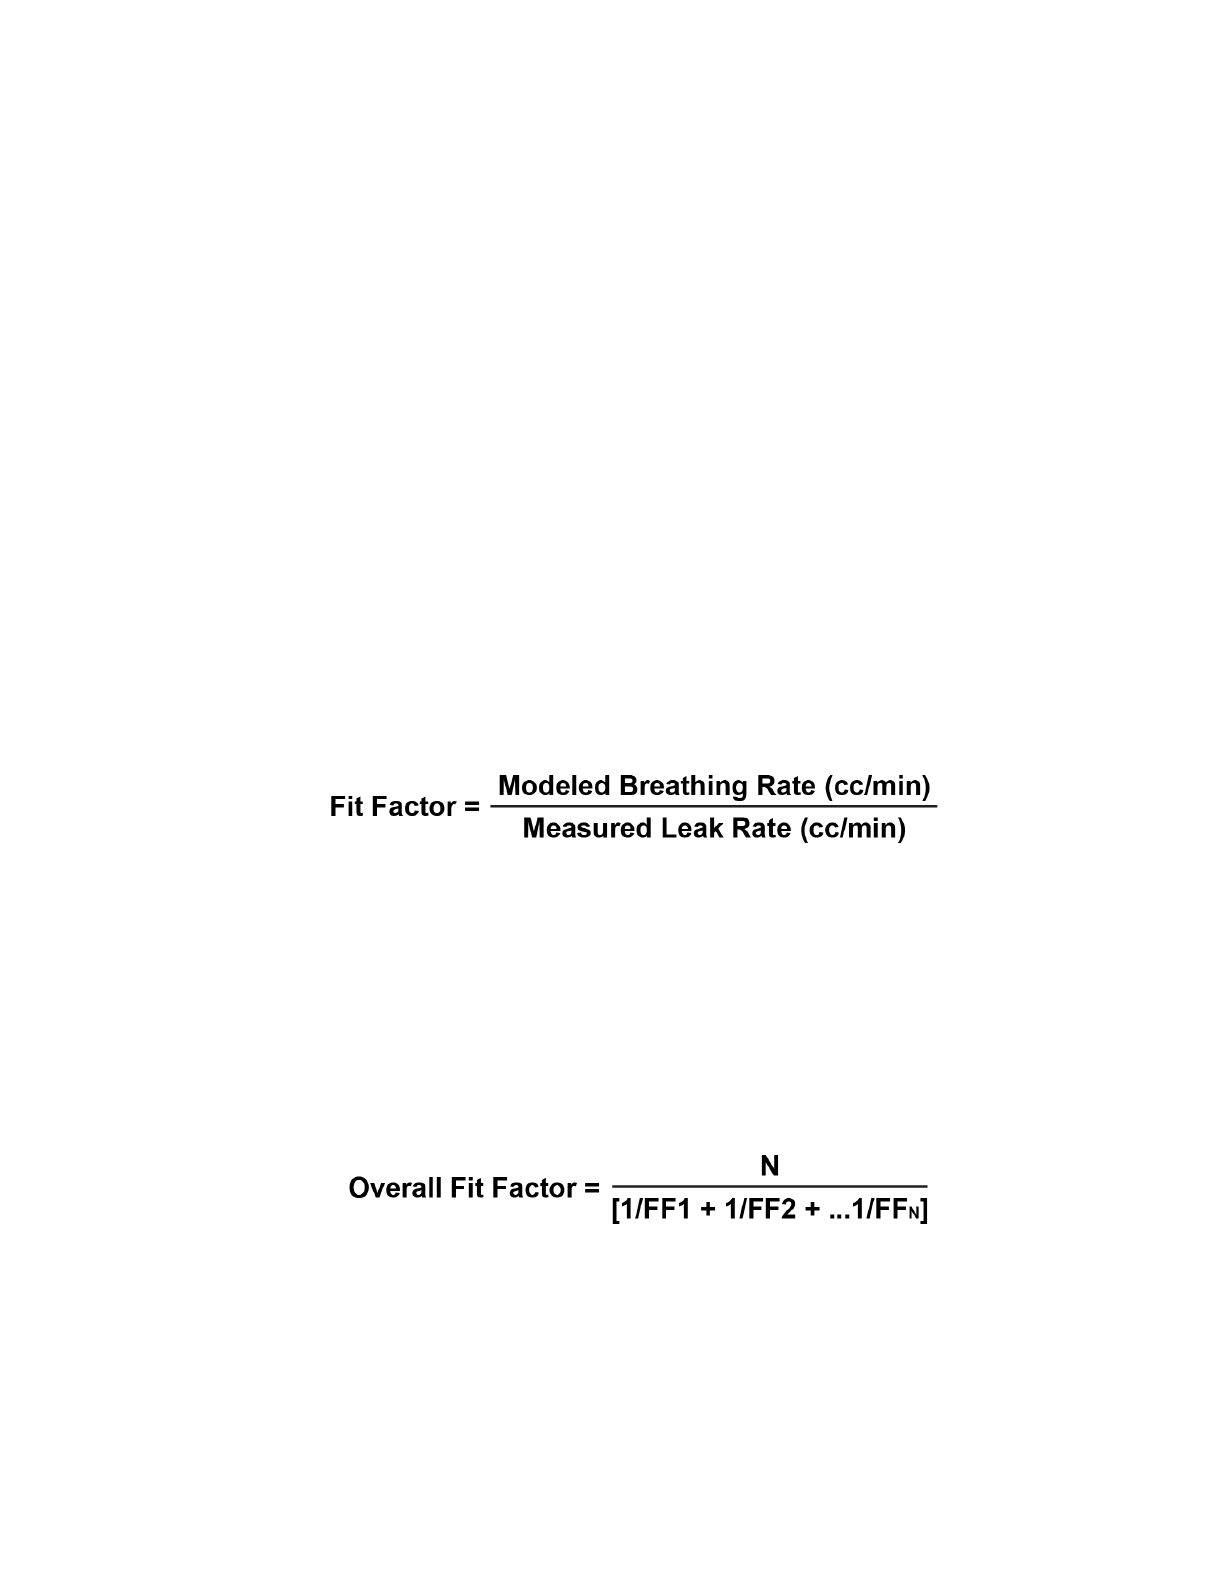
OHD QuantiFit 2 User manual

www.OHDGLOBAL.com
techsupport@ohdglobal.com
+1 205.980.0180
Contact
Us:
MANUAL

1
Table of Contents
Introduction.......................................................................................................................................................................2
How the QuantiFit2 Works ..........................................................................................................................................4
Instrument Setup.............................................................................................................................................................5
Startup Wizard .................................................................................................................................................................9
Navigation .......................................................................................................................................................................11
Performing a Test..........................................................................................................................................................16
Reports..............................................................................................................................................................................18
Daily Verification ...........................................................................................................................................................19
Onboard Settings..........................................................................................................................................................20
OHD Logic........................................................................................................................................................................24
Software Updates..........................................................................................................................................................26
Home Screen ..................................................................................................................................................................27
People................................................................................................................................................................................31
Company ..........................................................................................................................................................................32
Tests ...................................................................................................................................................................................33
Logic Settings .................................................................................................................................................................35
Devices..............................................................................................................................................................................37
Respirators.......................................................................................................................................................................38
Reports..............................................................................................................................................................................40
Troubleshooting............................................................................................................................................................41
Calibration and Maintenance ...................................................................................................................................47
Appendix A: Specifications ........................................................................................................................................48
Appendix B: Import Personnel Template .............................................................................................................49
Appendix C: Terminology ..........................................................................................................................................50
Appendix D: CNP Diagram ........................................................................................................................................51
Appendix E: Regulations.............................................................................................................................................52
Appendix F: Fit Test Adapters...................................................................................................................................53

Introduction
2
© All rights reserved. No parts of this work may be reproduced in any form or by any means -
graphic, electronic, or mechanical, including photocopying, recording, taping, or information
storage and retrieval systems - without the written permission of the publisher. OHD provides
this electronic copy which may be printed only for our customer’s use. Products that are referred
to in this document may be either trademarks and/or registeredtrademarks of the respective
owners. The publisher and the author make no claim to these trademarks.
While every precaution has been taken in the preparation of this document, the publisher and
the author assume no responsibility for errors or omissions, or for damages resulting from the
use of information contained in this document or from the use of programs and source code
that may accompany it. In no event shall the publisher and the author be liable for any loss of
profit or any other commercial damage caused or alleged to have been caused directly or
indirectly by this document. For further information, please contact the manufacturer:
OHD, LLLP
2687 John Hawkins Pkwy | Hoover, AL 35244 | U.S.A
+1.205.980.0180 | www.ohdglobal.com
Welcome
The QuantiFit2® can be used standalone or with OHD Logic software. When testing without a
computer, all reports and test data may be retrieved from the instrument. Data can be imported
into Logic software. The instrument is not compatible with FitTrack Gold, which comes with the
legacy Quantifit. However, data from FitTrack Gold can be imported into OHD Logic software.
The QuantiFit2 comes with an external power supply and can be powered by an optional battery
The QuantiFit2 has an optional removeable/rechargeable battery pack. Only the OHD battery
pack Part number FTK 3010-4023 may be used with the QuantiFit2. Go to
http://www.ohdglobal.com for information on purchasing the battery pack.
Safety and Environmental
The instrument and related documentation must be reviewed for familiarization with safety
markings and instructions before operating the instrument. The Quantifit2 is for use at an
altitude up to 3,100m (10,170ft.). The operating temperature range is 5 to 40 degrees C, (60 to
104 F) when powered by the external power supply; 5 to 45 degrees C, (60 to 113 F) when
powered by the optional battery pack, and 5 to 29 degrees C, (60 to 84 F) when powered by the
external power supply with the optional battery pack installed. If the included power supply
becomes faulty or damaged, it must be replaced with OHD part number FTK 3010-4021, whose
ratings are listed in the Appendix A: Specifications. The QuantiFit2 has an optional
removeable/rechargeable battery pack. Only the OHD battery pack part number FTK 3010-4023
may be used with the QuantiFit2. Call OHD (+1.205.980.0180) for information on purchasing
replacement power supplies and/or battery packs. The maximum relative humidity is 80% non-
condensing and pollution degree 2. If the Quantifit2 is not used specifically in the manor
outlined in this manual and for its intended use, the protection of the instrument may become
impaired. Under abnormal conditions, such as static discharge, it may be necessary to cycle
power to achieve proper operation.

Introduction
3
Statement on Cross-contamination
The risk of cross contamination resulting from the use of a QuantiFit2 is very minimal. Fit Testing
itself does not increase or decrease a person’s risk of exposure to any virus or illness. The real
threat is coming into close contact with an infected person no matter the location or activity.
The QuantiFit2 does not trap air in its system either before, during, or after a fit test. The
QuantiFit2 does not push air into the mask. The QuantiFit2 pulls air away from the test subjects’
respirator and vents it out of the system. This means that the chances of contaminated air being
in the system are, at worst, no more likely than contaminated air being in the surrounding
environment. If an infected person were to be fit tested, there is no more risk of contaminated
air being trapped and subsequently released on a succeeding fit test than there is just by
walking into the fit test area.
The QuantiFit2 and accessories are subject to surface contamination like any item in the test
area. Before and after fit test steps, when the test subject is wearing a respirator, his or her
inhalation is coming through inlets in the OHD adapter kit, and most of the exhalation should
travel through the exhalation valve and out of the respirator. There are many potential respirator
and adapter configurations. The chance could exist in a configuration that exhaled breath could
contact internal areas of an adapter kit. If it is suspected this has happened,disinfection would
be appropriate.
For protection against the transference of surface contamination, all possibly contaminated
surfaces the operator or subjects may contact need to be disinfected. This includes the
QuantiFit2 and accessories. The adapter kits may be cleaned either by immersion, spray, or wipe
from an EPA approved disinfectant as these have been shown to efficiently inactivate over 99%
of microorganisms (to include COVID-19) within a minute. The adapter should be dry before use
in a fit test. The QuantiFit2 tubing should be carefully wiped down with an EPA approved
disinfectant.
If there is a threat of contamination, the fit test operator should take precaution when carrying
out fit testing according to the guidance provided by the CDC.
If respirators are shared for fit testing, the fit test operator should follow OSHA 1910.134
AppendixB-2 Respirator Cleaning Procedures or the manufacturer’s guidelines for the disinfection
of the respirator to avoid any cross contamination.
See Appendix D: CNP Diagram for an air-flow diagram with Controlled Negative Pressure and the
QuantiFit2 system.

How the QuantiFit2 Works
4
The QuantiFit2 functions by creating and maintaining a negative pressure in the respirator. Once
the adapter valve is closed, sealing the respirator, the QuantiFit2 removes air from the respirator
until the challenge pressure is reached.
When the challenge pressure is reached, if there isn’t a leak, the QuantiFit2 doesn’t remove any
more air from the respirator. If there is a leak, air enters the respirator. The QuantiFit2 then
removes air from the respirator until the challenge pressure returns to the targeted value. This
process continues for 8 seconds, and then the test step ends.
During the fit test, the QuantiFit2 measures exactly how much air the instrument removed from
the respirator after reaching the challenge pressure. This measurement is equivalent to the leak
rate.
Challenge pressure, expressed in inches of water, is the maximum partial vacuum created in a
correctly fitting respirator when the user is working at a moderate to high rate. The modeled
breathing rate is the calculated total inspiration for one minute.
The modeled breathing rate is expressed in liters per minute (LPM), and is multiplied by 1,000to
provide cc/min, it is then divided by the leak rate in cc/min. This is the fit factor ratio. It is a ratio
of the total inhalation pressure to the air that leaked into the respirator.
Fit Factor Explanation
The ratio of the modeled breathing rate to the measured leak rate is the calculated fit factor and
is expressed by the following equation:
The modeled breathing rate (MBR) is the rate at which an individual could be expected to
breathe under moderate to heavy working conditions. The MBR is predetermined for the
standard respirator types. The MBR is calculated from the parameters specified by the operator
for custom respirators.
The measured leak rate (MLR) is directly related to respirator fit and integrity. All fit factors are
calculated from the MLR. The QuantiFit2 directly measures air leakage in cubic centimeters per
minute (cc/min) and then calculates the fit factor (FF).
The overall fit factor is calculated by using the harmonic mean of the fit testing steps as follows:
Where:
N = The number of exercises;
FF1 = The fit factor for the first exercise;
FF2 = The fit factor for the second exercise;
and FFN = The fit factor for the nth exercise

Instrument Setup
5
What comes with the QuantiFit2?
oThe QuantiFit2 Respirator Fit Tester
oTriple tube set
oPower supply and power cord
oUSB cable
oHard case with extendable handle and wheels
oLogic software
oCalibration Certificate
Unpacking the QuantiFit2 Carrying Case:
Release the two latches on the front of the case by depressing the moveable lever under each
latch.
A. Power cord
B. Batteries (optional)
C. Adapters (optional)
D. Power Supply
E. USB Cable
F. Tube Assembly
G. Additional Storage
Available Accessories
oRespirator adapters (required for fit testing)
oRechargeable battery pack
oPrinter (standard printer and/or cardprinter)
oUSB Keyboard
oTrigger button
Startup
oConnect the power supply or insert battery
oTurn on the instrument with the rocker switch
on the rear panel
oFollow the startup wizard (during initial setup
only)
oFollow instructions for Daily Verification
oReady to test

Instrument Setup
6
Instrument Front Connections
A. Carrying Handle
B. Color Touch Screen
C. Clear Tube Connection
D. Gray Tube Connection
E. Blue Tube Connection
F. Verification Connection for Gray/Clear Tube
G. Verification Connection for Gray/Clear Tube
H. Verification Connection for Blue Tube
I. Daily Verification Connection Points
J. Instrument Exhaust Port

Instrument Setup
7
Instrument Rear Connections
A. On-Off Switch - The On-Off Switch functions like a
standard power switch. Toggle up ( | ) and the
power is turned on. Toggle the switchdown (o) and
the power is turned off.
B. 12 VDC, 3A (max) Power Connection - The power
connection is to supply power to the unit,and the
universal power supply shipped with the QuantiFit2
must be used.
C. Trigger Button Connection –If the optional Trigger
Button is used to initiate test steps, it must be
inserted into this port.
D. USB Devices (4) - The four standard USB ports may
be used to connect a Keyboard, printer, USB
memory stick, or other useful devices.
E. USB PC Port - The USB PC Port is used to connect
the QuantiFit2 to a personal computer.The
QuantiFit2 is shipped with a supplied cable for this
purpose. The USB symbol on the cable must face up
to properly insert this cable. This
cable allows for the QuantiFit2 to be operated from the supplied software.
F. Serial Number –Located in the center, the serial number is important should you require
service or support. All records are kept according to the serial number.
G. Battery Latch –Push down on this latch to release the battery pack and pull outward to remove
it.
H. Battery Pack (optional) or Cover –When using an optional battery pack to operate the
QuantiFit2, it will be inserted here. When no battery pack is purchased, this cavity will be filled
with a blank cover.
I. Bluetooth Module (internal, not shown) - When purchased with the Bluetooth function, the
QuantiFit2 can wirelessly connect to a computer with Bluetooth capability.
CAUTION: It is vital to open Logic software to pair the device. See Logic Software
section.
OHD Logic software allows users to run multiple machines simultaneously, with flexibility on the
start time for any test. Standard Bluetooth allows testing to happen from across the room.

Instrument Setup
8
Connecting Tubes
It is best to connect the metal quick connects while holding onto the tube and not the
connection. The metal quick connect will click into place. The tubing set consists of three tubes
(blue,gray, and clear). Out of the six ends of the tube assembly, there is only one male
connection, which will always go into the largecircle on the front of the unit. The other two
tubes should be attached to the color-coded ports. When performing a daily verification, the
opposite ends of the tubes should be matched with the corresponding colors on the bottom
row of the front panel.
On the Adapter
oThe blue tube will always connect to the
single port connection.
oThe gray and clear tubes will be connected
to the port connectors that are side-by-
side. The two connections are
interchangeable on the adapter and can be
placed on either port.
Battery
The optional battery pack can be used in lieu of the power
cord. When a battery is in place, if the QuantiFit2 is plugged
into a wall outlet and the building loses power, the battery
will automatically take over without any interruption to the fit
test. The battery may be charged while connected to power
whether the QuantiFit2 is in use or not. When fully charged, the battery
typically yields approximately four hours of typical testing.
Daily Verification
The daily verification is required for each day of
testing. This check measures the leak rate of the
leak orifice on the triple tube assembly at various
pressure levels and confirms that the diaphragm
pump and other processes are working correctly.
See the Daily Verification section for more
information.

Startup Wizard
9
Language
Select your preferred language here.
Regulation
The operator will be required to select the
regulation that will be followed for testing in any
specific region. This can be changed in the
Settings>Admin Menu screen if there is a need to
switch regulations. The regulation controls all the
test parameters:
Select regulation links are listed in
Appendix E: Regulations.
Respirator Selection
Find the respirator(s) that will be used for fit
testing and toggle the on/off switch to on. If a
particular respirator has not been determined,
you may select any respirator andcontinue. This
can be changed later in the Settings>Setup
Respirators section.
Operators
For every test performed on the QuantiFit2, an
operator must be assigned to the record. The
Operator screen is used to add/edit operators
in the database. Enter one or more operator.
Additional operators may be added in the
Settings>Admin Menu section. See Setup
Operators for more information.

Startup Wizard
10
Daily Verification Wizard
This section will guide the operator through a daily
verification. This must be performed every day of
testing. Upon starting the instrument each day, the
Daily Verification screen will appear. See the Daily
Verification of this manual for more information.
People/Test
After the daily verification check has been
performed, the wizard will move on to the People
screen. People can be added one by one, imported
from a list, or added at the time of a test. The
people screen is the last screen in the setup
wizard. The operator may close this window or
perform fit tests. See Performing a Test
instructions in this manual.

Navigation
11
The QuantiFit2 is operated by the color touch on the front of the instrument. When pressing any
button, there will be a “click-tone”. The volume of this tone can be changed in the System
Settings menu. There are five major modules to select from:
People/Test: Where people are added, edited, or imported,
and where tests are initiated.
Seal Check: Holding this button will close off the air flow in
the respirator so that the test subject can do a user seal check.
Reports: Reports that can be printed out or exported one at
a time, or by date,company, or group.
Daily Verification: Used to perform the daily verification
requirement for each day of operation.
Settings: Contains parameters that can be changed for the
convenience or requirement of the operator.
Other buttons you will see are:
ADD –This button will allow the user to add to the records currently viewed, e.g.,
person, respirator, etc.
ADMIN MENU - Entry to a menu for secure and important settings
CANCEL –This button will close the current screen. Any values entered bythe operator
on the screen will not be saved.
COMPANY –A separation of people into different groups, teams, companies, etc.
DAILY VERIFICATION –Will allow the user to perform a daily verification when the
initial daily calibration has already been completed
DELETE –Removes an item from a list

Navigation
12
DOWNLOAD –For loading people into the QuantiFit2 from the OHD Logic software
EDIT –Allows the operator to change information for the selected item
GO BACK –The back button will allow the operator to return to the previous screen
GO DOWN –To move down through a list
GO FORWARD –This button will guide the operator to the next screen in the sequence
GO UP –This button will guide the operator to move up in a list
NEXT –Takes the operator from the People screen to the test screen
HELP –Dynamic help according to the screen being viewed
HISTORY –Will allow the operator to see recorded information regarding the selected
person
HOME - Will bring the operator back to the Home screen
OPERATORS - Add/edit operators that will be testing individuals
PEOPLE/TEST –Add/edit people and initiate fit test

Navigation
13
PRINT –The print button allows the user to print a report related to the current screen
REPORTS –Brings the operator to a section enabling them to print reports by date or
company
RETRY –When a test step is interrupted, this allows the test subject to retry that step
SAVE –The green checkmark will save the information entered on the screen
SEAL CHECK –Allows the test subject toperform a user seal check
SEARCH –A field available on the People screen that allows a search to find the
desired test subject quickly and easily
SETTINGS –Enters the screen with options for changing settings on theQuantiFit2
SETUP RESPIRATORS –Add, edit, or delete respirators
SYSTEM INFORMATION –with information including software version, serial number,
calibration due date, etc.
UPDATE SOFTWARE –Used when an update is available and saved on a USBdrive
USB SAVE –Save report or information to a USB drive plugged into the QuantiFit2

Navigation
14
People
A. Search
Test subjects may be searched by last name or by their personal ID. Click the button to be used
for the search. The search will be defaulted to Last Name. Press the X at the end of the search
bar to reset all search criteria. Partial names and numbers may be used in the search.
For example:
oEnter an “E”in the search, and all those in the database with the last name starting with “E”
will be displayed.
oWhen specifying a company and typing in an E, only those names starting with E and within
the company selection will be shown.
B. Select Company
Company is intended to create a division among the test subjects who are entered into the
onboard database. To add a company to the QuantiFit2 database, type in a company name
when adding a test subject to the database. The company will be saved automatically along with
the test record.
CAUTION: When entering the name of a company, it is critical that it exactly
matches the previous entries, or a new company will be created.
C. Add
The Add button will open a screen that will require
test subject information. The fields available are
Name, ID, Company, Group, and Notes.
D. Delete
When a test subject is selected, press on this icon to
delete this person from the instrument. There will be a prompt asking if you are sure that you

Navigation
15
want to delete this person from the database.
CAUTION: After deletion, a test subject cannot be restored.
E. Download
The download feature allows test subjects to be uploaded in bulk. This can be done
through a CSV file from the OHD Logic software. See Appendix B: Import Personnel Template for
import requirements.
F. History
When a test subject is selected and the history button is pressed, a screen will show any existing
tests for this person. Tests will be listed by date.
G. Edit
When selecting a test subject and pressing onthe edit button, there will be an opportunity to
change the saved information for this person. This includes Name, ID, Company, and Notes.
H. Next
When a test subject is selected, the Next button will move to the test screen

Performing a Test
16
Test Screen
The test screen prompts the operator or test
subject to select or fill in the details of the test.
This includes Respirator, Size, and Operator.
The Respirator selection will only show the
respirators that have been selected during thesetup
wizard or in the Setup Respirators module on the
settings screen.
Auto Start
The Auto Start feature is turned on by default. With this on, the test subject takes a comfortable
breath preparing to hold it once the circle in the lower right corner fills with green. The
QuantiFit2 senses the breath hold and the test automatically begins
Operator Signature
After the details of the test have been confirmed,
the operator can progress to input their signature
on screen, if desired. This feature can be turned off
in Settings>System Settings>Signature Capture.
Preparing the Respirator
If the respirator has an inhalation valve at
the place where a fit test adapter will be
connected to the respirator, it must be
removed or propped open.
When the test subject is ready, connect the
tube assembly to the adapter(s).
oThe blue tube goes to the singleport.
oThe gray and clear tubes go to the two
ports that are located side by side. It
does not matter which tube is
connected to which of these two
connectors. See Appendix F: Fit Test
Adapters for more information.
Beginning a Fit Test
After selecting or adding a person to the database, the test can begin. Explain the test to the test
subject: During each step, the test subject will be given instructions to be in a specific position for
the test, and a possible action to perform before the test step begins.

Performing a Test
17
Initiating the test step:
With Auto Start
oIf the Auto Start feature is turned on: Instruct the test subject to take a comfortable breath
preparing to hold it once the circle in the lower right corner fills with green.
•
The test will begin automatically.
•
Remain still for the duration of the test
•Pressing the green button will also initiate the test.
Without Auto Start
o
If not using Auto Start,
instruct the test subject to take a comfortable breath preparing to hold
it once the circle in the lower right corner fills with green, and then press the green button on
the screen.
At the end of each step, a fit factor will show for several seconds. If the fit factor is greater than
the minimum fit factor required, the instrument will advance to the next step. If the test should
fail for reasons other than a poor fit (test subject coughs, the test starts when the test subject
was not ready, etc.), the step may be retried.
After the final step, if the signature feature is
enabled, the test subject will sign on the
touchscreen.
At the end of the test, the results are saved into the database and cannot be edited. The operator
may choose to print the test results immediately or wait to print later. The test is stored and able
to be accessed at any time.

Reports
18
Reports may be printed at the time of the test, or any time after the testing hasbeen
completed. The following reports are available on the QuantiFit2:
Fit Test Reports
oIndividual
A single-page report that contains all required data for a respirator
fit test record. This report includes a fit test card at the bottom of
the sheet for the test subject to keep.
oSummary
A report that will print the specified group of people in a
truncated fashion, which allows for many people to be
recorded on the same sheet.
Fit test reports can be selected by:
o
Company
o
An individual person
o
T
ests that fall within a specific date range
Verification Reports
Quick selections include:
o
Today
o
Current week
o
Previous week
o
Current month
o
Previous month
o
Custom [Date Range]
Print/Export Reports
The reports can be saved as a PDF file, CSV file, or both, or
printed directly to an approved
printer.

Daily Verification
19
The daily verification is required for each day
of testing.
When turning on the instrument for the first
time each day, the Operator will first be prompted
with the daily verification message. Once the daily
verification has been performed for the day, this
message will no longer appear when the unit cycles
power.
The daily verification measures the leak rate of the leak orifice on the triple tube assembly at
various pressure levels and flow rates and confirms that the diaphragm pump and other
processes are working correctly.
The daily verification may be performed at other times for other purposes. A Daily Verification
button can be found on the QuantiFit2 Home Screen.
Run a daily verification when:
oThe instrument moves to another location, especially with any environmental changes.
oWhenever the triple tube assembly is changed.
Troubleshooting:
If the instrument does not pass the daily verification, troubleshooting information will be
displayed. If the verification will not pass after troubleshooting steps, the unit may require
service.Contact OHD technical support (techsupport@ohdglobal.com.
Table of contents