Oki MSM7617 User manual

¡ Semiconductor MSM7617 Evaluation Board
1
¡ Semiconductor
MSM7617 Evaluation Board
2-Channel Echo Canceller LSI
GENERAL DESCRIPTION
This evaluation board is used to evaluate the characteristics of the
MSM7617 (64-pin QFP), a 2-channel echo canceller LSI device.
Separate channels are provided for both analog and digital (PCM)
input/output interface, so this evaluation board will work with all I/O
modes of the MSM7617 and a wide variety of evaluation circuits.
BLOCK DIAGRAM
RIN1
IOM1
IOM0
ECDM2
ECDM1
ECDM0
ECM
PWDWN
ROUT1
SIN1
SOUT1
JP1
SYNC1
SCK
SYNC(8 K)
SCK(128 K)
SYNC(8 K)
RST1
SCKO
SYNCO
RIN2
ROUT2
SIN2
SOUT2
SYNC2
CLKIN
RST2
AIN1
2ch PCM CODEC
MSM7617
2ch PCM CODEC
AOUT1
AIN2
AOUT2
RIN1
ROUT1
SIN1
SOUT1
DOUT1
DIN1
DOUT2
DIN2
SYNC
SCK
A/m
JP2
JP12
JP9
JP19
JP20
AIN1
AOUT1
AIN2
AOUT2
RIN2
ROUT2
SIN2
SOUT2
DOUT1
DIN1
DOUT2
DIN2
SYNC
SCK
A/m
JP4
JP3
JP11
JP10
RPCMI1
RPCMO1
SPCMI1
SPCMO1
EXT.SYNC1
EXT.SCK
SYNC, SCK
Generator
RST SW1
D-VDD
D-GND
A-VDD
A-GND
RPCMI2
RPCMO2
SPCMI2
SPCMO2
EXT.SYNC2
RST SW1
Main CLOCK
Generator
A/m
Common
Mode SW
NLP2
HCL2
ADP2
HD2
ATT2
SG21
SG20
SA21
SA20
RGC21
RGC20
ch2
Mode SW
NLP1
HCL1
ADP1
HD1
ATT1
SG11
SG10
SA11
SA10
RGC11
RGC10
ch1
Mode SW
SYNC1OUT SCKOUT
SYNC2OUT

MSM7617 Evaluation Board ¡ Semiconductor
2
SPECIFICATIONS
CODEC used
Channels
Analog input
Maximum input level
Input impedance
Analog output
Maximum output level
Output load resistance
Digital input
Digital output
VIH
VIL
VOH
VOL
Power supply voltage
Current consumption
Operating temperature
Board size
Echo canceller characteristics
Echo attenuation
Cancelable delay time
MSM7533VGS-VK
2 channels (can be set by I/O mode as below)
2-channel parallel mode
2-channel serial mode
1-channel cross-connected mode (FTF mode)
3.4 Vp-p
600 W
3.4 Vp-p
600 W(min)
AOUT of PCM CODEC is output directly
Note: A 600 Wresistor is mounted on the board, but the surface trace of
the back side bypasses it. By cutting the pattern, the 600Wcan be
inserted in series.
2.4 V to VDD
0 V to 0.8V
4.2 V to VDD
0 V to 0.4 V
4.75 V to 5.25 V
200 mA (max)
–30 to +85°C
21.1 (W) ¥3.5 (H) ¥13.9 (D) (cm)
30 dB or higher
Input signal
ERL
Delay
Mode settings
59 ms (Calculated Value)
This value is measurable.
For possible 30 dB cancellation, deduct 5 ms from the value.
: –10 dBm0 white noise
: 6 dB
: 50 ms
: ATT, NLP, GC all off

¡ Semiconductor MSM7617 Evaluation Board
3
EXTERNAL VIEW & COMPONENT LAYOUT
PIN AND COMPONENT DESCRIPTIONS
Pin Descriptions (1/3)
COMMON
MODE
SW
ch1
MODE SW
MSM7617
QFP
1pin
D-V
DD
LD2
ch1
MODE
SW2
MSM7533
ch2
MODE
SW2
ch2
MODE
SW1
ch1
RST
ch1
MODE
SW1
Main CLOCK
Generator
SYNC, SCK
Generator
JP8
JP5
A-VDD
A-GND
AG
AG
AG
AG
RIN1
ROUT1
SIN1
SOUT1
AG
AG
AG
AG
RIN2
ROUT2
SIN2
SOUT2
SPCMO1
RPCMO1
DG DG
SPCMI1
RPCMI1
DG DG
RPCMI2
SPCMI2
DG DG
RPCMO2
SPCMO2
DG DG
SCKOUT
SYNC2OUT
DG
SYNC1OUT
DGDG
EXT.SCK
EXT.SYNC2
DG
EXT.SYNC1
DGDG
D-GND
LD1
VR1
VR2 1pin
JP1
JP2
MSM7617
PGA
1pin
ch2
RST
JP13
JP20JP19
JP12
JP14
U5
MSM7533
VR3
VR4
1pin
–
JP18
JP15
–
JP3
JP4
U6
JP10
JP11
JP9
ch2
MODE SW
Channel 2
PCM Signal
Input/Output Pins
Channel 1
PCM Signal
Input/Output Pins
Sync Signal
Output Pins
External Sync Signal
Input Pins
COMMON
MODE SW
Digital Power Supply
Input Pins
Analog Power Supply
Input Pins
Channel 1
Analog Signal
Input/Output Pins
Channel 2
Analog Signal
Input/Output Pins
RST SW
S4 S3 S2 S5 S1
S7
S8
U3
U4
U2
U1
Pin
Type
Description
RIN1 I Analog input pin for channel 1 RIN signal. The input analog signal is converted to a
PCM signal by a PCM CODEC to be provided as the RIN1 signal to the MSM7617. To
use the RIN1 pin, set JP1 (RIN1 SEL) to ANLG (refer to the description of JP1). This
input can be amplified about 0 to +12 dB by VR1.
ROUT1 O Analog output pin for channel 1 ROUT signal. The MSM7617's ROUT1 signal is
converted to the analog signal by a PCM CODEC and output on this pin.
SIN1 I Analog input pin for channel 1 SIN signal. The input analog signal is converted to a
PCM signal by a PCM CODEC to be provided as the SIN1 signal to the MSM7617. To
use the SIN1 pin, set JP2 (SIN1 SEL) to ANLG (refer to the description of JP2). This
input can be amplified about 0 to +12 dB by VR2.
SOUT1 O Analog output pin for channel 1 SOUT signal. The MSM7617's SOUT1 signal is
converted to the analog signal by a PCM CODEC and output on this pin.

MSM7617 Evaluation Board ¡ Semiconductor
4
Pin Descriptions (2/3)
Pin
Type
Description
RPCMO1 O Output pin for channel 1 ROUT PCM signal.
The MSM7617's ROUT1 signal is directly output on this pin. This pin is used for the
PCM interface.
SPCMO1 O Output pin for channel 1 SOUT PCM signal.
The MSM7617's SOUT1 signal is directly output on this pin. This pin is used for the
PCM interface.
RPCMI1 I Input pin for channel 1 RIN PCM signal.
The signal is directly input to the MSM7617's RIN1. To use the RPCMI1 pin,
set JP1 (RIN1 SEL) to PCM (refer to the description of JP1). This pin is used for the
PCM interface.
SPCMI1 I Input pin for channel 1 SIN PCM signal.
The signal is directly input to the MSM7617's SIN1. To use the SPCMI1 pin,
set JP2 (SIN1 SEL) to PCM (refer to the description of JP2). This pin is used for the
PCM interface.
RIN2 I Analog input pin for channel 2 RIN signal.
The input analog signal is converted to a PCM signal by a PCM CODEC to be provided
as the RIN2 signal to the MSM7617. To use the RIN1 pin, set JP4 (RIN2 SEL) to ANLG
(refer to the description of JP4). This input can be amplified about 0 to +12 dB by VR3.
ROUT2 O Analog output pin for channel 2 ROUT signal.
The MSM7617's ROUT2 signal is converted to the analog signal by a PCM CODEC and
output on this pin.
SIN2 I Analog input pin for channel 2 SIN signal.
The input analog signal is converted to a PCM signal by a PCM CODEC to be provided
as the SIN2 signal to the MSM7617. To use the SIN1 pin, set JP3 (SIN2 SEL) to ANLG
(refer to the description of JP3). This input can be amplified about 0 to +12 dB by VR4.
SOUT2 O Analog output pin for channel 2 SOUT signal.
The MSM7617's SOUT2 signal is converted to analog by a PCM codec and output on
this pin.
RPCMO2 O Output pin for channel 2 ROUT PCM signal.
The MSM7617's ROUT2 signal is directly output on this pin. This pin is used for the
PCM interface.
SPCMO2 O Output pin for channel 2 SOUT PCM signal.
The MSM7617's SOUT2 signal is directly output on this pin. This pin is used for the
PCM interface.

¡ Semiconductor MSM7617 Evaluation Board
5
Pin Descriptions (3/3)
Pin
Type
Description
RPCMI2 I Input pin for channel 2 RIN PCM signal.
The signal is directly input to the MSM7617's RIN2.
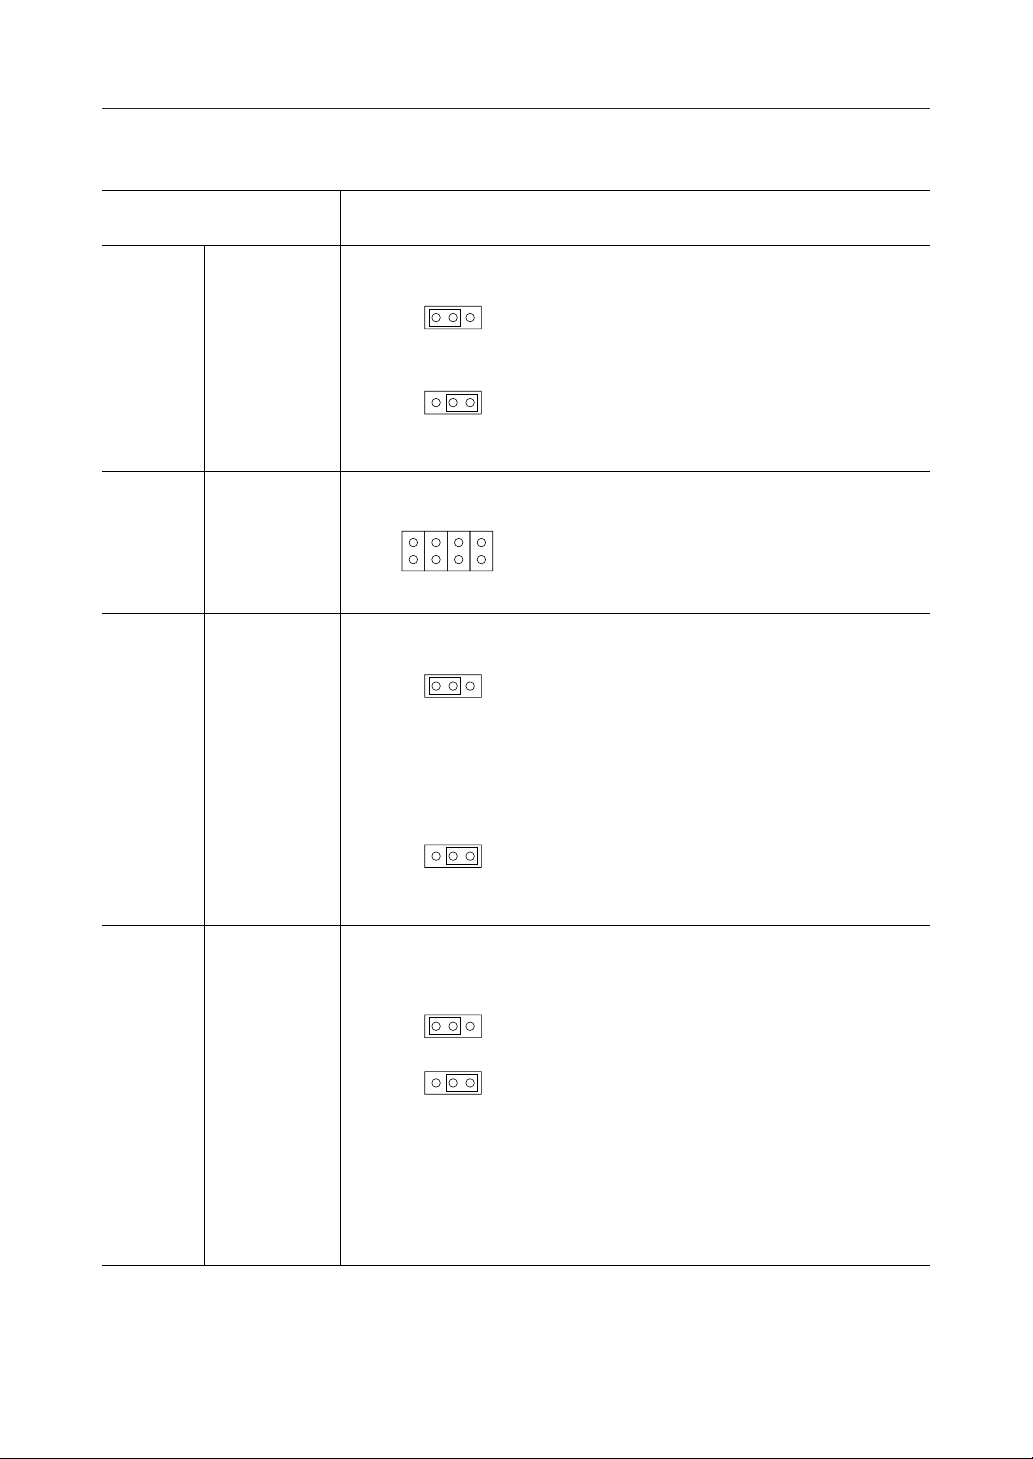
To use the RPCMI2 pin, set JP4 (RIN2 SEL) to PCM (refer to the description of JP4).
This pin is used for the PCM interface.
SPCMI2 I Input pin for channel 2 SIN PCM signal.
The signal is directly input to the MSM7617's SIN2.
To use the SPCMI2 pin, set JP3 (SIN2 SEL) to PCM (refer to the description of JP3).
This pin is used for the PCM interface.
SCKOUT O Directly outputs the SCK signal being used.
This pin is used for the PCM interface.
SYNC1OUT
O Directly outputs the SYNC signal being used on channel 1.
This pin is used for the PCM interface.
SYNC2OUT
O Directly outputs the SYNC signal being used on channel 2.
This pin is used for the PCM interface.
EXT.SCK I SCK input pin when an external sync signal is used.
To use the EXT.SCK pin, set JP12 (SCK SEL) to EXT (refer to the description of JP12).
For external synchronization, SYNC1 or SYNC2 also should be input externally.
The input frequency to EXT.SCK is 64 to 2048 kHz.
EXT.SYNC1
I SYNC1 input pin when an external sync signal is used.
To use the EXT.SYNC1 pin, set JP9 (SYNC1 SEL) to EXT (refer to the description of JP9).
For external synchronization, SCK also should be input externally.
EXT.SYNC2
I SYNC2 input pin when using an external sync signal is used.
To use the EXT.SYNC2 pin, set JP11 (SYNC2 SEL) to EXT
(refer to the description of JP11).
To use the same signal as EXT.SYNC1 without the need for another external input
signal, set JP10 (INT.SYNC2 SEL) to SYNC1 and set JP11 (SYNC2 SEL) to INT (refer
to the descriptions of JP10 and JP11).
For external synchronization, SCK also should be input externally.
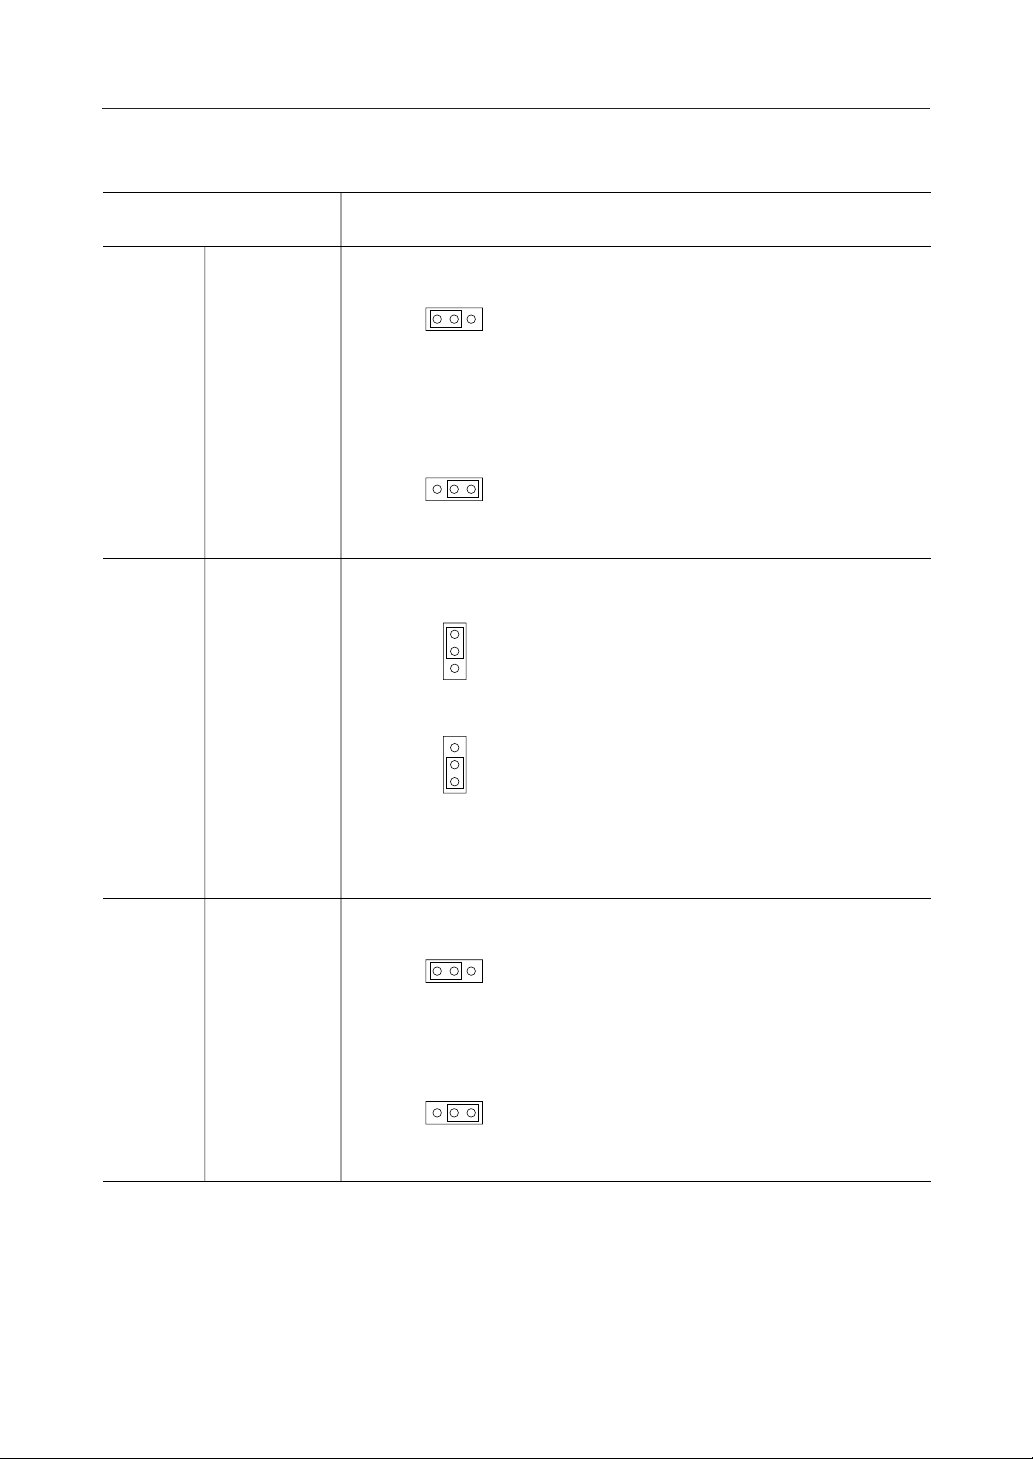
D - VDD I Power supply for digital circuits. Input 5 V.
A - VDD I Power supply for analog circuits. Input 5 V.
D - GND
DG
I
—
Ground for digital signals.
This is separate from analog ground, but just the AG and DG pins of the PCM CODEC
are tied together.
A - GND
AG
I
—
Ground for analog signals.
This is separate from digital ground, but just the AG and DG pins of the PCM CODEC
are tied together.

MSM7617 Evaluation Board ¡ Semiconductor
6
Component Descriptions (1/8)
Component Number
Component Name Description
MSM7617
QFP socket
U2 Insert MSM7617 (64-pin QFP).
MSM7617
PGA socket
U3
MSM7533
SOP socket
U1, U4 Insert MSM7533VGS-VK.
RIN1 SELJP1 Jumper pins for setting RIN1 (channel 1 RIN) input.
SIN1 SELJP2 Jumper pins for setting SIN1 (channel 1 SIN) input.
SIN2 SELJP3 Jumper pins for setting SIN2 (channel 2 SIN) input.
Analog input mode:
PCM data obtained by converting the analog input
signal from the RIN1 pin will be used for channel 1 RIN data.
PCM input mode:
PCM input data from the RPCMI1 pin will be used
directly for channel 1 RIN data.
Analog input mode:
PCM data obtained by converting the analog input
signal from the SIN1 pin will be used for channel 1 SIN data.
PCM input mode:
PCM input data from the SPCMI1 pin will be used
directly for channel 1 SIN data.
Analog input mode:
PCM data obtained by converting the analog input
signal from the SIN2 pin will be used for channel 2 SIN data.
PCM input mode:
PCM input data from the SPCMI2 pin will be used
directly for channel 2 SIN data.
Not used (used only by Oki Electric for test).
ANLG/PCM
JP1
ANLG/PCM
JP1
ANLG/PCM
JP2
ANLG/PCM
JP2
ANLG/PCM
JP3
ANLG/PCM
JP3

¡ Semiconductor MSM7617 Evaluation Board
7
Component Descriptions (2/8)
Component Number
Component Name Description
RIN2 SELJP4 Jumper pins for setting RIN2 (channel 2 RIN) input.
MUL. TESTJP5
JP6
JP7
JP8
SYNC1 SELJP9 Jumper pins for setting SYNC1 (channel 1 SYNC) input.
INT. SYNC2
SEL
JP10 Jumper pins for setting SYNC2 (channel 2 SYNC) input when JP11 has been
set to INT mode.
The SYNC generator is used only by Oki Electric for test, so it has not been
mounted on the board.
SYNC1 mode is not used.
Analog input mode:
PCM data obtained by converting the analog input
signal from the RIN2 pin will be used for channel 2 RIN data.
PCM input mode:
PCM input data from the RPCMI2 pin will be used
directly for channel 2 RIN data.
Open
External input mode:
The external sync signal from the EXT.SYNC1 pin will
be used for SYNC1. SYNC1 and SCK must be
synchronized, so if EXT.SYNC1 is used then SCK must
also be input externally.
Internal input mode:
Depending on JP19 (INT SYNC SEL), either the
internal sync (SYNC0) or the sync signal from the
sync generator will be used for SYNC1.
SYNC1 mode:
The SYNC1 signal will be used as SYNC2.
SYNC1 mode:
The inverted SYNC1 signal will be used as SYNC2.
This setting is valid only when JP19 (INT SYNC SEL)
has been set to OSC mode.
Not used (used only by Oki Electric for test).
ANLG/PCM
JP4
ANLG/PCM
JP4
MUL TEST
JP8
JP7
JP6
JP5
EXT/INT
JP9
EXT/INT
JP9
SYNC1/SYNC1
JP10
SYNC1/SYNC1
JP10

MSM7617 Evaluation Board ¡ Semiconductor
8
Component Descriptions (3/8)
Component Number
Component Name Description
SYNC2 SELJP11 Jumper pins for setting SYNC2 (channel 2 SYNC) input.
SCK SELJP12 Jumper pins for setting SCK input (channel 1 and channel 2 are common).
CLKIN SELJP13
Jumper pins for switching the oscillator circuit used as the MSM7617's CLKIN input.
External input mode:
The external sync signal from the EXT.SYNC2 pin will
be used for SYNC2. SYNC2 and SCK must be
synchronized, so if EXT.SYNC2 is used then SCK
must also be input externally.
Internal input mode:
The sync signal set by JP10 (INT.SYNC2) will be used
for SYNC2.
Internal mode:
Depending on the setting of JP20 (INT SCK SEL), either
the internal SCK (SCKO) or the SCK generator's SCK
signal will be used for SCK.
External mode:
The SCK signal input from the EXT.SCK pin will be
used for SCK. SCK and SYNC must be synchronized,
so SYNC1 and SYNC2 must also be input externally.
OSC mode:
The OSC1 (crystal oscillator) will be used for CLKIN.
This mode is not used because OSC1 (liquid
crystal oscillator) is not mounted on the board.
X'tal mode:
The Y1 (crystal resonator) oscillator output will be
used for CLKIN.
EXT/INT
JP11
EXT/INT
JP11
JP13
JP13
OSC1/X'tal
OSC1/X'tal
JP12
INT/EXT
SCK
JP12
INT/EXT
SCK

¡ Semiconductor MSM7617 Evaluation Board
9
Component Descriptions (4/8)
Component Number
Component Name Description
SYNC, CLK
SEL
JP14 This jumper is not used because the SYNC and SCK generator are used only
by Oki Electric for test and are not mounted on the board. It should be left
open.
Jumper pins for switching the SYNC and SCK generator's basic clock oscillator circuit.
128K SELJP15
JP16
JP17
JP18
These jumpers are not used because the SYNC and SCK generator are used only
by Oki Electric for test and are not mounted on the board. They all should
be left open.
Jumper pins for switching the SYNC and SCK generator's basic clock frequency.
Based on this setting, the SYNC and SCK generator will output SYNC = 8 kHz
and SCK = 128 kHz. Both SYNC and SCK are 50% duty waveforms.
INT. SYNC
SEL
JP19 Jumper pins for switching the SYNC signal when INT SYNC is being used.
The SYNC and SCK generator is used only by Oki Electric for test, so it has not
been mounted on the board.
OSC mode is not used.
X'tal mode:
The Y2 (crystal resonator) oscillator circuit will be
used for the internal SYNC and SCK generator's
basic clock.
OSC mode:
The OSC2 (crystal oscillator) will be used for the
internal SYNC and SCK generator's basic clock.
Select OSC2 or Y2 oscillation frequency from the
following four possibilities, and set the jumper
corresponding to that frequency.
JP18 : 32.768 MHz
JP17 : 16.384 MHz
JP16 : 8.192 MHz
JP15 : 4.096 MHz
SYNCO mode:
The internal SYNC output by MSM7617 (SCKO) will
be used.
OSC mode:
The SYNC output by the SYNC and SCK generator will
be used.
128K SEL
JP18
JP17
JP16
JP15
JP14
X'tal/OSC2
SYNC
CLK
JP14
X'tal/OSC2
SYNC
CLK
INT.SYNC
SYNCO/OSC
JP19
INT.SYNC
SYNCO/OSC
JP19

MSM7617 Evaluation Board ¡ Semiconductor
10
Component Descriptions (5/8)
Component Number
Component Name Description
INT.SCK SELJP20 Jumper pins for switching the SCK signal when INT SCK is being used.
The SYNC and SCK generator is used only by Oki Electric for test, so it has
not been mounted on the board. OSC mode is not used.
SCK mode:
The internal SCK output by MSM7617 (SCKO) will be
used.
OSC mode:
The SCK output by the SYNC and SCK generator will
be used.
VR1VR1 Volume for RIN1 pin amp.
This pin can amplify approximately 0 to +12 dB.
VR2VR2 Volume for SIN1 pin amp.
This pin can amplify approximately 0 to +12 dB.
VR3R13 Volume for RIN2 pin amp.
This pin can amplify approximately 0 to +12 dB.
VR4R14 Volume for SIN2 pin amp.
This pin can amplify approximately 0 to +12 dB.
ch1 RST SWS7 Reset switch for channel 1 echo canceller.
Press the reset switch after power is applied.
ch2 RST SWS8 Reset switch for channel 2 echo canceller.
Press the reset switch after power is applied.
LD1LD1 Analog power supply lamp (lights when power is applied).
LD2LD2 Digital power supply lamp (lights when power is applied).
74HC541U5 Not normally used (requires a pattern cut for use).
SYNC1OUT, SYNC2OUT and SCKOUT output buffer. To use, cut the following
lines at U5 on the solder side.
Lines between pin2 and pin18, between pin3 and pin17, between pin4 and pin16
74HC541U6 Not normally used (requires a pattern cut for use).
EXT.SYNC1, EXT.SYNC2, and EXT.SCK input buffer. To use, cut the following
lines at U6 on the solder side.
Lines between pin2 and pin18, between pin3 and pin17, between pin4 and pin16
INT.SCK
SCKO/OSC
JP20
INT.SCK
SCKO/OSC
JP20

¡ Semiconductor MSM7617 Evaluation Board
11
Component Descriptions (6/8)
Component Number
Component Name Description
ch1 MODE
SW1
ch2 MODE
SW1
S2
S1
Switches for setting channel 1 control pins.
Switches for setting channel 2 control pins.
1 NLP1
NLP2
ON Center clipping off
OPEN Center clipping on
When SOUT is below –57 dBm0, the smallest
positive value FF (hex) will be forcibly output,
eliminating low-level noise.
2 HCL1
HCL2
ON Normal mode
Echo canceller operates.
OPEN Through mode
3 ADP1
ADP2
ON Normal mode
Echo cancellation is performed by varying AFF
coefficients.
OPEN Fixed AFF coefficient mode
Coefficients are not varied. Echo cancellation is
performed with the coefficients at the point variation
was stopped.
4 HD1
HD2
ON Howling detector on
Howling will be detected and canceled.
OPEN Howling detector off
5 ATT1
ATT2
ON Attenuator on
RIN and SOUT will be input through the provided
attenuators (6 dB).
OPEN Attenuator off
6 Not used
7 Not used
8 Not used
SW Setting
8 7 6 5 4
OPEN
ch1 MODE SW1
3 2 1
OPEN
—
—
—
OFF/ON
OFF/ON
STOP/NORM
THRU/NORM
ON/OFF
ATT1
HD1
ADP1
HCL1
NLP1
ON
OPEN = 1
ON = 0
8 7 6 5 4
OPEN
ch2 MODE SW1
3 2 1
OPEN
—
—
—
OFF/ON
OFF/ON
STOP/NORM
THRU/NORM
ON/OFF
ATT2
HD2
ADP2
HCL2
NLP2
ON
OPEN = 1
ON = 0

MSM7617 Evaluation Board ¡ Semiconductor
12
Component Descriptions (7/8)
Component Number
Component Name Description
ch1 MODE
SW2
ch2 MODE
SW2
S3
S5
Switches for setting channel 1 control pins.
Switches for setting channel 2 control pins.
1
2
SG10
SG11
SG20
SG21
Switches for setting gain amplifier provided for SOUT. Control
takes 2 bits.
SGx1 SGx0
0 0 SOUT GAIN AMP OFF
0 1 SOUT GAIN AMP +6 dB
1 0 SOUT GAIN AMP +12 dB
1 1 SOUT GAIN AMP +18 dB
Operation
3
4
SA11
SA10
SA21
SA20
Switches for setting attenuator provided for SIN. Control takes
2 bits.
SAx1 SAx0
0 0 SIN ATT OFF
0 1 SIN ATT –6 dB
1 0 SIN ATT –12 dB
1 1 SIN ATT –18 dB
Operation
5
6
7
RGC11
RGC10
RGC21
RGC20
Switches for setting operating level and level regulation of the
GC provided for RIN. Control takes 2 bits.
Not used
8Not used
RGCx1 RGCx0
0 0 GC : OFF
LR : OFF
0 1 GC : ON
Operating level : ≥–20 dBm0
1 0 GC : ON
Operating level : ≥–3 dBm0
1 1 LR : ON
RIN and SIN are attenuated –6 dB; ROUT
and SOUT are amplified +6 dB.
Operation
SW Setting
8 7 6 5 4
OPEN
ch1 MODE SW2
3 2 1
OPEN
—
—
1/0
1/0
1/0
1/0
1/0
1/0
RGC10
RGC11
SA10
SA11
SG10
SG11
ON
OPEN = 1
ON = 0
8 7 6 5 4
OPEN
ch2 MODE SW2
3 2 1
OPEN
—
—
1/0
1/0
1/0
1/0
1/0
1/0
RGC20
RGC21
SA20
SA21
SG20
SG21
ON
OPEN = 1
ON = 0

¡ Semiconductor MSM7617 Evaluation Board
13
Component Descriptions (8/8)
Component Number
Component Name Description
COMMON
MODE SW
S4 Switches for setting both channel 1 and channel 2 control pins.
SW Setting
1
2
IOM1
IOM0
I/O mode control switches. Control takes 2 bits.
IOM1 IOM0
0 0 Parallel I/O mode
0 1 Serial I/O mode
1 0 1-channel cross-connected
1 1 Not used
Operation
3
4
ECDM1
ECDM0
Tone disable switches. Control takes 2 bits.
ECDM1 ECDM0
0 0 Tone disable off
0 1 Tone disable on
2100 Hz detection
1 0 Tone disable on
2100 Hz phase reversal detection
1 1 Not used
Operation
6 ECM Switch to select old or new method for improving echo
canceller acquisition.
ON Echo canceller operates with old method
Echo canceller operates with new methodOPEN
7 PWDWN MSM7617 power-down switch.
ON Power-down
Reset after releasing power-down.
Normal mode
Operate in accordance with control mode settings.
OPEN
8A/mSwitch to select MSM7533V A-law or m-law.
Set to correspond to MSM7617 used.
ON
OPEN
PCM CODEC uses m-law.
PCM CODEC uses A-law.
8 7 6 5 4
OPEN
COMMON MODE SW
3 2 1
OPEN
A-law/m-law
NORM/PWDWN
NEW/OLD
—
1/0
1/0
1/0
1/0
A/m
PWDWN
ECM
ECDM0
ECDM1
IOM0
IOM1
ON
OPEN = 1
ON = 0

MSM7617 Evaluation Board ¡ Semiconductor
14
USAGE METHOD
1. Set the I/O mode of the MSM7617.
COMMON MODE SW-1,2: 2-channel parallel I/O, serial I/O or 1-channel cross-connected
mode.
2. Set jumper pins in accordance with the interface circuit.
1) SYNC, SCK setting: external synchronization or internal synchronization
JP9 (SYNC1 SEL) EXT/INT
JP11 (SYNC2 SEL) EXT/INT
JP12 (SCK SEL) EXT/INT
2) Input signal setting: analog or PCM
JP1 (RIN1 SEL) ANLG/PCM
JP2 (SIN1 SEL) ANLG/PCM
JP3 (SIN2 SEL) ANLG/PCM
JP4 (RIN2 SEL) ANLG/PCM
3) Pins below are fixed
JP10 (INT.SYNC2 SEL) SYNC1
JP13 (CLKIN SEL) X’tal
JP19 (INT.SYNC SEL) SYNCO
JP20 (INT.SCK SEL) SCKO
3. Set the mode switches.
Note: Don'tturnonpowerwithCOMMONMODESW-7(PWDWNSW)settoON(PWDWN).
(Otherwise the clock is not distributed within the IC, and the internal states will not
stabilize, which could damage the chip.)
4. Connect power supply and ground.
The evaluation board is basically divided into analog and digital portions. The analog
circuit’s characteristics affect echo canceller characteristics, so use an analog power supply
and ground with little noise. If the power supply does have little noise, then it is acceptable
to use the same power supply and ground for the analog and digital portions.
Note: Always reset after applying power.
5. Connect external circuits and adjust levels.
When using the analog interface, adjust input levels as needed with the VR1 to VR4 volume
controls. Amplifier gain can be in the range 0 to +12 dB, but make sure there are no excessive
inputs. Level adjustments should be done in a single direction at a time.
6. The evaluation board settings are complete.

¡ Semiconductor MSM7617 Evaluation Board
15
* Usage Example 1: 2-Channel PCM Interface With 2-Channel Parallel I/O
Evaluation is performed after connected to the existing PCM interface.
Settings : 2-channel parallel I/O, PCM interface, external synchronization.
VR1
COMMON
MODE SW
IOM1 = 0 (ON)
IOM0 = 0 (ON)
ch1
MODE SW ch2
MODE SW
|
VR2
VR3
JP1
JP2
JP10
JP9
JP13
+5 V
Evaluation Board
MSM7617
RIN1
SOUT1
SYNC1
RIN2
SOUT2
SYNC2
SCK
ROUT1
SIN1
ROUT2
ch1
ch2
SIN2
Line Echo
PCM
Line
ADPCM
Line
GND
RIN1 (RPCMI1)ROUT1 (RPCMO1)
JP12
JP11
ch1 RST
VR4
ch2 RST
JP3
JP19 JP20
JP4
Digital Network
Wireless Interface
AFF
SOUT1 (SPCMO1)
SYNC1 (EXT.SYNC1)SIN1 (SPCMI1)
RIN2 (RPCMI2)
SOUT2 (SPCMO2)ROUT2 (RPCMO2)
SYNC2 (EXT.SYNC2)
SCK (EXT.SCK)
SIN2 (SPCMI2)
ADPCM ADPCM
H
H
+
AFF
+

MSM7617 Evaluation Board ¡ Semiconductor
16
1. Set the evaluation board.
Set the COMMON MODE SW’s I/O Mode (IOM1, IOM0) to 2-channel parallel I/O mode
(IOM1,0 = 0,0).
Set JP1, JP2, JP3, and JP4 to PCM mode.
Set JP9, JP11, and JP12 to EXT mode.
Fix JP10 to SYNC1 mode and JP13 to X’tal mode.
2. Referring to the diagram, connect the equipment under test to the evaluation board.
Use wires as short as possible to connect the equipment under test to the evaluation board.
If the connecting lines are long, noise or other factors can cause malfunction.
3. Apply power and reset the test system, set the mode switches, and start evaluation.

¡ Semiconductor MSM7617 Evaluation Board
17
* Usage Example 2: 2-Channel PCM Interface With 2-Channel Serial I/O
Evaluation is performed after connected to the existing multiplex PCM interface.
Settings : 2-channel serial I/O, PCM interface, external synchronization.
VR1
COMMON
MODE SW
IOM1 = 0 (ON)
IOM0 = 1 (OPEN)
ch1
MODE SW ch2
MODE SW
|
VR2
VR3
JP1
JP2
JP10
JP9
JP13
+5 V
Evaluation Board
MSM7617
ROUT1
SYNC1
SCK
PCM
DATA
SIN1
Line Echo
Multiplexed PCM Lines ADPCM Multiplexed
Lines
GND
RIN1 (RPCMI1)ROUT (RPCMO1)
JP12
JP11
ch1 RST
VR4
ch2 RST
JP3
JP19 JP20
JP4
Digital Network
Wireless Interface
AFF
SOUT1 (SPCMO1)
SYNC1 (EXT.SYNC1)SIN1 (SPCMI1)
SCK (EXT.SCK)
ADPCM ADPCM
H
H
+
AFF
ch1
ch2
+
RIN1
SOUT1
SYNC1
SCK
,y
z
ch1 ch2

MSM7617 Evaluation Board ¡ Semiconductor
18
1. Set the evaluation board.
Set the COMMON MODE SW’s I/O Mode (IOM1, IOM0) to 2-channel serial I/O mode
(IOM1,0 = 0,1).
Set JP1, JP2, JP3, and JP4 to PCM mode.
Set JP9 and JP12 to EXT mode.
SYNC2 is not used in serial I/O mode, so set the JP11 to PCM mode or EXT mode.
Fix JP10 to SYNC1 mode and JP13 to X’tal mode.
2. Referring to the diagram, connect the equipment under test to the evaluation board.
Serial I/O mode is a multiplexed mode for input/output of continuous serial data on two
channels. If data is not continuous, test with parallel I/O mode.
Use wires as short as possible to connect the equipment under test to the evaluation board.
If the connecting lines are long, noise or other factors can cause malfunction.
3. Apply power and reset the test system, set the mode switches, and start evaluation.
Usage Example 3: 1-Channel Cross-Connected Mode
This mode confirms the effectiveness of using both acoustic and line echo cancellation for hands-
free telephone sets.
Settings: cross-connected mode, analog impedance, internal synchronization
VR1
COMMON
MODE SW
IOM1 = 1 (OPEN)
IOM0 = 0 (ON)
ch1
MODE SW ch2
MODE SW
|
VR2
VR3
JP1
JP2
JP10
JP9
JP13
+5 V
Evaluation Board
AFF
ch1
GND
ROUT1
SIN1
ROUT2
SIN2
JP12
JP11
ch1 RST
VR4
ch2 RST
JP3
JP19 JP20
JP4
AFF
MSM7617 Analog
Impedance
Level Adjuster
Microphone
Amp
Speaker Amp
ch2
SIN2
ROUT2
ROUT1
SIN1Line Echo
Acoustic Echo
+
{
+
CODEC
CODEC

¡ Semiconductor MSM7617 Evaluation Board
19
1. Set the evaluation board.
Set the COMMON MODE SW’s I/O Mode (IOM1, IOM0) to 1-channel cross-connected mode
(IOM1,0 = 1,0).
Set JP1, JP2, JP3, and JP4 to ANLG mode.
Set JP9 and JP12 to INT mode.
SYNC2 is not used in 1-channel cross-connected mode, so set the JP11 to ANLG mode or INT
mode.
Set JP19 to SYNC0 mode and JP20 to SCK0 mode.
Fix JP10 to SYNC1 mode and JP13 to X’tal mode.
2. Referring to the diagram, connect the equipment under test to the evaluation board.
3. Apply power and reset the test system, set the mode switches, and adjust analog levels. Do
level adjustment for each side in through mode.
VR2 can amplify the input level of SIN1, and VR4 can amplify the input level of SIN2.
4. When level adjustment is complete, start evaluation.
Table of contents
Other Oki Motherboard manuals
Popular Motherboard manuals by other brands

Analog Devices
Analog Devices EVAL-ADPD7000 manual

Freescale Semiconductor
Freescale Semiconductor TWR-K70F120M quick start

Lucky Star
Lucky Star 6VPM1 user manual

JETWAY
JETWAY NF9VT Technical manual

Texas Instruments
Texas Instruments SWIFT TPS561201EVM-896 1-A user guide

ASRock Industrial
ASRock Industrial NUC-J6412 Settings guide