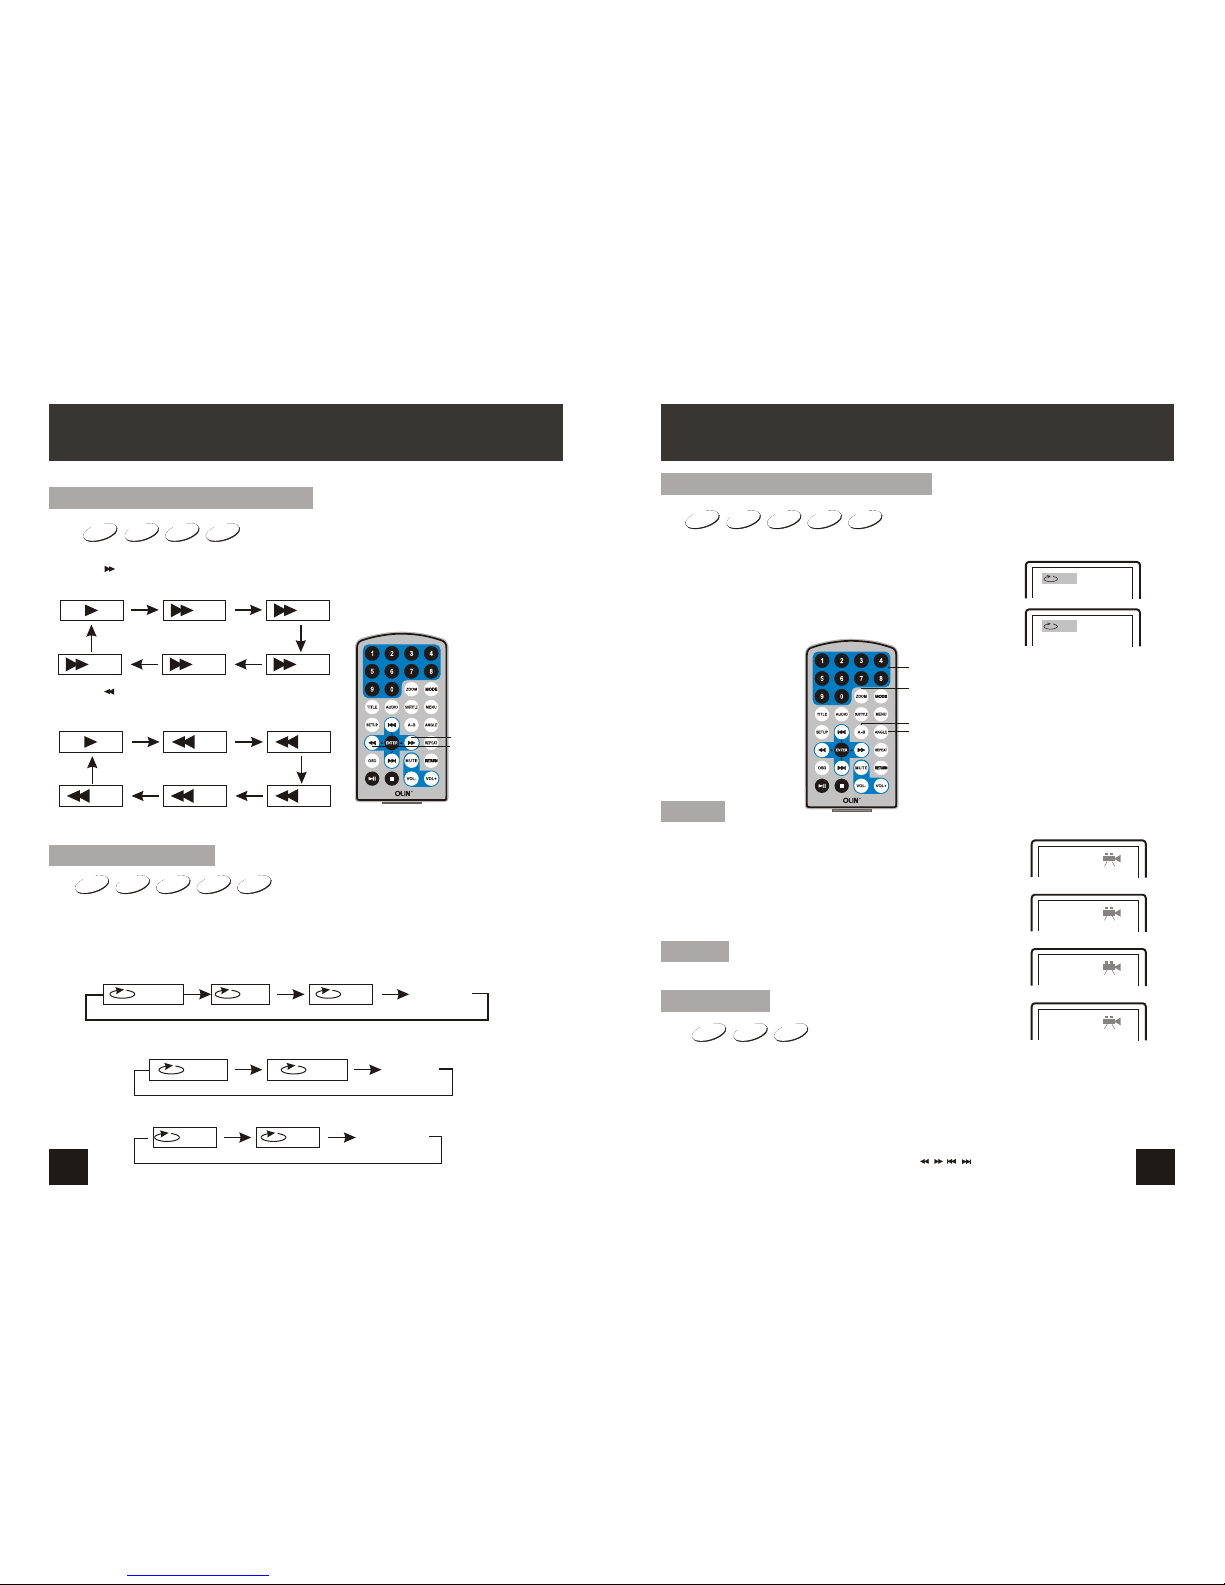
Olin PD-9910 User manual

1
Warning: To reduce therisk of fireor electric shock,do not exposethis apparatus torain
or moisture.
1) Please readthe instruction manualcarefully and followall the requirementsof safe
operation to operatethe device.
2) Do notuse this unitnear water.Do not placeover the unitany container withliquid
inside.
3) Do notinstall near anyheat sources suchas radiators, heatregisters, stoves, orother
apparatus (including amplifiers)that produce heat.
4) Unplug thisunit during lightningstorms or whenunused for longtime.
5) AboutCleaning: Unplug thesystem, use onlywet cloth toclean. Do notuse liquid
detergent or aerosol.
6) Only useaccessories specified bythe manufacturer.
7) Refer allservicing to qualifiedservice personnel, servicingis required whenthe unit
has been damagedin any way, such as power supply cord or plug is damaged, liquid
has been spilledor objects havefallen into theunit, exposed tomoisture, does not
operate normally.Don't try torepair the machineby yourself becauseof the dangerof
high voltage andelectric shock.
8) Do notuse irregular shapeddiscs such asheart or star-shapeddiscs as theymay
Cause the unitto malfunction.
Hi-voltage, Don't Openit
Remind user tobe careful to
avoid electric shock
Thank you forchoosing our portableDVD player.It includes a9 wide screen DVDplayer.
The unit appliesthe latest stateof art electronicsand is designedfor use athome, in
hotels and inoffices etc forrelaxation. The compactsize makes carryingeasier as well
as installation. Pleaseread the manualcarefully prior touse and keepit well forlater
consultation.
SAFETY PRECAUTION
9)
)
)
)
)
)
)
)
Please ensure enoughclearance around thereceiver for goodventilation. Any
objects and theappliance should beat least 10cm apart.
10 The ventilation shouldnot be impededby covering theventilation openings with
items, such asnewspapers, table-cloths, curtains,etc
11 No naked flame source, such as lighted candles, should be placed on the apparatus
12
13 Attention should bedrawn to theenvironmental aspects ofbattery disposal.
14 CAUTION : Dangerof explosion ifbattery is incorrectlyreplaced. Replace onlywith
the same orequivalent type.
15 The mains plugis used asthe disconnect device,the disconnect devicesshall
remain readily operable.
16 Only used withthe provided adaptormodel no.: HNC090100X.
Battery shall notbe exposed toexcessive heat suchas sunshine, fireor the like.

TABLE OF CONTENTS
2Olin_Portable_DVD_Player_PD-9910_User_Manual_V1
SAFETY PRECAUTION
TABLE OFCONTENTS
PACKAGE CONTENTS/MAINFEATURES
ABOUT OPTICAL DISCS
MAIN UNIT
SYSTEM CONNECTION
THE REMOTE CONTROL
BASIC OPERATION
PLAYING JPEG FILE
SYSTEM SETUP
SPECIFICATION
BATTERY
Package contents
Main Features
Disc Requirements
Disc Care and Maintenance
Powering and installation
Connecting to theslave screen
The Use ofRemote Control
Fast forward and fastbackward
Repeat playing
Repeat playing offavorite scene
Angle
Zoom In/ Out
Playing JPEG file
Playing MP3 files
General Setup Page
Audio Setup page
Video Setup Page
Preference Page
Rechargeable Battery Use
Precautions related toBattery Recharge
Using and Maintaining RechargeableBattery
TROUBLESHOOTING
1
2
4
4
4
5
5
5
6
8
8
9
11
12
13
14
14
15
15
15
16
16
16
17
17
18
19
19
21
22
22
22
22
24
10
MOUNTING BAG 23
7
SLAVE SCREEN
Audio and videosignal output
WARRANTY STATEMENT 26
3
QUICK INSTALLATION GUIDE
Designed to makethe device setupprocedure easier:
STEP 1
Remove the MainUnit, Monitor andall accessories ofthe player frompackaging.
Pull the tabfrom the remotecontrol to activateit.
STEP 2
For clear viewingon display panelor to removethe air bubble, users may lift the
clear protection shieldoff the screen.
STEP 3
Find the DC/AV cable (two ends are identical) from the accessories,plug one end
into DC OUTand AV OUT socketin Main Unit,plug the other end into the DC IN 9-
12V andAV INsocket in Monitor
STEP 4
Plug one endof the poweradaptor/car adaptor intothe portable DVD Main Unit's
DC IN 9-12Vsocket, and plugthe other endinto the powersocket/12VDC Car
Cigarette Lighter Socketif you usein car.
STEP 5
Make sure powerswitch is setto OFF andthe battery willstart to chargewhile battery
rechargeindicator lightturns red.Theindicator light willturn Blue ifthe unit isfully charged.
STEP 6
Activate the powerby turning thepower switch ofboth Main Unitand LCD Monitor to
ON, made surethe OLIN welcomescreen display onMain Unit andMonitor.
STEP 7
Slide the latchon the topleft side ofthe Main Unitto open the disc cover and insert
a DVD discinto the drive.
STEP 8
You can see the unit is loading DVD and you are ready to watch. More instructions
are in usermanual.
STEP 9
Toaccess contents fromUSB device orSD card, justsimply plug inUSB device or SD
card, if noDVD disc isin Main Unit,then a windowwill popup to show all available
Media Sources. Usenavigation buttons tohighlight the filename and press OK to
confirm/play. Ifyou have multiMedia Sources, useMODE buttons fromremote or
front panel ofMain Unit toselect.
WARNING:
THIS MODEL AND ITS ENCLOSED CAR ADAPTOR AREONLY
COMPATIBLE WITH 12V VEHICLES.
THIS MODEL IS NOT COMPATIBLE WITH 24V VEHICLES. (TRUCK/BUS)
DO NOT CONNECTTHE UNIT TO THECAR VIACAR ADAPTORBEFORE
THE ENGINE HASBEEN STARTED.
PLEASE NOTE:
THE BATTERY ONLY CANBE CHARGED WHENTHE SWITCH ISIN OFF POSITION.
DISCONNECT THE CAR ADAPTORWHEN IT ISNOT IN USE.
THE INTERNAL BATTERY IN MAIN UNITONLY SUPPORTS ITSELF BUT
NOT THE MONITOR.
QUICK INSTALLATION GUIDE 3

High brightness color 9”LCD screen
Compatible with discof DVD,VCD,MP3,CD,JPEG,etc
Built-in stereo speakers
Built-in rechargeable Lithiumpolymer battery
Support PALor NTSC system
Support speed forward/backward,repeatfunction
Zoom in/out function
Built-in Low BatteryRemind
Main Features
1
1
1
1
1
1
2
Remote Control withbattery
AC/DC Power Adapter
Cigarette LighterAdapter
User Manual
Headphone
1
DC+Audio/Video Cable
DVD Player
9 '' LCDMonitor
4
Mounting Bag 2
PACKAGE CONTENTS/MAIN FEATURES
Please make surethe following items are included in the package. Ifany
item is missing,contact your dealer.
Package contents
ABOUT OPTICAL DISCS
5

Slave screen
3. Headphone jack
6. Brightness knob
7
8.
. Bracket
Rating label position
1
2
3
4
5
6
12
345678
9
10
11
12
13
14
15
1617 78
ON OFF
CLOSE
AVO U T DCOUT
CLOSE
ON OFF
BRIGHTNESS
7
MAIN UNIT
1.Open Knob
Switch the knob to unlock the disc cover
2.Power ON/OFFSwitch
Switch the DVDplayer on/off
3.SETUP Button
Press SETUP to display the system
setup menu
4.MODE Button
Press MODE to circularly change media
source, DVD, USBFlash, or SD Card.
5.OK Button
Press OK toconfirm selection
7.PLAY/PAUSE Button
Press Play/Pause to start/hold playback
8.STOP Button
Press STOP to stop playback
9.DC IN9-12V
Connect to thepower outlet
10.DC OUT
Connect to Slavescreen DC IN
11.AV OUT
Output audio/ videoSignals
Turn the volume up/ down
6. ( )/ ( )/ ( )/ ( )
12. Headphone jack
13. Volume knob
14. SD card slot
15. USB Port
16. Bracket
17. Rating label position
6
1.Power ON/OFF
Switch the Slave screen on/off
2.Volume Knob
Turn the volume up/down
4.AV IN
Input audio/ videosignals
5.DC IN9-12V
Connect to theDVD player DC OUT or the power outlet

89
BRIGHTNESS
AVOUT DCOUT
AVOUT DCOUT
AV O U T DCOUT
Powering and installation
Plug one endof theAC/DC power adaptorinto the DCIN 9-12V jackon the rightof the
unit, then plugthe other endinto theAC power receptacle.Please refer tothe following
illustration.
If using carcigarette lighter adaptorto connect tothe power:
Plug one endof the cigarettelighter adaptor intothe DC IN9-12V jack onthe unit, plug
the other endinto the carcigarette lighter socket.Seeillustration below.
SYSTEM CONNECTION
Connecting to theslave screen
The unit canalso be connectedto the externalLCD monitor.
Connect the unitto power byAC/DC adapteror cigarette lighteradapter.
Then connect theunit DC OUTjack to DC IN 9-12V Jack of the LCD Monitor by a DC/AV
cable. Alsouse this DC/AV cable to connect the AV OUTjack of theunit toAV INjack of
the Monitor.
Please refer tothe illustration below.
SYSTEM CONNECTION
Notice:
Car cigarette lighteradaptor is notrecommended to rechargethe battery.
Warning:
This model andits enclosed caradaptor are onlycompatible with 9~12Vvehicles.
It is notcompatible with 24vvehicles.
Please note:
Do not connectthe unit tothe car viacar adaptor beforethe engine hasbeen started.
Disconnect the caradaptor when itis not inuse.
Remark:
Users can poweroff the machineentirely by turning off the power switch and removing
the power plugfrom main powerpoint. The power-off mechanism is available for user to
operate at anytime.
Note
the enclosedAC/DC PowerAdaptor and CarCharger are designedfor the MasterUnit
power supply only.
The AV/DC cable is used to connect the Master Unit to Slave Unit.
Users are notrecommended to connectthe AC/DCPower Adaptorand Car Chargerto
the Slave Unit

AVOUT DCOUT
Audio and videosignal output
The unit canbe connected withexternal speaker.Pleasesee the followingillustration.
AMPLIFIER
TV
SUBWOOFER
Left front speaker Right front speaker
Center speaker
Left rear speaker Right rear speaker
AUDIO IN
VIDEO IN
AV CABLE
Not supplied
10 11
SYSTEM CONNECTION
Notice:There is no 5.1channel in the unit,however, after connectingto APM itis available to
output audio in5.1 channel
1. Refer theowner's manual ofthe external receiveras well
2. Make sureall necessary connectionshave been properlymade before connect
the power.
3.If the playerwill not beused for along period oftime, disconnect thepower.
1. Number button
2. TITLE(To display title information)
3. AUDIO(To select audiolanguage)
4. SETUP(To go to or exit setupmenu)
5. Previous/Next button(To go
to previous/next chapteror scene
during playing)
6. Fast forward/backward
button(Toscan forward/backward
at 2,4,8,16,or 32times)
7. OSD(To display disc information
during playing suchas elapsed and
remaining time)
8. PLAY/PAUSE
9. STOP(press oncetostop playback,then
press to resumeplayback from the
point where youstopped; press stop
button twice tostop playback completely)
10. MODE(To select thesource)
THE REMOTE CONTROL
11. ZOOM(To zoom in/outthe image
during the playback)
12. MENU(To enter or exit root menu)
13. SUBTITLE(To select subtitlelanguage
when playing DVDdisc)
14. ANGLE(To change viewingangle
when playing discwith multi-angle)
15. A-B(Repeata specific portionfrom
point Ato B, pressit again tocancel
repeat playing)
16. REPEAT(To repeat playingtitle,
chapter or track)
17. RETURN(To return tothe main menu)
18. MUTE(To turn tomute)
19. VOL +/- (To adjust the volume)
20. ENTER(To confirm)
PD-9910
1
2
3
4
5
6
7
8
9
10
11
12
13
14
15
16
17
18
19
20
These cables are
not included in package

413
1
2
CR2025 CR2025
Please put thebattery into theremote control asper below illustration.
When using remotecontrol,make sure theinfrared window ispointed to infraredreceiving
window of themachine.The distance betweenmachine and remotecontrol must bewithin
3 metres.Please referto the followingillustration.
The Use ofRemote Control
0
30
0
30
THE REMOTE CONTROL
12
PD-9910
Notice
3.Please usea new batteryto replace oldone if theremote control doesn't work.
4.Remove the batteryfrom the remoteif it willnot be usedfor a longperiod of time.
1. Avoidplacing the unitin a dampenvironment or wherethere is arisk it mayfall.
2. Avoidplacing the unitin an areawhere the infraredremote receiving windowis
in direct sunlight.
Warning: Keep the battery from children.
BASIC OPERATION
Playing disc ofDVD, SVCD, VCD,CD, Mp3.
2. Open thedisc door andinsert a discinto the doorwith the labelside facing up.
3. Close thedisc door.Theunit will loadthe disc andstart playing.
4. Press“ ”once to stopplayback; press“ ”to resume playback from the point
where you stoped;press“ ”twice to stopplayback completely.
5. During playback,press“ ”to pause; pressit again to resume playback.
6. When the playingis finished, pleaseturn off thepower by slidingON/OFF switch toOFF.
7. For someDVD disc withTitle orChapter menu, press“MENU”button to enter menu
page, and use“ ”to select. Press ENTER to confirm.
DVD SVCD VCD CD MP3
Note:
Please do notdisconnect USB devicesor plug outSD/MMC cards whilethey are working
with the unit.Functionalfailure may occurin case ofwrong operations.
Play/pause
Cursor button
ENTER
Title Menu
PD-9910 PD-9910
1. Afterconnecting power tothe unit, turn on the unit by sliding the ON/OFF
switch to
ON to goto DVD source.

415
14
DVD SVCD VCD CD MP3
DVD SVCD VCD CD
2X 4X
8X16X32X
2X 4X
8X
16X32X
Search forward
When playing discof DVD,SVCD,VCD,CD,the machinecan search forward or backward.
1. Press“ ”,the unit willsearch forward. Pressit repeatedly ,themachine will play
at 2, 4,8,16, 32 timesof speed.
2. Press“ ”, the unitwill search backward.
Press it repeatedly,the machine will play at
2,4,8,16,32 times ofspeed.
When playing discof DVD,SVCD,VCD,CD,MP3,user canrepeat playing one chapter,
title or thewhole disc.
For DVD disc,press“repeat”button,user can repeatplaying one Chapter;pressit
again to repeatplaying Title;pressit the thirdtime to repeatplaying the wholedisc.
For MP3 disc,press“repeat”button to repeatplaying present file;pressit again torepeat
playing the folder;pressit the thirdtime to cancelrepeat function.
Search backward
Chapter Title All
Repeat off
one folder
Repeat off
Fast forward andfast backward
Repeat playing
Track All Repeat off
For CD/VCD disc,press repeatedly to repeatthe track andthe whole disc.“repeat”button
BASIC OPERATION
PD-9910
When playing discof DVD,SVCD,VCD,CD,MP3,user canrepeatedly play aspecific
section.
During playback,press“A-B”button at apoint A,thenpress
this button againin point B,theunit will automaticallyrepeat
playing the partbetween“A-B”
Press it thethird time,the unitwill return tonormal playback. AB
A
Repeat playing offavorite scene
Angle
A-B
Angle
Number
During playback,press“Zoom”button,the image willbe
enlarged;press it againthe image willbe enlarged again;
press it fourthtime,the image willzoom out,press it
repeatedly and theimage will returnto normal status.
Zoom in/out
When the imageis enlarged,user canpress“ / / / ”to move the image.
Zoom in/ out
When playing discof DVD,SVCD,VCD,user canzoomin or
zoom out theimage.
MP3
VCD
SVCD
DVD CD
SVCD
DVD VCD
BASIC OPERATION
PD-9910
Note: Audiowill be mutedduring fast forwardand fast backward. During playing DVDdisc with multi-angle,press “Angle”
button, the followingswill be displayedon screen:
Press number buttonsto select theangle you desire
Toreturn to normalplaying, please press“Angle”,
until the unitplays the discin the defaultangle.
1 /4
2 /4
3 /4
4 /4
Notice
The function isavailable only fordiscs with multi-angle.

Mp3
......
\Ctyy\
00 36 03 43
Dir 001
Mp3
TRACK02
TRACK01
Mp3
Mp3
TRACK03
Playing JPEG file
Playing MP3 files
1.Place MP3disc into thedisc door.
Press “ ”or “ENTER”button to choose an MP3 file;Press “ ” or“ENTER”button to
play the fileselected.
TRACK05
Mp3
TRACK04
1. Place aJPEG disc intothe tray,the unit will start reading and play.
2. Press “ ” to select aJPEG file andpress“ENTER”button to confirm.
Note:you can press“MENU”to return tothe folder list.Press“ ” or“ENTER” to
preview the fileselected.
3. To rotate the picture counter-clockwise,press“ ”;Press “ ”to rotatethe picture
clockwise.
4. Press “OSD”button when viewingpictures,you can selectdifferent refresh modeas
follows:
1. from topto bottom
2. from bottomto top
3. from leftside to rightside
4. from rightside to leftside
5. from lefttop to rightbottom
6. from righttop to leftbottom
7. from leftbottom to righttop
8. from rightbottom to lefttop
9. from horizontalcenter to bothsides
10.from vertical centerto both sides
11.from topand bottom tocenter
12.from right andleft to center
13.from four window'stop side tobottom side
14.from four window'sleft side toright side
15.from 4 edgesto center
5. During viewingfiles,“ ”may appearwhen pressing“Angle”or“Subtitle”or “Audio”
or“A-B”or“Title”etc; in this situation these options are unavailable to operate.
6. When viewingJPEG files,press“ ”,pictureswill be displayedin thumbnail mode,
press“ ”or“ENTER”button to selectone picture toview.
417
16
PLAYING JPEG FILE IN DATA DISC
General Setup Page
TV display:
Enter this option,user canset screen display format
(Nomal/PS,Nomal/LB,Wide)
The default is "Wide"
Note
The function depends onthe display ratio withwhich the
DVD disc is recorded.
Please choose “Wide(16:9)"when using a16:9 widescreen
TV set
Video Preference
General Audio
- - General Setup Page - -
Set TV Display Modo
Normal/PS
Normal/LB
Wide
TV Display
TV Type
Angle Mark
OSD Lang
Screen Saver
Last Memory On
Wide
PAL
On
ENG
On
TV Type:
Video Preference
General Audio
- - General Setup Page - -
Set TV Standard
PAL
NTSC
TV Display
TV Type
Angle Mark
OSD Lang
Screen Saver
Last Memory On
Wide
PAL
On
ENG
On
Angle Mark:
Enter this option toset the angle duringplayback.
Optional setting: ON, OFF
The default is: ON
Video Preference
General Audio
- - General Setup Page - -
Set Anglo Mark
On
Off
TV Display
TV Type
Angle Mark
OSD Lang
Screen Saver
Last Memory On
Wide
PAL
On
ENG
On
Enter this option toselect DVD video outputsignal type. Set
the value to correspondwith your TV's Video System type.
PAL isthe standard used inAustralia.
The default is PAL
SYSTEM SETUP
Video Preference
General Audio
- - General SetupPage - -
Wide
PAL
On
ENG
On
TV Display
TV Type
Angle Mark
OSD Lang
Screen Saver
Last Memory On
Go to General Setup Page

4
18 19
OSD Language:
In the option usercan set OSD menu
language English.
The default:English
Video Preference
General Audio
- - General Setup Page - -
Set OSD Languago
English
TV Display
TV Type
Angle Mark
OSD Lang
Screen Saver
Last Memory On
Wide
PAL
On
ENG
On
Last Memory
Video Preference
General Audio
- - General Setup Page - -
Set Screen Saver
On
Off
TV Display
TV Type
Angle Mark
OSD Lang
Screen Saver
Last Memory On
Wide
PAL
On
ENG
On
Screen Saver
Video Preference
General Audio
- - General Setup Page - -
Set Screen Saver
On
Off
TV Display
TV Type
Angle Mark
OSD Lang
Screen Saver
Last Memory On
Wide
PAL
On
ENG
On
Enter this option toactive/ turn-off the screensaverfunction.
The screensaver prevents burningdamage to the player's
screen
The default is ON
Enter this option toturn on or offthe Last Memory function.
When it is ONthe player can resumeplayback from where
you stop last time
The default is ON
Audio Setup Page
Downmix :
Video Preference
General Audio
- - Audio SetupPage - -
Set downmix
LTR T
Stereo
Downmix
EQ type
STR
None Enter this to selectdownmix mode, used tomix a number of
distinct audio channels togetherto produce a lowernumber
of channels, such asLeft-Right (LTRT) channels or Stereo
The default is Stereo.
SYSTEM SETUP
Subtitle
Select your preferred languageto show the subtitles
on the screen.
The default is OFF
The subtitle languages dependon the
information available on eachdisc,You canalso change the
subtitle language during playbackby press the SUBTITLE
button.
Video Preference
General Audio
- - Preference Page --
Preferred Subtitle Language
Audio ENG
Subtitle OFF
Disc Menu ENG
Parental
Password
Default
English
Off
Video Setup Page
Select EQ type:
Default is none.
Video Preference
General Audio
- - Audio SetupPage - -
Select EQ type
None
Rock
POP
Live
Dance
Tenco
Classic
Soft
Downmix
EQ type
STR
None
Video Preference
General Audio
- - Video SetupPage - -
Brightness
Brightness
Contrast
Hue
Saturation
00
00
00
00 Enter this option, usercan adjust picture qualityof video
output. There are itemsavailable to be adjusted:
Brightness, contrast, Hue andSaturation.
For all these itemsthe default is 00
Preference Page
Audio:
Enter this option, usercan select your preferredaudio
language for DVDs.
The default is English
Note
The audio language dependon the material oneach disc.
User can also changethe audio language duringplayback
by pressing theAudio button.
Video Preference
General Audio
- - Preference Page --
Preferred Audio Language
Audio ENG
Subtitle OFF
Disc Menu ENG
Parental
Password
Default
English
SYSTEM SETUP

20 21
Disc Menu
This function allows youto choose the menulanguage
stored on the disc.
The default is English.
Note: the disc menulanguages depend on the
information available on thedisc.
Parental:
Enter this option toset the parental controllevel to some
unsuitable disc scenes beingwatched by the children.
Optional parental control levels:KID SAFE, G, PG,PG 13, PGR,
R, Nc17, ADULT.
The default of thisoption is ADULT.
Video Preference
General Audio
- - Preference Page --
Preferred Menu Language
Audio ENG
Subtitle OFF
Disc Menu ENG
Parental
Password
Default
English
Video Preference
General Audio
- - Preference Page --
Set Parental Control
Audio ENG
Subtitle OFF
Disc Menu ENG
Parental
Password
Default
1 KID SAFE
2 G
3 PG
4 PG 13
5 PGR
6 R
7 NO 17
8 ADULT
Video Preference
General Audio
- - Preference Page --
Change Password
Audio ENG
Subtitle OFF
Disc Menu ENG
Parental
Password
Default
Change
Video Preference
General Audio
- - Preference Page --
Load Factory Setting
Audio ENG
Subtitle OFF
Disc Menu ENG
Parental
Password
Default Reset
Enter this option,you canset a password(four numbers).
All parental Control featuresare password protected.
Default:
Select this item andpress OK button toreset
all settings to theoriginal factory settings.
Password
The default is 0000
SYSTEM SETUP SPECIFICATION
Note:
1.The quality andspeed for readingJPEG photos dependon the resolutionand
compression ratio ofthe photos. SomeJPEG photo maynot be playeddue to thedisc
quality and theformats.
2.Some DVD+R/RW,DVD-R/RW,CD-R/RW discmay not beplayed due tothe quality on
burning conditions.
247x191.8x41.9mm
Slave screen:246.5x191.6x30mm
Power Supply
Power Consumption
Signal System
Video Output
Audio Output
Headphone Terminal
Frequency Response
Signal/Noise(Audio)
Dynamic Range
Panel Size
Laser Wavelength
Operating Conditions
Rechargeable Battery
Dimensions
Weight
DC 9-12V
10W
PAL/NTSC
1 Vp-p/ 75ohm,unbalanced, 3.5mm miniJack *1
1.4Vrms / 10Kohm, 3.5mm mini Jack *1
3.5mm stereo minijack *1
20 Hz -20KHz
80dB
85dB
9 inch
650nm/ 795nm
Temperature:0~40°C Status: Horizontal
Lithium Polymer
Main Unit:
Main Unit: 1.1kg Slave screen:0.55kg
<
<
<
Support device SD/MMC/Full Speed USB2.0
Device capacity Up to 8GBSD/8GB MMC/8GB USB
Remark This model iscompatible with 9~12Vvehicles

22 23
BATTERY MOUNTING BAG
The unit utilizeslong-life Li polymerbattery for portablepower supply.The battery has
no "Memory Effect"and thus can be recharged safely regardless of whether the battery
is fully orpartially discharged. It'senough to rechargeno longer than6H each time,fully
recharged battery canlast about 2hours.
The battery canbe only rechargedwhen turning powerto OFF state,and keep continuous
power supply,the red light will be on, and the lightwill turn Greenwhen it's fullycharged.
1. The normalworking temperature is:0°C ~40°C ;
2. Alwaysunplug AC/DCpower supply forthe unit whennot in use;
3. It isnormal for theunit to produceheat during playback,however, theunit should not
be used forextended periods orleft unattended.
4. Avoidhaving the unitcollide with anyobjects, and placeaway from allpossible heat
sources or dampareas.
Precautions related toBattery Recharge
Rechargeable Battery Use
The unit willaccess to Standbymode automatically whenthe battery islow.
If the batterydoes not workto your expectation,please consult theservice centre. Do
not attempt toreplace or repairthe battery byyourself unless youare qualified service
personnel.
Using and maintainingrechargeable battery supply
Please note:
Battery will notbe chareged duringplayback. This isdesigned to prolong the battery life
and protect itfrom being overcharged.
Caution:Danger of explosionif battery isincorrectly replaced.Replace onlywith the
same or equivalenttype.

24 25
TROUBLESHOOTING
You can't advance through the opening credits and warning information that appears at the beginning of
movies because the disc is programmed to prohibit that action.
Some discs have sections that prohibit rapid scanning or chapter skip;
If you try to skipthrough the warning information and credits at the beginning of a movie, you won't be able to.
This part of the movie is often programmed to prohibit skipping through it.
The icon appears on screen
Ensure there is no restriction on the disc's software
Ensure the feature is supported by the disc
Ensure the feature is available at the moment
Ensure requested ttitle or chapter is not out of range
The player can notadvance through a movie
No forward or backwardscan
Copyright
This manual containsinformation protected by copyright law.
No part ofthis document may be used or reproduced in any form or by any means, or
stored in adatabase/retrieval system without prior written permission from us.
The information ofthis manual is based on the current version of the product.
We reserve theright to alterthe content withoutprior notice.
All brand namesin this manual are the property of their respective owners.
Owing to continuousimprovement, no prior notice will be given regarding changes on
above feature andspec.

26
12 Month Warranty
Thank you foryour purchase fromKmart.
Kmart AustraliaLtd warrants yournew product tobe free fromdefects in materials and
workmanship for theperiod stated above,from the dateof purchase, provided that the
product is usedin accordance withaccompanying recommendations or instructions
where provided. Thiswarranty is inaddition to yourrights under theAustralian
Consumer Law.
Kmart will provideyou with yourchoice of arefund, repair orexchange (where possible)
for this productif it becomesdefective within thewarranty period. Kmartwill bear the
reasonable expense ofclaiming the warranty. This warrantywill no longer apply where
the defect isa result ofalteration, accident, misuse,abuse or neglect.
Please retain yourreceipt as proofof purchase andcontact our Customer Service Centre
on 1800 124125 (Australia) or0800 945 995(New Zealand) or alternatively, viaemail at
for any difficultieswith your product. Warranty
claims and claimsfor expense incurredin returning thisproduct can be addressed to our
Customer Service Centreat 690 SpringvaleRd, Mulgrave Vic3170.
Our goods comewith guarantees thatcannot be excludedunder the Australian
Consumer Law. Youare entitled toa replacement or refund for a major failure and
compensation for anyother reasonably foreseeableloss or damage. You are also
entitled to havethe goods repairedor replaced ifthe goods fail to be of acceptable
quality and thefailure does notamount to amajor failure.
For New Zealandcustomers, this warrantyis in additionto statutory rightsobserved
under New Zealandlegislation.
WARRANTY STATEMENT
For kmart customersonly
Table of contents
Other Olin Portable DVD Player manuals