manuals.online logo
Brands
  1. Home
  2. •
  3. Brands
  4. •
  5. Oliveri
  6. •
  7. Bathtub
  8. •
  9. Oliveri Dublin DU1650 User manual

Oliveri Dublin DU1650 User manual

WARRANTY
Page 4 of 4
Congratulations on purchasing an Oliveri bath. It represents
the very best of Australian design ideas combined with
well proven construction techniques. Oliveri products are
manufactured to stringent Australian Standards, so you
can be assured of safety and reliability.
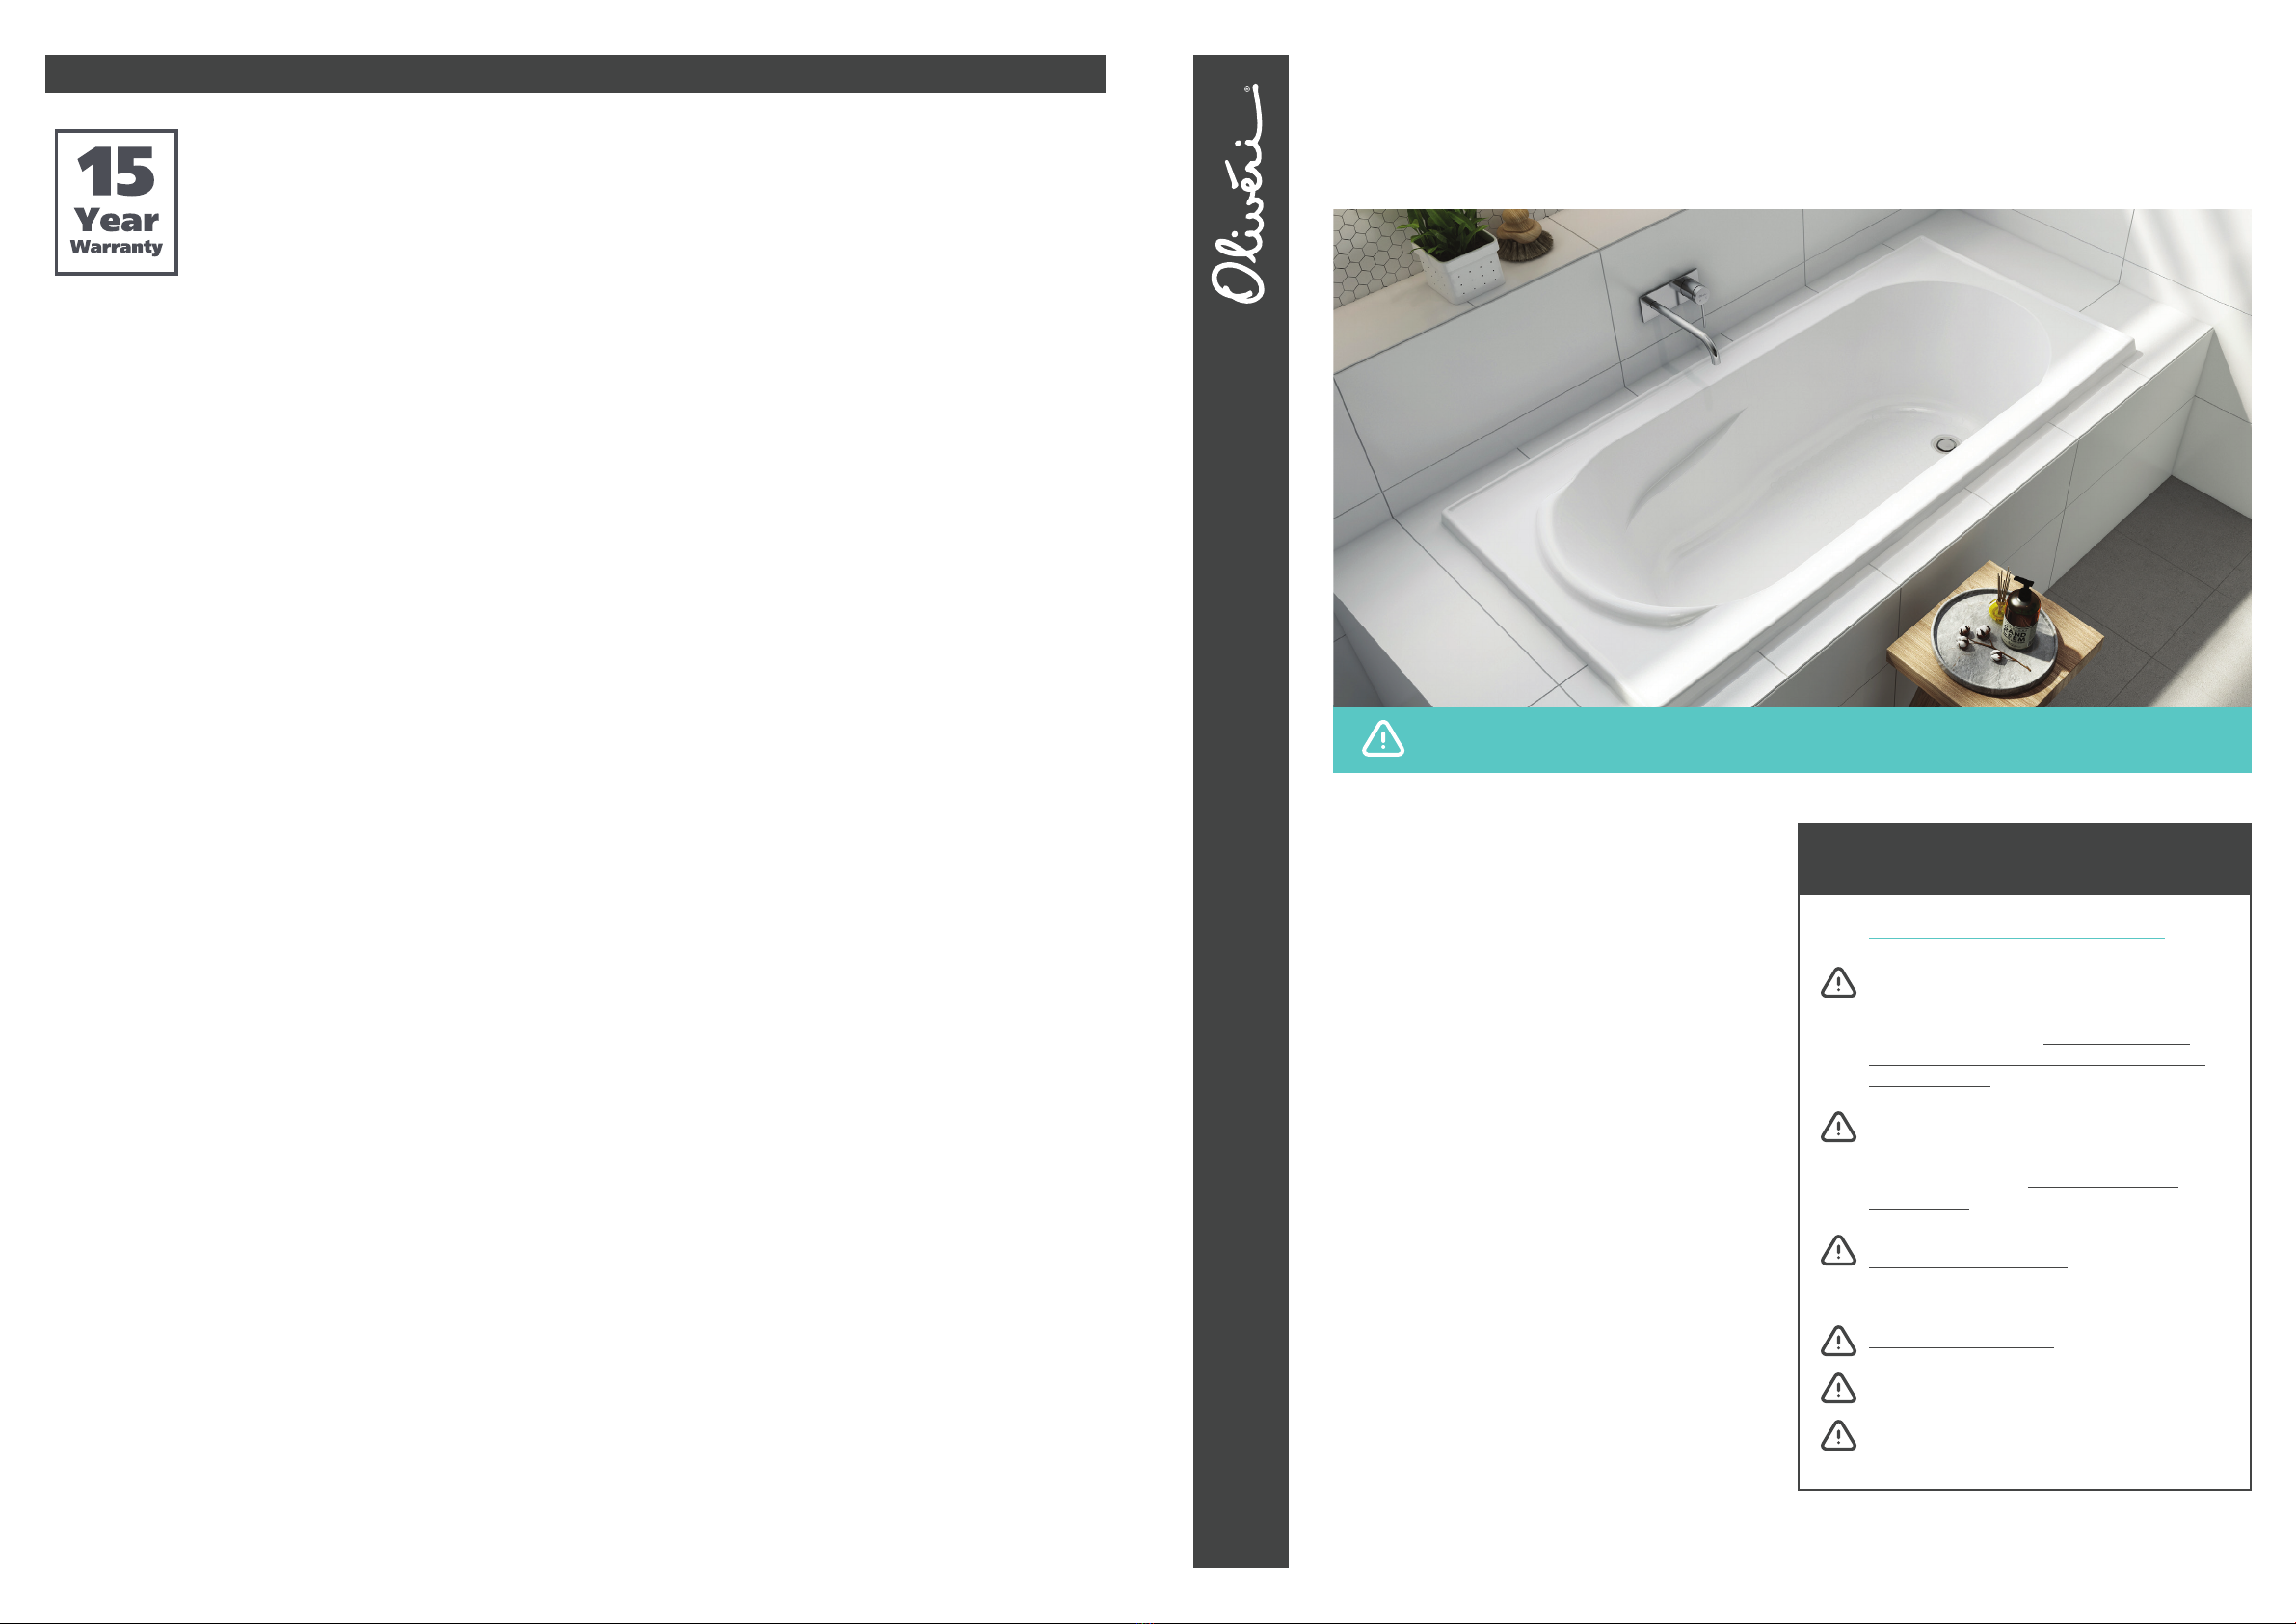
The Dublins’ elegant, simple lines create the perfect
balance of form and function. Manufactured from
premium sanitary grade acrylic, the bath is durable and
easy to clean. Additionally this bath base has been
reinforced with a resin and fiberglass coating for superior
sturdiness and durability.
Correct and proper use of your bath will ensure its
long-lasting life. Please consult the Caring for Your Bath
section of this manual for advice on cleaning and
regular maintenance.
Features
• 15 year warranty (see Oliveri.com.au for details)
• Manufactured to AS/NZ Standard 2023/1995
• Steel rod reinforced rim
• Double reinforced bath base
• End waste position*
*Plug and waste not included
oliveri.com.au
Installation Instructions
Dublin
Inset Bath With Tile Bead
THIS PRODUCT MUST BE INSTALLED BY A QUALIFIED TRADESPERSON
TF34a - Dublin Inset Bath Installation Instructions / Page 1 of 4
PRE-INSTALLATION CHECKS
Inspect the acrylic surface of the bath for
damage. Damage found after installation
is not covered by the manufacturer’s
warranty conditions. ANY CLAIMS FOR
DAMAGE WILL NOT BE ACCEPTED AFTER
INSTALLATION.
Protect your bath before and during
installation. Scratches, cracks or other
surface damage sustained during or after
the installation are NOT COVERED BY
WARRANTY.
Installation must only be carried out by a
QUALIFIED TRADESMAN and in accordance
with building regulations and any local
authority requirements.
REMOVE PLASTIC FILM prior to installation.
We recommend that ‘pre-framing’ work be
carried out when the product is on-site.
Do not install bath on foam.
STOP AND READ CAREFULLY
Oliveri Inset and Island Baths carry the following domestic warranty:
15 years replacement product / 1 year labour
Visit oliveri.com.au for full details.
Please note: It is the responsibility of you and/or the installer
to ensure that prior to installation:
• the Product is not damaged; and
• the Product has all its components.
Following installation of your Product, it is your responsibility
to ensure all required maintenance is performed. If the product
is incorrect or has a genuine manufacturing fault, it must NOT be
installed. The Product can be returned, with proof of purchase, to
the location it was purchased.
If you are a consumer as defined under the Australian Consumer
Law, our goods come with guarantees that cannot be excluded under
the Australian Consumer Law. You are entitled to a replacement or
refund for a major failure and compensation for any other reasonably
foreseeable loss or damage. You are also entitled to have the goods
repaired or replaced if the goods fail to be of acceptable quality and
the failure does not amount to a major failure.
The Oliveri Warranty is in addition to all your rights and remedies
under the Australian Consumer Law.
The Oliveri Warranty only applies to you if you are the original
purchaser of the Product. It is not transferable.
Subject to the terms contained in the full Oliveri Warranty
document available at oliveri.com.au/service-and-warranty-au,
where a genuine manufacturing defect arises in your Oliveri Inset
or Island Bath during the course of normal domestic or commercial
use within the warranty period, Oliveri will, at its election repair the
defect or replace the Product.
Your Oliveri Warranty does not cover scratching or any defect or
damage caused, or partly caused by, or arising through: fair wear
and tear (e.g. surface deterioration or scratching from cleaning etc.);
incorrect storage or handling of the Oliveri Inset or Island Bath;
failure to correctly install, use or maintain the Product or to follow
any instructions or guidelines for installation, use or maintenance
of the Oliveri Inset or Island Bath; faulty design of a system in
which the Product is used; the use of the Oliveri Inset or Island Bath
other than for any application specified on a quote or order form,
price book or catalogue issued by Oliveri; the continued use of the
Product after any defect becomes apparent or would have become
apparent to a reasonably prudent operator or user; or any accident
or act of God.
This Warranty will be void if certain events arise including:
• You are unable to provide proof of purchase or equivalent
documentation from an authorised retailer of your Oliveri Inset or
Island Bath;
• If:
• your Oliveri Inset or Island Bath is not installed by a licensed
plumber or qualified tradesperson, (as appropriate);
• your Oliveri Inset & Island Bath is not installed in
accordance with the recommended design guidelines or
installation instructions; and
• unauthorised modifications are made to your Oliveri Inset
or Island Bath.
Full details of exclusions and limitations are set out in the full
Oliveri Warranty document available at: oliveri.com.au/service-and-
warranty-au
To the fullest extent permitted by law and subject to and without
limiting your consumer rights under the Australian Consumer
Law, Oliveri expressly limits its liability under this Oliveri Warranty
and under any other statutory guarantee imposed at law to, at its
option:
• the replacement or repair of the Oliveri Inset or Island Bath;
• the supply of an equivalent Oliveri Inset or Island Bath; or
• the payment of the cost of the Oliveri Inset or Island Bath or of
repairing the Product or of acquiring an equivalent Oliveri Inset or
Island Bath.
To the fullest extent permitted by law, Oliveri expressly excludes:
• all liability for damage or injury to any person;
• damage to any Property;
• loss of profit, loss of revenue, loss of use, loss of business,
loss of opportunity, loss of goodwill, loss of contracts, loss of
production, business interruption or any kind of indirect, special
or consequential loss or damage arising in connection with the
defective product; and
• all conditions, warranties and undertakings in relation to the
Oliveri Inset or Island Bath except as set out in the full
Oliveri Warranty document available at oliveri.com.au/service-
and-warranty-au
SERVICE / WARRANTY CLAIMS
To make a warranty claim, please contact Oliveri by phone on:
08 8348 6444 or by email: [email protected]. You must
bear your own costs incurred in making a warranty claim.
No specific claim form is required however the following
documentation must be supplied as part of your claim:
• proof of purchase;
• handover documentation (for new homes);
• your contact details, including the address of the installed Product;
• photo/s of your Product and the defect in question; and
• details of the warranty claim including date of installation,
installer details, and description of the product fault.
Oliveri Solutions Pty Ltd ABN 12 007 551 886
51 Naweena Rd, Regency Park SA 5010
P 08 8348 6444 E [email protected]
Page 3 of 4Page 2 of 4
Please note that this product has been through our rigid quality
control procedures which include visual inspection under bright
lights. For your peace of mind, please unwrap the bath and check
carefully to ensure it has not been damaged in handling or transport
which is beyond our control.
Claims regarding cracks and/or face and/or surface
damage will not be recognised after 14 days from when
the product was dispatched from our warehouse or
48 hrs after receipt by end user. No such claims will be
recognised after installation.
Acrylic baths need to be supported under all rims as well as along the full length of the floor of the bath.
Baths with Self-Supporting Base Pads
Some baths (only those with 5 PVC circles glassed to the base) can be
installed on a firm level surface without the need to use a mortar bed.
Use a cement based adhesive to glue the base pads to the floor.
This must only be done where the support area is completely smooth,
clean and level. Spread adhesive liberally over the support floor and
base pads and allow adequate time for it to cure. On a timber floor
it is necessary to first lay a fibre cement sheet in accordance with
the manufacturer’s installation instructions. The bath feet must then
be adhered to the sheet with a concrete based adhesive.
All Other Baths
Allow a minimum of 50mm for the mortar bed. Mix the mortar to
a dryish consistency to minimise shrinkage and droop. Include a
bonding Agent such as BONDCRETE in the mix. It is a requirement
of the water authorities that all non-self-supporting baths be
supported the full length of the bath base on a mortar mix. When
installing an Island bath, the full perimeter also has to be supported
by a ‘frame’ of timber or masonry as per diagram “D”.
Supporting the Base
DO NOT USE
FOAM TO
SUPPORT THE
BASE OF
ANY BATH
When baths are supplied with steel base (and/or base and rim)
support frame, the bath should be slipped into position and the top
levelled by adjusting the feet on the frames. All of the adjustable
feet of the frame must be in full contact with the floor, so that the
base is fully supported.
A mortar mix must also be laid to fill the void between the bottom of
the bath and the floor within the frame perimeter if the bath is going
to be used as a shower/bath.
Holes for taps can be drilled in the bath using a timber hole saw.
Care should be taken not to bottom out the hole saw on the bath
as this can leave deep marks in the surface.
To avoid this, cut a 200 x 200mm section of cardboard and drill the
required hole through the centre. Leave this cardboard over the hole
saw as protection. When drilling acrylic, the points of the drill bits
should be eased from the usual chisel angle of 118 degrees to 130
degrees to reduce the chances of grabbing.
Detail of Bath to Wall
INSTALLATION MUST BE CARRIED OUT BY A QUALIFIED TRADESMAN
BATH INSTALLATION
Tap Holes
Acrylic has an excellent resistance to most things it is likely to come
into contact with in the bathroom. However if it should be exposed
to a naked flame, cigarettes or strong solvents they should be
removed immediately. To keep your bath in good condition it is
recommended you adopt the following:
1. When filling the bath start with cold water to allow the bath to
gradually adapt to the temperature.
2. To maintain the bath’s good looks it should be cleaned with liquid
or gel-type (not powder) household detergent, or all-purpose
liquid cleaners such as “Handy Andy” or “Liquid Ajax. Do not use
coarse abrasives. However cream-type cleaners such as “Jif” may
be used to remove stubborn marks but not on plated fittings.
3. When your bathing is completed it is recommended that you
wipe a damp sponge or cloth around the water line to remove
any build-up of body fats or soap residue that may result in a
“tidemark”.
4. If the bath is accidentally scratched it may be restored by using a
fine polish such as “Brasso”. If this will not remove the damage
it can be cut back with either very fine wet and dry paper used
liberally with water or car cutting compounds. After removing the
damage, restore the gloss of the bath with car polish.
CARING FOR YOUR BATH
YOUR BATHING EXPERIENCE
Your bath should be an experience to look forward to, an opportunity to pamper yourself, a retreat from the pressures
of life. The temperature of your bath will have a lasting effect on you. A hot bath will leave you totally relaxed for a
restful sleep. Run it luke warm and it will leave you fresh and ready to go. Ideally the bath water should not be too
hot. Research has shown that a temperature of 35ºC (95ºF) has the most beneficial effect on the bather. Increasing the
temperature to 37ºC or above reduces the therapeutic effects on the bather and induces drowsiness.
Diagram A
Bath
Timber or
masonry
support
wall
Timber or
masonry
wall
checked
out to
accept
bath edge
Sand cement
mortar bed
Where the bath abuts a wall, it must be set back into the wall as
detailed in diagram “B”. The wall is checked out to a depth that
will accommodate the full round of the tiling bead. A batten is
fixed to the wall to support the bottom edge of the bath rim.
The front and sides of the bath are to be supported on a dwarf
wall constructed in either timber or masonry. The front edge of
the bath can overlap the wall as shown in diagram “C” or sit on
top of the wall to create a ledge as in diagram “D”.
Detail of Bath to Wall
...Continued
Diagram B
Tile backing sheet
Tile
Timber
stud
50 x 25
batten
Silicone seal
Diagram C
Tile backing
sheet
Tile
Bath
Masonry or
stud wall Mortar bed
Silicone sealant
Diagram D
Tile
Spa jet
Masonry or
stud wall
Mortar
Silicone sealant
Risk of personal injury. Baths are heavy and awkward to handle. Get help
when lifting or moving. Be sure to use proper tools and always wear
personal safety devices for your protection.
CAUTION
Handling
NOTE
A mortar mix must also be laid to
fill the void between the bottom
of the bath and the floor within
the frame perimeter if the bath
is going to be used as a shower/
bath. (It is a requirement of
Building Authorities and Australian
Standards that acrylic baths be
fully supported with a mortar mix).

This manual suits for next models

1

Other Oliveri Bathtub manuals

Oliveri Munich MU1500 User manual

Oliveri

Oliveri Munich MU1500 User manual

Oliveri Naples NA1665 User manual

Oliveri

Oliveri Naples NA1665 User manual

Oliveri Naples User manual

Oliveri

Oliveri Naples User manual

Popular Bathtub manuals by other brands

Signature Hardware BAXTER 929440-AIR manual

Signature Hardware

Signature Hardware BAXTER 929440-AIR manual

Fleurco BAC5731 Installation and user guide

Fleurco

Fleurco BAC5731 Installation and user guide

STROMBERG Cameo Documentation

STROMBERG

STROMBERG Cameo Documentation

Astra BARCELONA ACP17 installation manual

Astra

Astra BARCELONA ACP17 installation manual

American Standard Renaissance 047438-0070A parts list

American Standard

American Standard Renaissance 047438-0070A parts list

Artize TIAARA owner's manual

Artize

Artize TIAARA owner's manual

glass 1989 pop 160/100 manual

glass 1989

glass 1989 pop 160/100 manual

American Standard Hampton 5' Drop-in Whirlpool 2425.018W Specifications

American Standard

American Standard Hampton 5' Drop-in Whirlpool 2425.018W Specifications

Kohler K-1114-HL Roughing-In Guide

Kohler

Kohler K-1114-HL Roughing-In Guide

Clou InBe IB/05.40402 installation instructions

Clou

Clou InBe IB/05.40402 installation instructions

Porcelanosa noken BASIC 100096848 N710000628 manual

Porcelanosa

Porcelanosa noken BASIC 100096848 N710000628 manual

American Standard DXV LYNDON D12536-004 installation instructions

American Standard

American Standard DXV LYNDON D12536-004 installation instructions

Laurel Mountain Whirlpools Colony Series owner's manual

Laurel Mountain Whirlpools

Laurel Mountain Whirlpools Colony Series owner's manual

DURAVIT Soleil by Stack 760503 PRE-INSTALLATION

DURAVIT

DURAVIT Soleil by Stack 760503 PRE-INSTALLATION

Kohler Underscore Cube K-1969-VB Detailed Planning Dimensions

Kohler

Kohler Underscore Cube K-1969-VB Detailed Planning Dimensions

Laufen PALOMBA manual

Laufen

Laufen PALOMBA manual

Crosswater Formoso Petite US-N1ACS installation instructions

Crosswater

Crosswater Formoso Petite US-N1ACS installation instructions

Kohler K-1106 installation guide

Kohler

Kohler K-1106 installation guide

manuals.online logo
manuals.online logoBrands
  • About & Mission
  • Contact us
  • Privacy Policy
  • Terms and Conditions

Copyright 2025 Manuals.Online. All Rights Reserved.