Omega Diamond Blue Ripper G2 Use and care manual

The Blue Ripper G2™
The Blue Ripper G2™
Rail Saw
(Blade shown might not ship with saw or be available.)
Operation, Safety, and Instruction Manual
v20181210
™

Page 2
Operating/Safety Instructions
IMPORTANT: Read Before Operating Equipment
To avoid accidents or injury, keep work area clean, well lit, and well
ventilated.
lways wear eye, hand, ear, foot and all other appropriate protective
apparel when operating saw.
Keep all other people, children, and small farm animals away while
operating saw.
Use only properly grounded, GFCI protected electrical outlet. GFCI
must be tested every 2 months.
arning: Do NOT turn machine on or off with the GFCI safety switch.
Turn machine toggle switch off before resetting the GFCI.
Ensure that the electrical system in your work location meets all codes
and regulations prior to operating saw.
Do not modify the plug on the saw or use any adapters between the saw
and the electrical outlet.
Do not allow water to run directly on the motor or any other electrical
component.
If power cord or any other part of the saw is damaged, discontinue use
immediately until damaged parts can be replaced.
Keep saw blade clear of clothing, jewelry, hair, cords, hoses, or any other
object while in operation.
Ensure that the saw is switched off (trigger released) before plugging or
unplugging it.
Ensure that blade is clamped firmly between flanges and spinning freely
prior to operating.
Keep hands on provided handels of the saw and away from the blade
while operating.
Never force the saw if it seems to be stuck or if it seems to be moving
with difficulty.
Use only blades of correct size and shape. Do not modify blades.
Do not force bolts; most have been assembled with a threadlocking
adhesive for safety.
Page 3
Operating Instructions
Installing/Replacing Blade:
Note: This saw is designed for stone and masonry applications
exclusively. For optimal performance use only Diamond blades from
mega Diamond that are designed for the material you are cutting.
Place the saw on the rail (with rail rubber side down) providing
clearance for installing the blade. Loosen Vertical djustment lock and
raise motor to full height.
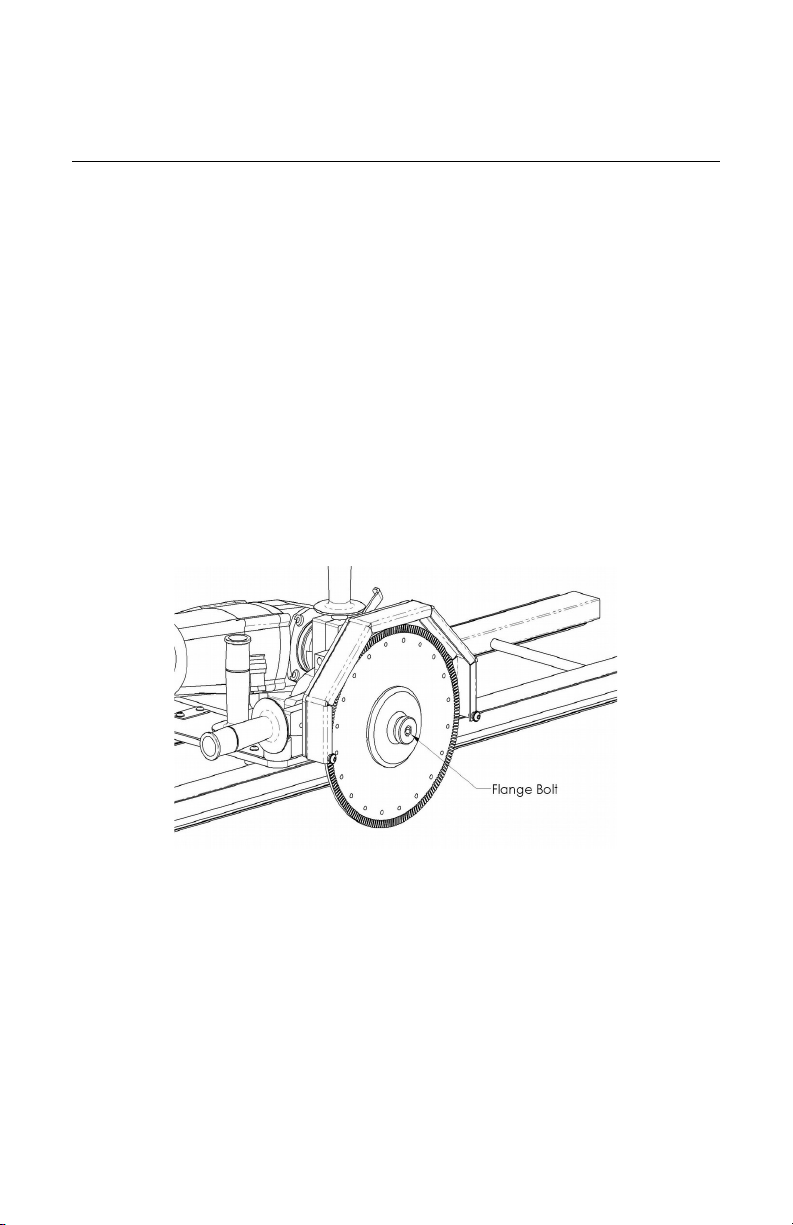
Remove the right-hand threaded bolt that is holding the flanges and
blade to the shaft, by turning counter clockwise. If the bolt is too tight to
loosen by hand, use a 8mm llen wrench to turn it. (To lock the shaft,
insert a #2 Philips screw driver through the hole and shaft in the motor
mount housing.)
Remove the front flange (and old blade, if applicable) and slide the
new blade against the rear flange. Ensure that the blade is flat against the
rear flange with rotation direction arrow facing counter-clockwise.
rrow on some blades may be facing the motor or facing out, depending
on blade manufacturer (see Spin Direction, pg 6).
Replace the front flange so the blade is sandwiched between the two
flanges. Replace the right-hand threaded bolt and tighten securely by
hand.
For more detailed instructions see YouTube video
https://www.youtube.com/watch?v=Jn7QugM0NCg

Page 4
Typical Operation:
Note: For fastest cutting speeds, it is recommended that you lay your slab
on top of a foam sheet at least 1” (3cm) thick. (1.5” (4cm) is
preferred for less crumbling). But you can use standard stone cutting
tables.
1) Lay the rail on the slab along the line to be cut. Note this saw can cut
on either side of our rails (it has a 1” offset)
2) llow the rails to overhang enough for the blade to clear the stone
where you will begin your cut. It may be necessary to clamp the rails to
the stone to prevent wandering. Clamp onto provided angle bolted to
one side of rail.
3) Turn the water valve on and adjust desired flow.
4) Turn saw on before blade touches the stone. Do not stand directly in
front of or behind the blade while cutting.
5) Unlock and lower blade to desired cut depth by rotating the vertical
adjustment system locking handle counter-clockwise then lock the saw
height by rotating the same handle clockwise
Page 5
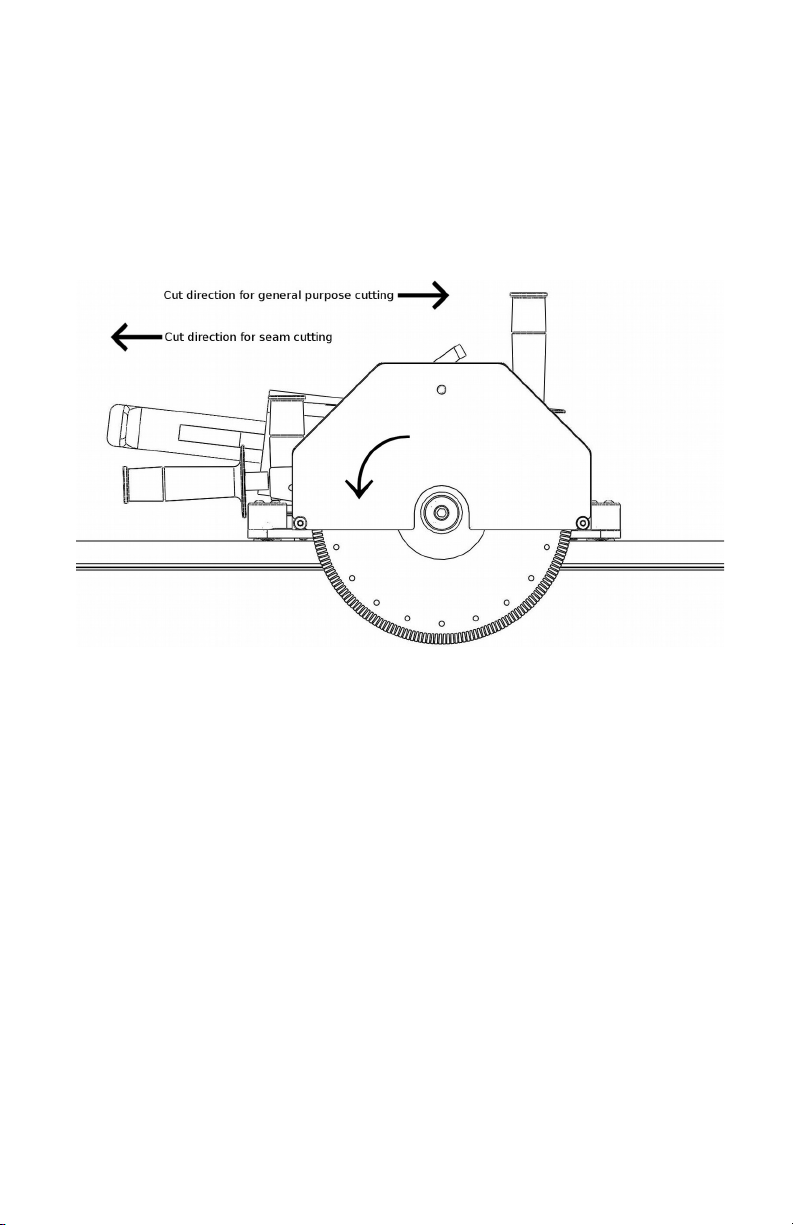
6) Begin your cut by slowly pushing the saw into the stone. Note the
G2 will cut in both directions but cutting from left to right
will reduce lifting forces. When seam cutting, cut from right to left
(climb cutting). This will reduce surfaces chipping.
7) Note: Step cutting has less chance of saw cut wandering in the cut.
8) Once you have initiated the cut you must not go too slow or the
diamonds on the blade will glaze over, and the cutting speed will drop
dramatically.
9) Example: On a 2 cm thick slab of bsolute Black granite try to
maintain a cutting speed of about 6 FPM (1.8 meter per minute) or faster.

Page 6
Troubleshooting
Blade seems to be cutting slowly or not cutting at all?
Suggestions: Make sure the blade is mounted to spin in the proper
direction (See Spin Direction, on guard and on blade).
The material being cut may have “loaded” or “glazed” the diamond.
Use a dressing stone or “green stone” to free the diamond. See video on
https://omegadiamond.com/ExposingDiamondSharpenDressBlade_Vide
o
Blade binds or “freezes.
Suggestions: The blade may be cutting at a slight angle. Check
alignment. Make sure that the saw is rolling freely on the rails and the
rails are not damaged or bent. Make sure that the blade spindle is
securely fastened to the mounting plate.
Saw shuts off after a few minutes of use and/or fails to turn
on at all.
Suggestions: Check circuit breaker. If that is on and it still fails to
start, the motor may have overheated and may need to be replaced.
lso check the brushes in the motor. If these are worn out you can
either order them from us, directly from the motor manufacturer, or pick
them up from your local hardware store.
Saw grinder motor spins but blade dose not turn.
Suggestions: Check if timing belt is broken. Replace if needed.
If you have any questions please call us toll free:
1 (888) 996-4777

Page 7
Replacement Parts
Is your blade worn out? Want a spare? Need extra rail? Visit www.
OmegaDiamond.com or give us a call and we will be happy to help you
with your order.
Toll Free: 1 (888) 996-4777
Fax: 1 (530) 885-3785
Web: OmegaDiamond.com
Email: [email protected]
Page 8

Page 9
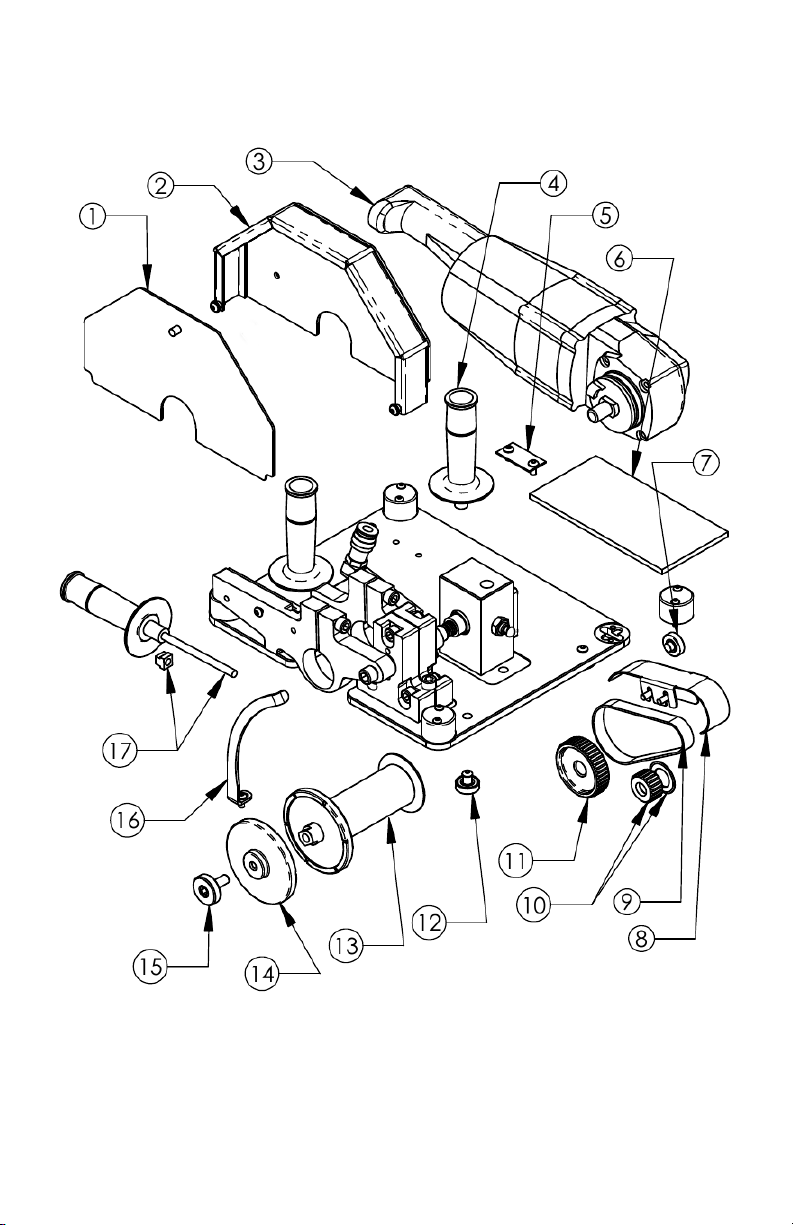
Bill of Materials
DESCRIPTION QTY
1 Front Guard Assembly 1
2 Guard Rim Assembly 1
3 928-295 Makita GA7021 fi ed speed angle grinder 1
4
5 Velcro Anchor with Velcro Included 1
6 Foam Pad 1
7 508-356 Traverse Bearing Assembly 4
8 Belt Guard Assembly 1
9 324-478 Belt 1
10 Motor Pulley with washer 1
11 Spindle Pulley 1
12 214-882 Alignment Bearing Assembly 4
13 Spindle Assembly with Rear Blade Flange 1
14 Front Blade Flange 1
15 Blade Bolt 1
16 Height Adjustment Arm 1
17 Height Adjustment Handle with Threaded Block 1
Illustration
Number
Part
Number
See omegadiamond.com/948-421 under ttached Files for the up to date
Replacement Parts List.

Page 10
Limited arranty
For warranty information please visit our web site at
omegadiamond.com/warranty
Please record the Date of Purchase and the Serial Number of your
machine here for future reference:
Date of Purchase:
Serial Number:
Table of contents
Other Omega Diamond Saw manuals


