Omegon AC 70/400 BackPack AZ User manual

Instructions Manual
Omegon® AC 70/400 BackPack AZ
English version 3.2017 Rev A Art-Nr. 53090

The Omegon® AC 70/400 BackPack AZ
Congratulations on the purchase of the new Omegon® AC 70/400 BackPack AZ. This telescope will
give you hours of fun, with its optical glass lens and light gathering capability it is the ideal
companion to start in the world of terrestrial view and the night sky. With this telescope, you will be
able to see the craters on the Moon, Sun Spots (with the supplier Sun filter), the Galilean Moons and
the rings of Saturn.
Included parts.
a - Aluminium Tripod;
b- Optical tube;
c- 5x finderscope;
d- K20mm eyepiece 1.25”;
e - K10mmr eyepiece 1.25”
f - Prism 1.25”;
g - Sun filter;
h –Back pack (not shown)
1. Knowing your telescope.
1.1. The Optical Tube (b)
The optical tube is one of the two
main parts of the telescope. It has a
glass lens (objective) - (1) at one
end. The objective gathers light from objects. This telescope has a 70mm (2.7”) objective, this is the
lens diameter. On the opposite end of the objective there is the focuser (9). The focuser is a
mechanical system that extends a tube #5. It allows in combination with the prism (8) and one of the
two eyepieces K20mm (e) and K10mm (d) (included) to obtain a magnified image that can be
observed peeking through the eyepiece lens. The optical tube also carries a small telescope -
finderscope - (c) which is used to aim the optical tube to an object to be observed. A tripod is
required to point and a Sun filter can be used to observe the Sun.
1- Objective lens 2- Optical tube 3- Finderscope base
4- Brake (focuser) 5- Draw-tube 6- Eyepiece
7- Prism thumbscrew 8- Prism 9- Knob (focuser)
10- Dovetail
Figure 2. Optical Tube.
Figure 1. What’s included.

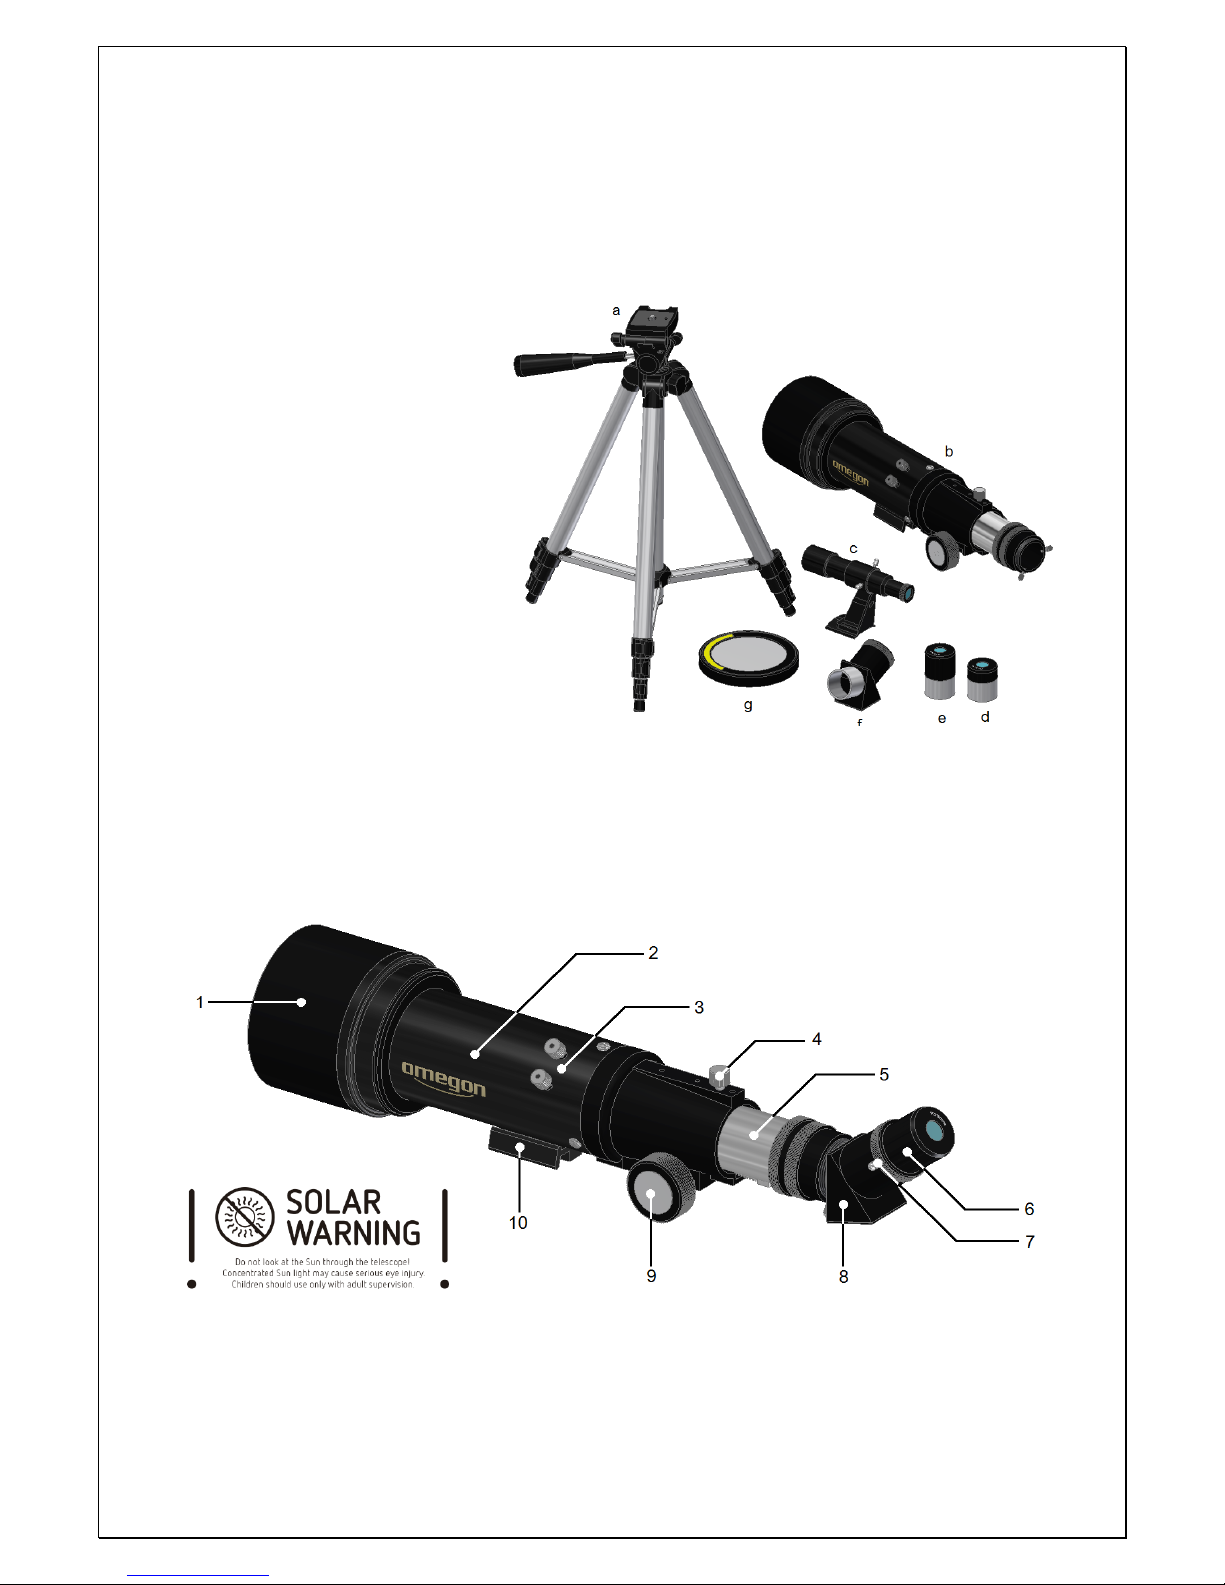
1.2. The tripod (a). The supplied aluminium tripod is used as a platform to place the optical tube.
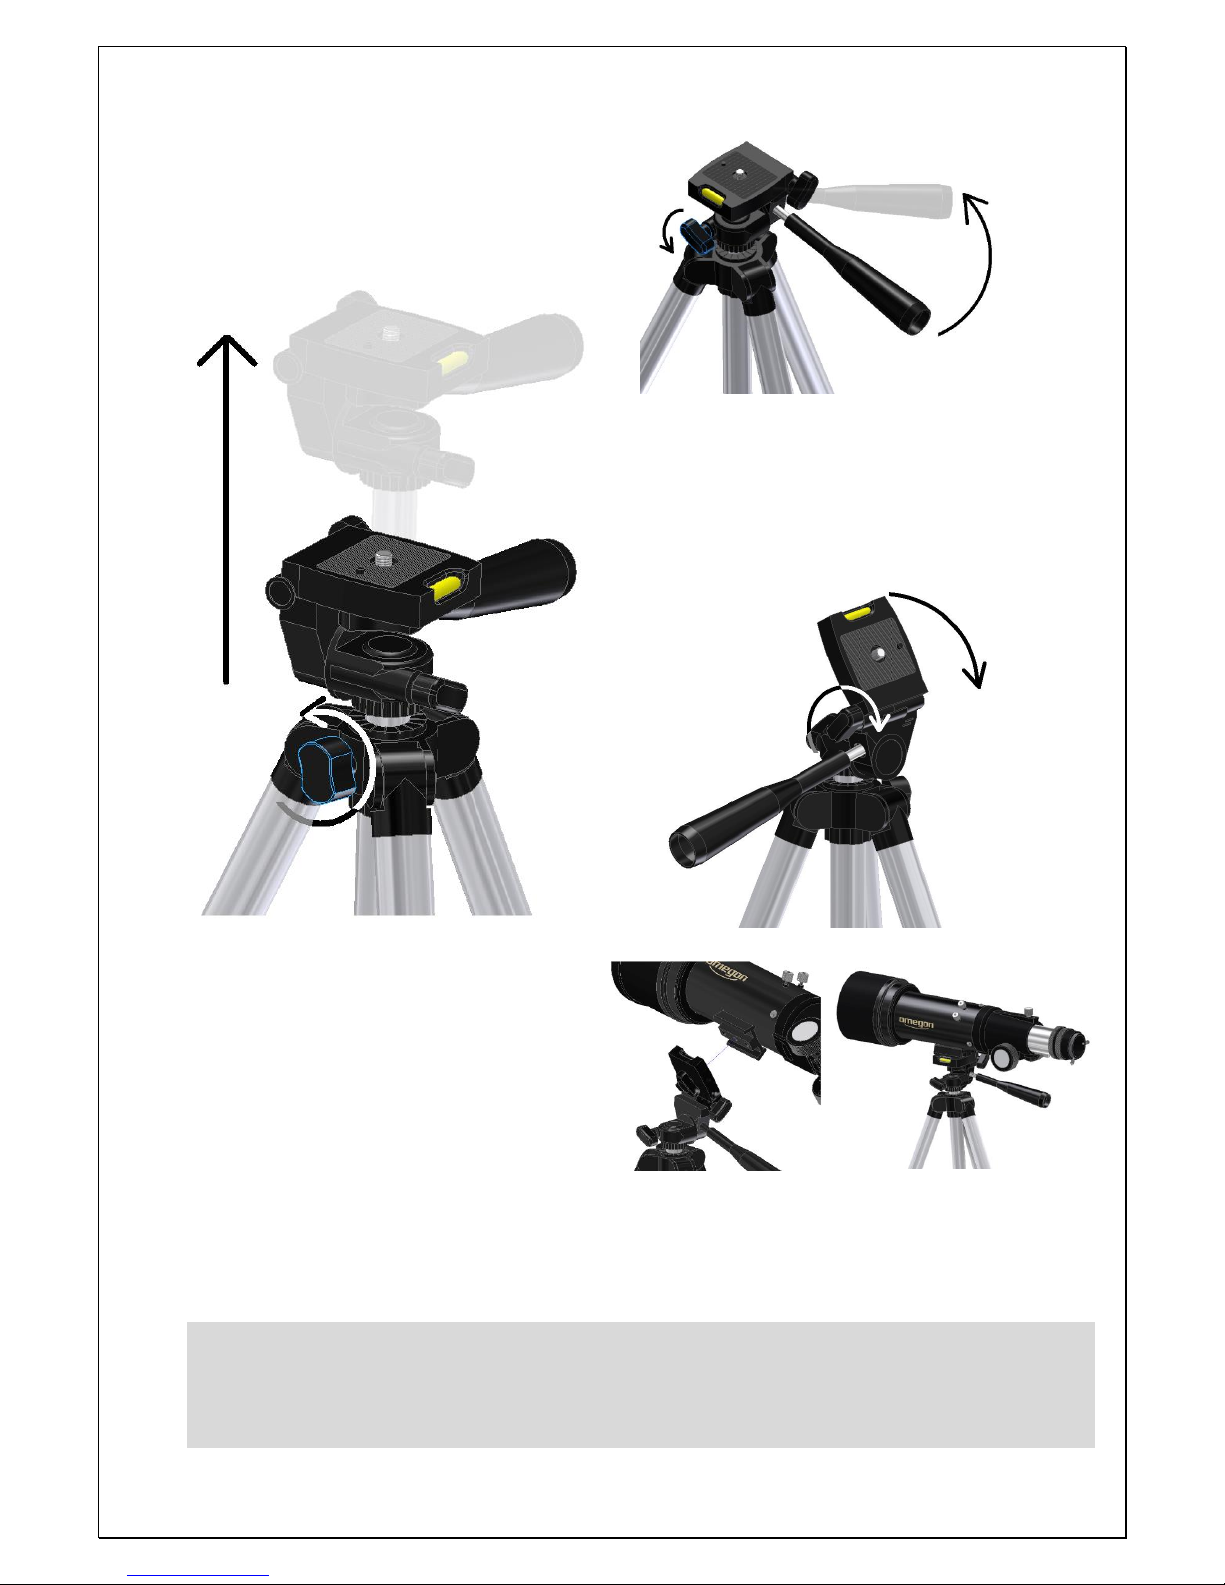
Here are some details about the tripod’s head – figure 3.
A- Telescope base; B- Bubble level;
C- Hand Grip; D- Lock-az;
E- Tripod Leg; F- Lock (shaft);
G- Lock (telescope); H- ¼”-20 Camera thread;
I- Lock (tilt); J- Shaft.
1.2.1. Extending the tripod. The tripod is compact
and the metal legs can be extended into several
configurations. A central shaft allows additional
extension if required –figure 4.
The most stable configuration is, however, with the
tripod’s legs collapsed to their minimum. It’s
recommend using the collapsed tripod on a table top
for more comfort and stability.
1.2.2. Camera base (A). The tripod’s camera base (A)
is compatible with most photo and video cameras
having a ¼”-20 thread standard. It also allows to level
horizontally by using the integrated bubble level (B).
1.2.3. The hand grip (C). Is used to direct and point
the tripod to a certain direction it also acts as a brake
to fix the tripod to a certain tilt. Release to tilt the
camera base (A) –figure 5.
1.2.4. Rotating the tripod head in az.Release the
Lock-az (D). One can see that the tripod head now
rotates freely around the tripod’s shaft (J) – azimuth
movement. Tighten to lock in a specific azimuth
direction –figure 6.
Figure 3.
Figure 4.
Figure 5.

1.2.5 Using the shaft extension. Release the Lock
(shaft) –(F), so that the central metal shaft can
slide up and down. Make sure to re-tighten after
choosing the required position –figure 7.
1.2.6. Tilt the telescope base. There is an
additional possibility that allows tilting the
camera base. This is only necessary to fix the
telescope or a camera to the tripod. Release
the Lock (tilt) –(I) so that the Lock (telescope)
–(G) hand knob is accessed easily –figure 8.
2. 2. Getting Started.
2.2.1. First step is to fit the optical tube to the
tripod. Proceed as mentioned before in 1.2.6.
by tilting the telescope base (A). Use the Lock
(tilt) –(I) to tighten firmly the optical tube to
the tripod. The telescope dovetail (10) is also
Vixen-Style compatible and makes this
telescope compatible with many other
advanced mounts. The telescope should be
pointing in relation to the tripod has shown in
figure 10.
Make sure the grip (C) is pointing to the same side as the drawtube (5).
Did you know?
The Vixen-Style dovetail (10) with ¼”-20 camera thread makes the optical tube compatible with many
other more advanced mounts such as equatorial mounts and can even be used as a guide scope for
astrophotography.
Figure 6.
Figure 7.
Figure 8.
Figure 9. Figure 10.

2.2.2. Setting the findescope to the optical tube. To set the finderscope to the optical tube start by
removing the two thumbnuts from the respective screws and face the finderscope as shown. The
finderscope is used to aim the telescope to a target (like in a riffle) - figure 11 and figure 12.
Align the finderscope before using the telescope -
please look for instructions in Annex A.
2.2.3. Setting the prism and eyepiece to the focuser.
Simply slide the prism’s (f) metal barrel to the
focuser’s tube and fix using the two focuser’s
thumbscrews. Turn the screws so that the prism and
eyepiece do not fall or slide when observing. Choose
the K20mm eyepiece (e) and fix it to the prism too –
figure 13.
Your telescope should look like in figure 14.
3. First steps.
3.1. Learning to focus. Make sure to get used to use
the telescope during daytime. This is a great
telescope for terrestrial viewing too. Remove the
dust cap from the telescope’s objective. Point to an
object –at least half a mile (800 metres) away, it can
be a tree or a building. Make sure never to point to
the Sun (or its vicinity without using a full aperture
Sun filter).
Now rack the focuser all the way in. Use the Knob
(focuser) (9) and slowly start racking-out the
drawtube (5). This will expose the chromed draw-
tube (5). Look through the eyepiece when doing this.
A sharp image will start to form. The point where
the image is very sharp is the focus. Use first the
Figure 11.
Figure 12.
Figure 13.
Figure 14.

K20mm eyepiece (e) which provides the lowest power but the brightest image. Replace the K20mm
with the supplied K10mm to get more magnification if necessary. You may need to re-focus when
changing eyepieces.
3.2. Sun observations. A telescope should never be pointed to the Sun or its vicinity. The Sun light
entering the telescope will concentrate in the eyepiece. It will cause permanent retina damage or
even blindness to the observer. For Sun observation, a dedicated front aperture filter is required
(supplied).
Before observing the Sun check the supplied Sun filter. The Sun filter is
made from a special coated plastic foil that is fragile and can easily be
scratched or pierced. Examine the solar filter with a strong incandescent
bubble light (placing the filter between the light bulb and you). Make
sure that no holes or scratches are visible. You should however see the filament of the light. Filter
with no holes or scratches are usual in good condition for Sun observation. 3.2.1. Fitting the solar
filter to the telescope. Now that the filter (3.2.) fit it to the telescope as shown. The filter should
have a tight fit to the telescope and should not fall-off during the Sun observation –figure 15 & 16.
4. Specifications and Features.
Objective
Aperture: 70mm
Focal length: 400mm
Focal ratio: f/5.7
Design: Achromat
Weight & Dimensions
Tube length: 1ft (30cm)
N.W. 4lb (1.7kg)
Finderscope
single lens 5x
Eyepieces
Design: Kellner
Focal length: 20mm and 10mm
Barrel size: 1.25” (31.75mm)
Filter thread M28.5x0.6
Solar Filter
Foil: Baader Astrosolar Film
Tripod
Max extension 4.5 ft. (134cm)
Min extension 1.5 ft (45cm)
Materials: ABS and anodized aluminium
Fit: ¼“-20 camera thread
Guarantee
Europe 2 years
U.S.A. and Canada 1 year from the date of
purchase.
Origin
P.R.C.
Children should only use this telescope for Sun observation with the supervision of an adult!
This telescope is not a toy and should be used with caution especially during daytime observations.
Children should always be teached about the dangers of pointing a telescope to the Sun!
Figure 15.
Figure 16.

5. What can been seen with this telescope?
Below you will find some examples of what you can expect to see when using this telescope.
5.1. The Moon is one of the most spectular objects
to be seen through a telescope. Even a small
telescope will reveal high detail of the Moon’s
surface. You will be able to see the craters on the
Moon’s surface and other features like the Marea.
The moon is a very bright object. It is better to
observe it when the Moon is not full. Try the
crescent Moon and look for features along the
terminator (between illuminated and dark surfaces).
5.2. Jupiter is the biggest planet of our solar system.
It is also one of the favorite targets for beginners.
Galileo was able to discover that the four tiny dots
that turn around the planet were in fact part of
Jupiters system of moons. With this telescope you
will not only be able to see Jupiter’s planet disc with
its two major discernible bands, but also its biggest
moons, Io, Europa, Ganymedes and Callisto.
5.3. The “lord of the rings” of the night skies, Saturn
is by far the most popular target for small
telescopes. Saturn’s rings are discernible even at
60x magnification. In a very good night you will be
able to see the Cassini’s division (the darker band
on the Saturn’s rings).

Annex A
5. Aligning the Finderscope.
Figure A. A distant object is centered at the telescope’s field
of view. In this example we have a house with a chimney.
The chimney is the reference point to place at the center of
the field of view. We first look through the telescope with
the lowest magnification possible (K20mm should be
preferrable). So we have the widest field of view.
STEP 1
Figure B. Looking through the finderscope we see the same
building but in this case the chimney is not centered. We
adjust the finderscope using the three thumbscrews so that
the finderscope moves slightly. This is enough to correct the
objects position in the finderscope. Trial and error is required
to get a satisfactory result. Make sure to tighten the 3 screws
after finishing so that the finderscope tube does not move.
STEP 2
Figure C. After playing with the three findercope
thumbscrews and some trial and error we get the
finderscope recticle close to the center (in this case the
chimney). The Finderscope is now ready to use!
STEP 3
Copyright 2017 nimax GmbH –Germany $10.00/€10.00
Products or instructions may change without notice or obligation
Reproduction partial or complete is not permitted without written authorization.
Table of contents
Other Omegon Telescope manuals

Omegon
Omegon EQ-500 X User manual

Omegon
Omegon Advanced X 152 DOB User manual

Omegon
Omegon AC 50 User manual

Omegon
Omegon 90/1000 EQ-2 User manual

Omegon
Omegon 750 EQ-3 User manual

Omegon
Omegon Dobson 76/300 DOB User manual

Omegon
Omegon Maksutov Telescope 90/1250 OTA User manual

Omegon
Omegon AC 70/700 AZ-2 User manual

Omegon
Omegon 53306 User manual

Omegon
Omegon Dobson 102/640 DOB User manual
Popular Telescope manuals by other brands

GeoSafari
GeoSafari Vega 360 manual

iOptron
iOptron AstroBoy instruction manual

TwinStar Telescopes
TwinStar Telescopes 50mm Compact Refractor Telescope Assembly guide

Meade
Meade 114EQ-ASTR instruction manual

Conrad Electronic
Conrad Electronic Yukon 20-50x50 WA operating instructions

STARGAZER
STARGAZER SG40070 manual