Onda WiFi Extender User manual

ONDA WiFi EXTENDER
ONDA WiFi Extender
User Manual

ONDA WiFi EXTENDER
C A T A L O G
Chapter I: Product Information ...................................................................... 1
1-1 Introduction and safety information ................................................................1
1-2 Safety Information...........................................................................................2
1-3 System Requirements ......................................................................................3
1-4 Package Contents.............................................................................................4
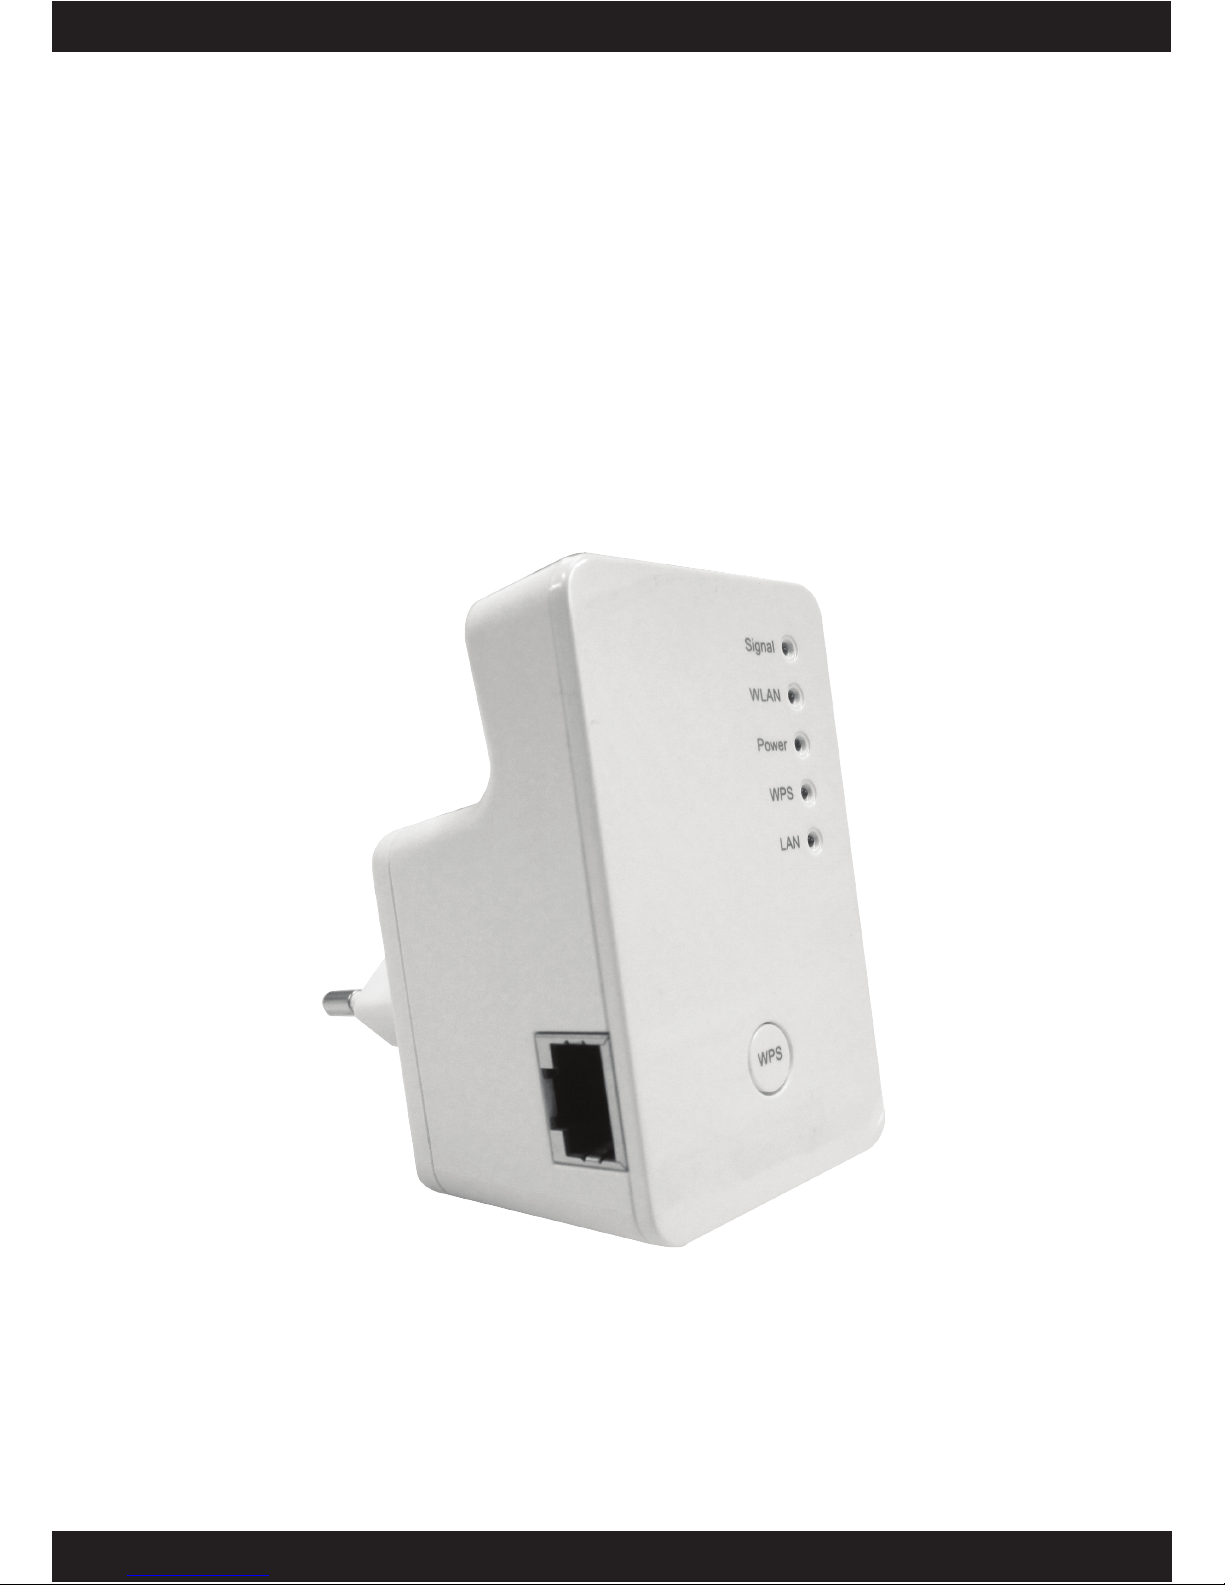
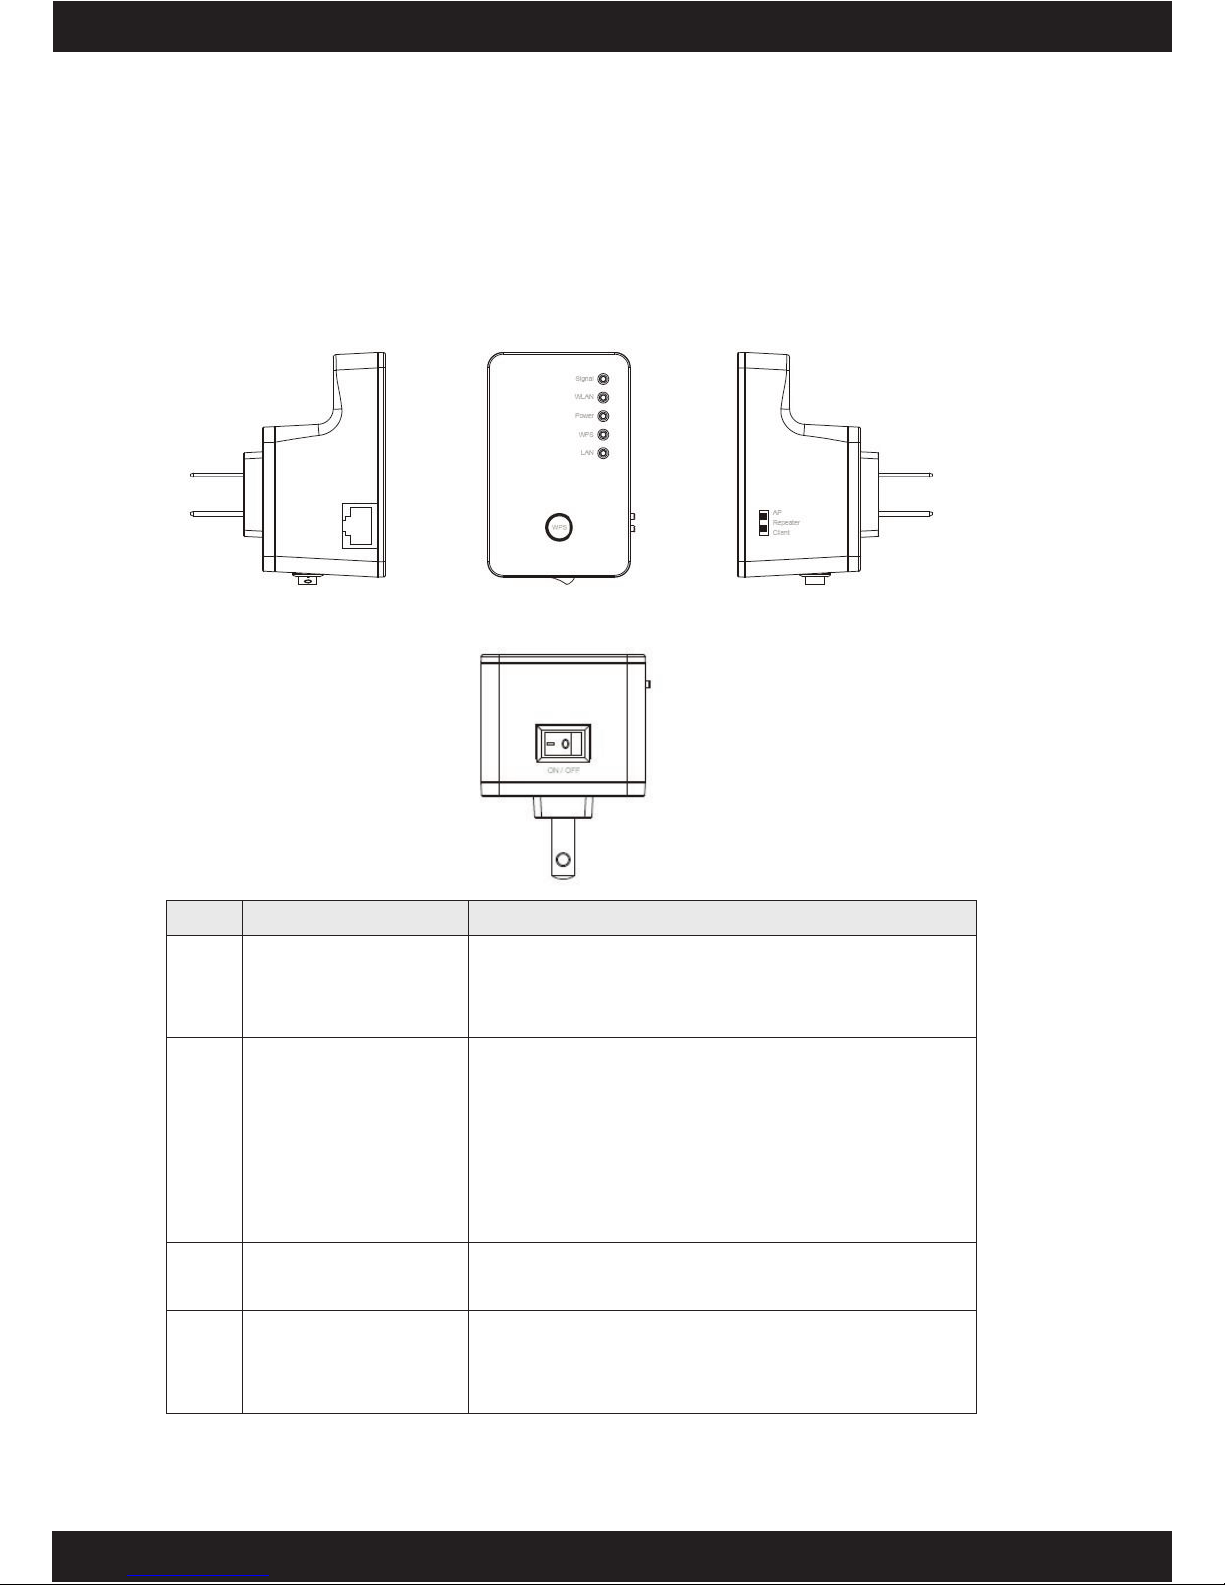
1-5 Familiar with your new wireless repeater........................................................5
CHAPTER II: Repeater mode.................................................................................8
2-1 Repeater mode Quick Installation Guide.........................................................8
2-1-1 Hardware WPS button setup ................................................................10
2-1-2 Web browser quick setup .....................................................................13
2-2 Repeater mode Advanced Settings ................................................................17
2-2-1 Setup IP address ...................................................................................17
Windows XP IP address setup:.............................................................17
Windows Vista/7 IP address setup:.......................................................18
2-2-2 Connect to web configuration menu ....................................................20
2-2-3 Home....................................................................................................22
2-2-4 WPS Setting .........................................................................................24
2-2-5 Advanced Settings................................................................................27
2-2-6 MAC Address Filtering........................................................................31
2-2-7 System Utility ......................................................................................38
CHAPTER III: Client mode ....................................................................... 44
3-1 Client mode Quick Installation Guide ...........................................................44
3-1-1 Hardware WPS button setup ................................................................46
3-1-2 Web browser quick setup .....................................................................49
3-2 Client mode Advanced Settings.....................................................................52
3-2-1 Setup IP address ...................................................................................52
Windows XP IP address setup:.............................................................52
Windows Vista/7 IP address setup:.......................................................53
3-2-2 Connect to web configuration menu ....................................................55
3-2-3 Home....................................................................................................56
3-2-4 WPS Setting .........................................................................................57
3-2-5 Advanced Settings................................................................................60
3-2-6 System Utility ......................................................................................63
CHAPTER IX: AP mode............................................................................. 69
4-1 AP mode Quick Installation Guide ................................................................69

ONDA WiFi EXTENDER
4-1-1 Hardware WPS button setup ................................................................71
4-1-2 Web browser quick setup .....................................................................73
4-2 AP mode Advanced Settings..........................................................................77
4-2-1 Setup IP address ...................................................................................77
Windows XP IP address setup:.............................................................77
Windows Vista/7 IP address setup:.......................................................78
4-2-2 Connect to web configuration menu ....................................................80
4-2-3 Home....................................................................................................81
4-2-4 WPS Setting .........................................................................................83
4-2-5 Advanced Settings................................................................................86
4-2-6 MAC Address Filtering........................................................................90
4-2-7 System Utility ......................................................................................97
Chapter X: Appendix................................................................................. 105
5-1 Configuring TCP/IP on PC..........................................................................105
5-2 Specification ................................................................................................109
5-3 Glossary....................................................................................................... 110

ONDA WiFi EXTENDER
1
Chapter I: Product Information
1-1 Introduction and safety information
Thank you for purchasing this mini 802.11b/g/n wireless repeater!
The ultra-compact design with power built-in allows you to install this
repeater everywhere, and still providing excellent network performance
to extend the Wi-Fi signal and wireless coverage.
Other features of this wireless repeater including:
Extend the wireless signal inside your home or office.
Ultra-compact design while maintaining excellent network
performance.
LED signal indicator to easily realize the best location placement
to extend WiFi signal and secure better wireless performance.
The device can support Repeater mode, AP mode and AP client
mode
Hardware switch button for user to change operation mode
quickly without logging into web firmware.
WPS (Wi-Fi Protected Setup) hardware button for easy
installation and secure wireless security.

ONDA WiFi EXTENDER
2
1-2 Safety Information
In order to keep the safety of users and your properties, please follow the
following safety instructions:
1. This wireless repeater is designed for indoor use only. DO NOT expose
this device to direct sun light, rain, or snow.
2. DO NOT put this at or near hot or humid places, like kitchen or
bathroom. Also, do not left this Wireless repeater in the car in summer.
3. Do not allow kids to put any small parts of this wireless repeater in
their mouth, and it could cause serious injury or could be fatal. If they
throw this wireless repeater, it will be damaged. PLEASE KEEP THIS
WIRELESS REPEATER OUT THE REACH OF CHILDREN!
4. This Wireless repeater will become hot when being used for long time
(This is normal and is not a malfunction). DO NOT put the Wireless
repeater on a paper, cloth, or other flammable objects after the Wireless
repeater has been used for a long time.
5. There’s no user-serviceable part inside the Wireless repeater. If you
found that the Wireless repeater is not working properly, please contact
your dealer of purchase and ask for help. DO NOT disassemble the
Wireless repeater by yourself, warranty will be void.
6. If the Wireless repeater falls into water, DO NOT USE IT AGAIN
BEFORE YOU SEND THE CARD TO THE DEALER OF PURCHASE
FOR INSPECTION.

ONDA WiFi EXTENDER
3
1-3 System Requirements
Wireless network card which is compatible with 802.11b/g/n wireless
network standard.
Windows 2000, 2003, XP, Vista, or Windows 7 operating system
CD-ROM drive
At least 100MB of available disk space

ONDA WiFi EXTENDER
4
1-4 Package Contents
Before you start to use this wireless repeater, please check if there’s
anything missing in the package, and contact your dealer of purchase to
claim for missing items:
□Wireless Repeater (1 pcs) …………………………..…………… 1
□Quick Installation Guide (1 pcs) …………………………………. 2
□User Manual CDROM (1 pcs) …………………………………… 3

ONDA WiFi EXTENDER
5
1-5 Familiar with your new wireless repeater
Interface Descriptions
Item
Item Name
Description
A
LAN
10/100M Ethernet LAN Port with
Auto-MDI/MDI-X. Connecting to computer,
switch or hub for local network sharing.
B
Reset / WPS
Reset the repeater to factory default settings
(clear all settings) or start WPS function.
Press this button and hold for 10 seconds to
restore all settings to factory defaults, and
press this button for less than 5 seconds to
start WPS function.
C
AP/Repeater/Client
Switch the button to change operating mode
to Access Point or Repeater or Client mode.
D
ON/OFF
This is power on/off slide switch. If you want
to switch off the repeater, switch it to Off
mode.
A
B
C
D

ONDA WiFi EXTENDER
6
LED Definitions
LED
Color
LED Status
Description
Signal
Amber
Steady ON
Good signal reception (signal strength
100%~50%).
Blinking
Normal signal reception
Slow blinking (50%~25%)
Poor signal reception
Quick blinking (<25%)
Off
Out of signal or disconnected/ or LED
off mode.
WLAN
Green
Blinking
Connect to wireless Router/or AP,
wireless function is active (transferring
or receiving data)
Off
Wireless network is switched off/ or
LED off mode.
Power
Green
Steady ON
Power is turned on.
In LED off mode. (except power LED
is on, other LEDs are off *)
*If user selects to enable “LED OFF
mode”, power LED On/Off depends on
user’s selection, user can select to
leave only power LED on or turn off all
LEDs including this power LED.
Slow Blinking
Ready for “Reset to factory default”,
power LED is blinking.

ONDA WiFi EXTENDER
7
Off
power is turned off.
WPS
Green
Steady ON
When WPS connection is successful,
turn on for 5 minutes.
Blinking
WPS is in progress of waiting another
WPS device’s connection, blinking (0.2
second on, 0.1 second off) for 2
minutes.
Quick blinking
WPS error, blinking (0.1 second on, 0.1
second off)
Off
NO WPS is in progress/ LED off mode
LAN
Green
Steady ON
LAN port is connected.
Blinking
LAN port is active (transferring or
receiving data).
Off
LAN port is not connected/ or LED off
mode

ONDA WiFi EXTENDER
8
CHAPTER II: Repeater mode
Repeater mode is your Wi-Fi range extender!
It can extend your wireless signal and coverage and help you to solve
wireless dead zone problem.
This chapter will show you how to quickly install this device by using
quick setup and show you the each detailed setting on web UI page of
repeater mode.
2-1 Repeater mode Quick Installation Guide
For the first time setup and easy installation, you can move this device
close to the Wireless Broadband Router or Access point you wish to
connect, after installation done and wireless connection is built, you can
move this repeater device to the place you wish to use.
Switch mode selector to ‘Repeater’.
Insert this device into power outlet on the wall, and switch wireless
repeater’s power switch to ‘ON’(1). You should see ‘Power’LED light
up in few seconds (2). If not, please check if the power outlet you’re
using is working.

ONDA WiFi EXTENDER
9
You can build wireless connection via ‘Hardware WPS button’or
‘Software web browser’.
If your broadband router or access point also supports ‘WPS button’, we
recommend you to use WPS button to establish connection, it is the fast
and secure way without computer.
Using WPS button - please go to section 2-1-1
Using Web browser - please go to section 2-1-2
(2)
(1)

ONDA WiFi EXTENDER
10
2-1-1 Hardware WPS button setup
(1) Press and hold WPS button on repeater for 2 seconds, ‘WPS’LED
will start flashing.
(2) Press WPS button on the wireless broadband router or access point
you wish to connect within 2 minutes.
WPS LED
WPS button
NOTE: this WPS button position on access point is for example,
different device may have different WPS button position.

ONDA WiFi EXTENDER
11
(3) If WPS connection is successfully established, ‘WPS’LED will light
for 5 minutes; if ‘WPS’LED flashes fast, there’s something error, please
wait for 2 minutes until ‘WPS’LED off, and try from step(1) again.
When quick installation is successfully done, ‘Signal”LED will turn on.
(4) Please move repeater to the place you wish to use (a better place will
be the center of your house) and insert this repeater into power outlet on
the wall, the wireless connection will be established automatically.
You can check ‘Signal’LED status to understand signal reception level.
Steady light: Excellent, Flash: Good, Fast flash: poor.
TIP: If the access point you wish to connect does not have hardware
WPS button, you can also use its web configuration menu’s WPS
function to establish connection. Or you can login this repeater web
UI to have quick setup (detailed setup refers to ‘2-1-2 Web browser
quick setup’ manual)
manual)
WPS LED
Signal LED

ONDA WiFi EXTENDER
12
The quick installation setup is completely done, you can refer to ‘2-2
Repeater mode Advanced Settings’to login in web UI for other advanced
settings.
NOTE: If the Signal LED is off, it means this place is out of wireless
signal of your wireless broadband router or access point, please
move this repeater closer to broadband router until repeater device
can receive signal from broadband router and extend its signal.

ONDA WiFi EXTENDER
13
2-1-2 Web browser quick setup
Before you can connect to the repeater and start configuration procedures,
your computer must be able to get an IP address automatically (use
dynamic IP address). If it’s set to use static IP address, or you’re unsure,
please refer to ‘Chapter X: Appendix, 5-1 Configuring TCP/IP on PC’to
set your computer to use dynamic IP address.
(1)Use Ethernet cable to connect your computer’s Ethernet port and
wireless repeater’s Ethernet port.
Or use your computer’s wireless configuration utility to search for access
point named ‘repeater’and get connected. (The default SSID of this
repeater device is ‘repeater’)
(2)Open web browser and input ‘http://repeater’in address bar. (or you
can input the default IP address ‘192.168.2.254’)

ONDA WiFi EXTENDER
14
(3)Wireless repeater will prompt you to input username and password.
Default username is ‘admin’and password is ‘1234’. Click ‘OK’button
to continue.
(4)All wireless access points nearby will be displayed on the list. Select
one access point you want to connect and click ‘Next’button to continue.
If the access point you wish to connect does not appear here, please click
‘Refresh’until it appears on the list, or try to move wireless repeater
closer to the access point you wish to connect.

ONDA WiFi EXTENDER
15
(5)You’ll be prompted to input access point’s wireless security key, input
it in ‘KEY’field and click ‘Next’to continue.
(6) Wireless repeater will display the connection information for you, if
everything’s correct, please click ‘APPLY’button to get connected.
‘Device SSID’will be the same of the access point’s SSID you connected
in this step. You can change it to a different SSID if you want.
(7)Please wait for few seconds for wireless repeater to reboot.
(8) After reboot complete, web browser will login repeater’s home page
of Web UI. You can close browser and use your computer to connect to
wireless access point by the SSID you set in last step and start using
network.

ONDA WiFi EXTENDER
16
NOTE: After wireless connection of this repeater and wireless
broadband router is built, repeater is DHCP client and will get IP
address from broadband router automatically. If you want to login
Web UI of repeater, please refer to ‘2-2 Repeater mode Advanced
Settings’ for more functions or learn how to login web UI again.

ONDA WiFi EXTENDER
17
2-2 Repeater mode Advanced Settings
2-2-1 Setup IP address
Default IP address of this Wireless repeater is 192.168.2.254, please make
sure your PC’s IP is within the range of 192.168.2.2~192.168.2.252.
Before you can login web UI, you can set your computer’s IP address to
any IP within this subnet. If you don’t know how to do this, please refer
to following instructions.
Windows XP IP address setup:
Click ‘Start’ button (it should be
located at lower-left corner of your
computer), then click control panel.
Double-click Network and Internet
Connections icon, click Network
Connections, and then double-click
Local Area Connection, Local
Area Connection Status window
will appear, and then click
‘Properties’
Table of contents