Teltonika WRP100 User manual

1
USER MANUAL

2
Legal notice
Copyright © 2013 TELTONIKA Ltd. All rights reserved. Reproduction, transfer, distribution or storage of part or all
of the contents in this document in any form without the prior written permission of TELTONIKA Ltd is prohibited.
The manufacturer reserves the right to modify the product and manual for the purpose of technical improvement
without prior notice.
Other product and company names mentioned herein may be trademarks or trade names of their respective owners.
Attention
Before using the device we strongly recommend reading this user manual first.
Do not rip open the device. Do not touch the device if the device block is broken.
All wireless devices for data transferring may be susceptible to interference, which could affect
performance.
The device is not water-resistant. Keep it dry.

3
Table of Contents
Legal notice........................................................................................................................................................................2
Attention............................................................................................................................................................................2
SAFETY INFORMATION ......................................................................................................................................................4
Device connection .........................................................................................................................................................5
Introduction .......................................................................................................................................................................6
Key Features ..................................................................................................................................................................6
Specifications .................................................................................................................................................................6
Wi-Fi...........................................................................................................................................................................6
Electrical, Mechanical & Environmental....................................................................................................................6
Applications ...................................................................................................................................................................7
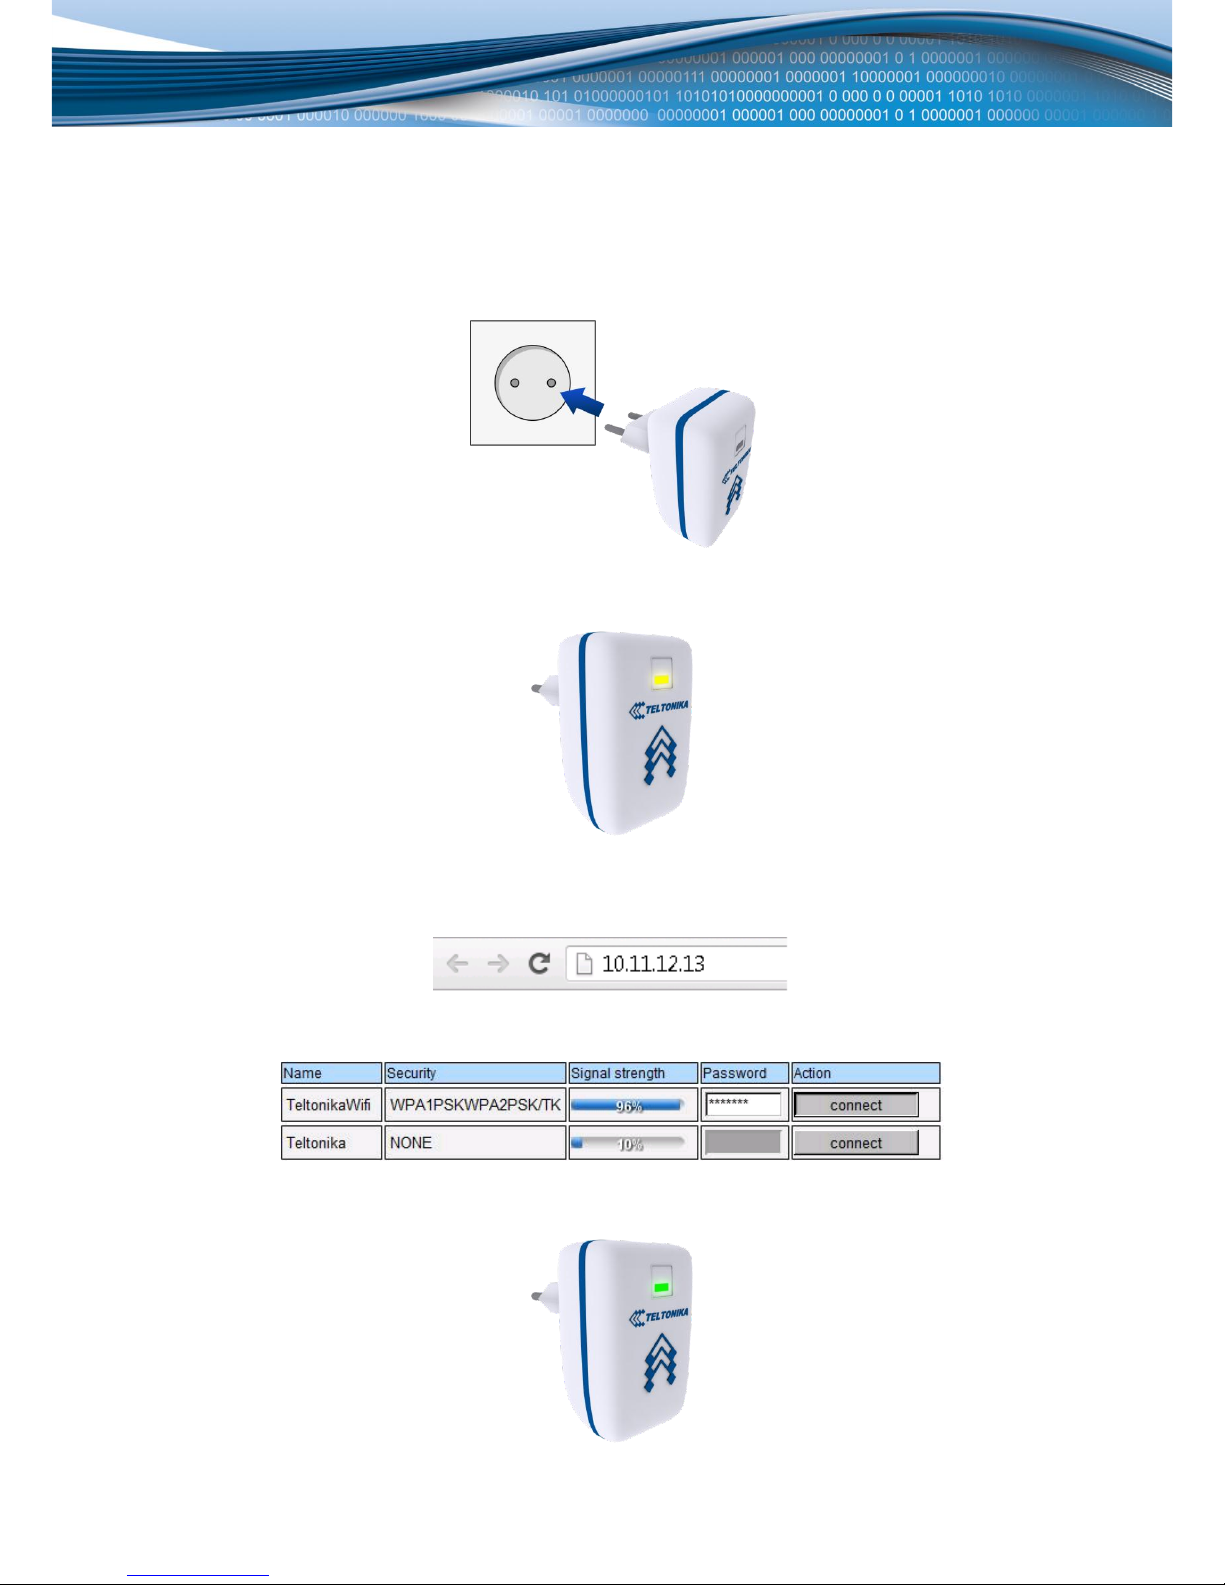
Setting up the device .........................................................................................................................................................8
Connecting to RUT500 ...................................................................................................................................................9
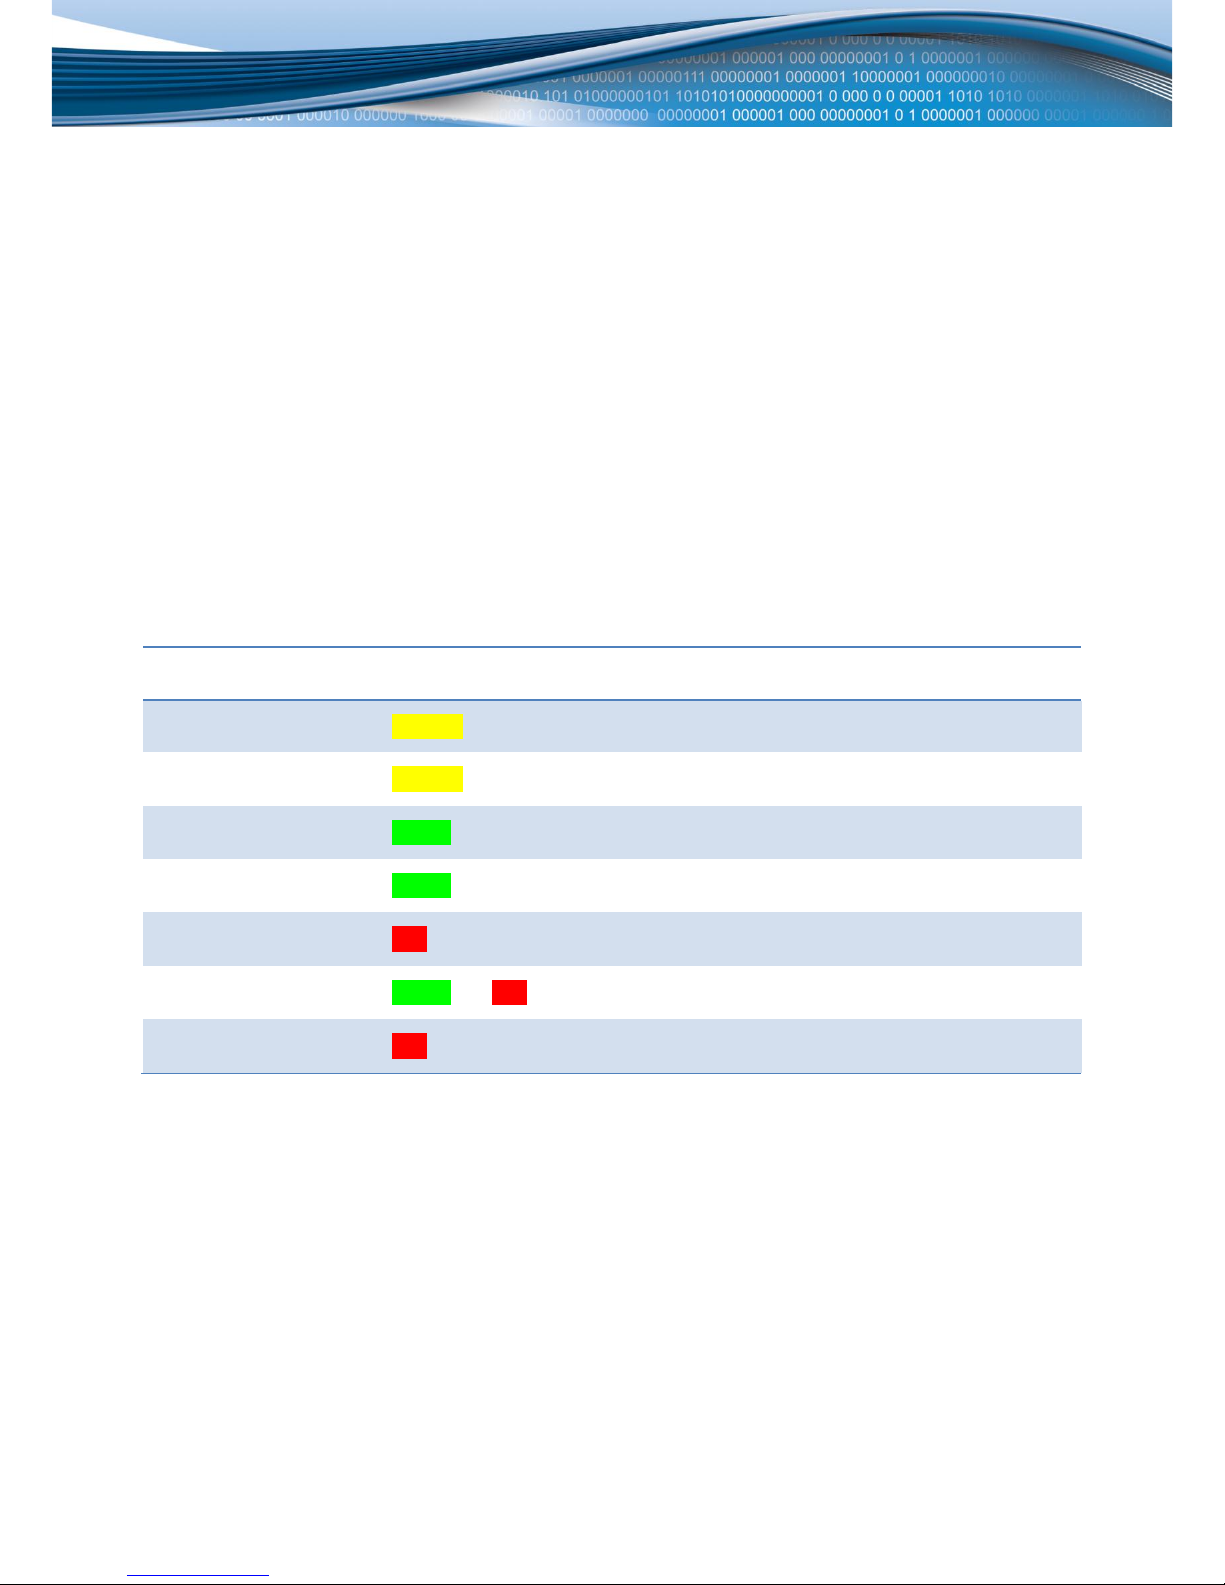
States of the device ...........................................................................................................................................................9
User interface ..................................................................................................................................................................10
Basic settings ...............................................................................................................................................................10
Advanced settings........................................................................................................................................................10
Status .......................................................................................................................................................................10
Advanced settings....................................................................................................................................................11
Connect....................................................................................................................................................................11
System log................................................................................................................................................................12
Management............................................................................................................................................................12
Update Firmware .....................................................................................................................................................13
Using the button..............................................................................................................................................................13
Configuring your computer..............................................................................................................................................14
Glossary............................................................................................................................................................................18

4
SAFETY INFORMATION
In this document you will be introduced on how to use a WRP100 repeater safely. We suggest you to adhere to
the following recommendations in order to avoid personal injuries and or property damage.
You have to be familiar with the safety requirements before using the device!
To avoid burning and voltage caused traumas, of the personnel working with the device, please follow these safety
requirements.
Do not mount or service the device during a thunderstorm.
To avoid mechanical damages to the device it is recommended to transport it packed in a damage-
proof pack.
Protection in primary circuits of associated PC and the device against short circuits and earth faults
of associated PC shall be provided as part of the building installation.
To avoid mechanical damages to the device it is recommended to transport it packed in a damage-proof pack.
While using the device, it should be placed so, that its indicating LEDs would be visible as they inform in which working
mode the device is and if it has any working problems.
Protection against overcurrent, short circuiting and earth faults should be provided as a part of the building
installation.
Signal level of the device depends on the environment in which it is working. In case the device starts
working insufficiently, please refer to qualified personnel in order to repair this product. We recommend
forwarding it to a repair center or the manufacturer. There are no exchangeable parts inside the device.

5
Device connection

6
Introduction
Thank you for purchasing a WRP100 wireless repeater!
WRP100 wireless repeater is designed to extend the coverage of your existing Wi-Fi network. WRP100 is compliant with
IEEE802.11b/g/n standards and can be used with most of the latest Wi-Fi access points while not forgetting the older
ones. Existence of internal antenna and integrated power supply means that no external accessories are required and
using the device is as simple as plugging it into AC power socket.
Key Features
•Complies with IEEE 802.11n, IEEE 802.11g, IEEE 802.11b wireless standards
•Internal antenna
•Internal power supply
•Bridged wireless interfaces
•Three LEDs for easy status indication
•One multifunctional button
•Automatic connection to Teltonika’s RUT500 3G router
•Configuration using web browser
Specifications
Wi-Fi
•High performance 320 MHz CPU with 256 Mbits SDRAM
•IEEE 802.11b/g/n standards
•Operates within 2.414 –2.484 GHz frequency range
•64/128-bit WEP, WPA, WPA2, WPA&WPA2 encryption methods
•1 x 2.5dBi wireless antenna
Electrical, Mechanical & Environmental
•Dimensions (H x W x D) 75mm x 58mm x 45mm
•Weight 64g
•Power supply 100 –240 (50 –60 Hz) VAC socket
•Power consumption < 3W
•Indicators 3 x status LEDs
•Operating temperature 0º to 50º C
•Storage temperature -20º to 70º C
•Operating humidity 10% to 90% non-condensing
•Storage humidity 5% to 95% non-condensing

7
Applications
WRP100 wireless repeater is most useful in the situation when your Wi-Fi device is outside the coverage area of the
access point. In this case WRP100 should be place roughly in the middle between your Wi-Fi device and access point.
Repeater will connect to the access point and provide Wi-Fi network for your device.

8
Setting up the device
Described below is quick sequence for setting up the device. Advanced configuration can be found further down in this
manual.
1. Power up the device
2. Wait for yellow LED to stop blinking
3. Connect to WRP100_Teltonika wireless network using your PC, netbook, tablet or smartphone.
4. Open page http://10.11.12.13 in your browser
5. Select wireless network, enter password (if required) and press connect
6. Wait for green LED to light up

9
7. If LED becomes yellow instead of green it means that connection to selected network has failed. Try again
starting from step 3 and verify that you are entering correct password.
8. If you want to change the network that is being repeater press and hold the button on the device for 5 seconds.
After the LED becomes yellow again start configuration from step 3.
Connecting to RUT500
WRP100 is designed for simple connection to Teltonika’s RUT500 series 3G routers. To connect WRP100 to RUT500
follow these steps:
1. Power up the device
2. Wait for yellow LED to stop blinking
3. Press the button on WRP100
4. Wait for green LED to light up
States of the device
These states of WRP100 wireless repeater can be judged from the status LEDs of the device
State
LED
Comment
Booting
YELLOW blinking
Device is powering up
Ready for configuration
YELLOW
Device is ready to be configured. Connect to Wi-Fi
network WRP100_Teltonika for configuration
Connecting to AP
GREEN blinking
Device is connecting to configured AP
Connected
GREEN
Device is connected and is repeating Wi-Fi network
of the selected AP
Not connected
RED
Device can’t connect to the selected AP
Connecting to RUT500
GREEN and RED blinking
Device is making quick connection to RUT500
Restoring defaults
RED blinking
Device is restoring factory defaults
Note: the states of status LEDs during the first 15 seconds after supplying power to the device should be ignored.

10
User interface
WRP100 has built-in HTTP server for configuration purposes. After connecting to device’s Wi-Fi network
WRP100_Teltonika its user interface can be access with web browser by opening page http://10.11.12.13
Basic settings
Basic settings window allows to set up the device while requiring very few parameters for the user to input. Though the
configuration possibilities of the Basic settings window are minimal they are enough in most cases.
Field name
Possible values
Explanation
Name
-
Name (SSID) of the discovered Wi-Fi network.
Security
-
Type of security used by the specific Wi-Fi network.
Signal
strength
-
Signal strength of the specific Wi-Fi network.
Password
“passwd”
Password of the Wi-Fi network. Has to be specified if the network is
secured.
Refresh –Press to repeat the scan of available Wi-Fi networks
Connect –Press to configure the device to repeat the selected network (password must be supplied if required)
Advanced settings
Advanced settings window offers more configuration options that may be required in some situations.
Status
Windows displays information of the device such as firmware version, up time, MAC address, etc.

11
Advanced settings
Advanced settings of the wireless interface can be configured in this window.
Field name
Possible values
Explanation
TX Power
1 –100
Set Tx power of the wireless interface.
Short Preamble
Enable/Disable
Enable or disable using of short preamble for CRC checks. This
parameter should match the settings of access point
Short Slot
Enable/Disable
Enable or disable using of short slot value when retransmitting the
packets after collision.
Tx Burst
Enable/Disable
Enable or disable using of Tx burst.
Carrier Detect
Enable/Disable
Enable or disable using of carrier detect.
Tx Beamforming
Both/Explicit
TxBF/Implicit
TxBf/Disable
Enable or disable using of Tx beamforming.
Apply –Press to apply new settings to the device
Cancel –Press to cancel current changes
Connect
Use this window to manually set up the parameters of the selected Wi-Fi network. Manual configuration is necessary if
access point is not broadcasting its SSID name.

12
Field name
Possible values
Explanation
SSID
“your_AP”
Set SSID (name) of the access point.
MAC Address
00:11:22:33:44:55
You may specify MAC address of the access point.
Security Mode
OPEN/SHARED/WPAPSK/WPA2PSK
Set security mode used by the selected access point.
Encryption type
WEP/None/TKIP/AES
Set encryption type used by the selected access point.
Pass Phrase
“password”
Set pass phrase used by the selected access point.
SCAN –Press to repeat the scan of available Wi-Fi networks
System log
This windows displays the log of the device
Refresh –Press to reload the log file
Clear –Press to clear the log
Management
Configuration can be uploaded, downloaded or reset in this window.
Export –Press to export (download) current configuration to your computer
Choose File –Press to select the configuration file to be imported (uploaded) to the device
Import –Press to import (upload) new configuration file
Load Defaults –Press to restore factory defaults and restart the device

13
Update Firmware
Firmware of the device can be updated in this window
Choose File –Press to select the firmware file to be written to the device
Apply –Press to start the firmware update process. Do not unplug the device before the process has
finished
Using the button
WRP100 wireless repeater has one multifunctional button located near the status LEDs. The device can perform two
different actions depending on the duration the press of the button:
Connect to RUT500 –Press the button to initialize quick connection to Teltonika‘s RUT500 series router.
Restore factory defaults –Press and hold the button for 5 seconds to restore factory defaults and reset the
device

14
Configuring your computer
Generally there is no need to change anything on your computer to connect to WRP100. The only requirement is for
wireless network connection to be enabled.
This example shows how to set up your computer under Windows 7 to connect to WRP100. On windows Vista: click
Start -> Control Panel -> Network and Sharing Centre -> Manage network Connections -> (Go to step 4). On Windows
XP: Click Start -> Settings -> Network Connections -> (see step 4). You wont’s see “Internet protocol version
4(TCP/IPv4)”, instead you’ll have to select “TCP/IP Settings” and click options -> (Go to step 6).
We first must set up our network card so that it could properly communicate with the repeater.
1. Press the Start button
2. Type in “network connections”, wait for the results to pop up.

15
3. Click “View network connections”
4. Then right click on your wireless device that you use to connect to other access points (It is the one with the
name “Wireless Network Connection” and has signal bars on its icon).
5. Select Internet Protocol Version 4 (TCP/IPv4) and then click Properties

16
6. By default WRP100 is going to have DHCP enabled, which means that if you select “Obtain an IP address
automatically” and “Obtain DNS server address automatically”, WRP100 should lease you an IP and you should
be ready to login.
7. If you choose to configure manually here’s what you do:
First select an IP address. Due to the stock settings that your WRP100 has arrived in you can only enter an IP in
the form of 10.11.12.XXX , where XXX is a number in the range of 14-253 (10.11.12.14 , 10.11.12.15,
10.11.12.16 and so on). Next we enter the subnet mask: this has to be “255.255.255.0”. Default gateway and
DNS server IPs are not required. Press OK to save the settings.
Nate: Manual settings can be useful if you want to reach user interface of the router when it is already
configured and connected to access point. Manual settings will override IP address provided by access point so
internet connection will be lost.

17
8. Right click on the Wireless network icon and select Connect / Disconnect. A list should pop up with all available
wireless networks. Select “WRP100_Teltonika” and click connect.
9. If WRP100 is powered and yellow LED is lit open page http://10.11.12.13 in your browser to reach user
interface of WRP100

18
Glossary
DHCP –The Dynamic Host Configuration Protocol (DHCP) is a network configuration protocol for hosts on Internet
Protocol (IP) networks. Computers that are connected to IP networks must be configured before they can communicate
with other hosts. The most essential information needed is an IP address, and a default route and routing prefix. DHCP
eliminates the manual task by a network administrator. It also provides a central database of devices that are connected
to the network and eliminates duplicate resource assignments.
AP –Access point. An access point is any device that provides wireless connectivity for wireless clients. In this case,
when you enable Wi-Fi on your router, your router becomes an access point.
DNS –Domain Name Resolver. A server that translates names such as www.google.lt to their respective IPs. In order for
your computer or router to communicate with some external server it needs to know it’s IP, its name
“www.something.com” just won’t do. There are special servers set in place that perform this specific task of resolving
names into IPs, called Domain Name servers. If you have no DNS specified you can still browse the web, provided that
you know the IP of the website you are trying to reach.
LED –Light-Emitting Diode is a semiconductor light source. LEDs are used inside WRP100 for indicating device status.
SSID –Service Set Identifier. The SSID identifies a specific wireless LAN. Before associating with a particular wireless LAN,
a client must have the same SSID configured as the access point
Table of contents