One Stop Gardens 66558 Installation manual

BOY/FISH WATER FOUNTAIN
BIRD BATH
66558
SET UP AND OPERATING INSTRUCTIONS
Distributed exclusively by Harbor Freight Tools®.
3491 Mission Oaks Blvd., Camarillo, CA 93011
Visit our website at: http://www.harborfreight.com
Read this material before using this product.
Failure to do so can result in serious injury.
SAVE THIS MANUAL.
Copyright©2008 by Harbor Freight Tools®. All rights reserved. No portion of this manual or any artwork
contained herein may be reproduced in any shape or form without the express written consent of
Harbor Freight Tools. Diagrams within this manual may not be drawn proportionally. Due to continuing
improvements, actual product may differ slightly from the product described herein. Tools required for
assembly and service may not be included.
For technical questions or replacement parts, please call 1-800-444-3353.

SKU 66558 For technical questions, please call 1-800-444-3353. Page 2
Before start-up, note the following:
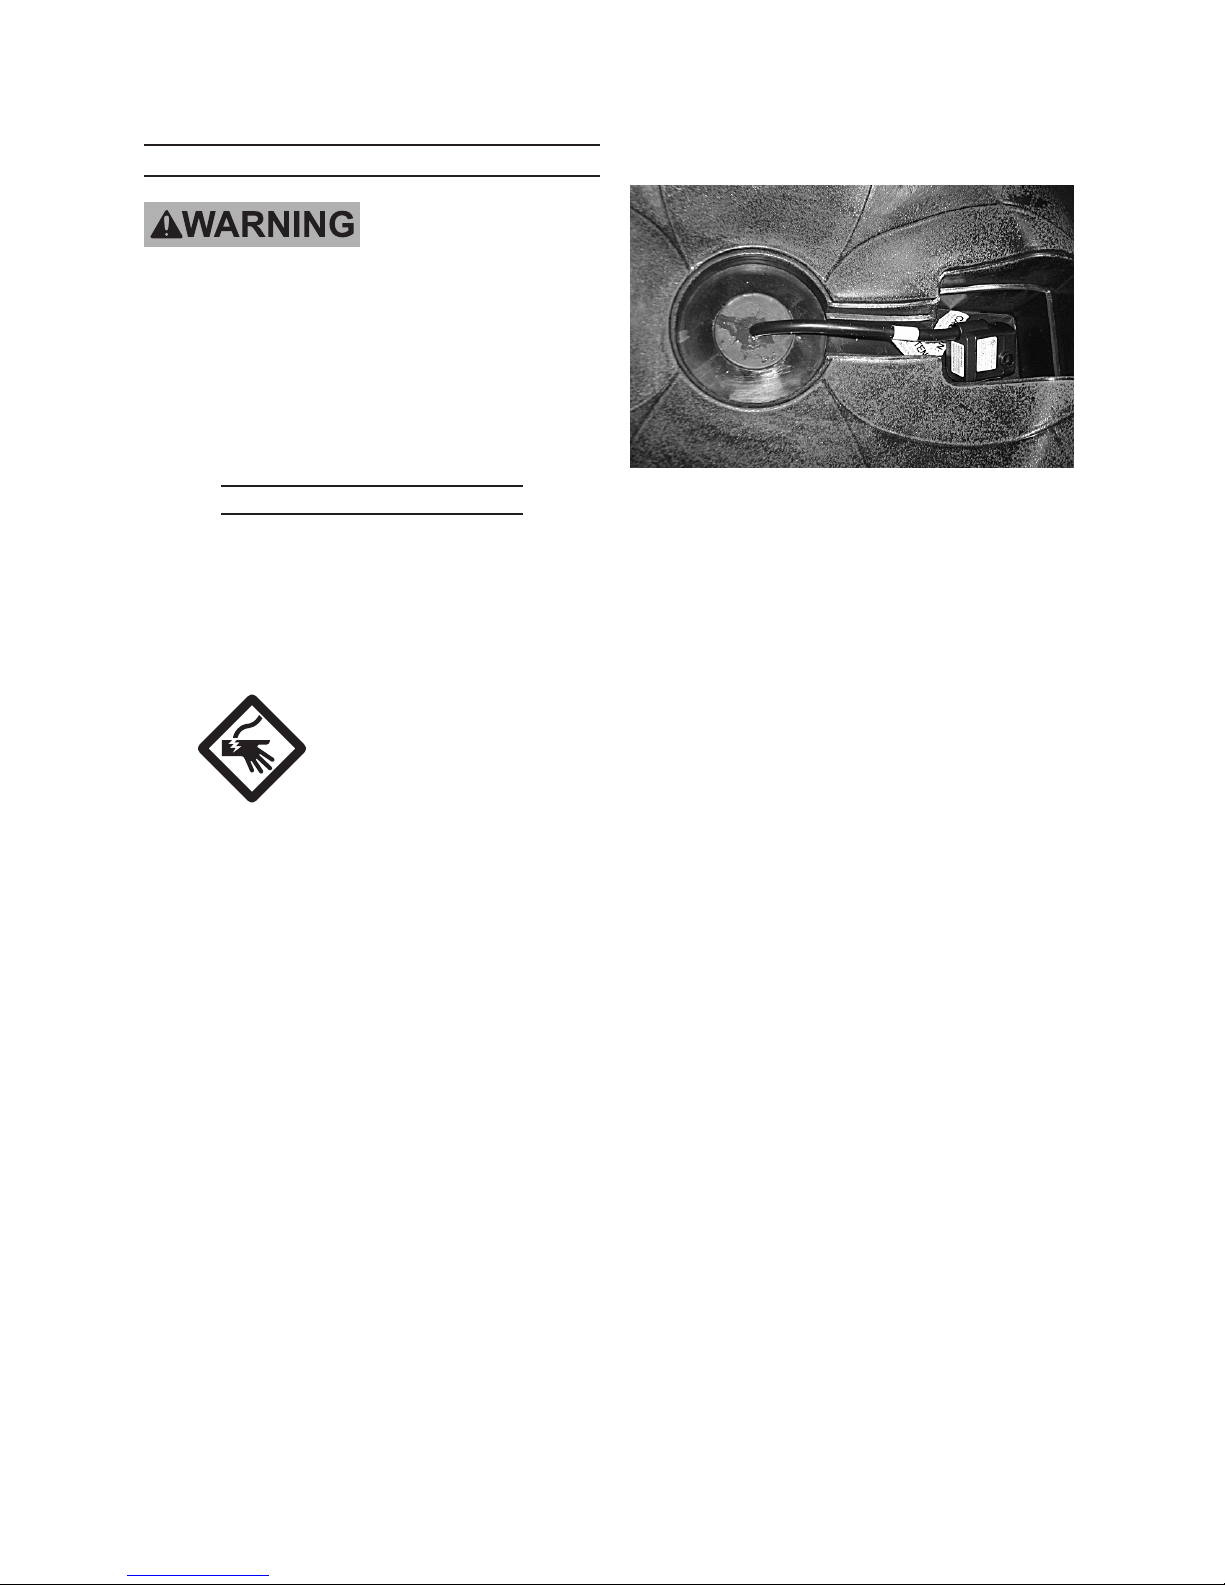
The pump can be connected to any
shock-proof plug which has been installed
according to regulations. The plug must
have a supply voltage of 110 V~ at 60 Hz.
WARNING
IMPORTANT! For your own safety –
before starting to run the pump, please
have the following items checked by an
expert:
Risk of electric shock – This pump is1.
supplied with a grounding conductor
and grounding-type attachment plug.
To reduce the risk of electric shock,
connect only to a properly grounded,
grounding-type receptacle.
Risk of electric shock – This pump2.
has not been investigated for use in
swimming pool areas.
The electrical connections must be3.
protected from moisture.
If there is danger of ooding, the 4.
electrical connections must be taken
to higher ground.
Circulation of caustic uids, as well 5.
as the circulation of abrasive materi-
als, must be avoided at all costs.
The pump must be protected from6.
frost.
The pump must be protected from7.
running dry.
Access by children should also be8.
prevented with appropriate mea-
sures.
Operate outdoors only.9.
WARNING: Handling the Power Cord10.
on this product will expose you to
lead, a chemical known to the State
of California to cause cancer, and
birth defects or other reproductive
harm. Wash hands after handling.
(California Health & Safety Code §
25249.5, et seq.)
The warnings, precautions, and in-11.
structions discussed in this instruction
manual cannot cover all possible con-
ditions and situations that may occur.
It must be understood by the operator
that common sense and caution are
factors which cannot be built into this
product, but must be supplied by the
operator.
Fluid Type
The Pump is designed for use with
water only with a maximum temperature
of 77° F (25°C). Do not use the pump for
other uids, especially not fuels, cleaning
uids, or other chemical products.
SPECIFICATIONS
Electrical Requirements 110 V~ / 60 Hz, 4W
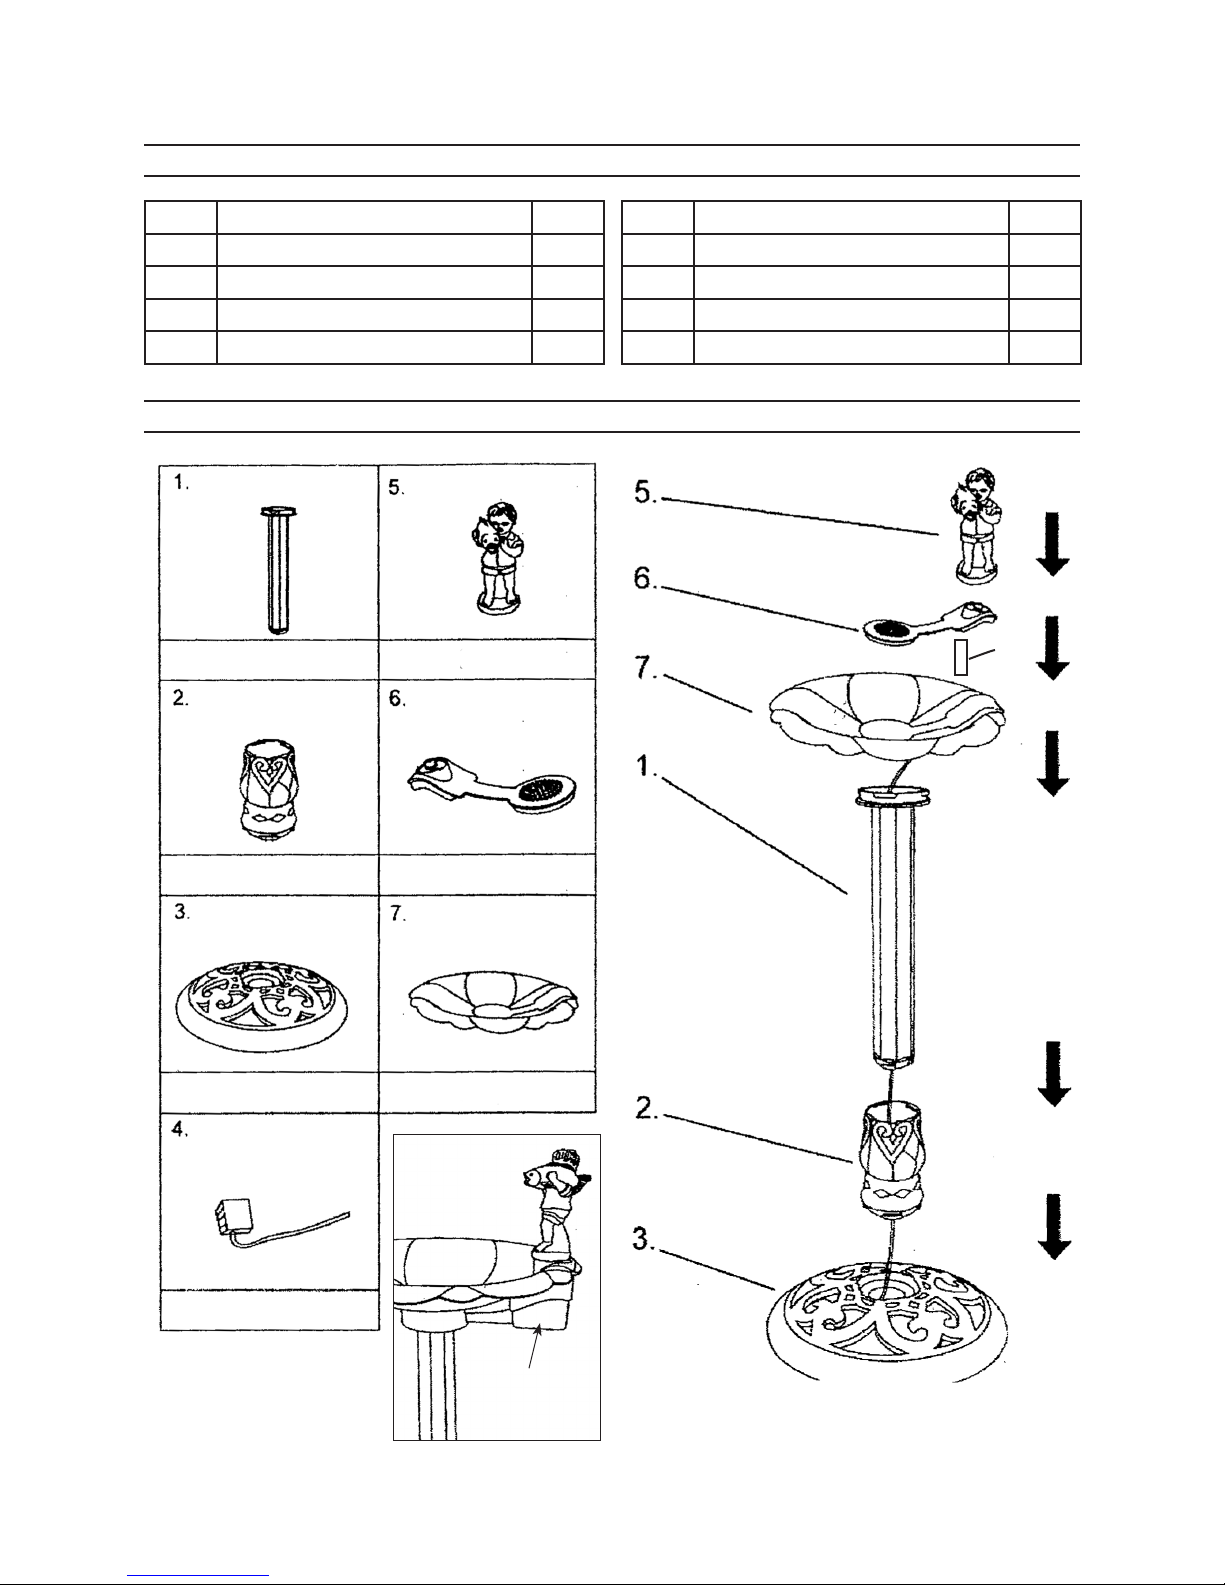
UNPACKING
When unpacking, check to make sure
that the item is intact and undamaged. If
any parts are missing or broken, please
call Harbor Freight Tools at the number
shown on the cover of this manual as soon
as possible.

SKU 66558 For technical questions, please call 1-800-444-3353. Page 3
INSTALLATION
Power Supply
The pump is equipped with a shock-1.
proof plug according to regulations.
The pump is designed to be connect-
ed to 110 V~, 60 Hz safety socket.
Make sure that the socket is suf-2.
ciently secured and is in excellent
condition.
WARNING! If the power cord or plug is
damaged, do not use the pump. The
power cord or plug may only be re-
paired by a certied electrician.
Assembly
With the Base (3) on a at, level 1.
surface, place the bottom end of the
Connector (2) into the opening in the
center of the Base and twist. The
built-in tabs on both will lock each
other together. (See Assembly draw-
ing for these steps.)
Slide bottom of Pole (1) into the top2.
opening of the Connector and twist,
locking both together.
Insert the plug and cord through Pole.3.
Run the cord all the way down and4.
out the bottom of the Base.
Put the Plug of the cord through an5.
opening in the Base and out the side.
Lower the Basin all the way onto the6.
top of the Pole and twist to lock it on.
Attach the Boy Figurine (5) onto the7.
Pump Cover.
Connect the Pump to the water inlet8.
of the Pump Cover beneath the Boy
Figurine with the Tube (8).
Place the Pump Cover into position9.
in the Basin with the Pump resting
on the bottom of the Pump compart-
ment.
Press the round end of the cover into10.
the round part at the center of the
Basin.
Press and snap the Pump Cover end11.
into position at the edge of the Basin.
Place the Boy Fish Water Fountain12.
Bird Bath on a level surface.
Anchor the Water Fountain securely13.
to the ground by driving the three
supplied “L” Stakes through small
openings in the Base and into the
lawn or dirt. Verify that installation
surface has no hidden utility lines
before driving Stakes.
OPERATION
The regulator switch on the end of1.
the pump adjusts ow rate.
Fill the Basin (7) with clean water.2.
Plug the power cord into a properly3.
fused GFCI outlet. Do not allow the
plug to get wet.
Add additional water if necessary.4.

SKU 66558 For technical questions, please call 1-800-444-3353. Page 4
MAINTENANCE
TO PREVENT
SERIOUS INJURY
FROM ACCIDENTAL
OPERATION:
Unplug the Pump from its
electrical outlet before
performing any inspection,
maintenance, or cleaning
procedures.
Quarterly Maintenance
The below maintenance must be per-
formed at least once every 3 months under
optimal conditions. For frequent use, or
dirty areas, more frequent maintenance is
required.
1. Unplug the power cord
before maintenance.
Remove the Pump Cover
from the Basin (7).
Rinse out the Basin (7) and Pump2.
compartment (see Assembly drawing)
with clean water.
Open the Pump housing by pulling3.
off the Filter Screen (4A).
(see Pump
Diagram for the following steps)
.
Remove the Regulator (4B), Covera.
(4C) and Rotor.
Wash these components in cleanb.
water.
Clean off the Filter screen (4A).c.
Run a stream of clean water through4.
the Rotor (4D) channel to ush out
any contaminants.
Reassemble the Pump in the reverse5.
order as disassembled.
FIGURE B
6. Remove the Pump Cover. Using a
garden hose, shoot a stream of water
through the water channel leading
from the bottom of the Boy Figurine
(5) and out the mouth of the sh.
Rinse out any sand and sludge that7.
may have accumulated in the Pump
compartment.

SKU 66558 For technical questions, please call 1-800-444-3353. Page 5
Troubleshooting
Problem Possible Causes Possible Solutions
Pump runs, but
will not deliver any
water.
Clogged Screen (see Pump1.
Diagram)
The pump water height is2.
below the minimum water
level.
Low line voltage.3.
Remove Screen. Clean out dirt and debris1.
from Screen and impeller. Then replace
Screen.
Fill Basin.2.
Consult an electrician.3.
Pump won’t start
or run.
Check power connections and1.
circuits/fuses.
Water level too low.2.
Screen and/or impeller3.
clogged.
Defective pump.4.
Consult an electrician.1.
Fill Basin2.
.
Remove Screen. Clean out dirt and debris3.
from Screen and impeller. Then replace
Screen.
Have a qualied service technician repair or 4.
replace.
Excessive noise or
vibration.
Debris in impeller. Remove Screen. Clean Rotor in clean water
with toothbrush. Then replace Screen.
Follow all safety precautions whenever diagnosing or servicing the
tool. Disconnect power supply before service.
PLEASE READ THE FOLLOWING CAREFULLY
THE MANUFACTURER AND/OR DISTRIBUTOR HAS PROVIDED THE PARTS LIST AND ASSEMBLY
DIAGRAM IN THIS MANUAL AS A REFERENCE TOOL ONLY. NEITHER THE MANUFACTURER OR
DISTRIBUTOR MAKES ANY REPRESENTATION OR WARRANTY OF ANY KIND TO THE BUYER THAT
HE OR SHE IS QUALIFIED TO MAKE ANY REPAIRS TO THE PRODUCT, OR THAT HE OR SHE IS
QUALIFIED TO REPLACE ANY PARTS OF THE PRODUCT. IN FACT, THE MANUFACTURER AND/
OR DISTRIBUTOR EXPRESSLY STATES THAT ALL REPAIRS AND PARTS REPLACEMENTS SHOULD
BE UNDERTAKEN BY CERTIFIED AND LICENSED TECHNICIANS, AND NOT BY THE BUYER. THE
BUYER ASSUMES ALL RISK AND LIABILITY ARISING OUT OF HIS OR HER REPAIRS TO THE
ORIGINAL PRODUCT OR REPLACEMENT PARTS THERETO, OR ARISING OUT OF HIS OR HER
INSTALLATION OF REPLACEMENT PARTS THERETO.

SKU 66558 For technical questions, please call 1-800-444-3353. Page 6
Part Description Qty.
1 Pole 1
2 Connector 1
3 Base 1
4 Pump Assembly 1
Part Description Qty.
5 Boy Figurine 1
6 Pump Cover 1
7 Basin 1
8 Tube 1
PARTS LIST
Pump
Compartment
ASSEMBLY DIAGRAM
8.

SKU 66558 For technical questions, please call 1-800-444-3353. Page 7
Record Product’s Serial Number Here:
Note: If product has no serial number, record month and year of purchase instead.
Note: Some parts are listed and shown for illustration purposes only, and are not avail-
able individually as replacement parts.
PUMP DIAGRAM
Part Description Qty.
4A Filter Screen 1
4B Regulator 1
4C Cover 1
4D Rotor 1
4E Pump Housing 1
Part Description Qty.
4F Adapter 1
4G Shaft 1
4H Suction Cup 27
4I Back Cover 1
Table of contents
Other One Stop Gardens Outdoor Fountain manuals
Popular Outdoor Fountain manuals by other brands

rba
rba RBA8903 Series Installation, operation and maintenance instructions

Campania International
Campania International Mykonos GF-6652-4201R Assembly instructions

PEAKTOP
PEAKTOP F40995GA quick start guide

CLIMAQUA
CLIMAQUA KERMO 10619 instructions

Angelo Decor
Angelo Decor AD95820 instructions

Ritchie
Ritchie Thrifty King CT Series installation instructions

Kasco
Kasco EJ Series Operation & maintenance manual

Campania International
Campania International 144533- 01 Series Components and Parts List

Oase
Oase PondJet Eco operating instructions

EASYFOUNTAIN
EASYFOUNTAIN Solitary Pour 45171L User instructions

Oypla GARDEN
Oypla GARDEN 4139 user manual

Jula
Jula Axley User instructions