manuals.online logo
Brands
  1. Home
  2. •
  3. Brands
  4. •
  5. One Stop Gardens
  6. •
  7. Outdoor Light
  8. •
  9. One Stop Gardens 58225 Assembly instructions

One Stop Gardens 58225 Assembly instructions

Visit our website at: http://www.harborfreight.com
Email our technical support at: [email protected]
Owner’s Manual & Safety Instructions
Save This Manual Keep this manual for the safety warnings and precautions, assembly,
operating, inspection, maintenance and cleaning procedures. Write the product’s serial number in the back
of the manual near the assembly diagram (or month and year of purchase if product has no number). Keep
this manual and the receipt in a safe and dry place for future reference. 21b
When unpacking, make sure that the product is intact
and undamaged. If any parts are missing or broken,
please call 1-888-866-5797 as soon as possible.
Copyright© 2021 by Harbor Freight Tools®. All rights reserved.
No portion of this manual or any artwork contained herein may be reproduced in
any shape or form without the express written consent of Harbor Freight Tools.
Diagrams within this manual may not be drawn proportionally. Due to continuing
improvements, actual product may differ slightly from the product described herein.
To ol s r eq ui r ed f o r as s em bl y a nd se rvice m a y not be i nc luded.
Read this material before using this product.
Failure to do so can result in serious injury.
SAVE THIS MANUAL.
Page 2 For technical questions, please call 1-888-866-5797. Item 58225
Specifications
Bulb Type 12 pcs SMD LEDs
Battery Type Lithium-Ion 3.7V
1500mAh, 18650
Run Time
Constant On: 4 hr. 30 min.
Dusk to Dawn: 13 hr. 30 min.
Flame: 29 hr.
Important Safety Information
1. THIS IS NOT A TOY; FOR
DECORATION ONLY.
2. DO NOT APPLY PRESSURE TO
GLASS LENS WHEN INSTALLING.
3. ENSURE SOLAR LIGHT IS
SECURELY STAKED INTO THE
GROUND PRIOR TO USE; FOR
INDOOR OR OUTDOOR USE.
4. LENS IS MADE OF GLASS AND
CAN BREAK, USE CAUTION,
WATCH FOR SHARP PIECES.
5. Assemble only according to these
instructions. Improper assembly
can create hazards.
6. Wear ANSI-approved
safety goggles during setup.
7. Keep assembly area clean and well lit.
8. Keep bystanders out of the
area during assembly.
9. Do not assemble when tired
or when under the influence
of drugs or medication.
10. Position battery in proper polarity.
11. This product is not a toy. Do not allow
children to play with or near this item.
12. Use as intended only.
13. Inspect before every use; do not
use if parts are loose or damaged,
or if sharp edges are exposed.
This is fragile and sharp edges may be
exposed if weathered or damaged.
14. Maintain product labels and nameplates.
These carry important safety
information. If unreadable or missing,
contact Harbor Freight Tools
for a replacement.
15. Contains Li-Ion battery. Battery
must be recycled or disposed of
properly. Do not open, crush, heat
above 140° F or incinerate.
Setup Instructions
1. Decide where you want to place
the Solar Light, indoor or outdoor.
Choose a location that receives full,
direct sunlight a minimum of 8 hours
a day. The location should not be
near nighttime light sources such as
porch lights or streetlights as this will
cause the Solar Light to remain off.
2. Confirm that the location is clear
of lines, cables and conduits.
3. With a rubber mallet (not included),
gently tap the Stake into the ground.
4. Attach Stake to connector and connect
remaining pieces using plugs. Adjust
height using one or two plugs. Attach
lantern to base and connect to pole.
5. Allow at least 24 hours charge
time before first use.
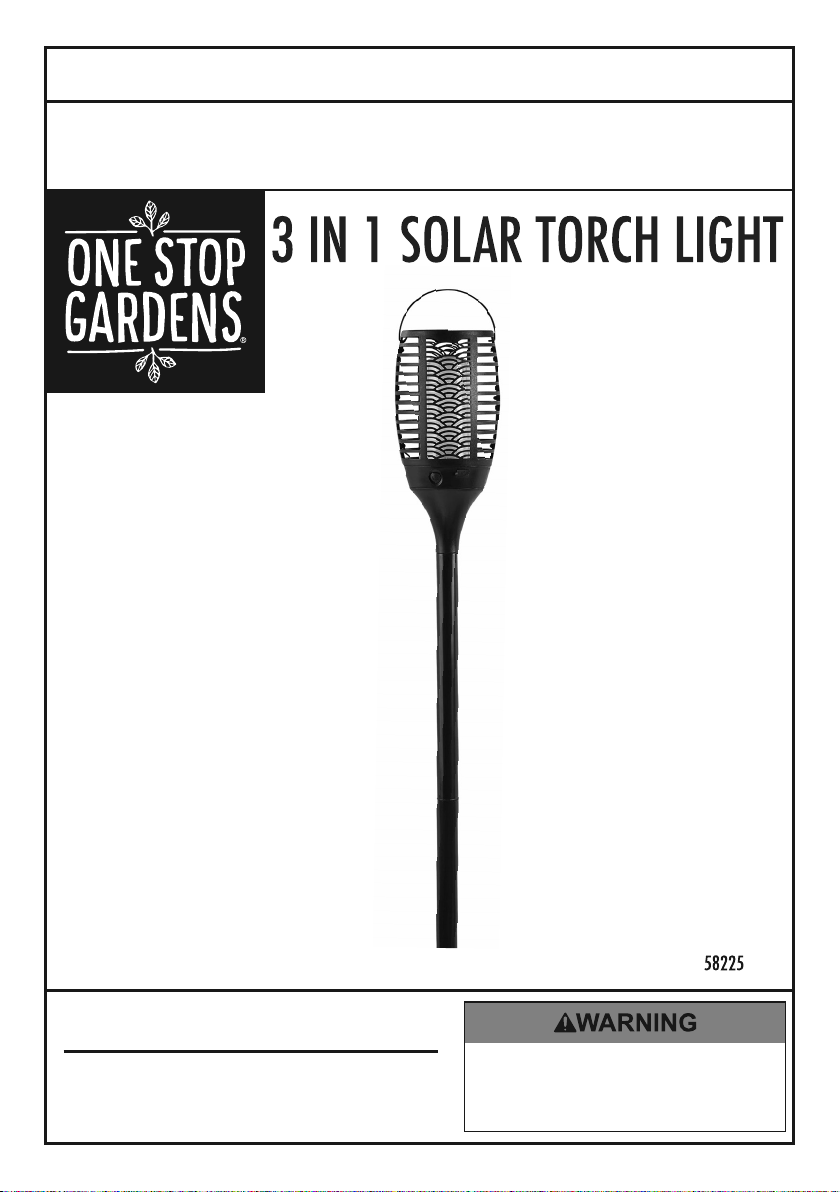
Page 3For technical questions, please call 1-888-866-5797.Item 58225
Operating Instructions
Note: Solar Panel converts sunlight into
electricity, recharging the battery. The
amount of light the Solar Panel receives
depends on placement of the Solar Light,
geographic location and weather. If the
weather is cloudy, panels will not receive
a full charge, the Solar Lights may not
achieve the full run time. They will catch
up after two to three days of full sun.
1. It needs 8 hours of sunlight charging
for Solar. To charge with USB
cable it needs about 2 hours.
2. After the initial charge is set, confirm
that the Lights are on by viewing
them at night or in a dark location.
If they are not lit, check that the
Solar Panel has had full sunlight for
8 hours. Check on and off switch.
Maintenance
1. Clean regularly with a damp towel.
Do not clean with solvent.
Do not put too much pressure on
the Solar Panel or accessories
while cleaning. Dry thoroughly.
2. BEFORE EACH USE, inspect the
general condition of the tool. Check for:
• leaking, swollen, or cracked battery,
• loose hardware,
• misalignment or binding of parts,
• cracked or broken parts, and
• any other condition that may
affect its safe operation.
3. AFTER USE, wipe external surfaces
of the tool with clean cloth.
4. Battery is irreplaceable. Follow steps
to properly dispose of battery.
a. Turn four screws out of the
battery box on bottom of lamp.
b. Gently open the battery cover on the
bottom of the Solar Panel housing.
c. Remove the old battery.
5. Contains Li-Ion battery. Battery
must be recycled or disposed of
properly. Do not open, crush, heat
above 140° F or incinerate.
Troubleshooting
Problem Possible Causes Probable Solutions
Light will
not turn on
1. Battery not allowed time for
recharging via Solar Panel.
2. Solar Light is set near nighttime
light sources such as porch
lights or street lights.
3. Solar Panel is dirty and
covered with dirt or dust.
1. Check that Solar Panel has
direct access to sunlight for
enough hours a day.
2. Move Solar Light or change Solar Panel
position.
3. Clean Solar Panel with a soft cloth.
Record Serial Number Here:
Note: If product has no serial number, record month and year of purchase instead.
Note: Replacement parts are not available for this item. Reference UPC 193175434418.
Limited 90 Day Warranty
Harbor Freight Tools Co. makes every effort to assure that its products meet high quality
and durability standards, and warrants to the original purchaser that this product is free from
defects in materials and workmanship for the period of 90 days from the date of purchase.
This warranty does not apply to damage due directly or indirectly, to misuse, abuse, negligence
or accidents, repairs or alterations outside our facilities, criminal activity, improper installation,
normal wear and tear, or to lack of maintenance. We shall in no event be liable for death,
injuries to persons or property, or for incidental, contingent, special or consequential damages
arising from the use of our product. Some states do not allow the exclusion or limitation of
incidental or consequential damages, so the above limitation of exclusion may not apply to you.
THIS WARRANTY IS EXPRESSLY IN LIEU OF ALL OTHER WARRANTIES, EXPRESS OR
IMPLIED, INCLUDING THE WARRANTIES OF MERCHANTABILITY AND FITNESS.
To take advantage of this warranty, the product or part must be returned to us with transportation
charges prepaid. Proof of purchase date and an explanation of the complaint must accompany
the merchandise. If our inspection verifies the defect, we will either repair or replace
the product at our election or we may elect to refund the purchase price if we cannot readily
and quickly provide you with a replacement. We will return repaired products at our expense,
but if we determine there is no defect, or that the defect resulted from causes not within
the scope of our warranty, then you must bear the cost of returning the product.
This warranty gives you specific legal rights and you may also
have other rights which vary from state to state.
26541 Agoura Road • Calabasas, CA 91302 • 1-888-866-5797

Other One Stop Gardens Outdoor Light manuals

One Stop Gardens 56680 Assembly instructions

One Stop Gardens

One Stop Gardens 56680 Assembly instructions

One Stop Gardens 92429 Quick reference guide

One Stop Gardens

One Stop Gardens 92429 Quick reference guide

One Stop Gardens 57680 Assembly instructions

One Stop Gardens

One Stop Gardens 57680 Assembly instructions

One Stop Gardens 60758 User manual

One Stop Gardens

One Stop Gardens 60758 User manual

One Stop Gardens 57679 Assembly instructions

One Stop Gardens

One Stop Gardens 57679 Assembly instructions

Popular Outdoor Light manuals by other brands

JONATHAN Y JYL2078A quick start guide

JONATHAN Y

JONATHAN Y JYL2078A quick start guide

Kira Home RV-TL2667-1 quick start guide

Kira Home

Kira Home RV-TL2667-1 quick start guide

LUDECO PL6001 manual

LUDECO

LUDECO PL6001 manual

IKEA ALLARP manual

IKEA

IKEA ALLARP manual

Kayoba 957-016 User instructions

Kayoba

Kayoba 957-016 User instructions

NOMA 52-4075 Installation and operating instructions

NOMA

NOMA 52-4075 Installation and operating instructions

Maxim Santa Barbara VX 40035CDSE manual

Maxim

Maxim Santa Barbara VX 40035CDSE manual

WE-EF RMM320 Installation and maintenance instructions

WE-EF

WE-EF RMM320 Installation and maintenance instructions

Illumitex VERSA VL installation instructions

Illumitex

Illumitex VERSA VL installation instructions

Pablo LUCI TABLE user guide

Pablo

Pablo LUCI TABLE user guide

STEINEL L1 quick start guide

STEINEL

STEINEL L1 quick start guide

Tracon Electric LSLS Series user manual

Tracon Electric

Tracon Electric LSLS Series user manual

Quoizel LWS3747Q Use and care guide

Quoizel

Quoizel LWS3747Q Use and care guide

Gelia 4077106501 User instructions

Gelia

Gelia 4077106501 User instructions

RGB A4183 manual

RGB

RGB A4183 manual

Gifas LaneLED INOX42 installation instructions

Gifas

Gifas LaneLED INOX42 installation instructions

Lucci LEDlux 240315 installation instructions

Lucci LEDlux

Lucci LEDlux 240315 installation instructions

Malmbergs Lyra instruction manual

Malmbergs

Malmbergs Lyra instruction manual

manuals.online logo
manuals.online logoBrands
  • About & Mission
  • Contact us
  • Privacy Policy
  • Terms and Conditions

Copyright 2025 Manuals.Online. All Rights Reserved.