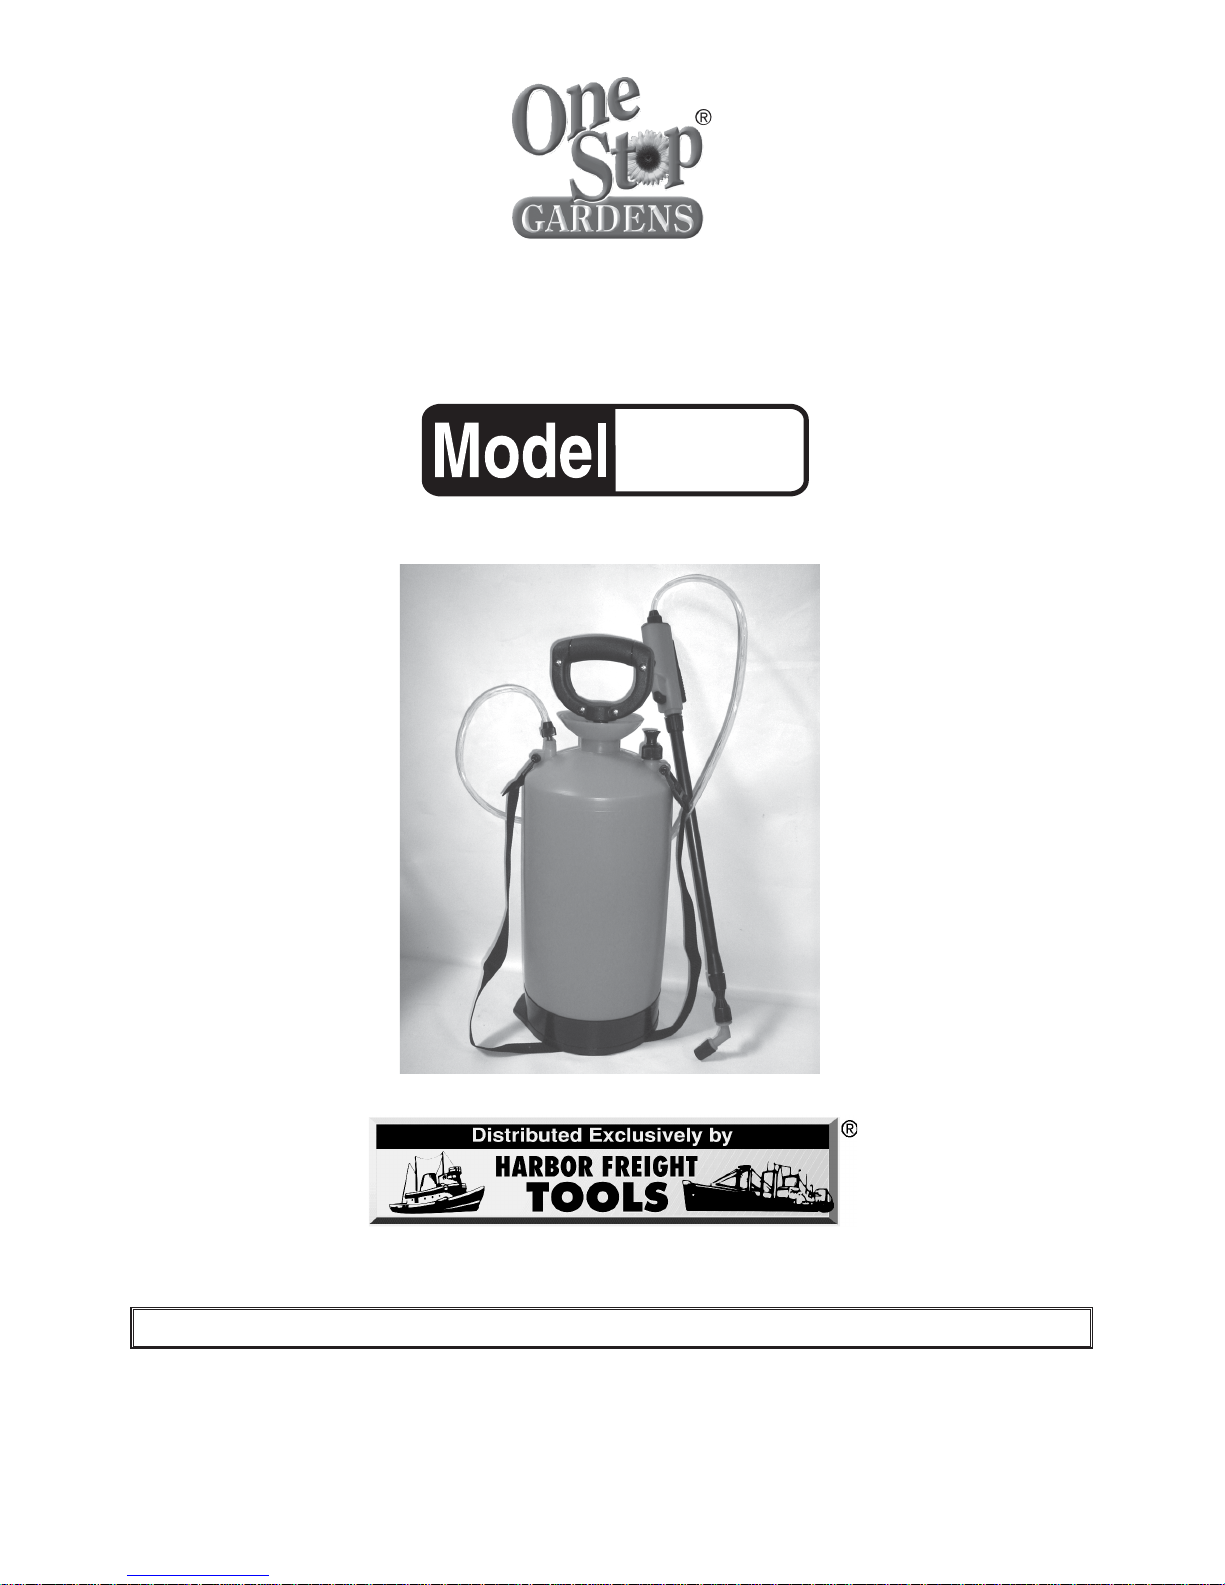
One Stop Gardens 95143 User manual

2-¼ Gallon
Pressure Sprayer
ASSEMBLY AND OPERATING INSTRUCTIONS
3491MissionOaksBlvd.,Camarillo,CA93011
Visit our Web site at http://www.harborfreight.com
Copyright © 2006 by Harbor Freight Tools®. All rights reserved. No portion of this
manual or any artwork contained herein may be reproduced in any shape or form
without the express written consent of Harbor FreightTools.
For technical questions and replacement parts, please call 1-800-444-3353
95143
Due to continuing improvements, actual product may differ slightly from the product described herein.
To prevent serious injury,read and understand all warnings and instructions before use.

SKU 95143
For technical questions please call 1-800-444-3353
Page 2
Specifications
Save This Manual
You will need the manual for the safety warnings and precautions, assembly
instructions, operating and maintenance procedures, parts list and diagram. Keep
your invoice with this manual. Write the invoice number on the inside of the front
cover. Keep the manual and invoice in a safe and dry place for future reference.
Safety Warnings and Precautions
WARNING: When using tool, basic safety precautions should always be fol-
lowed to reduce the risk of personal injury and damage to equipment.
Read all instructions before using this tool!
1. Keep work area clean. Cluttered areas invite injuries.
2. Observe work area conditions. Do not use machines or power tools in
damp or wet locations. Don’t expose to rain. Keep work area well lit. Do not
use electrically powered tools in the presence of flammable gases or liquids.
3. Keep children away. Children must never be allowed in the work area. Do
not let them handle machines, tools, or extension cords.
4. Store idle equipment. When not in use, tools must be stored in a dry
location to inhibit rust. Always lock up tools and keep out of reach of children.
5. Use the right tool for the job.Do not attempt to force a small tool or
attachment to do the work of a larger industrial tool.There are certain
applications for which this tool was designed.It will do the job better
and more safely at the rate for which it was intended.Do not modify this
tool and do not use this tool for a purpose for which it was not intended.
6. Dress properly. Do not wear loose clothing or jewelry as they can be caught
in moving parts. Protective, electrically non-conductive clothes and non-skid
footwear are recommended when working. Wear restrictive hair covering to
containlonghair.
:noitcurtsnoC ebuTrebbuR.esaBSBA,knaTcitsalPyloP .partSnolyN.dnaWgnipocseleTmunimulAdna :noitarepO rofrey
arpserusserpdetarepodnaH slacimehcdednemmocerroretaw )3egap,51#ees(
:yticapaCsnollaG¼-2:egnaR.teef01otpusya
rpS
:snoisnemiDknaTH"22xretemaiD"8:dnaWretemaiD"166.0xL"61/7-61
:gninepOpiTyarpS"060.0:thgieWteN.sbL07.3

SKU 95143
For technical questions please call 1-800-444-3353
Page 3
7. Use personal safety protection devices. AlwayswearANSIapproved
impactsafety goggles, rubberized glovesandnonskid, chemical resistant
shoeswhensprayingchemicals.Usearespiratortopreventbreathingfumes.
8. Do not overreach. Keep proper footing and balance at all times. Do not
reachoveroracrossrunningmachines.
9. Maintain tools with care. Keep tools maintained and clean for better and
saferperformance.Followinstructionsforlubricatingand changing
accessories.Inspecttoolcords periodically and, if damaged, have them
repaired by an authorized technician.The handles must be kept clean, dry,
and free from oil and grease at all times.
10. Avoid unintentional starting. Be sure the trigger is in the Off position when
not in use.Do not carry any tool with your hand on the trigger, whether or not
it is pressurized.
11. Stay alert. Watch what you are doing, use common sense. Do not operate
any tool when you are tired.
12. Check for damaged parts. Before using any tool, any part that appears
damaged should be carefully checked to determine that it will operate
properly and perform its intended function.Check for alignment and binding
of moving parts;any broken parts or mounting fixtures; and any other
condition that may affect proper operation.Any part that is damaged should
beproperly repaired or replaced by a qualifiedtechnician.
13. Guard against electric shock. Preventbodycontactwith grounded surfaces
suchaspipes,radiators, ranges, and refrigerator enclosures. Do not spray
wet materials on any power cord or outlet.
14. Replacement parts and accessories. When servicing, use only identical
replacement parts.Use of any other parts will void the warranty.Only use
accessoriesintended for use with this tool. Approvedaccessories are
availablefrom Harbor FreightTools.
15. Use only Recommended Chemicals. This sprayer is intended for use only
withcommonlyavailable consumer products suitable for home use. Carefully
followthedirectionsprovidedwith the chemicals for safe operation. Do not
sprayanyothermaterials,exceptwaterorrecommendedsolventfor cleaning.
16. Protect yourself from exposure to chemicals. When spraying be sure to
wearamaskoveryournoseand mouth. Wearing rubber gloves is
recommended.Other protective clothing is alsorecommended.
17. Do not ingest chemicals. Swallowing chemicals can result in extreme
personalillnessordeath.

SKU 95143
For technical questions please call 1-800-444-3353
Page 4
18. Do not smoke, drink or eat when using this sprayer or while in proximity
to chemicals.
19. Wash up after use. After spraying chemicals, thoroughly wash your face and
hands with soap, and rinse out your mouth and nostrils.
20. Dispose of unused chemicals properly. Replaceunusedchemicals in the
original package, or store in a proper container with contents clearly marked.
DONOTDUMPunusedchemicalson the ground or in the drain. Return
unneeded chemicals to the supplier, or a community disposal service.
21. Protect the Sprayer from Damage. Donotallowthesprayertobebanged
around,crushed or improperly handledorstored.
22. If the tank is less than 1/2 filled, use lesser pressure or add more material to
the tank.Overpressurizing a partially filled tank will cause the Pressure Relief
Valve to pop open.
23. Do not operate tool if under the influence of alcohol or drugs. Read
warninglabelsonprescriptionstodetermineifyourjudgmentorreflexesare
impaired while taking drugs. If there is any doubt, do not operate the tool.
24. Maintenance. For your safety, service and maintenance should be performed
regularlybya qualified technician.
25. Always store the Pressure Sprayer in a dry, safe location out of reach of
children.
26. Always read and adhere to all safety warnings and instrucitons provided by
the manufacturer/distributor of the chemicals being used with this Pressure
Sprayer.
Warning:Thewarnings,cautions,and instructionsdiscussed in this instruction
manual cannot cover all possible conditions and situations that may occur. It
mustbe understood bythe operatorthat common senseand caution arefactors
which cannot be built into this product,but must be supplied by the operator.
Unpacking
When unpacking, check to make sure the following parts are included.
Pressure Sprayer with Pump Assembly, Hose and Wand Assembly.
Fan Pattern Spray Nozzle Assembly (items 20 - 23 on parts list).
If any parts are missing or broken, please call Harbor FreightTools at the number
on the cover of this manual.

SKU 95143
For technical questions please call 1-800-444-3353
Page 5
Operation
CAUTION:This sprayeris constructedout of Polypropylene,Rubber,Aluminumand
Steel.Check the manufacturer’s compatibility list of any material you want to spray
before using that material in this sprayer.Some materials may damage
polypropylene, rubber, aluminumorsteel.
WARNING: This sprayer will create a mist or spray of whatever material is being
used.This spray may be breathed in or over-sprayed on plants, animals, property,
childrenorother bystanders. Use precautionsto prevent breathingthe sprayed
material and to avoid over-spray.Cover plants or materials that may be damaged
by over-spray.Keep children, animals and bystanders out of the area during
operation.
1. Be sure the MainTank (27), Pump Assembly (28),Tube andWand Assembly
(1-19)areallclean and dry before use.
2. Preparethe spraymaterial according to manufacturer’s directions.Use
caution to prepare for safely spraying.
3. Open the MainTank by turning the Pump Assembly (28) counterclockwise.
Locking Ring (34) will unscrew out of the MainTank (27).
4. Pour the prepared mixture (not included) into the MainTank(27).Do not
overfill.Do not fill beyond the “FULL” mark on the MainTank.This sprayer
requiressome open space forpressurized air abovethe mixture, tooperate
properly.
5. Screw the Pump Assembly back into the MainTank.The Locking Ring (34)
must make a good seal into the MainTank (27).
6. Pressurizethe tank by moving the Pump Handle (33) up anddownseveral
times. As pressure builds in the tank, you will feel increased resistance while
pumping.Whilepumping,be sure the Pump Rod (40) moves directly up and
down in line with the Pump Assembly (28). Do not bind or bend the Pump
Rod.
7. Do not over-pressurize the MainTank (27).You will learn by experience how
much pressure is enough.Too much pressure will result in the Pump
Assemblybeingvery hardto operate,thePressure ReliefValve(31) mayopen
releasing pressure or the O-Ring (35) may fail.Too little pressure will result in
the sprayer not spraying effectively.
8. Whendone pumping, pressthe Pump Handle (33)down and turnclockwise to
lock it in place in the Locking Ring (34).
9. To spray, hold the Handle (13) in your hand. Squeeze theTrigger and begin
spraying.Movethespray over the desired area. When done, release the
Triggerandspraying will stop.

SKU 95143
For technical questions please call 1-800-444-3353
Page 6
10. For extended spraying, you can lock the trigger in place.Squeeze the trigger,
move theTrigger Locktowardthe base ofthe Handle andrelease theTrigger.
The sprayer will continue to spray.To release theTrigger Lock, squeeze the
Triggerandallow the Trigger Lock to return towardthefrontoftheHandle.
ReleasetheTrigger and spraying will cease.
11. During spraying, the initial pressure will be released from the MainTank.When
you notice that more pressure is required, stop spraying. Turn the Pump
Handle(33)counterclockwiseto release it from the Locking Ring (34). Pump
the handle up and down to rebuild pressure in the tank. When done, relock the
PumpHandleinthe Locking Ring and continue spraying.
12. Whendone spraying, release pressure from the sprayer by pulling the
Pressure ReliefValve (31) straight up.Keep your face away in case any
material is ejected through the Pressure ReliefValve.Once all pressure is
removedfromthetankyoucan empty any remaining material.
13. To empty the MainTank, once pressure is removed, unscrew the Locking Ring
(34)byturningcounterclockwise. Remove the Pump Assembly from the Main
Tank by pulling it up and out of the tank.Set the Pump Assembly aside.
Empty remaining material from the MainTank into a suitable container.
14. Clean the tank and pump assembly thoroughly before storing. Be sure to
spraywater or other suitable solvent throughthe sprayer toensure that all
internal parts are clean before storage. It should not be necessary to
disassemblethesprayerforcleaning.
15. Store or dispose of excess spraying materials properly according to safe
practices and local ordinances. Store the sprayer in a clean dry location out of
reachof children or otherunauthorizedpersons.
Using The Fan Pattern Spray Nozzle Assembly:
1. Unscrew the standard spray nozzle assembly (1 - 4) from the Wand Nut (7).
Replace with Fan Spray Pattern Assembly (20 - 23). Be sure O-Ring (5) is in
placebeforetighteningbyturningclockwise.
Maintenance
1. Alwaysclean this sprayerthoroughly before andafter each use.Do not allow
different materials used at different times to become mixed in this sprayer.
2. Aftercleaning, drythoroughly and store properly.
3. If tank will not become pressurized, check all O-Rings and pressure relief
valve.Pressure ReliefValvemustbepressedintofunction properly.

SKU 95143
For technical questions please call 1-800-444-3353
Page 7
#traPnoitpircseD.YTQ#traPnoitpircseD.YTQ
1retsujdAyarpS112relriwS1
2gniR-O122piT1
3relriwS132redloHelzzoNnrettaPnaF1
4elzzoN142es
aBknaT1
5gniR-O252desUtoN
6dnaWmunimulA162desUtoN
7tuNdnaW272)sretiL01(snollaG¼-2knaTniaM1
8dnaWretuOcitsalP182ylbmessApmuP1
9gniR-O192niPelxA3
01bonKlortnoCevlaV103gnisuoHevlaVfeileRerusserP1
11gnirpSevlaV113evlaVfeileRerusserP1
21ylbmessAevlaV12
3partSgniyrraC1
31eldnaH133eldnaHpmuP1
41retliF143gniRgnikcoL1
51gniR-O253gniR-O1
61elppiN263gnisuoHpmuP1
71tuNebuT273notsiPpmuP1
81ebu
T183gniRrosserpmoC1
91noisnetxEebuT193enarbmeMevlaVyaWenO1
02retpadAelzzoNnrettaPnaF104doRpmuP1
PLEASE READTHE FOLLOWING CAREFULLY
THE MANUFACTURER AND/OR DISTRIBUTOR HAS PROVIDED THE PARTS DIAGRAM IN
THIS MANUAL AS A REFERENCE TOOL ONLY. NEITHER THE MANUFACTURER NOR
DISTRIBUTOR MAKES ANY REPRESENTATION OR WARRANTY OF ANY KIND TO THE
BUYER THAT HE OR SHE IS QUALIFIED TO MAKE ANY REPAIRS TO THE PRODUCT OR
THAT HE OR SHE IS QUALIFIED TO REPLACE ANY PARTS OF THE PRODUCT. IN FACT,
THE MANUFACTURER AND/OR DISTRIBUTOR EXPRESSLY STATES THAT ALL REPAIRS
AND PARTS REPLACEMENTS SHOULD BE UNDERTAKEN BY CERTIFIED AND LICENSED
TECHNICIANS AND NOT BY THE BUYER.THE BUYER ASSUMES ALL RISK AND LIABILITY
ARISING OUT OF HIS OR HER REPAIRS TO THE ORIGINAL PRODUCT OR REPLACEMENT
PARTS THERETO, OR ARISING OUT OF HIS OR HER INSTALLATION OF REPLACEMENT
PARTS THERETO.
Parts List

SKU 95143
For technical questions please call 1-800-444-3353
Page 8
Assembly Drawing
NOTE: Some parts are listed and shown for illustration purposes only and are not
available individually as replacement parts.
Table of contents
Other One Stop Gardens Paint Sprayer manuals

One Stop Gardens
One Stop Gardens 97411 User manual

One Stop Gardens
One Stop Gardens 93302 User manual

One Stop Gardens
One Stop Gardens BACKPACK SPRAYER 94573 Installation manual

One Stop Gardens
One Stop Gardens CADDY SPRAYER 96622 User manual

One Stop Gardens
One Stop Gardens 65040 Installation manual

One Stop Gardens
One Stop Gardens 97048 Installation manual

One Stop Gardens
One Stop Gardens 92497 User manual

One Stop Gardens
One Stop Gardens ONE STOP GARDENS 95690 User manual