One Talk T46G User manual

User guide
onetalk.com
One Talk T46G and
T46GW IP desk
phone user guide

2
User guide
Contents
Welcome.............................................................................................................................................................................................................5
Initial setup .......................................................................................................................................................................................................5
Connect to broadband and power................................................................................................................................................ 5
Wi-Fi connectivity (optional)............................................................................................................................................................5
Startup and initialization...........................................................................................................................................................................5
View E911 address........................................................................................................................................................................................5
Get to know your desk phone................................................................................................................................................................6
Hardware components.......................................................................................................................................................................6
Navigating the display................................................................................................................................................................................ 7
LED light status..............................................................................................................................................................................................8
Power indicator LED............................................................................................................................................................................8
Line key LED ..........................................................................................................................................................................................8
Busy Lamp Field LED..........................................................................................................................................................................8
Indicators and notifications on LCD display ............................................................................................................................8
Customize your desk phone. ..................................................................................................................................................................9
Basic settings..........................................................................................................................................................................................9
Language preferences .......................................................................................................................................................................9
Time, date and time zone settings................................................................................................................................................9
Display settings....................................................................................................................................................................................10
Backlight..................................................................................................................................................................................................10
Screen saver mode .............................................................................................................................................................................11
Sound settings.......................................................................................................................................................................................11
Call volume............................................................................................................................................................................................. 12
Ringer volume ....................................................................................................................................................................................... 12
Wi-Fi connectivity................................................................................................................................................................................ 12
Voice Mail setup................................................................................................................................................................................... 13
Basic call features ......................................................................................................................................................................................13
Make and receive calls..................................................................................................................................................................... 13
Manage multiple lines. ......................................................................................................................................................................13
Ignore a call............................................................................................................................................................................................ 13
End a call.................................................................................................................................................................................................13
Hold a call. ..............................................................................................................................................................................................13
Mute/unmute.........................................................................................................................................................................................13
Redial. .......................................................................................................................................................................................................14
Advanced call features ............................................................................................................................................................................14
One Talk feature access codes ...................................................................................................................................................14
Block a call. ............................................................................................................................................................................................14
Bridge line............................................................................................................................................................................................... 15

3
User guide
Busy Lamp Field .................................................................................................................................................................................. 15
Configuring and enabling Busy Lamp Field ........................................................................................................................... 15
Busy Lamp Field LED light status .............................................................................................................................................. 15
Busy Lamp Field customer experience....................................................................................................................................16
Configuring BLF using the One Talk Admin Portal.............................................................................................................16
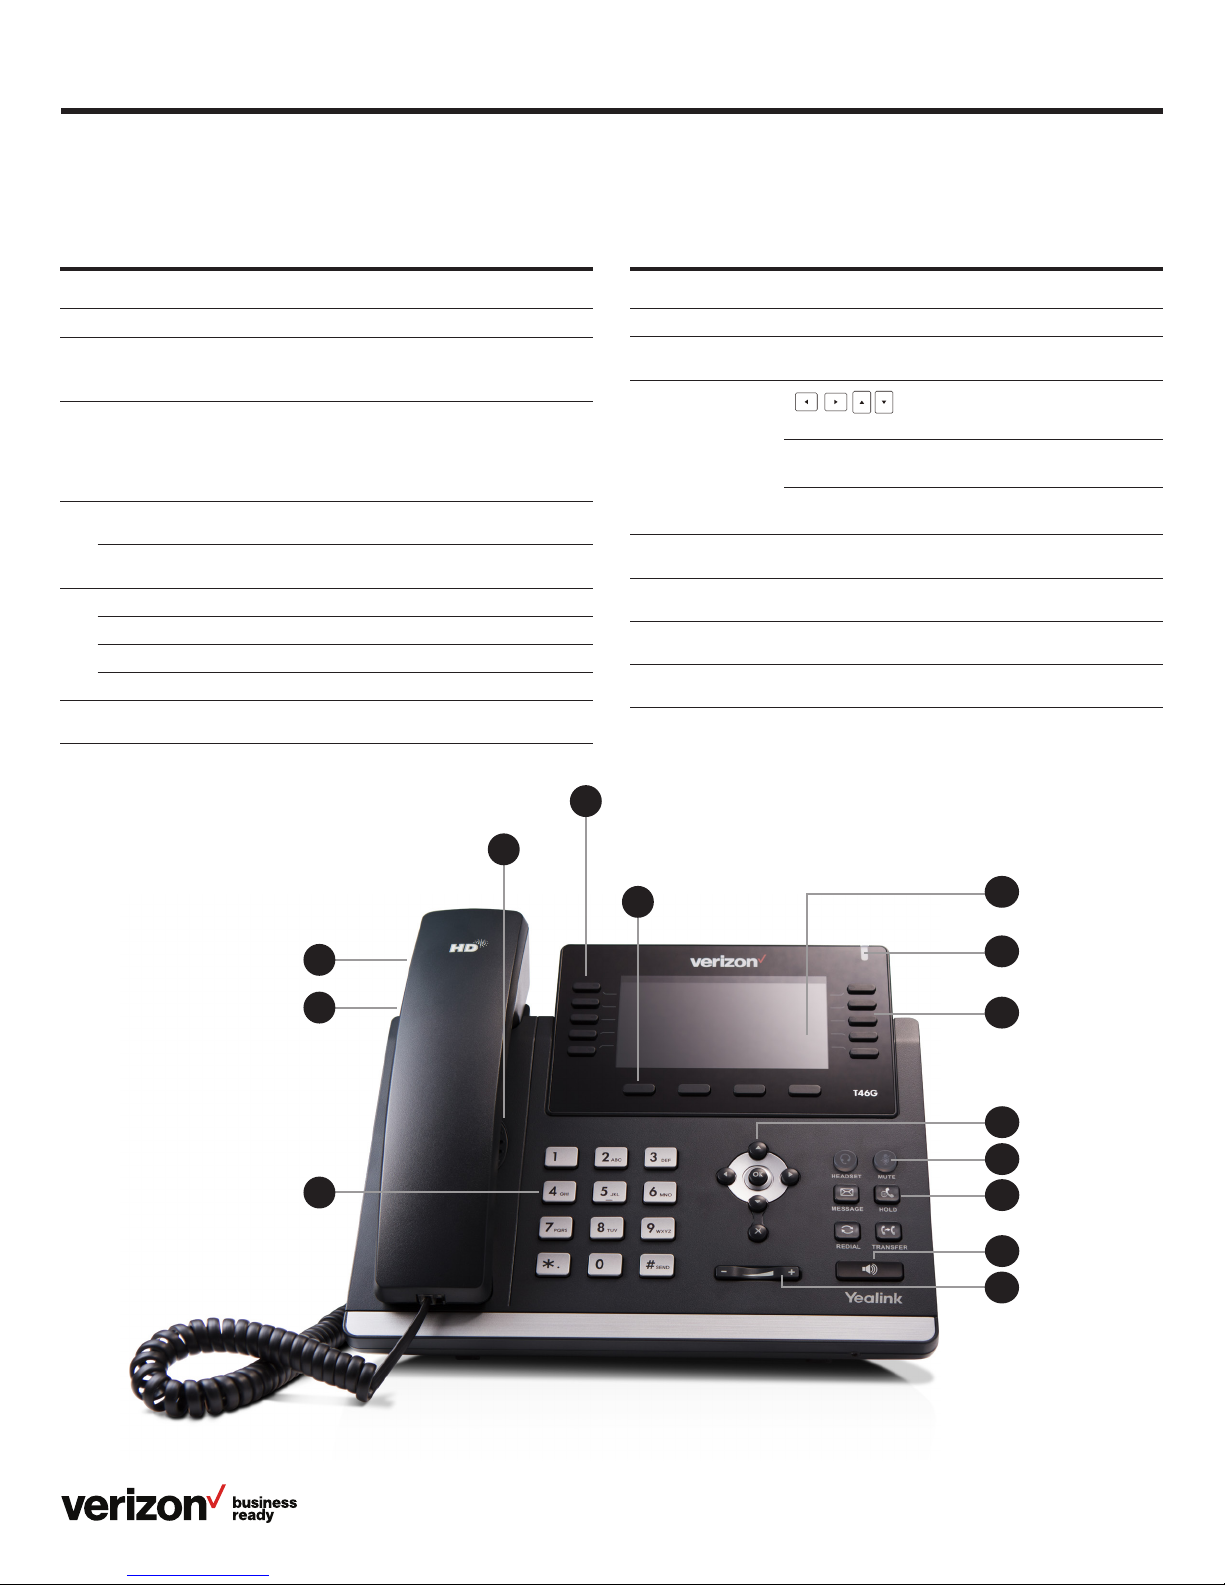
Desk-phone experience................................................................................................................................................................... 17
Desk-phone line status indicators ............................................................................................................................................. 17
Desk phone—incoming call display ........................................................................................................................................... 17
Call Barge ............................................................................................................................................................................................... 17
Call Forwarding .................................................................................................................................................................................... 17
Call Park and Retrieve ......................................................................................................................................................................18
Caller Line ID Block............................................................................................................................................................................19
Conference Calling............................................................................................................................................................................. 19
Do Not Disturb......................................................................................................................................................................................19
Intercom...................................................................................................................................................................................................19
Remote Group Pickup......................................................................................................................................................................20
Call History............................................................................................................................................................................................20
Contact management............................................................................................................................................................................... 21
Local Directory..................................................................................................................................................................................... 21
Groups..................................................................................................................................................................................................... 23
Voice Mail............................................................................................................................................................................................... 23
System status, troubleshooting and other settings............................................................................................................... 24
Check phone status.......................................................................................................................................................................... 24
Reboot phone or reset it to factory settings........................................................................................................................ 24
Specifications .............................................................................................................................................................................................. 25
Features........................................................................................................................................................................................................... 25
Bluetooth................................................................................................................................................................................................ 25
Form factor............................................................................................................................................................................................ 25
Network .................................................................................................................................................................................................. 25
Technology............................................................................................................................................................................................ 25
Applications and software............................................................................................................................................................. 26
Display and input................................................................................................................................................................................26
Music and audio.................................................................................................................................................................................. 26
Product....................................................................................................................................................................................................26
Tools ......................................................................................................................................................................................................... 26
Accessibility features..............................................................................................................................................................................26
For hearing-impaired users...........................................................................................................................................................26
For vision-impaired and blind users .......................................................................................................................................... 26
For mobility-impaired users...........................................................................................................................................................26

4
User guide
Compatible accessories.................................................................................................................................................................26
Important customer information....................................................................................................................................................... 27
WEEE warning..................................................................................................................................................................................... 27
Customer feedback .......................................................................................................................................................................... 27
GNU GPL information ...................................................................................................................................................................... 27
Copyright................................................................................................................................................................................................ 27
Warranty ................................................................................................................................................................................................. 27
Important 911 emergency response information................................................................................................................ 27
Declaration of conformity ..............................................................................................................................................................28
CE mark warning................................................................................................................................................................................28
Part 15 FCC Rules..............................................................................................................................................................................28
Class B digital device or peripheral...........................................................................................................................................28
Important safety precautions.......................................................................................................................................................28
Danger—electric shock and fire................................................................................................................................................. 28
Learn more:....................................................................................................................................................................................................28
T46 desk phone navigation guide (soft key menu A).......................................................................................................29
T46 desk phone navigation guide (soft key menu B).......................................................................................................30

5
User guide
Welcome
The T46G and T46GW IP desk phones are stationary Voice-
over-IP (VoIP) business phones that support One TalkSM from
Verizon features with up to 22 programmable line buttons. They
come with a 4.3-inch color display and 10 multipurpose line key
buttons. The T46G supports optional Wi-Fi for wireless
connection and Bluetooth® for hands-free calling. The T46GW
ships with the Wi-Fi adaptor included.
Most importantly, both models support the Verizon One Talk
service. So, wherever you are—at your desk or on the move—
you never have to miss a call.
Initial setup
If your T46G desk phone is not already connected and set up
to use the One Talk service, please verify the following with
your system administrator before proceeding:
1. You have a One Talk number
2. Your user information has been updated in the My Business
Verizon One Talk Admin Portal with your 911 address and
email address
3. Your phone number has been included in any business
group features
4. Preferred options for broadband and power connections
Connect to broadband and power.
Power
You have two options for broadband and power connections.
Your system administrator will advise you on which one to use.
Network
Connect the included standard Ethernet cable (or other
standard Ethernet cable) between the internet port on the
phone and the port on the wall or on your Power over Ethernet
(PoE)-capable switch/hub device.
Wi-Fi connectivity (optional)
As an alternative to wired Ethernet connection, the T46G desk
phone can also connect to the network wirelessly with the
optional WF40 Wi-Fi USB dongle. The T46GW ships with a
Wi-Fi adaptor already installed.
For setup instructions, please refer to Wi-Fi connectivity in the
“Basic settings” section of this user guide.
Startup and initialization
When your One Talk phone is connected to the network and
powered on, it will automatically start the initialization process.
The phone will attempt to contact a Dynamic Host Configuration
Protocol (DHCP) server in your network to obtain valid IPv4
network settings by default. After connecting, the power light
will start as a steady red light, then blink and turn on when
initialization is complete.
After startup and confirming the 911 address, the phone will be
ready for use.
View E911 address
Emergency 911 (E911) is a location technology that enables
emergency responders to know the geographical location of
a caller dialing 911.
To view your 911 address, press the 911 Address line key to the
right of the LCD screen.

6
User guide
Get to know your desk phone.
Hardware components
Item Description
1LCD screen Main display
2Power indicator
LED
Indicates phone power and status:
• Fast flash—incoming call
• Slow flash—new Voice Mail message
3Line keys
Configurable keys enable you to:
• Select a phone line to place a call
• Speed dial a favorite contact
• Answer incoming calls
• Monitor a shared line
4
Headset key Enable/disable headset mode and
indicates status
Mute key Mute/unmute microphone and
indicates status
5
Message key Access Voice Mail system and messages
Hold key Place and resume calls on hold
Redial key Redial last or previously dialed numbers
Transfer key Transfer a call to another party
6Speakerphone
key
Enable/disable speakerphone and
indicates status
Item Description
7Volume key Adjust call and ringer volume
8Keypad Alphanumeric interface for dialing numbers
or entering information
9Control pad
Allows you to scroll through the displayed information
OK
Confirms actions or answers incoming calls
X
Cancels actions or rejects incoming calls
10 Feature keys Context-sensitive keys to navigate and take action
depending upon the screen you are on
11 Speaker Provides hands-free speakerphone audio output
12 Hookswitch tab Secures the handset in the cradle when phone is
mounted vertically
13 Hookswitch Connects/disconnects phone line when handset is
removed/replaced in the handset cradle
3
2
7
1
4
85
10
3
6
9
12
13
11

7
User guide
Navigating the display
The Idle screen is the primary screen for accessing all other
menus and features on the T46G LCD display. The phone will
automatically return to this screen after 60 seconds of inactivity.
Line key labels
Line key labels
Main window Status bar
Main menu
• Basic settings
• Advanced settings
• Status
• Directory
• History
• Message
Local directory
• All contacts
• Groups
• Blacklist
Call history
• All calls
• Missed calls
• Placed calls
• Received calls
• Forwarded calls
Feature settings
• Call Forward
• Anonymous Call Rejection
• Forward to Voice Mail
• Start Log Capture
Do not disturb
911 address
Toggle between pages

8
User guide
LED light status
Power indicator LED
Indicators and notifications on LCD display
Line key LED
(configured as a phone line)
Busy Lamp Field LED
LED status
indicator
What it means
Solid red The phone is initializing
Fast flashing red The phone is ringing or downloading configuration files
Slow flashing red You have received a new Voice Mail message
Off The phone is not in use or powered off
Icon What it means
Call Forward enabled; receiving incoming call on that line
Do Not Disturb (DND) is enabled
Missed call
Wi-Fi enabled
New Voice Mail message
LED status
indicator
What it means
Green The monitored user is idle
Steady red The monitored user is on the phone
Blinking red The monitored user has an incoming call
LED status
indicator
What it means
Solid green The line is busy
Fast flashing green Receiving incoming call on that line
Slow flashing green Line placed on hold from this device
Slow flashing red Line placed on hold from another device
Solid red Line in use on another device
Off The line is inactive

9
User guide
Time, date and time zone settings
Time and date are displayed in the middle of the status bar. You
can configure your time zone to synchronize with the address
that your system administrator used when setting up One Talk
for your location. You can also set your preferred format for
displaying time and date in the Time & Date settings screen.
Configure time zone to synchronize with 911 address:
1. Press the Menu soft key while the phone is idle
2. Use the arrow keys to navigate to Basic settings and
press OK to select
3. From Basic settings, scroll to Time & Date and press OK
to select
4. Press OK to select General
5. Scroll to SNTP Settings and select OK
Customize your desk phone.
Basic settings
Setup and preference options for the following can be found
in the Basic settings screen:
Language preferences
• Time and date
• Display settings
• Ringtone and key tone sound settings
• Bluetooth headset setup
• Wi-Fi connectivity
To access Basic settings:
1. Press the Menu soft key while the phone is idle
2. Use the arrow keys to navigate to Basic settings and
press to select
Language preferences
To change the language of the phone user interface:
1. Press the Menu soft key while the phone is idle
2. Use the arrow keys to navigate to Basic settings
and press OK to select
3. From Basic settings, scroll to Language and press OK
to select
4. Scroll to your preferred language and press OK
to select

10
User guide
To set time and date format preferences:
1. Press the Menu soft key while the phone is idle
2. Use the arrow keys to navigate to Basic settings and
press OK to select
3. From Basic settings, scroll to Time & Date Format and
press OK to select
4. Scroll to select your preferred date and time formats
and press the Save soft key to accept the changes
Display settings
To change backlight duration:
There are four options for personalizing the LCD display of
your T46G desk phone. Select Menu > Basic > Display to
navigate to the Display settings screen.
• Backlight. Set the brightness of your LCD display
• Contrast. Personalize the sharpness of your LCD screen
• Wallpaper. Change the background color of your
LCD screen
• Screen saver mode. Configure your screen to automatically
dim or display time and date after the phone has been
inactive for a predetermined amount of time. You can stop
the screen saver and return to the idle screen at any time by
pressing any key on the phone
Backlight
There are two options for setting backlight preferences:
Backlight Active Level—sets the brightness of the LCD screen
when the phone is active. Brightness levels go from 1 to 10, with
10 being the brightest setting.
Backlight Inactive Level—enables low-light mode when the
phone is inactive for a designated period. You can configure
the amount of time the phone must be inactive before
switching to low-light mode. You can also turn o the backlight
completely when inactive.
To configure backlight settings:
1. From Display settings, scroll to Backlight and press
OK to select
2. Scroll Backlight Active Level to your preferred
screen brightness
3. Scroll to Backlight Inactive Level, then use or
the Switch soft key to select the desired value
4. Scroll to Backlight Time, then use or the Switch
soft key to select the desired value
5. Press the Save soft key to accept the changes

11
User guide
Sound settings
Sound settings is where you can configure ringtones and key
tones (keypad tones). Selecting a dierent ringtone than those
of your neighbors can help distinguish your phone from other
incoming calls. Key tones provide audible cues when pressing
conference buttons.
Select Menu > Basic > Sound to navigate to the Sound
settings screen.
To configure ringtones:
1. From Sound settings, scroll to Ringtones and press OK
to select
2. Highlight the line you wish to change the ringtone for or
select Common to change the ringtone for all lines. Press
Enter or OK to make your selection
3. Use to preview ringtone options and press the Save
soft key to select
To configure contrast settings:
1. From Display settings, scroll to Contrast and press OK
to select
2. Scroll or use the Switch soft key to increase or
decrease the desired contrast
3. Press the Save soft key to accept the changes
To configure wallpaper settings:
1. From Display settings, scroll to Wallpaper and press
OK to select
2. Scroll or use the Switch soft key to view wallpaper
options and press the Save soft key to select
Screen saver mode
Configure your screen saver:
1. From Display settings, scroll to Screen Saver Mode and
press OK to select
2. Scroll or use the Switch soft key to view options
and press the Save soft key to select

12
User guide
To configure key tones:
1. From Sound settings, scroll to Key Tone and press OK
to select
2. Use or the Switch soft key to enable or disable Key
Tones and press the Save soft key to accept the changes
Call volume
To adjust call volume, press the Volume Key
while on an active call.
Ringer volume
To adjust the ringer volume, press the Volume
Key when the phone is inactive.
Bluetooth headset setup
Your T46G desk phone supports wireless headsets with the
optional BT40 Bluetooth USB Stick. Before you enable
Bluetooth, make sure the BT40 is properly connected to the
USB port on the back of the phone.
To pair your Bluetooth headset:
1. From Basic settings, scroll to Bluetooth and press OK
to select
2. Use or the Switch soft key to enable or disable
Bluetooth and press the Save soft key to accept the
changes
The T46G desk phone will list paired devices. If you have not
previously paired your headset, press the Scan soft key
and follow the pairing instructions that came with your
Bluetooth device.
The LCD screen will display the Bluetooth icon when enabled.
Wi-Fi connectivity
Before setting up a wireless broadband connection, please
make sure the One Talk desk phone is connected to its power
adaptor and that no Ethernet cable—either for wired Ethernet
or PoE—is connected. Insert the WF40 Wi-Fi USB dongle into
the USB port in the back of the phone. You should see the
Wi-Fi signal indicator appear in the notification bar.
1. From Basic settings, scroll to Wi-Fi and press OK
to select
2. Use or the Switch soft key to enable or disable
Wi-Fi and press the Save soft key to accept the changes
The T46G desk phone will automatically scan for nearby Wi-Fi
networks. Select the network you wish to connect to and enter
your Wi-Fi password if required.
Line keys
Your T46G comes with 22 configurable line keys. You can use
them to create one-button speed dials for frequently dialed
numbers. This model also comes with the new Busy Lamp Field
(BLF) and Intercom features to give you even more functionality.
To configure line keys for speed dial:
1. Press and hold an unused line key (for about five seconds)
2. Use or the Switch soft key to scroll through the type
of line keys available until you locate Speed Dial
3. Scroll to complete each of the following fields:
–Account ID
Select the phone line/number that will dial out
–Label
Enter the name you would like displayed on the line
key label
–Value
Enter the phone number you would like this line key
to dial
4. Press the Save soft key to accept your changes.
You can now use this line key to speed dial this contact.

13
User guide
To access additional line keys:
To access additional line keys, press the 12 3 Pages key
(last line key on the right of the screen) to toggle between pages.
Voice Mail setup
To set up your Voice Mail:
1. Press Message button and follow the voice prompts
2. Select your preferred language
3. Create your four-digit passcode
4. Record your name at the voice prompt
5. Select a greeting, either personalized or standard
See “Voice Mail” for more information.
Basic call features
Make and receive calls.
Calls can be made using the handset, speakerphone, or
through a connected headset.
Using the handset:
To place a call, pick up the handset, enter the phone number
via the keypad and press the Send soft key.
To answer a call, simply pick up the handset.
Using the speakerphone:
With the handset on hook, press to answer an incoming
call, or enter a phone number and press Send to make a
hands-free speakerphone call.
Using a headset:
With the headset connected, press to answer an incoming
call, or enter a phone number and press Send to make a
hands-free call.
Note: During a call, you can alternate between these methods
by pressing the Headset or Speakerphone keys, or by picking
up the handset. Headset mode requires a connected headset.
From your Call History:
1. Press the History soft key when the phone is idle
2. Scroll All Calls to highlight the desired entry. You can
also filter your view by navigating Missed Calls,
Placed Calls, Received Calls or Forwarded Calls
• Press the OK soft key to dial the number
From the Local Directory:
1. Press the Directory soft key when the phone is idle
2. Scroll All Calls to highlight the desired entry. You can
also filter your view by navigating Missed Calls,
Placed Calls, Received Calls or Forwarded Calls
• Press the OK soft key to dial the number
Manage multiple lines.
The telephone number assigned to your desk phone gives
you three dierent lines to place and receive calls. Each line
is represented by a line key with your One Talk number. You
can use these lines to simultaneously hold three separate
conversations or conference in up to six participants.
Receiving incoming calls while the line is in use:
Press the line key with the flashing red indicator to answer the
call. You can also press Hold to place the current call on hold.
Then you can:
• Press Answer to pick up the incoming caller
• Press Ignore to trigger your Call Forward Busy and Call
Forward No Answer configuration
Ignore a call.
Press Ignore during an incoming call when you wish to trigger
the Call Forwarding options you configured for Call Forward
Busy or Call Forward No Answer.
End a call.
To end a call, press End Call.
Hold a call.
To place a call on hold, press or the Hold soft key during an
active call.
To resume the call, do one of the following:
One call on hold:
Press or the Resume soft key.
Multiple calls on hold:
Press the desired line key.
Mute/unmute.
Press to mute or unmute the microphone during a call.

14
User guide
Redial.
Press twice while the phone is idle to dial out to the last
number dialed.
To view a longer list of placed calls, press and use
to scroll to the desired number. Press again or the OK
soft key to place your call.
Advanced call features
One Talk feature access codes
Feature Feature access code
Anonymous Call
Rejection
**77 to enable
**87 to disable
Caller Line ID Block **67 then dial
Direct Transfer to
Voice Mail Transfer > **55 > dial extension > Direct
Remote Group
Pickup **98
For the complete list of quick access codes, check out our
One Talk feature access codes FAQ.
Block a call.
There are two ways to block incoming calls from ringing
your phone:
1. Anonymous Call Rejection blocks incoming calls that
restrict the display of their outgoing caller ID information
2. Blacklist allows you to specify contact names and Call
History numbers from which you do not wish to receive calls
To enable Anonymous Call Rejection:
1. Press the Features line key while the phone is idle
2. Scroll to Anonymous Call Rejection and press OK
to select
3. Use to highlight ON or OFF and press OK to make
your selection
Note: You can also turn Anonymous Call Rejection on by dialing
**77. To turn the feature o, dial **87.
To blacklist a contact from your directory:
1. Press the Directory soft key while the phone is idle
2. Locate the contact you wish to blacklist by selecting
All Contacts or the Group to which the contact belongs
3. Use to navigate to the contact and press the Options
soft key
4. Select Add to Blacklist
To blacklist a contact from your Call History:
1. Press the History soft key while the phone is idle
2. Use to navigate to the number you wish to blacklist
and press the Options soft key
3. Select Add to Blacklist

15
User guide
The One Talk Bridge Line feature lets you use your own desk
phone to receive and place calls on behalf of other phone
numbers. Incoming calls to those telephone numbers will ring
on your desk phone. You can also use those other numbers to
place calls directly from your own desk phone.
Configure another phone number to your desk phone:
Your organization’s One Talk service administrator can
configure bridged devices by logging into the My Business
Verizon One Talk Admin Portal.
Monitoring and answering calls for a bridged number:
1. When a call is made to a shared line, it will appear on
your screen
2. Press the appropriate line key to answer the call. The
monitored phone’s status display will now show that the
line is busy
Once a call is answered on a bridged line, you will have access
to the same features that are available on your own desk
phone line.
Busy Lamp Field
The Busy Lamp Field (BLF) allows you to monitor status and
answer incoming calls for other users within your group from
the T46G/T46GW desk phone. The EXP40 Button Expansion
Module is recommended for use of this feature on the T46G/
T46GW desk phones.
Configuring and enabling Busy Lamp Field
The BLF feature is configured and enabled using the One Talk
Admin Portal. The feature has to be enabled for each desk
phone within the One Talk Admin Portal. Once enabled,
monitored lines appear on the desk phone.
Please see the One Talk Admin Portal guide for
more information.
Busy Lamp Field LED light status
Once the BLF feature is enabled, the desk phone displays line
status for monitored lines using dierent light sequences on
the line keys.
LED status
indicator –
Busy Lamp
Field enabled
What it means
Solid green Monitored user is idle
Solid red Monitored user is on the phone
Fast flashing red Monitored user has an incoming call
To remove a contact from a blacklist:
1. Press the Menu soft key while the phone is idle
2. Press the Directory soft key, then press Blacklist
3. Scroll to highlight the contact you wish to unblock
and press Options
Select Add to Contacts and press OK to accept the change.
Bridge line

16
User guide
Busy Lamp Field customer experience
To use the BLF feature, you must first have compatible desk
phones and access to the One Talk Admin Portal. While you’re
logged into the One Talk Admin Portal, you must complete
the following:
1. Configure the BLF using the One Talk Admin Portal
2. Enable the BLF on each device using the One Talk
Admin Portal
Configuring BLF using the One Talk Admin Portal
Step 1: Establish a list of users you want to monitor (up to 50).
• Sign in to MyBusiness
• Click Manage Account
• From the Product Tools section, click One Talk
• From the dropdown, select the appropriate Group, then click
the Lines & Devices tab
• Select a line or phone number to manage
• From the line details page, select
Create/Edit Monitoring List
• Select Available Lines and press the >button to move
to the Monitored Lines field
• Click Save (notice the success informational message)
Step 2: Enable monitoring on the desk phone.
• Select the T46G/GW or a T49G desk phone from
Associated Devices
• Select the checkbox to enable monitoring for this device
Note: Each individual desk phone has to be enabled for
monitoring. Only one list is supported per One Talk mobile
directory number (MDN)

17
User guide
EXP40 monitored
The admin monitoring the line has an option to pick up the call
on behalf of the actual end user. When answering a monitored
line, the desk phone displays the feature access code and
extension used for directed call pickup with barge-in.
Call Barge
Any bridged line or other device that shares a number with you
can use the Call Barge feature to join a call in progress. Call
Barge is especially useful for admins when it is urgent that a
manager be reached immediately.
Before you can use Call Barge, your service administrator must
configure the barge function in the One Talk Admin Portal.
To barge in on a call to your One Talk number or bridged line:
1. Press and hold the line key* in use for approximately
five seconds
2. Press the Barge soft key to barge in on the active call
*The line key indicator will light steady green when the line is
busy (on an active call).
Barge-In warning tone:
One Talk can be configured to notify you when another user
barges in on a call. For more information, refer to the User
Portal Guide or contact your systems administrator.
Call Forwarding
This feature allows incoming calls to automatically ring another
phone number or to be sent directly to Voice Mail, depending
on your preferences. The following options are available:
Desk-phone experience
Once enabled, you’ll need to reboot your desk phone to pick up
the configuration change. The reboot will be automatic, without
any interaction needed on your part.
Desk-phone line status indicators
Once the BLF feature is enabled, the desk phone displays line
status for monitored lines using dierent light sequences on
the line keys. Below is a description of the line status.
Line status—lights
on line key
Detail
Green The monitored user is idle
Steady red The monitored user is on the phone
Blinking red The monitored user has an incoming call
Desk phone—incoming call display
When the monitored line receives an incoming call, the LED
flashes on the desk phone as described before; additionally,
the customer is presented with the following:
• Audio. There is an audible single beep indicating a call on
the monitored line
• Visual indication. This is visible on the idle screen and
displays the monitored line and Caller ID for the caller
T46G/T46GW (incoming call) monitored
T46G/T46GW (call answered)

18
User guide
Call Move
When you share your One Talk number with other devices, you
can move an active call between any of these devices without
disconnecting. You may share your One Talk number with up
to five dierent devices, including mobile phones and tablets.
To move a call:
To move a call from your desk phone to a mobile device, simply
place the call on hold by pressing the Hold soft key. You may
then continue the conversation by retrieving the call from your
mobile device.
To retrieve a call from your desk phone:
If you placed a call on hold from another One Talk device, the
line key on your desk phone will flash red. Press the line key to
pick up the call and continue your conversation.
Call Park and Retrieve
Call Park allows you to place a call on hold and assign or “park”
an active call to another member’s extension or 10-digit
telephone number for retrieval within the same Group.
The call can also be retrieved by the person who parked the
call. Parking against your own extension is just like placing a
call on hold, but with a ringback reminder. If you have Music on
Hold enabled, callers will hear music.
Parking a call:
1. While on an active call, press the Parksoft key
2. The user hears a message stating “Please dial the number
where you want to park your call followed by #, or dial # to
park the call against your number”
3. Enter the appropriate 10-digit number or the extension
number followed by #
4. Press #to park against your own extension
Call Forward Always
Forwards all calls made to your One Talk phone number to an
alternative phone number. Calls can be forwarded to any
domestic U.S. and 800 number.
Call Forward Busy
Forwards calls to an alternative number when your One Talk
number is busy. Calls can be forwarded to any domestic U.S.
and 800 number.
Call Forward No Answer
Forwards calls to an alternative phone number when there is
no answer at your One Talk number.
Call Forward to Voice Mail
Automatically forwards calls made to your One Talk phone
number to your Voice Mail box, where callers can leave a
voice message.
To configure Call Forwarding:
1. Press the Features soft key while the phone is idle
2. Select Call Forward and press OK to select
3. Use to navigate to your preferred forwarding option
and press OK to select. (Only one option can be enabled
at a time)
4. Use or the Switch soft key to enable or disable the
feature, then scroll to Forward to: and enter the number
to which you wish to forward calls. Press the Save soft key
to accept the changes
To forward to Voice Mail:
1. Press the Features line key while the phone is idle
2. Select Forward to Voicemail and press to select

19
User guide
Do Not Disturb
When enabled, Do Not Disturb (DND) will reject all incoming
calls automatically. Depending on how you configure other
devices that share your One Talk number, the call may ring
on another device or be forwarded to Voice Mail.
Enabling or disabling Do Not Disturb:
1. Press the DND soft key to enable or disable
the feature
2. Your desk phone will not ring while the screen
displays “DND”
Intercom
Intercom enables desk phones within the same group to call
each other by using the last four to six digits of the number and
having the call auto-answered on a speaker phone.
• Intercom must be enabled on each desk phone to work.
Enabling or disabling Intercom:
1. From the home screen, press the Features soft key
2. Press the Intercom soft key
3. Using the appropriate soft keys, highlight Accept Intercom
to enable or disable
• Default setting is disabled
4. Using the appropriate soft keys, highlight Intercom Mute to
enable or disable
5. Disable Mute allows the customer to be able to talk back
when receiving an intercom call
6. Press theSave soft key
Retrieving a parked call:
1. To retrieve a parked call, press the Retrieve soft key when
a call is parked against your phone number
• You will receive an audio and visual notification of the
parked call
Caller Line ID Block
You can opt to place outgoing calls anonymously by pressing
**67 prior to dialing. This will prevent your phone number or
any other Caller ID information from appearing on the
recipient’s display.
Conference Calling
One Talk 6-way Conference Calling enables you to have up to
six dierent parties participating in a single conference call.
During an active call, follow these instructions to add and
merge up to four more lines to your conference.
To start a conference call:
1. Press the Hold soft key during an active call, then press
New Line
2. Enter the number of the second party, then press the Send
soft key
3. After the second party answers, press the Conference soft
key. All parties are now joined in the conference
4. Repeat steps 1 to 3 to hold up to a 6-way conference call

20
User guide
Setting up an Intercom line key:
1. From the home screen, press and hold an empty soft key
2. From the type field, press the Intercom soft key
3. Enter the appropriate information, then press the Save soft key
• Label
• Value (extension number)
The user gets a prompt to enter the extension number if
left blank.
Using an Intercom line key:
To use a dedicated Intercom line key when an extension
is not defined:
1. From the home screen, press the Intercom soft key
2. Enter the target extension for Intercom, and then press the
Send soft key
To use a dedicated Intercom line key when the extension
is defined:
1. From the home screen, press the soft key next to the
Intercom label
2. The Intercom is connected
To access additional line keys:
To access additional line keys, press the 12 3 Pages
key (last line key on the right of the screen) to toggle
between pages.
Remote Group Pickup
One Talk helps ensure that calls are answered by associating
lines with groups (Inside Sales, for example). If your
administrator has assigned your line to a specific group,
Remote Group Pickup enables you to remotely pick up a group
member’s ringing line from your own desk phone.
Dial **98 from your desk phone to remotely pick up a group
member’s ringing line.
Transferring calls:
You may transfer an active call to any other phone number,
regardless of service provider (it does not have to be a One
Talk number). There are three transfer options: Consultative
Transfer, Direct Transfer and Direct Transfer to Voice Mail.
Consultative Transfer:
Consultative Transfer allows you to dial and speak to the
person before you transfer the call.
1. Press or the Transfer soft key during an active call.
This will place the call on hold
2. Enter the 10-digit phone number or extension you want to
transfer to and press the Consult soft key. When the
second party answers, advise them of the transfer
3. Press or the Transfer soft key to complete
Direct Transfer:
Direct Transfer enables you to immediately transfer an active
call. This feature will make it appear that the current caller
directly dialed the second caller.
1. Press or the Transfer soft key during an active call.
This will place the call on hold
2. Enter the 10-digit phone number or extension you want
to transfer to and press the Direct soft key to complete
the transfer
Call History
Call History maintains a list of all calls that were missed, placed,
received and forwarded. You can view and delete call records,
place a call, blacklist a contact or add a contact to your Local
Directory from the Call History screen.
To view your Call History:
1. Press the History soft key while the phone is idle
2. Scroll All Calls to highlight the desired entry. You can
also filter your view by navigating Missed Calls,
Placed Calls, Received Calls or Forwarded Calls
To call a contact from Call History:
• Follow steps 1 and 2 above, then press the OK soft key to
dial the contact
To delete an individual call record:
• Follow steps 1 and 2 above, then press the Delete soft key
For all other options, including:
• Add to Local Directory
• Blacklist the contact
• View details
• Delete all call records
3. Follow steps 1 and 2 above, then press the Options soft key
4. Scroll to highlight the desired option, then press OK
to accept the change
This manual suits for next models
1
Table of contents
Other One Talk Telephone manuals
Popular Telephone manuals by other brands

Telit Wireless Solutions
Telit Wireless Solutions Sat 600 user guide

Invoxia
Invoxia NVX 610 user guide

Bell
Bell 595 Series Installation and Maintenance

Command Communications
Command Communications privatetime PT1000 Operator's guide

Interquartz
Interquartz Hotline 9826N user manual

comfortel
comfortel D-100 quick guide