Onerr GEP 50 User manual

RHYTHM TEMPO
TAP SW EFFBYPASS
GEP 50
GUITAR EFFECTS Pedal
Thank you for purchasing an ONERR product.
Before getting started, read this manual and follow carefully
through the instructions of use and safety.
Keep this manual for future reference in case of any doubts
about the product's functioning.
All brand names mentioned in this manual are trademarks
from their respective owners/companies.
Owner´s Manual
Copyright 2007 MICROTRONIX ELETRÔNICA LTDA
C
This manual and its attachments cannot be developed and copied without
prior authorization of Microtronix Eletronica Ltda.

Manual do Usuário
2
Using This Product Safely
Before getting started, read the instructions carefully and explore all
its contents.
Do not attempt to disassemble, open up or repair the product without
consent of authorized members of the company. This procedure
cancels the product's warranty. Refer all servicing to your retailer or
an authorized distributor in your country.
Do not use or keep this product in places that are:
- Wet, moist, or slippery environments.
- Environments with a great amount of dust or any kind of dirt.
- Environments that may reach extreme temperatures.
- Environments subject to high vibration level.
The utilization of this device, by itself or in combination with other
equipments such as headphone, is capable of producing sound level
that may cause permanent hearing loss. Do not exceed the time
using it in a high volume level or even in volumes uncomfortable for
your own audition.
In a home with children, a responsible adult must instruct and
supervise the operation of this unit until the child is capable to follow
the essential and must-obey rules for safely operating this device.
Do not drop this unit, and protect it from direct harm or impacts.
Before moving the unit, make sure all the switches are set off and all
cords coming from external devices are disconnected.
Disconnect this unit from an outlet in case of storms or heavy rain
followed by lightning.
Warning or Caution :This warning is used to alert the user of either
a physical or health risk that could take place in case of the unit be
used improperly.
Do not place this unit in tilted or unstable surfaces that may shake
and strike down the unit.
Do not excessively crumple or fold the powering cord. Do not place
heavy objects over it as well to prevent short-circuits or anything that
can cause fire.
Make sure that liquids and small objects stay away from penetrating
inside this unit. They may cause internal trouble and damage to
internal circuits.
Forbidden Actions : This warning is used to alert the user of
actions that must never be carried out because it will affect the
well functioning of the product.
Never handle any components of this unit, or the cables, with wet
hands.
In case of malfunctioning, look for authorized technical assistance.
They can be found at your retailer or an authorized distributor in your
country.
Immediately disconnect the power cord from the outlet, in case of:
- Any damage of any kind to the AC cord.
- Improper functioning of the unit.
- Exposure to wetness, rain or inflammable products.
- Smoke coming from the unit.

3
Use good quality audio cables to avoid undesired noises and loss of signal.
Keep this manual in a safe spot in case you need to refer to it in the future.
Keep your presets' configurations written down somewhere safe. The
malfunction or inadequate operation towards this unit can cause total loss of
the data saved in the internal memory, with no chance of recuperation.
Contents
Using this Product Safely...................................................................
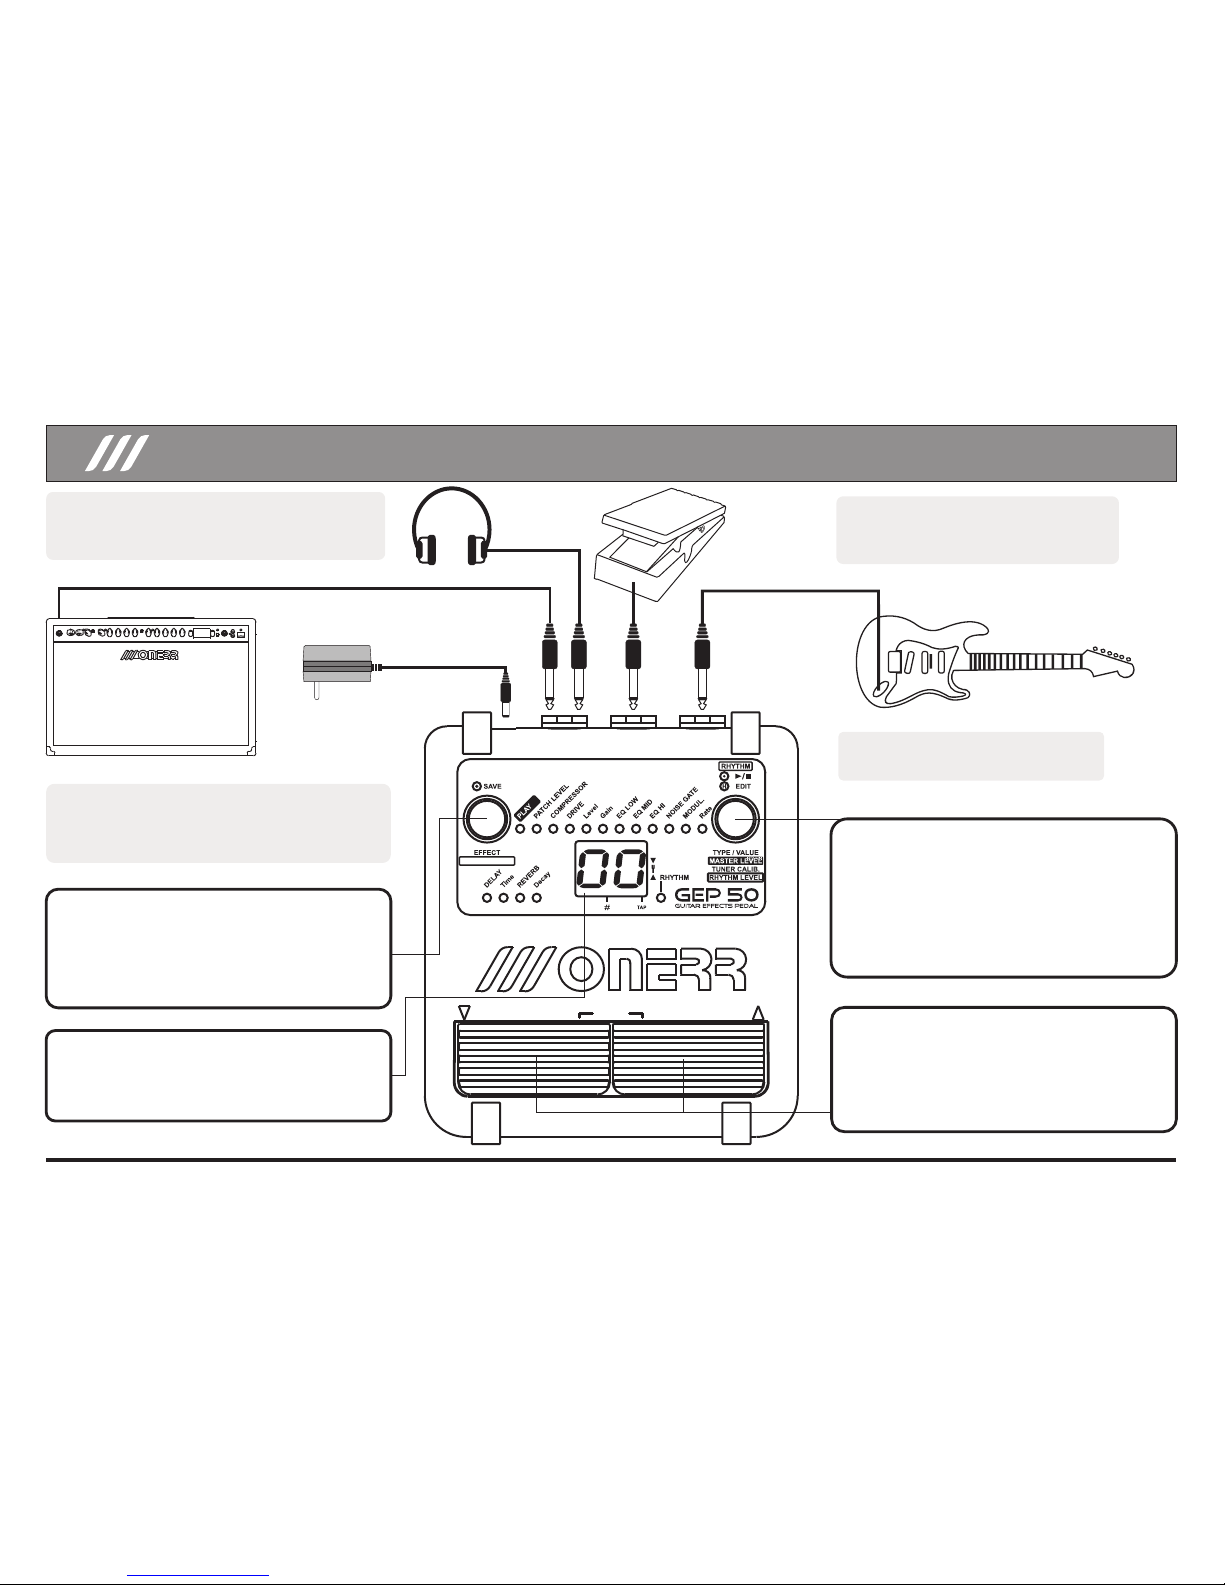
Description of Controls and Connections.......................................................
Terms and Basic Concepts of GEP 50...........................................................
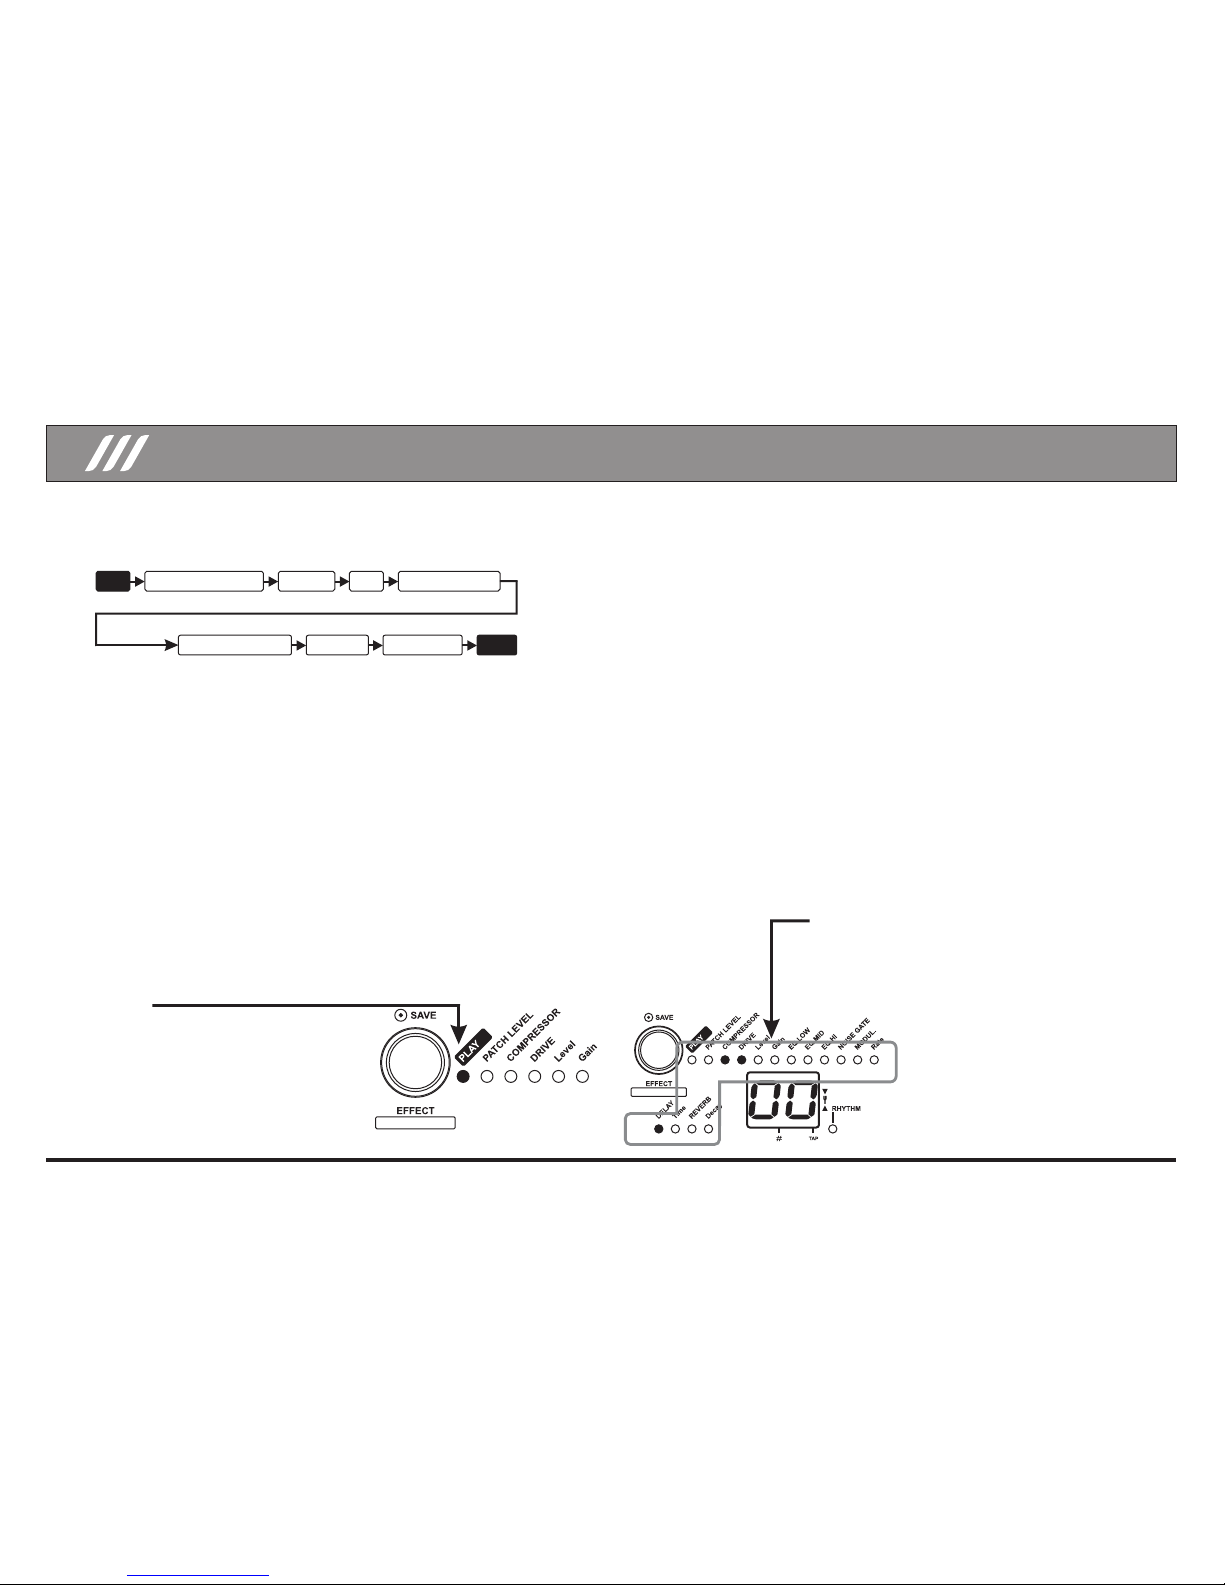
Playing and Exploring Patches on GEP 50...............................................
Tuning your Guitar..........................................................................................
Playing with the Rhythms of GEP 50.............................................................
Editing Patches..............................................................................................
Saving or Copying Patches on GEP 50..........................................................
Utilizing an Expression Pedal..........................................................................
Effect Types and Parameters.................................................................
Drum Presets on the GEP 50................................................................................
Restoring the Factory Presets.........................................................................
Warranty..........................................................................................................
Specifications..................................................................................................
02 and 03
04
05
06
07
08
09
10
11
12 to 16
17
18
19
19
IMPORTANT
Do not connect this unit to an outlet already in use by an electrical appliance
such as a refrigerator, dryer, dishwasher, microwave, air conditioner or any
other appliance that contains a motor. These can effect electric current and
may cause this unit to malfunction or may produce audible noise. In case of
the need of sharing an electric outlet with any of the above, connect a noise
filter between this unit and the electrical outlet.
Always connect all the electric and audio equipments when they are turned off
to prevent damage toward their well functioning.
For cleaning, wipe the unit with a soft and dry cloth, or one that has been
slightly dampened with water. To remove stubborn dirt use a soft cloth and a
mild non-abrasive and neutral detergent.
Never use benzine, thinners, alcohol or solvents of any kind to avoid
discoloration and/or deformation of the unit.
If the unit is meant to be used near other equipment with large transformers, it
may induce hum. In order to solve the problem, try moving the unit away from
the source of interference.
This unit may interfere with radio or television signal reception.
Avoid its use near such receivers.
Mobile cell phones or any other wireless devices can induce undesirable
noises and sounds on this unit if placed near it. If so, move the wireless
devices away to a longer distance or turn them off instead.
Do not expose this unit under heavy sunlight, excessive warm temperatures
or inside sealed cars receiving sunlight for a long period of time. Excessive
warm temperatures can cause inside melting of components and staining on
its outside.
To transport this unit, make sure it is well packed and protected from eventual
collisions and compressions made by other objects.
Only use original ONERR accessories along with this unit (pedals, adapters,
etc...). Other accessories might not be fully compatible and can potentially
cause malfunctioning or damage to this unit.

4
Description of Controls and Connections
RHYTHM TEMPO
TAP SW EFFBYPASS
ENCODER 1
This knob is used to:
1- Choose effects and its parameters.
2- Save patches in GEP 50's internal memory.
3- Alter the speed (TEMPO) of the electronic
drums.
DISPLAY
Exhibits the patch currently selected, values of
its parameters, and other important
information for the operation of the GEP 50.
FOOTSWITCHES
They are used to select the patches, turn
on/off the effect in a patch, select the
electronic drums' different rhythms, tap the
time for the effects of modulation, delay and
bypass.
ENCODER 2 - This knob is used to:
1- Choose the style and the parameter of the
effect.
2- Alter GEP 50's master level.
3- Alter the electric drums' level.
4- Turn on/off the electronic drums.
5- Edit the electronic drums' parameters.
6- Edit the tuner's parameters.
GUITAR
HEADPHONES
AMPLIFIER
AC ADAPTOR
EXPRESSION
PEDAL
Jack (OUTPUT/PHONES)
Connect your amplifier or your headphones
in this jack
Jack (CONTROL IN) - In case you
have an expression pedal, (ONERR
EP-50) connect it in this jack.
Jack (INPUT) - Connect your
guitar in this jack.
Jack (DC IN)
Connect the AC ONERR PA-30 adaptor in this
jack. Specifications of the a.c. adapter :
Output: 9 volts c.c./ 350/mA. Negative Center.

5
Terms and Basic Concepts of GEP 50
PLAY Mode
In this operation mode you are able to select
the effect patches to be used along with your
instrument. In PLAY Mode the led PLAY
should be lit up.
PATCH VIEWER
The illuminated leds indicate which effects are part of
the selected Patch. On the example aside, patch 00
holds the effects COMPRESSOR, DRIVE and
DELAY.
CURSOR
The cursor is represented by a blinking led. It indicates that the GEP 50 is in edit
mode. To change the position of the cursor, simply turn the [Encoder1].
Ex. If the Patch Level led is blinking, it indicates that the PATCH LEVEL is
being edited.
Effect Type
Some effect modules possess various types of effects.
Example: In the effect module MODULATION, you will find types of Chorus,
Flanger, Phaser, Vibrato, and others. Only one effect of each effect module can
be chosen at a time.
Effect Parameters
All the effects possess parameters that can be adjusted to your taste, similar to
the knobs of an effect pedal. The effect parameter alters the tone, intensity,
speed, etc...
EDIT EFFECT Mode
In this operation mode you can edit the effect patches and save your changes to
GEP 50's memory. In EDIT Mode, the led PLAY should not be on and any other
effect led should be blinking.
EDIT RHYTHM Mode
In this operation mode you can edit the functioning parameters of the electronic
rhythm machine.
TUNER/BYPASS
In this operation mode your guitar will not go through the effect modules of the
GEP 50.
Effect Modules
The GEP 50 has 7 individual effect modules that can be turned on/off
according to your taste.
PATCH
The GEP 50 possesses 100 memory patches. Each patch is a space of storable
memory where the effects and its parameters are stored in. The patches are
divided into 2 groups, the factory patches or Presets (00-49) and the user's
patches (50-99). Each patch can hold up to 7 simultaneous effects and its
parameters.
RHYTHM TEMPO
RHYTHM TEMPO
DRIVE EQ
MODULATION
COMPRESSOR NOISE GATE
DELAY REVERB
IN
OUT

6
Playing and Exploring Patches on GEP 50
Turning on the GEP 50
1 Connect the adapter AC plug in Jack DC IN then plug it into a socket.
2 Connect the guitar's cable in Jack INPUT.
3 Connect one end of the plug of another guitar's cable in Jack
Output/Phones and the other end to your amplifier.
In case you decide to not use an amplifier, you can connect headphones in
this jack.
4Turn on your amplifier and adjust it according to your personal taste. HINT: If you keep the footswitch pressed down it will enter the automatic mode.
The value of the MASTER LEVEL will be exhibited on
the display while [Encoder2] is turned. After adjusting
the desired value, the display will return to its previous
state and will exhibit the current patch number. The
MASTER LEVEL ranges from 00-99.
RHYTHM TEMPO
Factory Patches
To access GEP 50's patches, follow the instructions below:
1Turn [Encoder1] in order for it
to enter PLAY Mode.
The number of the selected
patch will be exhibited in the
display.
TAP SW EFFBYPASS
2Use the footswitches to select the patches. Once Footswitch
[UP] is pressed, the next patch will be selected and, by pressing
the footswitch [DOWN] the previous patch will be selected again.
3Turn [Encoder2] to change the
Master Level.

7
Tuning your Guitar
The GEP 50 possesses 2 tuning modes. BYPASS and MUTE.
The display will exhibit the letters
"bp" to indicate the BYPASS /
TUNER Mode in progress.
The display will exhibit the letters
"tu” to indicate the MUTE /
TUNER Mode in progress.
2Play de open string to tune and adjust
the pitch. The left digit of the display shows
the note which is closest to the current
pitch.
The default reference pitch setting (PITCH) is 440Hz, although, you can alter
that within a range of 435Hz up to 445Hz.
1A BYPASS Tuning
In PLAY Mode, press down the
footswitches [UP] and [DOWN],
simultaneously. The GEP 50
will enter BYPASS/TUNER
Mode.
1BMUTE Tuning
In PLAY Mode, keep the switches
[UP] and [DOWN] simultaneously
pressed down for about 2 seconds.
The GEP 50 will enter
MUTE/TUNER Mode.
A =
A#=
B =
C =
C#=
D =
D#=
E =
F =
F#=
G =
G#=
The right digit of the display shows a rotation bar that indicates
by how much the tuning is off. The faster the bars rotate around
the display, the more off the tuning is.
Pitch is
HIGH
Pitch is
LOW
Pitch is
Correct
3Keep tuning the string until the
bars stop rotating, establishing
itself in the center of the display.
To tune the other strings, simply
follows this same operation.
Reference pitch = 435 Hz.
Reference pitch = 445 Hz.
Reference pitch = 440 Hz.
4Turn [Encoder2] and the tuner reference value
(PITCH) will be exhibited for brief seconds in the
display of the GEP 50. After choosing the new
PITCH, the display will go back to what it was
exhibiting in its previous state.
5To return to PLAY Mode, press
down both footswitches
simultaneously.
TAP SW EFFBYPASS
OR

8
Playing with the Rhythms of GEP 50
To turn on/off the electronic rhythm on your GEP 50, simply press down the
[Encoder2]. The latest rhythm utilized will be the one to be played.
To enter EDIT RHYTHM Mode in the GEP 50, make sure that PLAY Mode is
selected.
4To adjust the number of beats per minute
(BPM), turn [Encoder1] . The values are in
between 40 and 299 BPM.
2 Use the Footswitches
[UP] and [DOWN] to select
one of the 60 different
rhythms available.
For more information on
GEP 50's rhythms, consult
page 17.
3To adjust the volume of the
rhythms, turn [Encoder2].
1 Press down [Encoder2] to turn
on/off the electronic rhythm.
1 Press and hold [Encoder2] for
approximately 2 seconds.
5 To exit RHYTHM Mode, press down
[Encoder2] again for approximately 2
seconds.
TAP SW EFFBYPASS
The led RHYTHM will start blinking
indicating that the GEP 50 is ready to
begin editing the rhythm parameters.
The led RHYTHM will light off
indicating that the GEP 50
returned to its previous state.
The adjusted level will be
shown for brief seconds.
The led RHYTHM will light up
indicating when it has been activated.
The adjusted level will be
shown for brief seconds.
RHYTHM TEMPO
Each dot exhibited under
the display represent the
addition of 100 BPM
over the TEMPO.
TEMPO=40 BPM TEMPO=140 BPM TEMPO=240 BPM

9
Editing Patches
The patches of GEP 50 can be freely edited by the type or parameter change
of the effect.
1Turn [Encoder1] and position the cursor to the
effect module that you would like to edit.
2Alter the effect type or parameter value of effect
by turning [Encoder2].
3When you completely finish your changes,
turn [Encoder1] and return to PLAY Mode.
If you select another patch, the changes will
be lost, unless you save them (see page 10).
2.1 If you select a parameter that can be adjusted with the function
TAP TEMPO, the indication dot "TAP" located on the right side of the
display will illuminate. The TAP TEMPO function is common in the
modulation effects and delay, and when enabled, it permits the
adjusting of the parameters according to the interval of time that the
footswitch [DOWN] is pressed repetitively.
If the display exhibits one of these two states, it
means that the effect module is turned off.
To activate this effect module, press down the
footswitch [SW EFF]. The effect type or
parameter value, then, will be exhibit on GEP
50's display.
The cursor on GEP 50 changes
as you turn [Encoder1].
RHYTHM TEMPO
RHYTHM TEMPO
PATCH LEVEL
COMPRESSOR
DRIVE
DRIVE Level
DRIVE Gain
EQ LOW
EQ MID
EQ HI
NOISE GATE
MODULATION
MODULATION Rate
DELAY
DELAY Time
REVERB
REVERB Decay
The level of the Patch
Compressor and Limiter levels
Low frequencies
Mid frequencies
Hi frequencies
Noise Gate’s Theshold
Modulation’s effect type
Modulation´s effect rate
Delay type
Delay time
Reverb type
Reverb decay
Drive type
Overdrive’s volume
Overdrive’s gain
Effect Module What can be altered
TAP BYP

10
Saving or Copying Patches on GEP 50
After modifying a desired patch, you can save the modifications made in the
user's patch area (50-99)
It is also possible to save the content of any patch in another position,
therefore, creating a copy.
1Press [Encoder1] from PLAY or
EDIT Mode.
2Turn [Encoder1] to select a destination
patch.
In case you do not wish to choose a new
patch destine and keep the actual one,
simply press down [Encoder1] again to
confirm.
3After choosing the patch destine,
press down [Encoder1] and the
content of patch origin will be passed
onto patch destine.
4 To cancel the saving-a-patch
operation, press [Encoder2] before
confirming the conclusion of the
operation
NOTE - If a patch is copied to the position of another patch, the content of patch
destine will be replaced with the content of patch origin.
Therefore, the content of destine patch will be lost and unable to be retrieved.
We recommend that you write down the content of your customized patches
in case they get accidentally overwritten and you wish to get them back.
After the confirmation, the value
shown on the display will stop
blinking, indicating that the operation
was successfully completed.
The patch number will blink on the display indicating
that you are about to save or copy it.
NOTE: Patches 00-49 are only reading patches and
cannot be overwrited. If you are in between patches
00 to 49 and press down [Encoder1], the GEP 50
will automatically position the changes on patch 50.
RHYTHM TEMPO
RHYTHM TEMPO
RHYTHM TEMPO

11
Utilizing an Expression Pedal
The Jack CONTROL IN located in the jack panel enables the connection of an
expression pedal to the GEP 50. (ONERR EP50)
The pedal of expression is an optional accessory and does not accompany
the GEP 50. It is used to control the effect parameters live.
The parameters that will be controlled via expression pedal are specified by
the user, and stored individually for each patch.
Ex. In patch 50, you can control the volume, in patch 51 the wah-wah, in
patch 52 the delay time, in conclusion, a different performance for each patch.
To connect the expression pedal to the GEP 50, follow the instructions below:
1Plug the expression pedal EP50 in the Jack CONTROL IN of GEP 50.
2Using the footswitches [UP] and [DOWN], choose the patch that you would
like to use along with the expression pedal.
3Make sure that the GEP 50 is in PLAY Mode.
Default : All the patches are associated to the "Patch Level".
The effect modules that can be controlled
through the expression pedal are listed in
the table aside.
6Save the patch after associating a function form the expression pedal to the
patch. That will guarantee that the adjustments will be saved for this patch.
7Select the patch on PLAY Mode and use the pedal of expression. The
parameter of effect will change as the pedal's movement changes.
NOTE - The parameters of each effect that
are controlled can be consulted in the
section "Effect Types and Parameters".
NOTE - If you do not wish to associate the
expression pedal to any effect style,
execute the procedure of step #5 until the
cursor can no longer be seen.
5Keeping [Encoder1] pressed down, turn
[Encoder2] to position the cursor on the effect style
that you wish to control with the expression pedal.
4 Keep [Encoder1] pressed down for
approximately 2 seconds. The initials "EP" will
be exhibited on the display and the cursor will
blink in one of the effect styles.
Ex. DRIVE.
RHYTHM TEMPO
PATCH LEVEL
DRIVE
NOISE GATE
MODULATION
DELAY
REVERB
NONE
Effect Modules
Configuring the Expression Pedal

12
Effect Types and Parameters
DRIVE EQ
MODULATION
COMPRESSOR NOISE GATE
DELAY REVERB
IN
OUT
The GEP 50 possesses a fixed effect chain as seen on the illustration just
below.
The effect modules can be used individually or together.
This symbol indicates that the effect can be used along with the
expression pedal.
This symbol indicates that the parameter of effect can be adjusted
with the TAP TEMPO feature.
NOTE -All the brands and manufacturers mentioned below are registered
trademarks of their owners and companies.
The names are used to exemplify the sonorous characteristics of the GEP 50
and are not connected to ONERR whatsoever.
Some styles possess various types of effects. They can be chosen and
adjusted by the user. Each module allows the use of a unique effect.
TAP
EXP
Symbols
Adjusts the level of the patch within a 00-99 range. The value
50 corresponds to a unitary gain.
EXP
PATCH LEVEL
COMPRESSOR
The compressor is used to produce long sustains to the sound of
the instrument.
LIMITER
The limiter is used to limit the peeks of the signal and prevent
against undesirable distortions.
COMPRESSOR
Fender Clean
Clean sound characterized by Fender's Amplifier; popular
among various guitar players of widely different musical styles.
British Clean
Clean sound characterized by Marshall's Amplifier adjusted at
the clean channel with little DRIVE addition.
The DRIVE module is used to emulate various
types of amplifiers likewise distortion and
overdrive pedals.
DRIVE
CALIFORNIA CLEAN
Clean sound characterized by a Mesa Boogie adjusted at the
channel clean with little DRIVE addition.
MESA VINTAGE
Clean sound characterized by a Mesa Boogie Vintage adjusted
at the clean channel with little DRIVE and BRIGHTNESS
addition.

13
BASSMAN TWEED
Clean sound characterized by the amplifier Fender Bassman
adjusted at the clean channel with little DRIVE addition.
BASSMAN BRIGHT
Clean sound characterized by the amplifier Fender Bassman
adjusted at the clean channel with little DRIVE and
BRIGHTNESS addition.
VOX CLEAN
Clean sound characterized by the amplifier Vox AC 30 adjusted
at the clean channel with little DRIVE addition.
PLEXI
Clean sound characterized by the amplifier Marshall Plexi
adjusted at the clean channel with little DRIVE addition.
HIWATT
Clean sound characterized by the amplifier Hiwatt Custom 100
adjusted at the clean channel with little DRIVE addition.
TWEED HI-GAIN
Overdrive characterized by the amplifier Fender Tweed adjusted
at the dirty channel.
BRITISH HI-GAIN
Overdrive characterized by the amplifier Marshall adjusted at the
dirty channel.
CALIFORNIA HI-GAIN
Overdrive characterized by the amplifier Mesa Boogie adjusted
at the dirty channel.
MESA VINTAGE HI-GAIN
Overdrive characterized by the amplifier Mesa Boogie Vintage
adjusted at the dirty channel with addition of BRIGHTNESS.
HIWATT HI GAIN
Overdrive characterized by the amplifier Hiwatt adjusted at the
dirty channel.
TECH 21 XXL
Simulation of the pedal Tech 21 XXL.
SCREAMER
Subtle overdrive characterized by the pedal Tube Screamer.
DISTORTION
Simulation of the distortion pedal ONERR DST-1.
METALZONE
Simulation of the pedal Boss Metalzone.
BIGMUFF
Simulation of the pedal Bigmuff.
FUZZFACE
Simulation of the pedal Fuzz Face.
Effect Types and Parameters

14
Level
: Controls the level of the DRIVE.
Gain
Controls the gain of the DRIVE. The higher the gain, more
distortion takes place.
EXP
DRIVE Level
DRIVE Gain
EQ LOW : Adjusts the low frequency bands (180Hz) of the
equalizer within a range of -12 to +12 dB.
EQ MID : Adjusts the medium frequency bands (850Hz) of the
equalizer within a range of -12 to +12 dB.
EQ HI : Adjusts the high frequency bands (3000Hz) of the
equalizer within a range of -12 to +12 dB.
EQ LOW
EQ MID
EQ HI
This effect reduces the noise produced by the pickups of an
electric guitar likewise the noises deriving from the chaining of
distortion effects.
NOTE: Louder noises require higher values of this parameter,
however, high values can result on the faded sound of your
guitar when you lower the volume of the instrument. Adjust
this parameter in order for the sound of your guitar to be as
normal as possible.
EXP
NOISE GATE
CHORUS - A slight detuning is generated and added to the
sound of the instrument. This effects adds dimension and
deepness to the sound of the guitar.
MODULATION
Effect Types and Parameters

15
Rate
Adjusts the speed of modulation of the effect chorus.
TAPEXP
FLANGER - This effect is produced by the combination of the
direct signal of the instrument with a sample of a late signal. The
result is a spacious and involving effect, sometimes imitating the
noise of a jetpack.
VIBRATO - Vibrato is an effect that imitates a gentle oscillation
on the guitar strings through a subtle modulation of the original
note's tuning.
TREMOLO - Creates cyclical variations of volume on the sound
of the instrument.
Rate
Adjusts the speed of modulation of the effect flanger.
Rate
Adjusts the speed of modulation of the effect vibrato.
Rate
Adjusts the speed of modulation of the effect tremolo.
TAP
TAP
TAP
EXP
EXP
EXP
PHASER - Creates an effect that is obtained by the variation of
phase of the direct signal, giving the sensation that the sound
circles around a whirlpool.
PITCH SHIFTER - The pitch shifter effect is used to change the
original tuning of your instrument.
ROTARY SPEAKER - Simulates the functioning of a Leslie box,
which possesses the speakers spinning around its axis. A slight
detune is generated and added to the original sound of the
instrument, adding deepness to the overall sound.
AUTO WAH - Wah Wah with an automatic variation through a
periodic circle pre-adjusted.
Rate
Adjusts the speed of modulation of the effect phaser.
Rate
Defines the quantity of the pitch shifter in semi-tones. The
adjustment "dt" corresponds to the effect detune, that simulates
a detune signal added to the original signal of the instrument.
Rate
Adjusts the speed of modulation of the effect rotary speaker.
Rate
Adjusts the speed of modulation of the effect auto wah.
TAP
TAP
TAP
TAP
EXP
EXP
EXP
EXP
H0 100% 100%20%
20%
0%
40%
40%60%
60%
80%
80%
100%
100% 100%
100% 100%
100% 100%
100% 100%
H5
DRY DRYEFFECT EFFECT
H1 H6
H2 H7
H3 H8
H4 H9
WAH WAH - The Wah Wah is an effect used alongside the
expression pedal of the GEP 50, which controls the sweep of the
effect. If used without the expression pedal, can be used as a
filter and give it a special touch to the distortion.
Effect Types and Parameters

16
TOUCH WAH - A touch wah is a wah wah controlled by the
dynamics of the plucking on the guitar strings. The stronger the
plucking is, the greater will be the result of the effect.
Rate
Adjusts the sensibility of the effect touch wah.
TAPEXP
DIGITAL DELAY - A highly reliable digital delay, similar to effects
found in expensive and sophisticated racks. The types of this
effect are formed by different FEEDBACK and LEVEL
adjustments.
PLATE - This reverb style simulates the characterized
reverberation of a metallic box, very much used in the past in
guitar amps. The higher the effect type is, the higher the overall
intensity will be.
HALL - This reverb style simulates the acoustic characteristics
of a concert hall. The higher the effect type is, the higher the
overall intensity will be.
ROOM - This reverb style simulates the acoustic characteristics
of a small environment, like a compact studio. The higher the
effect type is, the higher the overall intensity will be.
ARENA - This reverb style simulates the acoustic characteristics
of a larger environment, like a stadium or a sports arena. The
higher the effect type is, the higher the overall intensity will be.
DELAY
REVERB
DELAY Time
REVERB Decay
ANALOG DELAY - Simulates the effect of a delay or analog
echo. Popular in the 70's and in the 80's, the types of this effect
are formed by different FEEDBACK and LEVELadjustments.
Time
Adjusts the time of the delay in an interval from 0 to 1000ms.
Decay
Adjusts reverb's feedback. The higher the FEEDBACK, the
longer the reverb is going to last.
TAP
TAP
EXP
EXP
Rate
Adjusts the sensibility of the effect wah wah.
TAPEXP
NORMAL
INVERSO t0 300 a 800 Hz
2000 a 600 Hz
2500 a 700 Hz
1500 a 500 Hz
1000 a 400 Hz
800 a 300 Hz
400 a 1000 Hz
500 a 1500 Hz
600 a 2000 Hz
700 a 2500 Hz
t5
WAH WAH RANGEWAH-WAH RANGE
t1 t6
t2
t7
t3 t8
t4 t9
Effect Types and Parameters

Drum Presets on the GEP 50
17
PRESET RHYTHM
1SLOW ROCK
ROCK
HARD ROCK #1
HARD ROCK #2
DANCE #1
DANCE #2
DANCE #3
AXÉ MUSIC
SWING #1
SWING #2
POP ROCK #1
POP ROCK #2
POP ROCK #3
ROCK AND ROLL
HIPHOP
FUNK #1
FUNK #2
FUNK #3
DnB
PUNK ROCK
THRASH METAL
HEAVY METAL #1
HEAVY METAL #2
HEAVY METAL #3
HEAVY METAL #4
2
3
4
5
6
7
8
9
10
11
12
13
14
15
16
17
18
19
20
21
22
23
24
25
26
27
28
29
30
LATIN MUSIC
BOSSA NOVA
BALLAD #1
BALLAD #2
BLUES
PRESET RHYTHM
31
32
33
34
35
36
37
38
39
40
41
42
43
44
45
46
47
48
49
50
51
52
53
54
55
56
57
58
59
60
JAZZ #1
JAZZ #2
CALYPSO
OLDIES #1
OLDIES #2
OLDIES #3
BOUNCE #1
BOUNCE #2
8 BEAT #1
8 BEAT #2
8 BEAT #3
8 BEAT SHUFFLE
16 BEAT SHUFFLE
SHUFFLE #1
SHUFFLE #2
BAIÃO #1
BAIÃO #2
SAMBA
SAMBA ROCK
PARTIDO ALTO
MARCHA
XOTE
REGGAE #1
REGGAE #2
FORRÓ
CAPOEIRA
PAGODE
16 BEAT #1
16 BEAT #2
16 BEAT #3

Restoring the Factory Presets and Defaults.
IMPORTANT : This operation
erases all the memory that held your
customized patches, in conclusion, that
information will be lost and substituted
by the factory patches and defaults.
If you wish to restore all the original factory patches and defaults, follow the
instructions below:
1Disconnect the power supply of the GEP 50.
2Press and hold [Encoder1] and
footswitch [UP] simultaneously, and
connect the power supply of the GEP 50
back.
RHYTHM TEMPO
TAP SW EFFBYPASS
The display will exhibit the word
"ONERR" followed by "RELOADED".
That indicates that the operation has
been successfully completed.
18

Specifications*
Warranty
19
Effect types
Effect modules
Memory Patches
Tuner type
# of drums presets (PCM)
Sampling frequency
A/D converter
D/A converter
Frequency response
Display type
Input level
Input impedance
Maximum output level
Optional accessories
Power requirements
Dimensions
Weight
40
Up to 7 simultaneous effects.
50 Factory Presets and 50 user´s Patches.
Total =100 Patches.
Chromatic (Pitch=435 Hz to 445 Hz.)
60
48 kHz
24 bit
24 bit
20 Hz a 24 kHz
2 digit
-20 dBm
450 kohm
+3 dBm / 10 kilohms (Line)
20m W + 20m W / 32 ohms (Phones)
Expression pedal EP-50 ONERR and
AC Adaptador PA-50 ONERR
9 V d.c. x 350 mA (ONERR PA-50)- Positive
center.
160 x 136 x 55 (mm)
420 g.
Microtronix Eletrônica Ltda warrants this unit to be free from defects in
materials and workmanship for a period of 1 (one) year from date of first
purchase.
This warranty does not include any kind of damage resulting from accidents,
misuse, abuse, alteration to the internal circuitry or vital parts and damages
caused by non-reliable connections.
If in any way this unit becomes defective within the warranty period,
Microtronix Eletrônica Ltda will elect to repair or replace it free of charge.
After the warranty period, Microtronix Eletrônica Ltda will repair this unit for a
fee.
This warranty is extended for residents of Brazil. Please call main office for
return authorization number. Microtronix will not accept packages without prior
authorization, pre-paid freight, and proper insurance.
Please call or e-mail the authorized distributor in your country for warranty
information.
*Specifications are subject to change without prior notice
This symbol on the product or on its packing indicates that it shall not be
treated as household waste. Instead it shall be handed over to the
applicable collection point for the recycling of electrical and electronic
equipment. By ensuring this product is disposed of correctly, you will help
prevent potential negative consequences for the environment and human
health, which could otherwise be caused by inappropriate waste handling of
this product. The recycling of materials will help to conserve the natural
resources. For more detailed information about recycling of this equipment,
please contact your local city office, your household waste disposal service
or the shop where you purchased the equipment.

O N E S T E P B E Y O N D
www.onerr.com Designed and Manufactured in Brazil
Table of contents
Other Onerr Music Pedal manuals

Onerr
Onerr FAT BOY User manual

Onerr
Onerr Nickel Octave NO-1 User manual

Onerr
Onerr Touch Wah Vintage TWA-1 User manual

Onerr
Onerr Digital Reverb DGR-1 User manual

Onerr
Onerr Digital Delay DGD-2 User manual

Onerr
Onerr Copper Tremolo CT-1 User manual

Onerr
Onerr Introgen Chorus NC-1 User manual

Onerr
Onerr Cryin' The Wah Wha Pedal User manual

Onerr
Onerr Boosted Line Selector BL-1 User manual

Onerr
Onerr NITROGEN CHORUS NC-2 User manual