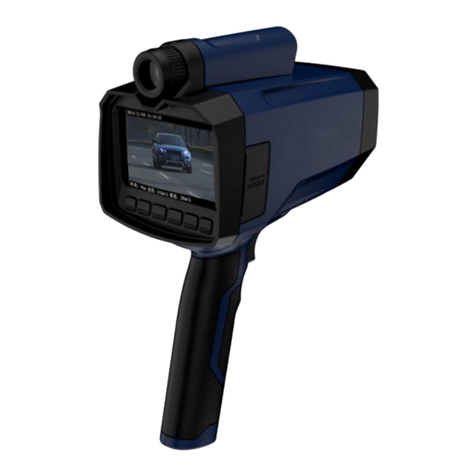
Onick LS320 User manual

Onick LS320
Handheld Laser Speedometer
USER MANUAL
1

Contents:
1. Product Introduction
2. Product parameters
3. Product view description
4. The initial screen
5. Backlight switch
6.Measure mode
7.Speed unit
8.Distance unit
9.Restricted speed
10.Environment mode
11.How to switch the Speed mode /distance mode
12. Telescope sighting device
13. Operation panel description
14. Component description
15. Important safety and product information
1. Product introduction:
This device is a portable unibody laser speed gun, which is capable of accurately measuring
the real-time speed of a vehicle while at the same time measuring its distance.
*Feature: Convenient, high-precision, waterproof and durable.
*Multiple modes selection: speed mode, distance mode, lock mode.
* Long life lithium battery.
2. Product parameters
Item name
1
Max distance
1200m
2
Speed range
10~320 km/h
3
Speed accuracy
2 km/h
4
Distance Accuracy
0.3m
5
Speed display resolution
1km/hour
6
Distance accuracy
0.1m
7
Power supply
7.4V 5600MAH lithium batteries
8
Measuring time
0.33~0.66 S
9
Protection level
NEMA 4 / IP 55
10
Operating temperature
-20°C to +60°C (-4°F to 140°F)
2

3. Product view description
4. The initial screen
Firstly, Install the battery handle into the bottom of the device, press the PWR button one
time to start the device,it will enter the standby mode,and the backlight is lighting up ,see
below,
3

Press the PWR button again to turn it off.
5. Backlight switch
Press and hold on the HUD button for 3 seconds, the backlight will be shut down.
Press the HUD button for another 3 seconds ,it will restore the backlight status.
PIC 1:Backlight in shutting down status
PIC 2:Backlight in lighting up status
6. Measure mode:
(This item is a description for the menu feature,don’t need testing)
Press the PWR button to power on, press and hold on the MODE button for 3 seconds to
enter the menu settings, press the ▲button to enter the different modes:
6.1. Speed & Distance (PIC1):
The running speed and distance of the vehicle (default mode)
6.2. Speed (PIC 2):
The running speed of the vehicle
6.3. Distance (PIC 3): Distance
6.4. Spd & Dist Hold (PIC 4):
Lock the Speed and Distance
6.5. Speed Hold (PIC 5):
Lock the running Speed of the Vehicle
6.6). Distance Hold (PIC 6):
Lock the Distance
PIC1 PIC2
4

PIC3 PIC4
PIC5 PIC6
7. Speed unit
Press the ▲button to switch the speed unit ,you can switch into the KM/H, M/H, M/S,
Default at KM/H.
8. Distance unit
Press the ▲button to switch the Distance unit ,you can switch into the M,Y,Default at M.
9. Restricted speed
Press the ▼/▲button to set the speed limit value,you can set it from 15KM/H to
5

250KM/H.
10. Environment mode
Press the ▲button to set the Normal,bad weather ,Default at Normal.
11.How to switch the Speed mode /distance mode
In the default operation interface, Press the▲button to switch the different modes, then
aim the target to test,you will get the distance and the speed.
11.1 V:---- D:----- speed and distance mode (PIC1)
In speed and distance mode, aim at the target to get the speed and distance, the LCD and
screen will display the running speed and distance data .
11.2 V:---- speed mode (PIC 2)
Directly press the▲button to switch into the speed mode, aim the target to test, the LCD
and screen will display the running speed data.
PIC 1 PIC 2
11.3 D:----- distance mode (PIC 3)
Directly press the ▲button to switch into the distance mode (D), aiming at the target to
6

test, the LCD and screen will display the distance data.
11.4 V:---- D:----- (H) speed and distance lock mode (PIC 4)
Directly press the▲button to switch into the speed mode and distance lock mode (H),
aiming at the target to test, the LCD and screen will display the locked speed and distance
data.
Note: When in lock status,if not release the trigger button ,it will not measure, if release
the trigger button,the date will change),the LCD and screen will display the locked data.
PIC 3 PIC 4
11.5 V:---- (H) speed lock mode (PIC 5)
Directly press the▲button to switch into speed lock mode (H), aiming at target to test,the
LCD and screen will display the speed data.
11.6 D:----- (H) distance lock mode (PIC 6)
Directly press the▲button to switch into the distance lock mode (H), target test, the LCD
and screen will display the distance data .
PIC 5 PIC6
12. Telescope sighting system
The aiming system has a fully transparent LCD display with cursor-line of sight and
simultaneous display of speed and distance.
7

T1 : Display the current measured speed
T2 : + / - is the driving direction of the vehicle , + for coming, - for going.
T3 : Aiming at the license plate through the central aiming rectangle
T4 : Display the current measured distance
13.Operation panel description:
13.1. MODE/REC:
Enter the main menu,scan the storing data(you can press the mode button firstly,then
press the ▲▼ button to check the data,it can store 90 group of the data )
*Switch the different modes.
13.2. HUD/B/Light:
Backlight on/ off, automatic test Normal , Set Date ,year/month/day adjustment, manual
printing function.
13.3. VOL/▼:
Adjust the Volume , the speed limit penalty , Set Date reduction , Set Time reduction
13.4. SPD/DIST/▲:
Switch the modes,adjust the Speed Limit , Set Date , Set Time .
13.5. PWR:
Pow on /off button.
14. Component Description
14.1 Battery handle
The battery handle is internally equipped with a 7.4V / 5600MAH lithium-ion battery pack,
and has a short-circuit and overcurrent protection function. The handle can provide 5-7
hours for normal use.
14.2 Battery Charging
caveat! When charging, be sure to follow the instructions below:
When charging, use the supplied charger and charging base. Do not use any other charging
power source.
The power input interface of the battery base cannot be directly connected to 12V or other
power sources.
Note: Failing to do so may cause the battery to overheat and rupture or burn, causing great
harm to people.
Do not place the battery near a fire or exposure to sunlight while the battery is charging.
When the battery gets hot, the built-in safety equipment is activated to prevent further
battery charging. Heating the battery can damage the safety device, causing additional
8

heat, cracking or igniting the battery.
Note: Lithium-ion batteries are unstable (potentially dangerous) at extremely low and high
temperatures
Charging temperature range: 0°C to 45°. Charging temperatures outside this range may
cause the battery to become hot or cracked, or probably damage the battery's
performance and reduce the expected battery life.
When the charger is normally charged, the charger is red, and when the charger is green,
the battery is sufficient.
14.3 Battery Handle Installation
Align the battery handle with the bottom of the instrument, press it flatly, and then push it
into place. Tighten the screws on the battery handle.
14.4 Removing the battery handle
Loosen the screws on the battery handle. Pull the battery handle out of the direction of the
display, you can remove the battery handle.
15. Important Safety and Product Information
Warnings:
Use of the product against the sun is strictly forbidden
Use of the product against the sun will be detrimental to your eyes.
Improper use of batteries will cause the batteries to heat, crack and even burn, which
causes severe damage.
Must follow safety rules as below:
Do not throw batteries to fire or high-heat stuff.
Do not reversely place the negative and positive polarities.
Do not use metal things like wires to connect the positive and negative polarities.
Do not mix or store batteries with hairpin, necklace or other metal stuff.
Do not puncture the batteries with nails or use the hammer to crush batteries, the feet to
step on batteries or any intense hit or shake.
Do not directly solder batteries.
Do not expose batteries directly in water or salt water. Please keep batteries dry.
Do not dismantle or modify batteries.
The batteries have safety protect equipment, which, if damaged, will cause batteries to
heat, crack or burn.
Do not put batteries close to fire or other high-heat occasions.
Do not directly put or store Lithium batteries under the sun. If the batteries have to be put
inside the vehicle in hot weather, please put the batteries in cool place. Do not direct
expose the batteries under the sun. Direct exposure and high temperature will cause
batteries to heat, crack and burn. If batteries are used improperly like that, it will reduce
the durability of the equipment and damage of performance.
Except professionals, do not use any equipment to dismantle batteries
If original batteries are used on other devices, battery life will be damaged and reduced. If
the device causes abnormal current, it will cause batteries to overheat, crack and burn,
thus causing serious damage.
9

Warnings:
Do not stare at laser beam for a long time.
This product is designed in accordance with human eyes safety laser Class 1. It means that
in normal conditions human eyes will not be damaged by directly looking at laser. But for
any laser equipment, proper protective measures are to be grasped in operation. We
suggest that you avoid staring at lasing lens when laser works. This product will cause more
harm to eyes when used with other optical equipment.
Strictly forbidden to target product at the sun
When exposing lens under the sun, even for a very short time, it will cause permanent
damage to the lasing system of laser.
Do not operate product in extreme temperature
Specified temperature ranger for product components is -10°C to +60°C (14°F to 140°F).
Please operate the device in that temperature range.
Li-ion battery will become unstable (potential danger) in high or low temperatures.
Charging temperature range 0°C to +45°C (+32°F to +113°F)
Storage temperature range -20°C to +60°C (-4°F to +140°F)
When using, charging or storing batteries, in event of the following conditions, please
terminate use of batteries immediately.
. Batteries smell bad
. Batteries feel hot
.Batteries color changes
. Batteries shape or any other cosmetics abnormal
In event of the above conditions please contact local distributors.
Please do not put batteries in microwave oven, high-pressure container or induction
cookers.
If batteries leak and the liquids contact eyes, please do not rub your eyes. Please clean eyes
with much clear water and seek doctor’s advice immediately.
Please note: if battery liquid remains in eyes, it will do harm to your eyes.
10
Table of contents
Other Onick Measuring Instrument manuals
Popular Measuring Instrument manuals by other brands

Greyline Instruments
Greyline Instruments A.1.1 Series user guide

CUBETAPE
CUBETAPE C190POS quick start guide

Kobold
Kobold DAG-M35 Series operating instructions

Teledyne Lecroy
Teledyne Lecroy PP011-2 Operator's manual

TDE Instruments
TDE Instruments 101398 instruction manual

Olympus
Olympus 45MG Getting started guide