CLOCK SETTINGS
During standby mode, press and hold PROG/MEM on the remote control until the hour digits blink on the
display. Press TUNE – or TUNE + button to adjust the desired hour and press PROG/MEM to confirm, then
the minute digits blink. Press TUNE – or TUNE + button to adjust the desired minutes and press the
PROG/MEM button once to confirm.
SYSTEM CONNECTIONS
Connect the speakers to the R terminal and the L terminal at the rear of main unit.
NOTE: Connecting the speakers other than the speakers supplied with the unit may damage the unit.
CAUTIONS:
- Ensure that the power supply in your house complies with that indicated on the identification sticker
located on the back of your unit (AC120V~60Hz).
- If you are not going to use the unit for a long time, disconnect the AC power plug from the wall outlet.
- This unit is designed for continuous use. Switching o the unit to standby mode does not disconnect it
from the power supply. To completely isolate the equipment, remove the plug from the wall outlet as
some components remain connected to the electrical supply.
- To prevent electrical shock, match wide blade of plug to wide slot of wall outlet, then fully insert.
SPECIFICATIONS
GENERAL
AC Input 120V/60Hz
Power Source(Remote Control) . . . . . . DC 3V,CR2025,Lithium Battery
Speaker (Tweeter) . . . . . . . . . . . . . . . . . . . . . . . . . . . . . . . . . . . . . . . . 6 ohm x 2
Speaker (Full Range) . . . . . . . . . . . . . . . . . . . . . . . . . . . . . . . . . . . . . . 6 ohm x 2
Output Power (Peak). . . . . . . . 100W+100W (per channel at 6 ohm, 1kHz)
Dimensions (Main Unit) . . . . . 6.7in x 8.4in x 10.6in (17cm x 21.3cm x 27cm)
Dimensions (Speaker) . . . . 8.7in x 7.7in x 10.6in (22cm x19.5cm x 27cm) x2
RADIO SECTION
Frequency Range . . . FM: 87.5 - 108MHz
BLUETOOTH SECTION
Bluetooth specification . . . . . . . . . . . . 5.0
Supported Protocol. . . . . . . . . . A2DPV1.3
Range . . . . . . . . 33 feet (10m) line of sight
LINE IN CONNECTION
Step 1 Connect an audio device such as smartphones, tablets or MP3 player to the Line-In jack using
a Line-In cable (not included).
Step 2 Press the SOURCE button to switch to AUX mode.
Step 3 The audio device will play through the speakers.
FM RADIO OPERATION
Step 1Press the POWER button to turn on the unit.
Step 2 Press the SOURCE button to switch to TUNER mode.
Step 3 Press the TUNE – or TUNE + button to adjust the radio frequency.
Step 4 To search for a station automatically, press and hold TUNE – or TUNE + button until the tuner
starts searching, then release. After tuning in a station, the search stops.
Saving Preset Stations
Step 1Tune the radio to the station you want to save.
Step 2 Press the PROG/MEM button on the remote control, P01 will blink on the display,
then press the TUNE – or TUNE + button to select a preset number.
Step 3Press the PROG/MEM button again to save the current station to the selected
memory slot.
Step 4Repeat steps 1, 2 and 3 to program additional stations.
Step 5To tune in to a preset station, press the MEM.UP button on the remote control
to select preset number.
Notes: You can program up to 20 FM presets.
Fully unwind the wire antenna. Then extend the wire antenna and place it in the position
that sounds best. When reception is good, the icon will appear on the display.
BLUETOOTH WIRELESS
You can stream audio to this product from up to 33' away using your iPod, iPhone, iPad , Android or other
Bluetooth enabled device.
Step 1Turn on the unit by pressing the POWER button.
Step 2 Press the SOURCE button to set the unit to BT mode, icon is shown and flashes on the display.
Step 3Turn on your Bluetooth enabled device and enable Bluetooth, select “onn. 100 Stereo”
from the available list and your Bluetooth audio device will connect to the CD Stereo.
Step 4If you want to pair the CD Stereo with another Bluetooth audio device, press and
hold the PAIR/CLOCK button to disconnect the current paired Bluetooth audio
device or make sure the current device has been moved out of range.
Step 5 During playback, press the PLAY/PAUSE button to pause playback and again to resume
playback.
Notes: If the last paired bluetooth audio device is powered on and within available range with
Bluetooth enabled, the device will automatically reconnect to the CD Stereo.
If the unit fails to pair or cannot connect to your Bluetooth device, try to refresh the Bluetooth
memory by pressing and holding the "PAIR/CLOCK" button on the unit for about 3 seconds,
then connect your Bluetooth device to the unit again.
Programming a CD
Step 1Follow the steps for “Playing a CD”, then press the STOP button.
Step 2 Press the PROG/MEM button on the remote control, “MEM” and “P01” will blink on the display,
indicating that the unit is in program mode, and it is ready for the first track to be selected.
Step 3Press the TUNE – or TUNE + button to select the track you desire.
Step 4Press the PROG/MEM button to store the track in memory, “P02” will blink on the display.
Step 5Repeat steps 3 and 4 until the desired CD tracks are programmed. You can program up to
20 tracks.
Step 6 Press the PLAY/PAUSE button to begin playback of the programmed tracks.
CD OPERATION
Playing a CD
Step 1Press the POWER button to turn on the unit.
Step 2 Press the OPEN/CLOSE button to open the CD DOOR.
Step 3Place a disc in the center with the label side up and then press
the OPEN/CLOSE button to close the CD door.
Step 4Press the SOURCE button to select CD mode, the loaded CD will begin to play automatically.
-To repeat playback, press the MEM.UP button on the remote control until blinks on
the display. The current track will be played repeatedly. Press the MEM.UP button until stops
blinking and remains on, all tracks will be played repeatedly.
-To cancel repeat playback mode, press the MEM.UP button until disappears on the display.
TIMER SETTING
The timer function will turn on the unit at a preset time.
Step 1 In standby mode, press and hold the TIMER button on the remote control until the display blinks.
Step 2 Press the PROG/MEM button until the hour digits blink.
Step 3Press the TUNE – or TUNE + button to adjust the desired hours, then press the PROG/MEM
button once to confirm. The minute digits will begin to blink.
Step 4Press the TUNE – or TUNE + button to adjust the desired minutes, then press the PROG/MEM
button once to confirm.
Step 5Press the SOURCE button to select the timer mode (RADIO or CD), then press the PROG/MEM
button once to confirm. The or icon will be shown on the display. For RADIO
timer, tune in to a desired station. For CD timer, insert a CD into the unit.
Step 6Press the VOL +/- buttons to adjust the volume levels.
Step 7 Press the PROG/MEM button to confirm.
Step 8 The unit will wake up to “RADIO” or “CD” when the timer reaches the preset time.
-To Cancel timer, press and hold the TIMER button on the remote control until the or icon
goes out.
SLEEP TIMER SETTING
The sleep timer automatically turns the units o at a certain time.
Step 1While the unit is on, press the SLEEP button on the remote control, “90” appears on the display.
Step 2 Press the SLEEP button repeatedly to select the desired sleep time as follows:
Step 3After setting a desired sleep time, “SLEEP” appears on the display.
Step 4The unit will automatically turn o once it reaches the sleep time.
Note: To clear the preset sleep time, press the SLEEP button on the remote control to
select “OFF” and the “SLEEP” disappears on the display.
USB DEVICE CHARGING
Your unit includes a USB charging port (DC 5V, 1A) for charging most devices, including iPhone, iPod,
Android devices and other compatible USB devices.
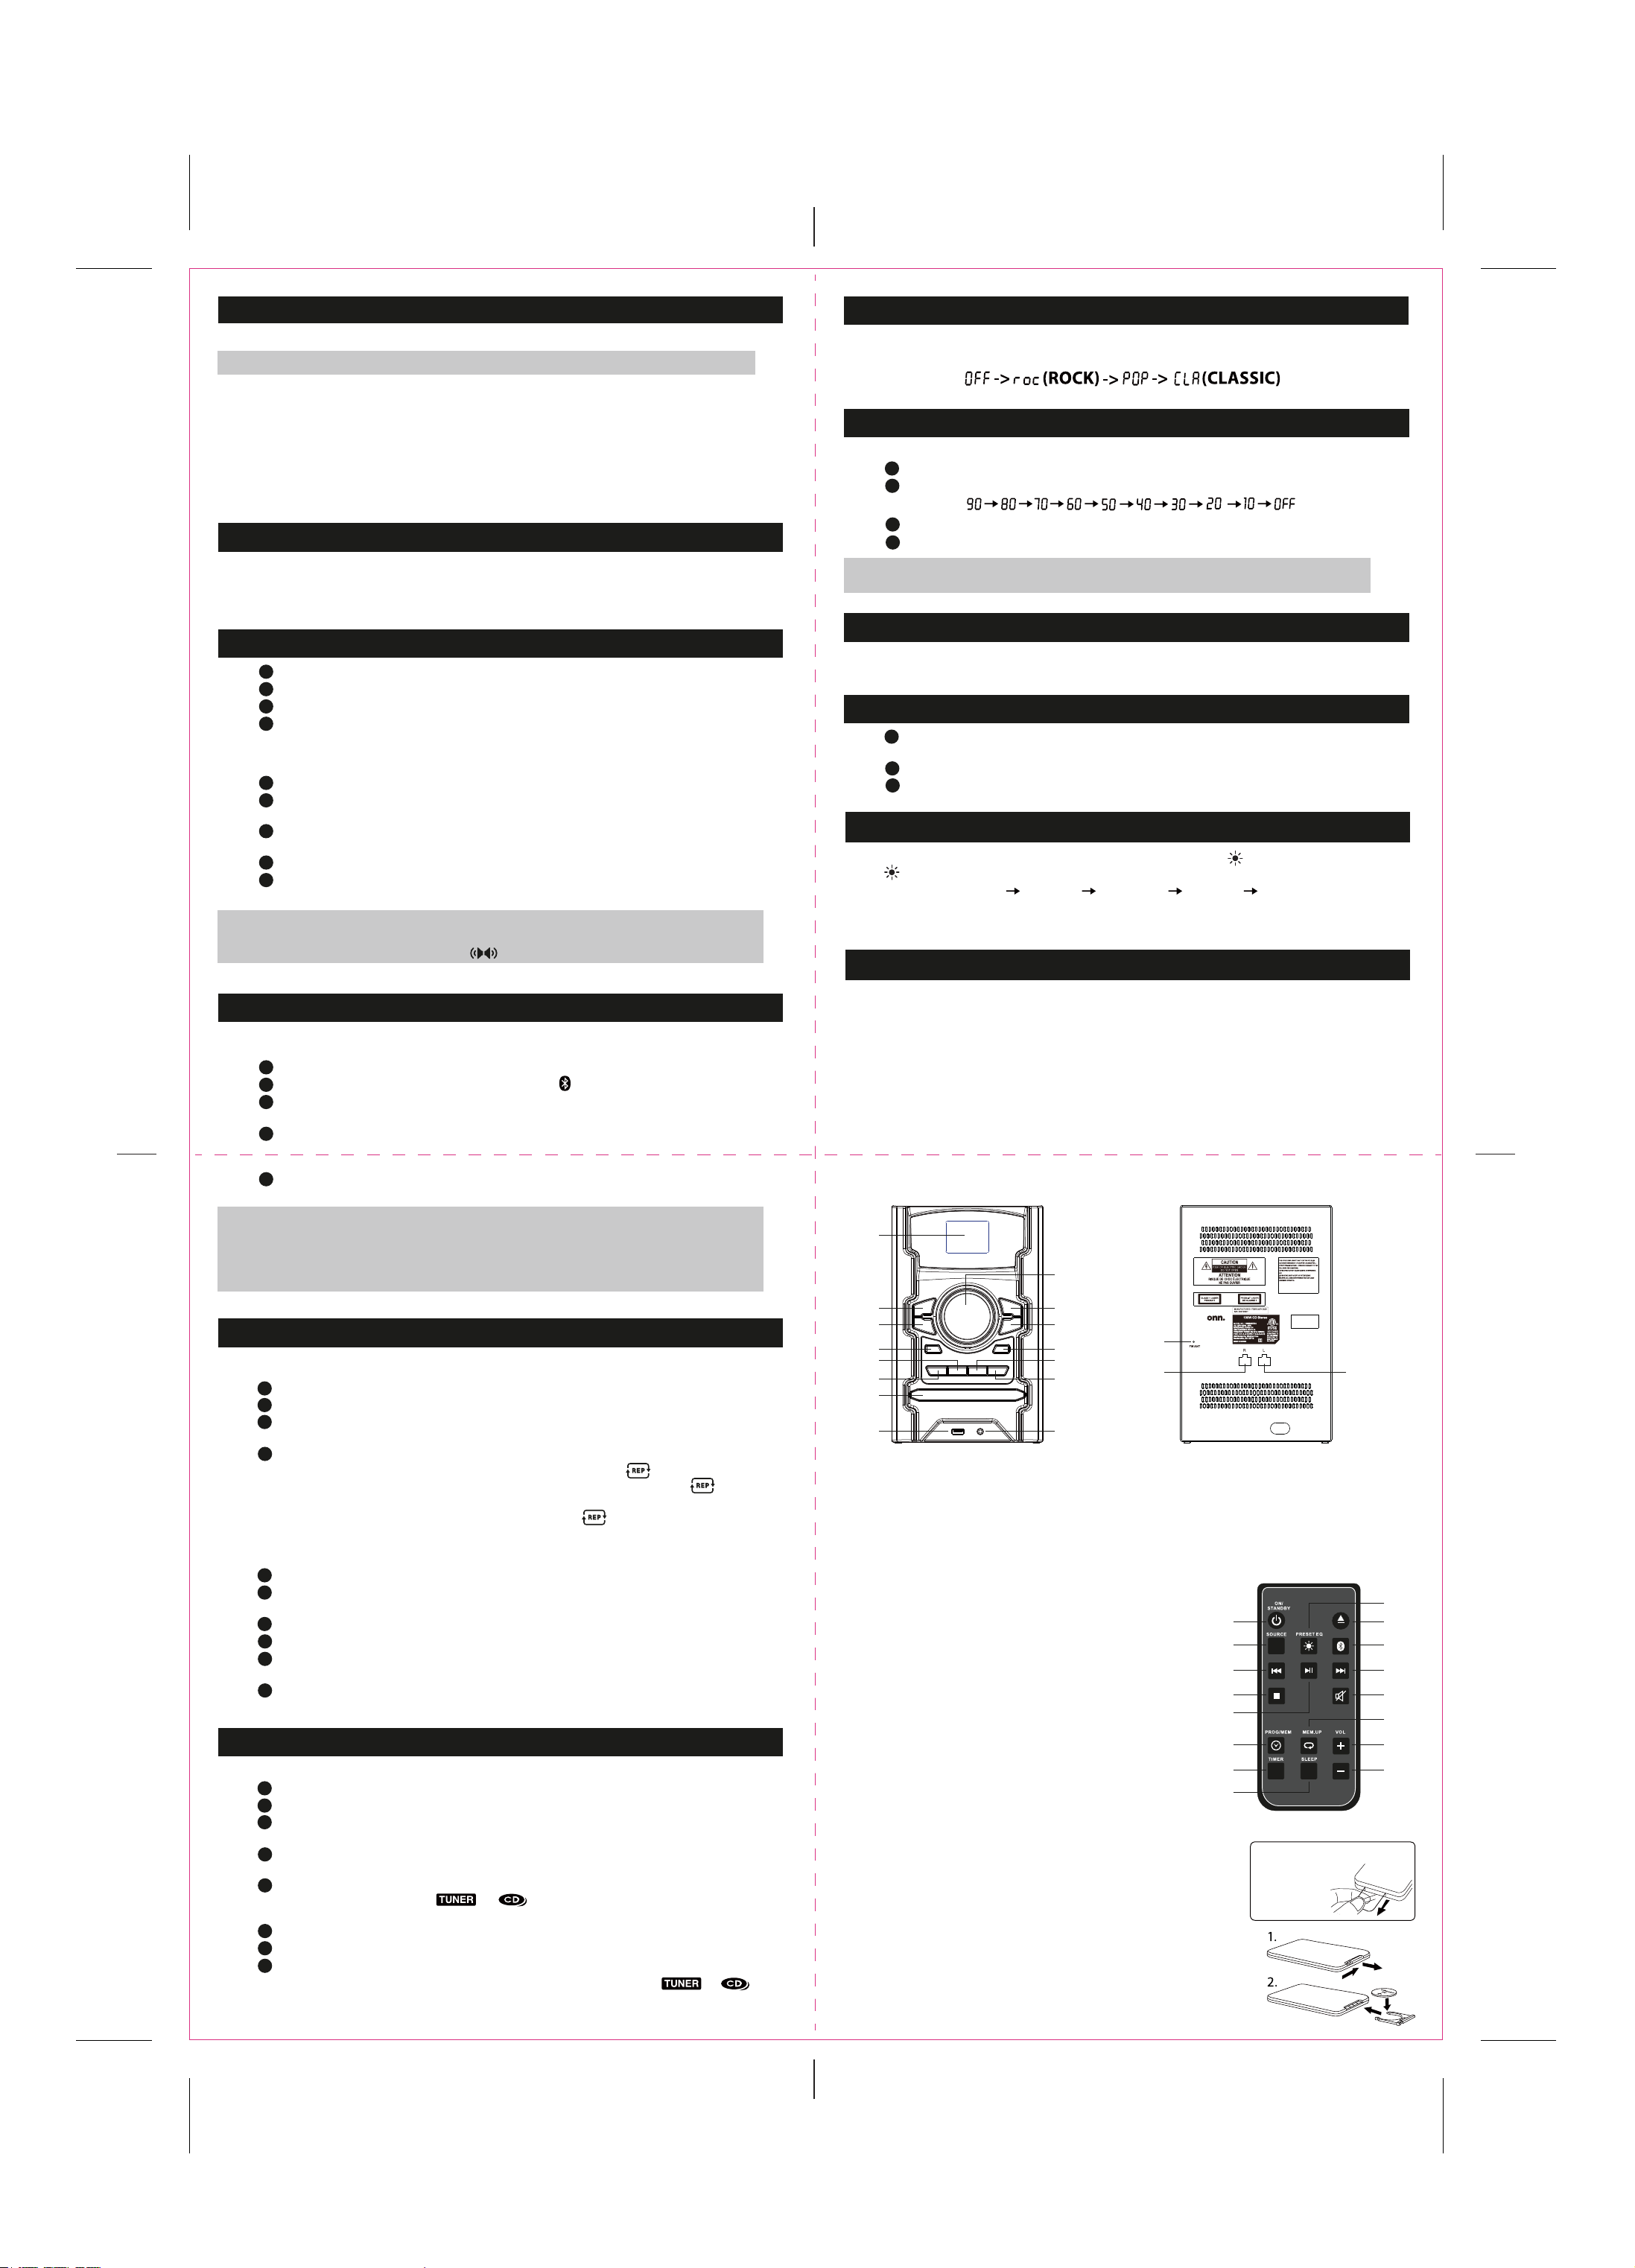
MAIN UNIT
17 18
16
1
2
3
4
5
6
7
8
10
11
12
13
9
14
15
PRESET EQ
This system has four dierent equalizer settings. During playback, press EQ button on the unit or
PRESET EQ button on the remote control repeatedly to select a desired setting as shown below:
AMBIENT LIGHTING EFFECTS
You can adjust the multi-color lighting eect of the speakers. Press the button on the unit or press and
hold button on the remote control repeatedly to select the desired mode as follows:
L01 (Multi-color) L02 (Red ) L03 (Green ) L04 (Blue) 0FF
The unit will remember the last multi-color lighting eect setting when powered o and return to it the
next time the unit is powered on.
Specifications are subject to change and improvement without notice.
Actual product may vary from the images found in this document.
FOLD FOLD
FOLD
BACK
FOLD
BATTERY REPLACEMENT
When the battery becomes weak, the operating distance of the remote
control is greatly reduced and you will need to replace the battery.
Note: If the remote control is not going to be used for a long time, remove
the battery to avoid damage caused by battery leakage corrosion.
Warning: Do not dispose of the battery in fire; battery may explode or leak.
Batteries should not be exposed to excessive heat such as sunshine, fire or
the like.
Caution: Danger of explosion if battery is incorrectly replaced.
Replace only with the same or equivalent type.
Walmart Inc. 702 SW 8th Street Bentonville, AR 72716
For customer service, please call: 844-250-5846
REMOTE CONTROL
1. ON/STANDBY Button
2. SOURCE Button
3. TUNE - / SKIP – Button
4. STOP Button
5. PLAY/PAUSE Button
6. PROG/MEM Button
7. TIMER Button
8. SLEEP Button
9. LIGHT/PRESET EQ Button
10. OPEN/CLOSE Button
11. BLUETOOTH PAIR Button
12. TUNE + / SKIP + Button
13. MUTE Button
14. MEM.UP Button
15. VOLUME + Button
16. VOLUME - Button
1. LED Display
2. PLAY/PAUSE Button
3. TUNE - / SKIP – Button
4. POWER Button
5. EQ Button
6. PAIR/CLOCK Button
7. CD Door
15. LINE-IN Jack
16. FM Antenna
17. SPEAKER OUT (R)
18. SPEAKER OUT (L)
8. USB CHARGING Port
9. VOLUME + / –
10. STOP Button
11. TUNE + / SKIP + Button
12. SOURCE Button
13. LIGHT Button
14. OPEN/CLOSE Button
1
2
3
4
5
6
7
8
10
11
12
13
14
15
16
9
Remove the plastic tab before
operating your
remote control.
Speaker Cable (each 1 piece on Left and Right Speaker Box): 70cm length, 6-PIN connector type


