OnPoint OPG9OAAASSPSS User manual

SAFETY INFORMATION ...........
3
PARTS INCLUDED ....................
4
GETTING STARTED..................
5
CONTROLS.............................
6
FUNCTIONS ............................
7
USING THE TOASTER OVEN.....
7
COOKING GUIDE ......................
8
CARE AND CLEANING..............
10
TROUBLESHOOTING ................
10
LIMITED WARRANTY...................11
CONSUMER SUPPORT ................12
OWNER’S MANUAL
OPG9OAAASSPSS
OPG9OAABSSPSS
ENGLISH
Write the model and serial numbers here:
Model #
Serial #
Find these numbers on a label
on the back of the unit.
DIGITAL AIR FRY
TOASTER OVEN

2

entangled in or tripping over a longer cord.
If an extension cord is used:
1) The marked electrical rating of the cord set or extension cord should be at least as great as the electrical rating of the appliance;
2) The cord should be arranged so that it will not drape over the countertop or tabletop where it can be pulled on by children or tripped over
unintentionally;
3) The cord set or extension cord should be a grounding-type 3-wire cord.
CAUTION A short power-supply cord is provided to reduce the risk resulting from becoming
IMPORTANT SAFETY INFORMATION
READ ALL INSTRUCTIONS BEFORE USING THE APPLIANCE
WARNING Read all safety instructions before using the product. Failure to follow these instructions may result
in fire, electrical shock, serious injury, or death.
IMPORTANT SAFEGUARDS
Always follow these safety precautions when using this appliance.
•Carefully read all instructions before operating the toaster oven.
•Remove and discard all packaging materials prior to operating the
oven.
•WARNING Remove plug from outlet when the appliance
is not in use, before putting on or taking off parts, and before
cleaning. Allow to cool before cleaning.
•WARNING To reduce risk of fire or electric shock, always
operate oven with crumb tray properly installed.
•To protect against electrical shock do not immerse cords, plugs, or
appliance in water or other liquid.
•Always place oven on a level, stable, and heat-resistant surface
whenever oven is in operation
•Keep at least 4” (10 cm) clearance on all sides of the appliance
whenever oven is in operation. Do not operate appliance
underneath wall cabinets.
•Do not place any of the following materials in the oven: paper,
plastic, pot holders, linens, gasoline or other flammable vapors and
liquids.
•A fire may occur if the toaster-oven is covered or touching
flammable material, including curtains, draperies, walls, and
the like, when in operation. Do not store any item on top of the
appliance when in operation.
•The exterior surfaces of the appliance can be hot during and after
oven operation. Allow appliance to cool completely before handling
appliance.
•Do not store items on top of the appliance, as this surface can be
very hot during and after oven operation.
•To prevent burns or injury, always use proper protection, such
as hot pads or oven mitts, when removing or handling items from
oven.
•Do not touch heating elements or interior surface of oven during or
after use. Allow to cool before cleaning or handling.
•Do not let power cord hang over edge of table or counter. Do not
let power cord contact hot surfaces.
•Always clean the oven according to cleaning and care instructions,
as provided on page 10.
•Do not clean with metal scouring pads. Pieces can break off the
pad and touch electrical parts involving a risk of electric shock.
•Do not operate any appliance with a damaged cord or plug or after
the appliance malfunctions or has been damaged in any manner.
Return appliance to the nearest authorized service facility for
examination, repair, or adjustment.
•Oversize foods or metal utensils must not be inserted in a toaster-
oven as they may create a fire or risk of electric shock.
•The use of accessory attachments not recommended by the
appliance manufacturer may cause injuries.
•Do not store any materials, other than manufacturers
recommended accessories, in this oven when not in use.
•This appliance is intended for indoor household use only. Do not
store or operate outdoors.
•Do not use appliance for other than intended use.
•Do not leave children alone - children should not be left alone or
unattended in an area where an appliance is in use.
•Always stop oven operation before unplugging the appliance.
•Before handling, moving, or cleaning the appliance, always unplug
the power cord from the wall outlet and ensure the appliance has
properly cooled.
•Do not place on or near a hot gas or electric burner, or in a heated
oven.
•Cook food thoroughly to help protect against foodborne illness.
Minimum safe food temperature recommendations can be found at
IsItDoneYet.gov and fsis.usda.gov. Use a food thermometer to
take food temperatures and check several locations.
•Extreme caution should be exercised when using containers
constructed of other than metal or glass.
•Extreme caution must be used when moving an appliance
containing hot oil or other hot liquids.
•Use extreme caution when removing tray or disposing of hot
grease.
•Do not cover crumb tray or any part of the oven with metal foil.
This will cause overheating of the oven.
•To disconnect, turn any control to "off", then remove plug from wall
outlet.
•Avoid contacting moving parts.
WARNING RISK OF FIRE OR ELECTRIC SHOCK
■TO REDUCE THE RISK OF FIRE OR ELECTRIC SHOCK, DO
NOT REMOVE COVER (OR BACK). ■Do not attempt to repair or replace any part of your toaster
oven unless it is specifically recommended in this manual. All
other servicing should be performed by authorized service
personnel.
49-9000010 Rev. 0 READ AND SAVE THESE INSTRUCTIONS 3
WARNING KEEP FLAMMABLE MATERIALS AWAY FROM THE TOASTER OVEN
Failure to do so may result in fire or personal injury.
•Do not store or use flammable materials in a toaster or near the toaster opening, including paper, plastic, pot holders, linens, wall coverings,
curtains, drapes and gasoline or other flammable vapors and liquids.
•Never wear loose-fitting or hanging garments while using the appliance. These garments may ignite if they contact hot surfaces causing
severe burns.
CAUTION To ensure continued protection against risk of electric shock, connect to properly
grounded outlets only.
SAFETY INFORMATION

4
49-9000010 Rev. 0
PARTS INCLUDED
C
B
A
D
E
F
Parts Included
Air Fry Basket Baking Pan Baking Rack
Start / Stop Button
Temp / Time Knob
Mode Knob
Handle
Door Window
Crumb Tray
A
B
C
D
E
F

Getting Started
Unpacking and Cleaning
•Remove and safely discard all packing materialsbefore
operating the oven.
•It is recommended to wipe the interior of the oven
cavity with a damp sponge before first use.
•It is recommended to thoroughly clean all accessories
before first use. Accessories may be cleaned with
warm, soapy water. Rinse and dry thoroughly.
•Place the oven on a level and stable surface where
oven has at least 4" (10cm) of clearance on all sides of
the unit, and at least 4" (20cm) of clear spaceabove.
•Do not place or store any items on top of the oven, with
the exception of the provided accessories.
Powering the Oven
•Unravel power cord and plug into a grounded120V
power outlet.
•Upon plugging into power outlet, LCD screenwill
illuminate and all icons will briefly display.
•By default, the LCD screen will display the AirFry
cooking mode.
Before First Use
•It is recommended to operate the oven empty for20-30
minutes before first use. This will ensure any protective
films on the heating elements are removed.
•When using the oven for the first time, the oven may
emit visible vapors and/or a slight odor. The vapors and
odor are normal, safe, and not detrimental to the oven.
Ensure that the room is well ventilated.
49-9000010 Rev. 0 5
GETTING STARTED

6
49-9000010 Rev. 0
CONTROLS
Controls
Cooking Mode Knob
This knob rotates to select the desired cooking mode
Temperature/Shade Display
Shows the selected oven temperature.
Also shows the selected shade level for TOAST
mode.
Cooking Mode Display
The selected cooking mode will be indicated by the
►symbol.
Time/Slices Display
Shows the remaining cook time for the current
cooking mode.
Also shows the number of slices selected for TOAST
mode.
Preheating Notification
Indicates that the oven is currently preheating to the
selected temperature
Cooking Settings Knob
This knob rotates to adjust the desired settings for
each cooking mode.
This knob also functions as a button. Pressing the
knob button toggles between adjustment of the slices/
shade or time/temperature, depending on the cooking
mode selected.
Start/Stop Button
When the oven is not in operation, this button starts
the selected cooking mode with the selected oven
settings.
When the oven is currently in operation, this button
stops the current cooking mode.
A
B
C
D
E
F
G
G
A
F
B
D
E
C

Functions
Air Fry
This mode is ideal for browning and crisping the exterior
offoods.The air fry mode can produce ataste andtexture
similar to deep frying without the need to submerge the
food in oil.
Bake
This mode is ideal for cooking foods that generally lack
structure before the cooking process, such as cakes,
cookies,muffins,pastries,pies,lasagnas,andcasseroles.
Food will be cooked thoroughly and evenly, which also
makes this mode suitable for packaged frozen meals.
Toast
This mode is ideal for browning slices of bread, bagels,
English muffins, and frozen waffles. Each slice will be
browned evenly on both sides without the need for flipping
the food.
Broil
This mode is idealfor quicklysearing meats (e.g.steaks or
fish), crisping vegetables (e.g. potatoes), or browning the
top surface of foods (e.g.casseroles).
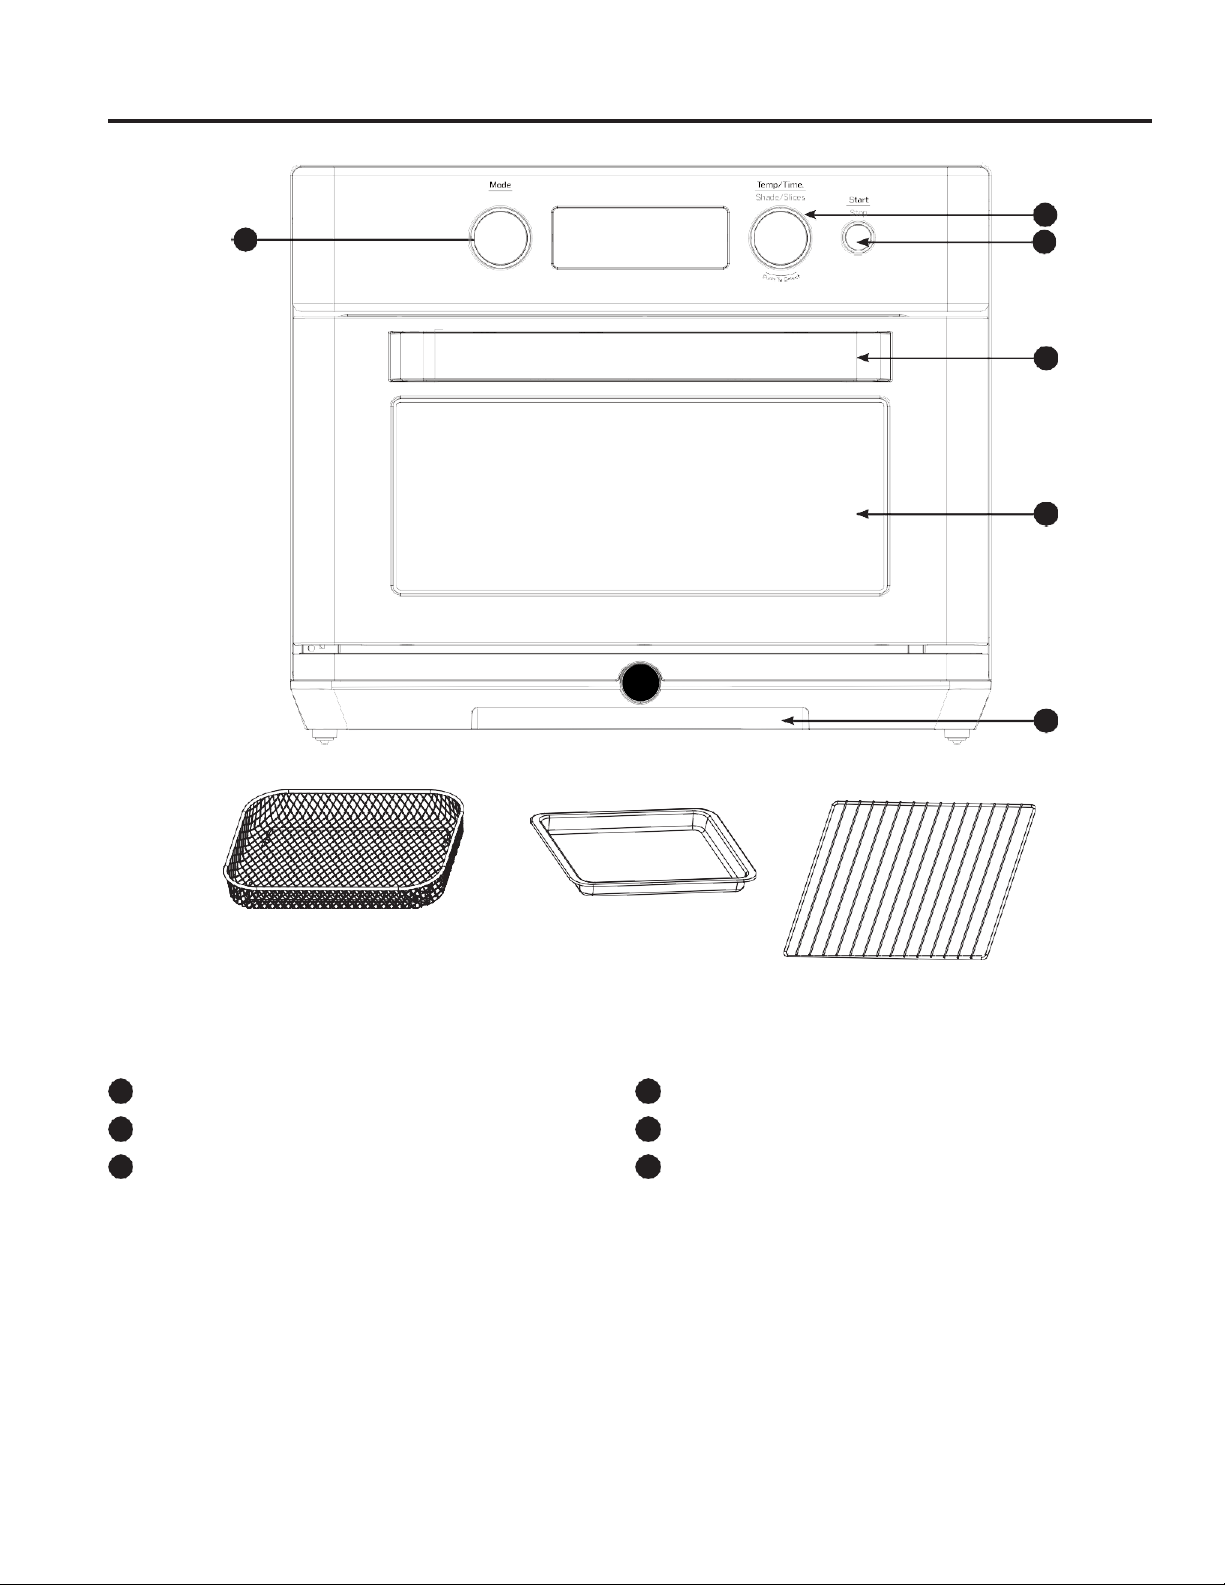
Using the Toaster Oven
Roast
This mode is idealforcooking foodsthat are generallysolid
before the cooking process, including a wide variety of
meats and vegetables. Foods will be tender and moist on
the inside, while developing a crispy texture on the exterior.
Proof
This mode is ideal for preparing yeast bread and other
baked goods where the dough is allowed to rest and rise
before baking. The low temperature heat will facilitate
fermentation.
Keep Warm
Thismode isusefulfor keepingfreshlycookedmeals warm
while waiting for guests or preparing the rest of the meal.
Convection Roast
This mode is similar to the ROASTmode, but activatesthe
convection fan to circulate hot air around the food. This
causes thefood tocook faster than normalROASTmode,
but the oven temperature may need to be reduced for
some recipes.
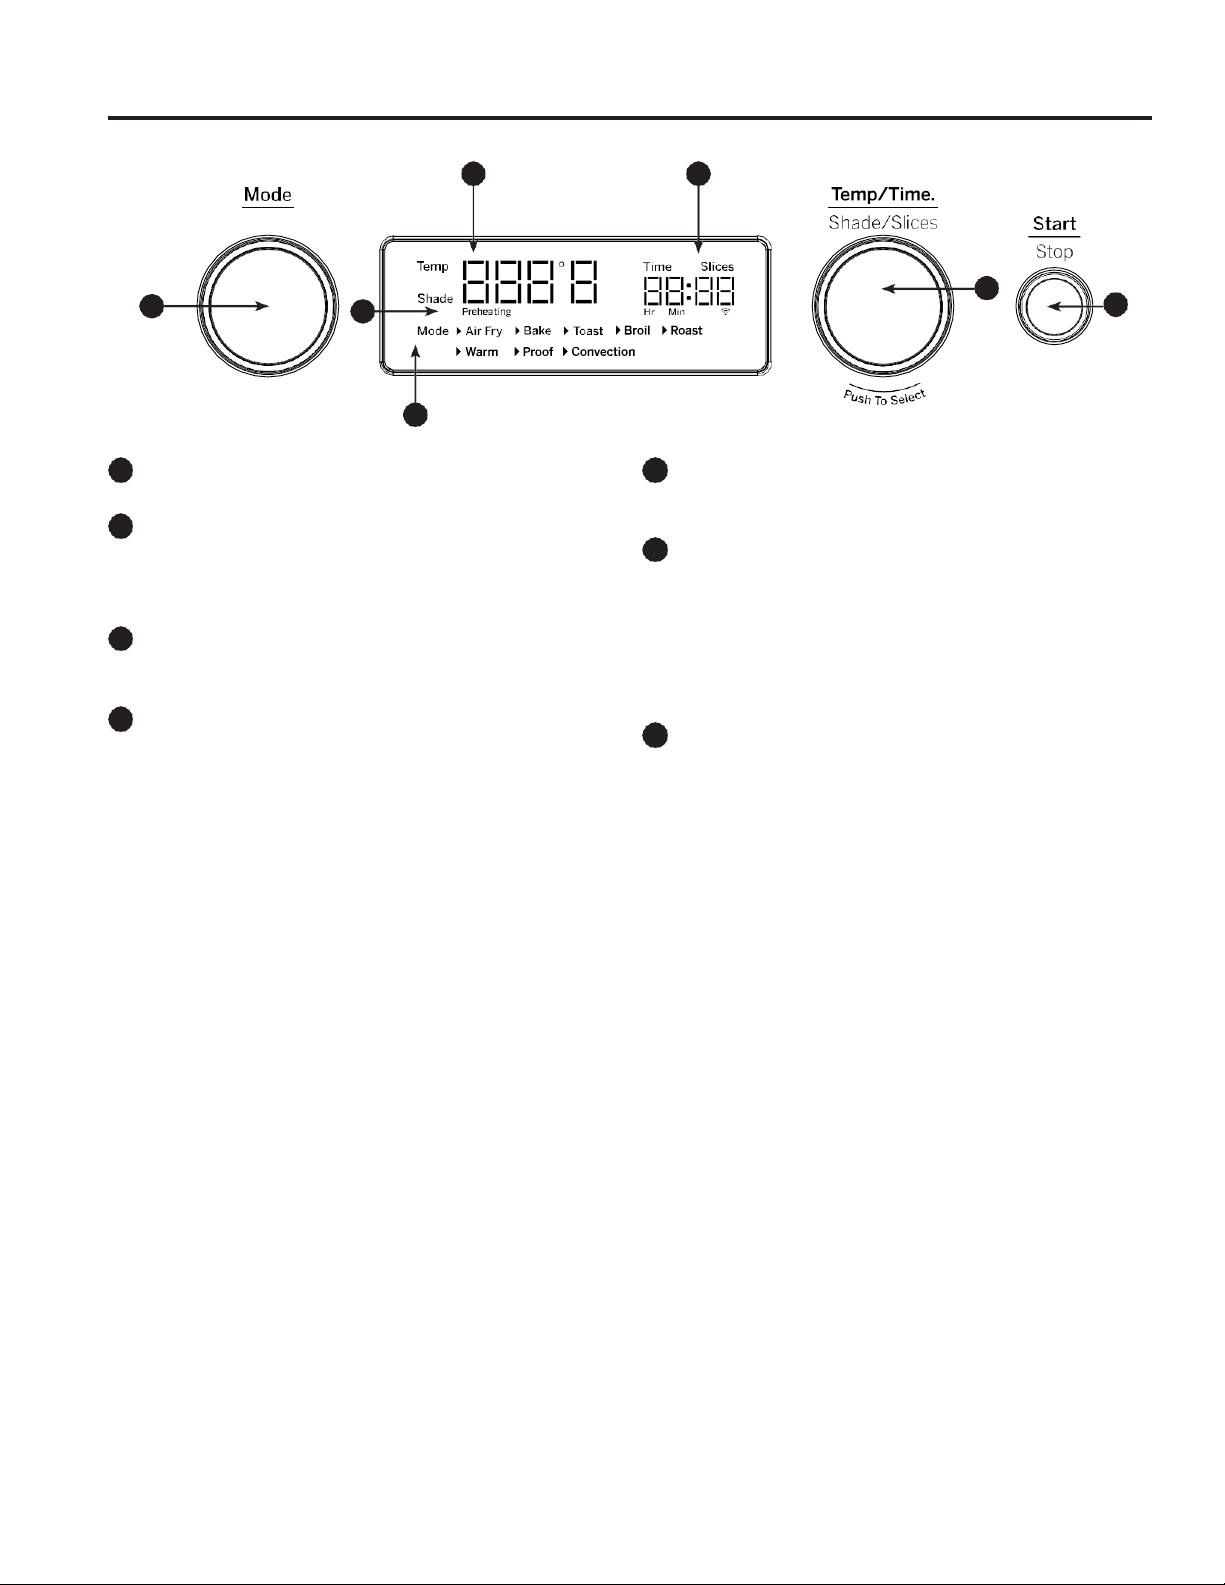
Selecting the Cooking Mode
Tochoose the cooking mode, rotate the "Mode" knob until
the ► symbol is next to the desired cooking mode.
Adjusting the Oven Settings
The settings for each cooking mode can be adjusted
by using the Temp/Time knob. The knob can be rotated
clockwise to increase the setting value, or it can be rotated
counterclockwise to decrease the settingvalue.
The Temp/Time knob also functions as a button. Pushing
the button will toggle between the settings being adjusted
(Slices/Shade or Temperature/Time).
For TOAST mode, use this knob to adjust the number of
slices of bread being toasted and the desired shade.
For all other cook modes, use this knob to adjust the
desired oven temperature and cooking time.
Starting the Cooking Cycle
After selecting the desired cooking mode and adjusting the
settings, place the food in the oven and press the "Start/
Stop" button to begin the cookingcycle.
Preheating the Oven
For BAKE, ROAST, BROIL, and CONVECTION:
Upon starting the cooking cycle, the "Preheating"
notification will begin to flash on the LCD screen and the
cook timer will begin to count down immediately. When the
oven has heated to the set temperature, the oven will emit
an audible beep and the "Preheating" icon will disappear
from the screen.
NOTE: The cooking time may need to be adjusted
to account for the preheating time. See next section,
"Adjusting Settings While Cooking".
49-9000010 Rev. 0
For AIR FRY, TOAST, WARM, and PROOF:
These cooking modes do not require preheating.
Immediately upon starting the cooking cycle, the cook
timer will begin to count down.
Adjusting Settings While Cooking
At any time during the cooking cycle, the temperature,
time, shade, and/or slices may be adjusted. Push the
"Temp/Time"knob and then rotate it to adjust the oven
temperature. Push the knob again to toggle between
adjusting the temperature and cook time. Once thesettings
are as desired, no further action is required, Theadjustment
mode will timeout and the new settings will be confirmed.
NOTE: The cook mode cannot be changed while the oven
is in operation. Press the "Start/Stop" button to end the
current cooking cycle and then select the desired cook
mode.
Ending the Cooking Cycle
When the selected cooking time has elapsed, the oven
alarm will sound to indicate that the cooking cycle is
complete. The oven will then shut off automatically. The
cooking cycle can also be ended at any time by pressing
the "Start/Stop" button.
NOTE: For some cooking modes, the internal fan will
continue to operate for 2 minutes after the cooking cycle
has completed. This is to ensure that internal components
of the oven are properly cooled. The word "COOL" will be
displayed on the LCD screen until the fan automatically
shuts off.
Even though you may hear the fan running during this
time, the unit will return to standby mode and the heating
elements will be turned off until the next cooking cycle is
started. 7
USING THE TOASTER OVEN

8
USING THE TOASTER OVEN
Cooking Guide
Cooking Guide
Cook food thoroughly to help protect against foodborne illness. Minimum safe food temperature recommendations can
be found at IsItDoneYet.gov. Always check internal food temperature to confirm minimum safe temperatures have
been reached.
Recommended Oven Rack Positions by Cooking Mode
Cooking Mode
Oven Rack
Baking Pan
Air Fry Basket
Air Fry
---
---
Middle
Bake
Middle or Lower
Middle or Lower
---
Toast
Middle
---
---
Broil
Upper
Upper
Upper
Roast
Middle or Lower
Middle or Lower
---
Warm
Any
Any
Any
Proof
Any
Any
Any
Convection
Middle or Lower
Middle or Lower
---
Air Fry Cooking Guidelines
Air Fry is a special, no-preheat cooking mode that is designed to produce foods with a crispier exterior than traditional
oven cooking. This cooking mode doesn’t require oil but spraying a light coating on food prior to cooking can enhance
exterior crispiness and browning.
It is generally recommended to use the provided air fry basket in the middle rack position for air frying. Foods may
cook faster than expected if the oven is already hot when food is placed in the oven. If foods are browning or drying
out too quickly, try using the lower rack position or setting a lower oven temperature.
To avoid the need to stir or flip food during cooking, arrange the food in a single layer in the basket. Overcrowding the
basket may negatively impact food texture and prolong cook times.
Food Type
Quantity
Temperature
Time
Thick Cut Bacon
6 oz or 6 slices
400°F
10-13 minutes
Fresh Wings
1 lbs. or 12 wings
400°F
25 minutes
Frozen Wings
1 ½ lbs. or 12 wings
400°F
25-30 minutes
Fresh hand-Cut French Fries
2 lbs. or 2 to 4 medium pota-
toes
400°F
30 minutes
Fresh Hand-Cut Steak Fries
1 lbs. or 2 to 4 medium pota-
toes
400°F
15-20 minutes
Frozen French Fries
1 lbs.
400°F
15 minutes
Frozen Steak Fries
1 lbs.
450°F
15 minutes
Mozzarella Sticks
1 ½ lbs. or 22 pieces
400°F
10 minutes
Fish Sticks
12oz
400°F
8 minutes
Chicken Nuggets
1 lbs. or 34 pieces
400°F
15-20 minutes
Frozen Shrimp
1 lbs. or 29 pieces of Frozen
Shrimp
380°F
9 minutes
Vegetables
1 lbs. of Fresh Green Beans
400°F
10-15 minutes

9
49-9000010 Rev. 0
Notes
NOTES

10
CARE AND CLEANING / TROUBLESHOOTING
Care and Cleaning
1. Be sure the oven is turned off, unplugged, and cool
before beginning cleaning.
2. Clean the glass door with a sponge, soft cloth, or
nylon pad and sudsy water. Do not use a spray
cleaner.
3. Remove slide rack and bake pan; wash in soapywater
to remove stubborn spots, use a polyester or nylon
pad.
4. Remove crumb tray using the handle and dispose
of crumbs. Wipe tray with a damp cloth and dry
thoroughly before placing back into the oven.
5. Wipe the outside of the oven with a damp cloth or
sponge. Dry thoroughly.
6. Do not attempt to clean the heating elements. Any
food that comes into contact with the elements will
burn off on its own.
Troubleshooting
COOKING CONTAINERS
Only metal, oven-proof glass or ceramic cookware
without glass lids are recommended for use in this oven
Follow the manufacturers' cleaning instructions to clean
each of these products.
Save time and money! Review the charts on the following pages first and you may not need to call for service.
Problem
Solution
The power indicator or display
window does not turn on even
though it is plugged in.
Ensure that the power cord is properly plugged into a power outlet.
Press any button to ensure oven is not in Sleep Mode.
Oven fails to get hot
There is a problem with the main unit. Contact OnPoint for customer support.
Oven omits a burnt smell
Ensure that the cooking time is appropriately set and that food is not being overcooked.
Fats, oils, and sauces that have dripped onto the lower heating elements may cause some smoke or
burning smell during oven operation.
Ensure that the baking tray, oven rack, and drip tray are thoroughly clean before each use.
Heater tubes turn off during
cooking.
The heater tubes turn on/off to control temperature. It is not a malfunction.
Smoke comes out.
The fat from the food sticking to the heater may cause smoke during cooking especially using “Broil”
menu. Set lower temperature if necessary.
E1, E2, or E3 appears on the
display window.
These error codes indicate a problem with the toaster oven. Contact OnPoint for customer support.

11
49-9000010 Rev. 0
Small Appliances Limited Warranty
Pleasehaveyourserialnumberandyourmodelnumberavailablewhenrequestingservice at
https://www.onpointwarranty.com/small-appliances-cx-portal
For Terms and Conditions, please visit
https://f.hubspotusercontent20.net/hubfs/4854028/GE_First%20Build/RefurbGoodsT&C.pdf
Staple your receipt here. Proof of the original purchase
date is needed to obtain service under the warranty.
LIMITED WARRANTY

12
49-9000010 Rev. 0
CUSTOMER SUPPORT
Customer Support / Return Contacts
Service and Registration
Register your new appliance on-line at your convenience! Timely product registration will allow for enhanced
communication and prompt service under the terms of your warranty, should the need arise.
Register your appliance at https://www.onpointwarranty.com/small-appliances-cx-portal
Contact Us
If you are not satisfied with the service you receive from OnPoint, contact us at
https://www.onpointwarranty.com/small-appliances-cx-portal with all the details including your phone number, or
write to: 9900 Corporate Campus Drive, Suite 2050, Louisville, KY 40223
This manual suits for next models
1
Table of contents
Other OnPoint Oven manuals
Popular Oven manuals by other brands

Frigidaire
Frigidaire ?FGEW3065PW Use & care guide

NEFF
NEFF B45E62N0 instruction manual

Bertazzoni
Bertazzoni F60 Series Installation and maintenance manual

cecotec
cecotec BOLERO HEXA SM406000 EDGE+ A+ instruction manual

Nordson ASYMTEK
Nordson ASYMTEK TCM-2200 Operation manual, troubleshooting and maintenance guide

Zanussi
Zanussi ZOP37972BK user manual

Electrolux
Electrolux SG429 Operating and installation instructions

APW Wyott
APW Wyott CDO-17 Specifications

DeDietrich
DeDietrich Oven user guide

Elba
Elba OB60 Series Installation instructions and user guide

NEFF
NEFF B45E42N0GB Instructions for use

Lotus
Lotus PC1T-64G Installation and operating instructions