ophelis CL Series User manual

Technische Dokumentation / Bedienungsanleitung
Technical documentation / Operating instructions
Documentation technique / Mode d’emploi
Reihe CL Sitz-Steh Arbeitstisch
CL Series sitting-standing workplaces
Les tables assis/debout série CL
Reihe CL

2 3
ophelis Technische Dokumentation und Betriebsanleitung Sitz-Steh Arbeitstisch Reihe CL
Technical documentation and operating instructions for CL Series sitting-standing workplaces
Documentation technique et mode d’emploi pour les tables assis /debout série CL
Inhalt
Table of Contents
Sommaire
5
6
7
10
12
14
15
15
17
18
19
22
24
26
27
27
29
30
31
34
36
38
39
39
Das Produkt
Funktionen
Betrieb
Erste-Hilfe-Checkliste
Die richtige Einstellung des Arbeitsplatzes
Sicherheitshinweise
Instandhaltung / Reinigung
EG-Konformitätserklärung
The Product
Features
Operation
First Aid Checklist
How to set up a workstation correctly
Safety Notes
Maintenance / Cleaning
EC Declaration of Conformity
Le produit
Caractéristiques
Fonctionnement
Check-list en cas de disfonctionnement
Les bonnes positions au poste de travail
Consignes de sécurité
Entretien / nettoyage
Déclaration de conformité européenne

4 5ophelis Technische Dokumentation und Betriebsanleitung Sitz-Steh Arbeitstisch Reihe CL
Technische Dokumentation /
Bedienungsanleitung
Sitz-Stehtische Reihe CL
Das Produkt
Sitz-Steh Arbeitstisch Reihe CL
Name Sitz-Steh Arbeitstisch Reihe CL
Höhenverstellbereich 650 – 1.250 mm
Hubbereich 600 mm
Maximale Belastung 80 kg (inkl. Tischplatte, Plattenrahmen und Anbauteile)
Hubgeschwindigkeit (bei
80 kg Belastung inkl. Tischpl.)
AUF 45 mm/sec.
AB 45 mm/sec.
Geräuschentwicklung ≤ 50 dB
Ausgangsleistung der
Steuerung ControlBasic
280 VA
Standby-Leistung / Verbrauch < 0,1 W
Versorgungsspannung 207 – 255,4 V / 50 – 60 Hz

6 7ophelis Technische Dokumentation und Betriebsanleitung Sitz-Steh Arbeitstisch Reihe CL
Einschaltdauerüberwachung Es wird überwacht, wie lange die Tischsäulen bewegt werden.
Nach 2 Minuten dauerhafter Nutzung schaltet sich die Steuerung
zum Schutz vor Überhitzung für 18 Minuten ab – im Display
erscheint „HOT“.
Sicherheitsabschaltung Die Steuerung schaltet bei unzulässig hoher Erwärmung aus.
Nachdem die Komponenten abgekühlt sind, werden diese wieder
automatisch zum Betrieb freigeschaltet.
Sicherheitsbereich Der Bereich, 4 cm bevor die unterste Tischplattenposition erreicht
wird, ist als Sicherheitsbereich definiert. Diese Funktion bewirkt,
dass das System vor dem Erreichen der untersten Position stoppt
und erst nach erneutem Betätigen der AB-Taste mit reduzierter
Geschwindigkeit bis zum Ende fährt.
Programmierbare Höhen
(nur mit Memory-Handschalter)
Es können insgesamt vier Positionen eingespeichert werden.
Drive back Der Tisch fährt nach Auslösen einer Sicherheitsfunktion (Auffahr-
schutz etc.) automatisch um ca. 30 mm in die Gegenrichtung,
um eine Quetschgefahr zu vermeiden.
Überlasterkennung Die Steuerung erkennt eine zu hohe (Gewichts-) Belastung des
Tisches und schaltet automatisch ab.
Softstart / Softstop Um ein sanftes Anfahren bzw. Anhalten zu ermöglichen, werden
die Antriebe für kurze Zeit nach dem Start bzw. vor dem Stop mit
verminderter Geschwindigkeit betrieben.
Funktionen
Abb. Handschalter
Abb. Memory-Handschalter
Betrieb
Steuerung ControlBasic
1
3
4
5
2
Handschalterbuchse HS
Montagelöcher
Antriebsbuchse M1
Antriebsbuchse M2
Netzbuchse PWR
1
32
1
3
2
Anschlusskabel
Taste AUF
Taste AB
DesignBase-Down
5
76
1 3 4
2
1
3
4
5
6
7
2
Anschlusskabel
Taste MENÜ
Taste MEMORY F1-F4
Taste AUF
Taste AB
Taste EXIT
Display
521 3 42

8 9ophelis Technische Dokumentation und Betriebsanleitung Sitz-Steh Arbeitstisch Reihe CL
Betrieb
1. Reset bei Erstinbetriebnahme
Wird der Tisch zum ersten Mal in Betrieb ge-
nommen, muss ein Reset durchgeführt werden,
bevor der Tisch normal genutzt werden kann.
Alle Säulen des Tisches werden auf das gleiche
Niveau in mittlerer Tischposition gebracht.
2. Reset
Um einen Reset durchzuführen, muss zuerst
der Energiesparmodus der Steuerung beendet
werden, indem die AUF- oder AB-Taste kurz
gedrückt wird. Danach müssen die AUF- und
AB-Taste des Handschalters gleichzeitig gedrückt
und gehalten werden. Nach 3 Sekunden beginnt
die Reset-Fahrt (mit halber Geschwindigkeit).
Das Erreichen der Resetposition wird durch
einen mehrmaligen Klick der Steuerung quittiert
und die Tasten können losgelassen werden.
Bei allen Resetvorgängen ist der Auffahrschutz
nicht aktiv. Bitte beachten Sie eine mögliche
Quetschgefahr!
3. Werkseinstellung (mit AUF/AB-Handschalter)
Um die Steuerung auf die Werkseinstellung
zurückzusetzen, muss zuerst der Energiesparmo-
dus der Steuerung beendet werden, indem die
AUF- oder AB-Taste kurz gedrückt wird. Danach
müssen die AUF- und AB-Taste des Handschalters
gleichzeitig ca. 3 Sekunden gedrückt werden bis
die Reset-Fahrt (mit halber Geschwindigkeit)
beginnt. Lassen Sie während dieser Reset-Fahrt
beide Tasten los. Drücken Sie die AUF-Taste für
ca. 10 Sekunden. Ein Doppelklick der Steuerung
signalisiert den Beginn und ein einfacher Klick
den Abschluss des Vorgangs. Lassen Sie danach
die Taste los. Ziehen Sie den Netzstecker für
mindestens 30 Sekunden. Stecken Sie danach
den Netzstecker wieder in die Steckdose. Führen
Sie zum Schluss einen Reset durch.
Hinweis: Die Steuerung befindet sich nun im
selben Zustand wie bei der Erstinbetriebnahme.
Bei allen Resetvorgängen ist der Auffahrschutz
nicht aktiv. Bitte beachten Sie eine mögliche
Quetschgefahr!
4. Werkseinstellung (mit Memory-Handschalter)
Um die Steuerung auf die Werkseinstellung
zurückzusetzen ziehen Sie den Netzstecker für
mindestens 30 Sekunden. Stecken Sie danach
den Netzstecker wieder in die Steckdose. Nun
muss zuerst der Energiesparmodus der Steuerung
beendet werden, indem die AUF- oder AB-Taste
kurz gedrückt wird. Innerhalb von <30 Sekunden
die Tasten M, 2, 3 gleichzeitig für ca. 3 Sekunden
gedrückt halten bis *S* erscheint. Nun die Zahlen
1, 2 und 3 nacheinander eingeben und den Vor-
gang mit der M-Taste bestätigen. Die Steuerung
bestätigt mit einem Doppelklick und der Meldung
E70 ein erfolgreiches Zurücksetzen auf die
Werkseinstellung. Ziehen Sie den Netzstecker für
mindestens 30 Sekunden. Stecken Sie danach
den Netzstecker wieder in die Steckdose. Führen
Sie zum Schluss einen Reset durch.
Hinweis: Die Steuerung befindet sich nun im
selben Zustand wie bei der Erstinbetriebnahme.
Bei allen Resetvorgängen ist der Auffahrschutz
nicht aktiv. Bitte beachten Sie eine mögliche
Quetschgefahr!
5. Energiesparmodus
Die Steuerung schaltet nach einigen Sekunden
in den Energiesparmodus. Durch Drücken der
AUF- oder AB-Taste beenden Sie den Energie-
sparmodus.
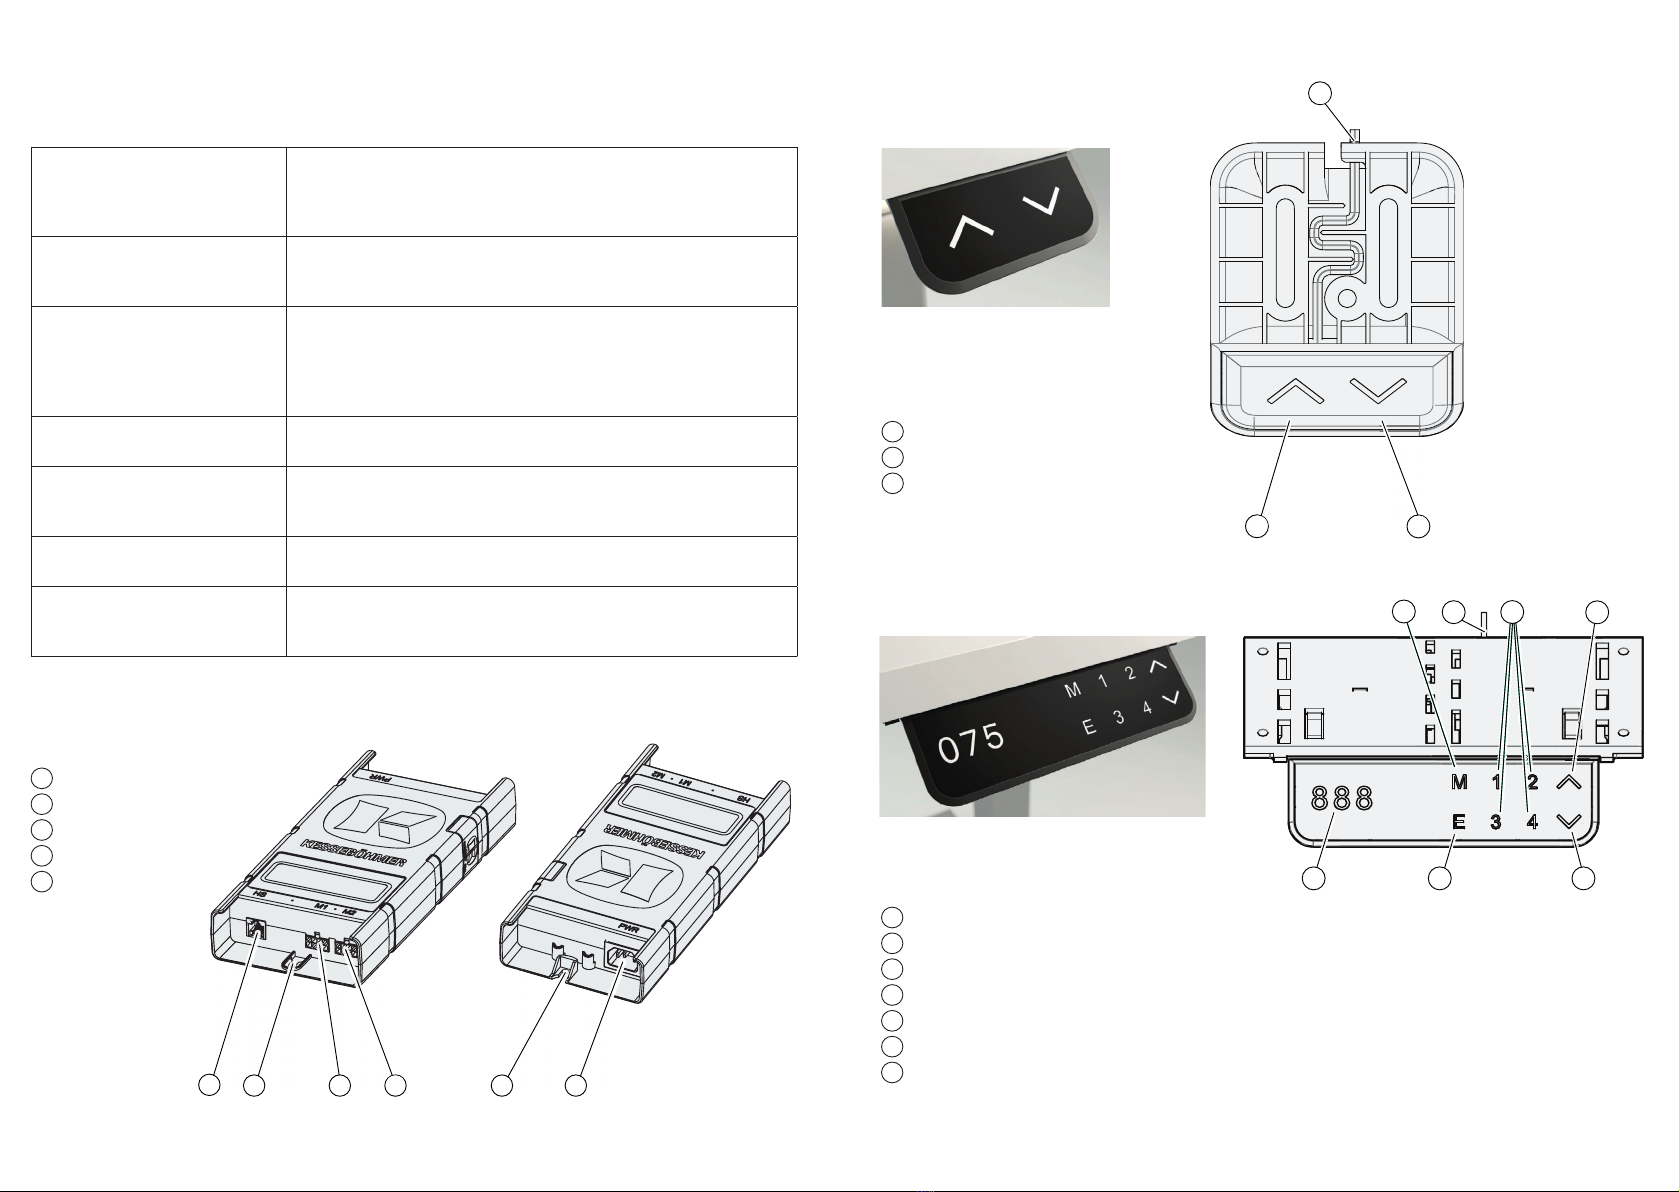
6. Tischhöhe manuell einstellen
- Drücken Sie die Taste AUF um den Tisch nach
oben zu fahren.
- Drücken Sie die Taste AB um den Tisch nach
unten zu fahren.
- Die Antriebe fahren so lange Sie die Taste
gedrückt halten oder die max. bzw. min. Tisch-
höhe erreicht wird.
7. Aktivieren der Shelfstop- bzw. Containerstop-
position (mit Auf/ AB Handschalter)
- Bringen Sie den Tisch in die gewünschte Position.
- Drücken Sie die Tasten AUF+AB für <1 sec
und anschließend für 5 sec die AUF Taste um
die Shelfstop- bzw. Containerstopposition
zu aktivieren
- Motorsteuerung bestätigt durch Doppelklick
bei CST und durch Einmalklick bei SST
- Shelfstopposition nur in der oberen Hubhälfte
möglich und Containerstopposition nur in der
unteren Hubhälfte möglich
8. Deaktivieren der Shelfstop- bzw. Container-
stopposition (mit Auf/ AB Handschalter)
- Bringen Sie den Tisch auf die Shelfstop- bzw.
Containerstopposition
- Drücken Sie die Tasten AUF+AB für <1 sec
und anschließend für 5 sec die AB Taste um
die Shelfstop- bzw. Containerstopposition
zu deaktivieren
- Motorsteuerung bestätigt druch Doppelklick
bei CST und durch Einmalklick bei SST
9. Aktivieren der Shelfstop- bzw. Containerstop-
position (mit Memory-Handschalter)
- Bringen Sie den Tisch in die gewünschte Posi-
tion. Am Display wird diese Position angezeigt.
- Menü aufrufen über Menütaste M 4 sec
gedrückt halten bis *M* erscheint
- mit AUF/AB Taste „SST“ für die oberste Tisch-
plattenposition bzw. „CST“ für die unterste
Tischplattenposition anwählen und mit Menü-
taste M öffnen
- mit AUF/AB Taste „ON“ wählen und mit M
bestätigen
- Motorsteuerung bestätigt durch Doppelklick
10.Deaktivieren der Shelfstop- bzw. Container-
stopposition (nur mit Memory-Handschalter)
- Menü aufrufen über Menütaste M 4 sec
gedrückt halten bis *M* erscheint
- mit AUF/AB Taste „SST“ für die oberste Tisch-
plattenposition bzw. „CST“ für die unterste
Tischplattenposition anwählen und mit M öffnen
- mit AUF/AB Taste „OFF“ wählen und mit M
bestätigen
- Motorsteuerung bestätigt durch Einfachklick
11. Weitere Tischplattenpositionen speichern (nur
mit Memory-Handschalter)
- Bewegen Sie den Tisch in die gewünschte Posi-
tion. Am Display wird diese Position angezeigt.
- M drücken und halten für 1 sec <M< 3 sec
- Dann innerhalb 3 sec F1, F2, F3 oder F4 drücken
- Bestätigung der gespeicherten Position durch
Doppelklick
12.Gespeicherte Einstellungen aufrufen (nur mit
Memory-Handschalter)
F1, F2, F3 oder F4 drücken und halten, bis die
gespeicherte Position erreicht ist (siehe Höhen-
anzeige auf dem Display)

10 11ophelis Technische Dokumentation und Betriebsanleitung Sitz-Steh Arbeitstisch Reihe CL
Erste-Hilfe-Checkliste
für elektromotorische Tische
geprüft
ÜBERPRÜFEN DER STECKVERBINDUNGEN IN DER STEUERUNG
(IM HORIZONTALEN KABELKANAL AN DER TISCHPLATTENUNTERSEITE)
Befindet sich der Netzstecker in der Steckdose?
Ist Strom auf der Steckdose?
Ist die Stromzuleitung (3-polig) fest in der Steuerung (Netzbuchse PWR) eingesteckt?
Sind die Antriebsbuchsen M1 und M2 in der Steuerung belegt? Festen Sitz dieser
prüfen.
Befindet sich der Stecker für den Handschalter in der Handschalterbuchse HS der
Steuerung?
ÜBERPRÜFEN DER HANDSCHALTER
A) HANDSCHALTER OHNE DISPLAY
Druckpunkt beim Betätigen und Loslassen erkennbar?
B) HANDSCHALTER MIT DISPLAY
Leuchtet die Anzeige?
Ändert sich die Anzeige bei Betätigen einer Taste?
STABILE AUFSTELLUNG
Haben die Höheneinstellfüßchen (je Ausleger 2 Stück) gleichmäßigen Bodenkontakt?
Papiertest: Legen Sie je ein Blatt Papier unter alle 2 Höheneinstellfüßchen des
Fußauslegers. Das Papier sollte dann mit gleichmäßiger Kraft herausgezogen
werden können.
MÖGLICHE STÖRUNGEN UND DEREN BEHEBUNG
Ursache Behebung geprüft
ANTRIEBE LAUFEN NUR IN EINE RICHTUNG
Stromausfall während der Fahrt Führen Sie einen manuellen Reset durch
TISCH ÜBERHITZT (BEI MEMORYSTEUERUNG – AM DISPLAY WIRD HOT ANGEZEIGT)
Aufgrund von Überhitzung wurde
der Überhitzungsschutz aktiviert
Warten Sie 18 Minuten bis die Motorsteuerung
abgekühlt ist bzw. HOT am Display erlischt, dann
ist der Tisch wieder betriebsbereit
Sollten Funktionsstörungen auftreten, die mit den bereits genannten Maßnahmen nicht behoben werden
konnten oder treten Fehler wiederholt auf, so füllen Sie bitte die Erste-Hilfe-Checkliste aus und senden
diese an unseren Kundendienst unter service@ophelis.de. Sie werden dann schnellstmöglich von uns
kontaktiert.
Die folgenden Informationen finden Sie auf dem Etikett unter der Tischplatte:
AB-Nummer:
Position:
Artikelnummer:
Beschreibung der Störung:
Datum, Unterschrift
Sie finden die Checkliste auch als Download auf unserer Webseite bei den Arbeitstischen Reihe CL.

12 13ophelis Technische Dokumentation und Betriebsanleitung Sitz-Steh Arbeitstisch Reihe CL
Die richtige Einstellung des Arbeitsplatzes
Ausgangspunkt zur Einstellung
des Arbeitsplatzes
für die Arbeit im Sitzen
die rechten Winkel zwischen Ober- und Unter-
arm und zwischen Ober- und Unterschenkel
für die Arbeit im Stehen
der rechte Winkel zwischen Ober- und Unterarm
1. Einstellung des Bürostuhls
- Sitzhöhe so einstellen, dass Ober- und Unter-
schenkel einen rechten Winkel bilden.
- Rückenlehne so einstellen, dass der untere
Rückenbereich (Lumbalzone) beim aufrechten
Sitzen optimal unterstützt wird.
- Soweit möglich, Sitztiefe und Sitzneigung
einstellen. Bei der Einstellung der Sitztiefe
sollte darauf geachtet werden, dass zwischen
der Kniekehle und der Vorderkante des Sitzes
mindestens eine knappe Handbreite frei bleibt.
- Höhe und soweit möglich den Abstand der
Armlehnen einstellen. Bei lockerer Schulterhal-
tung muss ein leichtes Abstützen der Ellbogen-
partie möglich sein. Dabei bilden Ober- und
Unterarm in etwa einen rechten Winkel.
- Soweit vorhanden, Höhe und gegebenenfalls
Neigung der Nackenstütze so einstellen, dass
der Kopf beim Zurücklehnen optimal abge-
stützt wird.
- Den Gegendruck der Synchronmechanik auf
das Körpergewicht einstellen.
Hinweis:
1. Sollte ein Arbeitstisch nicht höheneinstellbar sein, beginnt man die Einstellung des Arbeitsplatzes
mit Schritt 2.
Die Höhe des Arbeitsstuhls wird dann an die Höhe des Arbeitstisches angepasst. Ausgangsmaß und
feste Größe ist der rechte Winkel zwischen Ober- und Unterarm. Sollte die optimale Höhe des Arbeits-
stuhls daraufhin zu hoch sein, um beide Füße bequem auf den Boden stellen zu können, muss eine
Fußstütze zur Verfügung gestellt werden.
100°
2. Einstellung des Arbeitstisches und des
Bildschirms
- Zunächst die Tastatur auf der Arbeitsfläche
platzieren. Sie sollte in etwa in einem Abstand
von 10 bis 15 cm von der Tischvorderkante ste-
hen. Ergonomische Tastaturen verfügen über
die Möglichkeit, diese leicht schräg zu stellen.
Die Neigung sollte 8° keinesfalls überschreiten.
- Die Höhe des Arbeitstisches so einstellen, dass
bei der Eingabe über die Tastatur Ober- und
Unterarm weiterhin einen rechten Winkel
bilden. Unterarm und Handrücken sollen dabei
eine gerade Linie bilden.
- Bildschirm so platzieren, dass der Sehabstand
zwischen Auge und Bildschirm mindestens
50 cm beträgt. Bei einer Bildschirmdiagonale
von mehr als 17 Zoll ist ein größerer Sehabstand
notwendig. Bei der Platzierung des Bildschirms
ist aus Sicherheitsgründen darauf zu achten,
dass kein Teil des Bildschirms über die hintere
Kante der Arbeitsplatte hinausragt.
- Bildschirm um maximal 35° nach hinten neigen.
- Höhe des Bildschirms so einstellen, dass die
oberste Zeichenzeile maximal auf Augenhöhe
liegt. Eine niedrigere Einstellung ist i. d. R.
günstiger. Dies gilt insbesondere für Träger von
Gleitsichtbrillen.
3. Überprüfung der Sehbedingungen
- Prüfen Sie abschließend noch einmal, dass es
beim Arbeiten am Bildschirm nicht zu Blen-
dungen durch Beleuchtung oder Tageslicht
kommen kann und der Bildschirm frei von
Lichteinstrahlungen und Reflexen ist.
Quelle: iba - Industrieverband Büro und Arbeitswelt
(https://www.iba.online/arbeitsplatz-buero/gesundheit/arbeitsplatzgestaltung)
35°
50 - 70 cm
10 cm
60°
30 cm
20 - 30 cm
10 cm
20 cm
>90°
90°
90°

14 15ophelis Technische Dokumentation und Betriebsanleitung Sitz-Steh Arbeitstisch Reihe CL
- Die Steuerung und der Handschalter dürfen nur
mit einem trockenen oder leicht befeuchteten
Tuch gereinigt werden. Vor Reinigung unbedingt
den Netzstecker ziehen!
- Die Antriebe sind wartungsfrei.
Instandhaltung / Reinigung
Hiermit erklären wir, dass das nachstehend
bezeichnete Gerät in der von uns in Verkehr
gebrachten Ausführung den Anforderungen der
unten aufgeführten EG-Richtlinien entspricht.
Bei einer nicht mit uns abgestimmten Änderung
oder unsachgemäßem Verwendungszweck
verliert diese Erklärung ihre Gültigkeit.
Bezeichnung der Geräte:
Sitz-Stehtische Reihe CL
Angewendete EG Richtlinien:
Maschinenrichtlinie 2006/42/EG
Niederspannungsrichtlinie 2006/95/EG
EMV-Richtlinie 2014/30/EU
Angewendete Europäische Normen:
- DIN EN ISO 12100
Sicherheit von Maschinen
Allgemeine Gestaltungsleitsätze,
Risikobeurteilung und Risikominimierung
- DIN EN ISO 12100 - 1/2
Sicherheit von Maschinen - Grundbegriffe,
allgemeine Gestaltungsleitsätze
EG-Konformitätserklärung
- EN 349
Sicherheit von Maschinen
Mindestabstände zur Vermeidung des Quetschens
von Körperteilen
- DIN EN 60950–1
Einrichtungen der Informationstechnik – Sicher-
heit – Teil 1: Allgemeine Anforderungen
- DIN EN 527-1,2
Büromöbel, Büro-Arbeitstische
- DIN Fb 147
Anforderungen und Prüfung von Büromöbel –
Leitfaden für die Sicherheitsanforderungen an
Büro – Arbeitstische und Büroschränke in
Deutschland
- DIN EN 55014–1/2
Elektromagnetische Verträglichkeit – Anforderun-
gen an Haushaltsgeräte, Elektrowerkzeuge und
ähnliche Elektrogeräte
- DIN EN 61000–3–2/3
Elektromagnetische Verträglichkeit (EMV);
Teil 3: Grenzwerte
- Die übrigen Bauteile können mit handelsüblichen
Reinigungsmitteln, die keine scheuernden Eigen-
schaften aufweisen, gereinigt werden (Benutzer-
information des Reinigungsmittels einhalten). Es
ist jedoch darauf zu achten, dass keine Flüssigkeit
in die Beinrohre / Säule gelangt.
Sicherheitshinweise
- Voraussetzung für den sicherheitsgerechten
Umgang und den störungsfreien Betrieb ist die
Kenntnis der grundlegenden Bedienungsanleitung.
- Stellen Sie vor dem Anschluss an das vorhandene
Stromnetz sicher, dass die angegebene Versor-
gungsspannung eingehalten wird.
- Elektrische Zuleitungen dürfen keiner Quetsch-
gefahr, Biege- und Zugbeanspruchung ausgesetzt
werden!
- Beim Fahren des Antriebs ist sicherzustellen, dass
der Hubbereich frei ist und sich im Bewegungs-
bereich keine Gegenstände (z.B. Möbel) oder
Körperteile befinden, die eingeklemmt werden
können.
- Bei Resetvorgängen besteht Quetschungsgefahr
(Auffahrschutz inaktiv)!
- Die Bedienung ist nur für eingewiesene erwach-
sene Personen zulässig und keinesfalls für Kinder
geeignet.
- Personenbeförderung ist verboten.
- Nicht als Hebevorrichtung für Material zugelassen.
- Bitte stellen Sie eine stolperfreie Verlegung
der Leitungen beim Einsatz elektrischer Geräte
sicher, wie z.B. Monitor, Computer, Telefon unter
Berücksichtigung ausreichender Leitungslängen
(Hubhöhe beachten) und Benutzung der vorhan-
denen Kabelkanäle.
- Zu nebenstehenden Gegenständen ist jeweils ein
Mindestabstand von mind. 25 mm einzuhalten,
um Quetsch- und Scherstellen zu vermeiden!
- Bei Funktionsstörungen, Rauch- oder Geruchent-
wicklung, ungewöhnlichen Geräuschen oder bei
sichtbaren äußerlichen Beschädigungen darf der
Tisch nicht weiter betrieben werden. Ziehen Sie
den Netzstecker!
- Öffnen Sie nie das Gehäuse der Führungssäulen
oder der Steuerung! Durch unbefugtes Öffnen
der Komponenten und unsachgemäße Repara-
turen können Gefahren für die Benutzer sowie
Beschädigungen an den Bauteilen entstehen und
der Garantieanspruch erlischt.
- Das Öffnen oder Reparaturen der elektrischen
Einrichtungen dürfen nur vom Hersteller oder
von ihm autorisierten Kundendienstmonteuren
durchgeführt werden.
- Nach 2 Minuten dauerhafter Nutzung schaltet
sich die Steuerung zum Schutz vor Überhitzung
für 18 Minuten ab.
- Lassen Sie keine Flüssigkeit in das Innere der
Führungssäulen oder der Steuerung eindringen,
da sonst elektrische Schläge oder Kurzschlüsse
die Folge sein könnten!
- Der Tisch darf wegen Explosionsgefahr nicht in
explosionsfähiger Atmosphäre betrieben werden!
- Alle Komponenten sind sowohl in ihrer Funktion
(technische Auslegung) wie auch Dimension
genau aufeinander abgestimmt und dürfen nicht
verändert werden.
- Jede Änderung kann sowohl zur Gefährdung
wie auch Beschädigung führen und ist deshalb
von Haftungs- und Garantieansprüchen ausge-
schlossen.
- Belastungswerte dürfen nicht überschritten
werden.
- Garantie wird nur für bestimmungsgemäßen
Gebrauch gewährt.
Bitte bewahren Sie die Bedienungsanleitung sorgfältig auf!

16 17ophelis Technical documentation and operating instructions for CL Series sitting-standing workplaces
Technical Documentation /
Operating Instructions
Sitting-Standing Tables CL Series
The Product
CL Series sitting-standing workplaces
Name CL Series sitting-standing workplaces
Adjustable height range 650 – 1,250 mm
Lifting range 600 mm
Maximum load 100 kg (incl. tabletop, panel frame and add-ons)
Lifting speed UP/DOWN
(with a load of 80 kg incl.
tabletop)
45 mm/sec.
Sound level ≤ 50 dB
Output of the
ControlBasic
280 VA
Standby output/
consumption
< 0,1 W
Supply voltage 207 – 255,4 V / 50 – 60 Hz

18 19ophelis Technical documentation and operating instructions for CL Series sitting-standing workplaces
Power-on duration monitoring The power-on duration monitoring checks how long the table col-
umns have been moving. After 2 minutes of uninterrupted use, the
control unit will switch off automatically for 18 minutes to prevent
overheating – „HOT“ will appear on the display.
Safety shutdown The control unit will shut down automatically when components
become too hot. The system will automatically return to operation
after the components have cooled down sufficiently.
Safety zone The safety range starts 40 mm before the tabletop reaches its
lowest position. This feature causes the system to stop before the
tabletop reaches its lowest position. It requires the user to press
the DOWN button again to continue lowering the desk to the lowest
position at a reduced speed.
Programmable position (only ap-
plicable for manual switch with
memory function)
A total of four positions can be saved.
Drive back When a safety feature (e.g. collision detection) is triggered, the
desk will automatically be driven back in the opposite direction by
approx. 30 mm to prevent crushing injury.
Overload detection The control unit is able to detect excessive loads (weight) on the
table and switch off automatically.
Softstart / Softstop After starting and before stopping, the drive units will run briefly
at a reduced speed so that the tabletop can gently start and stop
moving.
Features
ControlBasic
Fig. Manual switch
Fig. Manual switch with memory function
Operation
521 3 42
1
3
4
5
2
Manual switch port HS
Installation holes
Actuator port M1
Actuator port M2
Power port PWR
1
32
1
3
2
Connector cable
UP button
DOWN button
DesignBase-Down
5
76
1 3 4
2
1
3
4
5
6
2
Connector cable
MENU button
MEMORY buttons F1-F4
UP button
DOWN button
EXIT button
Display
7

20 21ophelis Technical documentation and operating instructions for CL Series sitting-standing workplaces
Operation
1. Reset at first start-up
A reset is required the first time the desk is used
before the desk can be used in the normal man-
ner. All desk columns are set to the same height
at the desk’s middle position.
2. Reset
To perform a reset, you have to first deactivate
the energy-saving mode of the control unit by
briefly pressing the UP or DOWN button. Then
press and hold the UP and DOWN buttons simul-
taneously. The reset action will begin after 3 sec-
onds (at half speed). You can release the buttons
once the control unit makes two clicking sounds
to indicate the reset position has been reached.
The collision protection is not active during all
reset processes. Please be aware of potential
crushing hazards!
3. Factory settings (with UP/DOWN button)
To reset the desk to its factory settings, you
have to first deactivate the energy-saving mode
on the control unit by briefly pressing the UP
or DOWN button. Then press and hold the UP
and DOWN buttons simultaneously for around
3 seconds until the reset action begins (at half
speed). Let go of both buttons during the reset
action. Press and hold the UP button for around
10 seconds. The control unit will make two click-
ing sounds to indicate the start and one clicking
sound to indicate the end of the process. After-
wards let go of the button. Remove the mains
plug from the socket for at least 30 seconds.
Then reinsert the mains plug into the socket.
Finally perform a reset.
Note: The control unit is now in the same state
as when powering on for the first time.
The collision protection is not active during all
reset processes. Please be aware of potential
crushing hazards!
4. Factory settings (with manual switch with
memory function)
To reset the desk to its factory settings,
remove the mains plug from the socket for at
least 30 seconds. Then reinsert the mains plug
into the socket. The energy-saving mode must
be deactivated first through pressing the UP
or DOWN button shortly. Within <30 seconds
press the buttons M, 2, 3 simultaneously for
ca. 3 seconds until *S* appears. Then enter the
numbers 1, 2 and 3 and confirm the process
with the button M. The control unit confirms
a successful reset to the factory setting with
a double click and message E70. Remove the
mains plug from the socket for at least 30
seconds. Then reinsert the mains plug into the
socket. Finally perform a reset.
Note: The control unit is now in the same state
as when powering on for the first time.
The collision protection is not active during all
reset processes. Please be aware of potential
crushing hazards!
5. Energy-saving mode
The control unit will activate its energy-saving
mode after a few seconds of inactivity. You can
deactivate the energy-saving mode by pressing
the UP or DOWN button.
6. Manual desk height adjustment
- Press the UP button to raise the desk.
- Press the DOWN button to lower the desk.
- The motors continue to move for as long as you
press the button or until the maximum desk
height has been reached.
7. Activating the shelf stop or container stop posi-
tion (with UP/DOWN button)
- Bring the desk to the desired position.
- Press the UP+DOWN buttons for <1 sec and
then the UP button for 5 sec to activate the
shelf stop or container stop position.
- Motor control confirmed by double-click at
CST and by one-time click at SST
- Shelf stop position can only be activated in the
upper half of the stroke and container stop
position only in the lower half of the stroke
8. Deactivating the shelf stop or container stop
position (with UP/DOWN button)
- Bring the table to the shelf stop or container
stop position.
- Press the UP+DOWN buttons for <1 sec and
then the DOWN button for 5 sec to deactivate
the shelf stop or container stop position.
- Motor control confirmed by double-click at
CST and by one-time click at SST
9. Activating the shelf stop or container stop posi-
tion (for manual switch with memory function)
- Bring the desk to the desired position. The
position will be shown on the display.
- Press the button M to access the menu.
- Use the UP/DOWN button to select either
“SST” for the uppermost desktop height or
“CST” for the lowermost desktop height and
open by pressing the menu button M.
- Use the UP/DOWN button to select “ON” and
confirm by pressing M.
- The motor control unit will confirm your selec-
tion by making two clicking sounds.
10.Deactivating the shelf stop or container stop
position (for manual switch with memory
function)
- Press the menu button M to access the menu.
- Use the UP/DOWN button to select either
“SST” for the uppermost desktop height or
“CST” for the lowermost desktop height and
open by pressing the menu button M.
- Use the UP/DOWN button to select “OFF” and
confirm with M.
- The motor control unit will confirm your selec-
tion by making one clicking sound.
11. Saving further table top positions (only applica-
ble for manual switch with memory function)
- Bring the desk to the desire position. The posi-
tion will be shown on the display.
- Hold M for 1 to 3 seconds.
- Then press F1, F2, F3 or F4 within 3 seconds.
- The control unit will make two clicking sounds
to confirm that the position has been success-
fully saved.
12.Apply saved settings (only applicable for manual
switch with memory function)
Press and hold F1, F2, F3 or F4 until the desired
height is reached (see height indicator on the
display).

22 23ophelis Technical documentation and operating instructions for CL Series sitting-standing workplaces
First Aid Checklist
for electromotive tables
checked
CHECK THE PLUG CONNECTIONS IN THE CONTROL UNIT
(IN THE HORIZONTAL CABLE CHANNEL ON THE DESKTOP’S UNDERSIDE)
Is the appliance connected to the power outlet?
Is there power to the socket?
Is the power supply lead (3-pole) properly inserted into the control unit (power port
PWR)?
Are the corresponding plugs connected to actuator ports M1 and M2 in the control
unit? Check if the connections are secure.
Is the manual switch plugged in to the designated port, HS, on the control unit?
CHECK THE FUNCTION OF THE SWITCH
A) SWITCH WITHOUT DISPLAY
Is the pressure-point from press and release visible?
B) SWITCH WITH DISPLAY
Does the display shine?
Does the display change, when pressing a key?
DESK STABILITY
Are the levelling feet (2 on each leg) evenly in contact with the ground?
Paper test: Put a piece of paper underneath all 2 height adjusters of the table foot.
It should be possible to pull out the paper with equal force.
POTENTIAL MALFUNCTION AND THE RECTIFICATION
Potential cause Error handling checked
MOTORS ONLY MOVE IN ONE DIRECTION
Power failure during move Carry out a manual reset
TABLE OVERHEATED (FOR MEMORY FUNCTION – THE DISPLAY SHOWS HOT)
The overheating protection was
activated due to overheating
Wait 18 minutes for the motor control unit to cool
off or for HOT to disappear from the Display; the
desk will then be ready for operation again
If you encounter any malfunctions that cannot be remedied with the measures listed above or if the
same faults keep reoccurring, please fill in the first-aid checklist and send it to our Customer Service
department at service@ophelis.de. We will get in touch with you as soon as possible.
The following information you will find on the lable below the table top:
Order confirmation number:
Item:
Article number:
Description of the malfunction:
Date, Signature
You can find the checklist as well as download on our homepage under the category of the
tables CL Series.

24 25ophelis Technical documentation and operating instructions for CL Series sitting-standing workplaces
How to set up a workstation correctly
Premise when setting up
a workstation:
For seated work
The upper and lower arm and the upper and
lower leg are both positioned at right angles
For working when standing
The upper and lower arm form a right angle
1. Adjusting the office chair
- Adjust the height of the seat so that the upper
and lower leg form a right angle.
- Adjust the back of the chair so that the lower
back (lumbar area) is perfectly supported when
sitting in an upright position.
- Adjust the depth and the angle of the seat, if
possible. When adjusting the depth of the seat,
ensure that the minimum space between the
front edge of the seat and the back of the knee
amounts to just under the width of a hand.
- Adjust both the height and the spacing of the
armrests, if possible. The elbow should be
slightly supported when the shoulders are
relaxed. At the same time, the upper and lower
arm should approximately form a right angle.
- If there is a headrest, the height and angle
should also be adjusted so that the head is
perfectly supported when leaning back.
- Adjust the synchronous mechanism so the
counter pressure matches the body weight.
Note:
If the height of the desk cannot be adjusted, start from Step 2 when setting up the workstation. The
height of the work chair should then be adjusted to suit the height of the desk. The initial dimensions and
constant are based on the right angle formed by the upper and lower arm. If the ideal height of the work
chair means it is too high for both feet to reach the floor comfortably, then a footrest will also be required.
100°
2. Setting up the desk and the screen
- First place the keyboard on the work surface.
It should be positioned so that it is between 10
and 15 cm from the front edge of the desk. Er-
gonomic keyboards can be set at a slight angle.
However, the angle must not exceed 8°.
- Adjust the height of the desk so that the upper
and lower arm still form a right angle when
working on the keyboard. The lower arm and
the back of the hand should form a straight
line.
- In terms of viewing distance, position the
screen so that it is at least 50 cm away from
the eyes. The viewing distance should be
increased if the diagonal measurement of the
screen exceeds 17 inches. For safety reasons,
ensure that the screen does not extend out
over the rear edge of the desktop when select-
ing a position.
- Tilt the screen no more than 35° backwards.
- Adjust the height of the screen so that the top
row of characters is no higher than eye level. It
is usually better to set it at a lower height. This
particularly applies to those who wear glasses
with varifocal lenses.
3. Checking the visual conditions
- Lastly, check again whether lighting or daylight
create a glare on the screen when in use, and
check that the screen is not affected by direct
sunlight or reflections.
Source: iba - Industrieverband Büro und Arbeitswelt (Industrial Association for the Office and the Working Environment)
(https://www.iba.online/arbeitsplatz-buero/gesundheit/arbeitsplatzgestaltung)
35°
50 - 70 cm
10 cm
60°
30 cm
20 - 30 cm
10 cm
20 cm
>90°
90°
90°

26 27ophelis Technical documentation and operating instructions for CL Series sitting-standing workplaces
- The control unit and manual switch may only be
cleaned using a dry or slightly damp cloth. Always
unplug the desk from the mains before cleaning.
- The drive units do not require maintenance.
Maintenance / Cleaning
We herewith declare that the device named below,
in the version put on the market by us, is in con-
formity with the EC Directives listed below. This
declaration becomes null and void if the device is
modified without our approval or is not used as
intended.
Device Name:
CL Series sitting-standing workplaces
Applicable EC Directives:
Machine directive 2006/42/EC
Low voltage directive 2006/95/EC
EMC directive 2014/30/EU
Applicable European Standards:
- DIN EN ISO 12100
Safety of machinery
General principles for design, risk assessment
and risk reduction
- DIN EN ISO 12100 - 1/2
Safety of machinery - basic principles, general
principles for design
EC Declaration of Conformity
- EN 349
Safety of machinery - minimum gaps to avoid
crushing of parts of the human body
- DIN EN 60950-1
Information technology equipment - safety -
Part 1: General requirements
- DIN EN 527-1,2
Office furniture, office desks
- DIN Fb 147
Requirements and tests of office furniture -
guideline for the security requirements on work
tables and storage furniture in Germany
- DIN EN 55014-1/2
Electromagnetic compatibility - requirements for
household appliances, electric tools and similar
apparatus
- DIN EN 61000-3-2/3
Electromagnetic compatibility (EMC);
Part 3: Limits
- The remaining components can be cleaned
with standard detergents that do not have any
abrasive properties (follow the user information
provided by the manufacturer). However, make
sure no liquid enters the legs/columns.
Safety Notes
- Familiarity with the basic instructions for use is
necessary to ensure safe handling and proper
operation of the product.
- Before connecting the desk to any existing mains,
ensure that the mains voltage complies with the
specifications.
- Electrical lines may not be exposed to any risk of
crushing, bending or tensile stress.
- When the drive unit is running, it is necessary to
ensure that the stroke area is free and there are
no items (e.g. furniture) or body parts that could
become trapped in the area of movement.
- There may be risk of crushing injury during reset
processes (collision detection is deactivated)!
- The system may only be operated by adults who
have been instructed on its proper use and may
not be operated by children.
- Do not use the desk as a means to move people.
- Do not use the desk to lift materials.
- When using electronic equipment (e.g. monitor,
computer, phone) with the desk, please en-
sure that cables do not pose a tripping hazard
and are long enough to account for the height
adjustment. In addition, use the provided cable
channels for cable management.
- Keep adjacent objects at least 25 mm from the
desk to avoid crush and sheer points!
- Stop using the desk if it malfunctions, starts
emitting smoke or odours, makes unusual noises
or shows visible signs of external damage. Unplug
the desk from the mains!
- Never open the housing of the guide columns or
of the control unit. Unauthorised opening of the
components and improper repair may result in
risks to the user and damage to the components.
In this case, the warranty will no longer be valid.
- Electrical equipment may only be opened or re-
paired by the manufacturer or authorised service
centres.
- After 2 minutes of uninterrupted use, the control
unit will turn off automatically for 18 minutes to
prevent overheating.
- Do not let any liquid enter the guide columns or
the control unit as this could result in electric
shocks or short circuits.
- Due to explosion hazard, the table must not be
used in explosive atmospheres!
- All components are carefully coordinated with
one another in terms of both their function
(technical design) and their dimensions and may
not be changed.
- Any changes may lead to danger and damage and
are therefore excluded from liability and warranty
claims.
- Do not exceed the maximum permissible loads
indicated.
- The warranty is only valid if the product has been
used properly.
Please keep the operating instructions in a safe place!

28 29ophelis Documentation technique et mode d’emploi pour les tables assis/debout série CL
Les tables assis/debout de la série CL
Le produitDocumentation technique /
Mode d’emploi
Nom Tables assis/debout de la série CL
Plage de réglage de la
hauteur
650 – 1,250 mm
Plage de réglage 600 mm
Charge maximale 100 kg (plateau, cadre et pièces de construction compris)
Vitesse de montée et de
descente (pour une charge
de 80 kg, plateau compris)
45 mm/sec.
Bruit ≤ 50 dB
Puissance 30 sec.
HAUT / BAS
280 VA
Puissance stand-by < 0,1 W
Tension d’alimentation 207 – 255,4 V / 50 – 60 Hz
Tables CL assis/debout

30 31ophelis Documentation technique et mode d’emploi pour les tables assis/debout série CL
Prise en compte de la durée
d’activation
Le facteur de marche contrôle la durée d’activation des colonnes
de la table. Après 2 minutes d’utilisation en continu, le boîtier de
commande se désactive pour 18 minutes afin d’éviter toute sur-
chauffe. Sur l’écran s’affiche alors le mot « HOT ».
Coupure pour plus de sécurité En cas de chauffe au-delà de la valeur de référence, le boîtier de
commande disjoncte. Une fois les composants refroidis, ces derniers
se remettent automatiquement en marche.
La plage de sécurité Les 40 mm précédant la position la plus basse est définie comme
la plage de sécurité. Arrivé à cette zone, le système s’arrête de
fonctionner. Il faut reconfirmer la poursuite de la descente – en
actionnant la touche BAS qui se fera à vitesse réduite.
Hauteurs programmables (seule-
ment avec commande memory)
Quatre positions différentes peuvent être mémorisées.
Mouvement de retour Après le déclenchement de la fonction de sécurité (protection anti-
collision, etc.), le plateau retourne automatiquement d’env. 30 mm
pour éviter tout risque d’écrasement.
Détection de surcharge Le boîtier de commande reconnaît s’il y a surcharge et se désactive
alors automatiquement.
Démarrage et arrêt en douceur Les moteurs fonctionnent à puissance réduite durant quelques
instants au démarrage et à l’arrêt.
Fontions
Boîtier de commande
Image : Table de commande
Image : Table de commande avec
option memory
Mise en marche et mode d’emploi
521 3 42
1
3
4
5
2
Prise pour la table de commande (HS)
Trou de fixation
Connecteur pour moteur 1 (M1)
Connecteur pour moteur 2 (M2)
Prise de réseau PWR
1
32
1
3
2
Câble de raccordement
Touche HAUT
Touche BAS
DesignBase-Down
5
76
1 3 4
2
1
3
4
5
6
2
Câble de raccordement
Touche MENU
Touche MEMORY F1-F4
Touche HAUT
Touche BAS
Touche EXIT
Écran
7

32 33ophelis Documentation technique et mode d’emploi pour les tables assis/debout série CL
Mise en marche et mode d’emploi
1. Initialisation à la première utilisation (Reset)
Lors de la mise en service, il est nécessaire
d’effectuer une initialisation. Toutes les colonnes
du piétement de la table sont amenées au même
niveau sur la position médiane de la table.
2. Initialisation (Reset)
Pour initialiser, le mode économie d’énergie
doit tout d’abord être désactivé. Pour ce faire,
appuyez une fois sur le bouton HAUT ou BAS
du boîtier de commande. Après, maintenez
appuyées simultanément les touches HAUT et
BAS de la table de commande. Après 3 secondes,
l’ascension vers la position reset est enclenchée
(vitesse plus lente que de normal). Lorsque la
position reset est atteinte s’enclenche un double
ou triple-clic et vous pouvez relâcher les boutons.
Attention ! Lors de tous les processus d’ini-
tialisation, la protection anticollision n’est
pas active. Veuillez tenir compte des risques
d’écrasement !
3. Initialisation – réglage usine (avec table de com-
mande HAUT/BAS)
Pour initialiser la commande, le mode économie
d’énergie doit tout d’abord être désactivé. Pour
ce faire, appuyez rapidement sur le bouton HAUT
ou BAS du boîtier de commande. Puis appuyez
simultanément sur les touches BAS et HAUT de
la table de commande et maintenez ces touches
appuyées pendant env. 3 secondes jusqu’à ce
l’ascension vers la position reset ne commence.
Pendant l’ascension, les touches ne doivent pas
être appuyées. Appuyez ensuite sur la touche
HAUT pendant 10 secondes. Un double-clic
annonce le début de l’ascension et un clic la
fin. Relâchez les touches. Débranchez la prise
pour au moins 30 secondes et rebrancher. Enfin,
procédez à une réinitialisation (reset).
Remarque : La table de commande est réinitia-
lisée aux paramètres d’usine comme lors de la
première mise en service.
Attention ! Lors de la réinitialisation la protec-
tion anticollision n’est pas active. Veuillez tenir
compte des risques d’écrasement !
4. Initialisation – réglage usine (avec table de com-
mande memory)
Pour réinitialiser la table aux réglages d’usine,
débranchez la prise pour au moins 30 secondes
puis rebranchez. Le mode économie d’énergie
doit maintenant être désactivé. Pour ce faire,
appuyez sur le bouton HAUT ou BAS du boîtier de
commande. Juste après (moins de 30 secondes
après) appuyez simultanément les touches M, 2
et 3 jusqu’à ce qu’apparaissent *S* (env. 3 se-
condes). Les chiffres 1, 2 et 3 doivent maintenant
être l’un après l’autre entrés et la procédure
sera confirmée en appuyant sur la touche M.
La réinitialisation aux paramètres d’usine sera
confirmée par un double-clic et l’affichage sui-
vant : E70. Débranchez la prise pour au moins 30
secondes puis rebranchez. Enfin, procédez à une
réinitialisation (reset).
Remarque : La table de commande est réinitia-
lisée aux paramètres d’usine comme lors de la
première mise en service.
Attention ! Lors de la réinitialisation la protec-
tion anticollision n’est pas active. Veuillez tenir
compte des risques d’écrasement !
5. Mode économie d’énergie
Le boîtier de commande se met en mode éco-
nomie d’énergie après quelques secondes. En
appuyant sur les touches HAUT ou BAS, le mode
économie d’énergie s’arrête.
6. Régler manuellement la hauteur du poste
- Appuyez sur la flèche HAUT pour élever le
poste de travail
- Appuyez sur la flèche BAS pour abaisser le
poste de travail
- Le poste continue de monter ou de des-
cendre tant que les touches restent appuyées
et jusqu’à ce que la hauteur max/min soit
atteinte.
7. Activation de la position d’arrêt pour étagère
et/ou pour caisson (avec la table de commande
HAUT / BAS)
- Positionnez le poste de travail à la hauteur
souhaitée. L’écran montre cette position.
- Appuyez sur les touches HAUT+BAS environ 1
seconde puis sur la touche HAUT pendant 5
secondes afin d’enclencher la position d’arrêt
pour étagère ou caisson.
- La commande sera confirmée par un double-
clic avec CST et un simple-clic avec SST
- La position d’arrêt pour étagère n’est possible
que dans la partie supérieure
- La position d’arrêt pour caisson n’est possible
que dans la partie inférieure.
8. Désactiver la position d’arrêt pour étagère
et/ ou pour caisson (avec table de commande
HAUT/BAS)
- Positionnez la table au niveau de l’arrêt étagère
ou caisson
- Appuyez sur les touches HAUT+BAS environ
1 seconde puis sur la touche BAS pendant 5
secondes afin de désactiver la position d’arrêt
pour étagère ou caisson.
- La commande sera confirmée par un double-
clic avec CST et un simple-clic avec SST
9. Activation de la position d’arrêt pour étagère
et/ou pour caisson (avec la table de commande
memory)
- Positionnez le poste de travail à la hauteur
souhaitée. L’écran montre cette position.
- Appuyez sur la touche M 4 secondes pour
accéder au Menu. M apparaît alors sur l’écran
- Avec la touche HAUT ou BAS sélectionnez « SST »
pour la position supérieure ou « CST » pour la
position inférieure et appuyez sur la touche M
pour ouvrir le menu
- Avec la touche HAUT ou BAS sélectionnez ON
et confirmez avec M
- La commande sera confirmée par un double-
clic.
10.Désactivation de la position d’arrêt pour
étagère et / ou pour caisson (avec la table de
commande memory)
- Appuyez sur la touche M 4 secondes pour ac-
céder au Menu. M apparaît alors sur l’écran
- Avec la touche HAUT ou BAS sélectionnez « SST »
pour la position supérieure ou « CST » pour la
position inférieure et appuyez sur la touche M
pour ouvrir le menu
- Avec la touche HAUT ou BAS sélectionnez OFF
et confirmez avec M
- La commande sera confirmée par un double-
clic.
11. Mémoriser plusieurs hauteurs (pour commande
memory)
- Déplacez le plateau de table à la position sou-
haitée. Cette position s’affiche à l’écran.
- Appuyez sur la touche M entre 1 et 3 secondes
- Rapidement (moins de 3 secondes), appuyer
sur F1, F2, F3 ou F4
- La commande sera confirmée par un double-
clic
12. Élever la table à une hauteur enregistrée (pour
commande memory)
Appuyez sur F1, F2, F3 ou F4 jusqu’à ce que la
hauteur souhaitée soit atteinte (voir l’affichage
sur l’écran)

34 35ophelis Documentation technique et mode d’emploi pour les tables assis/debout série CL
Check-list en cas de disfonctionnement
pour table assis/debout
Contrôlé
VÉRIFICATION DES CONNEXIONS DU BOÎTIER DE COMMANDE (VOIR CHEMIN DE CÂBLES HORIZONTAL
AU-DESSUS DU PLATEAU DE TABLE)
Est-ce que la prise de secteur est branchée dans la prise de courant ?
Est-ce que le câble d’alimentation est branché dans la prise de secteur ?
Est-ce que le câble d’alimentation (tripolaire) est bien insérée dans le bloc de
commande ?
Vérifier que les branchements sur les postes M1 et M2 ont bien été enclenchés dans le
boîtier de commande ? Vérifiez que le branchement a bien été effectué.
La prise table de commande est-elle bien enclenchée à l’emplacement HS du boitier
de commande ?
VÉRIFICATION DE LA TABLE DE COMMANDE
A) TABLE DE COMMANDE SANS ÉCRAN
Le point de pression est-il reconnaissable ?
B) TABLE DE COMMANDE AVEC ÉCRAN
L´écran s’allume-t-il ?
Est-ce que l’affichage d’écran change à la pression d’une touche ?
MEILLEUR STABILITÉ
Est-ce que le vérin de compensation des inégalités du sol (2 éléments constitutif par
pied) a été ajusté ?
Test du papier : Mettez une feuille de papier sous chacun des vérins de compensation.
La feuille doit être tirée avec un effort égal.
DYSFONCTIONNEMENTS POSSIBLES ET RÉSOLUTIONS
Cause possible Mesure corrective Contrôlé
LES MECANISMES NE TOURNENT QUE DANS UN SENS
Panne de secteur pendant la
course
Effectuer une réinitialisation manuelle
TABLE EN SURCHAUFFE (POUR COMMANDE MEMORY, « HOT » S’AFFICHE À L’ÉCRAN)
En raison d’une surchauffe, la
sécurité anti-surchauffe est
déclenchée
Attendre 18 minutes que le moteur ait refroidi
ou que « HOT » disparaisse sur l’écran de la table
de commande. La table est alors de nouveau
opérationnelle.
En cas de dysfonctionnement ne pouvant être résolu au moyen des mesures décrites ci-dessus, ou en
cas de dysfonctionnement récurrent, veuillez remplir la check-list et l’envoyer à notre service clients :
service@ophelis.de. Nous vous contacterons dans les plus brefs délais.
Pour les informations suivantes voir l’étiquette qui se trouve sous le plateau de table :
Numéro de confirmation de commande :
Position :
Numéro de l’article :
Description du disfonctionnement :
Date, signature
Vous trouverez la check-list aussi en téléchargement sur notre site internet dans la catégorie de table
Série CN.

36 37ophelis Documentation technique et mode d’emploi pour les tables assis/debout série CL
Les bonnes positions au poste de travail
Les éléments de base d’une bonne position
à son poste de travail
pour travailler en position assise
un angle droit au niveau des coudes
un angle droit au niveau des genoux
pour travailler en position debout
un angle droit au niveau des coudes
1. Ajuster son siège
- Régler la hauteur de votre siège de manière à
ce que vos genoux forment un angle droit.
- Ajustez le dossier de manière à ce que la zone
lombaire soit bien soutenue lorsque vous êtes
en position assise.
- Ajustez, si possible, la profondeur et l’angle de
votre siège. Une fois assis, veiller à laisser un
espace, grand comme la largeur d’une main,
entre le creux du genou et le siège.
- Réglez la hauteur et, autant que possible, la
distance entre les accoudoirs. Relâcher les
épauler, cela permettra un léger soutien des
coudes. Vos coudes forment à peu près un
angle droit.
- Dans la mesure du possible, ajustez la hauteur
et l‘inclinaison du support de la nuque afin que
votre tête soit supportée de manière optimale
lorsque vous vous pencherez en arrière.
- Ajuster le mécanisme synchrone (de contre-
poids) à votre propre personne.
Remarque:
Si votre bureau n’est pas ajustable en hauteur, commencez par l’étape 2. La hauteur du siège sera alors
à déduire de la hauteur de la table. Il faut, dans ce cas, partir de l’angle droit formé au niveau du coude
(entre le bras et l’avant-bras). Si votre fauteuil est alors trop haut pour que vos pieds soient posés à plat
sur le sol, utilisez un repose pieds.
100°
2. Position de la table et de l‘écran
- Poser tout d’abord votre clavier sur le bureau.
Il doit se trouver entre 10 et 15 cm du bord
de la table. Les claviers ergonomiques ont
l’avantage de pouvoir s’incliner légèrement. At-
tention toutefois à ne pas incliner votre clavier
sur plus de 8°.
- La hauteur de la table doit permettre à ce
que les coudes forment un angle droit lorsque
vous utilisez votre clavier. Le dos de la main et
l’avant-bras forment alors une
ligne droite.
- Placez l’écran de manière à ce qu’il se trouve à
au moins 50 cm de vos yeux. Dans le cas d’un
écran de 17 pouces ou plus, pensez à éloi-
gner l’écran davantage. Lorsque vous placerez
l’écran sur votre bureau, veillez, par sécurité,
à ce qu’aucune partie de l’écran ne dépasse à
l’arrière du bureau.
- L’inclinaison de l’écran ne doit pas être
supérieure à 35°.
- Ajuster la hauteur de l’écran : le haut de l’écran
doit au maximum correspondre à la hauteur
de vos yeux. De manière générale, un position-
nement plus bas est préférable. Cette règle
s’applique tout particulièrement aux porteurs
de verres progressifs.
3. Vérifier la luminosité
- Enfin, vérifier régulièrement que vous ne serez
pas ébloui lorsque vous travaillerez sur votre
écran, ni par les luminaires ni par la lumière du
jour. Il ne doit pas y avoir de reflets sur l’écran
et celui-ci ne doit pas être éclairé directe-
ment.
source : iba – Industrieverband Büro und Arbeitswelt (organisation industrielle pour les bureaux et la vie au travail)
(https://www.iba.online/arbeitsplatz-buero/gesundheit/arbeitsplatzgestaltung)
35°
50 - 70 cm
10 cm
60°
30 cm
20 - 30 cm
10 cm
20 cm
>90°
90°
90°

38 39ophelis Documentation technique et mode d’emploi pour les tables assis/debout série CL
- Le boîtier de commande et la table de commande
ne peuvent être nettoyés qu’à l’aide d’un chiffon
sec ou légèrement humidifié. Avant toutnet-
toyage, prenez soin de débrancher les prises !
- Les dispositifs moteurs ne nécessitent aucun
entretien.
Entretien / nettoyage
Nous déclarons par la présente que l’appareil
ci-dessous nommé tel que nous le commerciali-
sons satisfait aux exigences des directives euro-
péennes citées ci-dessous. Toute modification non
convenue avec nous ainsi que tout usage impropre
invalide la présente déclaration.
Désignation de l’appareil :
Tables de travail assis/debout série CL
Directives CE utilisées :
Directive Machine 2006/42/EC
Directive Basse Tension 2006/95/EC
Directive CEM 2014/30/EU
Normes européennes utilisées :
- DIN EN ISO 12100
Sécurité des machines
Principes généraux, estimation des risques et
réduction des risques
- DIN EN ISO 12100 - 1 / 2
Sécurité des machines
principes de bases et principes généraux d’agen-
cement
Déclaration de conformité
européenne
- DIN EN 349
Sécurité des machines
Distances minimales pour éviter l’écrasement de
parties du corps
- DIN EN 60950–1
Matériels de traitement de l’information
Sécurité – Partie 1 : Exigences générales
- DIN EN 527-1,2
Meubles de bureaux, tables de travail de bureaux
- DIN Fb 147
Exigences et contrôles pour meubles de bureaux
Sécurité envers les tables de travail de bureaux et
les armoires de bureaux en Allemagne
- DIN EN 55014-1/2
Compatibilité électromagnétique
Exigences pour les appareils électrodomestiques,
outillages électriques et appareils analogues
- DIN EN 61000–3–2 / 3
Compatibilité électromagnétique (CEM) -
Partie 3 : Valeurs limite
- Les autres pièces peuvent être nettoyées avec
un détergent classique, non abrasif (respecter
les consignes du fabricant à destination des
utilisateurs). Il convient toutefois de veiller à ce
qu’aucun liquide ne pénètre dans les colonnes/
tubes du piètement.
Consignes de sécurité
- Afin de manipuler la table en toute sécurité et
de permettre le bon fonctionnement de la table,
il est nécessaire de commencer par prendre
connaissance du mode d’emploi.
- Avant d’effectuer le raccordement au réseau
électrique, assurez-vous qu’il y ait bien la tension
indiquée.
- Les fils électriques ne doivent pas être exposés
à un quelconque risque d’écrasement, ni à un
effort de traction ou de cintrage.
- Risque d’écrasement lors des processus de
réinitialisation : la protection anticollision est
inactive !
- Lorsque le moteur fonctionne, il convient de
s’assurer que la plage d’évolution soit libre et
qu’aucun objet (par ex. un meuble) ou pièce
susceptible d’être coincé ne se trouve dans la
zone d’évolution de la table.
- Risque d’écrasement lors des processus de
réinitialisation : la protection anticollision est
inactive !
- La manipulation doit être effectuée par une
personne adulte, préalablement initiée au fonc-
tionnement, et en aucun cas par des enfants.
- L’acheminement de personnes est interdit.
- Non conçu comme mécanisme de levage de
matériel.
- Effectuez une pose sûre des fils en cas d’utilisa-
tion d’appareils électriques, comme un moniteur,
un ordinateur ou un téléphone, en prenant soin
de laisser une longueur de fil suffisante (tenir
compte de la plage de réglage). Utiliser les che-
mins de câbles existants.
- Veiller à placer les objets environnants à au moins
25 mm, pour éviter tout point d’écrasement ou
de frottement !
- En cas de dysfonctionnements, d’émanation de
fumées ou d’odeurs, de bruits inhabituels ou de
dégradations extérieurs visibles, ne plus faire
fonctionner le table. Débrancher simplement
l’appareil.
- Ne jamais ouvrir la carcasse des colonnes ou du
boîtier de commande ! L’ouverture non autori-
sée des composants ainsi que toute réparation
impropre peuvent générer un risque pour les uti-
lisateurs et détériorer des pièces, ce qui a pour
conséquence d’exclure tout recours à la garantie.
- L’ouverture ainsi que les réparations d’installa-
tions électriques doivent être effectuées seu-
lement par le personnel du fabricant ou par des
ajusteurs-mécaniciens du service après-vente
qu’il a lui-même autorisés !
- Après 2 minutes d’utilisation permanent le boîtier
de commande se désactiver pour 18 minutes pour
protection de surchauffe.
- Ne laissez aucun liquide pénétrer dans les co-
lonnes ou dans le boîtier de commande, car cela
pourrait provoquer des chocs électriques ou des
courts-circuits !
- La table ne doit pas être placée dans un endroit
sujet à explosion sous risque d’exploser.
- L’ensemble des composants sont adaptés les uns
aux autres, tant du point de vue de leur fonction
(conception technique) que de leurs dimensions,
et ne doivent, par conséquent, subir aucune
modification.
- Toute modification peut entraîner une mise en
danger ainsi qu’une détérioration et exclut, de
ce fait, tout recours à la garantie ou en respon-
sabilité.
- Les charges maximales indiquées ne doivent pas
être dépassées.
- La garantie s’exerce seulement en cas d’utilisa-
tion conforme aux consignes.
Veuillez conserver le mode d’emploi dans un endroit sûr!
Table of contents
Languages:
Other ophelis Indoor Furnishing manuals
Popular Indoor Furnishing manuals by other brands

Geberit
Geberit Ifo Sense 47370 Operating and maintenance instructions

Office Star Products
Office Star Products OSP Designs EUREKA EUKLD Assembly instructions

Lucid
Lucid 600 Series owner's manual

Broyhill
Broyhill PEMBROKE H22SK2110 Assembly instruction

Dream On Me
Dream On Me 598CA owner's manual

FAB GLASS AND MIRROR
FAB GLASS AND MIRROR BC102 quick start guide

Extron electronics
Extron electronics UTR 104 SP installation guide

Pawleys Island
Pawleys Island Durawood Essentials quick start guide

rst brands
rst brands Venetia OP-ALSTR2424-VEN Assembly instructions

Ameriwood HOME
Ameriwood HOME 7916348COM manual

Gispen
Gispen TRIENNIAL user manual

modway
modway EEI-2675 quick start guide