Optiled REAL CLEAN OPCL-GL15X3 User manual

Model: OPCL-GL15X3
UV-C Air Sanitizer
Powerful
UV-C Lamps
253.7nm
REAL CLEAN
Designed in Japan
日本のデザイン

Air Sanitizer
1
日本のデザイン Designed in Japan
INDEX
Product Overview
Warnings & Safety
Getting Started
FAQ
Warranty &
After-Sales Service
2
3
4-6
6
6
Thank you for purchasing Optiled REALCLEAN UV-C Air Sanitizer. REALCLEAN uses powerful
UV-C technology to disinfect the air. Before you start using REALCLEAN, please ensure you have
read this instruction manual, including warnings and safety precautions, and followed the directions
for installation, use and maintenance. Please keep this instruction manual for future reference.
This appliance can be used by people with reduced physical, sensory or mental capabilities or lack
of experience and knowledge if they have been given supervision or instruction concerning use of
the appliance in a safe way and understand the hazards involved.
If any damages were found to the product, please immediately contact the relevant distributor,
service agents or manufacturer for a repair or replacement.
*Your WARRANTY CARD is attached to the end of this instruction manual. Please check the date of
purchase and the name of store are correctly recorded, etc.

2
■Internal Structure
Timer Knob
Power Button
Fan Speed Knob
Indicator Light
Front Cover Screws
(4 parts)
■Front View
OPCL-GL15X3
(B): Black (W): White
GL15
AC220-240V
50/60Hz
55W
13.5kg
5˚C~35˚C
Indoor use
Non-waterproof
84m³ / 904ft³ 1 hour
Model Power Consumption
Operating Temperature
Application
Waterproof
Color Weight
Lamp Base
Input Voltage
Frequency
Sanitization TimeRoom Size
Product Overview
■Top View
1
3
2
3x UV-C Lamps
Fan
Fan guard
Air Reflector
Safety Sensor
Air Inlet
5
6
7
8
9
10
11
Specification
1
2
3
4
5
6
7
8
9
10
11
4

3
WARNINGS
Direct electrical contact with a power supply can cause electric shock. Do not
open the front case when the product is connecting with power and operating.
Use the correct voltage for your product. Incorrect voltage supply may result in
fire, electric shock or product malfunction.
Skin or eye damage may result from directly viewing the light produced by the
lamp in this product. Always disconnect power before relamping or servicing.
Replace lamps with TUV T8 double please ended germicidal UVC lamps
(GL15W). For list of approved replacement lamps, visit website.
Do not insert any metal objects into the air inlet and outlet of the product, it may
cause fire or electric shock.
Do not plug in the product with wet hands, this may cause an electric shock.
Always ensure the product is DISCONNECTED from the power socket and
switched OFF before installation, lamp replacement and any cleaning or
maintenance. Failure to do so may cause electric shock or damage to eyes
and skin.
UV-C rays may leak from the product when the main body is deformed or
damaged, or any other parts of the product are broken. If the product is physically
damaged, stop using and disconnect it from the power socket to avoid any
potential UV-C exposure. Request repair immediately.
Do not pull, twist, bend or use any excessive force on the power cord as it may
damage the cord, which could cause product malfunction, or possible fire or
electric shock.
Allow 5 minutes for the product to cool down before handling.
SAFETY PRECAUTION
Use this product in ambient temperature range of 5°C to 35°C. Operation
above this range may increase risk of fire or electric shock. Operation below
this range may cause product malfunction.
Do not use this product in places with excessive vibrations or mechanical
shocks, or in a corrosive atmosphere. This may cause fire or electric shock
due to deterioration of equipment.
The product is for indoor use only. Do not use outdoor, or in wet area.
Do not use the product on unstable surface, or elevated surface (e.g. table).
Do not cover or obstruct the air inlet or outlet during operation.
Do not use the product in flammable environment.
This product is not waterproof. Do not use in area with high humidity (above
85%).
Environment
Maintenance and cleaning
Replace the UV-C lamps every 8,000 hours of operation. Operation beyond the
lifetime of the UV-C lamps will reduce the disinfection efficiency and effective-
ness.
Clean the UV-C lamps, inlet and outlet as per instructions at least every 2
months. The disinfection efficiency will be reduced if dust accumulates on the
UV-C lamps or in the air inlet and outlets.
Ensure the UV-C lamps are installed properly every time following cleaning
or replacement.
To carry or move the product, use the handles. Do not lift the product using the
air reflector alone, as it is heavy and may damage the structure.
Check the product for damage before first use. Do not use a physically
damaged product.
Check all cover screws are securely fastened after installation, cleaning or
replacement.
Regular inspection of the product is required to prevent malfunction.
Install the UV-C lamps with care. Pushing or turning the UV-C lamps with
excessive force may damage the lamp caps or the UV-C lamps.
The UV-C lamps are made of glass and must be handled with care. Do not
drop or bump them on hard surfaces. Use of gloves and safety eye wear is
recommended when installing, replacing, or cleaning UV-C lamps
If a lamp breaks, ventilate the room for 30 minutes and remove all parts,
preferably with gloves. Do not use a vacuum cleaner. Place broken lamp parts
in a sealed plastic bag and take it to your local waste facility for recycling . For
your lamp recycling information in Hong Kong, visit https://www.wastereduc-
tion.gov.hk/en/household/flrp_intro.htm
Mechanical
Photobiological
Electrical
Mechanical
Warnings & Safety

1) Turn off the power and unplug the power cord.
4
NOTE
A built-in safety switch is designed for this product, so that the product will not
operate in the case of incorrect installation.
Always supervise children when they are near the product.
The indicator light is an LED that does not emit any UV-C radiation.
The product may cause interference with other electronic equipment and
applicance. If this occurs, increase the distance between the product and
another appliances.
I. Install the UV-C lamps into REALCLEAN
ENSURE YOU HAVE READ ALL THE WARNINGS AND SAFETY PRECAUTIONS BEFORE PROCEEDING WITH
INSTALLATION. MAKE SURE THE PRODUCT IS DISCONNECTED FROM THE POWER SOCKET AND SWITCHED
OFF BEFORE YOU REMOVE THE FRONT COVER.
Getting Started
Remove the
4 screws
1
4
2Twisting 90 degrees
3
56 7
Light ON Light OFF
Installation Complete Installation Mistake
1. Remove the 4 front cover screws with a hexagonal screw driver.
2. Carefully remove the front cover.
3. One by one, insert the 3 UV-C lamps into their lamp holders and gently turn each one
90-degrees to secure in place. (Do not rotate lamps 180 degrees)
4. Replace the front cover back and fasten well using the 4 cover screws.
5. Plug the power adaptor into compatible power socket (AC220-240V)
6. Press the power button at the top of the product.
7. Check the indicator light.
• Light ON, installation is complete.
• Light OFF, an error may have occurred during installation. Turn off and unplug the
product, and repeat the installation process (also see troubleshooting, page 5).

5
1. Remove the 4 front cover screws and carefully remove the front cover.
2. Carefully remove the UV-C lamp one by one, by twisting 90 degrees until the
lamp is easily freed from the lamp holders.
3. One by one, insert the 3 UV-C lamps into their lamp holder and gently turn
each
one 90-degrees to secure in place. (Do not turn lamps 180 degrees) lamp
4. Replace the front cover and fasten well using the 4 cover screws.
5. Plug the power adaptor into a compatible power socket (AC220-240V)
6. Press the power button at the top of the product.
7. Check the indicator light.
• Light ON, installation is complete.
• Light OFF, an error may have occurred during installation. Turn off and unplug
the product, and repeat the lamp replacement process
II. Replacing the UV-C Lamps (GL15)
ENSURE YOU HAVE READ ALL THE WARNINGS AND SAFETY PRECAUTIONS BEFORE PROCEEDING WITH
LAMP REPLACEMENT MAKE SURE THE PRODUCT IS DISCONNECTED FROM THE POWER SOCKET AND
SWITCHED OFF BEFORE YOU MOVE THE FRONT COVER TO REPLACE LAMPS.
12 3
Light ON Light OFF
Installation Complete Installation Mistake
Twisting 90 degrees
4
567

6
ENSURE YOU HAVE READ ALL THE WARNINGS AND SAFETY PRECAUTIONS BEFORE PROCEEDING WITH
CLEANING AND MAINTENANCE MAKE SURE THE PRODUCT IS DISCONNECTED FROM THE POWER SOCKET AND
SWITCHED OFF BEFORE YOU REMOVE THE FRONT COVER OR CONDUCT ANY CLEANING OR MAINTENANCE.
DO NOT USE ANY DETERGENT OR SOLVENTS IN CLEANING, USE WATER ONLY.
III. Cleaning and Maintenance
123
45
AIR OUTLET
AIR INTAKE
6
1. Remove the 4 front cover screws and carefully remove the front cover.
2. Carefully remove the UV-C lamp one by one, by twisting 90 degrees until the lamp can be detached easily from the
lamp holder.
3. Carefully wipe the surface of each lamp with a soft, lint-free cloth to remove any dust.
4. Insert the 3 UV-C lamps one by one into their lamp holder and gently turn each one to a 90-degrees to secure in place.
(Do not rotate lamps 180 degrees)
5. Replace the front cover and fasten well using the 4 cover screws.
6. Using a soft duster, remove any dust accumulated at the air inlet (top) or air outlet (bottom) of the product, as pictured.

Please check the following FAQ if you have problem when using the product.
If you cannot find the problem you encounter below, or these steps do not resolve your issue, please contact your local dealer.
●
●
●
●
●
●
●
●
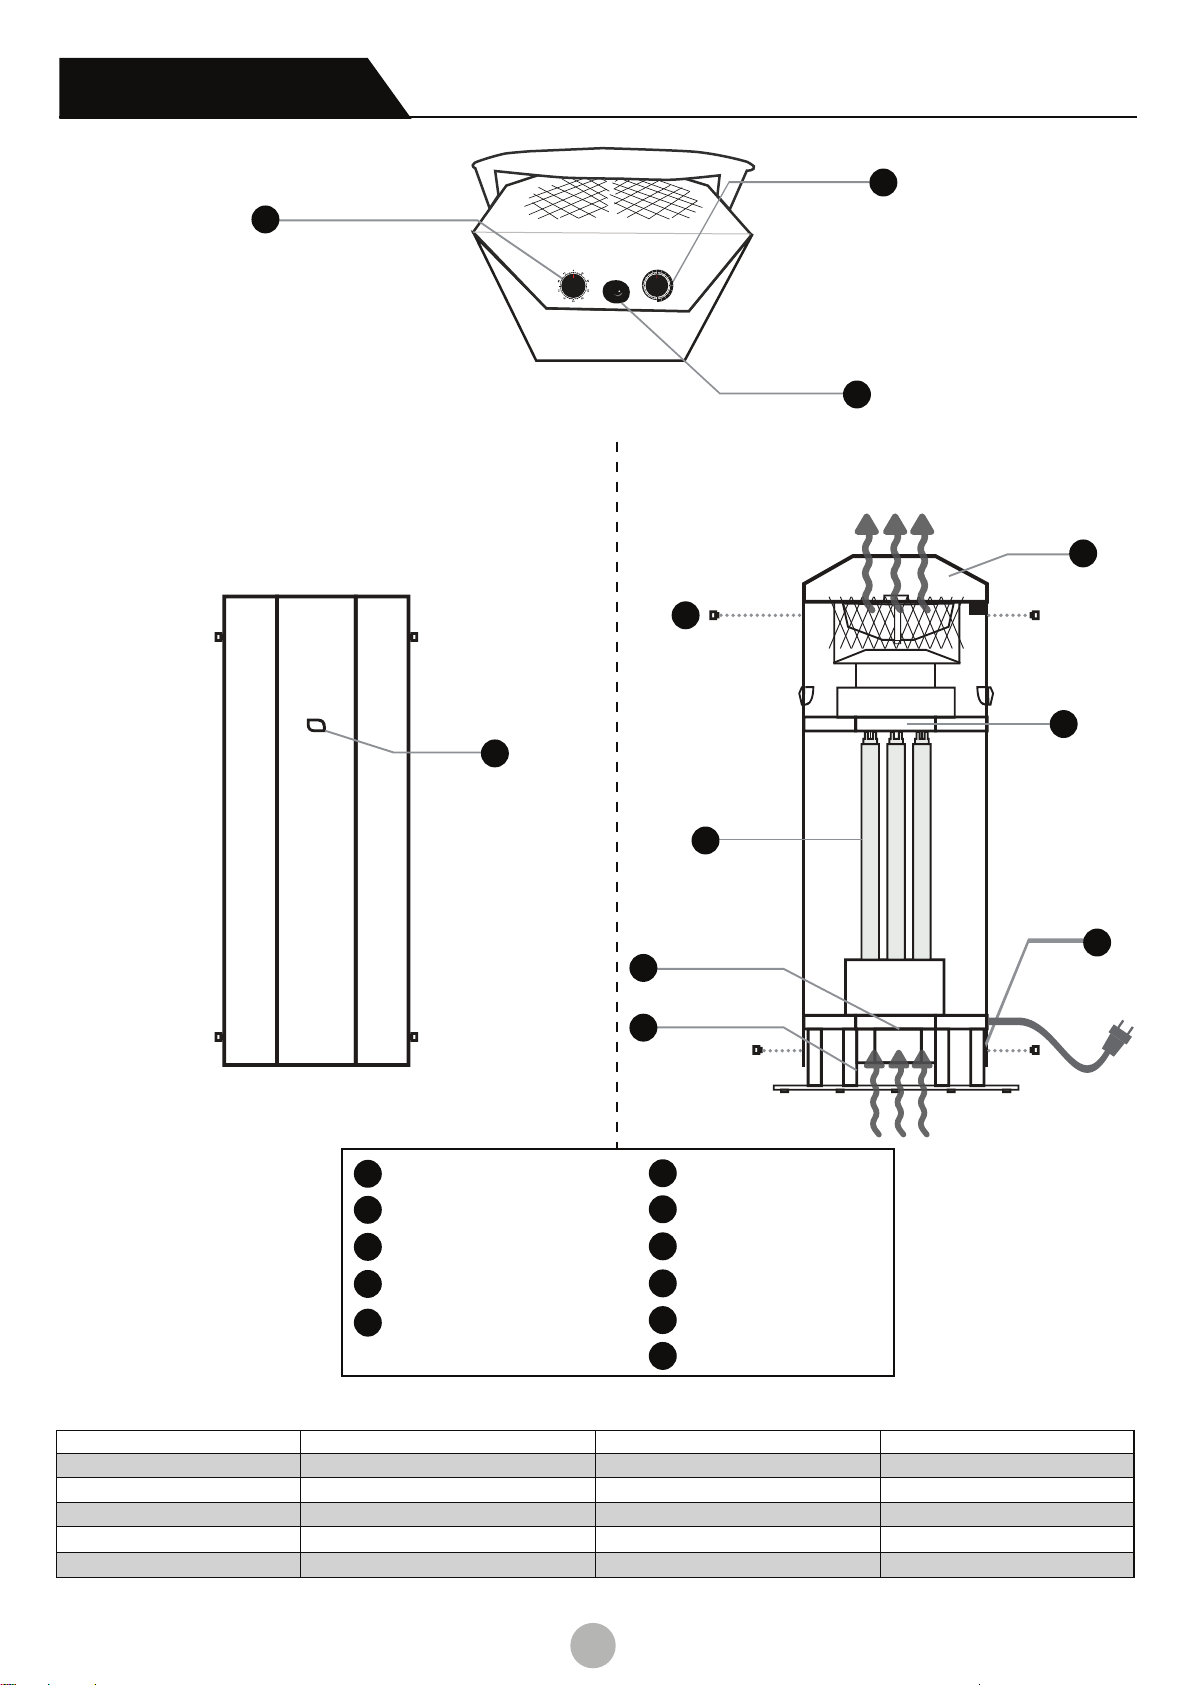
Q1. The product is not
working after I turn it on.
Q2. I turn on the product but
only the fan is working, the
indicator light is still off.
Q3. When I turn on the
product, only the indicator
light is on, the fan is not
working.
Q4. The indicator light is
flashing
Q5. When I turn on the
product, it appears to create
interference with my audio
and video appliances (or
other electronic equipment).
Check if the product is connected to a power socket with correct voltage. (e.g. AC220-240V for Hong Kong)
Check if the front cover is installed properly, with all cover screws fastened securely.
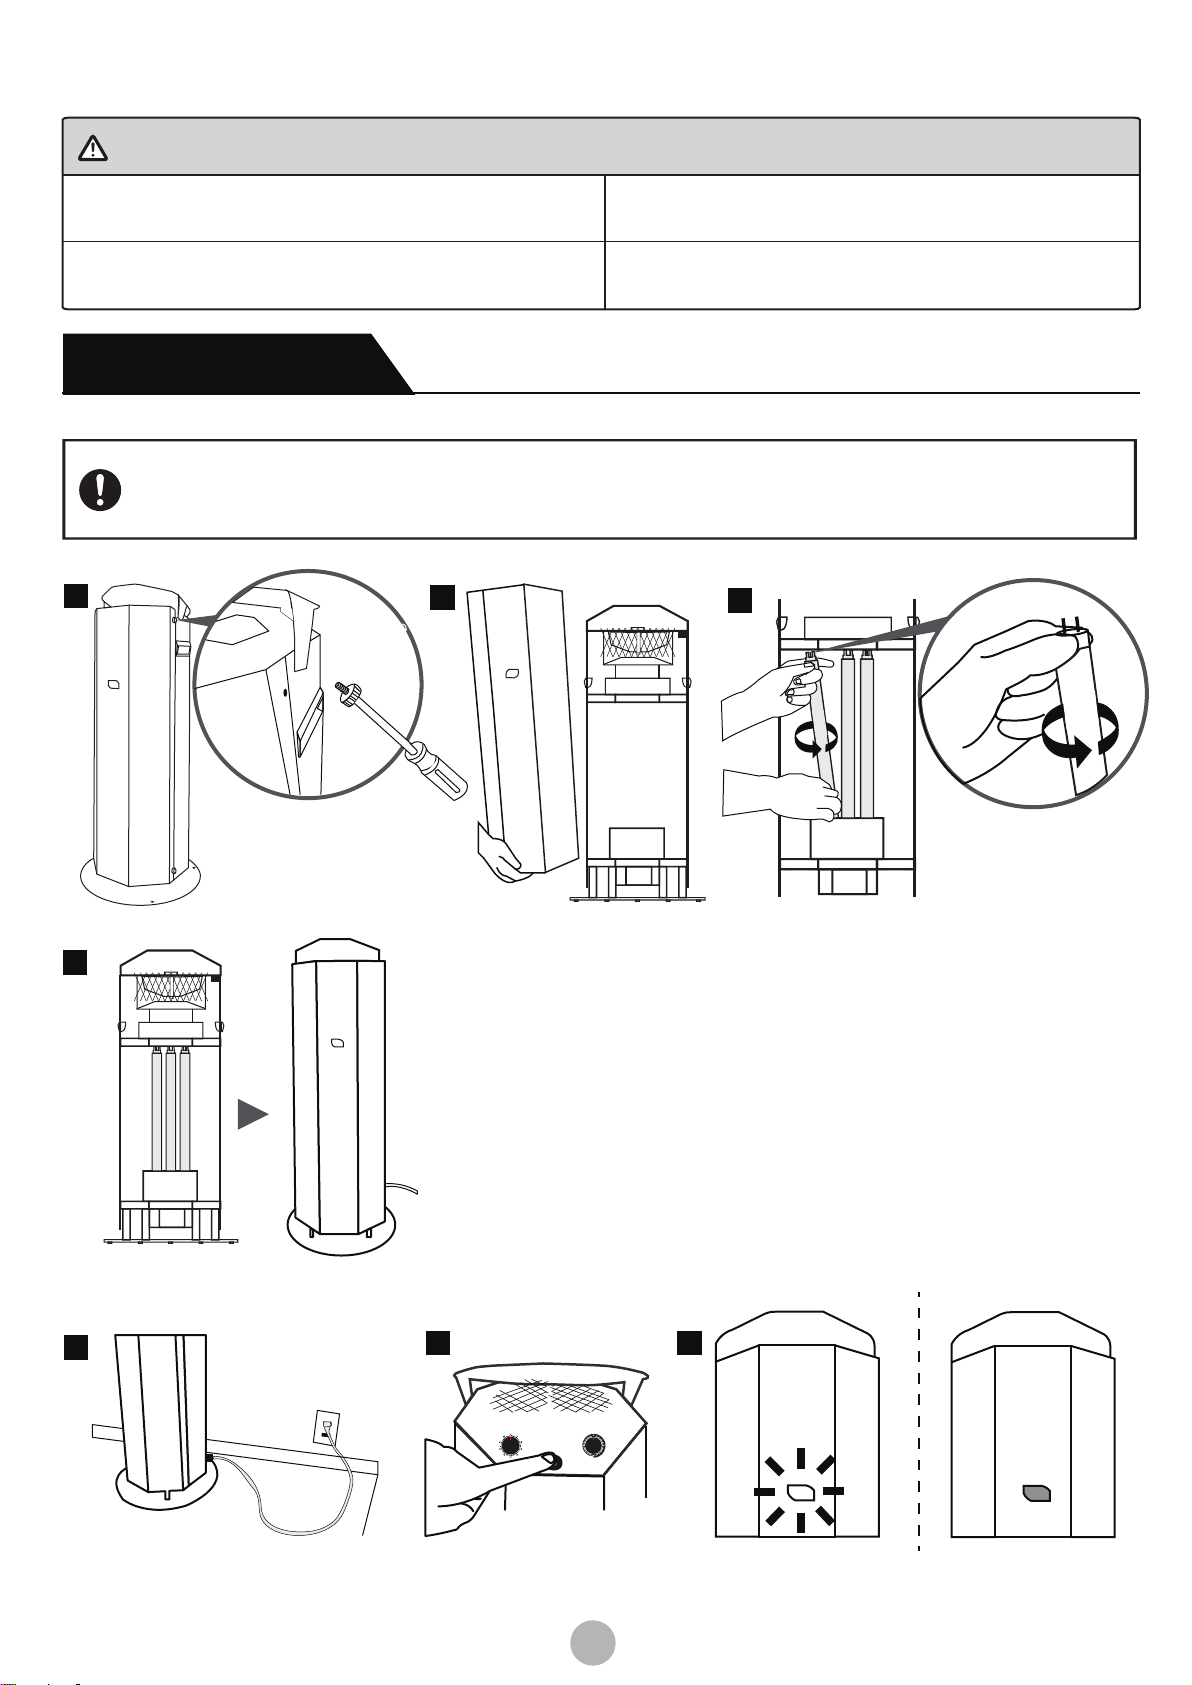
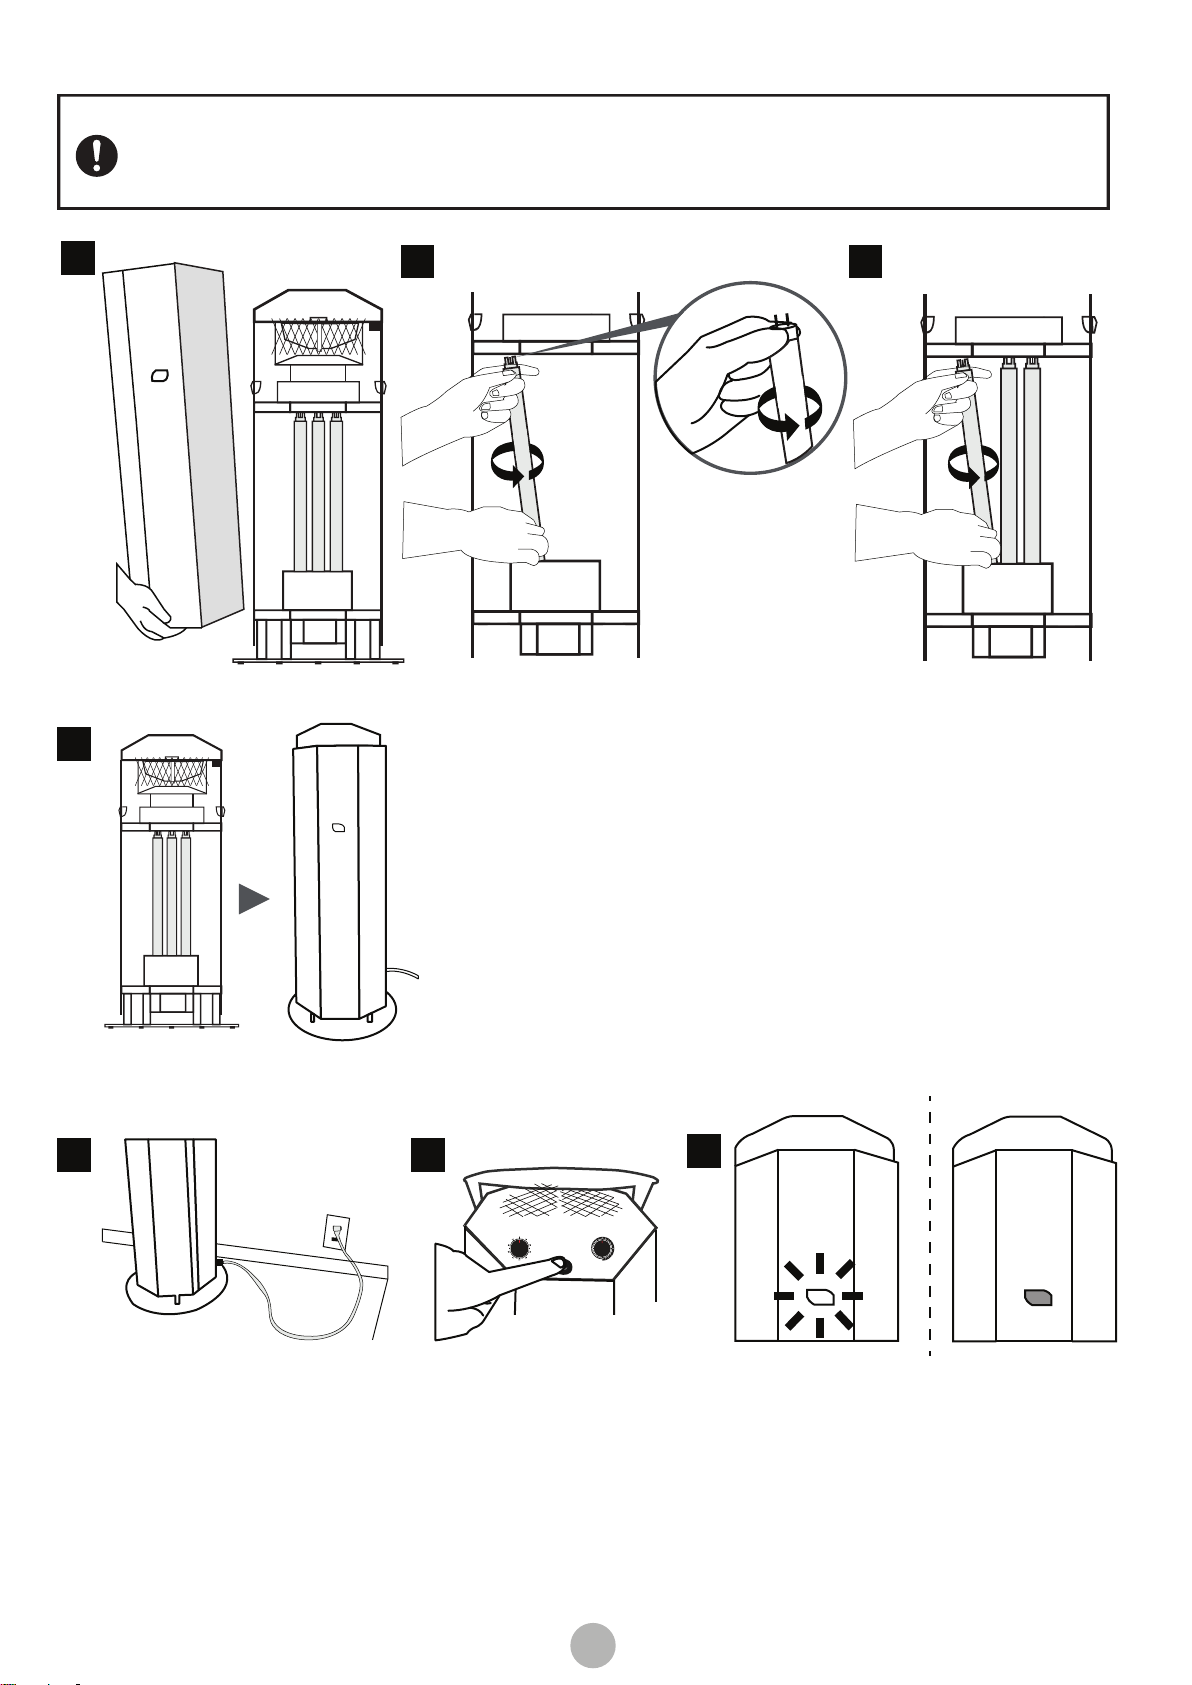
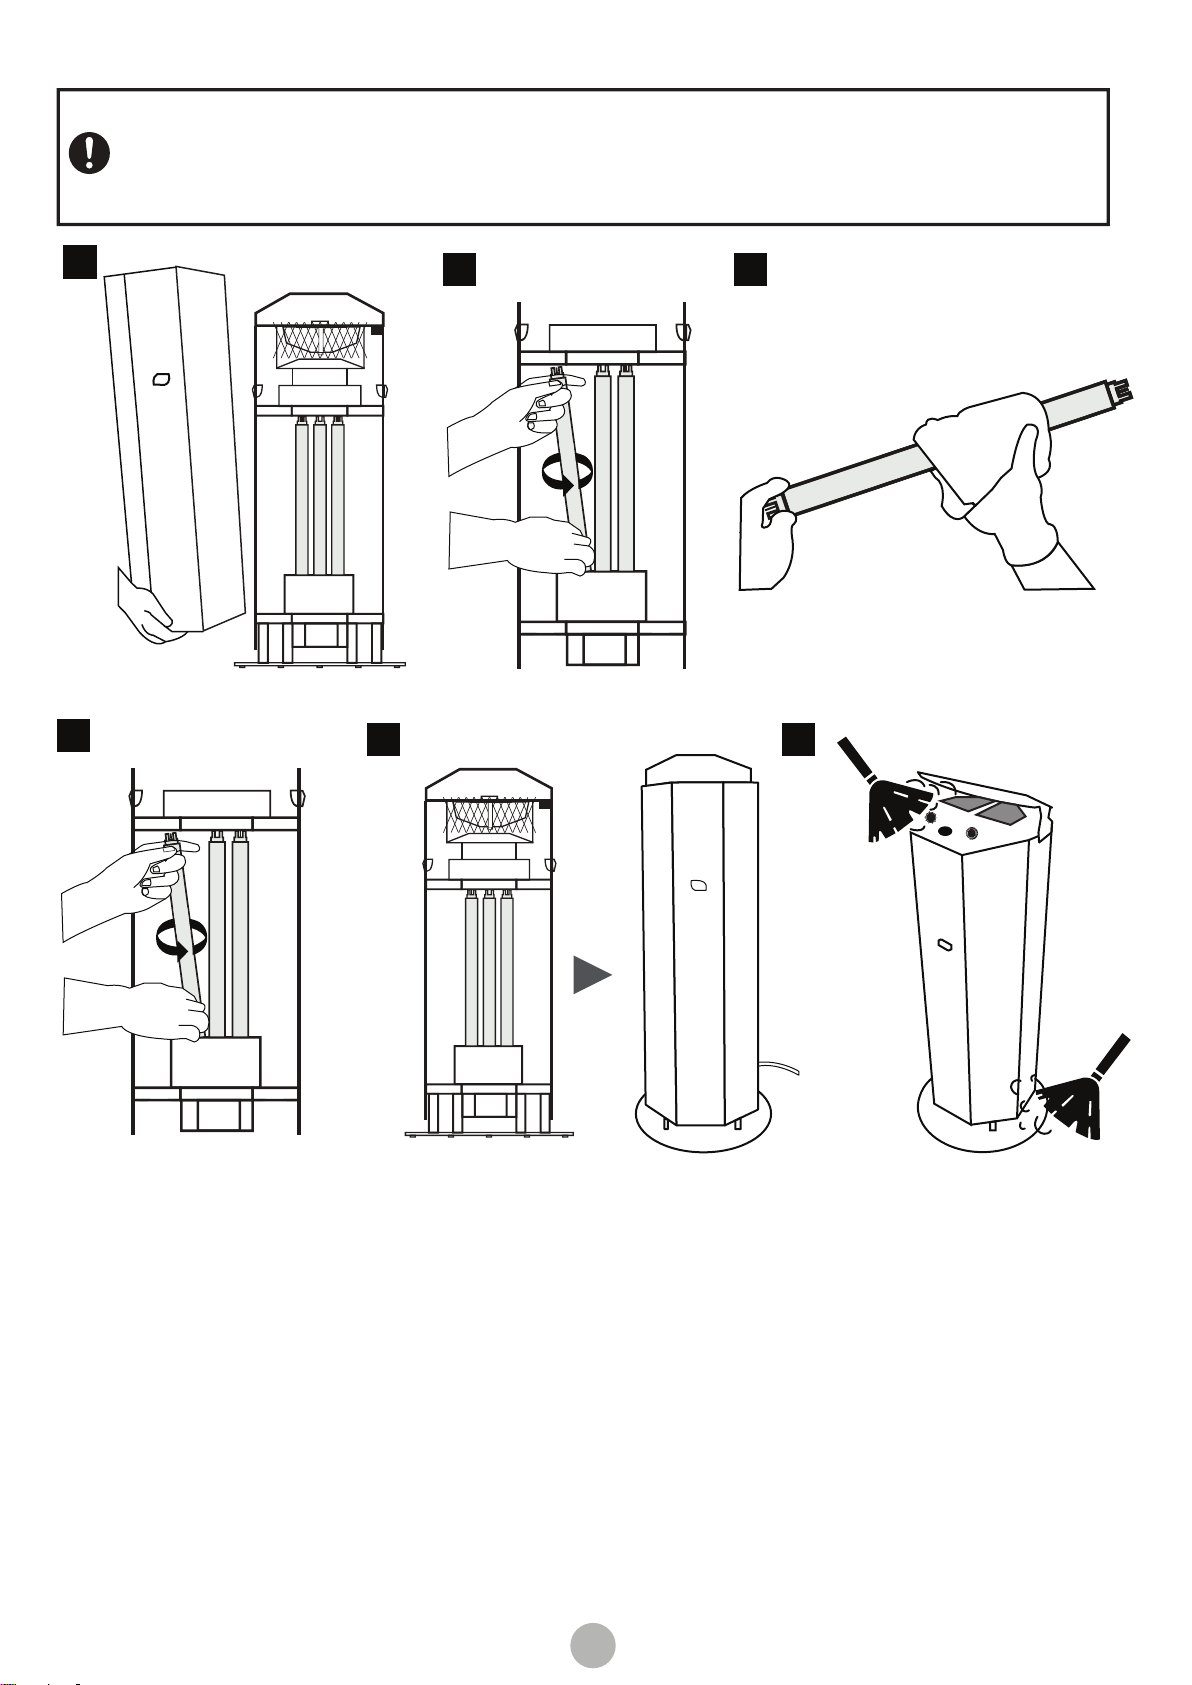
If the product is still not working, it may due to an error in UV-C lamp installation. Please turn off and unplug the
product and repeat the lamp replacement process.
This may caused by incorrect installation of the UV-C lamps. Please turn off and unplug the product and repeat
the lamp replacement process.
If the indicator light is still not working, it may be due to malfunction of the UV-C lamps themselves. Please
replace all the three UV-C lamps.
This may be due to malfunction of the fan. Please contact your dealer.
This indicates that all 3 UV-C lamps have exceeded their recommended hours of operation and are due for
replacement.
If this occurs, increase the distance between the REALCLEAN and another appliance.
ISSUE SOLUTIONS
If you have any questions about repair, handling, or maintenance, please contact your dealer.
If you are unable to contact your dealer, please contact us directly on our website or email [email protected]
NAME
Model: OPCL-GL15X3
PRODUCTION
NO.
Free Warranty Policy
Additional Remarks
WARRANTY
PERIOD
PURCHASE
DATE
ADDRESS
PHONE
SHOP NEARBY
2 year warranty
Consumables are excluded (lamp)
Described on the nameplate of the main body
WARRANTY CERTIFICATE
CUSTOMER
During the warranty period, if the product breaks down under normal use as per the instructions contained in the
instruction manual and warning affixed to the product, and without any unauthorized tampering or misuse, a repair
service will be provided without any charge.
However, the following instances will not warrant a free repair or replacement, even within the warranty period:
A)
B)
C)
D)
E)
F)
G)
H)
If the date of purchase, customer name, or store name is not entered in this manual, or if the original text has
been overwritten.
Failure or damage caused by use prohibited in the instruction manual or similar documents, such as incorrect
use, improper repair or modification.
Failure or damage due to relocation, transportation, dropping of the installation location.
Failure or damage due to fire, pollution, abnormal voltage, unrated working voltage (voltage, frequency),
earthquake, lightning strike, wind and flood damage, salt damage, gas damage (sulfur gas).
When parts need to be replaced due to natural wear and tear, deterioration, etc. of live parts.
In the case of failure or damage caused by the customer's usage environment or maintenance / management
method. (Example: dust, water, rust, invasion of small animals, manure, etc.)
Failure or damage that occurs when mounted on a vehicle or ship.
Failure or damage caused by not performing the maintenance and inspection as outlined in the instruction
manual.
We will make every effort to repair the product that is eligible for a warranty; however, we may replace a new
product instead, depending on the conditions.
The warranty period is counted from the date of purchase (the purchase date printed on the receipt).
Please note that the information entered by the customer may be used for service activities and safety
inspection activities within the warranty period.
This warranty guarantees free repair under the period and conditions specified in this manual. If you are
unsure about repairs after the warranty period has expired, please contact the store where you purchased the
product.
You will need a store stamp and date of purchase stated in this warranty card, or attach the original copy of
the delivery note from us to prove the product is still under warranty, you will be eligible for a free repair.
This manual will not be reissued, so please keep it in a safe place do not lose it.
This warranty is valid only in Hong Kong.
Customers are responsible for the shipping charges for repair requests.
STORE
* This product is not classified as a "medical device" under
electrical appliance safety law.
7
FAQ
Warranty And After-Sales Service

UV-C Air Sanitizer
20220309
Table of contents
Popular Accessories manuals by other brands

Clear-Com
Clear-Com ProGrid PG2-MADI-F-FX user guide

U.S. General
U.S. General 45342 Assembly and operating instructions

digi-tech
digi-tech PDS3500 owner's manual

Silvercrest
Silvercrest STK 36V2 A1 quick start guide

Silvercrest
Silvercrest Z32138 Assembly, operating and safety instructions

M Climate
M Climate LoRaWAN user manual