Optimus 900MHz Rechargeable Wireless Stereo... User manual

Cat. No. 33-1144
OWNER’S MANUAL
Please read before using this equipment.
900MHz Rechar
g
eable
Wireless Stereo Headphones
33-1144.fm Page 1 Tuesday, August 10, 1999 10:16 AM

2
INTRODUCTION
Your Optimus 900 MHz Rechargeable
Wireless Stereo Headphones bring you
the latest in wireless headphone tech-
nology. Using the 900 MHz band, they
can deliver high-quality stereo sound al-
most anywhere in or around your home.
The signals can easily travel through
most walls and floors, so you do not
need to be in the same room as your au-
dio source to hear your favorite pro-
grams.
Your stereo headphones also have the
following features.
Ad
j
ustable Headband — you can easi-
ly adjust the headband for the most
comfortable fit.
On/Off Switch — lets you turn off the
headphones when you are not using
them to save battery power.
Char
g
in
g
Jack — lets you power the
headphones for 7 hours or more on a
single charge.
Volume Control — lets you easily ad-
just the volume to a comfortable listen-
ing level without adjusting the audio
source.
Char
g
in
g
Li
g
ht — automatically lights
green when the transmitter is on and re-
ceiving clear signals from the audio
source, or red when charging batteries.
This symbol is intended to alert you to
thepresence of uninsulated dangerous
voltage within the product’s enclosure
that might be of sufficient magnitude to
constitute a risk of electric shock. Do
not open the product’s case.
This symbol is intended to inform you
that important operating and mainte-
nance instructions are included in the
literature accompanying this product.
RISK OF ELECTRIC SHOCK.
DO NOT OPEN.
CAUTION: TO REDUCE THE RISK OF
ELECTRIC SHOCK, DO NOT REMOVE
COVER OR BACK. NO USER-SERVICE-
ABLE PARTS INSIDE. REFER SERVIC-
ING TO QUALIFIED PERSONNEL.
Warning: To reduce the risk of fire or
shock hazard, do not expose this
product to rain or moisture.
CAUTION
!
!
© 1998 Tandy Corporation.
All Rights Reserved.
Optimus and RadioShack are registered trademarks used by Tandy Corporation.
33-1144.fm Page 2 Tuesday, August 10, 1999 10:16 AM

3
THE FCC WANTS YOU
TO KNOW
Your 900 MHz Rechargeable Wireless
Stereo Headphones System might
cause TV or radio interference even
when it is operating properly. To de-
termine whether your headphone sys-
tem is causing the interference, turn
off your headphone system. If the in-
terference goes away, your head-
phone system is causing the
interference. Try to eliminate the inter-
ference by:
• moving your headphones away
from the receiver
• connecting your headphones to
an outlet that is on a different elec-
trical circuit from the receiver
• contacting your local RadioShack
store for help
If you cannot eliminate the interfer-
ence, the FCC requires that you stop
using your headphone system.
33-1144.fm Page 3 Tuesday, August 10, 1999 10:16 AM

4
PREPARATION
Before you can use your headphone
system, you must find a suitable location
for its transmitter, make the necessary
transmitter connections, then install and
charge the headphone batteries.
CONNECTING THE
TRANSMITTER TO YOUR
AUDIO SOURCE
You can connect the transmitter to either
a headphone jack or audio output phono
jacks on your audio source.
Simply insert the transmitter’s built-in
plug into your audio source’s 1/8-inch
(3.5-mm) headphone jack. Or, insert the
transmitter’s built-in plug to the 1/8-inch
jack on the supplied y adapter then con-
nect the y adapter’s phono plugs to the
audio source (matching red (right chan-
nel) to red and white (left channel) to
white).
To connect the transmitter to a monaural
audio source, insert the transmitter’s
plug into a 1/8-inch (3.5-mm) monaural
plug such as Cat. No. 274-368 (not sup-
plied). Then insert the plug into the au-
dio source’s headphone jack.
Cautions:
• Do not connect the transmitter to
the audio source’s speaker out-
put. Doing so could damage the
transmitter.
• Do not turn the audio source’s
volume beyond about 1/3 of the
maximum if you connect the
transmitter to a headphone jack.
Doing so could damage the trans-
mitter.
CONNECTING THE
TRANSMITTER TO
POWER
To power the transmitter, insert the sup-
plied AC adapter’s barrel plug into the
19V 200mA jack on the back of the trans-
mitter. Then plug the adapter’s other end
into a standard AC outlet.
Cautions:
• Do not leave the adapter plugged
into the AC outlet when the barrel
plug is not plugged into the transmit-
ter.
33-1144.fm Page 4 Tuesday, August 10, 1999 10:16 AM

5
• The supplied AC adapter supplies
19 volts and delivers at least 200
milliamps. Its center tip is set to
negative and its plug properly fits
the transmitter’s 19V 200mA jack.
Using an adapter that does not
meet these specifications could
damage the transmitter or the
adapter.
INSTALLING THE
HEADPHONES’
BATTERIES
To power the headphone receiver, use
the two supplied AA nickel-cadmium
rechargeable batteries.
Cautions:
• Use only fresh batteries of the
required size and recommended
type.
• Do not mix old and new batteries,
different types of rechargeable
batteries, or rechargeable batter-
ies of different capacities.
Follow these steps to install the batter-
ies.
1. Remove the battery compartment
cover on the right earpiece by
pushing up the tab and pulling up the
cover in the direction of the arrow.
2. Place the batteries over the ribbon in
the compartment, as indicated by the
polarity symbols (+ and –) marked
inside.
3. Replace the cover.
When the headphone system stops oper-
ating properly, replace/recharge the bat-
teries. For the best performance and
longest life, we recommend RadioShack
Cat. No. 23-125/23-325.
Cautions:
• Always remove old or weak batteries.
Batteries can leak chemicals that can
destroy electronic parts.
• Dispose of old batteries promptly and
properly. Do not burn or bury them.
33-1144.fm Page 5 Tuesday, August 10, 1999 10:16 AM

6
Important: At the end of the batteries’
lives, the rechargeable nickel-cadmium
batteries must be recycled or disposed
of properly. Contact your local, county,
or state hazardous waste management
authorities for information on recycling
or disposal programs in your area. Some
options that might be available are: mu-
nicipal curbside collection, drop-off box-
es at retailers such as your local
RadioShack store, recycling collection
centers, and mail-back programs.
CHARGING THE
HEADPHONES’
BATTERIES
You must charge the supplied recharge-
able batteries at least 24 hours before
you use the system the first time or
when you replace the batteries.
Follow these steps to charge or re-
charge the batteries.
1. Set the headset’s ON/OFF switch to
OFF.
2. Insert the plug on the transmitter’s
charging cord into the CHARGE jack
on the left earpiece. The charging
indicator on the front of the transmit-
ter lights during fast charging (about
the first 5 hours). The indicator turns
off when fast charging is finished. At
this point, the system is ready to
use. To fully charge the batteries to
its maximum capacity, continue
charging the batteries for another 8–
10 hours.
3. When charging is complete, be sure
to disconnect the charging cord from
the left earpiece.
33-1144.fm Page 6 Tuesday, August 10, 1999 10:16 AM

7
OPERATION
LISTENING SAFELY
To protect your hearing, follow these
guidelines when you use headphones.
• Set the volume to the lowest set-
ting before you begin listening.
After you begin listening, adjust
the volume to a comfortable level.
• Do not listen at extremely high
volume levels. Extended high-
volume listening can lead to per-
manent hearing loss.
• Once you set the volume, do not
increase it. Over time, your ears
adapt to the volume level, so a
volume level that does not cause
discomfort might still damage your
hearing.
USING THE
HEADPHONES
1. Turn on your audio source and
adjust its volume control to the
minimum position.
2. If you connected the transmitter to
a headphone jack, adjust the
audio source’s volume control
until the indicator on the transmit-
ter lights green.
Note: If you connect the transmit-
ter to a line-out (fixed-level) audio
output jack, the volume control on
the audio source has no effect.
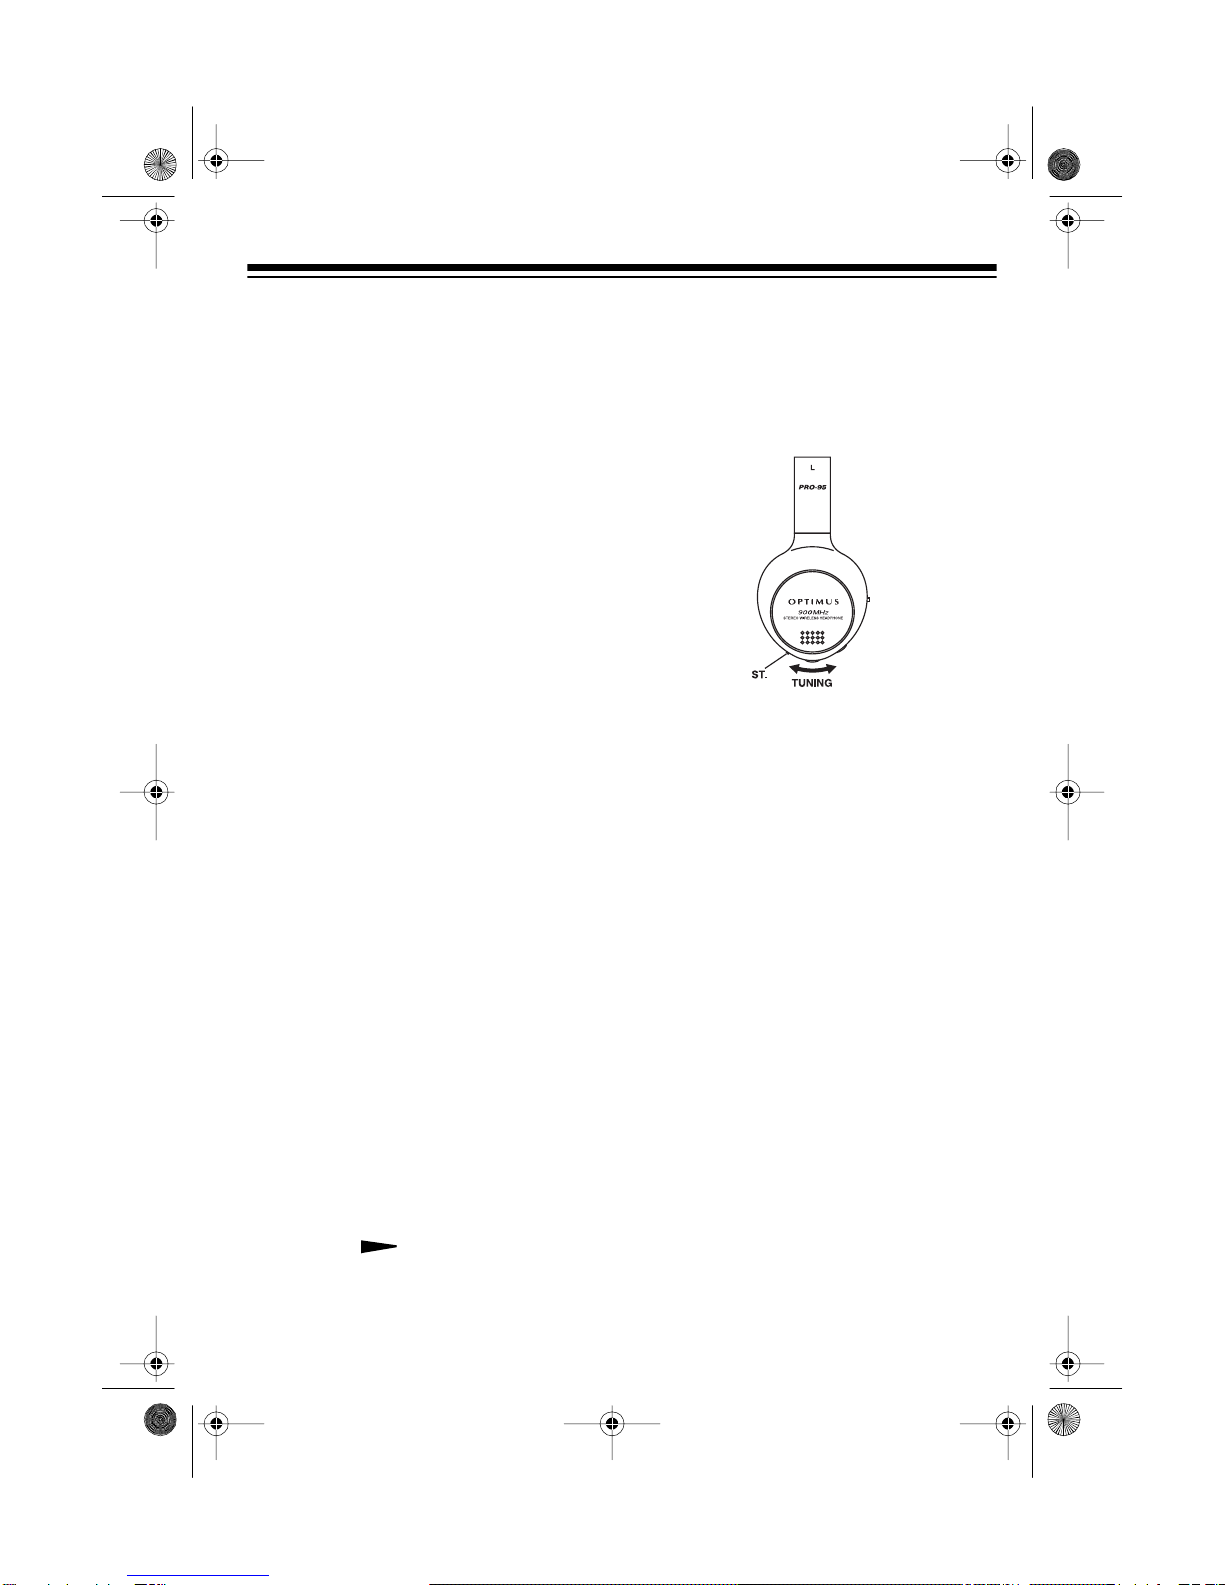
3. Rotate on the headset
upward until it stops to set it at its
lowest level.
4. Set the headphone receiver’s ON/OFF
switch to ON. The indicator lights red.
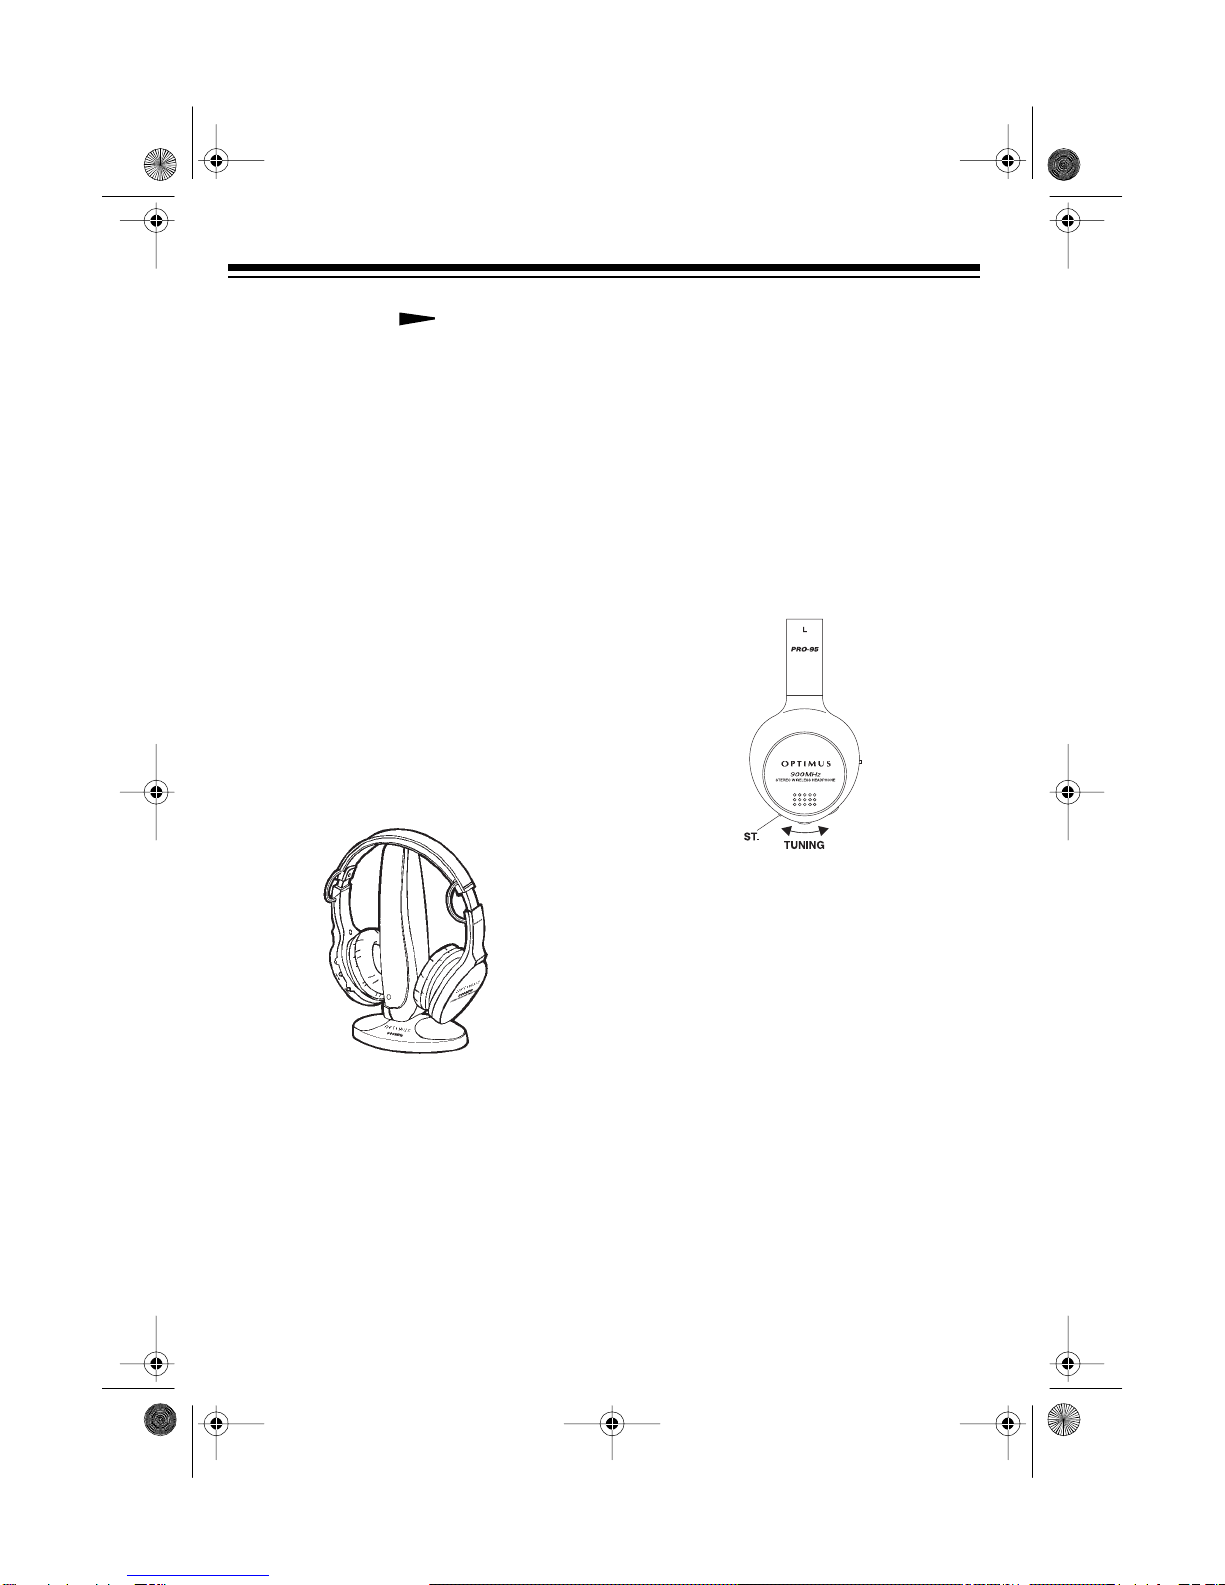
5. Rotate TUNING on the left earpiece
until the ST. (stereo) indicator on the
earpiece lights.
Notes:
• The ST. indicator lights red when
the headphones are receiving a
clear signal in stereo. As you move
out of the transmitter’s range, the
sound distorts and the indicator
turns off. The indicator turns on
again and the sound returns to ste-
reo when you move back into
range.
• If the reception is poor, even when
the batteries are fully charged and
you are near the transmitter, try
moving the transmitter to a higher
location or moving it away from the
audio source.
6. Put on the headphones. If necessary,
adjust the headphones around your
head by pulling down or pushing up on
the headband.
33-1144.fm Page 7 Tuesday, August 10, 1999 10:16 AM

8
7. Slowly rotate on the head-
phones to a comfortable listening
level.
Note: If the audio source’s volume
level is not high enough, the trans-
mitter’s indicator does not light at all
and the sound quality might not be
clear.
8. To turn off the system, take off the
headphones, then set ON/OFF on
the headphone receiver to OFF.
Notes:
• Be sure to turn off the system
when you are not using it to con-
serve battery power.
• You can place the headphones on
top of the transmitter when you
are not using them.
ADJUSTING THE
FREQUENCY
If you receive interference from other de-
vices, you might be able to reduce the
interference by adjusting the stereo
headphones’ operating frequency.
Simply rotate FREQ. ADJUST on the
transmitter then rotate TUNING on the
left earpiece until the headphones’ ST.
indicator lights steadily.
33-1144.fm Page 8 Tuesday, August 10, 1999 10:16 AM

9
TROUBLESHOOTING
We do not expect you to have any problems with your headphones system. How-
ever, if you do have a problem, the following suggestions might help. If you cannot
solve the problem, take the system to your local RadioShack store for assistance.
Problem Solution
No sound Be sure the headphones are turned on.
Be sure the AC adapter is plu
gg
ed in and has power.
Be sure the audio source is turned on and operatin
g
.
If you connected the headphones to jacks that are controlled
by the audio source’s volume control, turn up the audio
source’s volume control until the indicator li
g
ht on the head-
phone’s transmitter li
g
hts
g
reen.
If the ST. indicator on the left earpiece does not li
g
ht steadily,
adjust TUNING on the left earpiece until it turns on.
Adjust the headphones’ volume control.
Chan
g
e the position of the transmitter.
Char
g
e the headphones’ batteries.
Distorted audio If the ST. indicator on the left earpiece does not li
g
ht steadily,
rotate the FREQ. ADJUST control on the transmitter and
adjust TUNING on the left earpiece until it turns on.
Chan
g
e the position of the transmitter.
Other receivers or transmitters that use 900 MHz frequencies
mi
g
ht be interferin
g
with your headphones. Adjust the head-
phones’ operatin
g
frequency (see “Adjustin
g
the Frequency”
on Pa
g
e8).
33-1144.fm Page 9 Tuesday, August 10, 1999 10:16 AM

10
CARE AND MAINTENANCE
Your Optimus 900MHz Rechargeable Wireless Stereo Headphones System is an
example of superior design and craftsmanship. The following suggestions will help
you care for your system so you can enjoy them for years.
Keep the system dry. If it gets wet, wipe it dry immediately. Liquids
might contain minerals that can corrode the electronic circuits.
Use and store the system only in normal temperature environments.
Temperature extremes can shorten the life of electronic devices,
damage batteries, and distort or melt plastic parts.
Keep the system away from dust and dirt, which can cause prema-
ture wear of parts.
Handle the system gently and carefully. Dropping it can damage cir-
cuit boards and cases and can cause the system to work improperly.
Use only fresh batteries of the required size and type. Batteries can
leak chemicals that damage your system’s electronic parts.
Wipe the system with a dampcloth occasionally tokeep them looking
new. Do not use harsh chemicals, cleaning solvents, or strong deter-
gents to clean the system.
Modifying or tampering with the system’s internal components can cause a malfunc-
tion and might invalidate your system’s warranty and void your FCC authorization to
operate it. If your system is not performing as it should, take it to your local Ra-
dioShack store for assistance.
33-1144.fm Page 10 Tuesday, August 10, 1999 10:16 AM

11
SPECIFICATIONS
TRANSMITTER
Operating Frequency ................................................................... 911.5–913.5 MHz
Power Source ...................................................................... 19 VDC, 200 milliamps
HEADPHONES
Frequency Response ........................................................................ 30 Hz–13 kHz
Power Source ............................................................ 2 AA Rechargeable Batteries
S/N Ratio ........................................................................................................ 60 dB
Stereo Separation ........................................................................................... 30 dB
Distortion ....................................................................................................... <1.0%
Operating Range .................................................................. 164 Feet (Open Field)
Size (WHD) .................................................................. 17 9/16 × 7 1/16 × 3 3/16 Inches
(192 ×180 ×81 mm)
Weight (without batteries) ................................................................................. 8 oz
(224 g)
Specifications are typical; individual units might vary. Specifications are subject to
change and improvement without notice.
33-1144.fm Page 11 Tuesday, August 10, 1999 10:16 AM

RadioShack
A Division of Tandy Corporation
Fort Worth, Texas 76102
9A8N Printed in Hong Kong
Limited Ninety-Day Warranty
This product is warranted by RadioShack against manufacturing defects in material and workman-
ship under normal use for ninety (90) days from the date of purchase from RadioShack company-
owned stores and authorized RadioShack franchisees and dealers. EXCEPT AS PROVIDED
HEREIN, RadioShack MAKES NO EXPRESS WARRANTIES AND ANY IMPLIED WARRANTIES,
INCLUDING THOSE OF MERCHANTABILITY AND FITNESS FOR A PARTICULAR PURPOSE,
ARE LIMITED IN DURATION TO THE DURATION OF THE WRITTEN LIMITED WARRANTIES
CONTAINED HEREIN. EXCEPT AS PROVIDED HEREIN, RadioShack SHALL HAVE NO LIABIL-
ITY OR RESPONSIBILITY TO CUSTOMER OR ANY OTHER PERSON OR ENTITY WITH RE-
SPECT TO ANY LIABILITY, LOSS OR DAMAGE CAUSED DIRECTLY OR INDIRECTLY BY USE
OR PERFORMANCE OF THE PRODUCT OR ARISING OUT OF ANY BREACH OF THIS WAR-
RANTY, INCLUDING, BUT NOT LIMITED TO, ANY DAMAGES RESULTING FROM INCONVE-
NIENCE, LOSS OF TIME, DATA, PROPERTY, REVENUE, OR PROFIT OR ANY INDIRECT,
SPECIAL, INCIDENTAL, OR CONSEQUENTIAL DAMAGES, EVEN IF RadioShack HAS BEEN AD-
VISED OF THE POSSIBILITY OF SUCH DAMAGES.
Some states do not allow the limitations on how long an implied warranty lasts or the exclusion of in-
cidental or consequential damages, so the above limitations or exclusions may not apply to you.
In the event of a product defect during the warranty period, take the product and the RadioShack
sales receipt as proof of purchase date to any RadioShack store. RadioShack will, at its option, un-
less otherwise provided by law: (a) correct the defect by product repair without charge for parts and
labor; (b) replace the product with one of the same or similar design; or (c) refund the purchase
price. All replaced parts and products, and products on which a refund is made, become the prop-
erty of RadioShack. New or reconditioned parts and products may be used in the performance of
warranty service. Repaired or replaced parts and products are warranted for the remainder of the
original warranty period. You will be charged for repair or replacement of the product made after the
expiration of the warranty period.
This warranty does not cover: (a) damage or failure caused by or attributable to acts of God, abuse,
accident, misuse, improper or abnormal usage, failure to follow instructions, improper installation or
maintenance, alteration, lightning or other incidence of excess voltage or current; (b) any repairs
other than those provided by a RadioShack Authorized Service Facility; (c) consumables such as
fuses or batteries; (d) cosmetic damage; (e) transportation, shipping or insurance costs; or (f) costs
of product removal, installation, set-up service adjustment or reinstallation.
This warranty gives you specific legal rights, and you may also have other rights which vary from
state to state.
RadioShack Customer Relations, Dept. W, 100 Throckmorton St., Suite 600, Fort Worth, TX 76102
We Service What We Sell
3/97
33-1144.fm Page 12 Tuesday, August 10, 1999 10:16 AM
Table of contents
Other Optimus Headphones manuals