Optimus Polaris Optifuel User manual

OPTIMUS | CLEVER COOKING SINCE 1899™
Polaris Optifuel TM
Universal fuel stove for outdoor use
ARTICLE NO. 8019229
PRINT NO. 8019335/0
ENENEN
FR
DE
NL
DK
SWE
NO
FI
IT
PL
ES
CZ
PT
RU

1
This stove is designed for sports enthusiasts for outdoor cooking and boiling water only
– never use it for any other purpose.
IMPORTANT: This manual uses the terms DANGER, WARNING and CAUTION to indicate
possible safety hazards. Please read these messages carefully and follow the safety
precautions. Please make sure you understand the contents of this manual before using the
stove. Never let children and individuals with diminished mental capacity use this stove.
WARNING
IF YOU SMELL GAS:
- Do not attempt to light stove
- Extinguish any open flame
- Disconnect stove from fuel supply
WARNING - FOR YOUR SAFETY
Do not store or use gasoline or other liquids
with flammable vapors in the vicinity of this or
any other appliance.
ENGLISH
FIGURE [1] FIGURE [13] FIGURE [14]
FIGURE [15]
FIGURE [16]
FIGURE [4]
FIGURE [7]
FIGURE [10]
FIGURE [2]
FIGURE [5]
FIGURE [8]
FIGURE [11]
FIGURE [3]
FIGURE [6]
FIGURE [9]
FIGURE [12]
O-ring Art. No. 8017867
E
D
F
A
B
H
C
G
On
O
OOn
On
O
On
O
Burner Plate
Jet
Cleaning Needle
Pump Rod
Pump Leather
Pump Valve
Fuel Filter
O-Rings
Wick
Bottom Nut
11mm Key
Burner Bottom Nut
Service Functions of the MagicTM Multitool
Hook
7mm Key
Pump Leather Cup
8mm Key
Spindle Nut
Screw Driver
Jet Adjustment
6mm Key
10mm Key
Fuel Hose Change
Cleaning Magnets
12mm Key

2
WARNING CALIFORNIA PROPOSITION 65:
The fuel and byproducts of combustion of this fuel contain chemicals known to the state of
California to cause cancer, birth defects, or other reproductive harm.
SAFETY FIRST
DANGER
If the stove is used incorrectly, it could cause fire, explosion or carbon monoxide
poisoning.
Please keep these instructions in a safe place for future reference.
• If you have any questions, call Katadyn Products Inc. in Switzerland at +41 44 839 21 11;
DANGER CARBON
MONOXIDE
HAZARD
This appliance can produce carbon
monoxide which has no odor.
Using it in an enclosed space can
kill you.
Never use this appliance in an en-
closed space such as a camper,
tent, car or home.
ENENEN
FR
DE
NL
DK
SWE
NO
FI
IT
PL
ES
CZ
PT
RU

3
DANGER
This stove can be used with liquid pressurized gas (LPG) canisters or liquid fuels which
are highly flammable and explosive. Improper or unsafe use can result in accidental fire
and explosions which can cause serious injury or possible death.
• Use outdoors only.
• The Optimus Polaris stove is designed for optional use with Optimus gas canisters
containing 50% Butane / 25% Isobutane / 25% Propane with a threaded valve certified to
the EN 417 standard (max 450g). It is hazardous to attempt to fit other types of gas
canisters.
• Listen and smell for leaking gas. LPG is invisible and may be odorless, as its strong
odorant can fade over time. As a result, leaks are not always detectable by smell.
• If you suspect that there is a leak, do not use the stove or canister. To locate and stop the
leakage, move stove to a well-ventilated area outdoors away from any ignition source.
Check that the stove and fuel canister connection is secure and tight.
• Move the stove away from any spilled fuel.
• Do not use the stove if damaged or if it does not operate properly.
• Use extreme caution when using stove in temperatures below freezing. In freezing
temperatures, O-rings can stien and leak fuel.
• Always check for fuel leaks before and after lighting the stove.
• Keep children more than 3+ meters (10 feet) away from stove and fuel.
• Keep highly flammable fabrics away from stove, such as outdoor clothing, sleeping bags,
tents etc.
• Never leave a burning or hot stove unattended.
• Do not use for space heating.
• Always store fuel bottle tightly closed and gas canisters in cool, well ventilated areas away
from heat or ignition sources, such as water heaters, stoves, pilot lights, furnaces, and
electric devices. Use extreme caution when storing stove fuel.
WARNING
Risk of fire and explosion when using fire to detect fuel leaks.
• Only check for leaks using soapy water. Do not try to detect leaks using a flame.
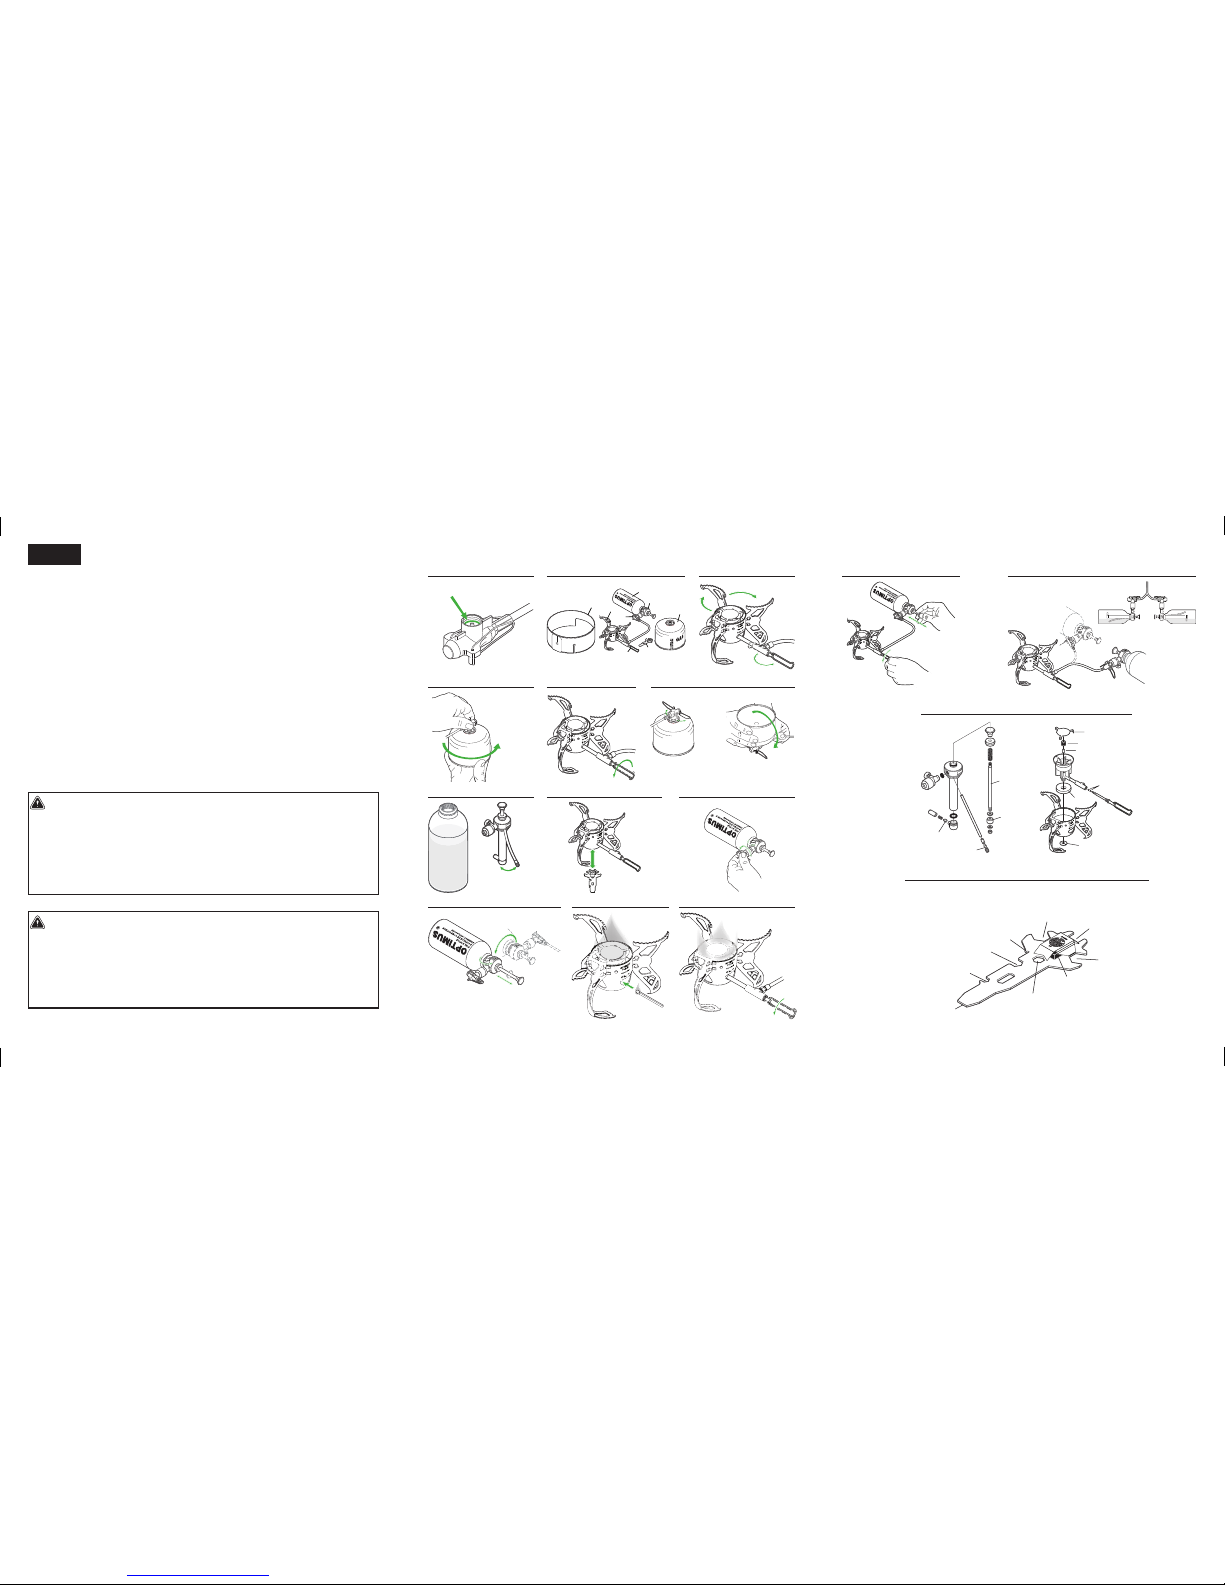
• Always check the fuel connector O-ring before connecting a new fuel canister or fuel bottle
to the stove. Do not use the stove if O-ring is damaged or worn. FIGURE [1]
WARNING
If you expose the gas canister or fuel bottle to high heat, it could explode or leak.
• Keep stove, fuel canister and fuel bottle away from other heat sources.
• Follow all warnings on fuel canister regarding use and storage.
• Do not attach or remove canister near high heat, open flames, direct sunlight, other
ignition sources or where temperature of canister exceeds 50°C (120°F).

4
INSTRUCTION FOR USE
Before using your Optimus Polaris, read the entire manual. To minimize any risk of serious
injury or possible death, follow the instructions and safety precautions in this manual. Only
use the stove as described in this manual.
FIGURE [2]
A: Pot Supports E: Fuel Pump
B: Control Valve F: Fuel Connector
C: Gas Canister G: Windscreen
D: Fuel Bottle H: Multitool
TECHNICAL SPECIFICATIONS (STOVE ONLY):
Fuel: Butane/Isobutane/Propane gas canister, certified to EN standard 417 (max 450g),
common liquid fuels (White gas, Gasoline, Kerosene, Diesel, Jet fuel) Weight: 475 g
(16.75 oz) Measurement folded: 140 mm (5.52 in) x 80 mm (3.2 in) x Ø 65 mm (2.56 in)
Rating: Canister gas 3300 W / 11267 BTU ; White gas 4200 W / 14340 BTU Burn Time:
Canister gas (230g): up to 105 min; White gas (0.4 l): up to 100 min. depending on climate,
altitude, etc. Injector Size: 0.32mm EN521:2006: Category direct pressure – butane /
propane mix
CE-845CP-0025
SET UP STOVE
1. Lay out hose to full length and make sure that it is not twisted in any place.
2. Fold out the control valve handle and make sure that it is fully closed (turned fully
clockwise). FIGURE [3]
3. Fold out pot supports. FIGURE [3]
4. It gets very hot under the stove, so remember to place it on a firm base which is not
flammable. It is compulsary to use a floor shield when using this appliance on a
combustible surface.
5. Keep stove area clear and free from combustible materials, gasoline and other
flammable vapors and liquids.
6. Allow plenty of free space around the stove and keep solid combustibles at least 1.5 m
(4.5 feet) away from the top and on each side of a burning stove or a stove which you are
in the process of lighting.
7. Keep flammable liquids and vapors at least 8m (25 feet) away from the top and sides of a
burning stove, or a stove which you are in the process of lighting.
ENENEN
FR
DE
NL
DK
SWE
NO
FI
IT
PL
ES
CZ
PT
RU

5
8. We recommend using the windscreen for optimal results. Make sure that the gas canister /
fuel bottle is placed outside the windscreen. Adjust windscreen to pot diameter and allow
a gap of 2.5 cm (1 inch) between pot and windscreen for sucient air intake. Always place
the windscreen carefully AFTER the stove is lit.
OPERATION OF THE OPTIMUS POLARIS
WITH GAS CANISTERS
1. CONNECT STOVE TO GAS CANISTER
1. Hold onto the fuel connector of the stove and screw the canister counterclockwise tightly.
Tighten by hand only and be careful not to damage the threads when you connect the gas
canister. FIGURE [4]
2. Always keep the gas canister in upright position while connecting to the stove. FIGURE [4]
3. Make sure the stove and canister are in a stable horizontal position so they do not tip over.
WARNING
Risk of burning or serious injuries due to gas leakage hazard.
• Never light the stove if you detect a hissing sound or the smell of gas after tightening the
canister to the stove. The gas has an additive with a foul smell. Never use a stove that
smells of gas.
• Never overtighten the fuel canister when connecting it to the stove. Overtightening can
damage stove or canister causing fuel to leak.
2. USE THE STOVE TO COOK
1. Always light your stove with the canister in upright position (vaporized gas mode) to avoid
large flare ups.
2. Open the control valve approximately one turn counterclockwise and bring a powerlighter
(blue flame); e.g. Optimus Burny close to the top of the burner to light it. FIGURE [5] When
using a match or a normal lighter (yellow flame) it is easier to light up the stove from the
side via one of the holes in the cup. FIGURE [11] The flame ring should be complete, mostly
blue and non-pulsating in normal operation.
3. Adjust the control valve to get the flame you want.

6
4. If the output is weak, it could mean that the gas is running out or that the canister is too
cold. Turn o the stove and let it cool down. When a canister change is necessary, please
follow steps 3 & 1 of this manual carefully. Make sure there is no open flame nearby when
changing the canister.
5. Accessible parts may become very hot. Keep out of reach of children, people with
diminished mental capacity and pets.
TIPS FOR OPTIMAL USAGE:
• Use the stove in vapor gas mode in normal conditions and for optimal simmering results.
• Use the stove in liquid gas mode when cooking in colder conditions, when a shorter boil
time is needed or when pressure in canister is low. Fold out the canister support legs on
the fuel connector and turn canister over slowly. Keep canister low when inverting it and
hold the fuel hose with one hand in position to avoid movement of the stove. FIGURE [6]
Take extra care that the canister is standing stable and continue cooking in liquid gas
mode.
• For better performance keep the gas canister warm inside your jacket or in your sleeping
bag at night.
WARNING
Risk of burning or serious injuries due to flare up hazard when lighting up the stove in
liquid gas mode.
• Let the stove burn for 30 seconds before inverting the canister for preheating.
• Never hold your face or any other part of your body above the burner while lighting the
stove or cooking.
• Never shake a canister when the stove is lit as you risk big flare-ups.
WARNING
Overheating and explosion hazards
• Never allow a canister inside the windscreen perimeter.
• Never attempt to light a stove if control valve has been left open. If control valve is left
open, close it immediately and thoroughly ventilate the area before lighting the stove.
Failure to ventilate the area can result in an explosion.
• Never use cookware with a diameter larger than 220 mm (8.5 inches). The pan plus food
must not weigh more than 4 kg (8.8 lbs) combined.
• Never place and operate 2 or more stoves together.
• Never operate stove with empty or dry cookware.
• Never use non-Optimus heat reflectors or windscreens.
ENENEN
FR
DE
NL
DK
SWE
NO
FI
IT
PL
ES
CZ
PT
RU

7
3. TURN OFF, COOL AND PACK STOVE
1. Make sure the canister is standing in upright position (vapor gas mode) before turning o
the stove.
2. Turn o the stove by turning the control valve handle fully clockwise and double check that
the flame is completely extinguished.
3. Allow stove to cool for at least 10 minutes before moving it.
4. Disconnect the gas canister.
5. It is normal for a small amount of gas to fizz out when you unscrew the gas canister.
6. Fold in pot supports and place stove in stu sack.
CAUTION
Risk of burning due to incorrect handling and storage
• Do not turn o the stove with the canister being in liquid gas mode, as more gas will fizz
out when the fuel connector is disconnected from the canister.
• Never move a burning or hot stove.
• Storing gas canisters near any heat or ignition source, or where temperatures exceed 50°C
(120°F) can result in the canister exploding.
OPERATION OF THE OPTIMUS POLARIS
WITH LIQUID FUEL
1. PREPARE FUEL BOTTLE
1. Do not fill fuel bottle to the top; only to the maximum filling line indicated on the fuel bottle.
You must leave space for the pump and the air which is needed to compress when you
pressurize the bottle.
2. Make sure the fuel intake hose is bent away from the pump. The brass tip of the intake
hose should touch the interior wall of the fuel bottle once the pump is inserted. FIGURE [7]
3. Check that the seal is positioned correctly in its groove before you turn the pump into
position. It must be flat and smooth.
4. Screw on the pump until it is tightly sealed and wipe o any spilled fuel.
5. Read more about the performance and the handling of various fuels in the FUELS section.

8
WARNING
Risk of burning or serious injuries due to fuel leakage hazard.
• Use only Optimus fuel bottles. Non-Optimus fuel bottles may leak fuel.
2. CLEAN BURNER JET
• All fuels contain contaminants that can block the jet in the burner.
• The Optimus Polaris has a built-in cleaning needle. Slide the multitool a few times
underneath the burner to operate it (using magnetic power) before and after each
use.
FIGURE [8]
3. CONNECT STOVE AND PUMP
1. Make sure that the fuel feed valve is fully closed (turned fully clockwise). FIGURE [9]
2. Connect the black fuel connector to the pump by screwing it onto the thread of the pump
coupling. To do so, turn the black pump coupling counterclockwise. FIGURE [9]
WARNING
Risk of burning or serious injuries due to fuel leakage hazard.
• Screw fuel connector tightly, all the way down to the end of the thread to ensure complete
sealing and avoid leaking of fuel.
4. PRESSURIZE FUEL BOTTLE
The fuel in the bottle is not pressurized, so you must pump up pressure before the stove
can be lit and used.
1. Place the bottle in the ON position (ON on top) FIGURE [10] when you want to use the
stove.
2. If fuel bottle is full (3/4 is full), you will need to pump around 25 strokes. Pump about 40
strokes if the bottle is half full or less. There must be firm resistance in the pump when you
reach the stove’s working pressure. FIGURE [10]
3. Open the fuel feed valve fully. FIGURE [10]
4. The air pressure in the fuel bottle is crucial to the heat of the stove. While operating the
stove you may have to do some more pumping in order to maintain maximum heat.
ENENEN
FR
DE
NL
DK
SWE
NO
FI
IT
PL
ES
CZ
PT
RU

9
However, if you pump up too high a pressure, the fuel flow will be too great, resulting in an
inecient yellow flame.
WARNING
Risk of burning or serious injuries due to fuel leakage hazard.
Check visually for any fuel leakage after having opened the fuel feed valve. Never light a
stove that is leaking fuel.
5. PREHEAT STOVE
Risk of burning or serious injuries due to fuel leakage hazard.
1. Start by opening the control valve for two seconds to release fuel, then close the control
valve. It is dicult to see how much fuel has run out onto the wick, but as time goes by
you will get a feel for this. Proceed with caution as you familiarize yourself with your stove.
2. Light the fuel at the wick using a match or a lighter. The wick is the white pad in the
bottom of the cup. This is accessed from the side via one of the holes in the cup.
FIGURE [11]
3. If the stove cannot be lit, you might not have released enough fuel. If this is the case,
repeat the preheating process.
4. The fuel will burn with a yellow, flaring flame and heat the burner. Wait a short time until
the fuel has almost burned out and the flame has become small.
5. The preheating time varies depending on what type of fuel you are using. For example,
white gas is vaporized more readily than kerosene and requires less preheating.
6. Preheating takes longer when it is cold and if the stove is not protected from the wind.
DANGER
Risk of burning or serious injuries due to flare-up hazard when preheating the stove
with liquid fuel
• Never attempt to light a stove if the control valve is left open. Leaving the control valve
open while lighting can result in a large flame that can cause serious injury, possible death
and property damage.
• Never preheat your stove in an enclosed space and remove all combustible and flammable
material from the area beforehand.

10
6. USE STOVE TO COOK
1. Once the preheating flames are almost out, open the control valve again by a quarter turn.
If the burner is hot enough, vaporization of the fuel takes place. The flame ring should then
be complete, turn blue and hiss gently. FIGURE [12] If the vaporized fuel does not ignite,
light it carefully with a match.
2. A yellow, flaring flame means that the burner is not hot enough or that the control valve is
opened too far. To avoid that, close the control valve slightly. If the flame does not turn
blue after 10 - 15 seconds, the burner is not hot enough and you have to preheat the stove
longer. In this case, close the control valve one more time, wait until the flames are almost
out and then open the control valve again.
3. When the stove is properly burning, you can gradually open the control valve and increase
power. Maximum power is reached when the control valve has been opened by about two
turns. If you open it by more than two turns, you will use up more fuel without making the
stove any hotter.
4. If the flame flares up and turns yellow, turn down the control valve slightly and wait until
the flame has turned blue again.
5. Once the stove is burning for a while, maintain pressure in the fuel bottle with
additional pumpstrokes. Too little pressure will result in poor performance. Too much
pressure will lead to a yellow, flaring flame. With some practice, you will learn how often to
pump in order to maintain an eective flame.
DANGER
Risk of burning due to incorrect handling
Make sure to arrange the pump head and the control spindle before you in a safe and
ergonomic way FIGURE [13], so that you are not getting too close to the flame during
operation of the stove.
7. TURN OFF, COOL AND PACK STOVE
1. Turn the fuel bottle to the OFF position while the flame is burning. OFF will then be visible
from above on the pump. FIGURE [14] The fuel in the hose will now burn up and the
remaining pressure in the bottle will be released.
2. The flame will not go out immediately, but will burn for a few minutes depending on which
fuel you are using and how far the control valve is open.
3. If the stove is to be used again without being moved, you can switch o the stove using
the control valve. Allow the stove to cool properly before lighting it again.
4. Allow stove to cool for at least 10 minutes before packing it.
ENENEN
FR
DE
NL
DK
SWE
NO
FI
IT
PL
ES
CZ
PT
RU

11
5. Leave the control valve open when you have shut o the stove by turning the bottle to the
OFF position. If you close the valve when the stove is hot, it may be hard to open the next
time you use the stove.
6. Close the fuel feed valve fully.
7. Disconnect the fuel connector from the pump. Sometimes, there may be some pressure
left in the bottle, which could release fuel when you disconnect the fuel hose. Turn your
face away from the stove to protect your eyes and be sure not to disconnect the fuel hose
near open flames.
WARNING
Risk of burning or serious injuries due to incorrect fuel pressure release.
• If you turn o the stove by closing the control valve only, you can only release the pressure
in the bottle by unscrewing the pump head from the bottle. This is potentially dangerous
as fuel could spill on you and your equipment.
• Do not remove pump from fuel bottle near a hot stove or open flame. Fuel may splash on
the hot burner and ignite causing serious injury, possible death and property damage.
• Be very careful when lighting a stove that has just been used. A hot burner can vaporize
the fuel. Vaporized fuel is very dicult to see. There is a risk that the fuel will ignite
explosively causing burns.
• Never move a burning or hot stove.
FUELS
• When liquid fuels are used, the Optimus Polaris can only be operated with
petroleum-based fuels (not with alcohol-based fuels).
• For optimal performance and less risk, we recommend to use chemically pure white gas or
high-quality kerosene.
• Under no circumstances should you handle fuel near an open flame, lit stove or in your
tent.
• Use a filter funnel when filling the bottle to avoid dirt and foreign contaminants getting into
the fuel bottle.
• Never mix dierent kinds of fuel. Empty the bottle entirely before putting in a dierent fuel.
GASOLINE
• Gasoline is highly flammable, volatile, burns explosively and preheating occurs quickly.
Only use with utmost caution.
• Ordinary automotive gasoline contains additives which will contaminate your stove and are
hazardous to your health. If you have to use automotive gasoline, use unleaded wherever
possible.

12
KEROSENE (PARAFFINE)
• Kerosene has a similar energy value as gasoline, but is considerably less hazardous.
• Preheating takes slightly longer with kerosene than with gasoline and is slightly sooty, but
there is not much of a risk of explosion.
• Cleaning the burner is required more often.
• Use kerosene, as it is primarily designed for use in stoves and heaters. We do NOT advise
the use of lamp oil or fire lighting fluid (charcoal lighter).
• In extreme cold, there is a risk of kerosene solidifying, which makes the stove unusable.
DIESEL
• Diesel is similar to kerosene, but preheating takes longer and it produces even more soot.
• We recommend that you only use diesel as a last option. If you do so, use diesel for cars.
Avoid marine diesel entirely.
ROUTINE MAINTENANCE
1. CLEANING THE JET
• If you operate the cleaning needle while the stove is burning, the flame may go out. Keep a
match or lighter at hand to relight the stove if necessary. FIGURE [8]
2. CHECKING THE O-RINGS
• It is important to ensure that the O-rings of the control valve spindle and the fuel
connector are complete and undamaged in order to avoid fuel leakage.
• Get into the habit of occasionally checking the two O-rings by unscrewing the control
valve and spindle.
• Replace the O-rings if you suspect that they are damaged by teasing them out with a tool
such as the blunt end of a sewing needle. Never use a sharp or pointed object that can
damage the seal surfaces. Fit the new O-rings with care to avoid damaging them.
3. LUBRICATING THE PUMP LEATHER
• Lubricate the pump leather using Optimus silicone lubricant so the pump will function
correctly. It is particularly important to check this if the stove has not been used for a long
time. The pump leather is located at the far end of the pump rod. This is accessed by
unscrewing the pump rod and pulling out the pump rod entirely from the pipe. FIGURE [15]
Lubricate the leather using a small amount of lubricant (butter can be used in an
emergency).
ENENEN
FR
DE
NL
DK
SWE
NO
FI
IT
PL
ES
CZ
PT
RU

13
ADVANCED STOVE MAINTENANCE
REPLACING THE FUEL FILTER
If you are still having problems with the stove, the fuel filter may need to be replaced. The fuel
filter is located at the end of the plastic tube on the fuel pump. Unscrew the patterned part of
the filter holder and push the filter out using a pointed object. Make sure the filter holder is
clean before inserting the new filter. If you are without a replacement fuel filter, the stove can
be used without one until one can be acquired. It will be more sooty than usual and will
require more cleaning. Some fuels also tend to flare more if no filter is fitted. Replace the filter
as soon as possible. FIGURE [15]
CLEANING THE JET AND CLEANING NEEDLE
If the stove is not functioning satisfactorily and the steps above do not help, the jet and
cleaning needle may need to be cleaned. Remove the burner plate, use the tip of the
multitool as a screwdriver and unscrew the jet. Remove the cleaning needle from the burner.
Wipe clean the cleaning needle body and the inside of the jet. Clean the jet hole by carefully
pushing the cleaning needle through the jet and reassemble all parts to their initial operating
position. FIGURE [15]
CLEANING THE FUEL GROOVES OF THE CONTROL VALVE
If the stove is still not performing, the spindle’s fuel grooves may need to be cleaned.
Unscrew the control valve (+) as far as it will go. Use the multitool to unscrew the spindle
nut. Unscrew the control valve fully and then pull it out together with the spindle. Clean
carefully the grooves running the length of the spindle close to the tip using a fingernail for
example. Take care not to damage the spindle threads. FIGURE [15]
WARNING
• Do not disassemble stove or pump beyond what is described in this manual.
Disassembling or modifying the stove or the pump in any manner not consistent with these
instructions voids the warranty and can result in an unsafe situation where fire, burns,
severe injury or death can occur.
• Do not use stove or pump if parts are missing or broken, or with replacement parts not
specific to your stove model. Use of stove with missing, broken or incorrectly specified
parts can result in an unsafe situation where fire, burns, severe injury or death can occur.
Only qualified individuals are allowed to do additional service. For major repairs, send
the stove back to Katadyn Group.

14
TROUBLESHOOTING
FUEL IS LEAKING OUT
• Between the bottle and the pump
Check that the pump is screwed on securely.
Check the rubber gasket, and replace it if it is damaged.
• At the fuel connector
Check the O-ring in the housing of the connector and replace it if it is damaged, worn or
missing.
• At the control valve
Unscrew the control valve and check the O-rings. Replace them if they are damaged.
• Between the fuel hose and the control valve
Dismantle, clean and reassemble.
• From the hole where the pump rod enters the pump
The pump’s valve is leaking and has to be replaced. This is also evident by the pump rod
slowly coming out of the pump pipe.
THE FLAME IS YELLOW AND FLARING
• Insucient preheating
Allow preheat flame to reduce in size (approximately 2 minutes). When flame turns blue
preheating is complete.
• You have opened the control valve too far
Turn down the control valve.
• Impure fuel
Use only petroleum based fuels such as gasoline, kerosene and diesel. Do not mix dierent
types of fuel.
• Poor oxygen supply
Make sure that your stove has free access to air.
• The jet is loose
Let the stove cool down, then screw the jet into position.
THE FLAME IS LOW
• Bottle pressure too low
Pump a few times to increase the pressure in the bottle. If this does not help, check
whether the pump leather is dry or damaged. Soften it with your fingers and lubricate it with
oil or replace it if required. Also, make sure that the pump valve is not stuck open. Finally,
make sure that the pump is screwed together properly.
• Jet blocked
See Advanced Stove Maintenance.
ENENEN
FR
DE
NL
DK
SWE
NO
FI
IT
PL
ES
CZ
PT
RU

15
• Fuel filter clogged
If output increases when the fuel bottle is turned to the OFF position, then the fuel filter is
clogged. Replace the fuel filter. See Advanced Stove Maintenance for details.
• Fuel grooves on the control valve spindle blocked
Unscrew the control valve spindle and clean the grooves. See Advanced Stove
Maintenance for details.
SPARE PARTS
For simple pump maintenance of your Optimus Polaris stove, the Optimus silicone lubricant
Art. No. 8018276 is included with the purchase.
We recommend that you perform regular maintenance in order to enhance the life and
reliability of the stove. For this purpose, Optimus provides a Regular Maintenance Kit Art. No.
8016305.
If you are going o on longer trips, we recommend that you take along Extensive Repair Kit
Art. No. 8017632 for your Optimus Polaris stove. This will allow you to perform advanced
maintenance measures in the field.
SERVICE FUNCTIONS OF THE MULTITOOL FIGURE [16]
1. 10 mm key for fuel hose change
2. Cleaning magnets
3. 12 mm key
4. Screw driver for jet adjustments
5. 6 mm key
6. 8 mm key
7. 7 mm key for pump leather cup
8. Hook
9. 11 mm key for burner bottom nut
If you have any questions about these instructions, your stove, replacement parts, or repairs,
please contact:
Katadyn Products Inc. Katadyn North America Inc.
Pfäkerstrasse 37 4830 Azelia Avenue North
8310 Kemptthal Minneapolis, MN 55429
Switzerland USA
+41 44 839 21 11 +1-800-755-6701
www.optimusstoves.com

16
LIMITED WARRANTY
Optimus provides a 2-year limited warranty against manufacturing defects for the original
stove purchaser. Proof of purchase is required for this warranty to be valid. This warranty
does not cover damage due to accident, improper use or modifications.
If you have any problems with your Optimus Polaris, return it to your dealer or contact
Katadyn. Clean food and dirt from the stove before returning it. For more information, contact
your dealer or Katadyn Products Inc. in Switzerland at +41 44 839 21 11 or e-mail us at
This warranty gives you specific legal rights and you may have other legal rights which vary
from state to state.
Please visit our website for additional information about our other products:
www.optimusstoves.com
For clean water visit www.katadyn.com; for dehydrated food visit www.trekneat.com /
www.alpineaire.com (not all of the products are available worldwide).
ENENEN
FR
DE
NL
DK
SWE
NO
FI
IT
PL
ES
CZ
PT
RU
Table of contents
Other Optimus Stove manuals
Popular Stove manuals by other brands

EMPERO
EMPERO EMP.YRG.50 manual

Moretti Design
Moretti Design ARIA DOLBY AIR DEDICATED MANUAL

WANDERS
WANDERS SQUARE 60 G User guide and installation manual

IronStrike
IronStrike EPIC33 Installation and operation

Penman Collection
Penman Collection VEGA C7 installation instructions

COMPANION
COMPANION 10000054 owner's manual

Hunter Stoves
Hunter Stoves herald 8 mk 2 Installation and operating instructions

Nordpeis
Nordpeis Q-34AL - Powerstone user manual

ACR Electronics
ACR Electronics The Buxton BX1MF Technical manual

Dovre
Dovre 325MF Installation instructions and operating manual

Carolina Cooker
Carolina Cooker M110836 owner's guide

Morso
Morso 1410 Assembly and user instructions