Optoma H76 User manual

1
English
Usage Notice
Precautions........................................................................................................2
Introduction
Product Features ...............................................................................................4
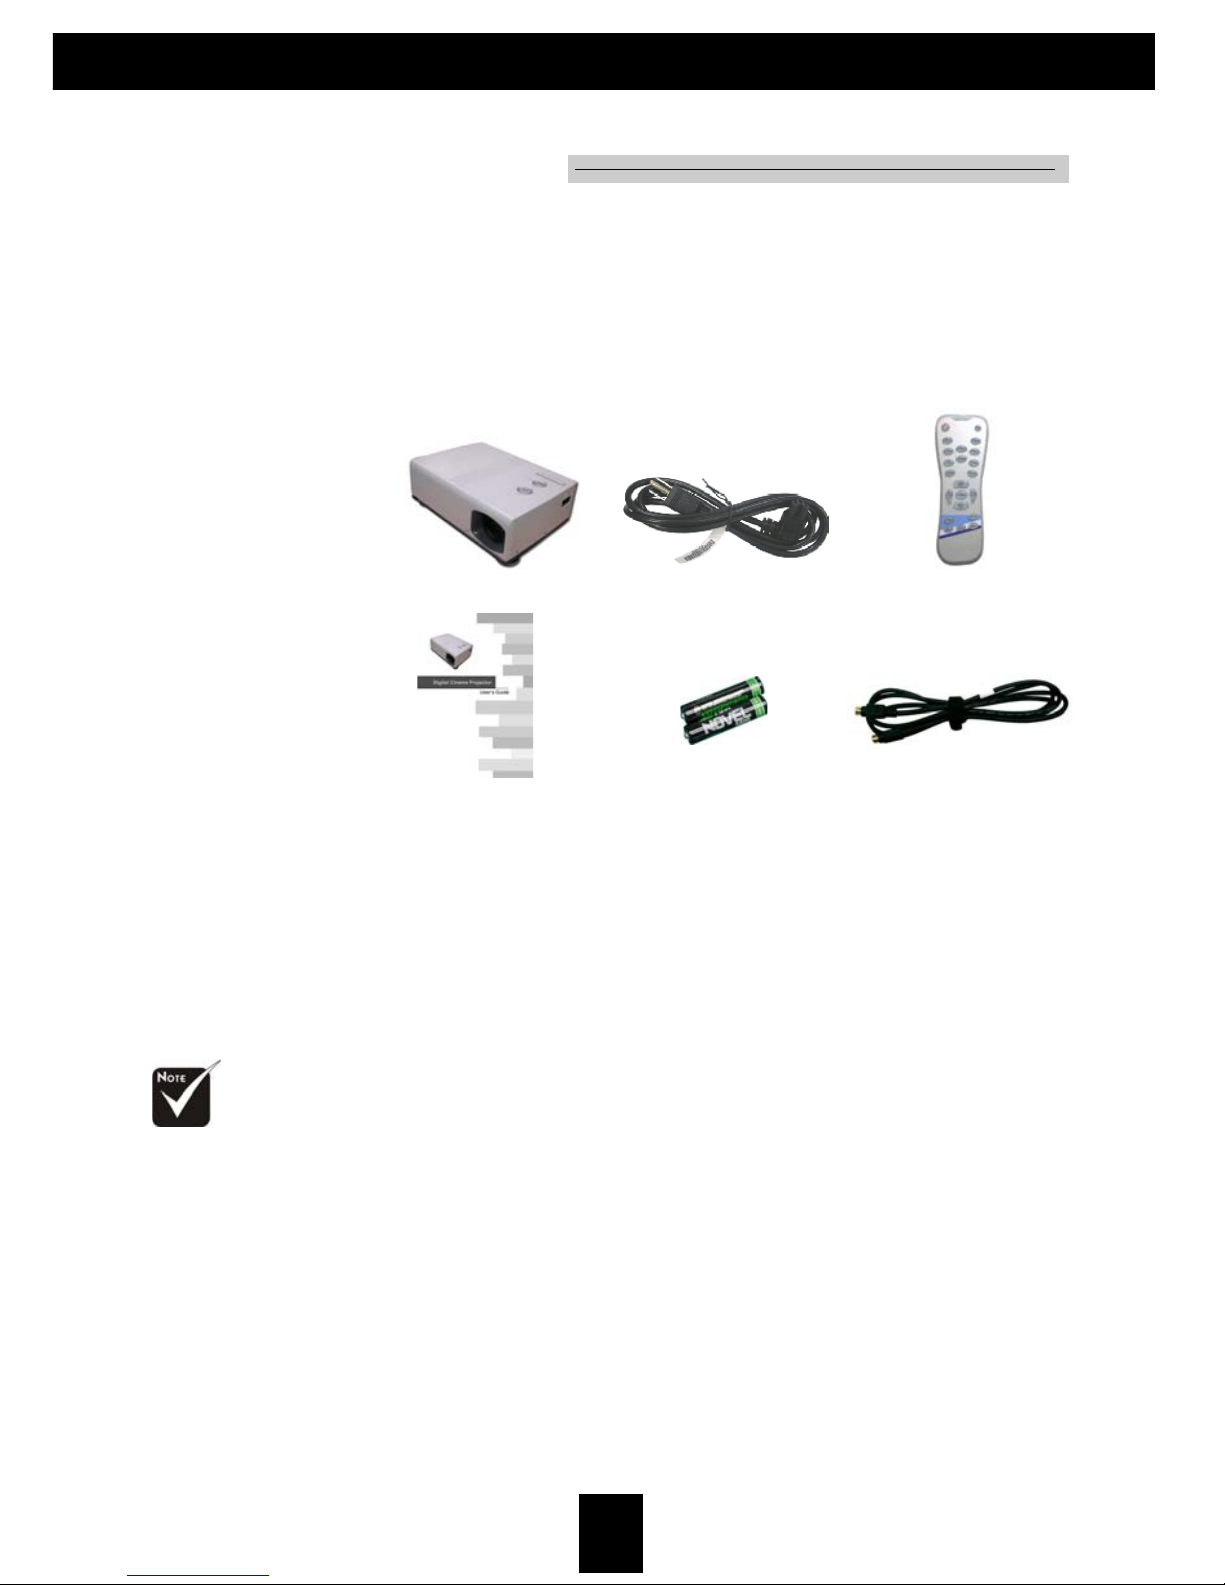
Package Overview .............................................................................................5
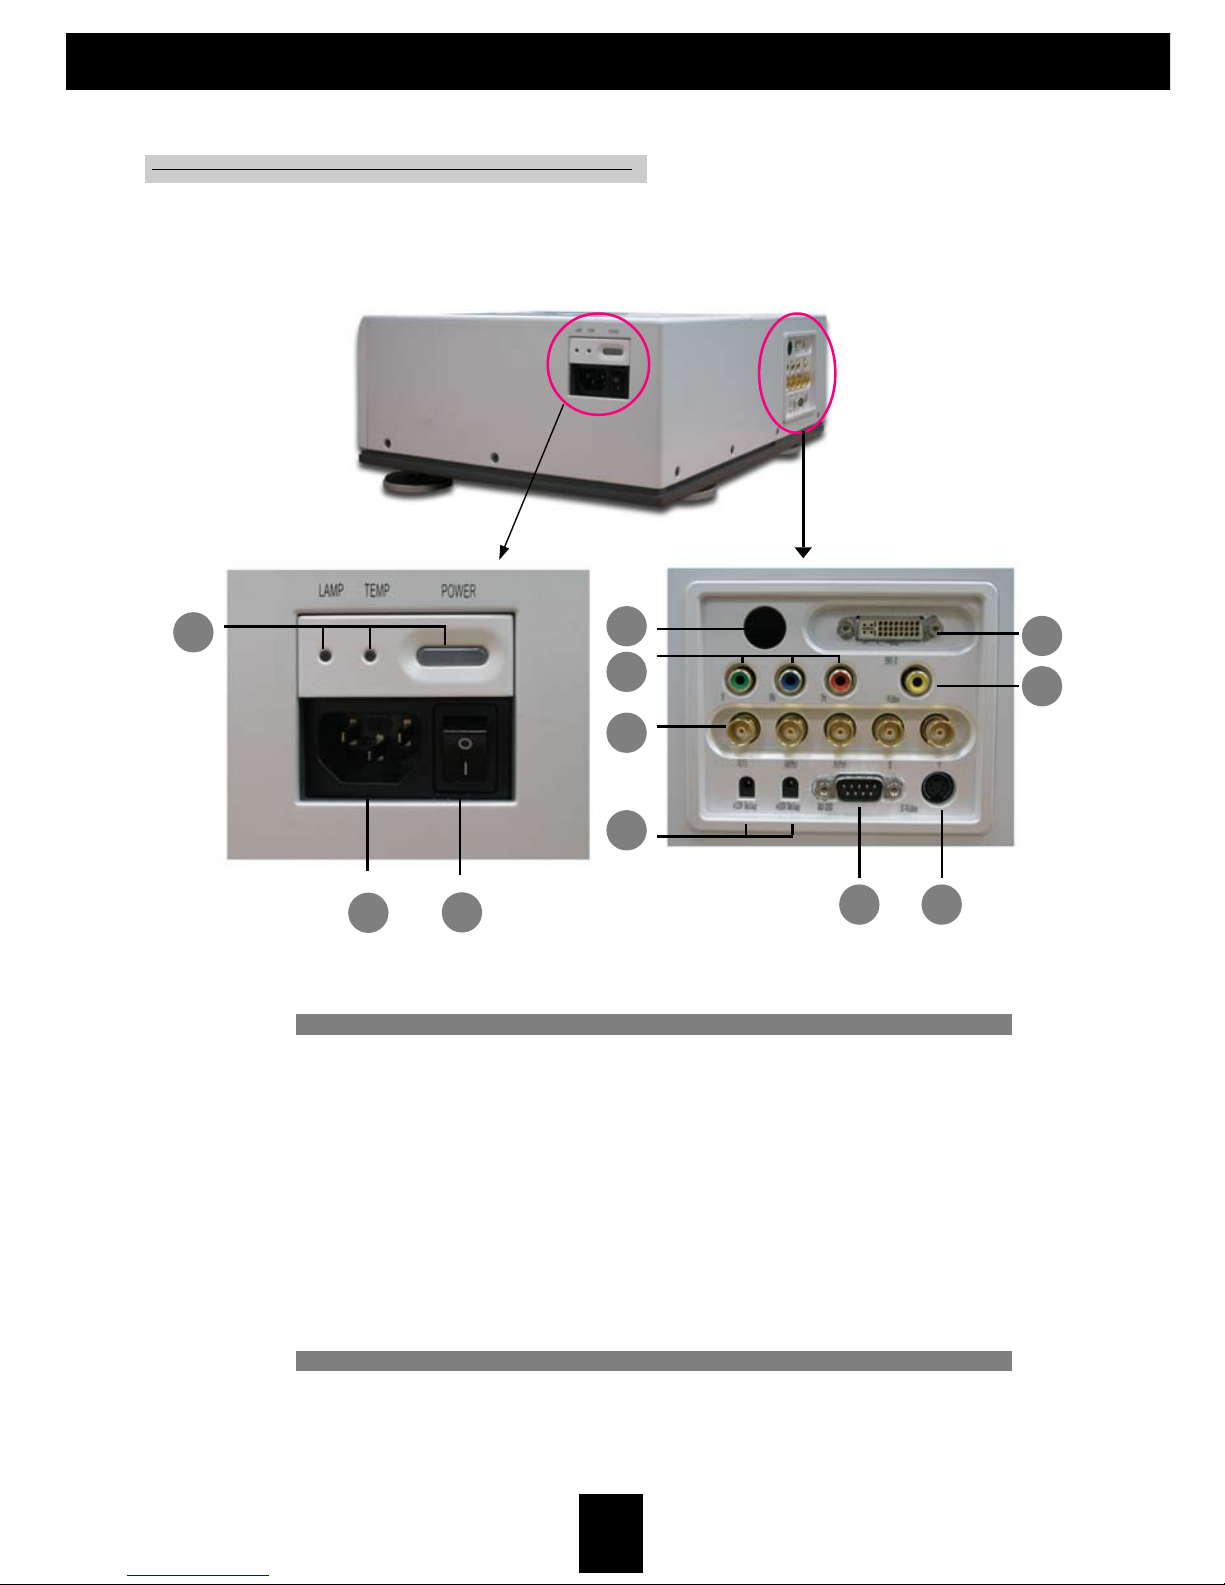
Product Overview...............................................................................................6
Main Unit ......................................................................................................6
Control Panel ...............................................................................................7
Connection Ports ......................................................................................... 8
IR Remote Control.......................................................................................9
Installation
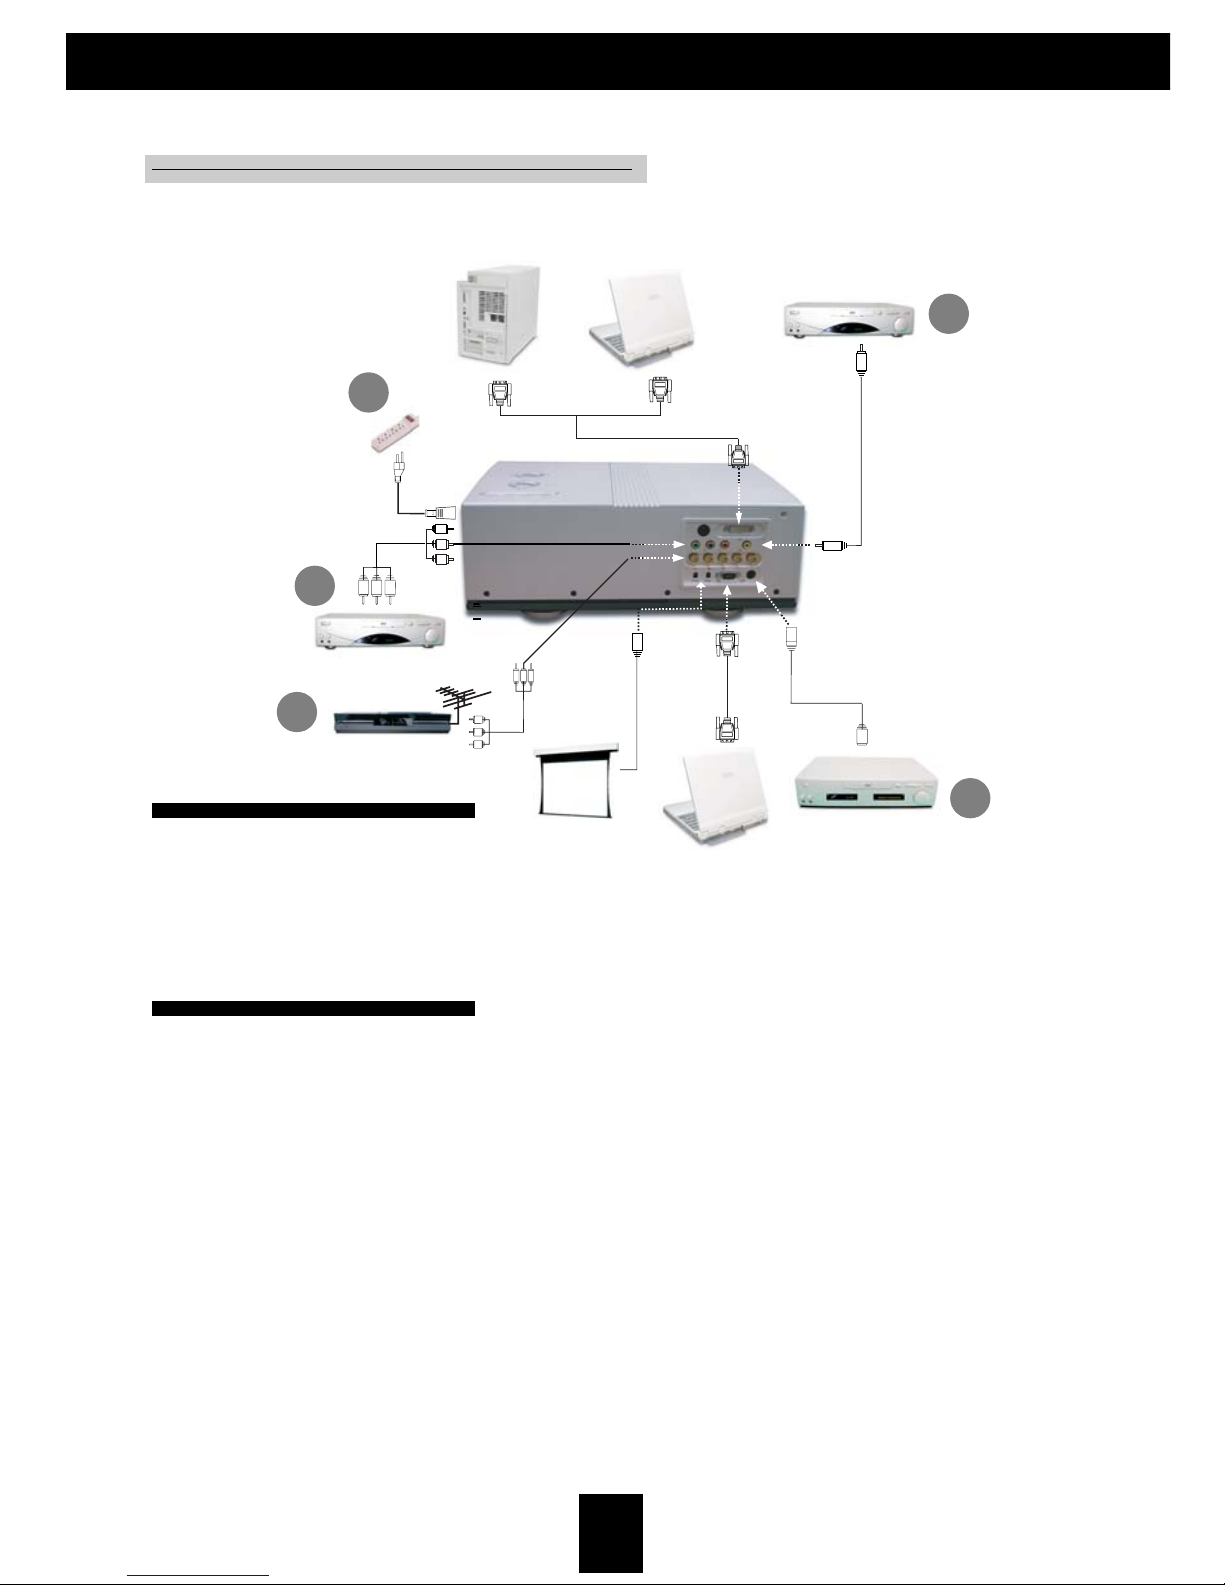
Connecting the Projector ................................................................................... 10
Powering On/Off the Projector ........................................................................... 11
Powering On the Projector ...........................................................................11
Powering Off the Projector ...........................................................................12
Adjusting the Projected Image..........................................................................13
Adjusting the Projector’s Height ..................................................................13
Adjusting the Projector’s Zoom/Focus.........................................................14
UserControls
Control Panel & Remote Control....................................................................... 15
Onscreen Display Menus .................................................................................18
How to Operate ............................................................................................18
Menu Tree .................................................................................................... 19
Picture ..........................................................................................................20
Image........................................................................................................... 22
System .........................................................................................................24
Display .........................................................................................................25
Appendices
Troubleshooting .................................................................................................27
Replacing the Lamp ..........................................................................................30
Table of Contents

2
English
Usage Notice
Precautions
Please follow all warnings, precautions, and maintenance
procedures as recommended in this user’s guide.
Warning- Do not look into the lens. The bright light may cause
eye injury.
Warning- To reduce the risk of fire or electric shock, do not
expose this product to rain or moisture.
Warning- To prevent the risk of electric shock, do not open or
disassemble the product.
Warning- Please allow the unit to cool down before changing the
lamp; carefully follow the lamp replacement instruc-
tions listed under “ Replacing the lamp.”
Warning- This product self-detects the life cycle of the lamp and
will display a warning message when the lamp is
about to expire. Be sure to replace the lamp when it
disaplays warning messages.
Warning- After installing a new lamp, reset the lamp life using
the onscreen menu.
Warning- Before turning off the product, follow the cooling fan
to run for several minutes.
Warning- Turn on the projector first and then select the signal
sources.
Warning- When the lamp reaches the end of its life, it will burn
out and may make a loud “popping” sound. If this
occurs, the projector will not turn back on until the
lamp module has been replaced. To replace the lamp,
follow the procedures listed under “Replacing the
Lamp.”

3
English
Do:
Turn off the product before cleaning.
Use a soft cloth moistened with mild detergent to clean the
display housing.
Disconnect the power plug from AC outlet if the product is not
being used for a long period of time.
Do not:
Block the slots and openings on the unit provided for
ventilation.
Place in direct sunlight.
Use abrasive cleaners, waxes or solvents to clean the unit.
Use under the following conditions:
- Extremely heat, cold or humidity.
- In areas susceptible to excessive dust and dirt.
- Near any appliance generating a strong magnetic field.
Usage Notice

4
English
Product Features
This product is a WXGA single chip 0.79-inch DLPTM
projector featuring:
True WXGA resolution 1280 x 720 addressable pixels
17-pounds (7.72 kgs) compact design
Single chip DLPTM technology
Power zoom and focus
HDTV compatible (480i/p, 576i/p, 720p, 1080i )
NTSC/PAL/SECAM, and HDTV compatible
Hi-tech DVI-I connection for digital and analog video
connectivity
IR remote control
User-friendly multilingual onscreen display menu
Advanced electronic keystone correction
User-friendly control panel
SXGA compression
250-watt replaceable UHP lamp
Vertical lens shift
HDCP compliant
Introduction

5
English
Introduction
IR Remote Control
Battery x 2
Projector Unit
Package Overview
This projector comes with all the items shown below. Check to
make sure your unit is complete.
User’s Manual/
Warranty Card
Power Cord
Due to the differ-
ence in applications
for each country,
some regions may
have different
accessories.
S-Video Cable

6
English
Introduction
Main Unit
Product Overview
1. Control Panel
2. Power Socket & Power Switch
3. Height Adjustment Foot
4. Lens
5. IR Receiver
6. Connection Ports
1
3
4
2
5
6

7
English
Control Panel
1
3
2
1. Lens Shift (Up/Down)
2. Zoom/Focus Shift
-Zoom:Up/Down
-Focus: Right/Left
3. Key Pad
- Resync
- Source
- Menu/Exit
- Enter
Introduction

8
English
Introduction
Connection Ports
1 Lamp/Temp & Power LEDS
2. Power Socket
3. Power Switch
4. IR Receiver
5. Component Connector
6. BNC Connector
7. +12V Relay Connectors
8. RS-232 Connector
9. S-Video Input Connector
10. Composite Video Input Connector
11. DVI-I Input Connector
23
4
5
6
8
1
7
9
10
11

9
English
Wireless Remote Control
Re-sync
Format
Freeze
CompositeSource
KeystoneAdjustment
PowerOn/Off Display Hide
Enter
Component Source
(YPbPr)
S-Video Source
DVI-I Source
BNC Source
Contrast
Introduction
Brightness
Menu/Exit
Hue Adjustment
Four Directional
Select Keys
Optics Zoom
Optics Focus
Zoom

10
English
3
2
1
4
Connecting the Projector
S-Video Output
DVD Player
Digital Tuner Output
Antenna
RS-232
DVI-I Output
1. Power Cord
2. RCA Component Cable for
YPbPr
3. BNC Cable for RGB/Compo-
nent
4. S-Video Cable
5. Composite Video Cable
Installation
To ensure that the projector properly displays source material from your
computer, please configure the display settings of your graphics card to less
than or equal to 1280 x 720 resolution. Be sure that the timing of the display
setting is compatible with the projector.
5
+12V Relay Outputs
VideoOutput

11
English
3
2
Installation
Power Button
Powering On the Projector
1. Remove the lens cap.
2. Ensure that the power cord and signal cable are securely
connected.
3. Turn on the main power switch on the side of the projector.
4. Turn on the lamp by pressing the “Power” button on the side
of the projector.
The startup screen will display in approximately one minute.
5. Turn on your source (computer, notebook, video player etc),
the projector will automatically detect your source.
If the screen displays “No Signal,” make sure the signal cables are
securelyconnected.
If you connect multiple sources at the same time, use the “Source”
button on the remote control or control panel to select your desired
source.
Powering On/Off the Projector
Turn on the
projector first and
the signal sources
next.
Power Switch
1
Lens Cap
II
II
I
OO
OO
O

12
English
Installation
Powering Off the Projector
1. Press the “Power” button to turn off the projector lamp.
2. After pressing the “Power” button, you will see the message
“Power off the lamp? Video Mute” displayed on the
projector’s screen. Press the “Power” button again to confirm,
otherwise the message will disappear after five seconds.
Please note that if the
key is pressed instead, the projector
will enter the “Video Mute” mode and no image will be
displayed. To exit the “Video Mute” mode, press the “Power”
button again.
3. The “Power” LED indicator will flash for about 120 seconds
while the lamp cools. After the “Power” indicator stops
flashing, you may then turn off the main power switch on the
side of the projector. If you want to turn on the projector, you
must press “Power” within 90 seconds of when the “Power”
indicator light begins to flash.
4. Do not restart the projector immediately following a power
offprocedure.
Note: If the “TEMP” indicator flashes orange for approximately
ten seconds, the projector will display “Fan Fail. ” Please contact
your local reseller or service center.
Note: If the “TEMP” indicator illuminates orange, the projector has
overheated. The projector will display “Over Temperature.” The
projector will then automatically shut down. Under normal
conditions, the projector may be restart. However, if the problem
persists, you should contact your local reseller or service center.
Note: If the “LAMP” indicator illuminates red, the lamp may of
failed. Please contact your local reseller or service center.

13
English
Adjustable foot
Installation
The projector is equipped with four adjustable feet to modify
the height of the projector.
To raise or lower the projector :
1. Locate the adjustable foot you wish to modify on the under
side of the projector.
2. Rotate the foot counterclockwise to raise the projector or
clockwise to lower it. Repeat with the remaining feet as
needed.
3. Reset the projector on its feet and re-adjust as needed.
Adjusting the Projected Image
Adjusting the Projector’s Height

14
English
Zoom/
Focus Shift
Adjusting the Projector’s Zoom/Focus
You may adjust the Zoom shift to zoom the lens in or out. Press
to zoom in or
to zoom out. To adjust focus of an image, press the
focus shift buttons
and
. The projector will focus at distances
from 3.28 to 32.80 feet (1.19 to 10m).
Installation

15
English
Remote ControlControl Panel
User Controls
Control Panel & Remote Control
There are two ways for you to control the functions: with
control panel and remote control.
UsingtheRemoteControl
Power
4“Power” turns on the projector’s lamp, refer to the “Powering
On/Off the Projector” section on page 11~ 12 for more details.
Hide
4“Hide” immediately turns the screen black. Press “Hide” a
second time to restore the display.
Brightness
4Adjust the brightness of the image.
Freeze
4Press “Freeze” to pause the screen image.

16
English
User Controls
Contrast
4“Contrast” controls the degree of difference between the
lightest and darkest parts of the picture.
Hue
4“Hue” adjusts the color balance from red to green.
H.Keystone & V.Keystone
4Correct image distortion caused by rotating and tilting the
projector.
Re-Sync
4Automatically synchronizes the projector to the input source.
Zoom
4Press “Zoom” to display the zoom menu.
Press or button to zoom in or zoom out of an image.
Focus
4Press “Focus” to display the focus menu, then use or to
focus in or out of an image.
Format
4Display the “Format” section of the onscreen display menu
to select the desired aspect ratio.
Menu/Exit
4Display or exits the onscreen display menu.
Four Directional Select Keys
4Use to zoom the lens in or out.
4Use to focus the image.
4Or Press “Menu/Exit” then use to select items
or make adjustments to your selection.
Enter
4Confirm your item selection.
S-Video
4Press “S-Video” to choose S-Video source.
Composite
4Press “Composite” to choose video source.
BNC
4Press “BNC” to choose Analog RGB or YPbPr video
from the BNC input.

17
English
DVI
4Press “DVI” to select input from the DVI-I connector
RCA
4Press “RCA” to select input from the RCA component video
connector.
Using the Control Panel
Power
4The power switch is located near the power socket on the side
of the projector. Use it to power on/off the projector. Please
refer to the “Powering On/Off the Projector” section on pages
11~ 12.
Lens Shift
4Turn the Lens Shift dial clockwise to shift the projected
image in an up ward direction. Turn the Lens Shift dial counter
clockwise to shift the projected image in a down ward
direction.
Zoom/Focus
4Press or to zoom in or out.
4Press or to focus the image.
4Press “Menu/Exit,” then use to
select items or make adjustments to your selection.
Re-Sync
4Automatically synchronizes the projector to the input source.
Source
4Press “Source” to choose RGB, DVI-Digital, DVI-Analog,
S-Video, Composite, Component, and HDTV sources.
Menu/Exit
4Display or exit the the onscreen display menus.
Enter
4Confirm your selection.
User Controls

18
English
User Controls
How to Operate
4The projector has multilingual onscreen display menus that allow
you to make image adjustments and change a variety of settings.
The projector automatically detects the source.
4To launch the menu, press “Menu/Exit” on the Remote Control or
Control Panel.
4When the main menu is displayed, use to select it.
While making a selection, press “Enter” to go into the sub-menu.
To exit the menu, press “Menu/Exit”.
4When a sub-menu is displayed, use to select the desired
item and adjust the settings with .
To exit the sub-menu, press “Menu/Exit.”
4After using to make selections to the sub-menu, press
“Enter” to confirm your changes and return to the the main menu.
Press “Menu/Exit” to return to the main menu. If you don’t
press “Enter” to confirm your changes and exit the menu, the
items will not to be modified.
Onscreen Display Menus
Main menu Sub-menu
Item

19
English
User Controls
Menu Tree
PICTURE............... Mode
Contrast
Brightness
Color (Video only)
Tint (Video only)
Sharpness
Gamma
Reset
White Peaking
Color Temp
Image Mode
Advanced Adjustment
Signal
Reset
Language
Bulb
Source Lock
Auto Shutdown
Blanking
Eco Mode
Projection
Format
V.Keystone
H.Keystone
Digital Zoom
IMAGE...................
SYSTEM.................
DISPLAY...............
Cinema/Normal/Vivid
Current/All
Film/Video/TV
R Contrast/G Contrast/B Contrast/R
Brightness/G Brightness/
B Brightness
Horizontal/Vertical/Frequency/
Phase
Current/All
Lamp Hour/Lamp Reminding/Lamp
Hour Reset
On/Off
On/Off
Blue/Black
1/2/3
English/French/Japanese/Spanish/
Chinese(Simplified)(Traditional)/
Italian/Portugese/Deutsch/Korean
Front Desktop/Front Ceiling/Rear
Desktop/Rear Ceiling
On/Off
16:9=>Native/Window/16:9/Letter
Box
-50~+50
+1~32

20
English
PICTURE
Mode
There are three factory presets optimized for various types of
pictures: Cinema, Normal, and Vivid. You can customize contrast,
brightness, intensity, color, tint, sharpness, and gamma for each
preset mode.
Contrast
Contrast controls the degree of difference between the lightest
and darkest parts of the picture. Adjusting the contrast changes
the amount of black and white with an image.
4Press to decrease the contrast.
4Press to increase the contrast.
Brightness
Adjust the brightness of the image.
4Press to darken an image.
4Press to lighten an image.
Color
Adjust a video image from black and white to fully saturated
color.
4Press to decrease the amount of color in an image.
4Press to increase the amount of color in an image.
Tint
Adjust the color balance of red and green.
4Press to increase the amount of green in an image.
4Press to increase the amount of red in an image.
Sharpness
Adjust the sharpness of an image.
4Press to decrease the sharpness.
4Press to increase the sharpness.
User Controls
The “Color” sub
menu is not
supported under
the digital RGB
input source.
The “Tint” sub
menu is not
supported under
the digital RGB,
component video
or analog RGB
input sources.
Other manuals for H76
2
Table of contents
Other Optoma Projector manuals

Optoma
Optoma ML750 User manual

Optoma
Optoma HD73 User manual

Optoma
Optoma Optoma ThemeScene H77 User manual

Optoma
Optoma DX326 User manual

Optoma
Optoma HD806-ISF User manual

Optoma
Optoma HD70 User manual

Optoma
Optoma EW675UT User manual

Optoma
Optoma EX685UT User manual

Optoma
Optoma EP731 User manual

Optoma
Optoma MovieTime User manual

Optoma
Optoma HD72 User manual

Optoma
Optoma TX1080 User manual

Optoma
Optoma Optoma EP1691 User manual

Optoma
Optoma DW326e User manual

Optoma
Optoma HD7300 User manual

Optoma
Optoma DV20 User manual

Optoma
Optoma TW610ST User manual

Optoma
Optoma ZW400usti User manual

Optoma
Optoma EP729 User manual

Optoma
Optoma EP737 User manual