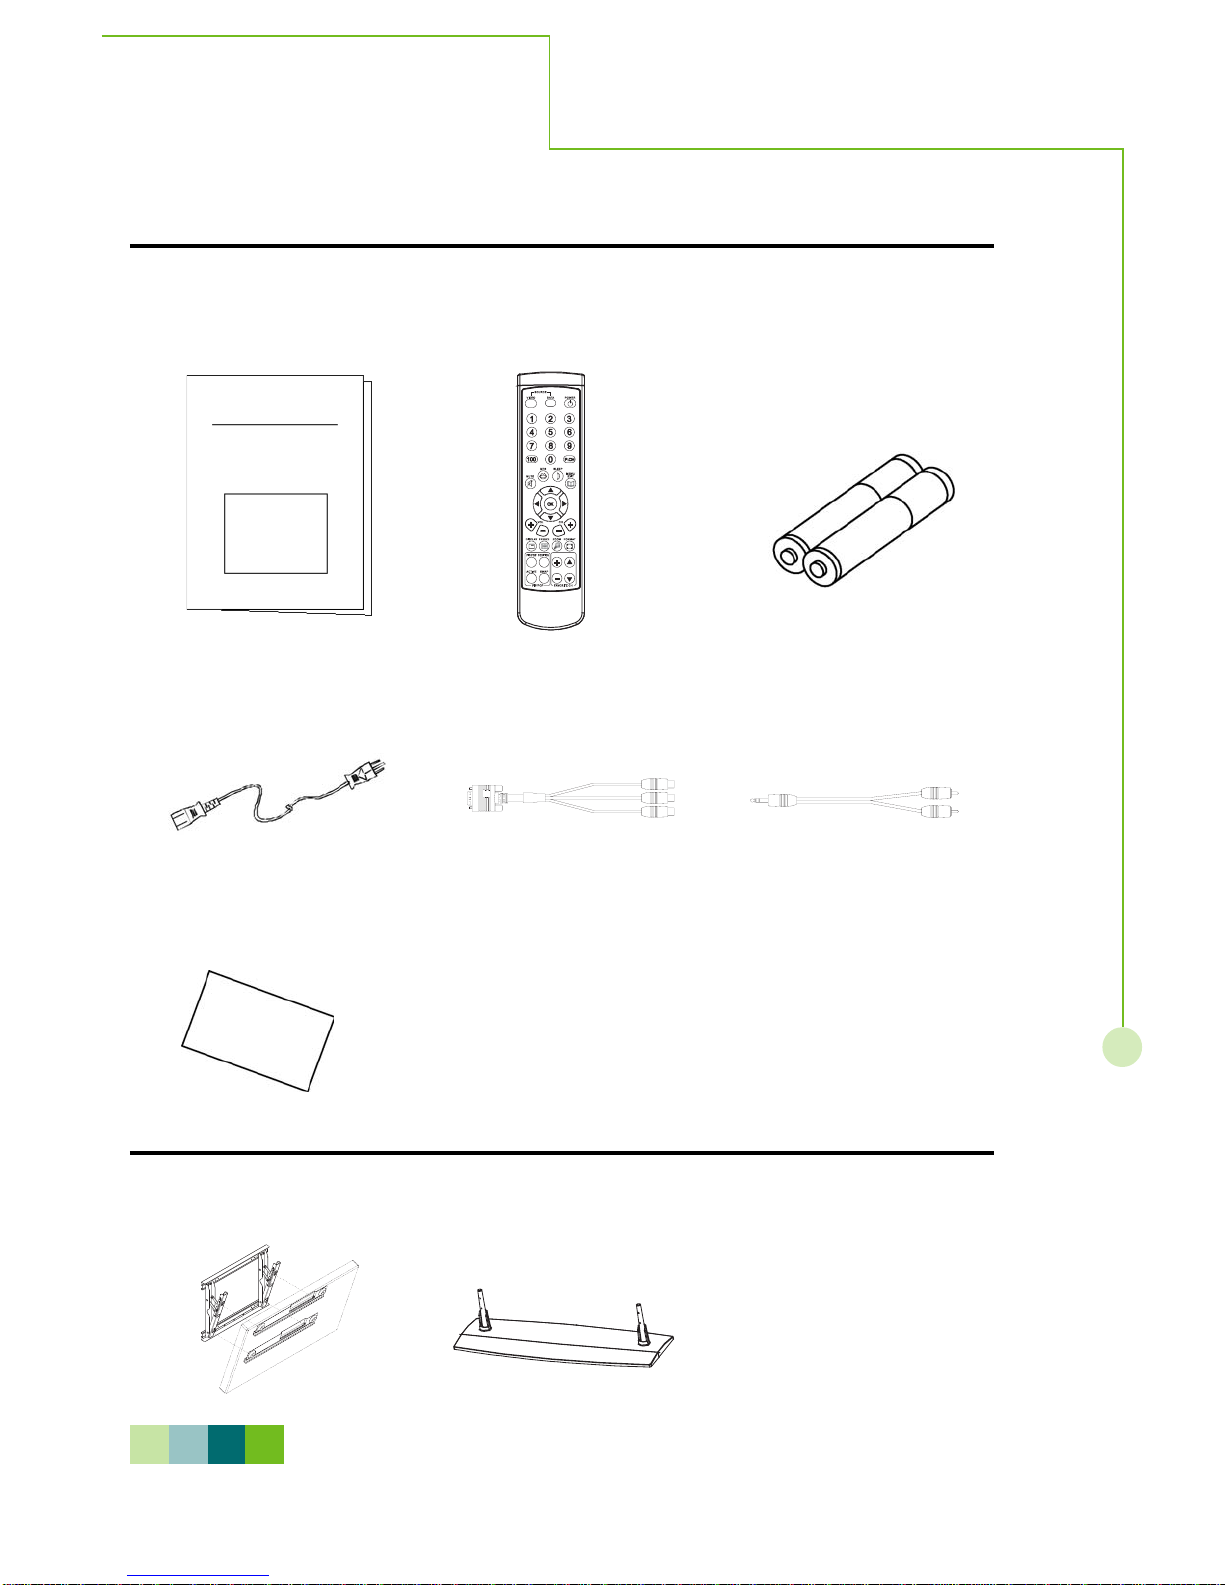
Optoma PD50 User manual

1
Table of Contents
Contents
Table Of Contents.................................................................................................................1
Warnings ...............................................................................................................................2
FCC Statement......................................................................................................................3
Safety Instructions ...............................................................................................................4
Safety Precautions ...............................................................................................................5
Accessories...........................................................................................................................7
Batteries ................................................................................................................................8
Remote Control.....................................................................................................................9
Control Panel ......................................................................................................................10
FrontControl Panel..............................................................................................................10
BackControlPanel ..............................................................................................................11
Connections .......................................................................................................................12
HowtoconnecttheCableTVorAntenna .............................................................................12
HowtoconnecttheComputer..............................................................................................12
How toconnect the VHS ......................................................................................................13
HowtoconnecttheDVDplayer ............................................................................................13
HowtoconnecttheHDTV....................................................................................................14
Howtoconnectthe Speakers ..............................................................................................15
On-Screen Menu.................................................................................................................16
PIP/POP .............................................................................................................................16
PICTURE ............................................................................................................................18
SCREEN.............................................................................................................................23
AUDIO.................................................................................................................................25
SETTINGS ..........................................................................................................................28
OPTIONS ............................................................................................................................30
TUNER................................................................................................................................34
Hot Key Functions .............................................................................................................36
Appendices .........................................................................................................................38
Troubleshooting ...................................................................................................................38
Specifications .....................................................................................................................39
VESAMonitor Timing Spec .................................................................................................40

2
The lightening flash with
arrow-head within a triangle
isintendedtotelltheuserthat
parts inside the product are
a risk of electric shock to
persons.
Warnings
WARNING:
To prevent damage which may result in fire or shock hazard, do not expose this appliance to
rain or moisture.
Do not place containers with water (flower vase, cups, cosmetics, etc.) above the set.
(including on shelves above, etc.)
WARNING:
1) To prevent electric shock, do not remove cover.No user serviceable parts inside. Refer servicing to
qualified service personnel.
2) Do not remove the grounding pin on the power plug. This apparatus is equipped with a three pin
grounding-type power plug. This plug will only fit a grounding-type power outlet. This is a safety
feature. If you are unable to insert the plug into the outlet, contact an electrician.
Do not defeat the purpose of the grounding plug.
The exclamation point within
a triangle is intended to tell
the user that important
operating and servicing
instructions are in the papers
with the appliance.
WARNING
RISK OF ELECTRIC SHOCK
DO NOT OPEN

3
FCC Statement
This equipment has been tested and found to comply with the limits for a Class B digital device,
pursuant to Part 15 of the FCC Rules. These limits are designed to provide reasonable protection against
harmful interference in a residential installation. This equipment generates, uses and can radiate radio
frequency energy and, if not installed and used in accordance with the instructions, may cause harmful
interference to radio communications. However, there is no guarantee that interference will not occur in a
particular installation. If this equipment does cause harmful interference to radio or television reception,
which can be determined by turning the equipment off and on, the user is encouraged to try to correct the
interference by one of the following measures:
Reorient or relocate the receiving antenna.
Increase the separation between the equipment and receiver.
Connect the equipment into an outlet on a circuit different from that to which the receiver is connected.
Consult the dealer or an experienced radio/TV technician for help.
This device complies with Part 15 of the FCC Rules. Operation is subject to the following two
conditions: (1) This device may not cause harmful interference, and (2) this device must accept any
interference received, includinginterference that may cause undesired operation.
FCC Statement

4
Safety Instructions
1. Read these instructions.
2. Keep these instructions.
3. Heed all warnings.
4. Follow all instructions.
5.Do not use this apparatus near water.
6. Clean only with dry cloth.
7.Do not block any ventilation openings. Install in accordance with the manufacturer’s instructions.
8.Do not install near any heat sources such as radiators, heat registers, stoves, or other apparatus (including
amplifiers) that produce heat.
9.Do not defeat the safety purpose of the polarized or grounding-type plug.Apolarized plug has two blades
with one wider than the other.A grounding type plug has two blades and a third grounding prong. The wide
blade or the third prong are provided for your safety. If the provided plug does not fit into your outlet, cosult
an electrician for replacement of the obsolete outlet.
10. Protect the power cord from being walked on or pinched particularly at plugs, convenience receptacles,
and the point where they exit from the apparatus.
11. Only use attachments/accessories specified by the manufacturer.
12. Use only with the cart, stand, tripod, bracket, or table specified by the manufacturer, or sold with the
apparatus. When a cart is used, use caution when moving the cart/apparatus combination to avoid injury
from tip-over.
13. Unplug this apparatus during lightning storms or when unused for long periods of time.
14. Refer all servicing to qualified service personnel. Servicing is required when the apparatus has been
damaged in any way, such as power-supply cord or plug is damaged, liquid has been spilled or objects
have fallen into the apparatus, the apparatus has been exposed to rain or moisture, does not operate
normally, or has been dropped.

5
SafetyPrecautions
Set up
Do not place the High Definition Plasma Display on sloped or unstable surfaces.
The HighDefinition PlasmaDisplay may fall off or tip over.
Do not place any objects on top of the High Definition Plasma Display.
IfwaterspillsontotheHighDefinitionPlasmaDisplay or foreignobjectsget inside it, ashort-circuitmayoccur
which could result in fire or electric shock. If any foreign objects get inside the HighDefinition PlasmaDisplay,
please consultanAuthorizedServiceCenter.
Do not cover the ventilation holes.
Doing so may cause the HighDefinition PlasmaDisplay to overheat, which can cause fire or damage to the
HighDefinition PlasmaDisplay.
If using the pedestal (optional accessory), leave a space of 10 cm (approx. 4 inches) or more at the
top, left and right, 6 cm (approx 2.5 inches) or more at the bottom, and 7 cm (approx. 3 inches) or
more at the rear. If using some other setting-up method, leavea space of 10 cm (approx. 4 inches) or
more at the top, bottom, left and right, and 1.9 cm (approx. 1 inches) or more at the rear.
As illustrated below, if an outside antenna is connected to the television equipment, be sure the
antenna system is grounded so as provide protection against voltage surges. US section 810 of the
National Electrical Code provides information with respect to proper grounding of the mast and
supporting structure. Grounding of the lead-in wire to an antenna discharge unit, size of grounding
conductors, location of antenna discharge unit, connection to grounding electrodes, and
requirements for the grounding electode.
AC Power Supply Cord
Securely insert the power cord plug as far as it will go.
If the plug is not fully inserted, heat may be generated which could fire. If the plug is damaged or the wall
socket plate is loose, they should not be used.
Do not handle the power code plug with wet hands.
Doing so may cause electric shocks.
Do not do anything that might damage the power cable. When disconnecting the power cable, hold
the plug, not the cable.
Do not make any modifications, place heavy objects on, place near hot objects, heat, bend, twist or
forcefully pull the power cable.Doing so may cause damages to the power cable which can cause fire or
electric shock. If damage to the cable is suspected, have it repaired at anAuthorized Service Center.
If the Plasma Display is not in use for a long period of time, unplug the power cord from the wall
outlet.
N O T E
Do not allow a still picture to be displayed for an extended period, as this may cause a permanent after-image
to remain on the HighDefinition PlasmaDisplay, which will not be covered by the product.
Antennalead-in
Antennadischarge
Grounding
Groundingclamps
Powerservice
Electronicservice

6
If Problems occur during use
If a problem occurs(such as no picture or no sound), or if smoke or an abnormal odor is detected
from the High Definition Plasma Display, unplug the power cord immediately.
Continuous use of theDisplay under these conditions might cause fire or permanent damage to the unit.
HavetheDisplay evaluated atanAuthorized Service Center. Services to theDisplay by any unauthorized
personnelarestronglydiscouraged due to its highvoltagedangerous nature.
If water or foreign objects get inside the High Definition Plasma Display, if the High Definition
Plasma Display is dropped, or if the cabinet becomes damaged, disconnect the power code plug
immediately.
Ashort may occur, which could cause fire. Contact anAuthorized Service Center for any repairs that need
to be made.
When using the High Definition Plasma Display
Do not bring your hands, face or objects close to the ventilation holes of the High Definition Plasma
Display.
Top of HighDefinition PlasmaDisplay is usually very hot due to the high temperature of exhaust air being
released through the ventilation holes.Burns or personalinjuriescan happen ifany body parts are brought
too close. Placing any object near the top of the display could also result in heat damages to the object as
well as to theDisplay if its ventilation holes are blocked.
Be sure to disconnect all cables before moving the High Definition Plasma Display.
Moving theDisplay with its cables attached might damage the cable which, in turn, can cause fire or
electric shock.
Disconnect the power plug from the wall outlet as a safety precaution before carrying out any
cleaning
Electric shocks can result if this is not done.
Clean the power cable regularly to prevent it from becoming dusty.
Built-up dust on the power cord plug can increase humidity which might damage the insulation and cause
fire. Unplug the cord from the wall outlet and clean it with a dry cloth.
Cleaning and maintenance
The front of the display panel has been specially treated. Wipe the panel surface gently using only
a cleaning cloth or a soft, lint-free cloth.
If the surface is particularly dirty, soak a soft, lint-free cloth in a weak detergent solution and then wring the
cloth to remove excess liquid. Use this cloth to wipe the surface of the display panel, then wipe it evenly
with a dry cloth, of the same type, until the surface is dry.
Do not scratch or hit the surface of the panel with fingernails or other hard objects. Furthermore, avoid
contact with volatile substances such as insect sprays, solvents and thinner, otherwise the quality of the
surface maybeadversely affected.
If the cabinet becomes dirty, wipe it with a soft, dry cloth.
If the cabinet is particularly dirty, soak the cloth in a weak detergent solution and then wring the cloth dry.
Use this cloth to wipe the cabinet, and then wipe it dry with a dry cloth.
Do not allow any detergent to come into direct contact with the surface of the HighDefinition Plasma
Display. If water droplets get inside the unit, operating problems may result.
Avoid contact with volatile substances such as insect sprays, solvents and thinner, otherwise the quality of
the cabinet surface may be adversely affected or the coating may peel off. Furthermore, do not leave it for
long periods in contact with articles made from rubber or PVC.
SafetyPrecautions
CAUTION

7
Accessories
Check that you have the Accessories and items
Operating instruction book Remote control transmitter Betteries for the remote
control transmitter
(AAABattery¯2)
Accessories Supplied
OptionalAccessories
Power cord
Wall mount bracket Pedestal
N O T E
Please only use attachments/accessories specific by manufacturer.
Recommend to use the qualified accessaries with your PDP only.
Phone plug/RCA jack audio input
Warranty Card
D-sub to RCA cable

8For frequent remote control users, we suggest to replace batteries with Alkaline batteries f
or
longer life.
Batteries
1. Turn the transmitter face down.
Press and slide off the battery cover.
Requires two AAA batteries
2. Install the batteries as shown in the
battery compartment.
(Polarity + or - must match the
markings in the compartment).
3. Replace the cover and slide in
reverse until the lock snaps.
H I N T
Precaution on battery use
Incorrect installation may cause battery leakage and corrosion that will damage the remote
control transmitter, please follow the precautions below to replace battery.
1. Batteries should always be replaced as a pair. Always use new batteries when replacing
the old set.
2.Do not combine a used battery with a new one.
3.Do not mix battery types(for example: Zinc Carbon with Alkaline)
4.Do not attempt to charge, short-circuit , disassemble, heat or burn used batteries.
5. Battery replacement is necessary when the remote control acts sporadically or stops
operating the PlasmaDisplay.
Two AAA size

9
Remote Control
MUTE
Turn sound on or off
POWER
Turn the plasma display
on or off(stand by)
NUMBERS0~9
Individually select TV
channels
MENU/EXIT
Activate or Exit the On
Screen Display Menu
Previous Channel
Back to previous channel
100
Quickly enter channel
number greater than 100
CHANNELUP/DOWN
Channel up/down in TV
mode
Volume Up/Down
Increase/decrease
sound output
FORMAT
Change display format
ZOOM
Enlarge image
SLEEP
Select sleep mode
MTS
Change TV sound mode
FREEZE
Freeze/Unfreeze image
DISPLAY
Display active source
and sleep timer
PIP/POP
Turn on/off
Main/PIP/POP/POP3
DATA
Select Data source
VIDEO
Select Video source
OK
Confirm the selection on
OSD
UP/DOWN/LEFT/
RIGHT
Move on OSD Menu
ACTIVE
Select main picture in
PIP/POP mode
POSITION
Change PIP position
SWAP
Swap main and sub
picture in PIP/POP mode
Channel UP/DOWNin
favorite TV channel list
ADD currentchannel
into favorite channel list
REMOVEcurrent
channelfromfavorite
channel list

10
Control Panel
Thecontrolkeys andLEDindicatorlight areinthe frontdisplayasillustratedbelow.
Front Control Panel
Main Power On/ Off Switch
Power Indicator
Volume Adjustment
The Power Indicator will light under below
condition.
Power- OFF......Indicator not illuminated
(The unit will still consume some power
as long as the power cord is still inserted
into the wall outlet.)
Stand-by......Red
Power-ON......Green
fan unwork......Flash red
Push the volume Up or
down button to increase or
decrease the sound
volume level.
Select Input Source

11
Control Panel
Back Control Panel
SPEAKER
Terminals (R
)
SPEAKER
Terminals (L
)
Antenna Terminal
Audio Output Terminals
Component Terminals
S-Video & Composite
V
ideo & Audio input
T
erminals
Connect to PC
a
nalog or HDTV
Y
PbPr output
Analog input terminal
f
or computer or HDTV
Y
PbPr input
This terminal is for after
s
ervice purpose only
Audio Input terminal
f
or computer, HDTV
Y
PbPr
Digital input
T
erminal for
c
omputer

12
Connections
How to connect the Cable TV or Antenna
Thisunitcanreceiveanddisplay programs andsignalfromVHS,DVD, HDTV,videogameandetc.
Here we list and explain some kinds of familiar apparatus. Please ensure the correct connection
betweendisplayandexternalequipment.
UseAntenna cable to connect ANTENNA socket of F connector with 75 Ohms impedance.
How to connect the computer
Ifyouwant toconnectwith computer,youmayuse the rearinputterminal-VGAINorDVI for
Video input and PCAudio forAudio input
(OR)

13
Connections
How to connect the VHS
If your VHS does not support S-Video output, you may use three RCA audio cables(Video, L/R
audiochannels) andconnectwithAV1.
If your VHS supports S-Video output, you may use S-Video input and two RCAaudio cables(L/R
audiochannels).
N O T E
AV1 S-Video input priority is always higher than Composite video, we strongly suggest not to connect S-
Video and Video in the sameAV terminal at the same time.
Connect TV game set to Display is the same as VHS connection.
How to connect the DVD player
Most of DVD player can support various input types, and this unit can support all kinds of output types as
well. Before connecting toDVD, please check the input type first.
1. Use Y, Cb, Cr input (AV2), it could have higher signal quality. Here you have to connect to five sockets,
including three image control sockets(Y, Cb, Cr ) and two audio control sockets(L/R audio channel.
2. Use S-Video input, it could have secondly signal quality. Here you have to connect three sockets,
including S-Video input and two audio control sockets(L/R audio channel).
3. Use regularAVinput. Here you have to connect to three sockets, including Video input and two audio
control sockets. (L/R audio channel)
(OR)
(OR)

14
Connections
How to connect the HDTV
For HDTV Tuner or D-VHS user, please connect Y, Pb, Pr cable to VGAIN/HDTV input.
N O T E
You may need a VGA-to-Y,Pb,Pr adapter to connect VGAIN/ HDTV input with HDTV .
For better picture quality, please use YCbCr connector for 480i signal.

15
(RED)
(BLACK)
(RED) (BLACK)
(RED) (BLACK)
Connections
1. If you have purchased our optional speakers, please connect the speaker
wires to L/R speaker terminals. These terminals only be suit to use in 6
ohm speaker.
2. You can also connect to other speakers by usingAudio out sockets, you
need to connect to external amplifier then connect to speaker.
AudioAmplifier
How to connect the speakers (Optional)

16
On - Screen Menu
PIP/POP
Step 1 :
Press the MENU/EXIT button on the remote control Xto
call up the on screen display to enter PIP/POP function list
.
Step 2 :
Press theTbutton to enter the sub-selection and then use
STbutton to select your preferable watching format. There
are full, PIP, split screen and POP3 selections for selecting
,
referring the page 17 for more information.
Step 3 :
Press the OK button to confirm your selection and then
press MENU/EXIT to exit sub-menu, re-pressing MENU/
EXIT to exit main menu. The display mode will activate
immediately after selecting.
It is possible to view two programs simultaneously using either the PIP or the POP function.
The PIP (Picture-In-Picture) function allows the user to watch two video programs
simultaneously, one on the full screen and one on a smaller pop-up screen. The POP
(Picture-Outside-Picture) function essentially splits the viewing area into two halves, allowing
the simultaneous viewing of two programs in side-by-side windows.
1. Select from OSD Menu
2. Select from Hot key
Step 1 :
Direct press PIP/POP button on the remote control Yto
call up the function.
Step 2 :
Select your preferable format from the list with re-pressing
PIP/POP button. The display mode will activate immediatel
y
after pressing.
1
2
1. You can use the above hot keys in PIP/POP area for quick operation. PI
P/
POP,ACTIVE, POSITIONand SWAP. Please refer to page 36 to see the functio
n
usage.
2. Some items of adjustment might not be available when PIP or POP function
is
activated.
H I N T

17
On - Screen Menu
- This function can be spread frame to all screen(1366 x 768).
- It is suitable to watch HDTV and 16:9 format DVD.
- PIP mode lets you view 2 different inputs (picture sources) on your monitor screen at the same
time. One source will be large, and another source will show a smaller inset image.
Full screen
PIP(Picture-In-Picture)
- Split screen mode lets you view 2 different inputs (picture sources) on your monitor screen at
the same time.
Split screen(side by side)
- This function lets you view 2 different inputs (picture sources) on your monitor screen at the same
time.
POP 3
Selecting a Source for the pip, split screen and pop3,
- In TV for main picture, you can selectAV1, HDTV/VGAINandDVI for sub picture.
- InAV1 for main picture, you can select HDTV/VGAINandDVI for sub picture.
- InAV2 for main picture, you can selectAV1, HDTV/VGA INandDVI for sub picture.
- In HDTV/VGAINfor main picture, you can select TV,AV1 and AV2 for sub picture.
- In DVI for main picture, you can select TV,AV1 and AV2 for sub picture.
H I N T
N O T E
POP3 sub window only supports max. resolution up to 800x600.
It is normal if POP3 sub window displays still for 1~2 sec., this causes of source scan
circularly.
More Information

18
On-Screen Menu
1.During Composite, S-Videio and TV input signal modes
This menu allows the user to modify the individual components of the picture quality or to
simplychoose from oneofseveralfactory-presentpicturesettingsor user presentsettings.
And the different sources input will have different menu function, referring to
follwoing menu.
2.During YCbCr 480i inputsignal mode.
3.During Analog RGB inputsignal mode.
PICTURE

19
On-ScreenMenu
4.During Digital RGBinputsignalmode.
5.During HDTV input signal mode.
Step 1 :
Press the MENU/EXIT button on the remote control to
call up on screen display and then useWXbutton to sele
ct
the picture function.
Step 2 :
Press theTbutton to enter the sub-selection and then
use STbutton to select picture items.
Step 3 :
Selecting one of picture items then pressWXbutton to
adjust picture quality.All adjustments made will be
automatically saved after adjusting.
Step 4 :
Press MENU/EXIT to exit sub-menu, re-pressing
MENU/EXIT to exit main menu.
N O T E
Please refer to next page for detailed OSDoperation information.
PICTURE

20
On-Screen Menu
Brightness
Contrast
Description : Adjust for easier viewing of dark pictures such as night scences and black hair
Steps : Selecting brightness item then press WX button to enter the function. The
brightness bar appears on the bottom of screen, selecting WXbutton to adjust
brightness range from 0 to 63. Re-pressing MENU/EXIT to exit adjusting.
Mode : This function operates in every mode.
Description: Adjust the white to black level
Steps: Selecting contrast item then press WX button to enter the function. The
contrast bar appears on the bottom of screen, selecting WXbutton to
adjust contrast range from 0 to 63. Re-pressing MENU/EXIT to exit adjusting.
Mode: This function operates in every mode.
Description: Adjust the sharpness of image.
Steps: Selecting sharpness item then press WX button to enter the function. The
sharpness bar appears on the bottom of screen, selecting WXbutton to
adjust sharpness range from 0 to 12. Re-pressing MENU/EXIT to exit
adjusting.
Mode: This function works only in Composite, S-Video and TV modes.
Sharpness
Phase
Description: Harmonizes the signals from the plasmas dispaly and the computer
Steps: Selecting contrast item then press WX button to enter the function. The
phase bar appears on the bottom of screen, selecting WXbutton to
adjust phase. Re-pressing MENU/EXIT to exit adjusing.
Mode: This function works only in PC analog mode.
More Information
Other manuals for PD50
1
This manual suits for next models
2
Table of contents
Other Optoma TV manuals