OPTOSKY ATP9100 User manual

ATP9100 Handheld Field Spectroradiometer User Manual
ATP9100 Handheld Field
Spectroradiometer
User Manual

ATP9100 Handheld Field Spectroradiometer User Manual
1
CONTENT
1 SPECIFICATION................................................................................................................................2
2 TECHNICAL SPECIFICATION:......................................................................................................2
3 INTRODUCTION................................................................................................................................3
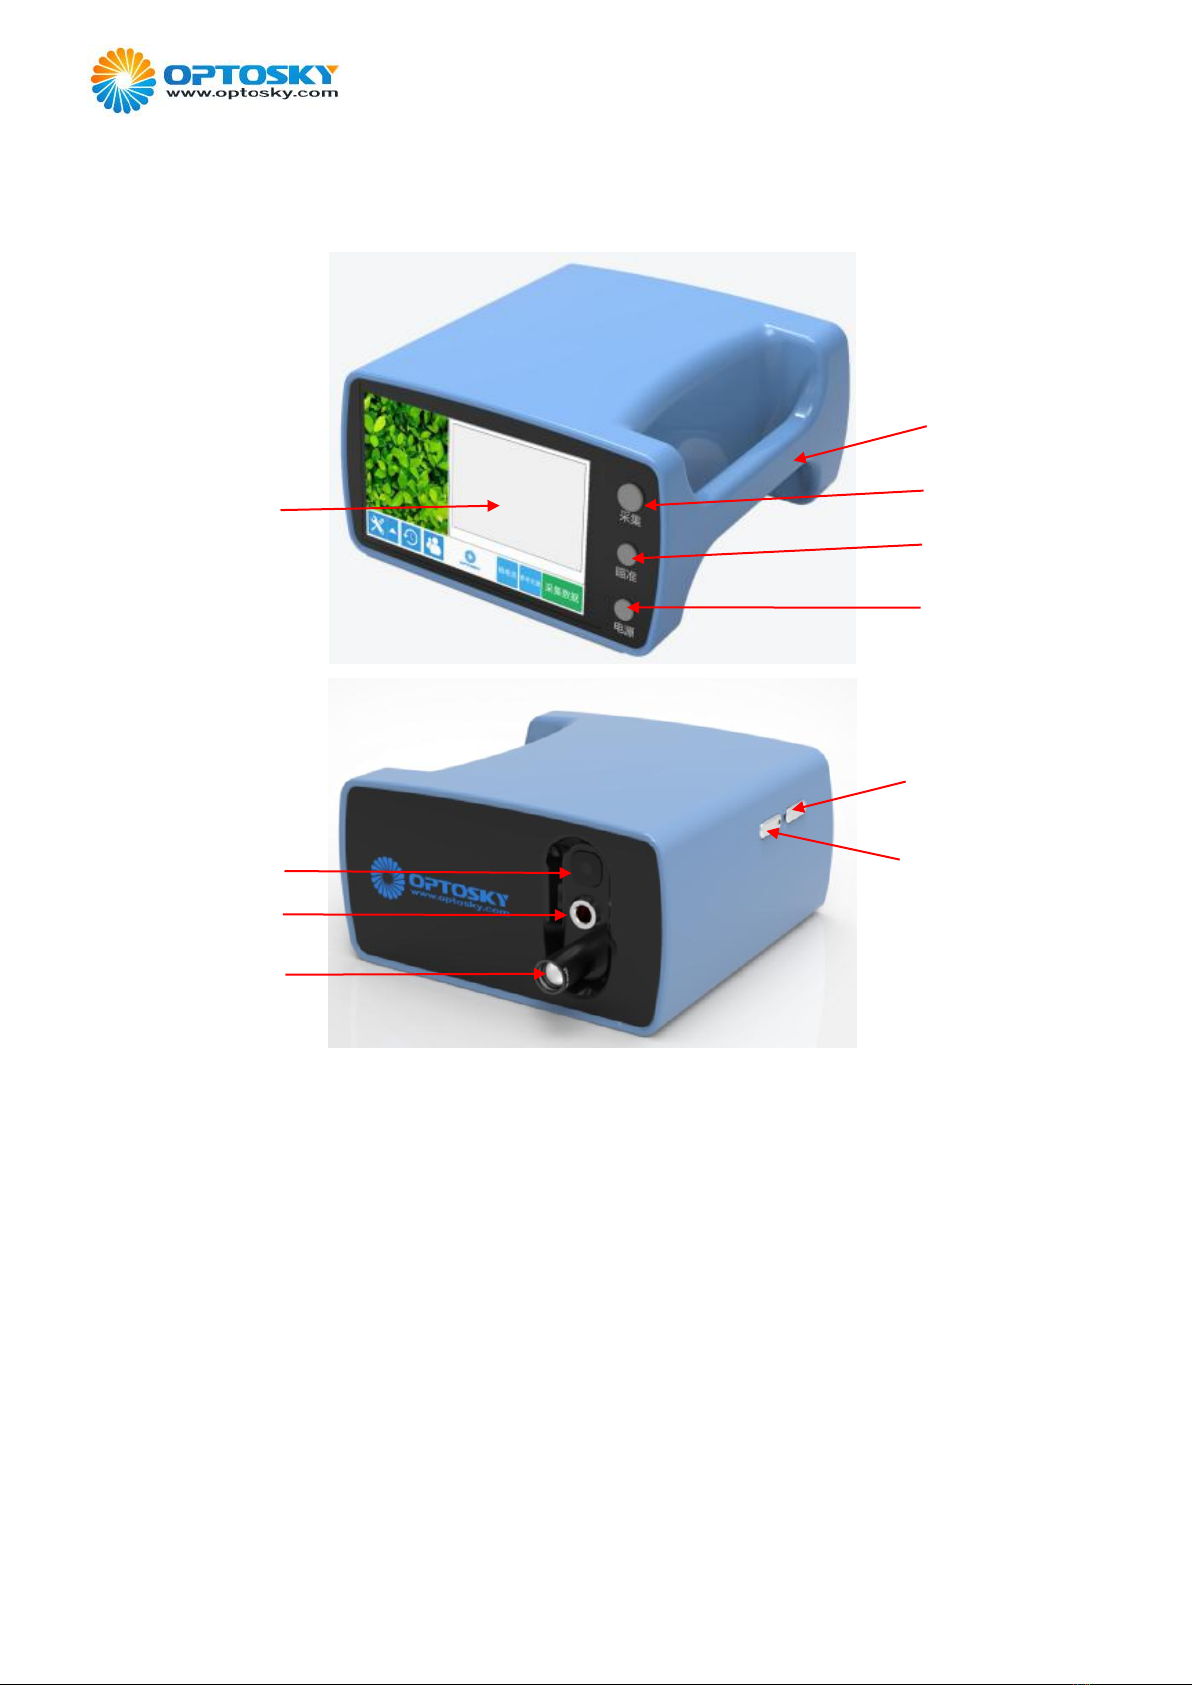
3.1 POWER BUTTON............................................................................................................................... 3
3.2 AIMING BUTTON.............................................................................................................................. 3
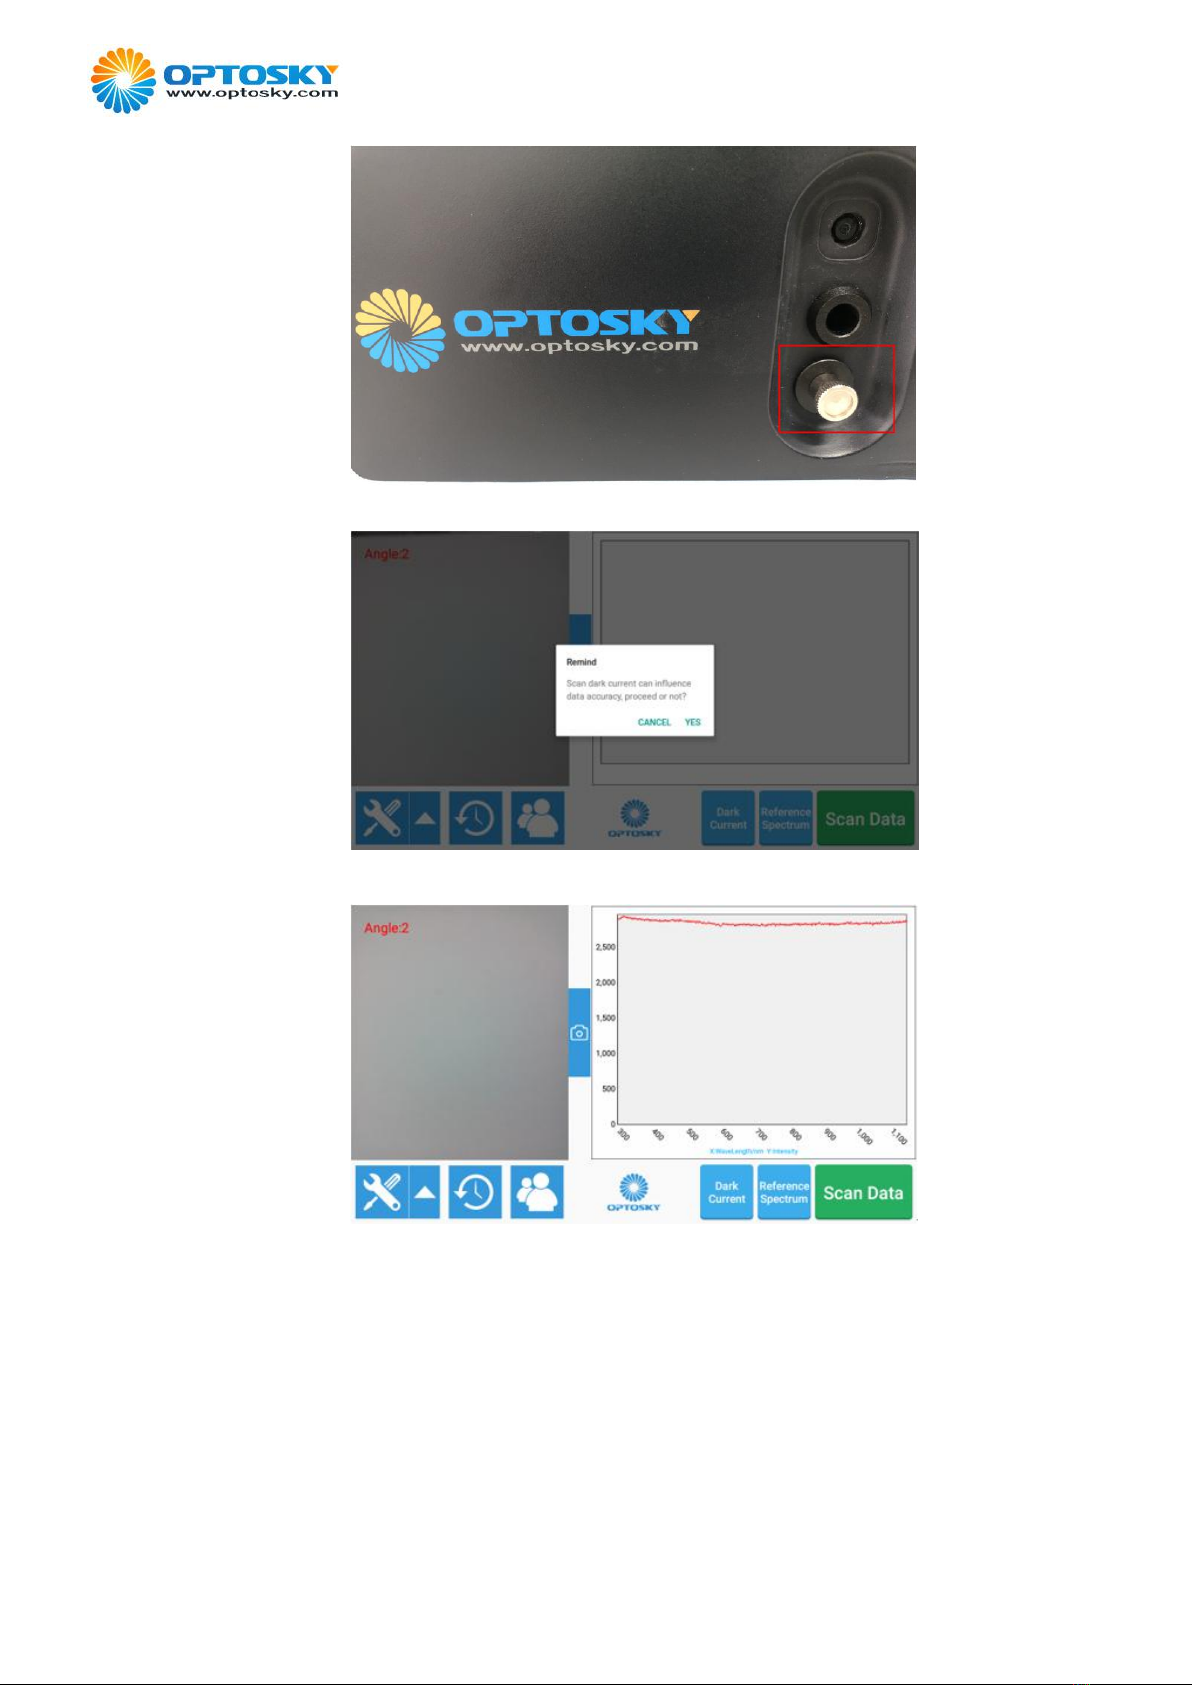
3.3 SCAN BUTTON..................................................................................................................................4
3.4 MAIN SCREEN................................................................................................................................. 4
3.5 POWER/USB PORT...........................................................................................................................4
3.6 PC PORT..........................................................................................................................................4
3.7 FOV LENS....................................................................................................................................... 4
3.8 LASER AIM AT................................................................................................................................. 4
3.9 CAMERA.......................................................................................................................................... 4
4 OPERATION MANUAL.................................................................................................................... 4
4.1 POWER ON/OFF............................................................................................................................... 4
4.2 MAIN INTERFACE.............................................................................................................................5
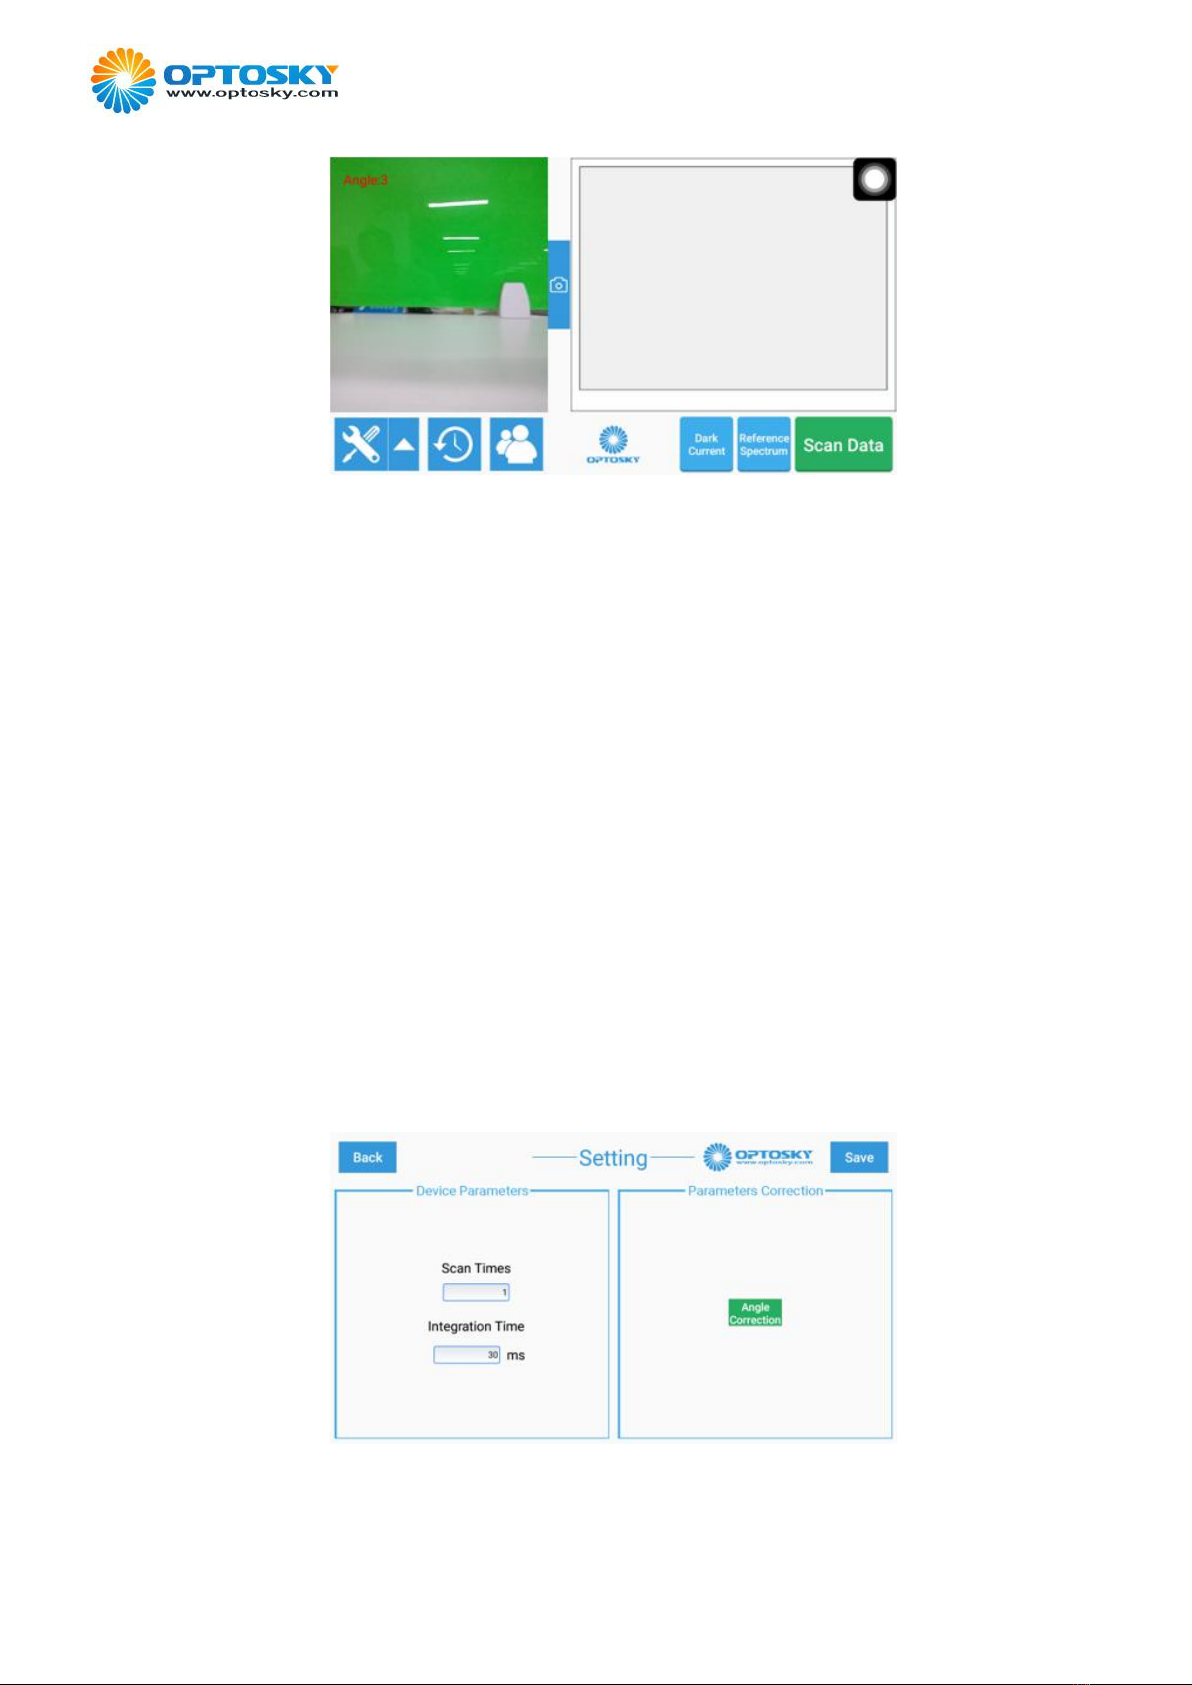
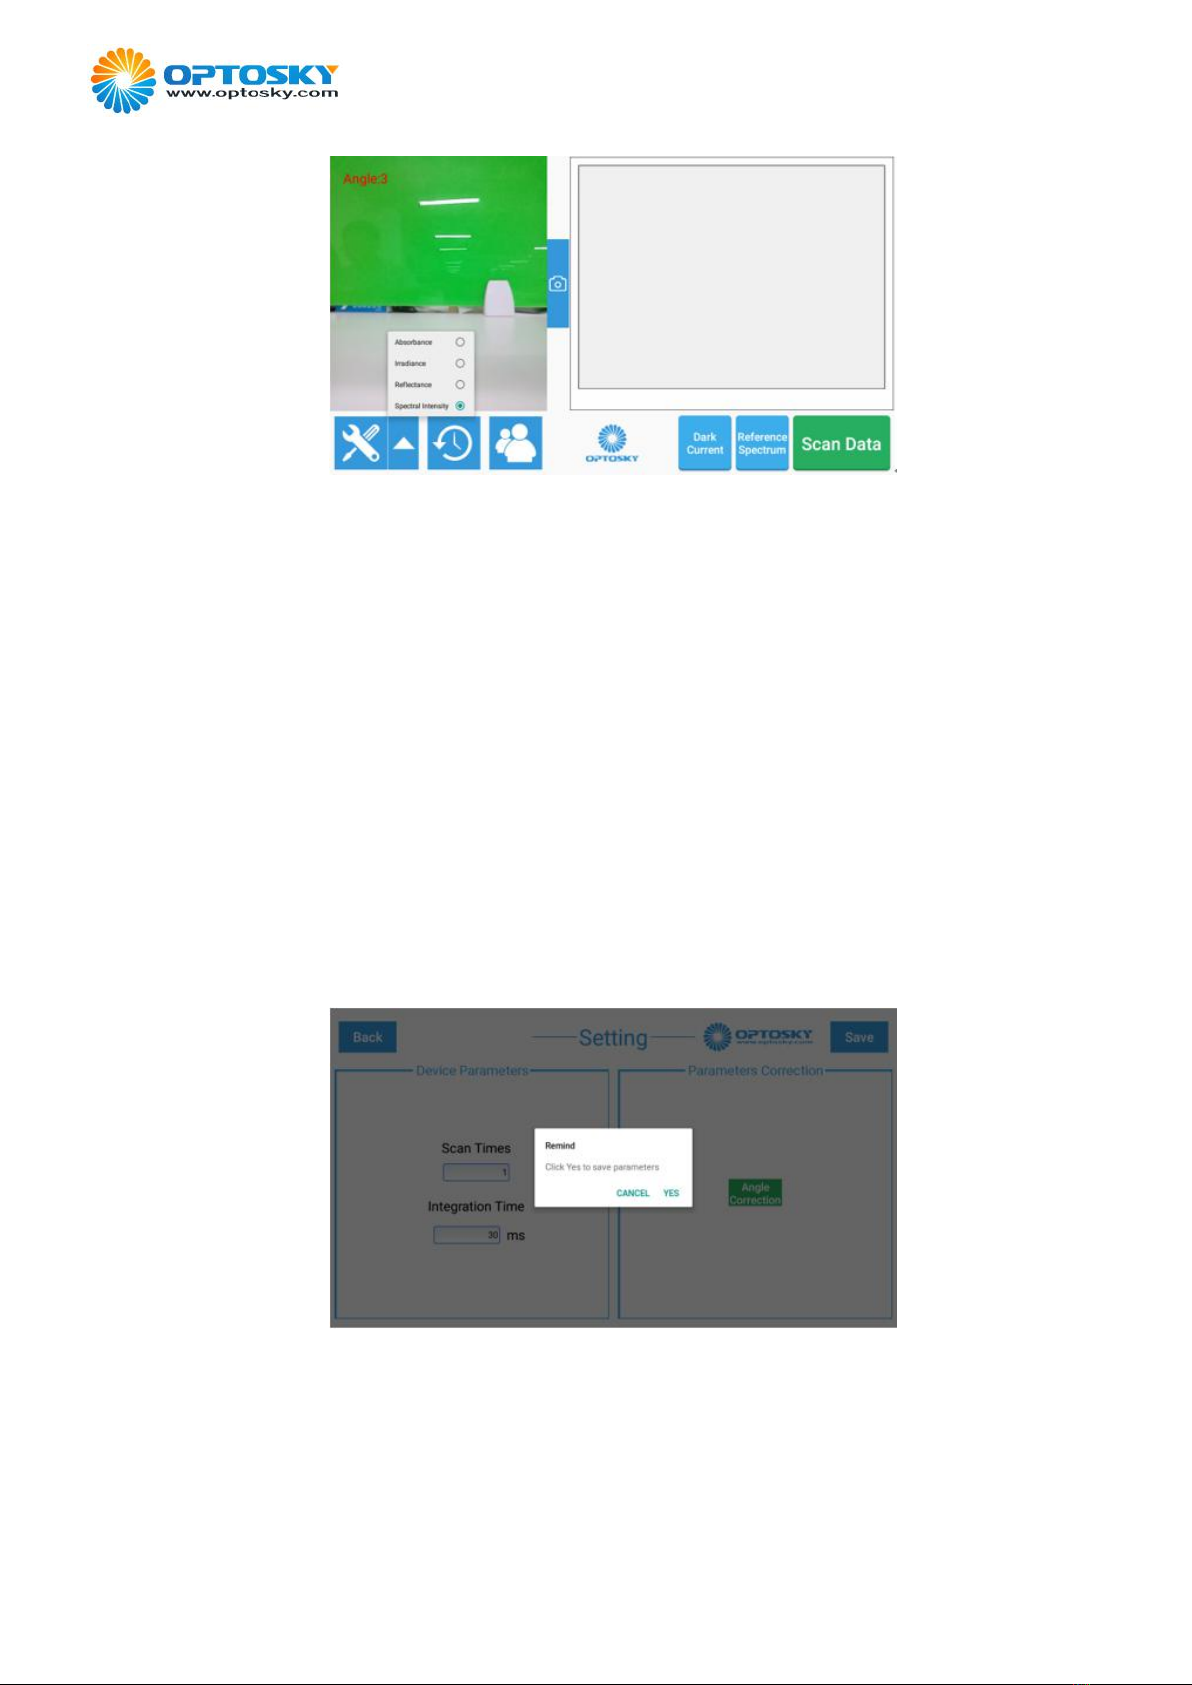
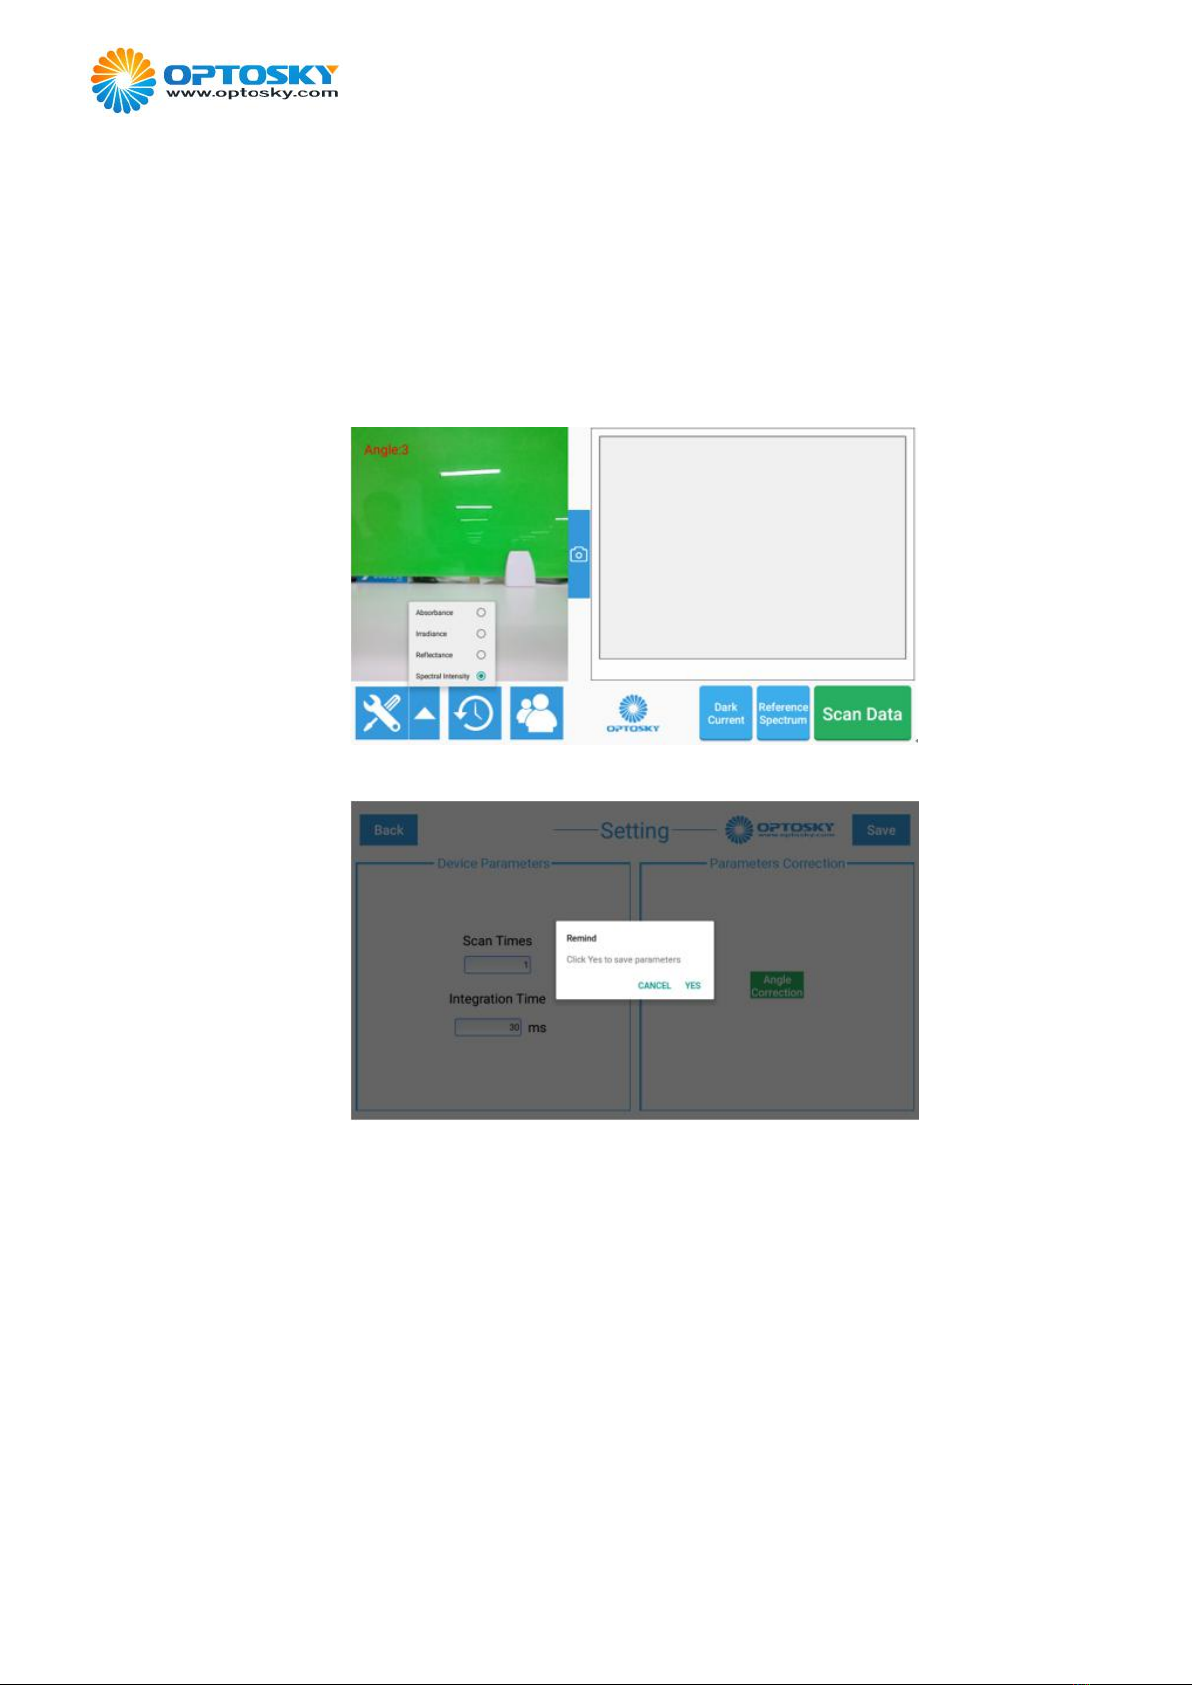
4.3 SETTING...........................................................................................................................................6
4.3.1 Configuration...........................................................................................................................7
4.3.2 Parameters correction.............................................................................................................. 7
4.4 SCAN DATA......................................................................................................................................8
4.4.1 Scan spectral intensity............................................................................................................. 8
4.4.2 Scan Reflectance................................................................................................................... 10
4.4.3 Scan irradiance...................................................................................................................... 13
4.4.4 Scan absorbance.................................................................................................................... 15
4.5 HISTORICAL RECORDS...................................................................................................................18
4.5.1 Review historical records...................................................................................................... 18
4.5.2 Rename historical records..................................................................................................... 19
4.5.3 Export data............................................................................................................................ 19
4.5.4 Delete data.............................................................................................................................21
5 USER MANAGEMENT................................................................................................................... 22
5.1 ADD USERS....................................................................................................................................22
5.2 REVISE &DELETE USERS...............................................................................................................23
6 SYSTEM INFORMATION...............................................................................................................25
7 NOTES................................................................................................................................................ 25
8 ATTACHMENT.................................................................................................................................26

ATP9100 Handheld Field Spectroradiometer User Manual
2
1 Specification
Optosky ATP9100 is a new handheld hyperspectral field spectroradiometer that
employs spectral range between 300-1100nm, and it's applied to fields of remote
sensing measurement, crop monitoring, research of forest and oceanography etc.
ATP9100 field spectroradiometer employs high performance, fast and accurate
measurement, easy to operate and held etc. It's configured powerful software package,
and applied to measurement of reflectance, radiometry, photometry and colorimetry.
2 Technical Specification:
SN
Specification
1
Field Spectroradiometer
Detector:2048pixels CCD;
Linearity:> 99%;
Spectral range:300-1100 nm;
Spectral resolution:<2.5nm@546nm;
Wavelength accuracy:± 0.5 nm;
Repeatability:± 0.3 nm @ ± 10 °C;
SNR:>800
Spectral sampling interval:0.6 nm;
Hardware spectral average: Max reach up to 100,000 times;
Size: 151×157×85mm;
Weight: 1.1Kg
Temp./Humidity:
0°C~40°C (working temp.)
-15°C~55°C (storage temp.)
Dry to non-condensate status
Probe tip angle accuracy: <1°(0°~30°)。
IP65
2
Standard Probe,SMA905, 6-pins water proof data port, M12×0.5 screw hole used to
connect fiber, cable and focus lens. Compact size.
Built-in inclined angle sensor can display probe inclined angle in the software
Built-in laser on used to indicate probe detect orientation
Replaceable FOV lens, available in 1°/8°/15°/25°, and optional angles.

ATP9100 Handheld Field Spectroradiometer User Manual
3
Scan button
Main screen
Aiming button
Power button
Handle
Power/USB Port
PC port
FOV lens
Laser aim at
Camera
3 Introduction
3.1 Power button
Long press power button till screen lighting up can start the device. Built-in
Li-battery can be charged with adaptor.
*Remark: It’s required the company's equipped batteries to be used, and a
certified adapter or connector could be used to charge the instrument, otherwise, it
can danger human body or the device.
3.2 Aiming button
Press aiming button can aim at the scan area before detection.

ATP9100 Handheld Field Spectroradiometer User Manual
4
*Remark: It prohibits to aim at eyes or skin while laser on.
3.3 Scan button
Users can press scan button to scan spectral data, one time press can save the last
scan data, but long press can save continuous scan spectral data.
3.4 Main Screen
5-Inch HD touch screen 720×1080, brief interface, easy-to-operate.
3.5 Power/USB port
Power/USB port is in the right side near the screen, the port can be used to
charge electricity, and connect USB cable to transmit data.
3.6 PC Port
Users connect PC port to PC software to realize data measurement on PC.
3.7 FOV lens
User can select different FOV lens according to FOV scope.
3.8 Laser aim at
The device employs a function of laser aiming paralleled to lens, and users can
adjust the head orientation to the reasonable scope and aim at the objective.
3.9 Camera
Built-in 12-mega camera can take a picture of the sample detected.
4 Operation manual
4.1 Power On/Off
Power on: Long press power button to access to login interface refer to Fig 4.4.4

ATP9100 Handheld Field Spectroradiometer User Manual
5
Fig 4.1.1 User login interface
First login user account and password are available in:
User account: supportAdmin; PSW: 123456
Remind: It’s suggest to revise password after login in order to ensure data safety.
Login:Select user name, input password, click login to access to main interface.
Power off: Long press power button till screen popup up power off warning refer to
Fig4.1.2, click button to power off.
Fig 4.1.2 Power off warning
4.2 Main interface
Login to access to main interface refer to Fig4.2.1

ATP9100 Handheld Field Spectroradiometer User Manual
6
Fig 4.2.1 Software main interface
【Setup】:Click it to access to configuration setting.
【Measure Types 】:Four types are available for selection including
absorbance, irradiance, reflectance, and spectral intensity.
【Historical Records 】 : Click historical records can review, export and
delete historical records.
【User Management】:click user management to create account, revise
password.
【System Info 】 : Include product name, model, s/n software version,
company information etc.
【Dark Current】:Click to scan dark current
【Reference Spectrum】:Click to scan reference spectrum
【Scan Data】:Click to scan spectral data
4.3 Setting
Setup parameters of scan times, integration time, parameters correction (angles
correction), and measure absorbance, irradiance, reflectance, and spectral intensity
refer to Fig4.3.1 and Fig4.3.2
Fig 4.3.1 Setting interface 1

ATP9100 Handheld Field Spectroradiometer User Manual
7
Fig 4.3.2 Setting and select measure items
4.3.1 Configuration
【Scan Times】:System can get average base on scan times.
【Integration Time】:Set time to scan spectrum of the sample.
*Remark :Scan times and integration time are not fixed value, it’s needed to
confirm base on light intensity and user requirement, sometimes it takes many times
to try out suitable integration time to set.
4.3.2 Parameters correction
【Angles correction】:Position the device in vertical to horizontal level, click angles
correction refer to warning in Fig 4.3.2.1, click confirm can set angle to zero,
click cancel correction.
Fig 4.3.2.1 Angles correction warning

ATP9100 Handheld Field Spectroradiometer User Manual
8
4.4 Scan data
4.4.1 Scan spectral intensity
Click【▲】, select spectral intensity refer to Fig 4.4.1.1, and setup scan times
and integration time, click save. System warn of click to save parameters or not
refer to Fig 4.4.1.2, click confirm to save parameters.
Fig 4.4.1.1 Click test type-spectral intensity
Fig 4.4.1.2 Setup and save parameters
Disassemble FOV lens, use cap to cover interface between fiber and lens
refer to Fig 4.4.1.3, click dark current refer to system warning info in Fig 4.4.1.4
Click confirm scan dark current, complete dark current acquisition, then dark
current can be saved in the device, if the user do not scan dark current again, it
can use the last dark current value refer to 4.4.1.5.

ATP9100 Handheld Field Spectroradiometer User Manual
9
Fig 4.4.1.3 Cap cover fiber interface
Fig 4.4.1.4 Warning of dark current acquisition
Fig 4.4.1.5 Complete dark current acquisition
Click scan data on screen or press scan button at the side, system can
continuously scan data, click save data refer to Fig 4.4.1.6, input file name and
click confirm can save the last piece of data, click cancel the save.

ATP9100 Handheld Field Spectroradiometer User Manual
10
Fig 4.4.1.6 Complete scan data
Long press scan button at the side, and the system can save all scan data,
save data file name increased from 1 to the last number, eg: if continuous 4 piece
of data, input file name is A, so that file name can automatically save to A-1
~A-4, the saved data can be reviewed from the historical records refer to Fig
4.4.1.7.
Fig 4.4.1.7 Historical Records
4.4.2 Scan Reflectance
Click【▲】can select reflectance refer to Fig 4.4.2.1

ATP9100 Handheld Field Spectroradiometer User Manual
11
Fig 4.4.2.1 Select detect reflectance
Setup scan times and integration time, click save, system can popup a
remind if click to save parameters refer to Fig 4.4.2.2
Fig 4.4.2.2 Setup and save parameters
Disassemble FOV lens, use cap to cover interface between fiber and lens
refer to Fig 4.4.1.3, click dark current refer to system warning info in Fig 4.4.2.3
Click confirm scan dark current, complete dark current acquisition, then dark
current can be saved in the device, if the user do not scan dark current again, it
can use the last dark current value refer to 4.4.2.4.
Fig 4.4.2.3 Scan dark current

ATP9100 Handheld Field Spectroradiometer User Manual
12
Fig 4.4.2.4 Complete scan dark current
Click reference spectrum can remind an information refer to Fig 4.4.2.5,
click confirm to complete scan reference spectrum. The reference spectrum can
be save to the device till the next scan again, it’s recommend to rescan reference
spectrum while light intensity change or condition change in order to ensure
accurate detect result.
Fig 4.4.2.5 Warning of scan reference spectrum
Click scan data on screen or press scan button at the side, system can
continuously scan data, click save data refer to Fig 4.4.2.6, input file name and
click confirm can save the last piece of data, click cancel the save.
Fig 4.4.2.6 Complete scan data
Long press scan button at the side, and the system can save all scan data,
save data file name increased from 1 to the last number, eg: if continuous 5 piece
of data, input file name is R, so that file name can automatically save to R-1
~R-5, the saved data can be reviewed from the historical records refer to Fig
4.4.2.7

ATP9100 Handheld Field Spectroradiometer User Manual
13
Fig 4.4.2.7 Historical records
*Suggestion :setup a suitable integration time can set spectral intensity
above 20,000.
4.4.3 Scan irradiance
Click【▲】to select irradiance refer to Fig 4.4.3.1
Fig 4.4.3.1 Select irradiance
Setup integration time and scan times, position the device is vertical to the floor,
click angles correction to correct a angle of zero. Click save, the system remind a
message if click to save the parameters or not refer to Fig 4.4.3.2, and click
confirm to save the parameters.

ATP9100 Handheld Field Spectroradiometer User Manual
14
Fig 4.4.3.2 Setup and save parameters
Disassemble FOV lens, use cap to cover interface between fiber and lens
refer to Fig 4.4.1.3, click dark current refer to system warning info in Fig 4.4.3.3
Click confirm scan dark current, complete dark current acquisition, then dark
current can be saved in the device, if the user do not scan dark current again, it
can use the last dark current value refer to 4.4.3.4.
Fig 4.4.3.3 Warning of scan dark current
Fig 4.4.3.4 Complete scan dark current

ATP9100 Handheld Field Spectroradiometer User Manual
15
Uncover the cap and equip cosine corrector, click scan data on the screen or press
scan button at the side, the system start continuous scan data, click save data refer
to Fig 4.4.3.5, input file name and click confirm can save the last data, click cancel
the saved.
Fig 4.4.3.5 Complete scan data
Long press scan button at the side, and the system can save all scan data,
save data file name increased from 1 to the last number, eg: if continuous 3 piece
of data, input file name is B, so that file name can automatically save to B-1
~B-4, the saved data can be reviewed from the historical records refer to Fig
4.4.3.6
Fig 4.4.3.6 Historical records
4.4.4 Scan absorbance
Click【▲】to select absorbance refer to Fig 4.4.4.1

ATP9100 Handheld Field Spectroradiometer User Manual
16
Fig 4.4.4.1 Select absorbance
Setup scan times and integration time, click save, the system popup a
warning click if save parameters or not refer to Fig 4.4.4.2
Fig 4.4.4.2 Setup and save parameters
Disassemble FOV lens, use cap to cover interface between fiber and lens
refer to Fig 4.4.1.3, click dark current refer to system warning info in Fig 4.4.4.3
Click confirm scan dark current, complete dark current acquisition, then dark
current can be saved in the device, if the user do not scan dark current again, it
can use the last dark current value refer to 4.4.4.4.
Fig 4.4.4.3 Warning of scan dark current

ATP9100 Handheld Field Spectroradiometer User Manual
17
Fig 4.4.4.4 Complete scan dark current
Click reference spectrum, the system popup a warning of message refer to
Fig 4.4.4.5, click confirm to complete reference spectrum
Fig 4.4.4.5 warning message of scan reference spectrum
Long press scan button at the side, system starts continuously scan data,
click save the data refer to Fig4.4.4.6, input file name click confirm can save the
current data, click cancel the saved, the saved data can be reviewed from the
historical records refer to Fig 4.4.3.7
Fig 4.4.4.6 Complete scan data

ATP9100 Handheld Field Spectroradiometer User Manual
18
Fig 4.4.4.7 Historical records
Long press scan button at the side, and the system can save all scan data,
save data file name increased from 1 to the last number, eg: if continuous 5 piece
of data, input file name is C, so that file name can automatically save to C-1
~C-5.
4.5 Historical Records
4.5.1 Review historical records
Click historical records to access to the interface refer to Fig4.5.1.1, Access to
historical records interface can screen records as required refer to Fig 4.5.1.2
Fig 4.5.1.1 Historical records

ATP9100 Handheld Field Spectroradiometer User Manual
19
Fig 4.5.1.2 Select time
4.5.2 Rename historical records
Access to historical records interface, click data as required, click the data, and click
rename, the system popup a message of save file refer to Fig 4.5.2.1, input file
name and click confirm can success to save.
Fig 4.5.2.1 Save file name
4.5.3 Export data
Export one data, firstly click export data, and click export data, the system
popup a warning if export the data or not refer to Fig 4.5.3.1, click confirm to
export.
Other manuals for ATP9100
1
Table of contents
Other OPTOSKY Measuring Instrument manuals