1. Use
Submersible recessed spotlight for occasional use and lighting small underwater
areas. Illuminates steps, small pools, waterfalls or a marine environment. Only
an IP69 connection to the electricity network ensures the IP69 degree of the
product.
Spotlight for permanent submersion only. Construction/special Functions
available on request. Please note that during installation in water, the intensity
depends on the turbidity of the water.
2. Technical data/Assembly
Spotlight in 316L INOX electro-polished - 12 x 10W LED - Color emission :
RGBW/W. 316L stainless steel gland. Delivered with 8x0.22 mm² Submersible
cable. Sealing casing to be ordered separately.
3. Installation/Assembly
Please comply with the applicable national safety requirements. We disclaim
all responsibility for non-compliant use or assembly. Similarly, we reject any
responsibility for any modifications to the light fittings. Possibility of mounting
the projector in combination with the corresponding moulded plastic housing for
mounting in the wall or floor of the tiled concrete basins (max. height of tiles/
mortar 10 mm or over-demand).
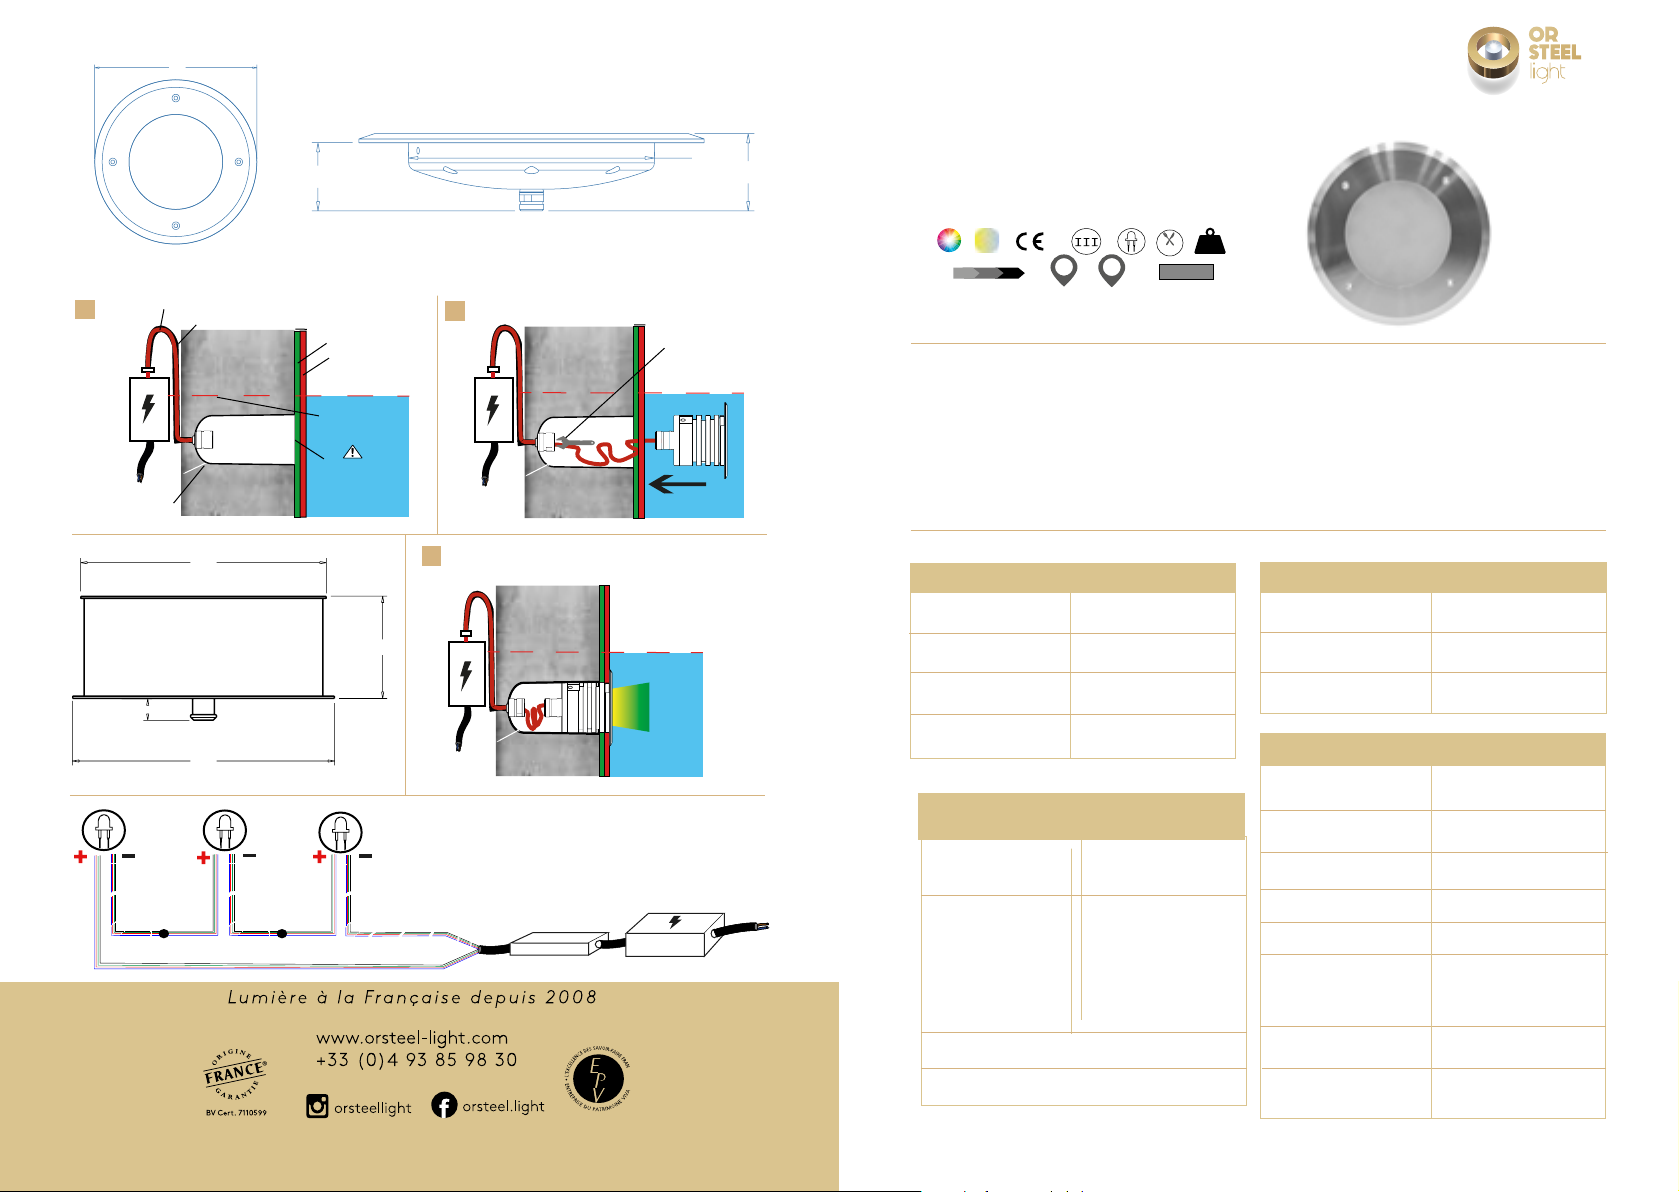
Monting in concrete pool
Position and secure the underrun housing on the front (water side) formwork as
marked. If necessary, seal the outer base, by example with silicone to prevent dirt
from entering the housing. Attach the plastic end cap to the posterior formwork.
Check the proper fastening of the underrun housing, the cable protective sheath
with clamps and the plastic end cap. After concreting the pool and removing the
formwork, apply the mortar and lay the tiles to the maximum inside diameter of
the housing. Maximum height mortar and tile 10 mm.
Monting of projector
Inject the silicone through the cable passage into the underrun housing and the
cable protective sheath. Tighten the fitting nut to seal the cable. Insert, adjust
and secure the projector. Screw the M16 plastic screw fitting supplied at the
plastic end-piece and tighten the nut-fitting to seal the cable. at the end of the
hose travel. Caution: use factory-connected cables only. Indicate the desired
cable length when ordering.
4. Connecting to the power packs/connection matrix
Constant current spotlights must only be connected in series. If necessary,
connect in series in separate distribution boxes, the exterior of which must also
be protected against moisture by means of a sealing mass.
5. General Maintenance Instructions
Do not use detergents which are harmful to metals when cleaning the spotlight.
The use of hydrochloric acid-based detergents on and around any parts of a
stainless steel light fitting is totally forbidden.
Regularly clean the spotlight and its mounting box to avoid any rust deposit.
Caution: Do not use a high pressure cleaner. Any lost screws should only be
replaced by V4A stainless steel screws.
According to conditions of use (power, environmental circumstances), it is
recommended to change the seals (on the glass, screw fittings and O-rings) and
the cable every 5 to 8 years.
6. Warranty conditions
The following time limits and provisions of the warranty shall apply from the date
of delivery: - 24 months for Orsteel spotlights
The warranty covers defects in materials, manufacturing defects and any
treatment which is proven to be attributable to the manufacturer.
Any damage resulting from the non-compliance with this user leaflet or any non-
compliant repair is excluded from the warranty.
We disclaim any guarantee where the installation has not been carried out
according to the instructions or where unsuitable bulbs or connection cables
have been used. We reserve the right to make any modification corresponding to
technical advancement.
7. Important Notice
(The warranty becomes void in the event of non-compliance with the following
points)
The absence of damage during transport must be verified before installation.
Any assembling and installation, as well as any electrical work, must be carried
out by qualified personnel.
To avoid any rust deposits, only stainless steel tools should be used.
The cable length for lamps must be chosen to avoid extending it in water or in a
damp environment. Any subsequent claim for this reason will not be accepted.
A mounting distance of 10 cm between each device is strongly recommended to
avoid mutual heating.
Equipment must be connected without current, otherwise surges in the power
supply could damage the LEDS. There must be no primary voltage when changing
LEDs. When connecting the lamps, please ensure that polarity matches! A polarity
error may damage the LED module.
The customer is advised to install protection against any over voltage compliant
with standards DIN VDE 0100-443, DIN VDE 0100-534 and En 62305.
Please observe the measures against electrostatic discharge during all work on
the spotlights, equipment and LEDs.
INSTALLATION MANUAL