ORANGE SPV C550 User manual


Smartphone User Manual
Safeguard
2
Congratulations on the purchase of your new Windows Mobile™
Smartphone!
Please read before operating your device.
THE DEVICE IS NOT CHARGED WHEN YOU TAKE IT OUT
OF THE BOX.
DO NOT REMOVE THE BATTERY PACK WHEN THE DEVICE
IS CHARGING.
WHEN INSERTING YOUR SIM CARD, MAKE SURE THE
DEVICE IS POWERED OFF, AND THAT THE SIM CARD
SNAPS INTO THE SOCKET SECURELY.
YOUR WARRANTY IS INVALIDATED IF YOU OPEN OR
TAMPER WITH THE DEVICE’S OUTER CASING. (For more
information, see the enclosed warranty statement.)
EXPLOSIVE ATMOSPHERES
When in any area with a potentially explosive atmosphere or where
flammable materials exist, the product should be turned off and the user
should obey all signs and instructions. Sparks in such areas could cause
an explosion or fire resulting in bodily injury or even death. Users are
advised not to use the equipment at refueling points such as service or
gas stations. Users are reminded of the need to observe restrictions
on the use of radio equipment in fuel depots, chemical plants or where
blasting operations are in progress. Areas with a potentially explosive
atmosphere are often, but not always, clearly marked. These include
fueling areas, below deck on boats, fuel or chemical transfer or storage
facilities, and areas where the air contains chemicals or particles, such
as grain, dust, or metal powders.
Please be aware that this user guide is describing a global Pocket PC phone.
There may be some differences in the features and applications described in
this guide, and those available on your phone. These variations depend on
your purchasing location and supplier.

Smartphone User Manual
Contents
3
Contents
Chapter 1 Getting Started 7
1.1 Knowing Your Smartphone ..........8
1.2 Status Indicators ........................15
1.3 Setting up Your Smartphone ......16
1.4 Included Accessories ..................20
1.5 Navigating ..................................21
1.6 Entering Text and Numbers .......26
1.7 Securing Your Smartphone ........30
Chapter 2 Using your Smartphone 33
2.1 Making a Call ..............................34
2.2 Receiving a Call ..........................37
2.3 Using Contacts and Beaming .....39
2.4 Caller Photo ID ...........................46
2.5 In-call Options ...........................55
2.6 Retrieving a Voice Mail Message ..56
2.7 Reviewing Your Calls .................56
2.8 Speed Dials and Voice Tags ........58
2.9 Advanced Dialing Information ...62
Chapter 3 Using Your Camera 65
3.1 Camera Mode .............................66
3.2 Album Mode ...............................78

Smartphone User Manual
Contents
4
Chapter 4 Personalizing your Smartphone 91
4.1 Customizing Phone Settings ......92
4.2
Customizing Profiles and Sounds ..... 99
Chapter 5 Getting Connected 103
5.1 Connecting to the Internet ......104
5.2 Internet Explorer .....................107
5.3 Bluetooth ..................................110
5.4 Modem Link ..............................113
Chapter 6 Messaging Features 115
6.1 Setting Up Accounts .................116
6.2 Managing Accounts ..................118
6.3 Creating E-mail
and SMS Messages ......................119
6.4 Receiving E-mail
and SMS Messages ...................122
6.5 Viewing Message Folders .........126
6.6 Managing Messaging ................128
6.7 Instant Messaging ....................131
6.8 MMS Messaging ........................135
Chapter 7 Synchronizing 143
7.1 Using ActiveSync ......................144
7.2 Installing ActiveSync ...............145
7.3 Server ActiveSync ....................146
7.4 Other Information ....................149

Smartphone User Manual
Contents
5
Chapter 8 Applications 151
8.1 Using Calendar .........................152
8.2 Using Tasks ..............................155
8.3 Using Calculator .......................156
8.4 Using Voice Notes ....................157
8.5 Using Windows Media Player ...158
8.6 Using Java Manager .................165
8.7 Games ......................................169
Chapter 9 Maintaining Your Smartphone 173
9.1 Adding and Removing
Programmes .............................174
9.2 File Manager .............................175
9.3 Task Manager ...........................182
9.4 Space Maker .............................184
Appendix Regulatory Notices 190
Troubleshooting ..............................197
Specifications ..................................202
Index 205

Smartphone User Manual
Contents
6

Chapter 1
Getting Started
1.1 Knowing Your Smartphone
1.2 Status Indicators
1.3 Setting up Your Smartphone
1.4 Accessories
1.5 Navigating
1.6 Entering Text and Numbers
1.7 Securing Your Smartphone

8
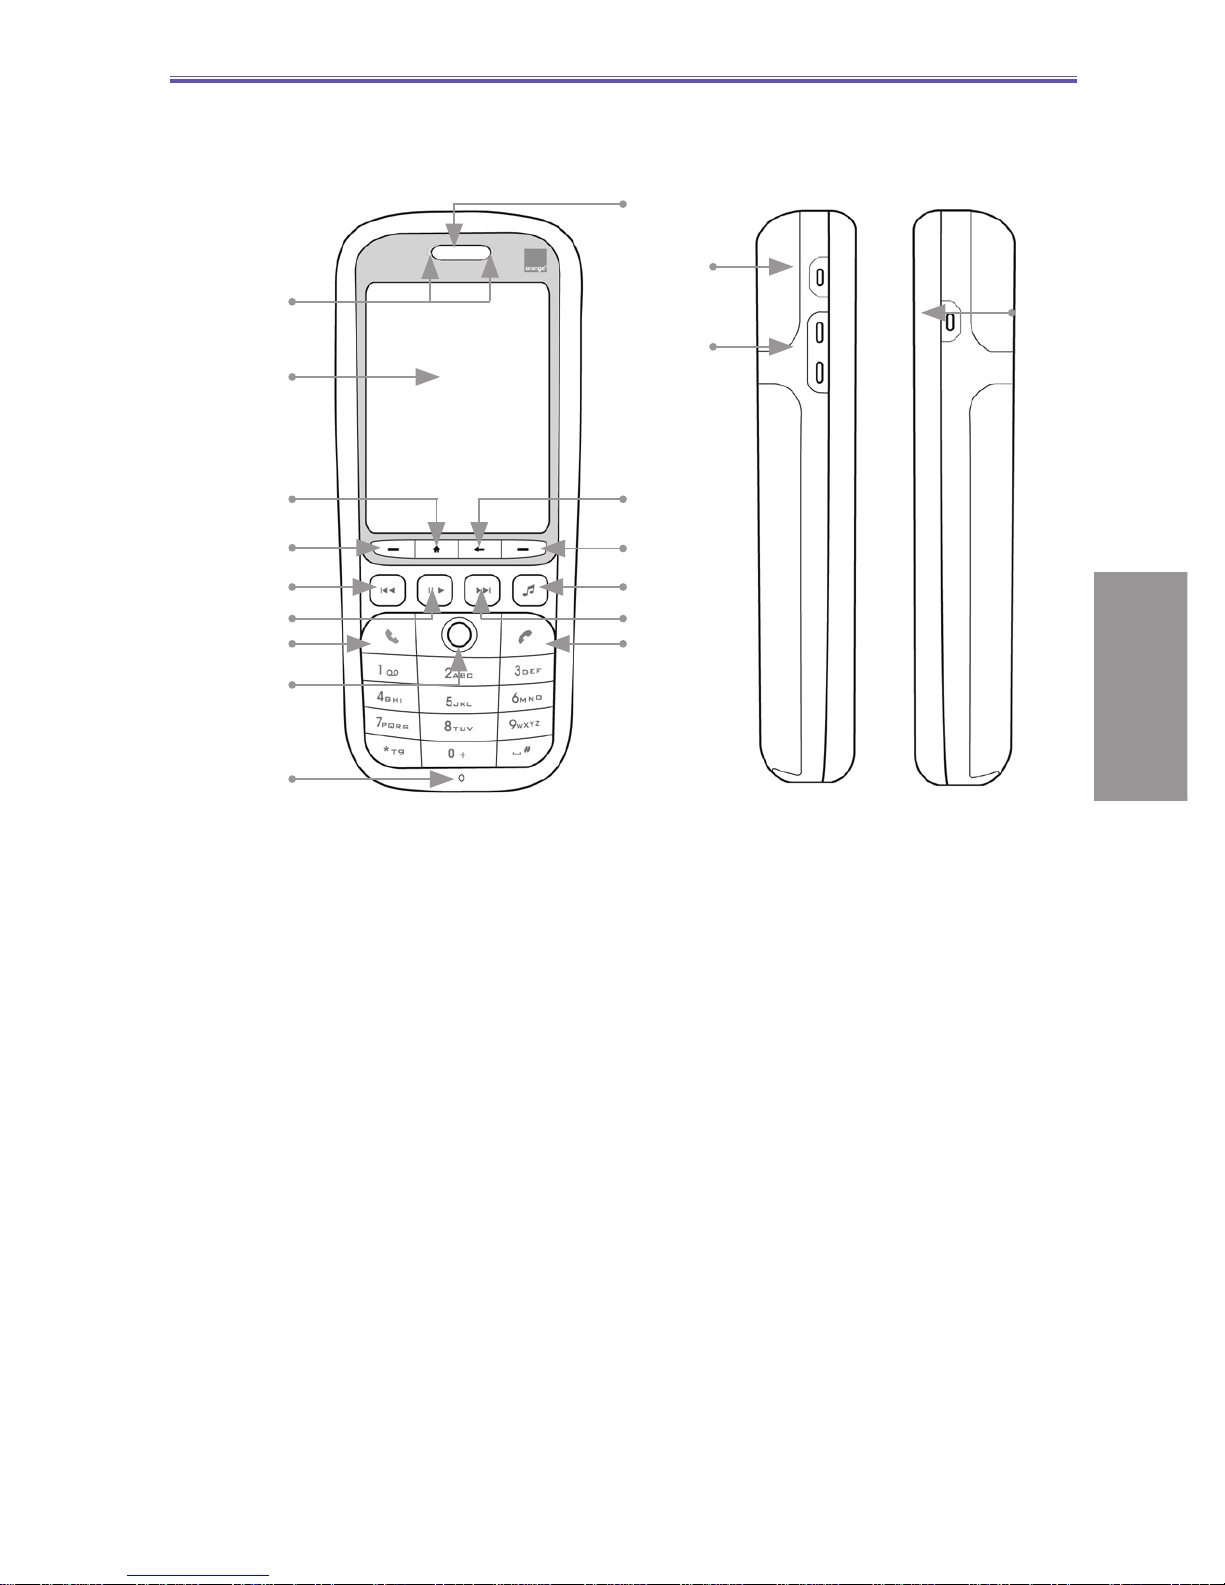
1.1 Knowing Your Smartphone
This section will help you become familiar with your
Smartphone’s hardware, including a basic introduction to
the buttons and features found on the top, bottom, front,
side, and rear of the phone. A brief explanation of the LED
indicator is also provided.
Top View Bottom View
1. Power button
When your Smartphone is turned Off, press and hold the
Power button to turn it On, and vice versa. When the
Smartphone is On, press and quickly release the Power
button to display the Quick List (illustrated later in this
chapter), which allows you to change profiles or “lock”
your Smartphone.
2. Infrared (IrDa) port
Enables your Smartphone to receive data from another
IR-compatible device through beaming.
3. Speaker
An additional speaker can be found on the front of the
Smartphone.
4. Microphone
5. Earphone plug
Plug the earphone jack here to use the hands-free mode
or listen to sound or multimedia files.
6. Mini-USB connector
Attach the mini-USB cable here to synchronise the
Smartphone with your PC, or to charge its battery.
Smartphone User Manual
1. Getting
Started
4 61 2 3 5
9
Front View Side View
Left Right
1. LED Indicators
The left bi-color LED Indicator (green/red) notifies you of
the battery and network status of your Smartphone, and
the right LED Indicator (blue) notifies you of the Bluetooth
connectivity status. The meaning of the various colors in
the two LED Indicators are described in a table later in
this section.
2. Display screen
The status indicators concerning the current mode,
battery strength, the current activity, or active program
are displayed in the Title Bar at the top of the screen. In
the center of the screen is the active menu or program
(or incoming live video stream if Camera mode is active).
At the bottom of the screen are the menus or commands
related to the active program.
3. Home button
The Home button provides two functions:
• Press to return to the Home screen.
• Press and hold to launch the Bluetooth/PDP Quick
List.
14
15
Smartphone User Manual
1. Getting
Started
1
2
12
3
4
6
9
8
10
13
16
17
11
5
7
18

10
4. Left Softkey (Softkey 1)
Performs the function shown in the “softkey label” on the
screen immediately above the button. (For example, when
in the Home screen, pressing the Left Softkey opens the
Start menu.)
5. Media Player — Previous hardkey
If Windows Media Player is not running, pressing this
hardkey will launch it (see Chapter 8 for information about
using Media Player).
If already running, behaviors are as follows:
• A quick press and release within the first two seconds
of file playback will stop playing the current file, jump
to the previous file, and begin playing it.
• A quick press and release after the first two seconds of
file playback will go back to the beginning of the current
file and start playing it again from the beginning.
• Pressing and holding will “fast rewind” (with
playback).
• If a file is selected but not currently being played, the
previous file in the sequence will be selected.
• If Media Player is running in foreground but no file
is loaded, nothing happens when you press this
hardkey.
6. Media Player — Pause/Play/Stop hardkey
If Windows Media Player is not running, pressing this
hardkey will launch it (see Chapter 8 for information about
using Media Player).
If already running, behaviors are as follows:
• A quick press and release during file playback will
pause the playback. Another quick press will resume
playback.
• Pressing and holding will stop the playback.
• If a file is selected but not currently being played,
pressing this hardkey will start playback of that file.
• When a file in “My Media” subfolders is selected,
pressing this hardkey will bring Windows Media Player
to the foreground and the file will be played.
• If Media Player is running in foreground but no file
is loaded, nothing happens when you press this
hardkey.
Smartphone User Manual
1. Getting
Started

11
7. Talk key
Press to start a call or answer an incoming call. Press and
hold to turn the speakerphone mode on or off, or switch
between an active call and a call on hold.
8. Navigation Pad
Use to scroll selection up, down, left, or right. Press
straight down on the center of the Navigation Pad (known
as the Action button) to select. In a text field, use the
navigation pad to move the cursor right or left, character
by character.
9. Light Sensor
If enabled in Settings > Power Management, dark
conditions (ambient luminance lower than 20~28 lux)
sensed here will activate a backlight under the keypad,
making it easier to see the buttons.
10. End key
Press to end a call; press to return to the Home screen;
or press and hold to lock the keypad.
11. Media Player — Next hardkey
If Windows Media Player is not running, pressing this
hardkey will launch it (see Chapter 8 for information about
using Media Player).
If already running, behaviors are as follows:
• A quick press and release during file playback will stop
playing the current file, and start playing the next file in
the sequence.
• Pressing and holding will “fast forward” (with
playback).
• If a file is selected but not currently being played, the
next file in the sequence will be selected.
• If Media Player is running in foreground but no file
is loaded, nothing happens when you press this
hardkey.
12. Media Player — Launch hardkey
Press to launch Windows Media Player directly, allowing
you to play media files on your Smartphone.
Smartphone User Manual
1. Getting
Started

12
13. Right Softkey (Softkey 2)
Performs the function shown in the “softkey label” on the
screen immediately above the button. (In many cases,
pressing the Right Softkey opens a menu associated with
a particular application.)
14. Back key
Press to go back to the previous screen, or to backspace
over one character in a text field. Press and hold to delete
the contents of an editable field.
15. Speaker
An additional speaker can be found on the top of your
Smartphone.
16. User button
This button is programmable to be set as a user-defined
function button.
17. Volume / Voice Tag / Voice Notes button
On the left side of your Smartphone, one of the functions
of this button is to let you adjust Volume during the talk
mode.
During the standby mode, pressing and holding the
Volume Down button will launch the Voice Tag feature
(explained in section 2.8). Or, you can press and hold the
Volume Up button to launch the Voice Notes recorder
(see section 8.4).
18. Camera button
On the right side of your Smartphone, this button switches
to the Camera mode (if not already in Camera mode).
If already in Camera mode, pressing this button captures
a still image or begins capturing a video clip, depending
on the current capture submode.)
Smartphone User Manual
1. Getting
Started

13
LED Indicator Lights
The various colors that might display in the two LED Indicators
are summarised in the table below.
Left LED Status
Solid green Battery is fully charged
Blank Battery case is empty
Solid Amber Battery is charging
Flashing green Network is attached
Flashing red Battery very low (less than 4%)
Flashing amber Battery temperature is hotter or colder
than the functional limits of 0 to 48
degrees Celsius, and has stopped
charging
Amber / green LED off Battery fault. The “Battery Fault” icon
is displayed ( ). In this case, the
flashing green LED can be recovered
by unplugging the AC adaptor.
Dim Network is disconnected.
Right LED Status
Flashing blue Bluetooth set to “On” mode or “Discover-
able” mode
Smartphone User Manual
1. Getting
Started

14
Back View
1. Camera lens
The “live” incoming video stream enters through this lens,
when Camera mode is active.
2. Self-Portrait mirror
Position your Smartphone until this mirror reflects the
image you want to capture.
3. Car antenna connector
Allows you to attach your Smartphone to a car antenna
for better network signal reception, if desired.
12
3
Smartphone User Manual
1. Getting
Started

15
1.2 Status Indicators
Status indicators are displayed in the Title Bar at the top of
your Smartphone’s screen.
New message
New voice mail
New instant message (MSN)
Voice call active
Data call active
Call forwarding
Call on hold
Missed call
“1” indicates Line 1; “2” indicates Line 2
Battery full
Battery very low (less than 4%)
Battery fault
Signal strength
Radio off
GPRS available
GPRS in use
Ringer off
Multipress input mode, lowercase
Multipress text input mode, uppercase
Multipress text input mode, caps lock
T9 text input mode, lowercase
T9 text input mode, uppercase
Caller ID monitor is off
Caller ID monitor is running
Smartphone User Manual
1. Getting
Started

16
1.3 Setting up Your Smartphone
In this section you will learn how to install a battery, SIM card,
Mini-SD card, and how to charge the battery.
Installing the SIM Card
The SIM (Subscriber Identification Module) card contains
a computer chip that stores your personal number, phone
book, and other services provided by your cellular service
provider.
To insert a SIM card:
1. Press and move the backside cover downward to open.
2. Remove the battery by lifting it up from both sides of the
bottom end.
3. Lift up the SIM metal socket.
4. Insert the SIM card with the gold-plated contact area on
the card facing down. Push the metal socket down to lock
into place.
Smartphone User Manual
1. Getting
Started

17
Installing the Mini-SD card
Use only the Mini-SD (Secure Digital) card in your
Smartphone. You can install the Mini-SD card to store
images, video clips, music, and other data you may have
obtained.
To insert a Mini-SD card:
1. Remove the back phone cover as explained on the
previous page.
2. Slide the Mini-SD card into the holder, with the gold-plated
contact area facing down.
3. Push the card down and slide the metal latch over the
Mini-SD card to secure it into place.
Installing the Battery
1. Insert the battery by aligning the exposed copper part of
the battery pack with the protruding copper conductor,
then gently push the bottom of the battery into place.
2. Slide the cover on the phone.
Smartphone User Manual
1. Getting
Started

18
Charging the Battery
Your Smartphone is powered by a rechargeable Lithium-
Ion battery. The battery will eventually wear out after a few
hundred charges or discharges. Replace the battery through
an authorised vendor when the operating time is noticeably
shorter than usual.
The time it takes for a battery to fully charge depends on
the environment temperature at the time of charge. A
completed charge normally takes about 3 hours in 0-10
degree temperatures, and less than 3 hours in temperatures
ranging from 20 to 45 degrees.
Fully charge the new battery before using your Smartphone
for the first time. When the low-battery indicator appears,
save any unsaved data you are working on by synchronizing
your Smartphone with your PC or an Exchange Server. Do
not restart your Smartphone until you have connected it to
an external power source.
NOTE: Do not leave your Smartphone connected to a
charger for longer than a week because overcharging can
shorten a battery’s lifespan. Your battery will automatically
discharge when the phone is not in use. Leaving the battery
in extremely hot or cold places may also reduce its capacity
or shorten its lifespan.
Mode Estimated battery life
Talk Time 5 hours
GPRS 2 hours prox.
Standby 250 hours
Smartphone User Manual
1. Getting
Started

19
Your Smartphone can be charged whether it is powered on
or off. Charge your battery by plugging the AC adaptor into
the Mini-USB connector at the base of the device.
If your Smartphone is turned off, charging is indicated by
an amber light. If turned on, charging is indicated by the
solid amber light on the LED indicator and the charging
icon ( ). The completed charge is indicated by either
a green light or a charged icon. You can also charge your
Smartphone using the USB Sync cable while connected to
the PC’s USB port.
Battery Capacity indicator icons
Full
50%-74% capacity
28%-49% capacity
Less than 27% capacity
“Very Low” alert (less than 4%)
Smartphone User Manual
1. Getting
Started
20
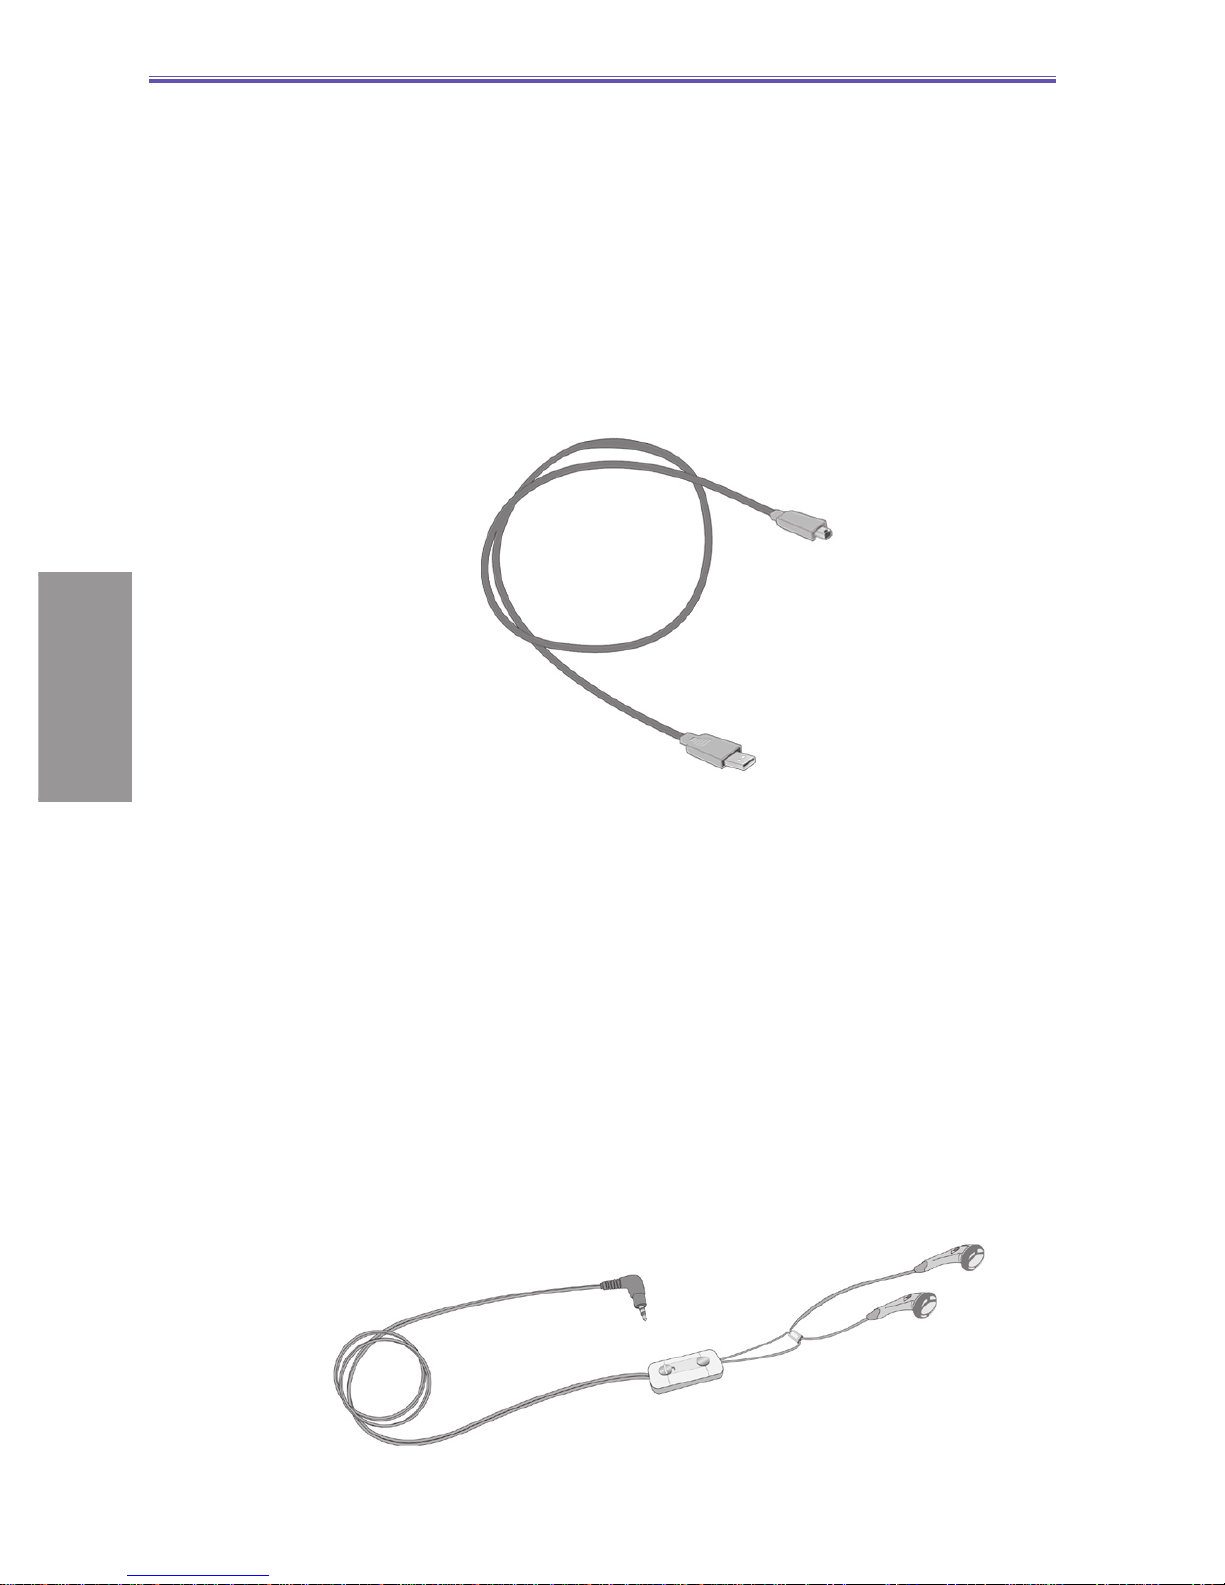
1.4 Included Accessories
Mini USB cable
A USB cable is provided to allow you to synchronise
information between your Smartphone and a desktop or
notebook PC using ActiveSync. You can also charge the
battery by plugging the cable to a PC’s USB port.
Stereo earphones with handsfree function
Use the earphones to listen to sound or multimedia files. The
earphones can also function as a handsfree device.
Using the earphones
Connect the earphone cable to the earphone jack located at
the base of the phone (identified in an illustration in section
1.1). Press the “Press To Talk” button to receive an incoming
call. Press and hold it to end a call. Rotate the Volume
buttons to adjust the sound level.
Smartphone User Manual
1. Getting
Started
This manual suits for next models
1
Table of contents
Other ORANGE Cell Phone manuals


