Oregon Scientific HT275 User guide

Original Instruction Manual
Hedge Trimmer Model HT275
Manuel d’instructions original
Taille-haie modèle HT275
Manual de instrucciones original
Cortasetos modelo HT275
Manual de instruções original
Do podador de cerca viva modelo HT275


English . . . . . . . . . . . . . . . . . . . . . . . . . . . . . . . . . . . . . . . . . . . . . . . . . . .4
WARNING: Read and understand all safety warnings and all instructions.
Failure to follow the warnings and instructions may result in electric shock, fire and/or serious injury.
Save all warnings and instructions for future reference.
This instruction manual contains translations of a manual drafted in English and are provided to assist those
who do not speak English as their first language. Being a technical writing, some terms may not have a like or
equivalent meaning as translated. Therefore, you should not rely on this translation, and should cross-reference
the English version, where relying on the translated instructions could result in harm to your person or property.
Français. . . . . . . . . . . . . . . . . . . . . . . . . . . . . . . . . . . . . . . . . . . . . . . . . .26
AVERTISSEMENT : Prenez connaissance de tous les avertissements et consignes de sécurité.
L’inobservation de ces avertissements et consignes comporte des risques d’électrocution, d’incendie
et/ou de lésions graves. Rangez ces consignes et avertissements en lieu sûr afin de pouvoir les
consulter ultérieurement.
Ce manuel d’utilisation contient plusieurs traductions d’un document rédigé en anglais. Ces traductions visent
à aider les utilisateurs dont l’anglais n’est pas la langue maternelle. Comme il s’agit d’un document technique,
certains termes sont susceptibles de prendre une signification différente après traduction. Par conséquent,
vous ne devez pas vous fier aveuglément à cette traduction. Reportez-vous à la version anglaise si vous
percevez que le respect des consignes traduites pourrait occasionner des dommages matériels ou des lésions
corporelles.
Español. . . . . . . . . . . . . . . . . . . . . . . . . . . . . . . . . . . . . . . . . . . . . . . . . .48
ADVERTENCIA: Lea y entienda todas las advertencias de seguridad e instrucciones.
El incumplimiento de las advertencias e instrucciones puede dar lugar a descargas eléctricas,
incendios o lesiones graves. Guarde todas las advertencias e instrucciones para referencia futura.
Este manual de instrucciones contiene traducciones de un manual redactado en inglés y se ofrece para ayudar
a aquellos que no hablan inglés como primer idioma. Al tratarse de un texto técnico, algunos términos pueden
no tener un significado similar o equivalente en la traducción. Por lo tanto, no debe confiar en esta traducción, y
debería ir consultando la versión inglesa en aquellos puntos donde la confianza en las instrucciones traducidas
pueda causar daños a su persona o a la propiedad.
Português . . . . . . . . . . . . . . . . . . . . . . . . . . . . . . . . . . . . . . . . . . . . . . . . 70
ADVERTÊNCIA: Leia e entenda todas as advertências e instruções de segurança.
A falha em seguir todas as advertências e instruções pode resultar em choque elétrico, incêndio e/ou
lesão pessoal séria. Preserve todas as advertências e instruções para consulta futura.
Este manual de instruções contém traduções de um manual escrito em inglês, e tem a finalidade de ajudar
quem não fala inglês como idioma nativo. Como se trata de escrita técnica, alguns termos podem não ter um
significado semelhante ou equivalente quando traduzidos. Portanto, não confie unicamente nesta tradução.
Consulte a versão em inglês quando confiar na tradução em português puder resultar em danos pessoais ou à
propriedade.

4Hedge Trimmer Model HT275
Table of Contents
Table of Contents
Important Safety Instructions . . . . . . . . . . . . . . . . . . . . . . . . . . . . . . . . . . . . . . . . . . . 5
Safety Signal Definitions . . . . . . . . . . . . . . . . . . . . . . . . . . . . . . . . . . . . . . . . . 5
General Power Tool Safety Warnings . . . . . . . . . . . . . . . . . . . . . . . . . . . . . . . . . .5
Work area safety . . . . . . . . . . . . . . . . . . . . . . . . . . . . . . . . . . . . . . . . . . . . . . 5
Electrical safety. . . . . . . . . . . . . . . . . . . . . . . . . . . . . . . . . . . . . . . . . . . . . . .5
Personal Safety . . . . . . . . . . . . . . . . . . . . . . . . . . . . . . . . . . . . . . . . . . . . . . . 6
Power Tool Use and Care . . . . . . . . . . . . . . . . . . . . . . . . . . . . . . . . . . . . . . . . . 7
Battery Tool Use and Care . . . . . . . . . . . . . . . . . . . . . . . . . . . . . . . . . . . . . . . . 7
Service . . . . . . . . . . . . . . . . . . . . . . . . . . . . . . . . . . . . . . . . . . . . . . . . . . . . 7
Hedge Trimmer Safety Warnings . . . . . . . . . . . . . . . . . . . . . . . . . . . . . . . . . . . . 8
Storage, Transporting, and Disposal . . . . . . . . . . . . . . . . . . . . . . . . . . . . . . . . . . 8
Battery Safety. . . . . . . . . . . . . . . . . . . . . . . . . . . . . . . . . . . . . . . . . . . . . . . .9
Charger Safety . . . . . . . . . . . . . . . . . . . . . . . . . . . . . . . . . . . . . . . . . . . . . . 10
Symbols and Labels . . . . . . . . . . . . . . . . . . . . . . . . . . . . . . . . . . . . . . . . . . . . . . . . 11
Hedge Trimmer Names and Terms . . . . . . . . . . . . . . . . . . . . . . . . . . . . . . . . . . . . . . . 12
Product Identification . . . . . . . . . . . . . . . . . . . . . . . . . . . . . . . . . . . . . . . . . . . . . . . 13
Operating the Hedge Trimmer . . . . . . . . . . . . . . . . . . . . . . . . . . . . . . . . . . . . . . . . . . 14
Unpacking . . . . . . . . . . . . . . . . . . . . . . . . . . . . . . . . . . . . . . . . . . . . . . . . . 14
Battery Pack and Charger . . . . . . . . . . . . . . . . . . . . . . . . . . . . . . . . . . . . . . . . 14
General Operation . . . . . . . . . . . . . . . . . . . . . . . . . . . . . . . . . . . . . . . . . . . . 16
Cutting Hedges . . . . . . . . . . . . . . . . . . . . . . . . . . . . . . . . . . . . . . . . . . . . . . 18
Maintenance and Cleaning . . . . . . . . . . . . . . . . . . . . . . . . . . . . . . . . . . . . . . . . . . . . 20
Hedge Trimmer . . . . . . . . . . . . . . . . . . . . . . . . . . . . . . . . . . . . . . . . . . . . . . 20
Battery pack . . . . . . . . . . . . . . . . . . . . . . . . . . . . . . . . . . . . . . . . . . . . . . . .21
Charger . . . . . . . . . . . . . . . . . . . . . . . . . . . . . . . . . . . . . . . . . . . . . . . . . . . 21
Troubleshooting. . . . . . . . . . . . . . . . . . . . . . . . . . . . . . . . . . . . . . . . . . . . . . . . . . .22
Specifications and Components . . . . . . . . . . . . . . . . . . . . . . . . . . . . . . . . . . . . . . . . . 24
Warranty and Service . . . . . . . . . . . . . . . . . . . . . . . . . . . . . . . . . . . . . . . . . . . . . . . 25
© Blount, Inc. Pricing and specifications subject to change without notice. All rights reserved. Oregon® is a registered trademark of Blount,
Inc. in the United States and/or in other countries.

5
Hedge Trimmer Model HT275
Important Safety Instructions
Introduction
This hedge trimmer is designed for regular maintenance and trimming. It is not designed to cut
branches greater than / inch ( mm) in diameter. Other uses may cause injury and are not
allowed.
Safety Signal Definitions
SYMBOL SIGNAL MEANING
WARNING Indicates a potential hazard which could result in serious injury.
CAUTION Indicates a potential hazard which could seriously damage the tool or
cause minor to moderate injury.
IMPORTANT Following this instruction will increase satisfaction with the tool.
General Power Tool Safety Warnings
WARNING: Read and understand all safety warnings and all instructions.
Failure to follow the warnings and instructions may result in electric shock,
fire and/or serious injury.
Save all warnings and instructions for future reference. The term “power tool” in the
warnings refers to your mains-operated (corded) power tool or battery operated (cordless)
power tool.
Work area safety
•Keep work area clean and well lit.
Cluttered or dark areas invite accidents.
•Do not operate power tools in explosive
atmospheres, such as in the presence of
flammable liquids, gases or dust. Power
tools create sparks which may ignite the dust
or fumes.
•Keep children and bystanders away while
operating a power tool (Fig. ). Distractions
can cause you to lose control.
CAUTION: Establish a bystander safety
zone of 10 ft (3 m) prior to operation of
this equipment. Bystander safety zone is
a 10 ft (3 m) circle around the operator that
must remain free from bystanders, children,
and pets.
Electrical safety
•Power tool plugs must match the outlet.
Never modify the plug in any way. Do
not use any adapter plugs with earthed
(grounded) power tools. Unmodified plugs
and matching outlets will reduce risk of
electric shock.
•Avoid body contact with earthed or
grounded surfaces, such as pipes,
radiators, ranges and refrigerators. There
is an increased risk of electric shock if your
body is earthed or grounded.
FIG. 1

6Hedge Trimmer Model HT275
Important Safety Instructions
•Do not expose power tools to rain or wet
conditions. Water entering a power tool will
increase the risk of electric shock.
•Do not abuse the cord. Never use the cord
for carrying, pulling or unplugging the
power tool. Keep cord away from heat, oil,
sharp edges or moving parts. Damaged or
entangled cords increase the risk of electric
shock.
•When operating a power tool outdoors,
use an extension cord suitable for outdoor
use. Use of a cord suitable for outdoor use
reduces the risk of electric shock.
•If operating a power tool in a damp
location is unavoidable, use a residual
current device (RCD) protected supply or
ground fault circuit interrupter (GFCI). Use
of a RCD (GFCI) reduces the risk of electric
shock.
•Remove plug from the mains immediately
if the cable is damaged or cut.
Personal Safety
•Stay alert, watch what you are doing
and use common sense when operating a
power tool. Do not use a power tool while
you are tired or under the influence of
drugs, alcohol or medication. A moment of
inattention while operating power tools may
result in serious personal injury.
•Use personal protective equipment.
Always wear eye protection. Protective
equipment such as dust mask, non-skid safety
shoes, hard hat, or hearing protection used for
appropriate conditions will reduce personal
injuries.
•Prevent unintentional starting. Ensure
the switch is in the off-position before
connecting to power source and/or
battery pack, picking up or carrying the
tool. Carrying power tools with your finger on
the switch or energizing power tools that have
the switch on invites accidents.
•Remove any adjusting key or wrench
before turning the power tool on. A wrench
or a key left attached to a rotating part of the
power tool may result in personal injury.
•Do not overreach. Keep proper footing and
balance at all times (Fig. ). This enables
better control of the power tool in unexpected
situations.
•Dress properly. Do not wear loose clothing
or jewelry. Keep your hair, clothing and
gloves away from moving parts. Loose
clothes, jewelry or long hair can be caught in
moving parts.
•If devices are provided for the connection
of dust extraction and collection facilities,
ensure these are connected and properly
used. Use of dust collection can reduce dust-
related hazards.
•Prolonged use of power tools has been
reported to cause vascular, muscular, or
neurological disorders (such as vibration
white finger or Raynaud’s syndrome).
To reduce the risk of injury, follow these
instructions:
– Wear gloves and keep hands and body
warm.
– Maintain a firm grip on the hedge
trimmer, but do not use prolonged,
excessive pressure.
– Take frequent breaks.
The vibration in normal use can differ from the
stated values depending on the material being
cut, maintenance of the cutting system, and
other factors.
FIG. 2

7
Hedge Trimmer Model HT275
Important Safety Instructions
Power Tool Use and Care
•Do not force the power tool. Use the
correct power tool for your application.
The correct power tool will do the job
better and safer at the rate for which it was
designed.
•Do not use the power tool if the switch
does not turn it on and off. Any power tool
that cannot be controlled with the switch is
dangerous and must be repaired.
•Disconnect the plug from the power
source and/or the battery pack from
the power tool before making any
adjustments, changing accessories, or
storing power tools. Such preventive safety
measures reduce the risk of starting the
power tool accidentally.
•Store idle power tools out of the reach
of children and do not allow persons
unfamiliar with the power tool or these
instructions to operate the power tool.
Power tools are dangerous in the hands of
untrained users.
•Maintain power tools. Check for
misalignment or binding of moving
parts, breakage of parts and any other
condition that may affect the power tool’s
operation. If damaged, have the power
tool repaired before use. Many accidents
are caused by poorly maintained power tools.
•Keep cutting tools sharp and clean.
Properly maintained cutting tools with sharp
cutting edges are less likely to bind and are
easier to control.
•Use the power tool, accessories and
tool bits etc. in accordance with these
instructions, taking into account the
working conditions and the work to
be performed. Use of the power tool for
operations different from those intended could
result in a hazardous situation.
Battery Tool Use and Care
•Recharge only with Oregon® Series C
chargers specified by the manufacturer
(Oregon® C, C). A charger that is
suitable for one type of battery pack may
create a risk of fire when used with another
battery pack.
•Use power tools only with specifically
designated Oregon® Series B battery
packs (Oregon® BE, B, BE,
BE, B, B). Use of any other
battery packs may create a risk of injury and
fire.
•When battery pack is not in use, keep it
away from other metal objects, like paper
clips, coins, keys, nails, screws or other
small metal objects, that can make a
connection from one terminal to another.
Shorting the battery terminals together may
cause burns or a fire.
•Under abusive conditions, liquid may be
ejected from the battery; avoid contact. If
contact accidentally occurs, flush with water.
If liquid contacts eyes, additionally seek
medical help. Liquid ejected from the battery
may cause irritation or burns.
Service
Have your power tool serviced by a
qualified repair person using only identical
replacement parts. This will ensure that the
safety of the power tool is maintained.

8Hedge Trimmer Model HT275
Important Safety Instructions
Hedge Trimmer Safety Warnings
DANGER: Keep hands away from blade.
Contact with blade will result in serious
personal injury.
WARNING: Only use with handle and
Hand guard properly assembled to hedge
trimmer. The use of the hedge trimmer
without the proper guard or handle
provided may result in serious personal
injury.
•Use both hands when operating the hedge
trimmer. Using one hand could cause loss of
control and result in serious personal injury
(Fig. ).
•Keep all parts of the body away from the
cutter blade. Do not remove cut material
or hold material to be cut when blades are
moving. Make sure the switch is off when
clearing jammed material. Blades coast
after turn off. A moment of inattention while
operating the hedge trimmer may result in
serious personal injury.
•Carry the hedge trimmer by the handle
with the cutter blade stopped (Fig. ).
When transporting or storing the hedge
trimmer, always attach the cutting device
cover. Proper handling of the hedge trimmer
will reduce possible personal injury from the
cutter blades.
•Hold the power tool by insulated gripping
surfaces only, because the cutter blade
may contact hidden wiring or its own cord.
Cutter blades contacting a “live” wire may
make exposed metal parts of the power tool
“live” and could give the operator an electric
shock.
•The hedge trimmer has no user
serviceable parts. Blade replacement,
service, and repair work requires special
training. See “Service and Support
Information” for contact information.
Storage, Transporting,
and Disposal
STORING THE HEDGE TRIMMER
•Apply lubricant to the cutting blades. See
“Maintenance and Cleaning” for more
information.
•Remove the battery pack from the hedge
trimmer.
•Clean the hedge trimmer thoroughly.
•Install the blade cover.
•Store in a dry place.
•Keep out of reach of children or pets.
FIG. 3
FIG. 4

9
Hedge Trimmer Model HT275
Important Safety Instructions
STORING THE BATTERY PACK
When storing the battery pack longer than nine
months, follow these guidelines:
•Remove the battery pack from the hedge
trimmer or charger.
•Store in a cool, dry place.
•Keep out of reach of children or pets.
•To prolong battery life, never store battery
pack in a completely discharged condition.
(Fig. ).
•For maximum battery life, make sure the
battery pack is charged once per year or when
the LED indicator shows only one light.
•Store at a temperature between -°F to °F
(-°C and °C).
STORING THE CHARGER
•Remove battery pack from the charger.
•Disconnect charger from power source.
•Store in a dry place.
•Keep out of reach of children or pets.
See “Maintenance and Cleaning” for more
information.
TRANSPORTING THE HEDGE TRIMMER
Prepare the hedge trimmer as described in
“Storing the Hedge Trimmer” before shipping.
TRANSPORTING THE BATTERY PACK
Observe national regulations when shipping
lithium ion batteries. Special package labeling
may be required.
BATTERY PACK DISPOSAL
Do not dispose of battery pack in household
garbage or incinerate. Local waste
management and recycling agencies have
information on proper recycling or disposal
instructions. Battery packs can be collected in
the United States or Canada through
Rechargeable Battery Recycling Corporation.
Oregon® has already paid the costs involved to
recycle battery packs. Return end of life battery
packs to participating retailer or recycling
center. Return locations and more information
can be found at www.callrecycle.org or
--BATTERY.
Battery Safety
DANGER: Failure to follow these
safety rules can cause the battery pack
to leak hazardous chemicals, overheat,
emit smoke, burst, flare, explode, and/or
ignite.
CAUTION: Do not dispose of the
battery pack in the household waste or
fire. Lithium ion battery packs should be
recycled by a local authorized recycler.
CAUTION: Do not expose battery pack
to excessive heat, such as the interior of
a vehicle in hot weather. Such exposure
can cause a loss in performance and/or
service life. Do not attempt to re-charge a
non-rechargeable battery pack.
•Do not disassemble or modify the battery
pack. This can damage safety features.
•Do not connect the positive (+) and negative
(-) terminals with metal objects or store the
battery pack with metal objects such as coins
or screws. This can cause short-circuiting and
generate enough heat to cause burns.
FIG. 5
INDICATOR LIGHTS

10 Hedge Trimmer Model HT275
Important Safety Instructions
•Do not incinerate the battery pack or expose
to excessive heat. This can melt insulation or
damage safety features.
•Do not use, charge, or store near heat higher
than °F (°C). This can cause overheating
and internal short-circuiting.
•Do not expose to extremely wet conditions.
This can damage safety features, cause
extremely high current and voltage charging,
and lead to abnormal chemical reactions.
•Use only Oregon® Series C chargers
specifically designed for the battery pack,
and follow the safety precautions described
in “Charger Safety”. Using another charger
can damage safety features, cause extremely
high current and voltage charging, and lead to
abnormal chemical reactions.
•Do not use Oregon® branded battery packs in
non-Oregon® branded tools.
•Do not strike, pierce, or throw the battery
pack, and do not use a damaged or deformed
battery pack.
•If recharging fails, do not attempt to recharge.
•If the battery pack gives off an odor, generates
heat, or is discolored, deformed, or abnormal
in any way during use, recharging, or storage,
immediately remove from the hedge trimmer
or charger.
•Any liquid leaking from the battery is
corrosive, can damage eyes and skin, and may
be toxic if swallowed.
Charger Safety
IMPORTANT SAFETY INSTRUCTIONS
CAUTION: This appliance is not
intended for use by persons (including
children) with reduced physical, sensory
or mental capabilities, or lack of
knowledge, unless they have been given
supervision or instruction by a person
responsible for their safety. Children
should be supervised to ensure that they
do not play with the appliances.
WARNING: Risk of Electric Shock.
When used outdoors, install only to
a covered “Class A” GFCI protected
receptacle that is weatherproof with the
power unit connected to the receptacle.
If one is not provided, contact a qualified
electrician for proper installation. Ensure
that the power unit and cord do not
interfere with completely closing the
receptacle cover.
CAUTION: Use this charger only with
the supplied power cord, making sure
that the input plug correctly mates to the
output receptacle.
When using electrical products, basic
precautions should always be practiced
including the following:
•Read and follow all safety instructions
before use. Read and follow all instructions
that are on the product or provided with the
product.
•Save these instructions.
•Do not use an extension cord.
•Do not abuse the cord. Never use the
cord for carrying, pulling or unplugging
the power tool. Keep cord away from heat,
oil, sharp edges or moving parts. Damaged or
entangled cords increase the risk of electric
shock.
•Do not expose the charger to rain.
For indoor use only.
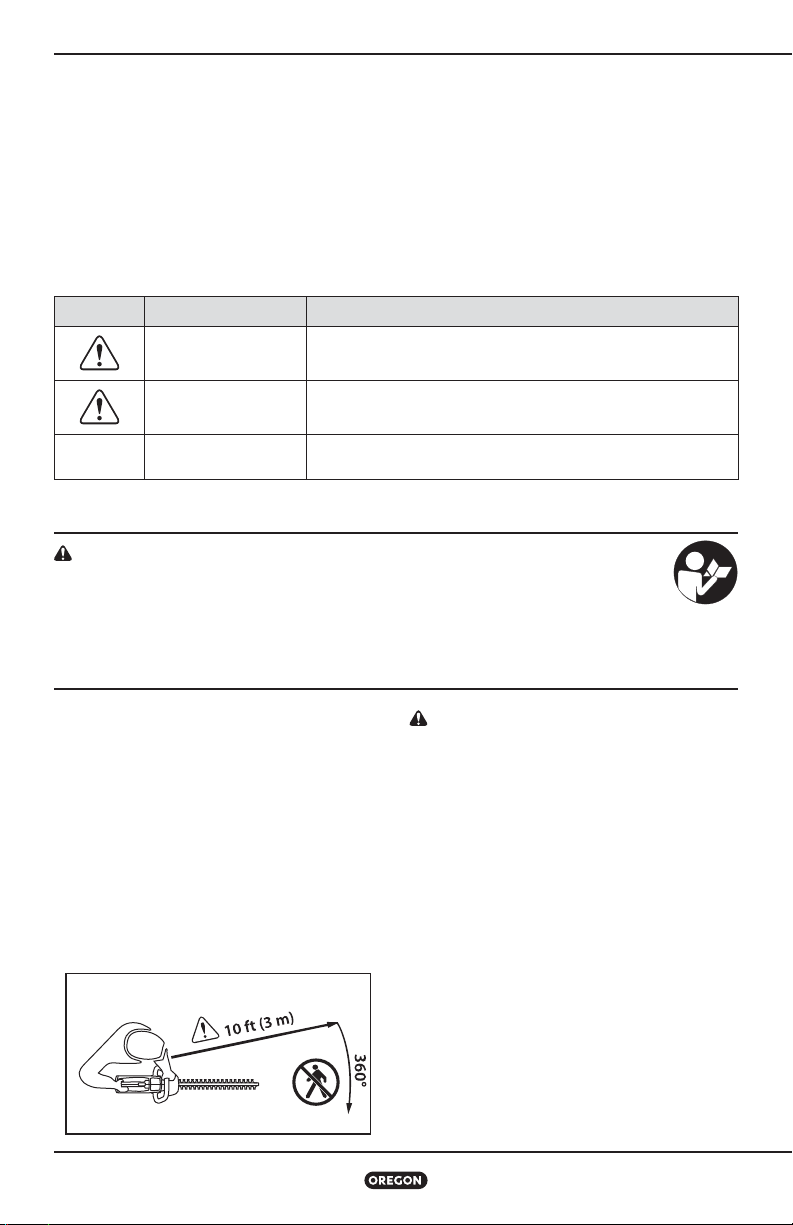
•Do not use within feet ( m) of a pool.
•Do not use in a bathroom.

11
Hedge Trimmer Model HT275
Symbols and Labels
Symbols and Labels
SYMBOL NAME EXPLANATION
Class II
Construction Designated double insulated construction tools
Safety Alert
Symbol
Indicates that the text that follows explains a danger, warning,
or caution.
Read Instructions The original instruction manual contains important safety and
operating information. Read and follow the instructions carefully.
Wear Eye
Protection Wear eye protection when operating the hedge trimmer.
Wear Hand
Protection
Wear gloves when operating the hedge trimmer and when
handling the cutting blades.
Sound Power Sound power level is 74 dB.
Two-handed hold Hold hedge trimmer with both hands.
One-handed hold Do not hold hedge trimmer with one hand.
Do Not Incinerate Do not dispose in flames.
Do Not Dispose Do not throw in the household waste. Take to an authorized
recycler.
Do Not Expose to
Rain Do not operate the charger in wet conditions.
Indoor Use Only Intended for indoor use only.
Inspect Power
Supply Inspect the charger power supply and cord regularly for damage.
Operating
Temperature
Only Use the battery pack at a temperature between 32°F to
104°F (0°C and 40°C).
Cutting Tool Cutting tool. Do not touch the cutting blades without first
deactivating the hedge trimmer by removing the battery pack.

12 Hedge Trimmer Model HT275
Hedge Trimmer Names and Terms
Blade bind: A condition where the cutting
blades will not move because of material
lodged between the moving and stationary
parts of the cutting blades.
Bystander safety zone: A ft ( m) circle
around the operator that must remain free
from bystanders, children, and pets.
Cutting blades: The series of sharpened
surfaces protruding from the front of the
hedge trimmer that move back and forth to
cut hedges.
Cutting season: The ideal time to trim
hedges varies by plant type, but it is
generally a good practice to trim during
periods of slow growth, after blooming is
complete. Consult with a local plant nursery
for tips on trimming specific plants.
Cutting speed: The hedge trimmer has a
variable cutting speed. Press the throttle
trigger more firmly for faster cutting speed.
To get the most cutting time out of each
charge, use only the minimum cutting speed
necessary to cut the material.
Front handle: The support handle located at
or toward the front of the hedge trimmer.
Front handle switch: A u-shaped switch
running along the front handle that prevents
the unintentional operation of the throttle
trigger until manually actuated.
Hand guard: A structural barrier between the
front handle of a hedge trimmer and the cutting
blades.
New growth: The most recent growth on a
plant. It is generally lighter in color, less woody,
and more flexible than the rest of the plant.
Rear handle: The support handle, located at
or toward the rear of the hedge trimmer, where
the throttle trigger is located.
Throttle trigger: A device that controls the
speed of the cutting blades.
Trigger lock-out: A movable stop that
prevents the unintentional activation of the
hedge trimmer until manually actuated.

13
Hedge Trimmer Model HT275
Product Identification
Know the Hedge Trimmer
NOTE: See “Unpacking” for a list of included items.
REAR HANDLE
THROTTLE
TRIGGER
THROTTLE
LOCKOUT
HAND GUARD
BLADE COVER
CUTTING BLADES
FRONT HANDLE SWITCH
FRONT HANDLE
PRODUCT NAME PLATE
BATTERY RELEASE
BATTERY PACK
BATTERY PORT

14 Hedge Trimmer Model HT275
Operating the Hedge Trimmer
Unpacking
What’s in the box?
The hedge trimmer comes completely
assembled. These items ship with the hedge
trimmer:
•Hedge trimmer
•Blade cover
•Instruction manual
•Charger and power cord (if so equipped)
•Battery (if so equipped)
After removing the hedge trimmer from the box,
inspect it carefully to ensure no damage has
occurred during shipping, and that no parts are
missing. If any parts are damaged or missing,
do not use the hedge trimmer. Contact Oregon®
Cordless Tool System to obtain replacement
parts at ...
Battery Pack and Charger
WARNING: Do not charge the battery
pack in the rain.
BATTERY PACK LED CHARGE-
LEVEL INDICATOR
The lithium ion battery pack is equipped with an
LED charge-level indicator. To test the charge
level of the battery pack, press the indicator
button on the battery pack’s face (Fig. ).
No lights: recharge.
One steady green light:
less than charged.
Charge battery pack before use.
Two steady green lights:
– charged.
Three steady green lights:
– charged.
Four steady green lights:
– charged.
CONNECTING THE CHARGER
Connect the charger cord to the charger and to
the proper electrical outlet (Fig. ).
FIG. 6
INDICATOR LIGHTS
INDICATOR BUTTON
FIG. 7

15
Hedge Trimmer Model HT275
Operating the Hedge Trimmer
Only use the cord set that was supplied with
the charger. At first use, verify that the plug
type matches the receptacle.
CHARGER LED CHARGE-STATE INDICATOR
The battery charger is equipped with an LED
charge-state indicator that indicates the state
of charging as well as conditions that may
delay or prevent charging (Fig. ).
Note: Until a battery pack is inserted, no lights
will be visible.
Blinking orange light: a fault condition
exists. There are several potential
causes. See “Troubleshooting” in this
manual.
Steady orange light: the battery pack
temperature is beyond the acceptable
range (°F/°C to °F/°C). Allow
the battery pack to reach the
acceptable temperature range before
charging. The pack may be left on the
charger as the temperature adjusts.
Charging will begin when the proper
temperature is reached.
Blinking green light: battery pack is
charging.
Steady green light: battery pack is
ready for use.
CHARGING THE BATTERY PACK
WARNING: Failure to follow proper
charging procedures may cause excessive
voltage, excessive current flow, loss
of control during charging, leakage of
hazardous chemicals, heat generation,
bursting, or fire.
With the charger cord connected to the charger
and plugged into an electrical outlet, align the
grooves in the battery with the rails on the
charger and slide the battery pack onto the
charger until fully seated (Fig. ).
Check the charge-state indicator for charging
conditions.
FIG. 8
FIG. 9

16 Hedge Trimmer Model HT275
Operating the Hedge Trimmer
INSERTING AND RELEASING
THE BATTERY PACK
Only use the Oregon® brand Series B battery
packs specified in these operating instructions.
Align the groove in the battery with the rails
inside the battery port. Firmly insert the battery
pack into the hedge trimmer’s battery port,
pressing forward until it clicks as it locks into
place (Fig. ).
To remove the battery pack, lift up on the
battery release and remove the pack (Fig. ).
General Operation
WARNING: Always wear proper gloves
and eye protection.
OPERATING TEMPERATURE
This hedge trimmer is designed to operate
within a temperature range of °F to °F
(°C to °C).
GRIP
Always grip the tool with both hands. For right-
handed operation, place the hedge trimmer on
a firm, flat surface, grasp the front handle with
the left hand and the rear handle with the right.
Wrap fingers over the top of the front handle
with the thumb below (Fig. ).
For left-handed operation, grasp the front
handle with the right hand and the rear handle
with the left (Fig. ).
FIG. 10
FIG. 11
RIGHT-HANDED GRIP
FIG. 12
LEFT-HANDED GRIP
FIG. 13

17
Hedge Trimmer Model HT275
Operating the Hedge Trimmer
STANCE
Stand with both feet on solid ground, with
weight evenly spread between them.
Do not overreach and do not stand on a ladder,
stepstool, or any raised position that is not
fully secured.
Hold the hedge trimmer as close as possible to
the body to maintain control (Fig. ).
STOPPING THE HEDGE TRIMMER
Release the throttle trigger to stop the hedge
trimmer.
STARTING THE HEDGE TRIMMER
Grasp the front and rear handles firmly. Pull
back on trigger lock-out () with thumb (Fig.
). Squeeze the throttle trigger () until the
cutting blades move at the desired speed. The
front handle switch () is a safety feature; the
hedge trimmer will not start unless it is
activated.
CONTROLLING CUTTING BLADE SPEED
The throttle trigger controls the speed at
which the cutting blades oscillate. Squeeze the
throttle trigger more firmly for faster cutting
speed.
Use the lowest pressure required to cut the
material. This helps to maximize the amount of
cutting time per battery charge and reduces the
number of charging operations required.
FIG. 14 2 THROTTLE TRIGGER
3 FRONT HANDLE SWITCH
1 TRIGGER
LOCKOUT
FIG. 15

18 Hedge Trimmer Model HT275
Operating the Hedge Trimmer
Cutting Hedges
WHEN TO CUT
The ideal time to trim hedges varies by plant
type, but it is generally a good practice to trim
during periods of slow growth, after blooming is
complete. Consult with a local plant nursery for
tips on trimming specific plants.
Observe all applicable national and municipal
rules and regulations for cutting hedges.
BASIC CUTTING
WARNING: Always be sure of footing
and hold the hedge trimmer firmly with
both hands while the motor is running.
Check the hedge for foreign objects prior to
cutting to avoid damaging the blades. Remove
any objects that may impede cutting.
Assume the proper grip and stance and start
the hedge trimmer. Hold the hedge trimmer
with the cutting blades angled –° toward
the direction of the cut (Fig. ).
IMPORTANT: The cutting blades
occasionally bind and stop moving when
material becomes lodged in the cutting
blades or if cutting blades contact a wire
or chain-link fence. See “Correcting Blade
Bind” to learn how to fix this.
CUTTING SEQUENCE
If the hedge is well-trained, focus on trimming
new growth until the hedge is in the desired
shape.
Once any large branches are removed, use the
hedge trimmer to trim the sides of the hedge to
the desired length. Trim the top of hedge last
after the sides are complete.
CUTTING VERTICALLY
When cutting the sides of the hedge, start at
the bottom of the hedge. Hold the hedge
trimmer with the cutting blades angled –°
toward the direction of the cut. Move down the
line of the hedge, sweeping the hedge trimmer
slowly up and down in a wide arc (Fig. ).
5–10°
direction of cut
FIG. 16 FIG. 17

19
Hedge Trimmer Model HT275
Operating the Hedge Trimmer
CUTTING HORIZONTALLY
When cutting the top of the hedge, start with
the nearest edge. Hold the hedge trimmer with
the cutting blades angled –° toward the
direction of the cut. Move down the line of the
hedge, sweeping the hedge trimmer slowly left
and right in a wide arc (Fig. ).
If the hedge top is too wide to cut in one sweep
of the hedge trimmer, do not lean over the
hedge to trim the remainder. Instead, make one
pass down one side of the hedge, and then cut
the remainder from the other side of the hedge.
CORRECTING BLADE BIND
CAUTION: Always remove the battery
before clearing cutting blades to avoid
accidental activation of the cutting
blades.
CAUTION: Cutting blades are sharp.
Always wear gloves when clearing
material from the cutting blades.
Sometimes when cutting flexible, “green”
branches, clippings can become lodged
between the moving parts of the cutting blades
and the stationary part. When this happens, the
cutting blades may suddenly cease to move.
This can also happen if the cutting blades
contact material too strong to cut through,
such as a chain-link fence. This condition is
called blade bind.
Follow these guidelines to safely and
effectively clear the material.
•Wear gloves.
•Remove the battery pack from the hedge
trimmer. See “Removing the Battery Pack”.
•Clear the material that is preventing the
cutting blades from moving.
FIG. 18

20 Hedge Trimmer Model HT275
Maintenance and Cleaning
Hedge Trimmer
WARNING: Inspect the hedge trimmer.
Regular inspection is the first step
to proper maintenance. Follow the
guidelines below to maximize safety
and satisfaction. Have any damaged
or excessively worn parts replaced
immediately. Failure to identify and
replace damaged or worn parts can cause
serious personal injury.
WARNING: Remove the battery pack
from the hedge trimmer before inspecting,
cleaning, or performing maintenance. A
battery operated tool with the battery
pack inserted is always on and can start
accidentally.
CAUTION: When cleaning the hedge
trimmer, do not immerse in water or other
liquids.
CLEAN THE HEDGE TRIMMER
•Wipe dust, leaves, and clippings from the
hedge trimmer.
•Clear the air vents to ensure proper airflow
and prevent overheating.
•Wipe the power head with a clean cloth
moistened with mild soap and water.
•Never use harsh cleaners or solvents.
INSPECT THE CUTTING BLADES
Make sure that cutting blades are sharp, have
no nicks or blunt edges, and do not hang up
or catch when running the hedge trimmer.
Periodically file away nicks and burrs on the
blades to ensure they move freely. Sharp and
free-moving cutting blades cut more easily
than dull or sticky ones.
BLADE CARE
When cutting hedges with heavy sap or in
dusty environments, buildup of sap and dirt can
occasionally cause blades to stick. To prevent
this blade stick condition, clean the blades with
a light coating of liquid silicon lubricant only
on the lubrication area of the cutting blades
(Fig. ) and run the blades briefly to evenly
distribute the lubricant.
IMPORTANT: Do not allow lubricant to
drip inside the body of the hedge trimmer.
Never use grease solvents or aerosol
water displacement products. Do not over
lubricate.
INSPECT THE TIP GUARD
If a tip guard is installed, check to make sure
it is not bent or broken. A bent tip guard can
prevent free movement of the cutting blades. If
the tip guard is bent or broken, have it replaced
at an approved service location.
INSTALL THE BLADE COVER
Slip the blade cover over the cutting blades to
keep them clean, and to prevent them snagging
or cutting people or objects.
FIG. 19
LUBRICATION AREA
Table of contents
Languages:
Other Oregon Scientific Trimmer manuals
Popular Trimmer manuals by other brands

Gardena
Gardena 350 operating instructions

Craftsman
Craftsman Incredi-Pull 316.791200 Operator's manual

Qualcast
Qualcast HQ-CG 3.6 Original operating instructions

Shindaiwa
Shindaiwa 63848-94010 Owner's/operator's manual

Tanaka
Tanaka THT-2520 Illustrated parts manual

Stiga
Stiga LT 20 Li S Operator's manual