Oricom MX300 User manual

MX300
3 WATT VHF MARINE RADIO
• IPX7 (1 Metre Depth for 30 Minutes)
• Floats in water
INSTRUCTION MANUAL
Keep this user guide for future reference.
Always retain your proof of purchase in
case of warranty service.
www.oricom.com.au

Thank you for purchasing this Oricom 3 watt VHF Marine Radio.
Please ensure you read this user guide carefully before using the MX300 VHF
Radio, to ensure you familiarise yourself with the functions and operation.
PLEASE RETAIN THE USER GUIDE FOR FUTURE REFERENCE.
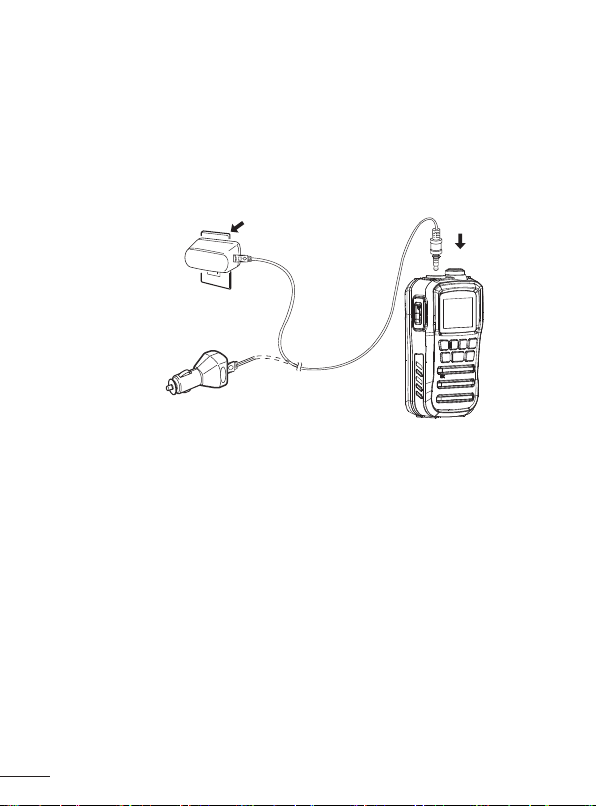
• NEVERconnecttheradiototheACpoweradaptorwhenwetasthismay
posearehazardorresultinanelectricshock.
• ONLYconnecttheradiotothepowersupplyandbatteriesprovidedwith
this product.
• KEEPtheradioatleast1metreawayfromyourvessel’smagnetic
navigationcompass.
• DONOTuseorplacetheradioindirectsunlightorinareaswith
temperaturesbelow-15°Corabove+55°C.
• NEVERmodifyyourradioinanywayasthiswillvoidwarrantyandcould
cause damage to your radio.
• ALWAYSchargeyourradioatnormalroomtemperature.
• ALWAYSturnoffyourradiowheninanyareawithapotentiallyexplosive
atmosphere.
Radio Antenna Warning
DO NOT use any radio that has a damaged antenna. If a damaged antenna
comesincontactwiththeskin,aminorburnmayresult.Unauthorized
antennas,modications,orattachmentscoulddamagetheradioandviolate
compliance. DO NOT change or modify the antenna. DO NOT hold the
antenna when the radio is “in use.”
Holding the antenna reduces range and may cause bodily harm.
Battery Warnings
Exerciseextremecarewhenhandlingbatteriesinordernottoshortthe
batteries with conducting materials.
Batteriesmayoverheatexplodeandorcauseburns-
• Ifthebatteryleaks,avoidcontactwithskinoreyes.Ifthishappens,
immediatelyushtheaffectedareaswithwater,andseekmedical
assistance.Releasedelectrolyteiscorrosiveandmaycausedamagetothe
eyesandskin.Itmaybetoxicifswallowed.
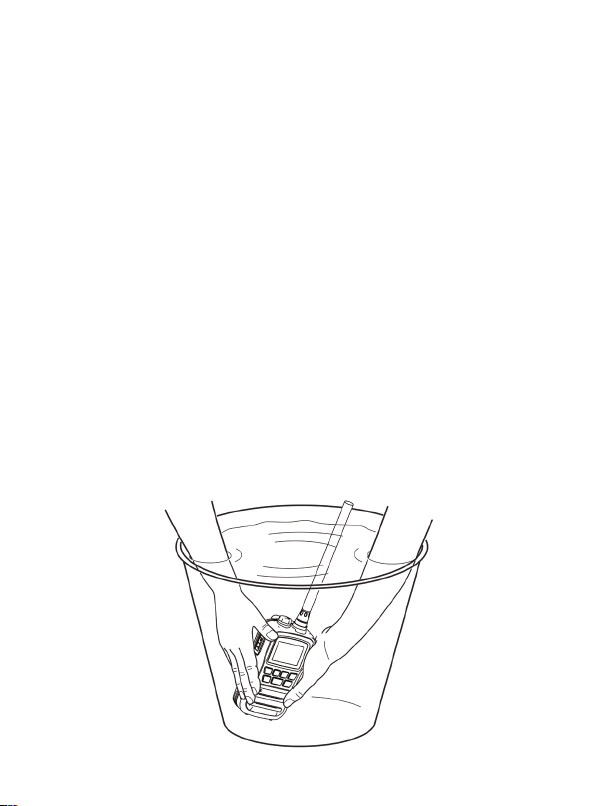
• DONOTimmerseorexposethebatteriestowaterorotherliquids.
• Ifyoubelievethebatteriesaredamaged,removeradiofromthecharger
immediately. Contact Oricom for assistance.
• Neverusedamagedbatteriesastheymayexplode.

EU Regulatory Conformance
Ascertiedbythequaliedlaboratory,theproductisincompliancewith
theessentialrequirementsandotherrelevantprovisionsoftheDirective
1999/5/EC.PleasenotethattheaboveinformationisapplicabletoEU
countries only.
OPERATING RULES
Priorities
• Readallrulesandregulationsrelatingtoprioritiesandkeepanup-to-date
copy.Safetyanddistresscallstakepriorityoverallothercalls.
• YoumustalwaysmonitorChannel16whenyouarenotoperatingon
another channel.
• Falseorfraudulentdistresscallsareprohibitedbylaw.
Privacy
• Informationoverheardbutnotintendedforyoucannotbeusedinanyway
by law.
• Offensiveordisrespectfullanguageisprohibited.
RADIO LICENCES
Ship Station License
WhenyourcraftisequippedwithaVHFradio,youmusthaveacurrentradio
station licence before using the radio.
It is unlawful to operate a ship station which is not licensed.
Inquirethroughyourdealerortheappropriategovernmentagencyfora
Ship-Radiotelephone license. This license includes the call sign which is your
craft’sidenticationforradiopurposes.
Operators License
Undernormalcircumstancesthisradioshouldonlybeoperatedbyaqualied
person.
Moreinformationregardingqualiedpersonscanbefoundat
“http://www.acma.gov.au/theACMA/marine-radio-qualications”
www.acma.gov.au/marine-radio-qualications.
A restricted Radiotelephone Operator Permit is the license most often held by
smallvesselradiooperatorswhenaradioisnotrequiredforsafetypurposes.
The restricted Radiotelephone Operator Permit must be posted near the radio
orbekeptwiththeoperator.Onlyalicensedradiooperatormayoperatea
radio.However,non-licensedindividualsmaytalkoveraradioifalicensed
operatorstarts,supervises,endsthecallandmakesthenecessarylog
entries.

Acurrentcopyoftheapplicablegovernmentrulesandregulationsisonly
requiredtobeonhandforvesselsinwhicharadiotelephoneiscompulsory.
However,evenifyouarenotrequiredtohavetheseonhanditisyour
responsibilitytobethoroughlyacquaintedwithallpertinentrulesand
regulations.
RANGE
The range of VHF transmissions depends on antenna height, transmitter
powerandtheterrainoverwhichthesignalspass.Fora3watthandheld
radio,shiptoshipcommunicationsupto5nauticalmilesshouldbepossible.
Ship to shore ranges will often be greater due to the increased height of the
shore antenna.
■■Recommendation
Cleanthetransceiverthoroughlywithfreshwaterafterexposuretosaltwater,
and dry before operating. Otherwise, the transceiver’s keys may become
unusable due to salt crystallization.
NOTE: DO NOT submerge the transceiver in water if there is any reason
to suspect the waterproof protection may not be effective, for example, in
caseswherethebatterycoverorDCJackcaprubbersealisdamaged,the
transceiver/batterycover/DCJackcapiscrackedorbroken,orthetransceiver
has been dropped, or when the battery cover, antenna or DC Jack cap are
detached from the transceiver.

■■Features
■◆Floats on Water
The radio oats in fresh or salt water when the supplied accessories are
attached.
Whenathird-partybatterypack,strap,antenna,etc.isused,itmaynotoat.
Need Help?
If you need assistance setting up or using your Oricom product now or in the
future, call Oricom Support.
Australia (02)45748888
www.oricom.com.au
Mon-Fri8am-6pmAEST
NewZealand 0800674266
Mon-Fri10am-8pmNZST

SETUP
Setup............................................................................................................ 1
Supplied Accessories.......................................................................... 1
Charging the Batteries ................................................................................. 2
Installing the Batteries......................................................................... 3
FlexibleAntenna.................................................................................. 4
CONTROLS and INDICATORS
Controls and Indicators................................................................................ 5
Display ......................................................................................................... 7
BASIC OPERATION
Main Function Operation Guide................................................................... 8
Select Channel Group......................................................................... 8
SelectWeatherChannel ..................................................................... 8
Edit CALL Channel.............................................................................. 8
Set/CancelTAGChannels .................................................................. 8
Scan Operation ................................................................................... 9
WatchOperation ................................................................................. 9
VibrationWaterDrainingFunction .................................................... 10
Menu Operation ......................................................................................... 10
VHF Marine Channel List........................................................................... 12
SPECIFICATIONS..................................................................................14
TROUBLESHOOTING ...........................................................................15
Express Warranty (Australia) ..............................................................18
CONTENTS

1
■■Setup
■◆Supplied Accessories
Carefully unpack your MX300 VHF Radio. We recommend that you identify
items listed in the following table before discarding the packing materials. If
any items are missing or has been damaged, please contact your place of
purchase.
ITEMS QTY
VHF Handheld Radio 1
AAA NiMH Batteries 5
AC Adaptor 1
12VDCCharger 1
Belt Clip 1
Handstrap 1
Antenna 1
Instruction Manual 1
SETUP

2
■■Charging the Batteries
1. PlugtheACadaptorintoanACoutlet,orplugthe12Vchargerintothe
cigarette lighter.
2. Rotatetoremovetheearphone/chargingcover.Inserttheoutputterminal
into the charging interface. Red light will then turn on and charging will
commence.
Voltage
DC 13.8V
AC Adaptor AC Outlet
12 V Charger
3. The time for NiMH batteries to be fully charged depends on the battery
power.Chargingshouldnotexceed10hourswhenpoweredOFF,and
cannot exceed 18hours when poweredON.
• ItisrecommendedtochargewhenpowerisOFF.
• NOTE:Ifalkalinebatteriesareused,NEVERchargetheradio,asthis
willdamageboththebatteriesandtheradio.
Accessories/sparepartscanbepurchaseddirectlyfromOricom.Visit
oricom.com.au or call (02) 4574 8888.
Batterypartnumber:2V0016(note:5batteriesrequired)

3
■◆Installing the Batteries
Insertingthebatteries
TheMX300includes5xAAAbatteriesNiMH1.2V850mAh.
Placethe5xbatteriesintothebackoftheunit,andsecurethebatterycoverby
closing and pushing the clip in.
Note: Battery cover must be closed correctly to ensure waterproong
integrity.
Batteries

4
■◆FlexibleAntenna
1. Connectthesuppliedexibleantennatothe
antennaconnector.Rotatetheantennaclockwise
until it is tight and secure in position.
2. Toremovetheantenna,rotateitcounter-clockwise.
• WARNING:Thebatterypackandantennamust
beinstalledcorrectlytopreventwateringress.
Failure to do so will cause damage to the radio.
• IMPORTANT:Priortousingthetransceiverfor
thersttime,thebatterypackmustbefully
charged for optimum life and operation.
Toavoiddamagetothetransceiver,turnthe
power OFF while charging.

5
■■Controls and Indicators
Microphone
LCD Display
Speaker
1. [PTT]Key:
Holddown[PTT]totransmit,speakwithnormaltone.
Release[PTT]toreceive.
2. [ ]PowerKey:
Holddownthiskeyfor1secondtopowerON/OFFtheradio.
3. Channel16/CALLChannel[C/16]:
PresstoselectChannel16;Holdfor1secondtoselectCallChannel.
• WhentheCallChannelisselected,holdfor3secondstoenterthe
Call Channel programming mode.
• Whileinthemenumode,pressthiskeytoexit.
4. High/LowPower/LockKey[LOCK]/[H/L]:
Presstoselecthighorlowoutputpower;Holdfor1secondtoturnLock
Function ON or OFF.
CONTROLS and INDICATORS

6
5. MenuKey[MENU]:
Pressto enter menumode;Hold for 1 secondtoset or cleartheTAG
channel.
6. Volume/Squelch/MonitorKey[VOL/SQL]/[MONI]:
Presstoenterthevolumeadjustmentmode;Pressagaintoenterthe
squelchadjustmentmode;Holdfor1secondtoactivetheMonitor
function.
• Whileholdingthiskey,press[▲]toturnontheVolumeMaximum
Function, repeat again to turn off this function.
• Whileholdingthiskey,press[▼]toturnontheVolumeMute
Function, repeat again to turn off this function.
7. Up/Down Key [▲]/[▼]:
Instandby,presstoselectoperatingchannel;inmenumode,press
toselectthemenuitems;inchannelscan,presstochangethescan
direction.
8. AntennaConnector:
Connectwith50Ωsuppliedantenna.
9. Earphone/Charging/ProgrammingJack[SP/MIC]/[CHR]:
Forconnectingexternalearphone/microphone;ForconnectingAC
Adaptor/DCCharger;Forconnectingprogrammingcable.
• Rotatethejackcovercounter-clockwisetoopen;Rotateclockwiseto
close.
❇ NOTICE:Makesurethejackcoverisxedtightlytoensurewaterproong
integrity.

7
■■Display
ICON DESCRIPTION
Appears while transmitting.
LOW Appears while selecting low power.
Flashes when forced to select low power.
USA Appears while USA Channel Group is selected.
INT Appears while INT Channel Group is selected.
CAN Appears while CAN Channel Group is selected.
Appears while channel is busy.
Flashes while motoring channel.
Appears when TAG Channel is selected.
CALL Appears when Call Channel is selected.
Battery indicator.
SCAN Flashes while scanning.
Appearswhilekeyboardsarelocked.
DUP Appearswhileaduplexchannelisselected.
DUAL Appears while dual watch.
TRI Appears while tri-watch.
Indicates the operating channel number.
Indicates menu item options in menu mode.
Indicatesauxiliarychannel.
Indicates menu mode items in menu mode.
Appears while weather alarm.
WX Appears while weather channel is selected.

8
■■Main Function Operation Guide
■◆Select Channel Group
• ThisradiocontainsUSA,InternationalandCanadianChannelGroups.
• In standby mode, press [MENU] key, then press [LOCK] key to switch
Channel Group.
■◆Select Weather Channel
Thisradiohas10weatherchannels.
• Instandbymode,press[MENU]key,then press [VOL/SQL] key to switch
between operating channel and weather channel.
■◆Edit CALL Channel
1. Hold[C/16]keyfor1secondtoselectCALLChannel,"CALL"andCALL
channel number are displayed.
2. Thenhold[C/16]keyfor3secondsuntiltwobeepsoundsareheardto
enter CALL channel programming mode, channel number ashes.
3. Press[▲]/[▼]keytoselectdesiredCALLChannel.
4. Press[C/16]keytoconrmandsaveCALLChannel.
■◆Set/Cancel TAG Channels
Set TAG () for channels to be scanned, cancel TAG ()toremovechannels
fromscan.Theuntaggedchannelswillbeskippedduringthescanning.
• Set/Cancel Single TAG Channels: Hold [MENU] key for 1 second to set/
cancel the current channel as TAG channel, “” displayed for channels
which are tagged.
• Set/CancelAllTAGChannels:WhilePowerOFF,hold[LOCK]keyandpress
[]keyto powerON,allTAGchannelswillbecanceled intheselected
channel group. Repeat the above operations to set all channels as TAG
channels.
BASIC OPERATION

9
■◆Scan Operation
Set scan resume timer in the menu mode.
1. Enter“ ”menuitemtoselectScan,exitmenumodetostartNormal
Scan or Priority Scan.
• "SCAN"ashesonLCD.
• "16"appearsonthesubchannelreadoutduringpriorityscan.
• Thescanpauseswhenasignalisreceived(Theresumetimecanbe
set in the set mode).
• Channel16ismonitoredinpriorityscan.
• Press[▲]or[▼]tochangethescandirection.
2. Press[MENU]keyagain,orpress[PTT]/[C/16]/[ ] to stop scanning.
■◆Watch Operation
ThisradiocontainsDual/TriWatch,thiscanbeselectedinthemenu.
Dualwatch:WatchandmonitorcurrentchannelandChannel16.
Triwatch:Watchandmonitorcurrentchannel,Channel16andCALLChannel.
1. Enter“ ”menutoselectWatch,exitmenumodetostartDualWatch
orTriWatch.
• “DUAL”ashesduringDualWatch;“TRI”ashesduringTriwatch.
(must select Dual or Tri watch in menu)
• A“BEEP”soundemitswhensignalisreceivedonChannel16.
• TriWatchswitchestoDualWatchwhensignalreceivedonCALL
Channel.
2. Press[MENU]key,orpress[PTT]/[C/16]/[ ] to stop watch and monitor.

10
■◆VibrationWaterDrainingFunction
TheVibrationWaterDrainingFunctionhelpstodrainthewaterawayfromthe
loudspeakerhousing,whichcanpreventwateringressaffectingloudspeaker
soundquality.
• When standby, press [MENU] key, then press [ ] key to activate this
function.
• A deep sound emits for 10 seconds to drain water. Any key operation is
invalidduringvibrationwaterdraining.
■■Menu Operation
Menu operation method as follows :
1. Press[MENU]keytoentermenumode.Press[▲]/[▼]keytoselectthe
desired menu item.
2. Press[MENU]keytoentersettingstatus.Press[▲]/[▼]keytoselectthe
desired setting.
3. Press[C/16]keytoexitmenumode.

11
DISPLAY ITEMS OPTIONS
Beep Tone of(OFF)/on(ON)
Channel Group Selection USA/INT/CAN/WX
Function Selection Of/SCAN/DUAL
WeatherAlert of(OFF)/on(ON)
Priority Scan of(OFF)/on(ON)
Scan Resume Timer of(OFF)/on(ON)
Dual/Tri-Watch d-(DualWatch)/t-(TriWatch)
BacklightLevel of(OFF)/1/2/3
LCD Contrast 1/2/3/4
Channel Display 3d(3Digits)/4d(4Digits)
AutoPowerSave of(OFF)/on(ON)
Monitor Function Pu(Push)/Ho(Hold)

12
■■VHF Marine Channel List
Channelnumber Frequency(MHz) Channelnumber Frequency(MHz)
USA INT CAN Transmit Receive USA INT CAN Transmit Receive
01 01 156.050 160.650 21 21 157.050 161.650
01A 156.050 156.050 21A 21A 157.050 157.050
02 02 156.100 160.700 21b RX only 161.650
03 03 156.150 160.750 22 157.100 161.700
03A 156.150 156.150 22A 22A 157.100 157.100
04 156.200 160.800 23 23 157.150 161.750
04A 156.200 156.200 23A 157.150 157.150
05 156.250 160.850 24 24 24 157.200 161.800
05A 05A 156.250 156.250 25 25 25 157.250 161.850
06 06 06 156.300 156.300 25b RX only 161.850
07 156.350 160.950 26 26 26 157.300 161.900
07A 07A 156.350 156.350 27 27 27 157.350 161.950
08 08 08 156.400 156.400 28 28 28 157.400 162.000
09 09 09 156.450 156.450 28b RX only 162.000
10 10 10 156.500 156.500 60 60 156.025 160.625
11 11 11 156.550 156.550 61 156.075 160.675
12 12 12 156.600 156.600 61A 61A 156.075 156.075
13*1 13 13*1 156.650 156.650 62 156.125 160.725
14 14 14 156.700 156.700 62A 156.125 156.125
15*1 15*1 15*1 156.750 156.750 63 156.175 160.775
16 16 16 156.800 156.800 63A 156.175 156.175
17*1 17 17*1 156.850 156.850 64 64 156.225 160.825
18 156.900 161.500 64A 64A 156.225 156.225
18A 18A 156.900 156.900 65 156.275 160.875
19 156.950 161.550 65A 65A 65A 156.275 156.275
19A 19A 156.950 156.950 66 156.325 160.925
20 20 20*1 157.000 161.600 66A 66A 66A*1 156.325 156.325
20A 157.000 157.000 67*1 67 67 156.375 156.375
*Only a low power.

13
Channelnumber Frequency(MHz) Channelnumber Frequency(MHz)
USA INT CAN Transmit Receive USA INT CAN Transmit Receive
68 68 68 156.425 156.425 86A 157.325 157.325
69 69 69 156.475 156.475 87 87 87 157.375 161.975
70 70 70 RX only 156.525 87A 87A 87A 157.375 157.375
71 71 71 156.575 156.575 88 88 88 157.425 162.025
72 72 72 156.625 156.625 88A 88A 88A 157.425 157.425
73 73 73 156.675 156.675
74 74 74 156.725 156.725
75*1 75*1 75*1 156.775 156.775
76*1 76*1 76*1 156.825 156.825
77*1 77 77*1 156.875 156.875
78 156.925 161.525
78A 78A 156.925 156.925
79 156.975 161.575
79A 79A 156.975 156.975
80 157.025 161.625
80A 80A 157.025 157.025
81 157.075 161.675 Weather channel Frequency(MHz)
81A 81A 157.075 157.075 Transmit Receive
82 157.125 161.725 1 RX only 162.550
82A 82A 157.125 157.125 2 RX only 162.400
83 83 157.175 161.775 3 RX only 162.475
83A 83A 157.175 157.175 4 RX only 162.425
83b RX only 161.775 5 RX only 162.450
84 84 84 157.225 161.825 6 RX only 162.500
84A 157.225 157.225 7 RX only 162.525
85 85 85 157.275 161.875 8 RX only 161.650
85A 157.275 157.275 9 RX only 161.775
86 86 86 157.325 161.925 10 RX only 163.275
*Only a low power.

14
ITEMS INDEX
General
Specications
FrequencyRange TX:156.000-162.000MHz
RX:156.000-163.275MHz
Modulation Mode FM(16K0F3E)
FrequencyInterval 25kHz
NiMH Batteries DC1.2Vx5,850mAh(AAA)
FrequencyStability ±2.5ppm
Operating Temperature -20°C~+60°C
WaterproofLevel IPX7(1metreDepthof
Waterfor30Minutes)
Dimensions(WxHxD) 63mmx119mmx35mm
Weight(WithBatteries) 136g
Transmmiter
Specications
Output Power 3W/1W
Output Current ≤1.3A/0.8A
Max.FrequencyDeviation ±5kHz
Spurious Emission ≤0.25μW
AdjacentChannelPower ≥65dB
Transmit Audio Distortion ≤5%
Receiver
Specications
ReceiveSensitivity ≤0.2μV
Signal-to-Noise Ratio ≥40dB
AdjacentChannelSelectivity ≥65dB
Spurious Response Immunity ≥70dB
IntermodulationRejection ≥68dB
Audio Output Power ≥0.6W
SPECIfICATIONS
Table of contents
Other Oricom Marine Radio manuals
Popular Marine Radio manuals by other brands

Optelian
Optelian RGN-3GSF user guide

Aeroflex
Aeroflex ATC-5000NG Getting started manual

Raymarine
Raymarine RAY 210VHF Operation manual

Shakespeare Electronic
Shakespeare Electronic Model SE 700 user manual

Thrane&Thrane
Thrane&Thrane SAILOR 6215 VHF DSC Radio installation guide

ACR Electronics
ACR Electronics PATHFINDER 3 SART (SEARCH AND RESCUE... Product support manual